Data Dictionary
The Data Dictionary stores all data fields that can be associated with documents so that they can be searched for and located in the future.
Any user that is assigned to a role with the Manage Data Dictionary permission can add, edit, and delete data fields.
View or edit data field properties
Filter data fields
Data fields can be filtered by name, display name, data field type, or which workflow they are referenced in.
-
Select filter criteria from the drop-down lists at the top of the page. For names, select Name or Display Name from the drop-down list, then enter the value you want to filter on in the box to the right.
The page will automatically refresh to display only data fields meeting the specified criteria.

Add a new data field
- On the Navigation Menu, click Settings, then click Data Dictionary.
-
Click New Data Field...

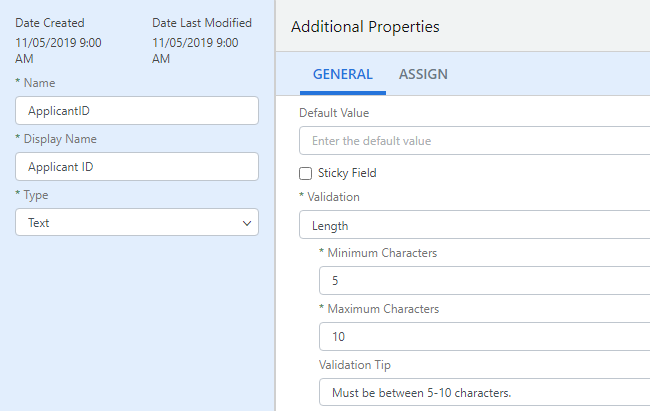
- In the Name box, enter a name for the data field. This name is used as the identifier when making calls to other systems during workflow export steps.
-
In the Display Name box, enter a display name for the data field. This is the name that will be displayed for the data field within Intelligent Capture.
For Line Item type data fields, the Display Name will be the name displayed at the top of the Line Items Panel.
-
Select a data field type from the Type drop-down menu. The following data field types are available:
Type Use Cascading Options A list of values that is dependent on a selection in a different field. Cascading Options must be configured on the Options tab of Additional Properties. See Configure a cascading options data field for more information.
Currency A monetary value. Date A date. A calendar control will display so a date can be selected. Decimal Numeric data with a decimal. Expression A mathematical calculation using numeric data. Expression fields can also be used to combine data from multiple text fields. See Configure an expression data field for more information. Integer Numeric data. Large Text Multiple lines of alphanumeric values. Formatting rules can be configured for large text fields on the Formatting tab of Additional Properties. See Add formatting to a text field for more information.
Line Items When a line item data field is configured, the Line Items panel will be available at the bottom of the Document Preview Window where line items for the document can be entered. Line items must be configured on the Line Items tab of Additional Properties. See Configure a line items data field for more information.
List A set list of values that can be selected for the data field. Lists must be configured on the Items tab of Additional Properties. See Configure a list data field for more information.
Lookup A lookup matches values from an external data source in order to automatically populate data field values in Intelligent Capture. Lookup fields must be configured on the Lookup tab of Additional Properties. See Configure a lookup data field for more information.
Text A single line of alphanumeric values. Formatting rules can be configured for text fields on the Formatting tab of Additional Properties. See Add formatting to a text field for more information.
-
On the General tab, in the Default Value field, enter a default value for the data field. This value will automatically be populated in the data field for each document.
You can use replaceable text variables for the default value to automatically populate specific information in this field. The following variables are supported:
Variable Returns %@UserName% The username of the user that scanned in or imported the document. %@UserEmail% The email address of the user that scanned in or imported the document. %$NOW% The date in YYYY-MM-DD-HHMMSS format. - For list type data fields only, select the Allow users to unselect this field (set to blank) to include a blank option in the selection list.
- Select Sticky Field to have the value in the data field carry over from one document to the next.
-
Select a validation type from the Validation drop-down menu to ensure that data is entered in the data field correctly. The following types of validation are available depending on the data field type selected:
- Length: This option is only available for text type data fields and ensures that the entered value is within a specific range of letters.
- List: This option is only available for text type data fields and ensures that the entered value matches a value in a predefined list. This validation can be used when a document comes from another system.
- Data Source Column: Ensures that the entered value matches a value in the selected data source column. See Data Sources for more information.
- Required (Not Blank): Ensures that the data field is not blank.
- None: No validation will be performed on the data field.
- Regex: Allows you to use a regex expression to validate the content in the field. See Regex examples.
-
On the Assign tab, select the workflows that you want to assign the data field to. The following options are available:
- All Workflows: Assigns the data field to all workflows defined in Intelligent Capture.
- Selected Workflows: Allows you assign the data field to selected workflow processes.

- Click Save.
Duplicate a data field
You may have a data field that is already configured very similarly to a new data field you want to create. Instead of configuring a new data field from scratch, you can save time by duplicating the existing data field and making modifications to the data field properties.
-
Right-click anywhere in the data field row or click the three dots next to the data field you want to duplicate, then select Duplicate from the drop-down menu.

- Update the Name and Display Name for the new data field.
- Update the Type if necessary and make any modifications to the additional properties, then click Save.
View or edit data field properties
In Data Field Properties, you can rename the data field, update the display name, change the data field type, and modify additional properties.
-
Perform one of the following:
-
Right-click anywhere in the data field row or click the three dots next to the data field you want to view properties for, then select Properties from the drop-down menu.
-
Or, click the name of the data field you want to view properties for.

-
- Modify data field properties as needed, then click Save.
Delete a data field
A data field cannot be deleted if it is assigned to a workflow or used in a training step for learned automation.
-
Perform one of the following:
-
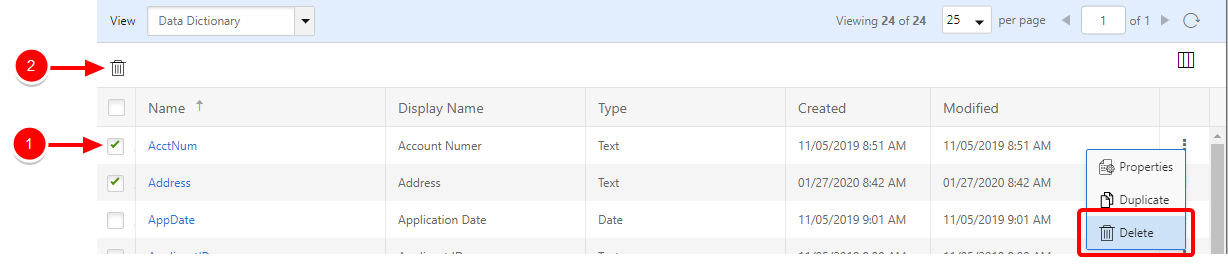
Right-click anywhere in the data field row or click the three dots next to the data field you want to delete, then select Delete from the drop-down menu.
-
Or, select the check box next to one or multiple data fields, then click Delete.
-
- Click Delete to confirm the deletion.