From the Expense System setup page you can define the Reporting Cycle, the Expense Entry Validation options, the items to be displayed on the Expense Report page, as well as the Credit Card Mask Configuration.
Furthermore you can access the:
- Expense System Defaults; where you can setup the default Expense Workflow and Expense Item.
- Expense Workflow Roles; where you can setup the various Expense Workflow Roles.
- Payable; where you can access Payable Setup and Pay Codes.
- Credit Card Transactions ; where you can access the Credit Card Transactions as well as the Processed Files.
- Payment Methods; where you can setup the various Expense Payment Methods.
This article details the options within the Expense System Setup page.
Reporting Cycle section
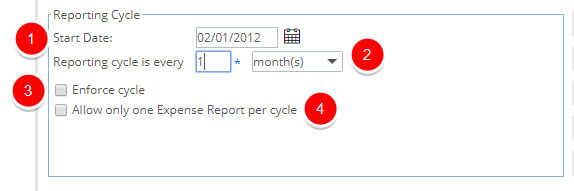
Within the Reporting Cycle section select/enter the following options:
- Start Date: Determines the first date of the expense report cycle. No expense reports can be created before this date.
- Reporting cycle is every: Lets you establish the frequency of expense report cycle. Select from Month(s), Semi-month(s), week(s) and day(s). Then enter a value in the appropriate box.
- Enforce cycle: Select the Enforce cycle option if expense reports may only be submitted as per the cycle as defined. If the Enforce cycle option is not selected, the user may submit the expense reports at any time.
- Allow only one Expense Report per cycle: When the Allow only one Expense Report per cycle option is enabled only one expense report may be submitted during a given expense report cycle, otherwise, several expense reports may be submitted.
Expense Entry Validation section
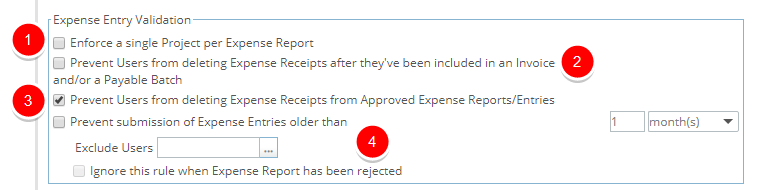
Within the Expense Entry Items to Display section select/enter the following options:
- Enforce a single Project per Expense Report: When selected, a new field called Project is added to the Expense Report Edit page.
- Prevent Users from deleting Expense Receipts after they've been included in an Invoice and/or a Payable Batch: Users can be barred from deleting Expense Entry & Expense Report Receipt and Document Attachments once the Expense Report has been included in an Invoice and/or Payable Batch.
- Prevent Users from deleting Expense Receipts from Approved Expense Reports/Entries: Users can be barred from deleting Receipts and Document Attachments of an Expense Entry and/or Expense Report once the Expense Report is in an Approved State.
- Prevent submission of Expense Entries older than [x]:
- Exclude Users:
- Ignore this rule when Expense Report has been rejected:
Expense Entry Items to Display section
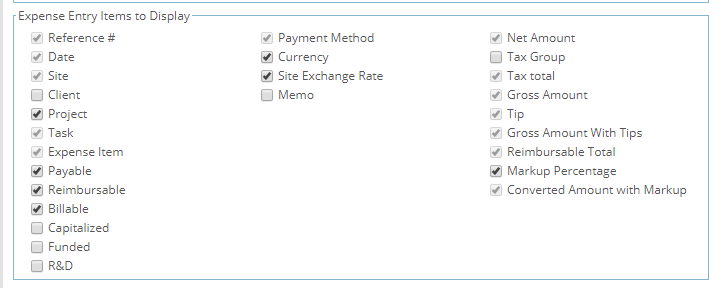
Within the Expense Entry Items to Display section, clear the selection box for the property you wish to hide, otherwise it will display on the Expense Entry:
- Reference #: Always displays on the Entry page. Numeric value automatically assigned to each expense entry, incremented by 1 for every entry created. It is editable, but must be a unique value.
- Date: Always displays on the Entry page. By default, this is set to the same date as the Start Date of the Expense Report. It can be manually edited directly in the Date box or by making a date selection using the calendar button.
- Site: Always displays on the Entry page. Site of the expense report owner (originator), which by default is their active site. This can be edited by entering or selecting from the list of available sites.
- Client: The Client against which the expense entry is being made. This can be edited by entering or selecting from the list of available clients.
- Project: The Project against which the expense entry is being made. This can be edited by entering or selecting from the list of available projects.
- Task: The Task against which the expense entry is being made. This can be edited by entering or selecting from the list of available tasks.
- Expense Item: Always displays on the Entry page. This is the type of expense that's been incurred, which can be entered or selected from the box.
- Payable: Allows identifying the expense entry as either a payable item, when selected on the Entry page, or not. This may be payable to the originator of the expense report or directly to the credit card company, if a corporate card was used when the expense was incurred. Payable expenses are a cost to the company.
- Reimbursable: Allows identifying the expense entry as either a reimbursable item, when selected on the Entry page, or not. The originator of the expense report is the one reimbursed. Reimbursable expenses are a cost to the company.
- Billable: Allows identifying an expense entry as either a Billable item, when selected on the Expense Entry page, or not. It is the client against which the expense entry is being made that will be invoiced for the item. Billable expense items generally generate revenue for the company.
- Capitalized: Allows identifying an expense entry as either a Capitalized item, when selected, or not. Indicates the expense item is a capital for the company.
- Funded: Allows identifying an expense entry as either a Funded item, when selected, or not. Indicates the expense item is receiving some funding, either internally or externally.
- R&D: Allows you to identify an expense entry as either part of a Research & Development (R&D) item, when selected, or not. For example, if the company is receiving government grants for R&D expenses, then the use of this property is helpful given the importance of tracking and maintaining accurate information of all actuals that relate to R&D expenses.
- Payment Method: Always displays on the Entry page. This is the method used to pay for the expense that's been incurred, which can be entered or selected from the box.
- Currency: This is the currency of the expense that's been incurred, which can be entered or selected from the box. It defaults to the originator's active site currency. If the item is of type "Mileage", the currency is set to the item's currency.
- Site Exchange Rate: The exchange rate from the entry currency to the master site currency.
- Memo: This provides a box, which will allow any additional information for the Expense Entry to be captured.
- Net Amount: Always displays on the Entry page. This is the expense amount that must be entered, before tax, in the selected currency.
- Tax Group: This is the tax group under which the expense, that's been incurred, falls. This can be entered or selected from the box.
- Tax Total: Will always display on the Entry page, provided there is tax applicable. This is an automatically calculated value once the Tax group is selected and the Net amount is entered. Displays the total tax in the selected currency.
- Gross Amount: Always displays on the Entry page. This is the sum of the Net Amount and the Tax Total. This value can be entered without an entry in the Net Amount, and the Net Amount and Tax Total will back-fill accordingly.
- Tip: Will always display on the Entry page, provided the "Include tips" property is set for the selected Expense Item, which must be entered.
- Gross Amount with Tips: Always displays on the Entry page. This is the sum of the Net Amount and the Tax Total with Tips.
- Reimbursable Total: Always displays on the Entry page. If the entry is set as reimbursable then the total reimbursable amount in the user's (originator's) master site currency will display, otherwise it will simply display a zero (0) value.
- Markup Percentage: This is the markup percentage that is to be applied to the entry, which will only display on the Entry page provided that the entry is flagged as Billable. By default, on the Entry page, this percentage displays the value entered for the selected expense item that could be modified, and it is applied to the expense entry amount that is converted to the base currency.
- Converted Amount with Markup: Will only display on the Entry page provided that the entry is flagged as Billable. Displays total reimbursable amount with the addition of any applicable dollar markup.
Note: The Expense Item category(ies), which are placeholders cannot be used/selected.
Credit Card Mask Configuration section

Within the Credit Card Mask Configuration enter the Credit Card Mask Code:
- Credit Card Mask Code: Enter the 16-digit credit card number in the Credit Card Mask Code field. The code entered is masked, for security reasons.