Work types in the application are generic in nature, and can be associated with any project, whenever appropriate. The association of the work type to a project creates the task. The project alias and the full task name make up the task name.
- From the Icon Bar click Setup
 .
. - From the Navigation Menu click Work to expand the corresponding menu.
- From the Work menu items, click Tasks.
- Click Create Task to access the Task Edit page
- Enter the required information
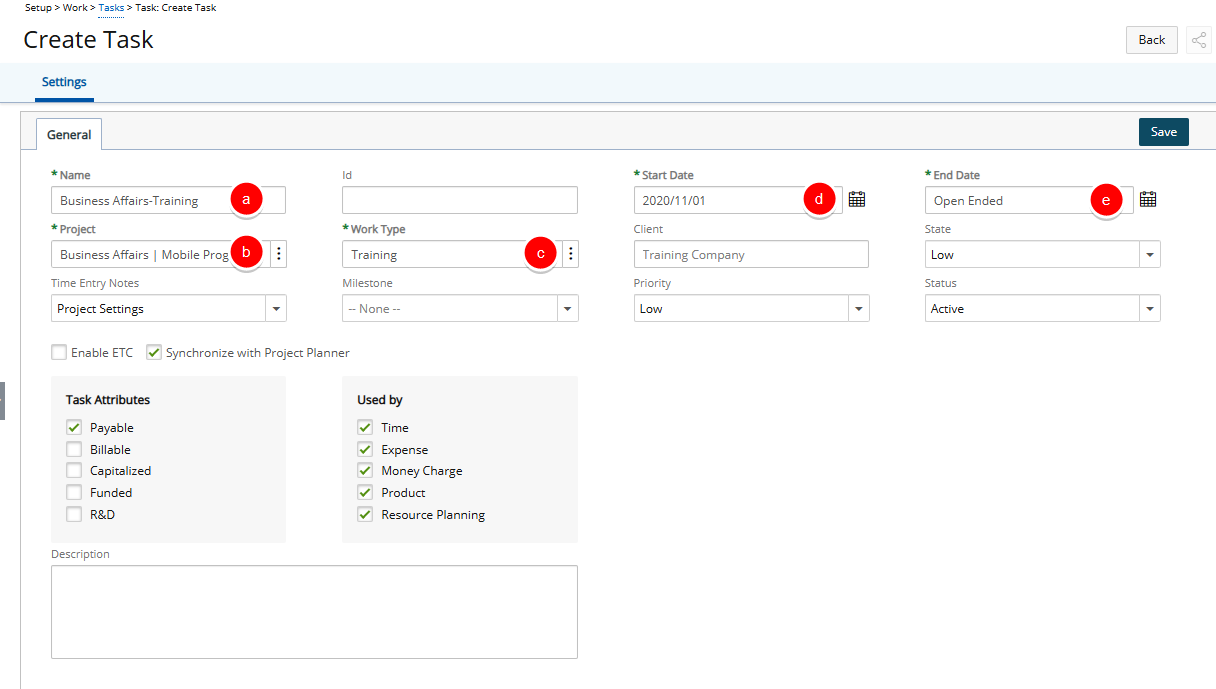
- Name: Enter an appropriately descriptive name for the task.
Note: If you enter a value for the Task Name here, the system will not automatically replace it when you select a Project or Work Type in steps b and c.
However, you can also leave the Name field empty. Selecting a Project and Work Type in steps b and c will then automatically populate the Task Name field based on the selections made in Task Preferences within the System Setup page (Setup > Organization > System).
For further details refer to Configuring Task Name Preferences.
- Project: Click the Ellipsis button, located beside this box and select from the list.
Tip: By default all suspended Projects are hidden from the list. If you want to view both non-suspended and suspended Projects, select the Show all Projects option. Once selected, all Projects will appear within the list. Your selection for showing or hiding suspended Projects is remembered, ensuring your preferred view is consistently applied each time you log in.
- Work Type: Click the Ellipsis button, located beside this box and select from the list.
Tip: By default Suspended Work Types are excluded from the list. You can select the Show Suspended Work Type selection box to include them in the list.
- Start Date: If not the default current date, click the Calendar icon, to the right of this date box, to select Month, Year, Day.
Note: The date must fall within the date range set for the project to which the task is associated.
- End Date: If not the default current date, click the Calendar icon, to the right of this date box, to select Month, Year, Day.
Note: The date must fall within the date range set for the project to which the task is associated.
- Name: Enter an appropriately descriptive name for the task.
- Enter or select the relevant information
- Id: Enter an Id.
- Client: The Client box is auto populated based on the selected Project.
- State: Select the Task State from these options: Low, Medium, Normal, High, Late and Critical.
- Time Entry Notes: Select from these available options: Project Settings, Template Settings, Required, Not allowed, Optional.
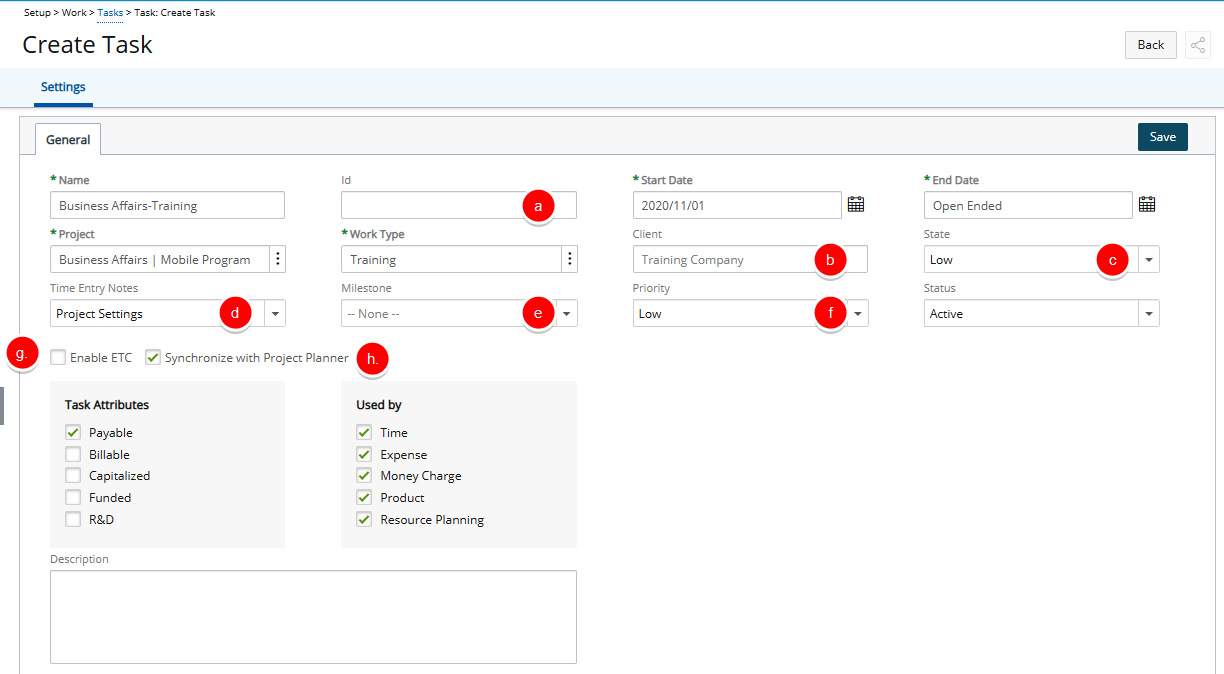
- Milestone: Select a Milestone if applicable.
Note: The Milestone field is disabled for:
- Tasks synchronized with the Project Planner (its value is populated from the Project Planner)
- Milestone Tasks (Tasks generated through the creation of a Milestone)
- Priority: Select the Task Priority from these options: Low, Medium, High, Important or Urgent.
- Enable ETC: The Enable ETC option is checked by default to have the Estimated Time to Complete column appear in the timesheet of any user that is assigned to this particular task. Uncheck this option if the Estimated Time to Complete column is not to appear.
- Clear the Synchronize with Project Planner checkbox to remove the Task from Project Planner.
Note: The Synchronize with Project Planner option is selected by default.
- Click the Status list and choose from:
- Active: This status indicates that the task is currently in use and available for updates, planning, and resource allocation. An active task is fully operational within the system and reflects ongoing or upcoming work. Tasks must be set to Active to be included in scheduling and resource planning activities.
Note: By default, a task is set to Active when created.
- Suspended: Select this option if the task is no longer in use. The difference between deleting and suspending a task is that once a task has been suspended, its records are kept for historical reasons, and can be edited later. A suspended task displays in red font on the Tasks list page.
Note: A Task can be suspended/unsuspended as a result of the Portfolio being suspended/unsuspended. On opting to unsuspend a Task, the associated Portfolio is unsuspended as well.
- Decommissioned: Select this option if the task is being deleted without its associated data being destroyed. Once Decommissioned, the Task cannot be reactivated, as opposed to a Suspended one.
- Active: This status indicates that the task is currently in use and available for updates, planning, and resource allocation. An active task is fully operational within the system and reflects ongoing or upcoming work. Tasks must be set to Active to be included in scheduling and resource planning activities.
- The options in the Task Attributes section are used to set rules regarding the billing and cost calculation procedures.
- Payable: Check this option if the Task is a cost to the company. The company pays costs incurred by the task.
Note: The Payable attribute is selected by default.
- Billable: Check this option if the client pays an added fee for all costs incurred by the project. Billable tasks generally generate profit for the company.
Note: The Billable attribute is selected by default.
- Capitalized: Check this option if the Task is a capital expense for the organization.
- Funded: Check this option if the company is receiving some outside funding for the work done on the task.
- R&D: Check this option to designate the task as part of research and development (R&D). Often it is possible to receive government grants for R&D projects. In this case it is important to keep accurate information of all actuals relating to R&D projects and tasks.
Note: The Task Attributes selections, default to the checked options made for the Work Type chosen.
- Payable: Check this option if the Task is a cost to the company. The company pays costs incurred by the task.
- The options in the Used by section are used to determine the module(s) in which the associated tasks should display. Modules under the Used by Section are: Time, Expense, Work Process, Purchase, Money Charge and Product.
Note: The Task Used by selections, default to the matching selections made for the Work Type and Project chosen in step 3.
- Click Save to apply your changes.
Note: Upon saving the Task the following buttons become available: Budget, Cost, Billing, Business Unit, Documents, Notes, Assign, Pay Codes and Integration.
- Click Back to return to the previous page.