The global Tasks list allows you to view a list of all Tasks. From this page you can create, manage and perform and Entry Mass Update.
This article details how to access the Tasks list page and the available options to you.
Access Tasks List Page
- From the Icon Bar click Setup
 .
. - From the Navigation Menu click Work to expand the corresponding menu.
- From the Work menu items, click Tasks.
- View the Tasks list page

Note: By default Active, Suspended and Decommissioned Tasks are listed.
Available Options
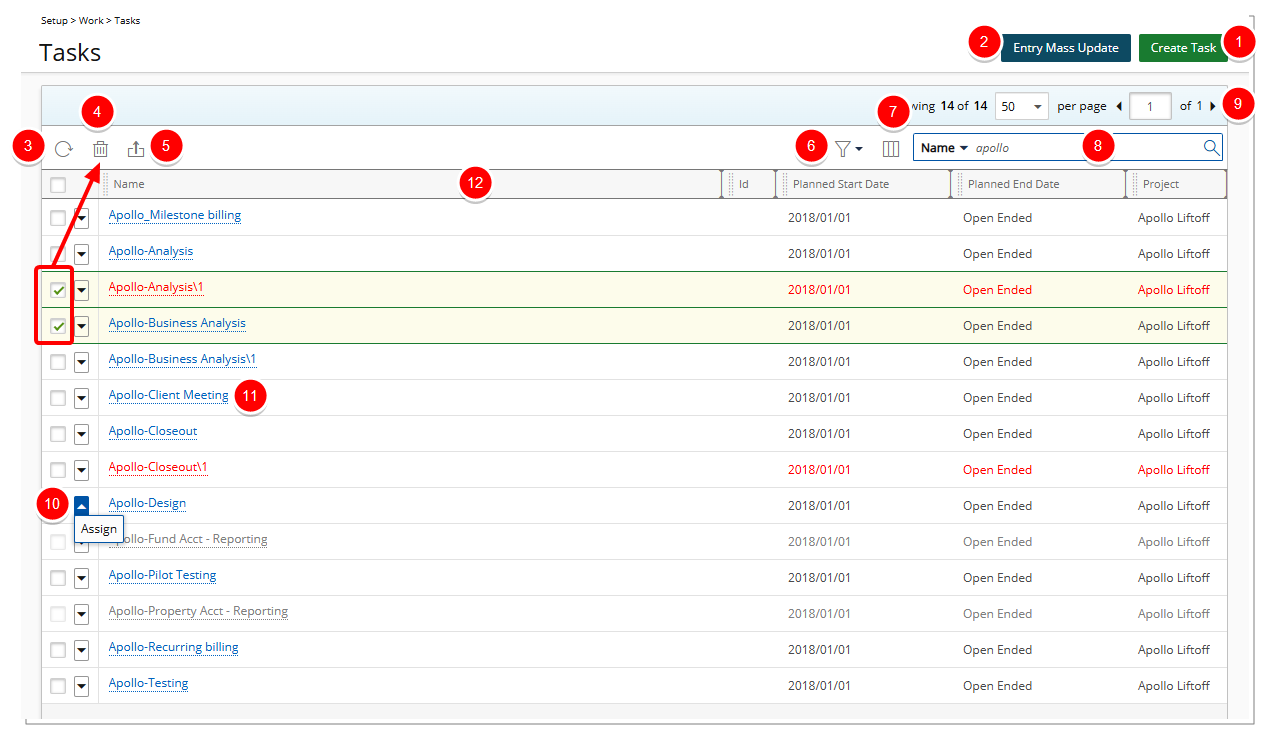
- Create Task
- Entry Mass Update can be used to perform updates on the attributes of Time, Expense, Money Charge and Product entries for selected tasks and users within a defined date range.
- Click Refresh
 to refresh the page.
 - Select single or multiple Tasks to Delete
 .
. - Click Export to Excel
 to export the list to Excel.
 - Click the Filter
 button to refine the list of tasks that are displayed based on Active, Suspended and Decommissioned Tasks. For further details refer to On-page basic Filter (Simple Filter).
 - By default the following Columns are displayed: Name, Id, Planned Start Date, Planned End Date and Project.
Click the Column Selection button to define which columns you wish to have displayed on the list page. In addition to any User Defined Fields associated to Tasks, you can choose to add: Client, Description, Milestone, Priority, State, Synchronize with Project Planner and Work Type.
 - To search for Tasks, click the Search down arrow
 , select a criterion and then enter the corresponding value. Either press the [Enter] key or click the Search button to perform a search.
By default, the available search criteria are: Name, Id, Project and Work Type and Synchronize with Project Planner. You can choose to add the following criteria: Planned Start Date, Planned End Date, Client, Description, Milestone, Priority, State and Work Type. For further details refer to Searching for an item. - Pagination included at the top to facilitate easy navigation across pages. The list displays, at most, 50 Entries at a time, and additional Entries fall within subsequent pages. From the pagination, you can select the number of Entries to display per page and click the Previous
 and Next
  buttons to navigate though the available pages. For further details refer to Pagination.
 - Access the Context menu from where you can Assign the Task to User(s).
- Click a Task name to access the Task Edit page.
Tip: You may wish to narrow your Tasks list so that you retrieve just the right amount of information you need. To do so you can perform a search. Select either Name, Id, Project or Work Type from the available search criteria and then enter a corresponding value in the Search box. Click the search icon to narrow down the Tasks list. For more information on the contains-in logic search click here.
- From the table header:
- You can easily sort the columns by ascending or descending order simply by clicking a column header. Note that an arrow indicates the descending (
 ) or ascending (
 ) order applied to the column.
 - Click
 and move a column to the desired position.
 - You can dynamically resize column(s), to your preferred width. Simply move your cursor to the column boundary (
 ) you want to resize. When the cursor becomes a resize cursor, click and drag the column accordingly.
- You can easily sort the columns by ascending or descending order simply by clicking a column header. Note that an arrow indicates the descending (