The Planners tab has an associated context menu which allows you to easily access the Project Financial Planner.
This article details how to access the Financial Planner and the available options to you.
Accessing the Financial Planner
- From the Icon Bar click Project List
 .
. - From the Project List page, select the Project you wish to edit by following one of these steps:
- Click the Project context menu button
 to expand it. From the available options click Edit.
OR - Click the name of the Project you wish to access.
Tip: Use the search capability for an efficient way of finding the specific project. For further details refer to Searching for a Project within the Project List page.
- Click the Project context menu button
- From the Project Edit page, hover your mouse over the Planners tab and select Financial Planner from the available options.
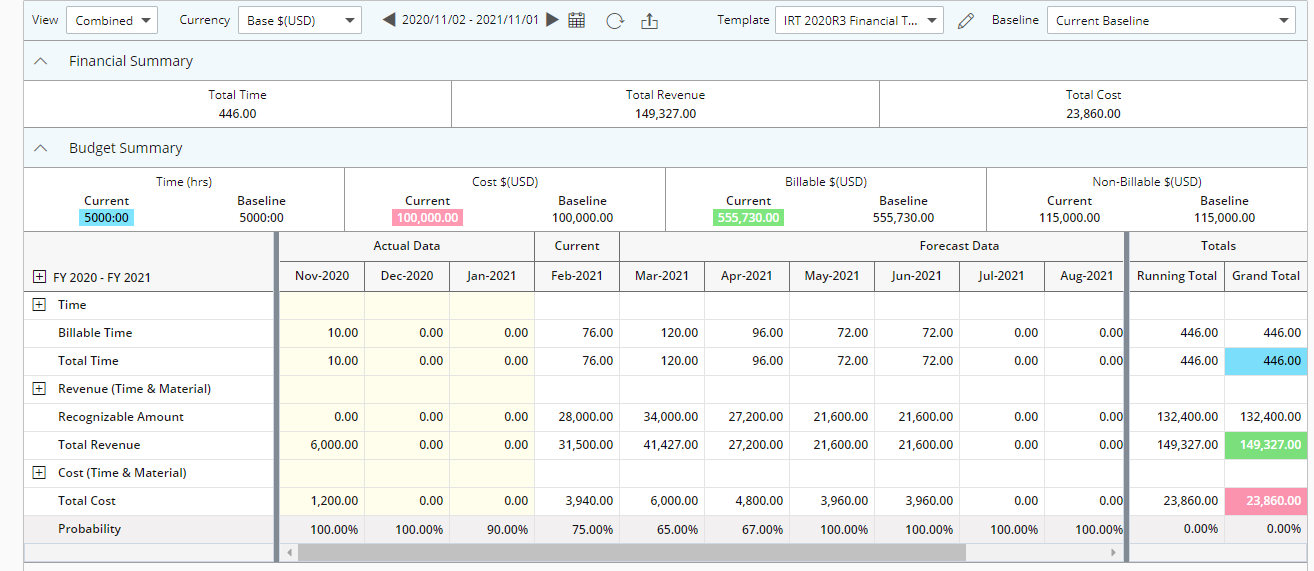
- View the Financial Planner.
Available options from the Financial Planner
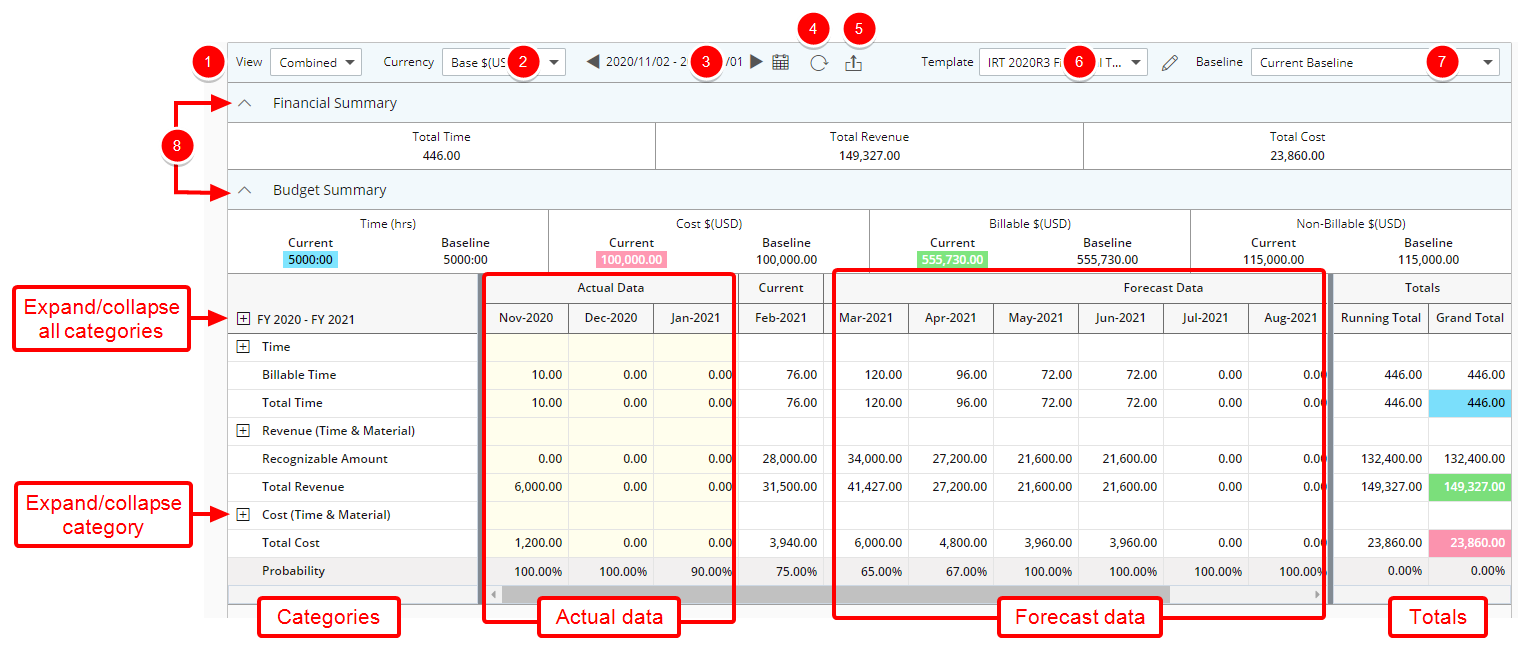
- Select the required View from the following available options:
- Combined: If Combined is selected, the columns displayed in the Project Forecast Grid will be both Actual and Forecast data.
Note: By default Combined is selected.
- Actuals: If Actuals is selected, all the columns displayed in the Project Forecast Grid will be Actual Data. All columns will be read only for Actual Data.
- Forecast: If Forecast is selected, all the columns displayed in the Project Forecast Grid will be forecast data. If there is Forecast Data in the past it’ll be read only.
- Combined: If Combined is selected, the columns displayed in the Project Forecast Grid will be both Actual and Forecast data.
- Select the required Currency from the following available options:
- Client
- Base
- Project
For further details refer to Choosing a display Currency within the Financial Planner.
- Select specific date range by using the Period picker. For further details refer to Choosing a date range while running the Financial Planner.
- Click Refresh
 to update the displayed data to reflect the most current information available.
 Note: When included in the layout the Budget and Financial Summary sections are now also refreshed.
- Click Export to Excel
 to download the financial data into an Excel file for further analysis or reporting. For further details refer to Exporting Financial Planner data to Excel.
 - Click the Template selection list to choose from predefined templates for organizing and displaying financial data. You can opt to Edit
 a copy of the template for the current Financial Planner. For further details refer to Overriding the Financial Planner Template at Project level.
 - Select a previously saved Baseline to serve as a reference point for comparison against actuals or forecasts. You can also create a new Baseline as needed. For further details refer to Saving a Baseline on the Financial Planner or Deleting a Baseline on the Financial Planner.
- Collapsible Financial/Budget Summary sections:
- The various Categories are displays as the first column to show various groups of financial data, such as revenue, expenses, or specific rows, organized into categories. For further details refer to Expanding/contracting the Financial Planner Rows.
- For each of the categories and rows:
- Actual Data column shows completed financial figures up to the current period, representing actual data.
- Current Data captures the latest financial entries, reflecting current data on progress or performance.
- Forecast Data projects financial figures for future periods based on trends, presenting forecast data.
- An overall summary is provided in the Totals column, displaying the combined amounts across categories and periods.