Portfolio Templates
Portfolio templates can be used to customize the "My Projects" Portfolios of other PowerSteering users. Portfolio administrators can create new Portfolio templates, customize their settings, and then apply them to specific users and User Groups to standardize their "My Projects" Portfolios.
Note: "My Projects" Portfolios are often reserved for work items that the user is primarily interested in / responsible for. Portfolio administrators should only apply changes to the "My Projects" Portfolios of others if they want to determine this for other users. Individual users will still have the ability to edit their own "My Projects" Portfolio whenever they please.
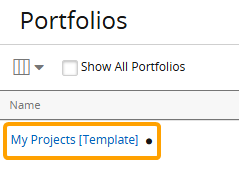
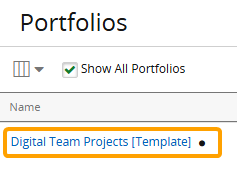
Uses with the "Portfolio Administration" Context permission will see Portfolio templates on their Portfolios page. These templates, similar to the "My Projects" Portfolio, will feature a black dot icon next to their names.
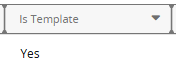
Additionally, each Portfolio template will display a "Yes" value under the "Is Template" column.
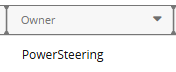
There is one default Portfolio template that cannot be deleted. This template will display "PowerSteering" under the "Owner" column.
This page covers the following topics:
Creating Portfolio templates
New Portfolio templates are created by copying existing ones. This allows users to configure custom Portfolio settings that can be applied to the "My Projects" Portfolios of others.
Note: Once created, other users with the "Portfolio Administration" Context permission will be able to edit your Portfolio template.
To create a Portfolio template:
Before You Start: Users require the "Portfolio Administration" Context permission to view and create Portfolio templates in PowerSteering.
-
Select Review → Portfolios from the Navigation Menu.
-
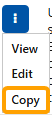
Select the triple-dot icon of the Portfolio template you would like to copy.

Tip: Select whichever template is the most similar to the template you would like to create. This could be the original Portfolio template owned by PowerSteering or a different one.
-
Select Copy.
-
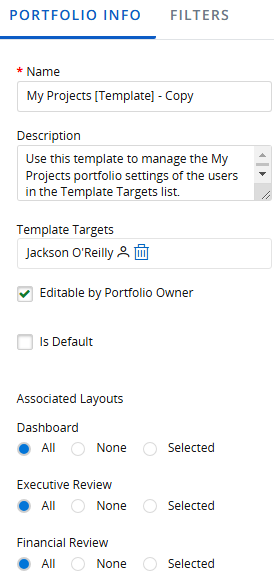
Edit the "Portfolio Info" of the template.
-
Name: Edit the name of the Portfolio template.
Tip: You should make the name as unique as possible so other Portfolio administrators do not confuse it with another template.
-
Description: Enter a description that defines the scope and focus of your Portfolio template.
Tip: Consider using the description to explain which users should have this template applied to their "My Projects" Portfolios.
-
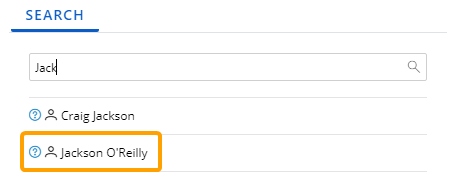
Template Targets: Select this field to determine which users and User Groups this template will be applied to. The "My Projects" Portfolios of the selected users will automatically inherit all of the template's settings and filters once it is saved.
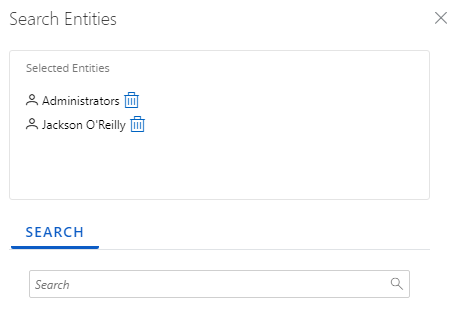
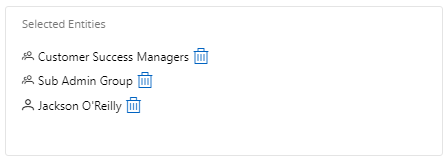
Use the search bar to search for users and/or User Groups to apply the template to. Selecting a user or group from the search results will add it to the "Selected Entities" box. Select the Trash icons
 to remove any users or groups from the box.
Note: If a user is targeted by more than one template, that user's "My Projects" Portfolio will automatically inherit the settings of the template that was most recently saved. Users that have never been targeted by a template will inherit the settings of the default template (more information below).
-
Editable by Portfolio Owner: When this checkbox is selected, users identified in the "Template Targets" field will be able to edit their "My Projects" Portfolios. These users will see the Edit button in the top right-hand corner of the screen when they select the "My Projects" Portfolio. When this checkbox is not selected, the users will not be able to edit their "My Project" Portfolios even if they have the "Portfolio Administration" Context permission.
-
Is Default: When this checkbox is selected, the template will be the default "My Projects" Portfolio template for new PowerSteering users or users that have never had a template targeted at them before.
Note: Once a template has been targeted at a user, that user will never automatically inherit the "My Projects" Portfolio settings of the default template if they are no longer targeted by a template. The user's "My Projects" Portfolio will continue to resemble the last changes that were saved to the template while the user was still a target.
Note: Only one template can be the default at once. If another template is already the default template when this checkbox is selected, the previous template will no longer be the default template.
-
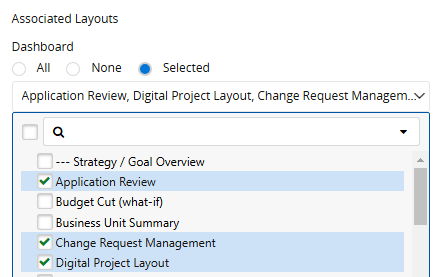
Associated Layouts: Determine which Dashboard Layouts, Executive Review Layouts, and Financial Review Layouts the selected users' "My Projects" Portfolios can be applied to.
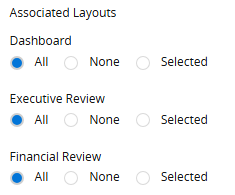
Example: While viewing a Dashboard, only the selected Dashboard Layouts can be selected when the Portfolio is applied.

-
All: The Portfolio can be applied to all Dashboard/Executive Review/Financial Review Layouts.
-
None: The Portfolio cannot be applied to any Dashboard/Executive Review/Financial Review Layouts.
-
Selected: Use the drop-down menu to determine which Dashboard/Executive Review/Financial Review Layouts the Portfolio can be applied to.
-
-
-
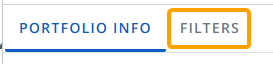
Select the Filters tab.
-
Edit the Portfolio template's filters to determine which work items will be included in each targeted user's "My Projects" Portfolio.
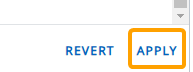
Tip: While editing filters, select the Apply button to see which work items will be included in the Portfolio.
Work items that satisfy all of the filters will be included in the "Projects" table on the right-hand side of the page.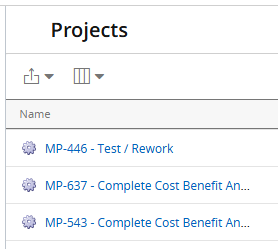
If you do not see any particular work items that you believe should appear, you may not have permission to view them. Reach out to a PowerSteering administrator for more information.
Selecting Apply will not save any of your changes. It will simply give you a preview of what your changes will look like.
Alternatively, select the Revert button to erase your changes. Any unsaved changes will be lost if Revert is selected.Select any of the filters below for more information.
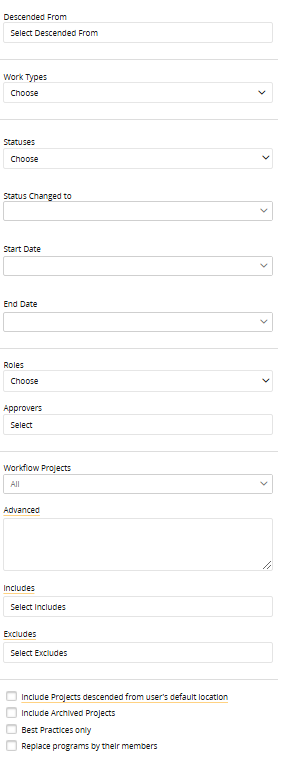
 Descended From
Select this field to determine which places in the Work Tree work items must be descended from in order to be included. Only work items under the selected Work Tree locations can be included in the Portfolio.
Note: The selected Work Tree work item will also be included as a Portfolio work item if it satisfies the rest of the filters.
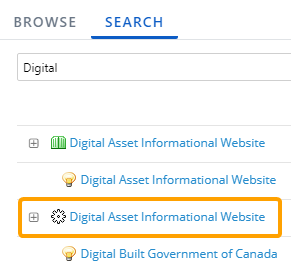
In the "Location in Work Tree" window that appears, use the Browse tab to navigate to a Work Tree location and select it.

Alternatively, you can use the Search tab to type in the name of a Work Tree location and select it from the list of suggestions.
Repeat this until all of your desired Work Tree locations have been added. The selected locations will appear in the "Selected Entities" box.
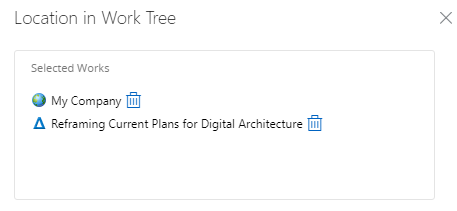
From here, you can select the Trash icon
 next to a location to remove it.
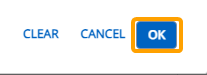
Select the OK button once you are done editing the "Descended From" list.
 Work Types
Use the drop-down menu to determine which Object Types will be included in the Portfolio. Only work items of the selected Object Types will be included.
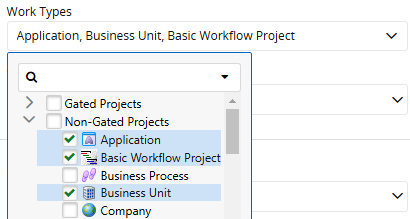
Note: If only "Gated Project" Object Types are selected, a "Gated Project Process" drop-down menu will appear allowing the user to select Gated Project Processes.
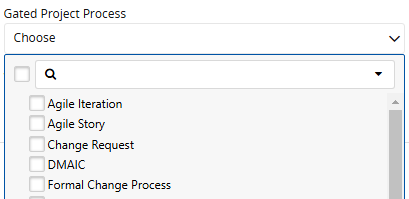
Only work items that use the selected Processes will be included in the Portfolio.Work Tags
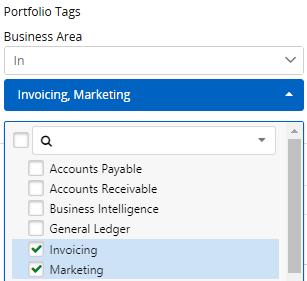
Set Portfolio filters based on the Tags that have been associated with the selected Object Types.

Note: Only Tags that have been associated with the Object Types selected in the "Work Types" field (above) will be included.
A "Portfolio Tags" drop-down menu will open for every selected Tag. This allows the user to determine how to filter the Portfolio's work items by the Tag.
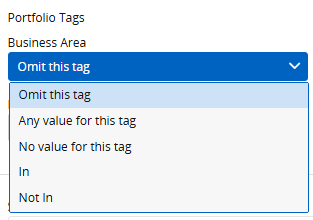
-
Omit this tag: The Tag value will have no impact on the Portfolio's work items.
-
Any value for this tag: Work items will only be included if they contain any value for the Tag.
-
No value for this tag: Work items will only be included if they do not contain a value for the Tag.
-
In: Use the drop-down menu that appears to select Tag values. Work items must contain at least one of the selected values on the Tag to be included in the Portfolio.
-
Not In: Use the drop-down menu that appears to select Tag values. Work items that contain at least one of the selected values on the Tag will not be included in the Portfolio.

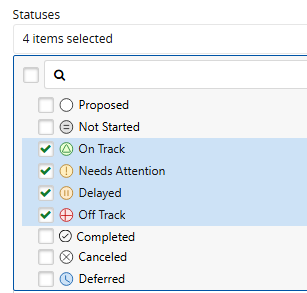
Statuses
Use the drop-down menu to filter work items by their Statuses. Only work items that currently have one of the selected Statuses will be included.
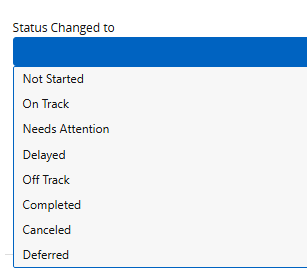
 Status Changed To
Use the drop-down menu to filter work items by Statuses they were given during a specific period of time.
After a Status is selected, use the drop-down menu that appears to determine the time period that the work item must have received the Status in order to be included in the Portfolio.
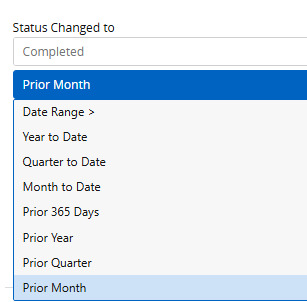
In the example above, only work items that received a "Completed" Status over the prior month will be included in the Portfolio.
Note: A work item's current Status does not have to match the selected Status from the "Status Changed to" field. For instance, if the options selected above were set and a work item received a "Completed" Status in the prior month, it would be included. If its Status was then changed to "On Track" it would still be included in the Portfolio if the change to "Completed" occurred in the prior month.
Tip: This can be used to create dynamic Portfolios that always contain up-to-date information and automatically exclude older work items.
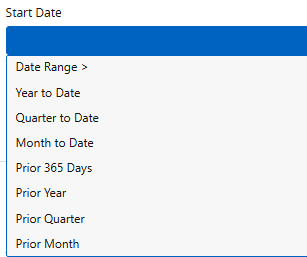
Start Date / End Date
Use these fields to filter work items by their Start and End Dates. Selecting either of the drop-down menus allow the user to determine a time period that a work item's Start Date or End Date must fall into in order to be included in the Portfolio.
Note: Depending on what dates exist for the work items, the filters will evaluate date values in the following sequence:
- Actual Dates
- Planned Dates
- System Dates
Please be aware that both "Planned" and "System" are Replaceable Terms in PowerSteering. They may be represented by different terms in your PowerSteering environment.Roles
Use the drop-down menu to filter work items by Resources assigned to Roles. Work items will only be included if at least one of the selected Resources is assigned to the work item in the selected Role.
Select which Roles you would like to filter work items by.
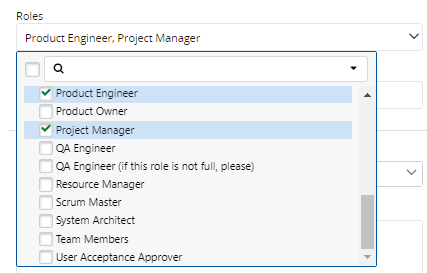
The selected Roles will appear on the page as fields.
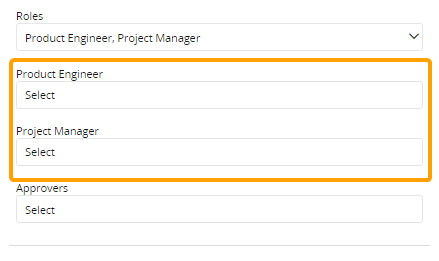
Select one of the fields to filter the work items by Resources assigned to Roles. Search for Resources or User Groups using the "Search" bar and select one from the list of suggestions.
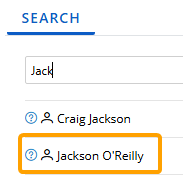
Repeat this until all of your desired Resources or User Groups have been added to the Roles. They will all appear in the "Selected Entities" box.
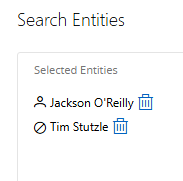
From here, you can select the Trash icon
next to a Resource to remove it.Select the OK button once you are done editing the Role.
Work items will only be included if they have at least one of the selected Resources assigned to the Role.
Approvers
Use this field to filter work items by their Gate Approvers. Work items will only be included if any of the selected users (or members of a selected User Groups) are assigned to one of the work item's gates as an approver.
Note: Non-Gated work items do not have Gate Approvers. If your Portfolio contains both Gated and Non-Gated Object Types, entering a value in this field will automatically filter out every Non-Gated work item.
Note: Users are not directly assigned as approvers on Gated Projects; Project Roles are selected as Approval Roles. To satisfy this filter, the selected user must be assigned to a Project Role that has been selected as an Approval Role. See Assign Approval Roles for more information.
Select the "Approvers" field and search for users and/or User Groups.
Repeat this until all of your desired users and User Groups are added. The selected users and User Groups will appear in the "Selected Entities" box.
Note: The single-person icon
 indicates a user and a multi-person icon
  indicates a User Group.
Note: If any member of a selected User Group is an assigned approver on a Gated Project, the Gated Project will be included in the Portfolio (assuming it satisfies the other filters).
From here, you can select the Trash icon
next to a user or User Group to remove it from the approvers list.Select the OK button once you are done editing the list.
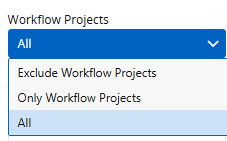
Workflow Projects
Use the drop-down menu to filter work items based on whether they are Workflow Projects.
-
Exclude Workflow Projects: Workflow Projects will be excluded from the Portfolio.
-
Only Workflow Projects: Work items will need to be Workflow Projects in order to be included in the Portfolio.
-
All: No filters based on Workflow Projects will be placed on the Portfolio.
Advanced
Select the "Advanced" box to open the Formula Builder. This allows you to create conditions as additional criteria for your Portfolio.
Note: Reach out to your PowerSteering representative if you would like some assistance using the Formula Builder.
Includes
Select this field to determine additional work items that will be included in the Portfolio. The selected work items will be included even if they do not satisfy any of the above filters.
Note: Descendants of the selected work items will not be automatically added to the Portfolio.
In the "Location in Work Tree" window that appears, use the Browse tab to navigate to a work item and select it.
Alternatively, you can use the Search tab to type in the name of a work item and select it from the list of suggestions.
Repeat this until all of your desired work items have been added. The selected work items will appear in the "Selected Entities" box.
From here, you can select the Trash icon
next to a work item to remove it.Select the OK button once you are done editing the "Included" list.
Excludes
Select this field to determine work items that should be excluded from the Portfolio. Even if any of the selected work items satisfy all of the filters, they will not be included.
Note: Descendants of the selected work items will not be automatically excluded from the Portfolio.
In the "Location in Work Tree" window that appears, use the Browse tab to navigate to a work item and select it.
Alternatively, you can use the Search tab to type in the name of a work item and select it from the list of suggestions.
Repeat this until all of your desired work items have been added. The selected work items will appear in the "Selected Entities" box.
From here, you can select the Trash icon
next to a work item to remove it.Select the OK button once you are done editing the "Excluded" list.
Include Projects descended from user's default location
Select this checkbox to include work items that are Descendants of the Portfolio viewers default Work Tree location. When a user views this Portfolio (or applies it to a Dashboard, Executive Review, Financial Review, or Report), the Descendant work items of the user's default Work Tree location will also be included in the Portfolio if they satisfy the Portfolio filters (apart from the "Descended From" filter).
Tip: Scroll your cursor over the checkbox label to see what your own default location is.
Include Archived Projects
Select this checkbox to include work items that have been archived in the Portfolio. If unselected, archived work items will be filtered out.
Best Practices Only
Select this checkbox to only include work items that have been approved as Best Practices. Work items that are not Best Practices will be filtered out.
Note: If selected, work items that have only been nominated as Best Practices will be filtered out. They will need to be approved as Best Practices to be included.
Replace programs by their members
Select this checkbox if you would like to replace Programs included in the Portfolio with their members instead. If selected, any Programs that satisfy the filters will be excluded from the Portfolio and their members will be included instead. The members will be included even if they do not satisfy all of the filters.
Note: A Program's members are not the same as its Descendants. Member work items do not need to descend under the Program in the work tree. See Change Program Membership from the Summary Page for more information on Program membership.
-
-
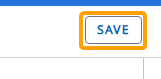
Select the Save button in the top right-hand corner of the page.
After selecting Save, your new Portfolio template will be saved to PowerSteering. Other Portfolio administrators (those with the "Portfolio Administration" Context permission) will be able to see it on their Portfolios page. The users and User Groups you targeted with the "Template Targets" field will have the settings and filters applied to their "My Projects" Portfolios.
Note: If you lose the "Portfolio Administration" Context permission, you will no longer be able to access your created Portfolio templates. Other Portfolio administrators will still be able to see and edit them.
Editing Portfolio templates
Portfolio templates can be edited at any time. Any user with the "Portfolio Administration" Context permission will be able to edit any other Portfolio administrator's Portfolio templates.
To edit a Portfolio template:
Before You Start: Users require the "Portfolio Administration" Context permission to view and edit Portfolio templates in PowerSteering.
-
Select Review → Portfolios from the Navigation Menu.
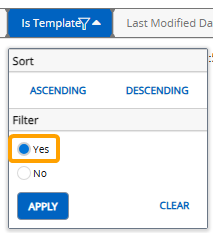
Tip: To quickly navigate to a Portfolio template, filter the Portfolio page by the "Is Template" column. Selecting "Yes" will filter out all Portfolios that are not templates.
See Data Grids for more information on configuring these tables. -
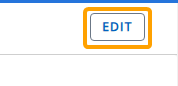
Select the name of the Portfolio template you would like to edit.
-
Select the Edit button in the top right-hand corner of the page.
-
Edit the "Portfolio Info" of the template.
-
Name: Edit the name of the Portfolio template.
Tip: You should make the name as unique as possible so other Portfolio administrators do not confuse it with another template.
-
Description: Enter a description that defines the scope and focus of your Portfolio template.
Tip: Consider using the description to explain which users should have this template applied to their "My Projects" Portfolios.
-
Template Targets: Select this field to determine which users and User Groups this template will be applied to. The "My Projects" Portfolios of the selected users will automatically inherit all of the template's settings and filters once it is saved.
Use the search bar to search for users and/or User Groups to apply the template to. Selecting a user or group from the search results will add it to the "Selected Entities" box. Select the Trash icons
to remove any users or groups from the box.Note: If a user is targeted by more than one template, that user's "My Projects" Portfolio will automatically inherit the settings of the template that was most recently saved. Users that have never been targeted by a template will inherit the settings of the default template (more information below).
-
Editable by Portfolio Owner: When this checkbox is selected, users identified in the "Template Targets" field will be able to edit their "My Projects" Portfolios. These users will see the Edit button in the top right-hand corner of the screen when they select the "My Projects" Portfolio. When this checkbox is not selected, the users will not be able to edit their "My Project" Portfolios even if they have the "Portfolio Administration" Context permission.
-
Is Default: When this checkbox is selected, the template will be the default "My Projects" Portfolio template for new PowerSteering users or users that have never had a template targeted at them before.
Note: Once a template has been targeted at a user, that user will never automatically inherit the "My Projects" Portfolio settings of the default template if they are no longer targeted by a template. The user's "My Projects" Portfolio will continue to resemble the last changes that were saved to the template while the user was still a target.
Note: Only one template can be the default at once. If another template is already the default template when this checkbox is selected, the previous template will no longer be the default template.
-
Associated Layouts: Determine which Dashboard Layouts, Executive Review Layouts, and Financial Review Layouts the selected users' "My Projects" Portfolios can be applied to.
Example: While viewing a Dashboard, only the selected Dashboard Layouts can be selected when the Portfolio is applied.
-
All: The Portfolio can be applied to all Dashboard/Executive Review/Financial Review Layouts.
-
None: The Portfolio cannot be applied to any Dashboard/Executive Review/Financial Review Layouts.
-
Selected: Use the drop-down menu to determine which Dashboard/Executive Review/Financial Review Layouts the Portfolio can be applied to.
-
-
-
Select the Filters tab.
-
Edit the Portfolio template's filters to determine which work items will be included in each targeted user's "My Projects" Portfolio.
Tip: While editing filters, select the Apply button to see which work items will be included in the Portfolio.
Work items that satisfy all of the filters will be included in the "Projects" table on the right-hand side of the page.
If you do not see any particular work items that you believe should appear, you may not have permission to view them. Reach out to a PowerSteering administrator for more information.
Selecting Apply will not save any of your changes. It will simply give you a preview of what your changes will look like.
Alternatively, select the Revert button to erase your changes. Any unsaved changes will be lost if Revert is selected.Select any of the filters below for more information.
Descended From
Select this field to determine which places in the Work Tree work items must be descended from in order to be included. Only work items under the selected Work Tree locations can be included in the Portfolio.
Note: The selected Work Tree work item will also be included as a Portfolio work item if it satisfies the rest of the filters.
In the "Location in Work Tree" window that appears, use the Browse tab to navigate to a Work Tree location and select it.
Alternatively, you can use the Search tab to type in the name of a Work Tree location and select it from the list of suggestions.
Repeat this until all of your desired Work Tree locations have been added. The selected locations will appear in the "Selected Entities" box.
From here, you can select the Trash icon
next to a location to remove it.Select the OK button once you are done editing the "Descended From" list.
Work Types
Use the drop-down menu to determine which Object Types will be included in the Portfolio. Only work items of the selected Object Types will be included.
Note: If only "Gated Project" Object Types are selected, a "Gated Project Process" drop-down menu will appear allowing the user to select Gated Project Processes.
Only work items that use the selected Processes will be included in the Portfolio.Work Tags
Set Portfolio filters based on the Tags that have been associated with the selected Object Types.
Note: Only Tags that have been associated with the Object Types selected in the "Work Types" field (above) will be included.
A "Portfolio Tags" drop-down menu will open for every selected Tag. This allows the user to determine how to filter the Portfolio's work items by the Tag.
-
Omit this tag: The Tag value will have no impact on the Portfolio's work items.
-
Any value for this tag: Work items will only be included if they contain any value for the Tag.
-
No value for this tag: Work items will only be included if they do not contain a value for the Tag.
-
In: Use the drop-down menu that appears to select Tag values. Work items must contain at least one of the selected values on the Tag to be included in the Portfolio.
-
Not In: Use the drop-down menu that appears to select Tag values. Work items that contain at least one of the selected values on the Tag will not be included in the Portfolio.
Statuses
Use the drop-down menu to filter work items by their Statuses. Only work items that currently have one of the selected Statuses will be included.
Status Changed To
Use the drop-down menu to filter work items by Statuses they were given during a specific period of time.
After a Status is selected, use the drop-down menu that appears to determine the time period that the work item must have received the Status in order to be included in the Portfolio.
In the example above, only work items that received a "Completed" Status over the prior month will be included in the Portfolio.
Note: A work item's current Status does not have to match the selected Status from the "Status Changed to" field. For instance, if the options selected above were set and a work item received a "Completed" Status in the prior month, it would be included. If its Status was then changed to "On Track" it would still be included in the Portfolio if the change to "Completed" occurred in the prior month.
Tip: This can be used to create dynamic Portfolios that always contain up-to-date information and automatically exclude older work items.
Start Date / End Date
Use these fields to filter work items by their Start and End Dates. Selecting either of the drop-down menus allow the user to determine a time period that a work item's Start Date or End Date must fall into in order to be included in the Portfolio.
Note: Depending on what dates exist for the work items, the filters will evaluate date values in the following sequence:
- Actual Dates
- Planned Dates
- System Dates
Please be aware that both "Planned" and "System" are Replaceable Terms in PowerSteering. They may be represented by different terms in your PowerSteering environment.Roles
Use the drop-down menu to filter work items by Resources assigned to Roles. Work items will only be included if at least one of the selected Resources is assigned to the work item in the selected Role.
Select which Roles you would like to filter work items by.
The selected Roles will appear on the page as fields.
Select one of the fields to filter the work items by Resources assigned to Roles. Search for Resources or User Groups using the "Search" bar and select one from the list of suggestions.
Repeat this until all of your desired Resources or User Groups have been added to the Roles. They will all appear in the "Selected Entities" box.
From here, you can select the Trash icon
next to a Resource to remove it.Select the OK button once you are done editing the Role.
Work items will only be included if they have at least one of the selected Resources assigned to the Role.
Approvers
Use this field to filter work items by their Gate Approvers. Work items will only be included if any of the selected users (or members of a selected User Groups) are assigned to one of the work item's gates as an approver.
Note: Non-Gated work items do not have Gate Approvers. If your Portfolio contains both Gated and Non-Gated Object Types, entering a value in this field will automatically filter out every Non-Gated work item.
Note: Users are not directly assigned as approvers on Gated Projects; Project Roles are selected as Approval Roles. To satisfy this filter, the selected user must be assigned to a Project Role that has been selected as an Approval Role. See Assign Approval Roles for more information.
Select the "Approvers" field and search for users and/or User Groups.
Repeat this until all of your desired users and User Groups are added. The selected users and User Groups will appear in the "Selected Entities" box.
Note: The single-person icon
indicates a user and a multi-person icon indicates a User Group.Note: If any member of a selected User Group is an assigned approver on a Gated Project, the Gated Project will be included in the Portfolio (assuming it satisfies the other filters).
From here, you can select the Trash icon
next to a user or User Group to remove it from the approvers list.Select the OK button once you are done editing the list.
Workflow Projects
Use the drop-down menu to filter work items based on whether they are Workflow Projects.
-
Exclude Workflow Projects: Workflow Projects will be excluded from the Portfolio.
-
Only Workflow Projects: Work items will need to be Workflow Projects in order to be included in the Portfolio.
-
All: No filters based on Workflow Projects will be placed on the Portfolio.
Advanced
Select the "Advanced" box to open the Formula Builder. This allows you to create conditions as additional criteria for your Portfolio.
Note: Reach out to your PowerSteering representative if you would like some assistance using the Formula Builder.
Includes
Select this field to determine additional work items that will be included in the Portfolio. The selected work items will be included even if they do not satisfy any of the above filters.
Note: Descendants of the selected work items will not be automatically added to the Portfolio.
In the "Location in Work Tree" window that appears, use the Browse tab to navigate to a work item and select it.
Alternatively, you can use the Search tab to type in the name of a work item and select it from the list of suggestions.
Repeat this until all of your desired work items have been added. The selected work items will appear in the "Selected Entities" box.
From here, you can select the Trash icon
next to a work item to remove it.Select the OK button once you are done editing the "Included" list.
Excludes
Select this field to determine work items that should be excluded from the Portfolio. Even if any of the selected work items satisfy all of the filters, they will not be included.
Note: Descendants of the selected work items will not be automatically excluded from the Portfolio.
In the "Location in Work Tree" window that appears, use the Browse tab to navigate to a work item and select it.
Alternatively, you can use the Search tab to type in the name of a work item and select it from the list of suggestions.
Repeat this until all of your desired work items have been added. The selected work items will appear in the "Selected Entities" box.
From here, you can select the Trash icon
next to a work item to remove it.Select the OK button once you are done editing the "Excluded" list.
Include Projects descended from user's default location
Select this checkbox to include work items that are Descendants of the Portfolio viewers default Work Tree location. When a user views this Portfolio (or applies it to a Dashboard, Executive Review, Financial Review, or Report), the Descendant work items of the user's default Work Tree location will also be included in the Portfolio if they satisfy the Portfolio filters (apart from the "Descended From" filter).
Tip: Scroll your cursor over the checkbox label to see what your own default location is.
Include Archived Projects
Select this checkbox to include work items that have been archived in the Portfolio. If unselected, archived work items will be filtered out.
Best Practices Only
Select this checkbox to only include work items that have been approved as Best Practices. Work items that are not Best Practices will be filtered out.
Note: If selected, work items that have only been nominated as Best Practices will be filtered out. They will need to be approved as Best Practices to be included.
Replace programs by their members
Select this checkbox if you would like to replace Programs included in the Portfolio with their members instead. If selected, any Programs that satisfy the filters will be excluded from the Portfolio and their members will be included instead. The members will be included even if they do not satisfy all of the filters.
Note: A Program's members are not the same as its Descendants. Member work items do not need to descend under the Program in the work tree. See Change Program Membership from the Summary Page for more information on Program membership.
-
-
Select the Save button in the top right-hand corner of the page.
After selecting Save, your changes to the Portfolio template will be saved to PowerSteering. Other Portfolio administrators (users with the "Portfolio Administration" Context permission) will be able to see it on their Portfolios page. The users and User Groups targeted by the "Template Targets" field will have the settings and filters applied to their "My Projects" Portfolios.