2025R1.2 - New Features
Below is a summary of the new additions to PowerSteering in the 2025R1.2 release. PowerSteering 2025R1.2 is currently scheduled to be deployed to the staging site on October 29th, 2025 and deployed to the production site on November 16th, 2025. When this happens, the listed features will become available.
Note: This page will be updated as new functionality becomes available.
The following key features will be made available with the 2025R1.2 PowerSteering release:
What's Different:
Users can now determine how Resource availability is calculated on both the Allocation (top) and Demand (bottom) sections of the Resource Review page.
Note: In the Allocation section, the "Availability" columns display values for each listed Resource.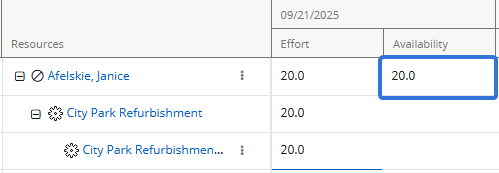
Janice has 20 hours of availability remaining for the week of September 21st.
In the Demand section, the "Availability" columns display values for each listed Role.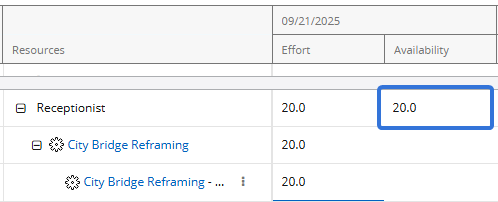
There are 20 Receptionist hours that are available to assign for the week of September 21st.
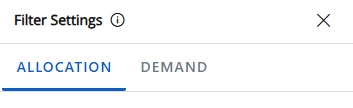
Prior to this release, users would only see two tabs on the "Filter Settings" window: "Allocation" and "Demand".

With this update, the window now features an "Availability" tab.

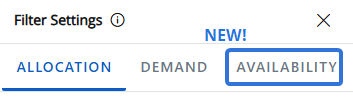
Selecting this tab allows users to determine how "Availability" values will be calculated. The settings will be applied to both sections of the Resource Review page (Allocation and Demand).

Note: None of these settings will change the "Effort" values. Only the displayed values in the "Availability" columns will be affected.
-
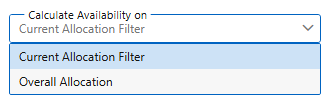
Calculate Availability on: Determine which data is used to calculate availability for the Allocation and Demand sections.
-
Current Allocation Filter: Availability for Resources and Roles is calculated using only Resources and assignments that are currently shown in the Allocation section.
Note: See Filter the Allocation Section for more information on these filters.
Note: When this is selected, each Role's availability is calculated using only the Resources and work items that are currently displayed in the Allocation (top) section. An exception occurs if there are no Resources with the Role on their profile displayed in the Allocation section. In this case, the Role's availability will be calculated using all PowerSteering Resources with the Role on their profile. See the example below for more information.
-
Overall Allocation: All Resources and Resource assignments in PowerSteering are used to calculate availability, not just those that satisfy the filters under the “Allocation” tab.
Tip: This selection ensures that a Resource's "true availability" is displayed. In other words, it displays a Resource's availability after taking all work items and assignments into consideration, not just those that satisfy the "Allocation" tab filters.
 Click here for an example of how these selections affect the Allocation section
Example: Cristina has been assigned to two separate Projects during the week of September 21st: "City Park Refurbishment" and "City Bridge Reframing". She is 50% allocated to both, which means she will work 20 hours on each one (40 total hours for the week).


On the Resource Review page, there is only one "Allocation" filter in use: the Digital Project Portfolio.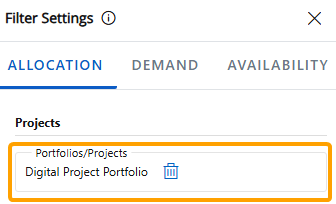
This means that the Allocation section will only display Resource assignments toward work items that belong to the Digital Project Portfolio. In this case, the "City Park Refurbishment" Project belongs to the Portfolio, but the "City Bridge Reframing" Project does not. Therefore, only the 20 hours allocated toward the "City Park Refurbishment" Project will be displayed as Cristina's "Effort".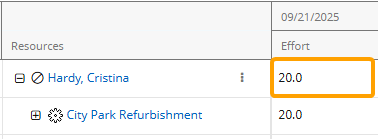
Her displayed "Availability" for the week will differ based on the "Calculate Availability on" selection. If "Current Allocation Filter" is selected, Resource assignments will only be included in Availability calculations if they satisfy the "Allocation" filters. Cristina's assignment on the "City Park Refurbishment" Project satisfies the filter (because the Project belongs to the selected Portfolio), but her assignment on the "City Bridge Reframing" Project does not. Therefore, her 20 hours toward the "City Bridge Reframing" Project will not be taken into account and her displayed "Availability" for the week will be 20 hours.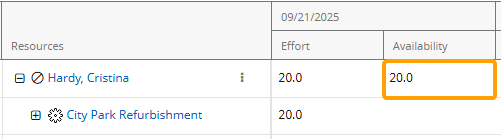
If "Overall Allocation" is selected instead, all of Cristina's effort will be taken into account while calculating her weekly Availability, not just effort that satisfies the filters. This means that her assignment on the "City Bridge Reframing" Project will be included in the calculation, leaving her with an "Availability" of 0 hours for the week.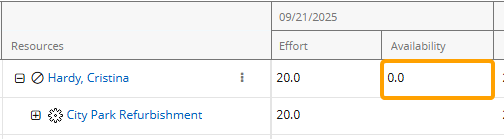 Click here for an example of how these selections affect the Demand section
Example: Janice and Rodney are the only two Receptionists who work for the company. Each of them has the "Receptionist" Role on their Profile with a Max Capacity of 100% (or 40 hours a week) and no other Roles. This means that there are always 80 total Receptionist hours available to be assigned to work every week.
For the week of September 21st, two Projects require 20 hours of Receptionist time each: "City Park Refurbishment" and "City Bridge Reframing". Janice has already been assigned to the "City Park Refurbishment" Project, but no Resources have been assigned to the "City Bridge Reframing" Project, resulting in 20 hours of unstaffed demand for a Receptionist.

On the Resource Review page, there is only one filter selected for both sections: the Digital Project Portfolio. This Portfolio contains both Projects.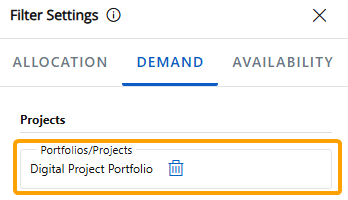
Currently, Janice's allocation to the "City Park Refurbishment" Project is the only assignment displayed in the Allocation section because the "City Bridge Reframing" Project does not have any Resource assignments.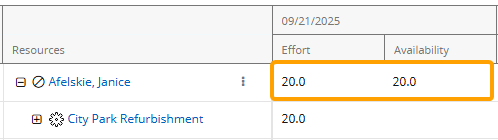
The 20 hours of unstaffed demand for a Receptionist on the "City Bridge Reframing" Project is displayed in the Demand section.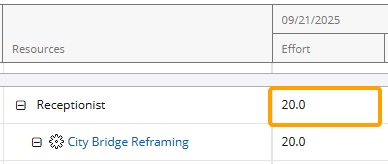
If "Total Allocation" is selected, all Resource allocations and availability will be taken into account. Janice and Rodney both have 40 allocatable hours each week. Janice has 20 hours already allocated, so her remaining availability is 20 hours. Added to Rodney's current availability of 40 hours, there are 60 hours of remaining Receptionist availability for the week.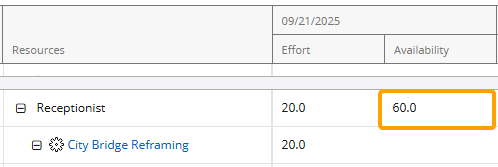
If "Current Allocation Filter" is selected, however, Resources and Resource assignments that do not appear in the Allocation section will not factor into Availability calculations. Rodney is not displayed in the Allocation section because he is not assigned to any work in the Portfolio, so his 40 hours of availability for the week do not count toward the Role's availability. Only Janice is displayed, so her 20 hours of availability are the only hours that count.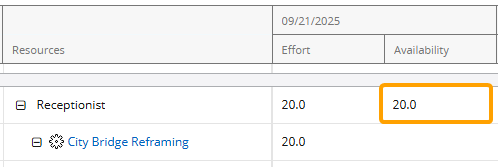
An exception occurs when no Resources with the Receptionist Role on their profile are displayed in the Allocation section. In these cases, the total availability of Receptionists is displayed. For example, if the "City Park Refurbishment" Project is removed from the Portfolio, Janice will no longer be displayed in the Allocation section because the work item she is allocated to is filtered out.
In the Demand section, the Receptionist Role will display the total availability of every Resource with the Receptionist Role on their profile because it cannot draw from any displayed Resources.
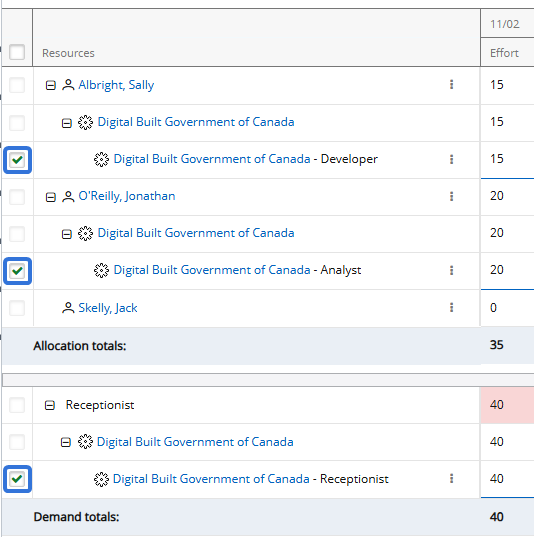
Please note that this also includes any Project Owners or any other Resources that are displayed in the Allocation section without any allocations. For example, Jack owns a Project in the selected Portfolio and is displayed in the Allocation section even though he is not allocated to any work (notice that there is no Expand icon next to his name).
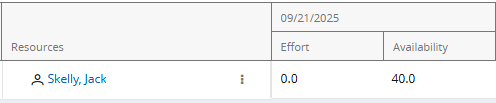
Now, imagine he has the "Receptionist" Role added to his profile with a 25% Maximum Capacity (10 hours per week). Janice and Rodney are not displayed in the Allocation section, so Jack's availability is the only Receptionist availability used to calculate the Role's availability in the Demand section.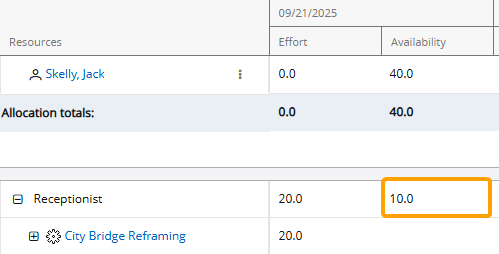
-
-
Exclude Status: Works items with any of the selected work statuses will not count toward availability calculations in the Allocation and Demand sections.
Note: The “Canceled” and “Archived” checkboxes are selected by default. Unselecting them could increase loading times.
Example: Cristina has been assigned to two separate Projects during the week of September 21st: "City Park Refurbishment" and "City Bridge Reframing". She is 50% allocated to both, which means she will work 20 hours on each one (40 hours total for the week).
In the Allocation (top) section of the Resource Review page, both of these work items are listed. Her work week consists of 40 hours, so she does not have any availability left.
However, the "City Park Refurbishment" Project currently has a "Proposed" work status.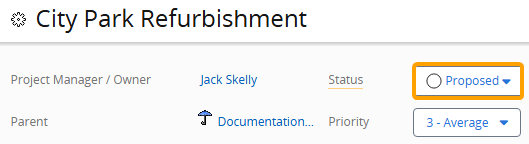
The Resource Manager decides that allocations toward "Proposed" Projects should not count toward availability calculations because they are not confirmed, so he selects "Proposed" from the "Exclude Status" list.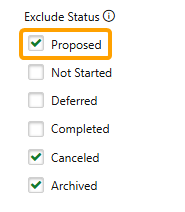
This means that any Resource assignments toward work items with a "Proposed" status will not be included in availability calculations, including the "City Park Refurbishment" Project. The 20 hours of Cristina's time that are allocated to this Project for the week will not be reduced from her weekly availability of 40 hours, so her availability is now displayed as 20 hours.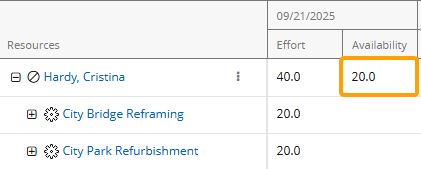
Notice that the "Effort" values stay the same; only "Availability" values will be affected.
Benefit:
The new "Availability" tab adds flexibility and accuracy to Resource Review availability calculations.
Prior to this release, Resource and Role availability was always calculated using the Resources and work items that were displayed in the Allocation section. The Resource Review behaved as if the "Current Allocation Filter" selection from the "Calculate Availability On" menu was always selected (with one exception regarding Role availability: when "Current Allocation Filter" is selected and the Allocation section does not display any Resources with the Role on their profile, the Role's availability will be calculated using every PowerSteering Resource with the Role. Prior to this release, the Role's availability would be displayed as "0" in this scenario). This prevented Resource Review users from viewing a Resource or Role's "true availability". In other words, work items and assignments external to the Allocation section were never taken into account. For example, a Resource with 20 displayed hours of availability for the week might be allocated to other work items that do not meet the Allocation filter criteria. Selecting "Overall Allocation" and calculating availability without Allocation filter restrictions ensures that all work items are accounted for, preventing misleading and inaccurate availability figures.
On the other hand, some Resource managers prefer to view availability through a specific scope of responsibility or testing scenario. While viewing Roles in the Demand section, it often makes sense to only display the availability of Resources that belong to a particular group; availability that includes all Resources might cause managers to assume there is enough capacity and ignore the gaps in their own team. For example, if a manager must fill a Role's unstaffed demand using only Resources from a single Resource Pool, the Role availability values may be misleading if they are calculated using every Resource in PowerSteering. Restricting the results to this Resource Pool and selecting "Current Allocation Filter" prevents the "Availability" columns in the Demand section from including hours that might not actually be available.
Additionally, Resource managers may wish to use the Resource Review page to create and test certain scenarios. For example, if a large group of Projects is expected to be canceled, Resource managers can use the "Allocation" tab to filter them out and then select "Current Allocation Filter" to see how much Resource effort will become available if this scenario comes to fruition. This allows Resource managers to answer any "what-ifs" and take advantage of upcoming opportunities.
Finally, excluding work items from availability calculations based on their statuses helps keep Resource Review data accurate and strategically aligned. Resource managers may decide that inactive work items (with statuses such as "Proposed" or "Deferred") should not be included in availability calculations because they do not actually consume Resource time. On the other hand, managers might decide to include these work items because they can become active at any moment and prevent Resources from being assigned to coinciding work. This gives managers the ability to test scenarios and prevent irrelevant work from distorting Resource availability.
What's Different:
Users can now maintain their Resource Review Layouts from a centralized page in PowerSteering.
A new Manage Resource Review option is available when Review is selected from the Navigation Menu.

Selecting this option will open up the new "Manage Resource Review" page, which features a data grid listing Resource Review Layouts that have been saved to PowerSteering.
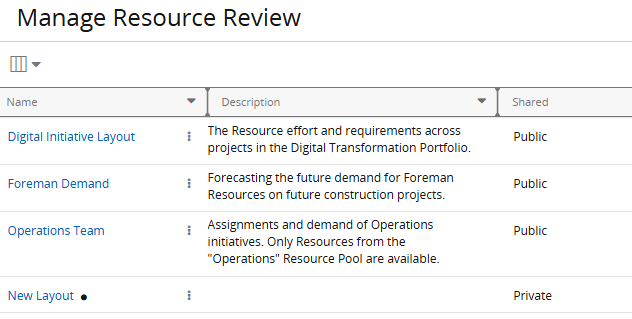
Note: Users can only view publicly shared Resource Review Layouts or their own private ones.
From here, users can review information about each Resource Review Layout. Similar to other data grids, the Select Columns button  can be used to add and remove columns that display specific information about each layout.
-
Name: The name of the Resource Review Layout
-
Description: A quick explanation of the Resource Review's purpose. Descriptions can only be created while editing a layout on the "Manage Resource Review" page.
Note: Resource Review Layout descriptions are new to PowerSteering with this release. See below for more information.
-
Shared: Indicates whether the layout is publicly shared or private to the user viewing the page.
Note: Users can set Resource Review Layouts as public or private while saving them.
-
Created By: The user who originally saved the Resource Review Layout.
-
Created Date: The date the Resource Review Layout was originally saved.
-
Last Updated By: The user who most recently saved any changes to the Resource Review Layout.
-
Last Updated Date: The date when changes were most recently saved to the Resource Review Layout.
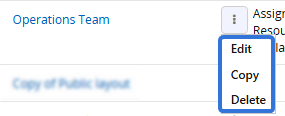
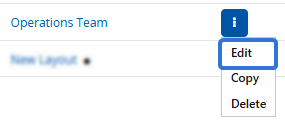
Additionally, each layout's Options button  provides management options.
-
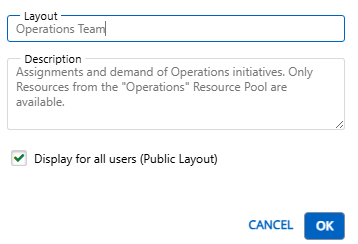
Edit: Update the name, description, and privacy settings of the Resource Review Layout.
Note: Only administrators can select the Edit button on publicly shared layouts.
-
Copy: Create a new Resource Review Layout using the same details as the existing one. Users have the option to change the name, description, and privacy settings of this new layout before saving.
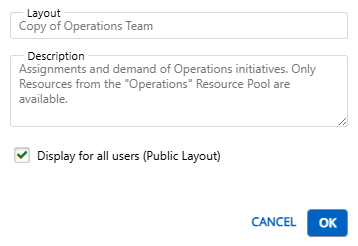
Note: Copying a layout like this will also copy all of its data from the Resource Review page, including filter and display settings. If you would like to alter some of these settings before saving the new layout, you may prefer to copy it by editing it from the Resource Review page and selecting the Save As button. See Save a Resource Review Layout for more information.
-
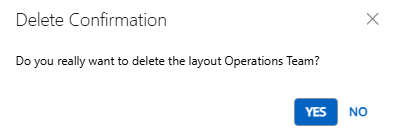
Delete: Remove the Resource Review Layout from PowerSteering. Users will no longer be able to apply it to the Resource Review page.
Note: Only administrators can select the Delete button on publicly shared layouts.
Note: With this update, this is now the only way to delete Resource Review Layouts. The Delete Current Layout icon
 has been removed from the Resource Review page.
Benefit:
The new "Manage Resource Review" page provides a centralized location in PowerSteering to monitor and maintain Resource Review Layouts. Prior to this release, users had to navigate to each individual layout on the Resource Review page to make any changes. With this update, users can easily make updates to multiple layouts without having to tediously open up each one. Additionally, it allows users to easily delete all unused or outdated layouts at once, keeping the "Layout" menu organized and relevant.
What's Different:
Descriptions can now be added to Resource Review Layouts in PowerSteering. Users will see these new descriptions under each Resource Review Layout when they open up the "Layout" menu on the Resource Review page.
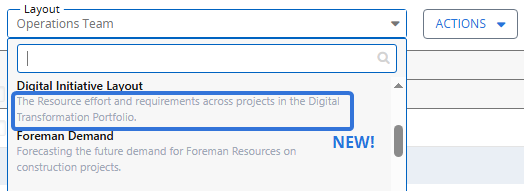
Note: Layout descriptions are only available for layouts on the new Resource Review user interface. Layouts on the legacy interface cannot contain descriptions.
Users can add descriptions while editing Resource Review Layouts on the new "Manage Resource Review" page.
From here, the "Description" field can be used to briefly describe the purpose of the Resource Review Layout.
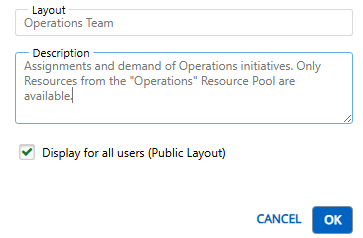
Note: Only administrators can select the Edit button on publicly shared layouts. Non-admin users can only edit their own private layouts.
Benefit:
Descriptions make Resource Review Layouts easier to maintain and understand. They can help explain which type of data the layout is configured to display, which makes it easier for users to understand its intent without guessing from the name alone. Descriptions promote effective collaboration and keep Resource Review Layouts organized and efficient.
What's Different:
Users can now edit Scorecard Metric views while creating new work in PowerSteering.
Note: A Metric View is a single Metric table that is accessed by selecting a tab at the top of the Metric. Only one view from a Scorecard Metric can be added to an Object Type's Create Work wizard.
While creating or editing Scorecard Metric Templates, administrators can configure a view to appear in the Create Work wizard for work items created using an automatically associated Object Type.
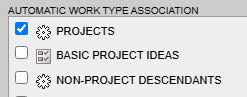
In this example, all new work items created using the "Projects" Object Type will feature the Metric view on the Create Work wizard.
Note: Work created using a template with one of the automatically associated Object Types as the "Root work object" will also feature the Metric view in the Create Work wizard.
Note: Users require the "Metric Template Administration" Context permission to create and edit Metric Templates. To edit Metric Templates that they did not create, they will need to be selected as an Administrator on the template's Basic Info tab.
Note: This feature will only be active when the criteria for a Scorecard Metric are met on the Basic Info tab. Specifically, the "Frequency Is" field must be set to "No Frequency" and the "Tag" field must be set to "No Tag Breakdown".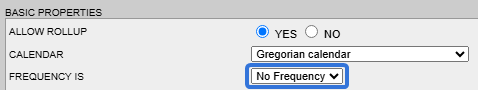

If the Scorecard Metric features multiple views, administrators can use the new "Display on Project Creation" checkboxes on the View tab to select the Metric View that will be featured.
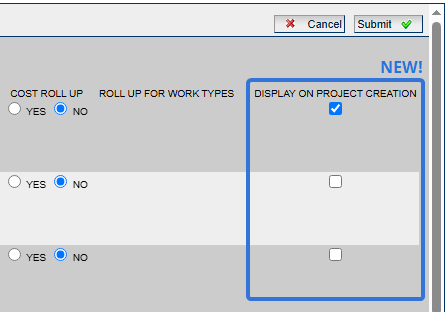
Note: These checkboxes (as well as the entire View tab) will only be displayed when "Views" are enabled from the the Basic Info tab.
If the Scorecard Metric does not feature multiple views, administrators can simply enable "Display on Project Creation" from the Basic Info tab.
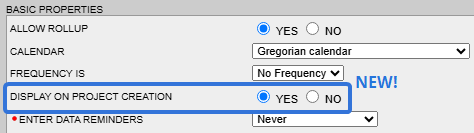
Note: This option will only be displayed when "Views" are disabled from the the Basic Info tab.
Once the Metric Template is saved, the Scorecard Metric View will be added to the Create Work wizard. The name of the Metric Template will appear as an additional step in the creation process when one of the automatically associated Object Types is selected as the "Work Type".
Note: The Metric will also appear if the "Work Type" field contains a Work Template with one of the automatically associated Object Types as the "Root work object".
Users can enter data into the Scorecard Metric view once they reach the step in the Create Work wizard.
Tip: See Enter Data into a Scorecard Metric for information on editing Scorecard Metrics.
Once the work item is created, the Scorecard Metric View will immediately contain the inputted data.
Note: When Scorecard Metrics are attached to the Create Work wizard, any user with the "Create Root Work" Context permission will have the opportunity to edit them. This includes users that may not have permission to edit Metrics on the work item. In these cases, a user that can edit the Scorecard Metric during creation may not be able to edit the Metric once the work item has been created.
Benefit:
Scorecard Metrics provide a structured and measurable way to evaluate PowerSteering work items at any point in the life cycle, including before they start. Evaluating a work item at the point of creation helps prevent errors and gives stakeholders confidence that the work is correctly configured before it gets underway. Additionally, it allows managers to assess whether certain work is worth pursuing before significant time and Resources are invested.
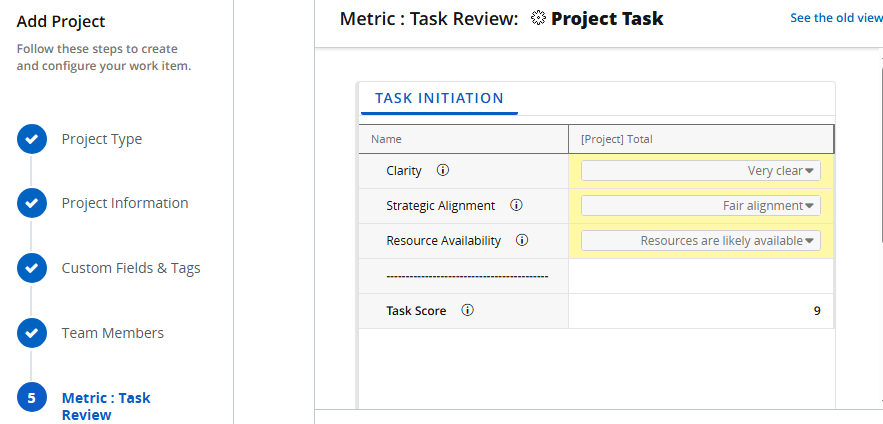
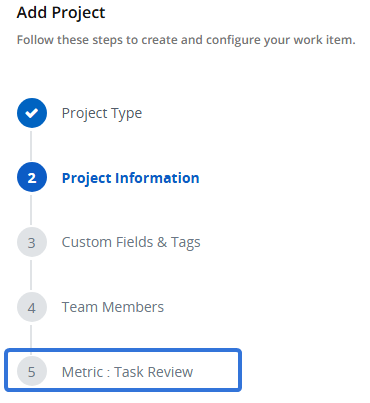
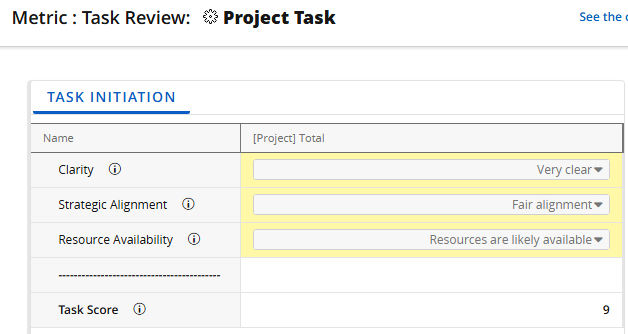
Example: Marilyn's organization has an Object Type called "Project Task", which represents any significant tasks that must be completed for a large Project. To ensure these tasks run smoothly, she has created a "Task Review" Scorecard Metric Template that is used to evaluate the task on clarity, strategic alignment, and Resource availability. The Metric is associated with the "Project Task" Object Type, which means it will automatically appear on all work items created from it.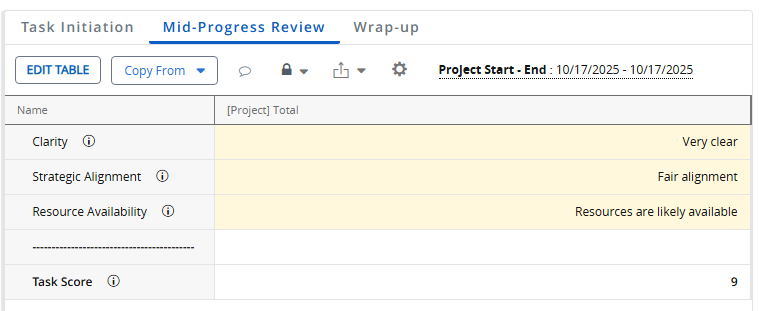
Each task is expected to undergo three separate evaluations that match up with the Metric's three views: Task Initiation (before the task begins), Mid-Progress Review (halfway through the task), and Wrap-up (once the task has concluded).
To ensure that the Task Initiation view receives an evaluation before the task begins, Marilyn decides to add it to the Create Work wizard.
This way, work creators will not forget to complete their Task Initiation evaluations before starting their Project Tasks.
The following enhancements will also be available with the 2025R1.2 release:
Documents
What's Different:
Document approval responsibility can now be given to Roles on work items as well as specific users.
Prior to this release, only specific users could be selected as approvers while uploading or editing a document attached to a work item or template. Selecting Approval Required from the "Approval Type" drop-down menu would open up the "Approvers" field, where the names of users responsible for approving the document could be typed in and selected.
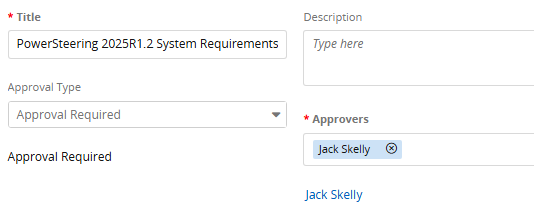
With this update, a new "Approver Type" drop-down menu will appear when Approval Required is selected.
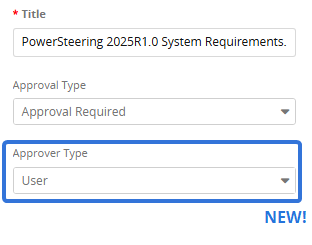
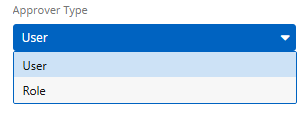
The "Approver Type" menu offers two options for determining the document's approval settings.
-
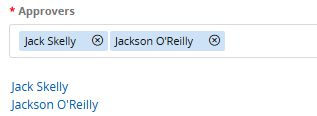
User: Specific users will be given approval responsibility on the document. An "Approvers" textfield will appear, allowing users to be searched and selected by name.
Note: This is how document approvals were always determined prior to this release.
-
Role: Specific Roles will be given approval responsibility on the document. A "Roles" menu will appear, allowing users to select any of the work item's Roles.
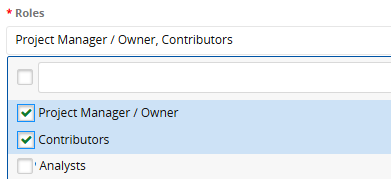
Users who are assigned to the selected Role(s) on the work item will be given approval responsibility over the document.
Note: Only one approver is necessary for documents. Selecting multiple Roles does not require a user in each Role to approve the document.
Benefit:
Assigning document approval to Roles instead of specific users helps Project Managers maintain their work and account for team changes. It creates a standardized process that can be implemented to multiple work items and templates. If document approval can be tied to specific Roles ("Contract Administrator", "Finance Reviewer", etc.), assigning the approval authority to these Roles prevents Project Managers from having to select different individuals on every work item. Instead, approval authority can be assigned to Role(s) before the project even begins.
Additionally, Role-based document approval helps prepare work items for any personnel changes. Assigning approval to Roles ensures that documents waiting for review will not be stuck waiting for someone who is no longer associated with the project. Project Managers will no longer forget to update document approvers when teams get shuffled around, which prevents review bottlenecks and unnecessary delays.
Formula Builder
What's Different:
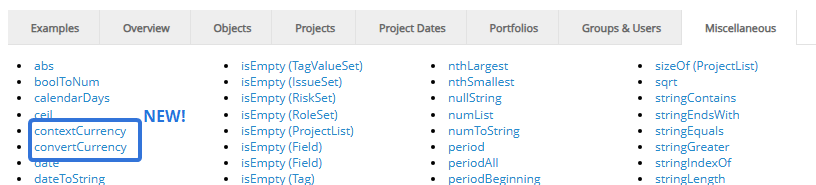
Two new currency-related functions have been added to the Formula Builder: "contextCurrency" and "convertCurrency".
The "contextCurrency" function represents the default PowerSteering currency.
Note: The default currency can be set on the Exchange Rates page.
The "convertCurrency" function can convert values from one currency to another. Selecting "convertCurrency" from the "Miscellaneous" tab will automatically add the function to the formula, including each of the parameters that must be replaced with data.

Tip: Other functions can be used to capture numbers and strings. For example, I can replace a "{Number}" parameter with the "fieldNumber" function to capture a number entered into a Custom Field. See the example below for more information.
The parameters are the following:
-
Number: Provide a number that must be converted from the source currency to the target currency.
-
String: The source currency that must be converted to another currency.
Tip: The new "contextCurrency" function can be entered here to capture the default currency.
-
String: The target currency that the number will be converted to.
Tip: The new "contextCurrency" function can be entered here to capture the default currency.
-
Number: The transaction date that will be used to convert the currency.
-
ExchangeRateTable: The exchange rate table that will be used to convert the currency.
Example: Lilly wants her Project to display how much its software licenses will cost in Canadian Dollars. The default currency is United States Dollars, and a Team Member always inputs this USD cost into a "Licensing Cost" Custom Field.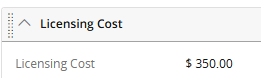
To provide the CAD amount for a monthly report, Lilly creates a Measure that will convert the "Licensing Cost" value from USD to CAD once a month. She uses the "convertCurrency" function in the Formula Builder to automatically generate this CAD value.
The "fieldNumber" function has been used to capture the "Licensing Cost" Custom Field value.
The "contextCurrency" function has been used to capture the default currency (in this case, USD).
The target currency is "CAD".
The "today" function has been used to capture the current date.
The "@ExchangeRateTable" object identifies the default exchange rate table.
When the Measure runs, it converts the "Licensing Cost" value from USD to CAD.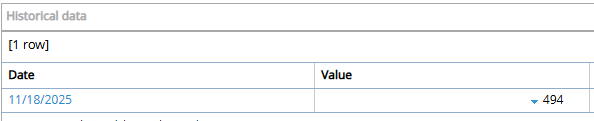
Benefit:
Prior to this release, Measures supported currency conversion from the local currency to the default currency for formulas using Metric data, but not for data inputted into monetary Custom Fields. This is especially important because Metric data cannot be passed to Filebound workflows. With this update, users working with currency that differs from the default can enter values into monetary Custom Fields, and Measures can convert those values to the default currency for use in a FileBound workflow.
Gated Work
What's Different:
On the Summary pages of Gated Projects, each Gate now contains a "History" tab that displays all approval actions that have been taken on the Gate.
Prior to this release, Gates within the Summary page header could be expanded to display an "Approvals" tab.
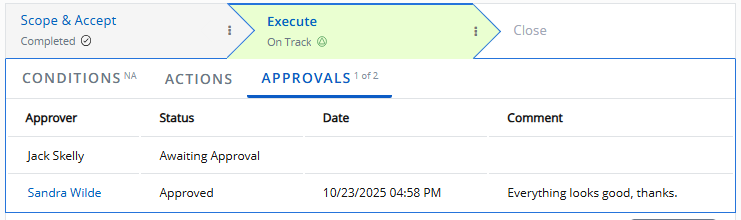
With this update, the "Approvals" tab has been replaced with a "History" tab.
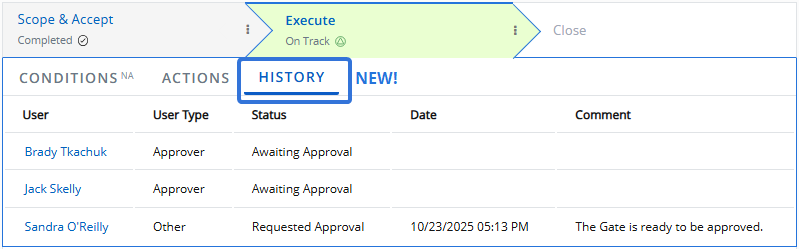
Just like the former "Approvals" tab, the "History" tab displays all of the Gate approvers and the status of their approval. However, the tab now lists all of the actions taken on the Gate. For example, notice that Sandra O'Reilly's approval request has been recorded above.
Non-approval related actions will also be recorded. For example, reactivating previous Gates will create a new entry on the "History" page.
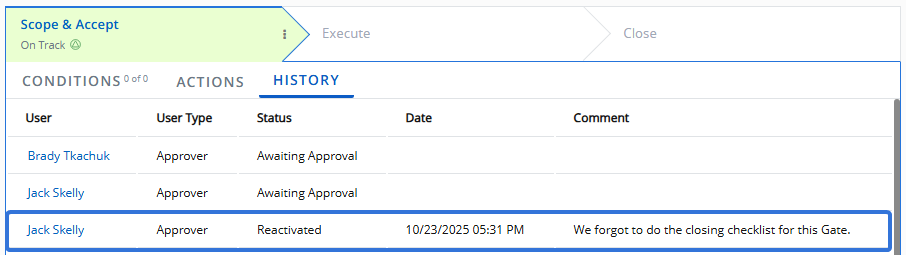
Additionally, users can revisit previous Gates and use the "History" tab to see who advanced the Gate.
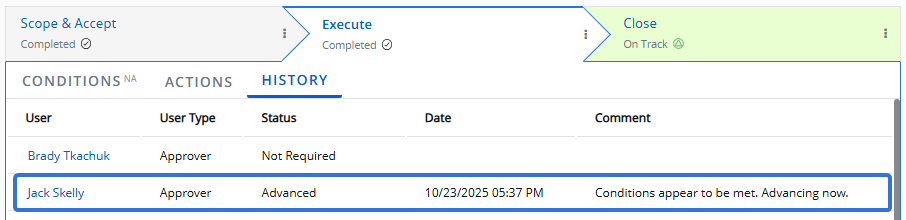
Note: The "History" tab will always display the status of the Gate approvers at the top of the list.
Benefit:
Knowing which users are responsible for carrying out Gate-related actions adds context and traceability to Gated Projects. Project Managers can easily analyze approval patterns and identify best practices as well as areas where governance rules are not being followed.
Prior to this release, the "Approvals" tab only displayed the current status of the designated Gate approvers. If users wanted to find out any additional information about actions taken on the Gate, they had to visit the Work History. With this upgrade, users no longer need to navigate away from the Summary page and waste time applying filters to the Work History page; all of the information can be found directly within the "History" tab.
What's Different:
Administrators can now configure Gated Work Conditions that allow Gates to be advanced when required deliverables contain a "Canceled" status.
Note: Work status names can be changed in PowerSteering. The "Canceled" status might be named something different in your PowerSteering environment. See Manage Work Status Names for more information.
Prior to this release, required deliverables with a "Canceled" status were still required to advance the Gate.
Example: In this Gated Project's "Descendants" module, the "Initial staff meeting" work item has been marked as a required deliverable for the "Scope & Accept" Gate. It must be completed before the Gated Project can advance.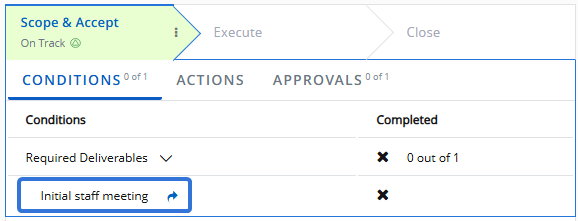
Because the project team is so small, however, the Project Manager decides that the staff meeting is not necessary. She uses the "Descendants" model to cancel the meeting.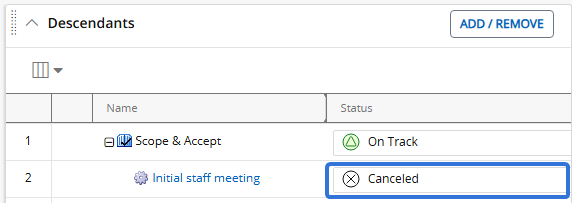
When a user refreshes the page, the work item is still listed as an incomplete deliverable even though it is no longer happening. Gate advance cannot be requested.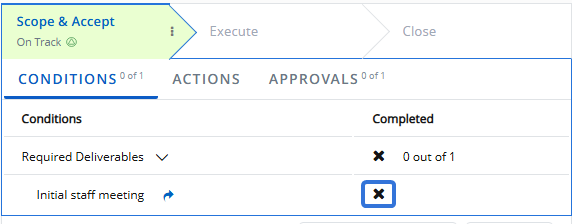
With this update, administrators will see a new "Ignore required deliverables if they are cancelled" checkbox while creating or editing Pre-Advance Conditions.
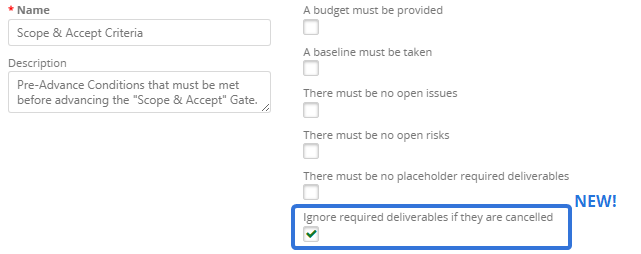
When this is selected, any required deliverables with a "Canceled" status will not have to be completed in order to advance the Gate. Canceled required deliverables will display a Canceled symbol  under the "Conditions" tab. Although they are not required to advance the Gate, they are also not considered "Complete".
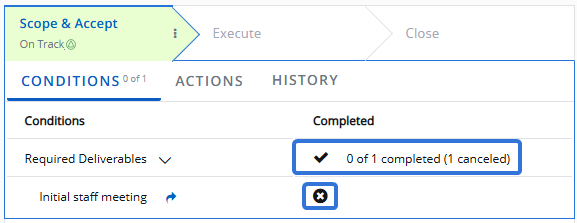
In this example, the only required deliverable has not been completed. However, it was canceled, so the Gate's "Required Deliverables" are satisfied.
Example: While creating some Pre-Advance Conditions for the "Scope & Accept" Gate, an administrator selects the "Ignore required deliverables if they are cancelled" checkbox.
In this Gated Project's "Descendants" module, the "Initial staff meeting" work item has been marked as a required deliverable for the "Scope & Accept" Gate. It must be completed before the Gated Project can advance.
Because the project team is so small, however, the Project Manager decides that the staff meeting is not necessary. She uses the "Descendants" model to cancel the meeting.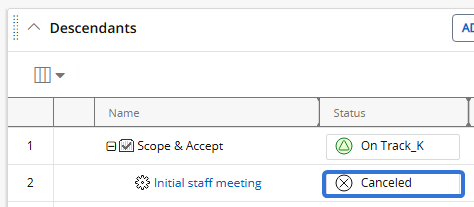
When a user refreshes the page, the list of required deliverables for the Gate is satisfied. The "Initial staff meeting" displays a Canceled symbol under the "Conditions" tab.
Benefit:
Although allowing canceled deliverables to satisfy Gate requirements may seem counter-intuitive, this new option accounts for project flexibility and uniqueness. In the real world, deliverables may be canceled because they are deemed no longer necessary or fulfilled elsewhere. Marking these deliverables as canceled while still satisfying the requirement accurately indicates that the project team intentionally decided not to proceed with them rather than forgot them.
Metrics
What's Different:
PowerSteering now features a "History" page for Metric Bulk Actions. This page keeps a log of each Metric Bulk Action job that runs in PowerSteering, including both scheduled and manual runs.
Note: Metric Bulk Actions are open to all PowerSteering users by default, but users will only be able to change Metrics that they have permission to change. For instance, if you are planning to copy Metric data from one view to another using a bulk action but you do not have permission to update the Metric instance on one of the Portfolio's work items, only the Metrics you have permission to change will be affected.
The Metric Bulk Action Jobs page now features a History button on the top right-hand corner.
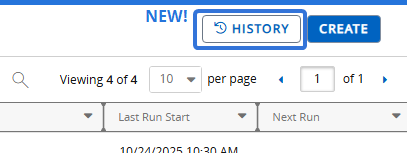
Selecting this button opens up a page containing a data grid with a log of previously run Metric Bulk Action jobs.
Tip: See Data Grids for information on sorting and filtering data grid results.
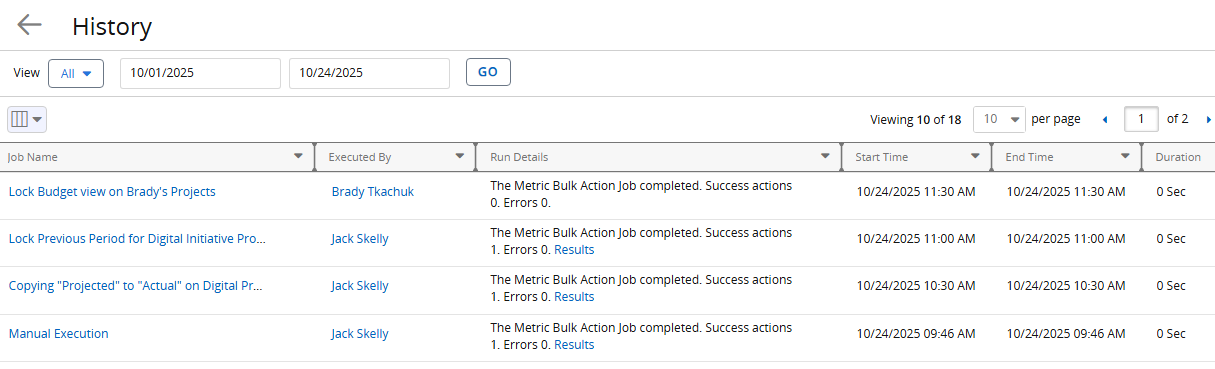
Note: Just like on the Metric Bulk Action Jobs page, you will only be able to see jobs you have created or jobs that have been shared with you.
Note: If "Manual Execution" is displayed in the job name, the Metric Bulk Action did not occur as an automatically scheduled job. Instead, it indicates that the Metric Bulk Actions wizard was used to run a Metric Bulk Action job on demand. This can occur by creating a new job and running it immediately or selecting a job from the Metric Bulk Action Jobs page and running it.
Selecting the name of a job will open up the Metric Bulk Action wizard that was used to create the job. Users can navigate through the wizard step-by-step to see the settings that were applied.
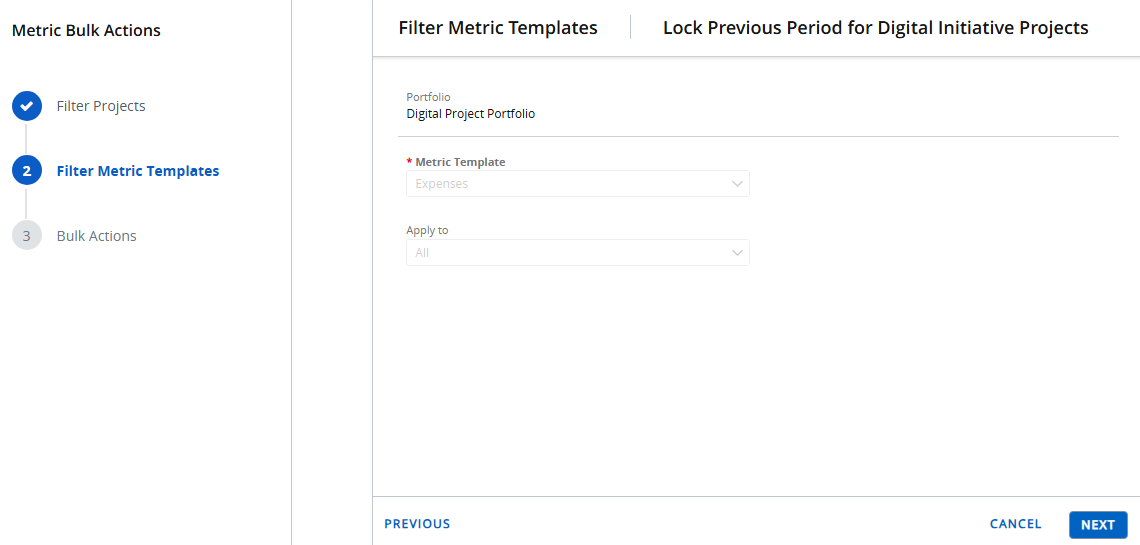
Note: These pages are only for reviewing the configurations of Metric Bulk Action jobs; all of the settings are greyed out and cannot be interacted with. If you would like to edit any Metric Bulk Action jobs, visit the Metric Bulk Action Jobs page.
In the "Run Details" column, users can select Results to see all of the Metric instances that were affected by the job.

The "Status" column will display one of two icons: a checkmark icon  indicates a successful action and an "X" icon
  indicates an error.
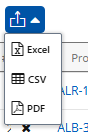
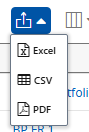
The Export button in the top left-hand corner of the page can be used to download the results table as a Microsoft Excel file, a CSV file, or a PDF.
Note: The exported file will contain all of the line items from the job, not just those that are currently listed on the page.
Benefit:
Prior to this release, users could use the Metric Bulk Action Jobs page to access the results of the last time a job ran. Once the job ran again, however, these results were replaced by the newest job's results and could no longer be opened. With this upgrade, users now have access to every specific Metric Bulk Action job that runs in PowerSteering, allowing them to complete audits and identify which users ran certain jobs.
Portfolios
What's Different:
Users can now export the Portfolios data grid from the main Portfolios page.
Note: The Portfolios page can be accessed by anyone in PowerSteering. However, you will only be able to see the Portfolios that have been shared with you and the Portfolios that you have created. Only those with the "Portfolio Administration" Context permission can see all PowerSteering Portfolios.
An Export button has been added to the top left-hand corner of the Portfolios page.
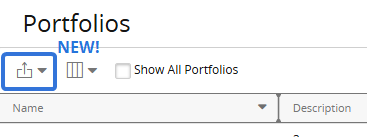
It can be used to download the results table as a Microsoft Excel file, a CSV file, or a PDF.
Note: The data will be exported with the columns that are displayed on the page. However, all pages of Portfolios will be included in the output, not just those listed.
Benefit:
Exporting Portfolios and their data allows users to conduct deeper analysis and auditing from outside of the application. Reviewing exported Portfolio lists through an external spreadsheet allows users to have an easier time spotting inconsistencies and outdated Portfolios that require their attention. Also, exported Portfolio lists can serve as a snapshot in time, which is useful for maintaining historical records and tracking how they have changed.
Reporting
What's Different:
Users can now prevent Project Reports from sending out scheduled emails when the work item contains an "Inactive" work status.
Note: See the Work Status Names page to see which work statuses are considered "Active" and "Inactive".
Users will now see a "Send email for active projects only" checkbox in the "Schedule" box while adding or editing a Project Report.
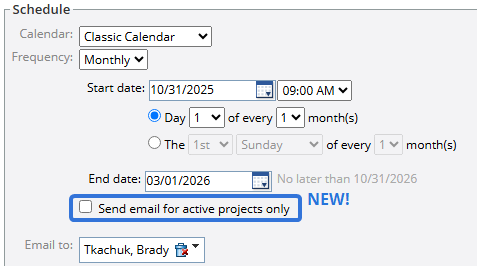
When this checkbox is selected, notification emails will not be sent to the "Email to" addresses when the work item contains an "Inactive" status.
Benefit:
Prior to this release, individuals found themselves receiving email notifications for Project Reports when work items were not active. These work items were often seen as irrelevant and users were not interested in reviewing their reports. With this upgrade, users have the freedom to determine whether or not their Project Reports will be sent out for inactive work items.
Resource Review
What's Different:
A Heat Map can now be applied to Resource and Role line items on the Resource Review page. The colors are used to indicate the amount of remaining availability for Resources in the Allocation (top) section and Roles in the Demand (bottom) section.
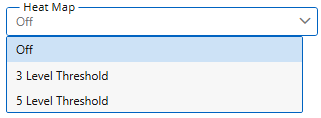
A new "Heat Map" drop-down menu can now be found in the "Display Settings" window.
The menu allows users to apply an availability Heat Map to the Resource Review page, as well as determine how many color thresholds will be used.
-
Off: An availability Heat Map will not be applied to the Resource Review page.
-
3 Level Threshold: Only three colors will be used to indicate availability. A simple "High / Medium / Low" availability scale will be displayed for each section.
-
5 Level Threshold: Five colors will be used to indicate availability.
Tip: This option should be used if your Demand (bottom) section commonly displays any negative minimum availabilities. See below for more information.
Availability Heat Maps will affect both Resource Review sections:
Allocation section
If a Heat Map is applied, the "Resource Threshold (% Allocation)" scale will affect the Allocation (top) section.
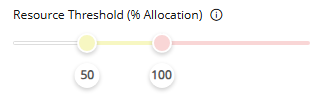
Resource Threshold colors indicate how much of a Resource's available working time is already booked for the time period. It uses a value called "% Allocation", which represents the percentage of the Resource's total effort that is currently allocated.
The following equation is used to calculate a Resource's "% Allocation":
(Total effort assigned ÷ Total user capacity) x 100 = % Allocation
The color of a Resource's "Effort / Allocation" and "Availability" cells for a specific time period will correspond with the Resource Threshold color spectrum.
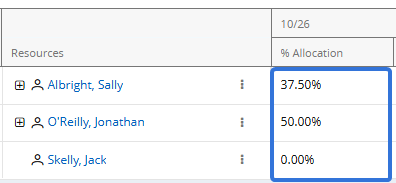
Example: Jonathan has a total of 40 working hours each week. He is currently assigned to one Project for the week with an allocation of 20 hours.
This means the "% Allocation" equation will be as follows:
20 (total effort assigned) ÷ 40 (total user capacity) x 100 = 50
Once a Heat Map is added, 50 lands in the yellow range:
This causes Jonathan's cells to turn yellow for the week.
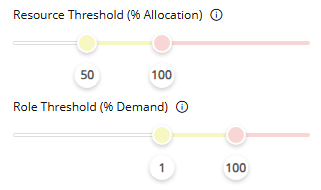
Tip: Users can configure the "Resource Threshold (% Allocation)" scale however they like, but it should reflect how close a Resource is to full allocation for the time period. For example, take a look at the following scale: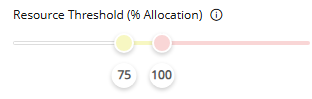
In this example, a Resource's cells will turn yellow when their available time is almost fully allocated for the week (75% allocated). This warns the Resource Manager that the Resource is almost fully booked for the week. Once the Resource is fully booked with no more available time left (100% allocated), their cells will turn red. This indicates that the Resource cannot take on any more assignments during the time period.
Demand Section
If a Heat Map is applied, the "Role Threshold (% Demand)" scale will affect the Demand (bottom) section.
Role Threshold colors indicate how much effort is available for a Role compared to its current unstaffed demand. It uses a value called "% Demand", which represents the percentage of a Role's minimum availability that the unstaffed demand requires.
The following equation is used to calculate a Role's "% Demand":
(Total demand x 100) ÷ Minimum availability = % Demand
Note: If there is only one value displayed in a Role's "Availability" cell, the minimum and maximum availability for the Role are the same. If the minimum and maximum availability values are different, the minimum availability is the first value displayed.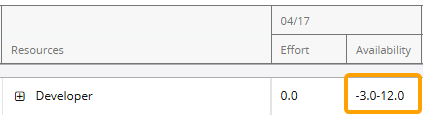
See Demand Section for more information on minimum availability.
The color of a Role's "Effort / Allocation" and "Availability" cells for a specific time period will correspond with the Role Threshold color spectrum.
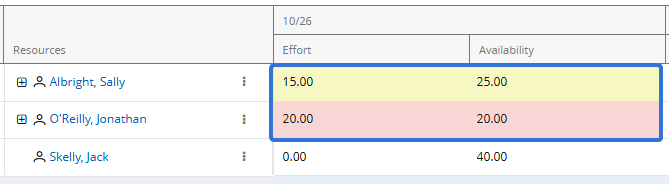
Example: There are currently 40 hours of unstaffed demand for a "Receptionist" for the week of October 26th. The minimum availability for the Role is 80 hours.
This means the "% Demand" equation will be as follows:
(40 (total demand) x 100) ÷ 80 (minimum availability) = 50
Once a Heat Map is added, 50 lands in the yellow range: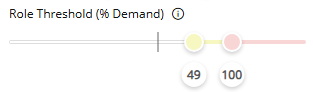
This causes the "Receptionist" cells to turn yellow for the week.
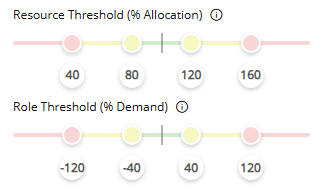
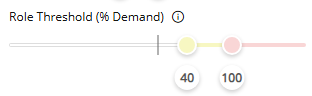
Tip: If a "3 Level Threshold" Heat Map is applied, it should reflect how close the Role is to running out of availability for the time period. For example, take a look at the following scale:
In this example, a Role's cells will turn yellow when it requires 50% or more of the current minimum availability. This warns the Resource Manager that the Role is running out of availability for the time period. Once the Role requires the total amount of minimum availability (100%) or more, the cells will turn red. This indicates that more availability or less demand is required.
Tip: It is important to keep in mind that minimum availability values can also be negative. When this occurs, the "% Demand" value will be a negative integer. For example, imagine the "Receptionist" Role has a minimum availability of -60 hours for the week.
The "% Demand" will be as follows:
(40 (total demand) x 100) ÷ -60 (minimum availability) = -66.7
The following "3 Level Threshold" Heat Map will only turn cells yellow when the "% Demand" value reaches -25, so the cells will not receive a color.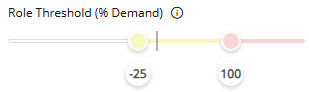
This is a problem because a "% Demand" value of -66.7 is much more worthy of a warning than a value of -25 or higher.
This is why the "5 Level Threshold" Heat Map should be applied when negative minimum availabilities are common. Similar to "% Demand" values over 100, negative "% Demand" values indicate that there is no more availability to cover the Role's current unstaffed demand. Take a look at the following scale: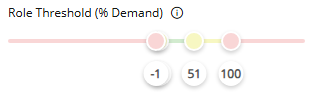
It has been configured in a way that turns a Role's cells red if they display a negative minimum availability OR if it requires more than the current minimum availability to cover its unstaffed demand.
Benefit:
Applying a Heat Map to the Resource Review page allows users to quickly identify potential capacity issues at a glance. Resource Managers can easily spot Resources who are nearing or exceeding their availability because cells will gradually turn yellow and red as they approach their full allocation. Additionally, the same color indicators highlight which Roles are close to requiring more effort than the current availability. These visual cues allow Resource Review users to detect bottlenecks and make informed staffing decisions more efficiently.
What's Different:
Resources can now be assigned to work items in bulk on the new Resource Review interface.
Prior to this release, this could only be done from the legacy Resource Review interface. With this update, the "Actions" drop-down menu is now available at the top of the new page.

The new menu can be used to assign Resources to Roles in both the Allocation (top) section and the Demand (bottom) section. To do this, a user can select the checkboxes of multiple "Role" line items on the page.
Note: "Role" line items contain both the name of the work item and the Role.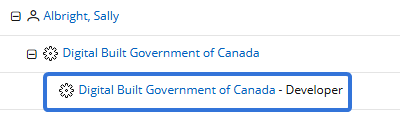
The "Allocation Group By" and "Demand Group By" fields in the Display Settings determine where the "Role" line items will appear when rows are expanded.
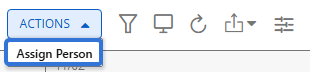
Once the Roles are selected, users can open the drop-down menu and select Assign Person.
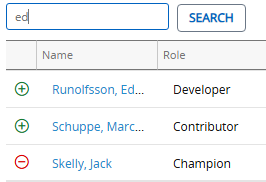
One of the three assignment methods can be used to assign a Resource to the Roles:
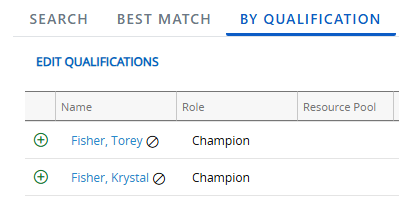
Enter a name (first or last) into the search bar and select the Search button. From the results table, select the "Plus" icon  of the Resource you would like to assign.
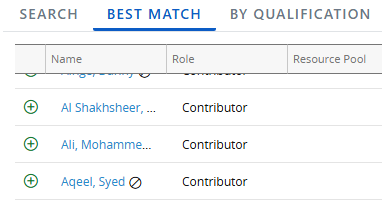
This option will provide a list of best-suited Resources, calculated by the required Role, the Resource Pool, and the Resources' Tag set (location, skills, etc.). From the results table, select the "Plus" icon of the Resource you would like to assign.
This option allows you to perform a Resource search based on chosen criteria, including Profile Roles, Resource Pools, and Resource Qualification Tags.
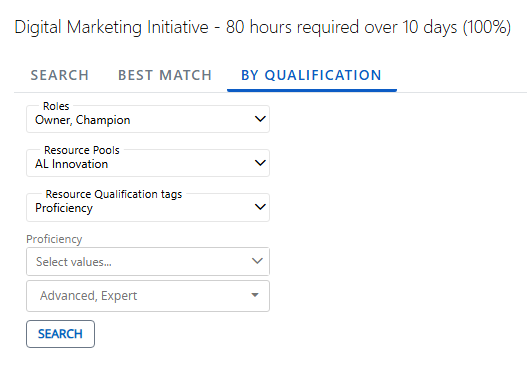
Note: Administrators can determine Resource Qualification Tags through Resource Planning.
Use the drop-down menus to select the criteria of your preferred Resource and select the Search button to compile a list of preferred Resources for the allocation.
Note: Resources only need to satisfy one of the selected values for each field. For example, if more than one value is selected for a Resource Qualification Tag, a Resource will only need one of those values selected for the Tag on their profile to be included in the results.
From the results table, select the "Plus" icon of the Resource you would like to assign.
The selected Resource will be assigned to each of the selected Roles. They will receive ALL of the effort assigned to the Role, whether it is assigned to a Resource or not.
Benefit:
Assigning Resources in bulk saves time and increases efficiency. Instead of having to open multiple work items individually, a Resource Manager can easily assign a single Resource to multiple projects in a single action, reducing a great deal of repetitive clicks and manual effort.
Prior to this release, this function only belonged to the legacy Resource Review page. Additionally, the legacy page did not allow users to assign Resources to both allocated effort and unstaffed demand at the same time. With this upgrade, the same Resource can be assigned to Roles that are currently occupied as well as those that are not.
What's Different:
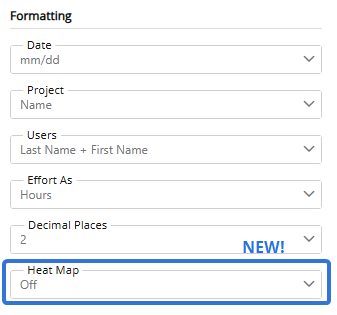
Users now have the option to display up to two decimal places for "Effort" and "Availability" values on the Resource Review page.
Prior to this release, only one decimal place could be displayed. The "Display Settings" window contained a "Precision" drop-down menu that could be used to display whole numbers or numbers with a single decimal place.
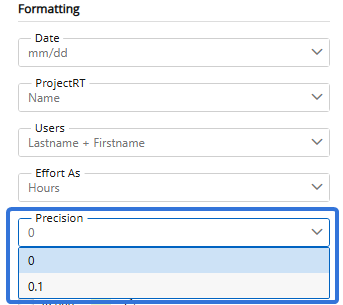
With this update, the "Precision" menu has been replaced with the "Decimal Places" menu.
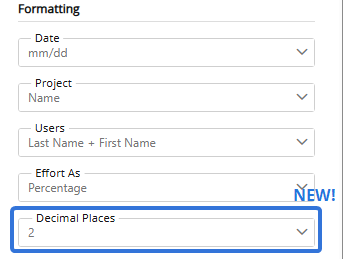
This new drop-down menu can be used to display whole numbers, numbers with one decimal place, or numbers with two decimal places.
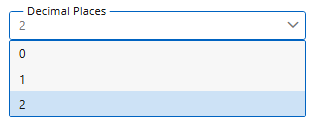
The selection will be applied to all "Effort / % Allocation" and "Availability" values on the page.
Note: The selected decimal places will be applied to values even if they do not require them. For instance, a whole number will still display two zeroes after the decimal point if "2" is selected from the drop-down menu.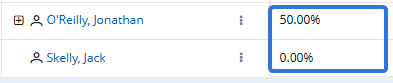
Benefit:
Additional decimal places add more precision to Resource Review values. Small differences in effort and availability can add up across many Resources and work items, so more precise values help ensure that totals are accurate.
Also, Project Central values are always displayed with two decimal points. Selecting "2" from the "Decimals" drop-down menu allows for greater consistency between effort on Project Central and the Resource Review page.
Tags and Custom Fields
What's Different:
Textfield Custom Fields can now contain up to 25,000 characters instead only 10,000. When users enter content into one of these Custom Fields, 25,000 characters can be supported.
Benefit:
The customizable nature of Custom Fields enables users to use them for a variety of unique needs, including capturing long and complex content. Higher character limits give more room for capturing meaningful, detailed information directly in PowerSteering without having to resort to separate documents or attachments.
Timesheets
What's Different:
PowerSteering users can now choose statuses for their imported Timesheets.
Prior to this release, every imported Timesheet was automatically given an "Approved" status.
With this update, users can choose which status their imported Timesheets will receive. A new "Import time with the following Timesheet status" drop-down menu is displayed on the Import Timesheet page.
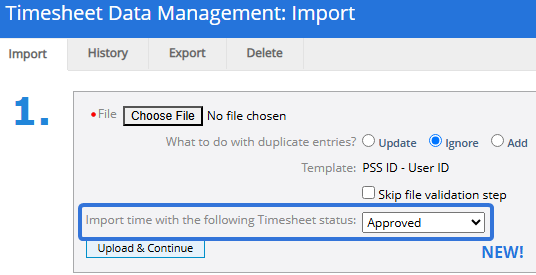
This menu contains a list of Timesheet statuses that can be applied to every Timesheet in the import file.
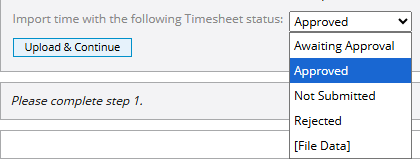
Note: "Approved" is always selected by default.
If the "[File Data]" option is selected, users can add a "Status" column to their Timesheet import file. This column must contain the name of a Timesheet status spelled correctly.
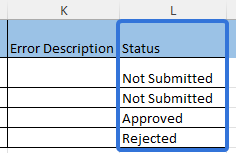
Note: The "Status" column can be located anywhere in the file.
Note: Empty "Status" cells will automatically receive an "Approved" status. Cells with misspelled words will cause an error.
Benefit:
Prior to this upgrade, every imported Timesheet automatically received an "Approved" status. This was based on the assumption that imported Timesheets were already verified. However, selecting the status of imported Timesheets can be valuable in an operational and administrative context. For example, Timesheet approvers may choose to import all Timesheets as "Not Submitted" so they can be reviewed on the Manage Time page. Alternatively, a Timesheet approver may have rejected some Timesheets external to PowerSteering but needs to import them into the system for record-keeping.
It may also be the case that not all Timesheets are prepared and approved at the point of import. Allowing Timesheets of any status to be imported gives users greater flexibility while preparing import files; Timesheets no longer have to be finished and approved before the file import.
What's Different:
Timesheet lines with pre-populated work items can now be deleted without saving.
Prior to this release, only line items that were saved after entering time could be deleted. The checkboxes of empty line items could not be selected and deleted, even if the line item contained an automatically populated work item.

Notice that the checkboxes next to each work item are grayed-out and not selectable.
With this update, these line items can be deleted. Line items with pre-populated work items can now be selected without saving any time toward them.
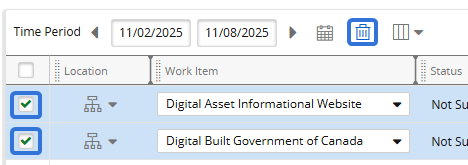
When line items are selected, the Delete icon  can then be clicked to remove them from the Timesheet.
Benefit:
Prior to this upgrade, users could not delete Timesheet rows with pre-populated line items. If they wanted to remove them, they would have to open the "Work Item" drop-down menu and clear them one-by-one. This resulted in plenty of unnecessary clicks and nullified the "Select All" feature that can be committed by selecting the checkbox in the column header.
With this update, users can now simply select and delete as many work items from their Timesheet as they like all at once.
What's Different:
Users will no longer see a confirmation window after saving their PowerSteering Timesheets.
Prior to this release, a confirmation window would appear whenever a user entered time and selected the Save button on a Timesheet.
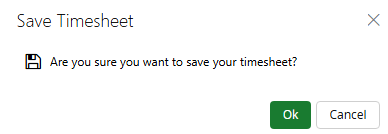
With this update, the "Save Timesheet" confirmation window will no longer appear. Instead, a confirmation banner will be displayed immediately.

Note: Submitting a Timesheet will still result in a confirmation window.
Benefit:
Users can now complete their Timesheets faster without too many unnecessary clicks that break their flow and result in "confirmation fatigue". Eliminating needless confirmation windows results in fewer interruptions and a more streamlined Timesheet experience.
Workflow
What's Different:
PowerSteering Workflow comments will not display both the author's name and the date and time that the comment was submitted.
Prior to this release, only the text content of a comment was displayed. For instance, when user opened up a Workflow Action Item, the "Previous Step Comments" would only display comments themselves.
With this update, metadata about the comment has been added. The name of the user who left the comment and the date and time the comment was submitted will now be displayed for each one.
Benefit:
Prior to this release, it was difficult for users to follow up on Workflow comments. Users would have to run a Workflow History report to find this information, wasting valuable time and effort. With this upgrade, users can now find this information right next to the comment. This allows users to quickly identify Workflow comment authors and consult them if necessary.