Client Edit | Invoice Options
This article details how to access the Invoice Options of a Client and the available options to you.
- From the Icon Bar click Setup
 .
. - From the Navigation Menu click Work to expand the corresponding menu.
- From the Work menu items, click Clients.
- From the Clients List page select the Client name to access the Client Edit page.
- From the Settings tab of the Client Edit page, expand the Financial navigation menu.
- Click Invoice Options. Refer to the subheadings General tab and Expense Invoicing tab for a list of all available fields.
General tab:
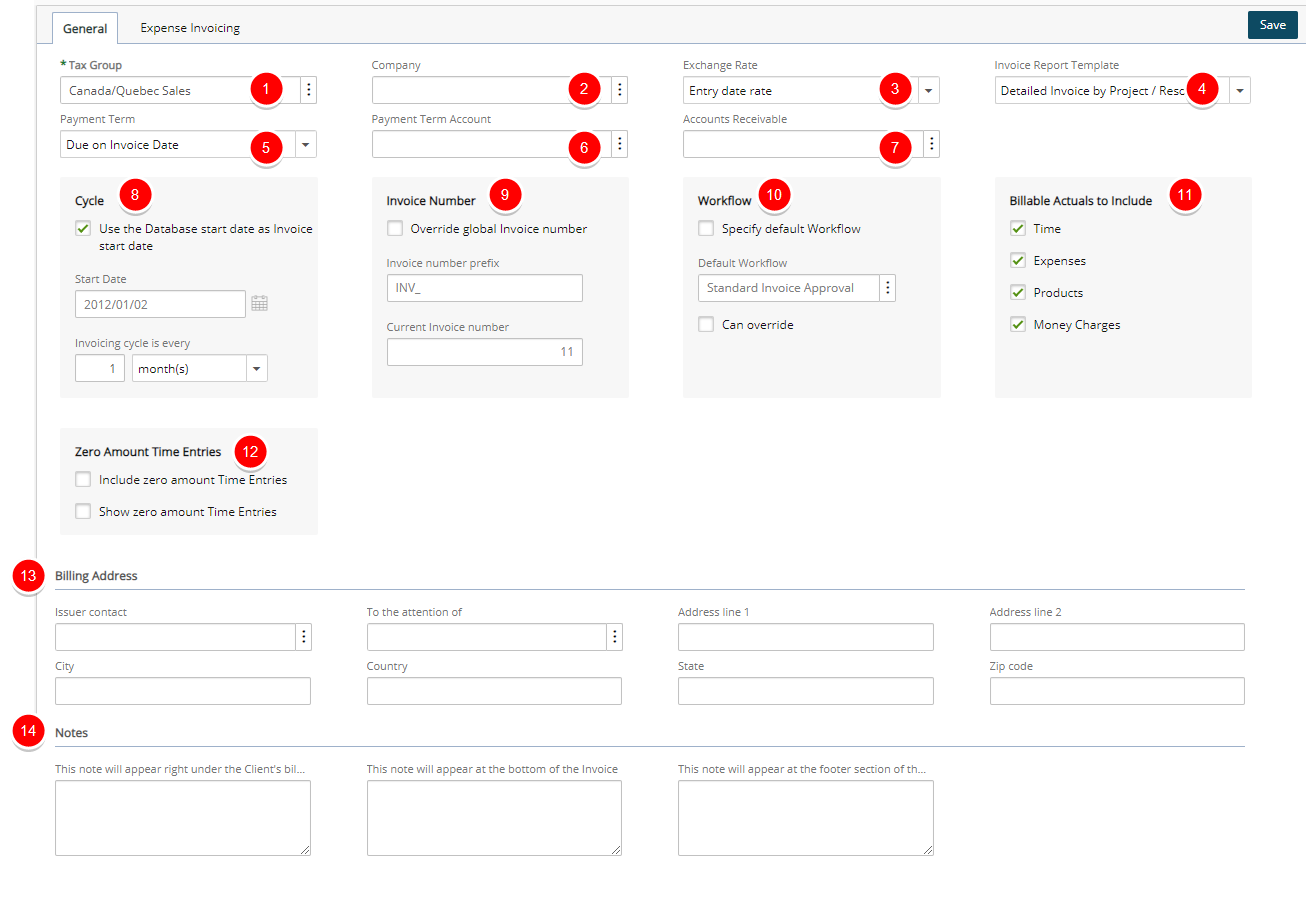
- Tax Group: Click the browse button and select the Tax Group used by the client.
- Company: Click the browse button and select the Company which is used for connection of the client’s accounting information to the integrated accounting software.
- Exchange rate: currency exchange rate calculations performed on the total invoice amount:
- Rate of the day: uses the exchange rate specified under Currency Exchange on the Financial System page (Setup>Financial>System)
- Invoice start date: uses the invoice start date to obtain the currency exchange rate
- Invoice end date: uses the invoice end date to obtain the currency exchange rate
- Entry date rate: uses the date when the billable entries were entered in the invoice to obtain currency exchange rate
- User defined: uses the exchange rate specified by the users
- Invoice Report Template: invoice report defined view:
- Detailed Invoice by Project/Resource: displays the invoice in detailed view by project and resource
- Detailed Invoice by Project/Task: displays the invoice in detailed view by project and task
- Detailed Invoice by Resource: displays the invoice in detailed view by resource
- Detailed Invoice by Project/Task with Notes: displays the invoice in detailed view by project and task with notes
- Payment Term Select the time frame that a client pays for the service:
- 2% - 10 days, Net 30: two percent is deducted if the invoice is paid within 10 days; the full payment is due within 30 days
- 90 day Multiple Payments: multiple payments toward the total net amount made within 90 days
- COD Terms: full payment made in cash upon delivery of the product
- Due on Invoice Date: net payment is due on the invoice date
- Due by Invoice Date: net payment is due by the invoice date
- Net 30 days: net payment made in 30 days
- Payment Term Account: Click the browse button and select a Payment Term Amount
- Accounts Receivable: Click the browse button and select an Accounts Receivable Account.
- Under Cycle, select the Use the Database start date as Invoice start date selection box to set the invoice start date the same as the database start date or click the Start Date calendar icon to select a date from the calendar, and then specify the invoice generation interval in the Invoicing cycle is every box.
- Under Invoice Number, select the Override global Invoice number selection box to specify the Invoice number prefix and the Invoice number.
- Workflow: Click the browse button (...) to associate a default invoice workflow to the client’s invoice
- Under Billable Actuals to Include, select the check boxes of the billable entry types included and calculating in the invoice
- Billable Time: includes all billable time entries made against the client’s projects
- Billable Expenses: includes all billable expenses incurred while working on the client’s projects
- Billable Products: includes all billable products incurred while working on the client’s projects
- Billable Money Charges: includes all billable money charges incurred while working on the client’s projects
- Under Zero Amount Time Entries, select the Include zero amount Time Entries and Show zero amount Time Entries selection boxes to display tasks in the invoices related to the client’s projects with no time entries.
- Under the Billing Address section specify the following information for the client contact
- Issuer contact: Name of client issuer contact
- To the attention of: Name of the person to contact
- Address line 1 and Address line 2: Civic address
- City: Name of city
- Country: Country of company
- State: State or province of company
- Zip code: Postal code or ZIP code
- Under the Notes section enter any required notes in the appropriate boxes:
- This note will appear right under the Client's billing address
- This note will appear at the bottom of the Invoice
- This note will appear at the footer section of the Invoice
Expense Invoicing tab:
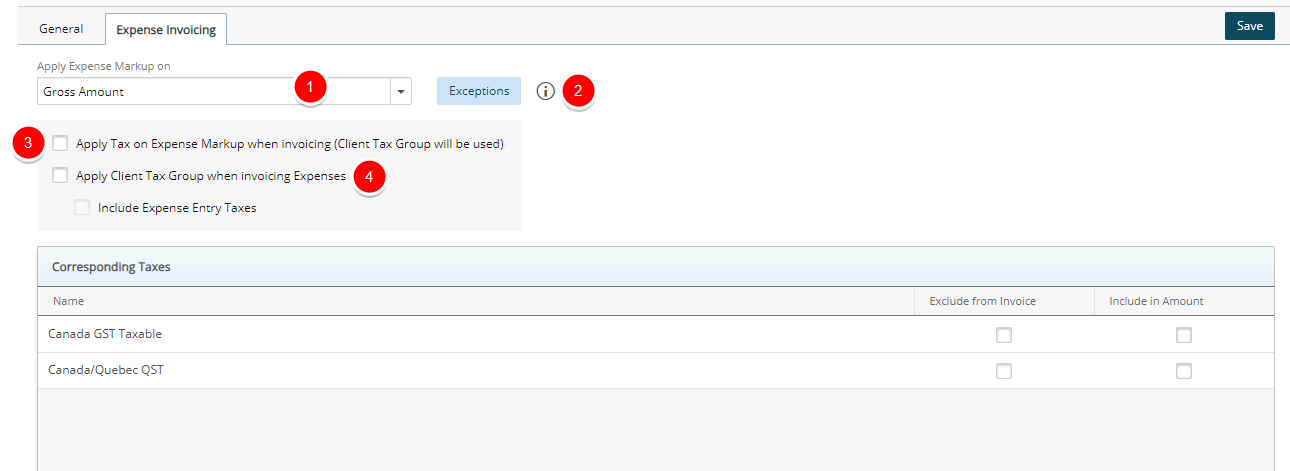
- From the Apply Expense Markup on section select:
- Gross Amount: (Gross Amount + Tips)*Markup percentage.
- Net Amount: Net Amount*markup percentage.
- Net Amount + Tips: (Net Amount + Tips)*Markup percentage.
- Exceptions:
- If Gross Amount is selected on this page then items selected in Exceptions have markup applied on Net Amount + Tips. (As Gross Amount already includes Tips).
- If Net Amount is selected on this page then items selected in Exceptions have markup applied on Gross Amount. (Gross Amount always includes Tips).
- If Net Amount + Tips is selected on this page then items selected in Exceptions have markup applied on Gross Amount. (Gross Amount always includes Tips).
- Apply Tax on Expense Markup when invoicing (Client Tax Group will be used)
- Select Apply Client Tax Group when invoicing Expenses
- Then choose Include Expense Entry Taxes
For further details refer to: Setting Expense Markup Exceptions based on Net Amount and Set Expense Markup Exceptions Based on Gross Amount