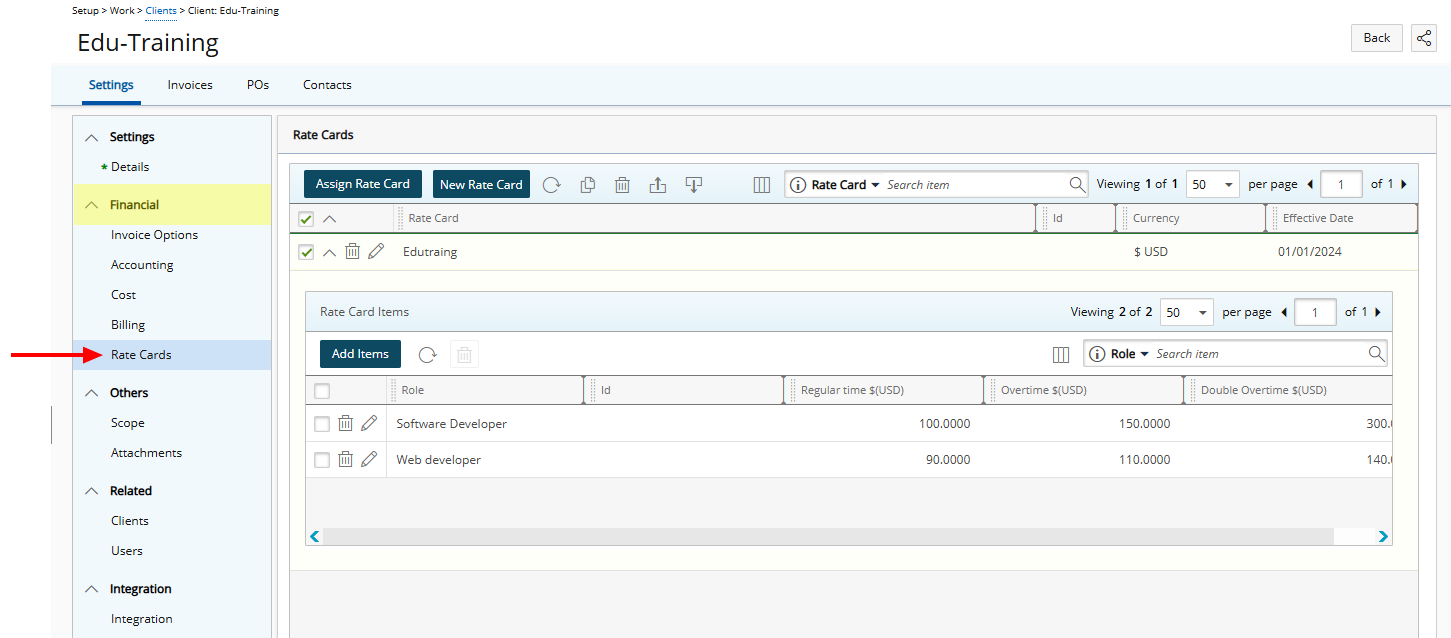
Users with the Can Modify Client Rate Cards right, have access to the Rate Cards option from the Client Edit menu from where they can:
- Assign System-level Rate Cards to a Client
- Create/Modify Rate Cards at the Client level
Client-Level Rate Cards are tailored to specific Clients and can be applied across all Projects associated with that Client. This enables rate consistency for all work done under a particular Client. When configuring Client-level rate cards, you have the flexibility to either select an existing System-level Rate Card or create a new Rate Card specifically for the Client.
To Access the Client Rate Cards list page
- From the Icon Bar click Setup
 .
. - From the Navigation Menu click Work to expand the corresponding menu.
- From the Work menu items, click Clients.
- From the Clients List page select the Client name to access the Client Edit page.
- From the Settings tab of the Client Edit page, expand the Financial navigation menu.
- Click Rate Cards.

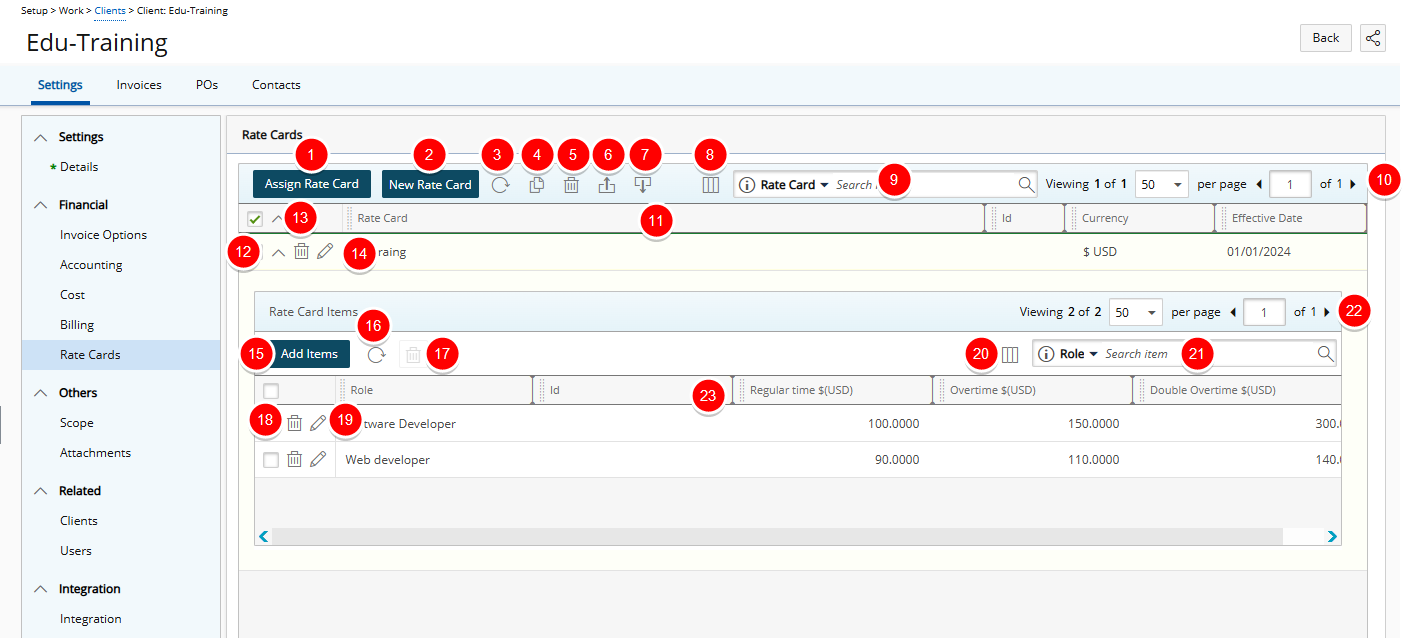
Available options within Client Rate Cards list page

- Assign an already existing Rate Card to your Client.
- Create a new Rate Card.
- Click the Refresh
 button to refresh the list.
 - Click the Copy
 button to copy an existing Rate Card.
 - Click the Delete
 button to delete selected Rate Card(s).
 - Click the Export
 button to export the list to Excel.
 - Click the Import
 button to import Rate Cards from Excel.
 - Manage Columns from Column Selection
 .
. - By default Search
 for Rate Cards based on Name, Id and Effective Date. You can manage the Search criteria from Column Selection
  . By default the following columns are displayed: Rate Card, Id, Currency and Effective Date.
 - Pagination is available at the top right corner to facilitate easy navigation across pages.
- From the table header:
- Sort the columns by ascending or descending order simply by clicking a column header. Note that an arrow indicates the descending (
 ) or ascending (
 ) order applied to the column.
 - Click
 and move a column to the desired position.
 - Dynamically resize column(s), to your preferred width. Simply move your cursor to the column boundary (
 ) you want to resize. When the cursor becomes a resize cursor, click and drag the column accordingly.
- Sort the columns by ascending or descending order simply by clicking a column header. Note that an arrow indicates the descending (
- Expand
 /Collapse
 the Client Rate Cards rows to view/hide Rate Card Items.
 - Delete
 Rate Card.
 - Modify
 Rate Card.
 - Click Add Items to add Roles and their associated rates to the Client Rate Card.
- Click the Refresh
 button to refresh the list.
 - Delete
 selected Rate Card Item(s).
 - Delete
 Rate Card Item.
 - Modify
 Rate Card Item.
 - The following columns are displayed by default: Role, Id, Regular time, Overtime and Double Overtime.
- Search
 for Rate Card Items based on Role, Id, Regular time, Overtime and Double Overtime.
 - Pagination is available at the top right corner to facilitate easy navigation across pages.
- From the table headers:
- Sort the columns by ascending or descending order simply by clicking a column header. Note that an arrow indicates the descending (
 ) or ascending (
 ) order applied to the column.
 - Click
 and move a column to the desired position.
 - Dynamically resize column(s), to your preferred width. Simply move your cursor to the column boundary (
 ) you want to resize. When the cursor becomes a resize cursor, click and drag the column accordingly.
- Sort the columns by ascending or descending order simply by clicking a column header. Note that an arrow indicates the descending (
For further details refer to: