The review and approval process begins after a User submits an entry. It’s then reviewed and approved or rejected.
With the workflow successfully configured, entries can be moved through the process, being transitioned from State to State. A user, who has been designated the Workflow Role, will be able to view the Entry and select the Transition.
This article details how to assign a State to a Workflow Role.
Note: The process of assigning a Workflow State to a Workflow Role is the same for all Workflows and for the purpose of this article we are using the Timesheet Workflow as an example.
-
From the Icon Bar click Setup
 .
. -
From the Navigation Menu click Timesheet.
-
From the available menu options select Timesheet Workflows.
- From the Timesheet Workflows list that displays, click the Name of the Timesheet Workflow you wish to access.
- From the Timesheet Workflow Edit page, navigate to the Assignments tab.
- Click New.

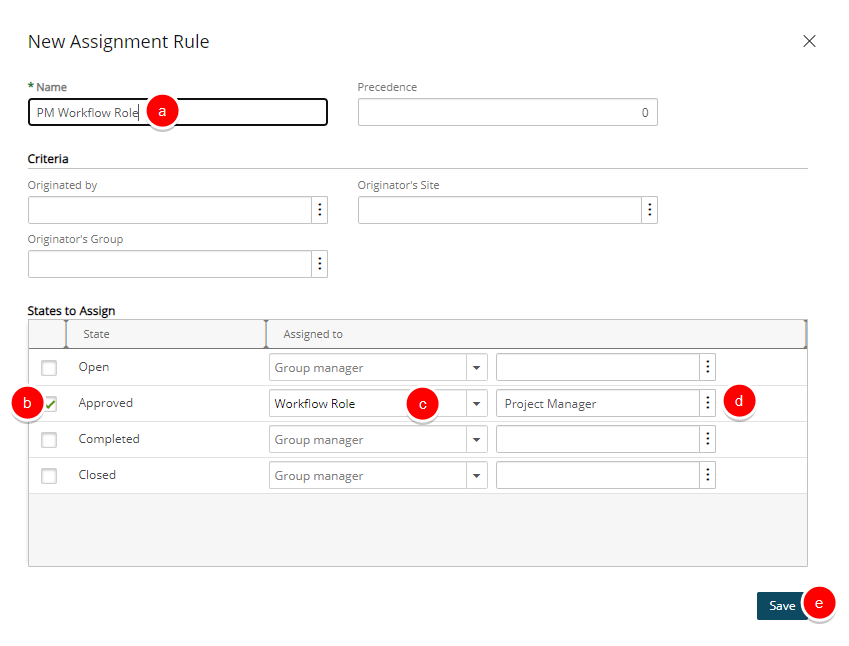
- Define the assignment on the New Assignment Rule dialog box:
- Enter the Name of the Assignment Rule
- From the States to Assign section select the State you wish to assign to a Role
- From the Assign To selection list selectWorkflow Role.
- Then choose the required Workflow Role from the Timesheet Roles dialog box.
- Upon returning to the New Assignment Rule dialog box, click Save.
- Upon the confirmation banner displaying, click the Close
 .
.
- Your newly created Assignment will be listed within the Assignments tab.
Impact of your changes
With the workflow successfully revised, entries can be moved through the process, being transitioned from state to state. A user, who has been designated the Workflow Role, will be able to view the Entry and select the Transition.
Note: In this example, as it is a timesheet entry, with the appropriate rights, the entry and transition can be seen and selected from the Timesheet Manager page, in addition to the entry page.