A workflow is a combination of States and Transitions that make up a process. The workflows are used to automate and streamline business practices by enforcing a systematic method of producing specific results in an organization.
- Select the Workflow Type: Creating workflows for all types of work is done in the same way, depending on which type of workflow you are creating. Select the workflow type that will be created by following either one of these steps:
- Expense workflows, click Setup > Expense > Workflows
- Invoice workflows, click Setup > Financial > Workflows
- Leave Request workflows, click Setup > Timesheet > Leave Request Workflows
- Project workflows, click Setup > Work > Project Workflows
- Resource Request workflow, click Setup > Workforce Planning > Resource Request Workflows
- Timesheet workflows, click Setup > Timesheet > Timesheet Workflows
- Work Item workflows, click Setup > Work > Work Item Workflows
Note: The workflow creation process is the same for all workflow types; however, the workflow properties and configuration can vary depending on the workflow type being created.
- From the top right corner of the page click Create workflow. As An Alternative you can also click the workflow context menu (
 ) then click New.
Note: For the purpose of this article we are going to create a Timesheet Workflow (Setup >Timesheet > Timesheet Workflows > Create Timesheet workflow).
- From the General tab of the Create Timesheet workflow page, the following parameters are defined:
- Name: Enter a unique name for the workflow being created.
- Id: Enter a unique identification code for the workflow being created, such as an employee number or number that has an inherent meaning within the organization.
- Alias: Enter a descriptive prefix no longer than three characters in length.
- Description: Enter a brief description of any relevant details regarding the workflow.
- Policies Page: Available only for Timesheet and Expense Workflows.
- Is a Placeholder: Select this box to use the workflow as a placeholder in the workflow hierarchical list; a placeholder is used to organize a structured hierarchy of the workflow list.
- Suspended: Select this box to render the workflow inactive without actually deleting it from the list.
Note: If a workflow is set as the system default or associated to a Portfolio or Project, the workflow cannot be suspended since it is being referenced in the system defaults or is associated to a portfolio or project.
- Prevent recalling approved entries: Available only for Timesheet Workflows.

-
 Add an Initial State
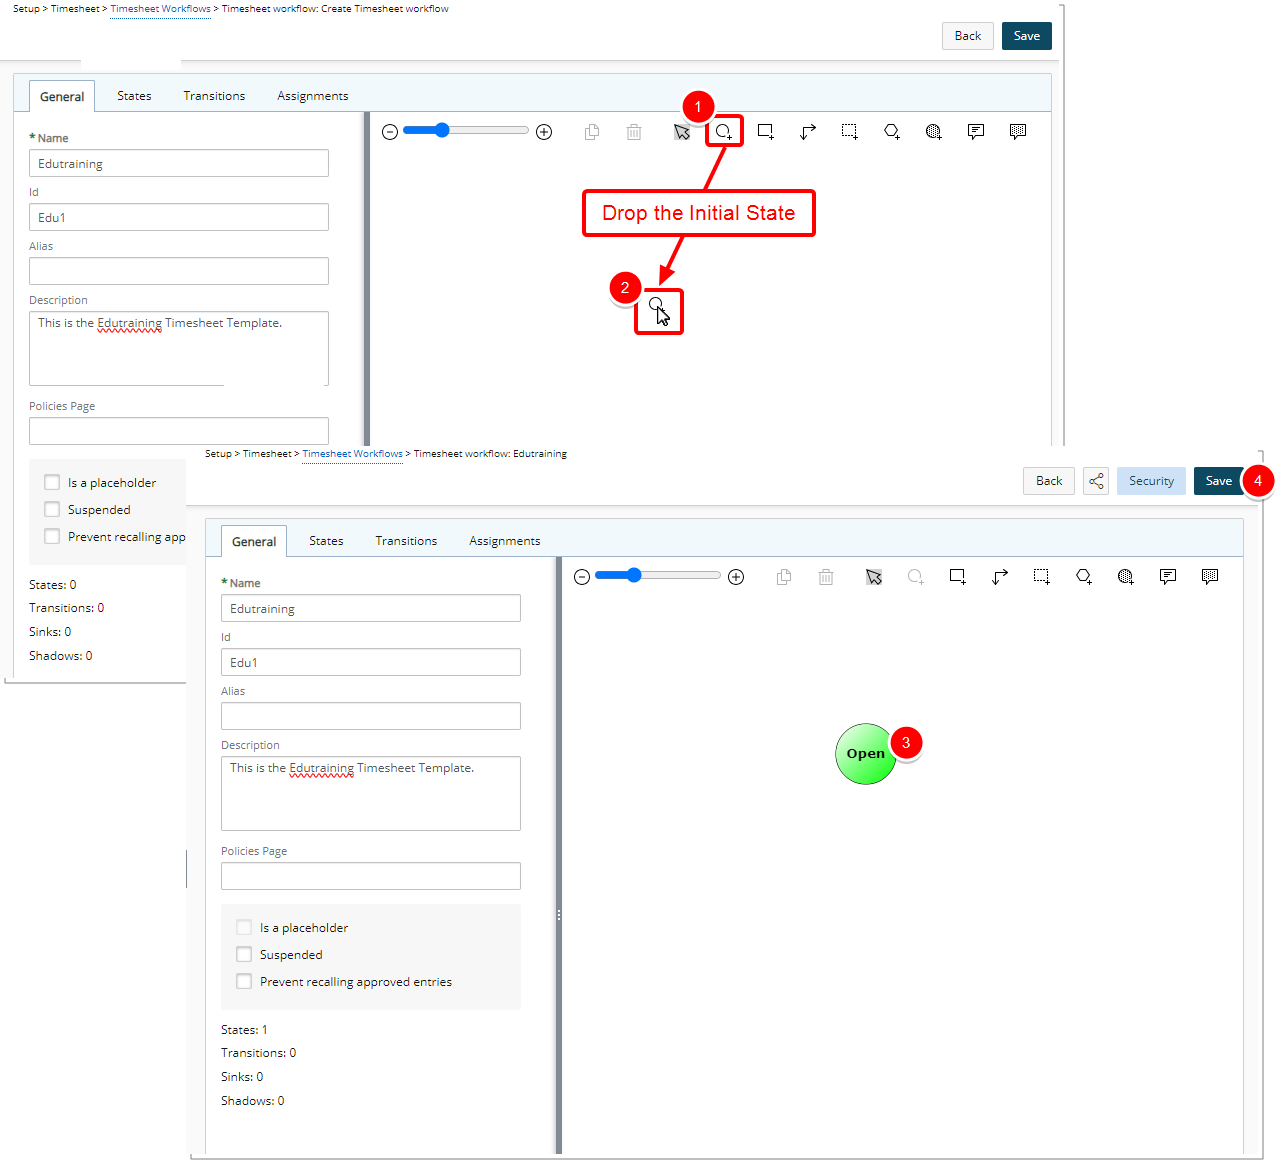
- On the Workflow toolbar, click the Initial State button
- Drag it to the design area.
- Drop it anywhere on the design area to create the Initial State for the workflow.
- Click Save.
For the purpose of this article we are going to add an Intermediate State to our workflow however note that the following State types can be added:
- Initial State: first state of a workflow
- Intermediate State: states created between the Initial State and Final State
- Shadow State: an image representing an existing state in a workflow used to simplify graphs; a Shadow State is not displayed in the completed States list.
- Final State: last state of a workflow.
- Sink State: default state; every state in a workflow can have a transition ending in a Sink State (behaves like the Cancel button).
Note:
- An Initial State must be created; otherwise, the workflow cannot be saved.
- After a workflow is saved, the Setup and Security buttons are displayed and the Processing link is enabled where applicable.
-
Add Intermediate State(s)
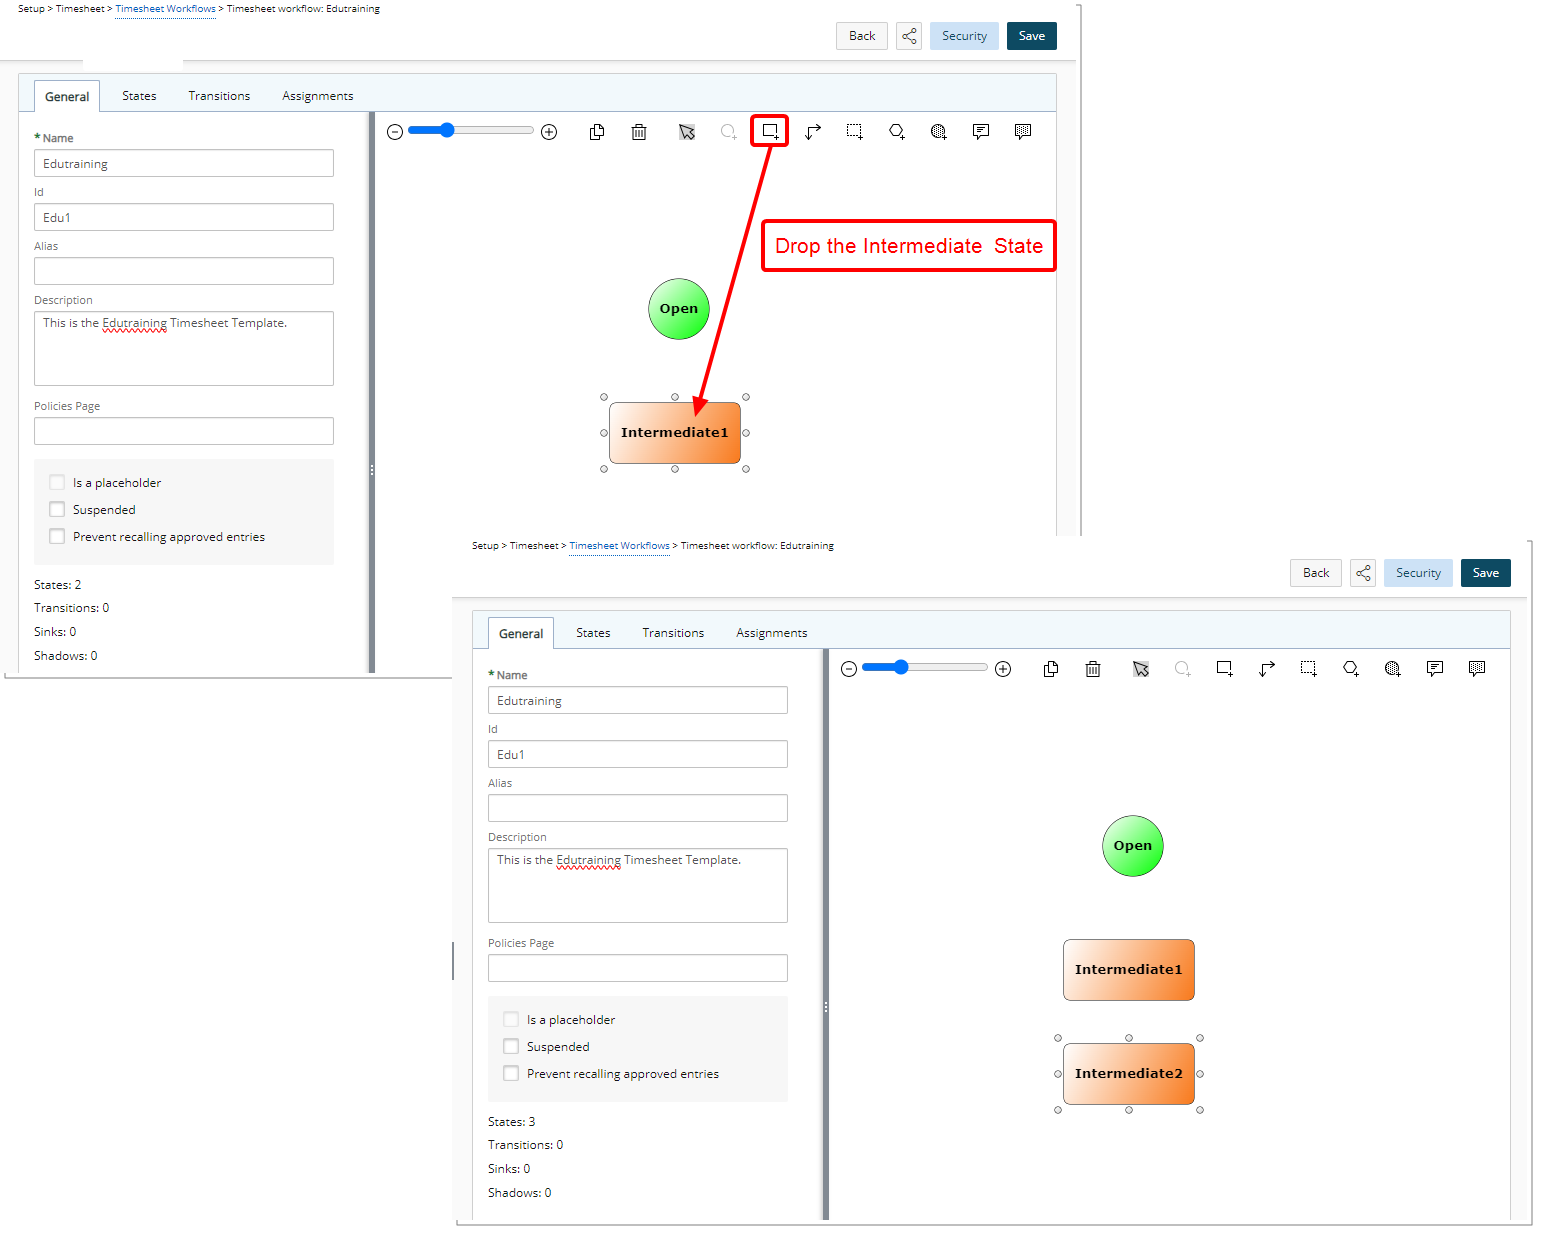
On the Workflow toolbar, click and then drag-and-drop the Intermediate State button in the design area.
Note: An unlimited number of Intermediate States can be created for a workflow.
-
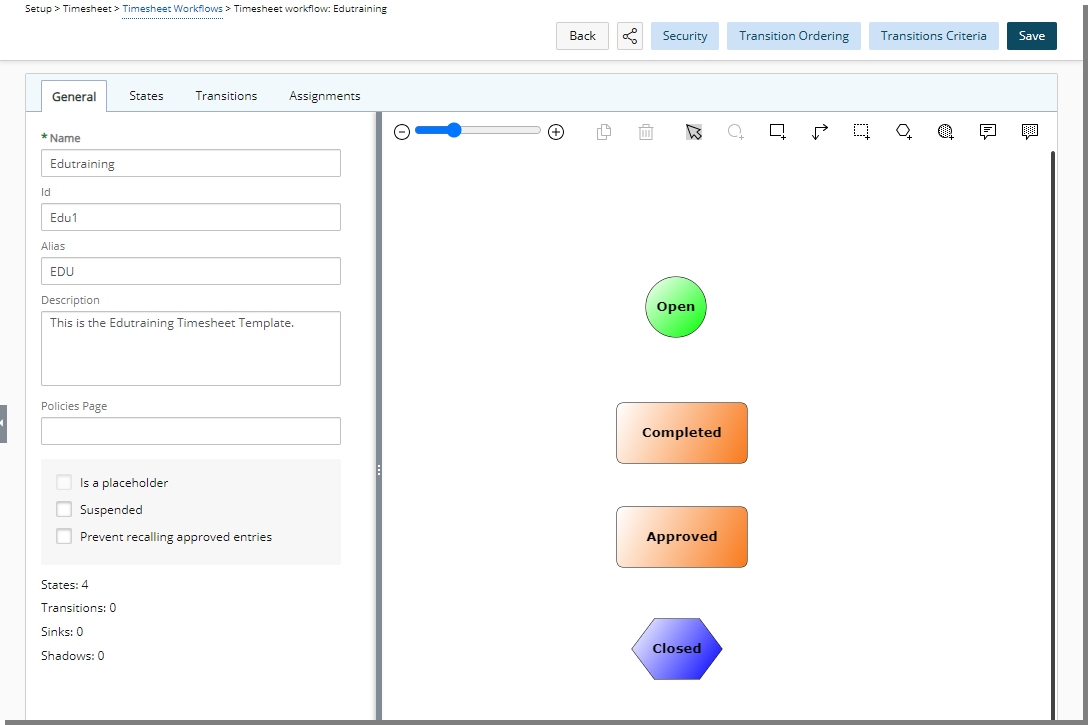
Add Final State(s)
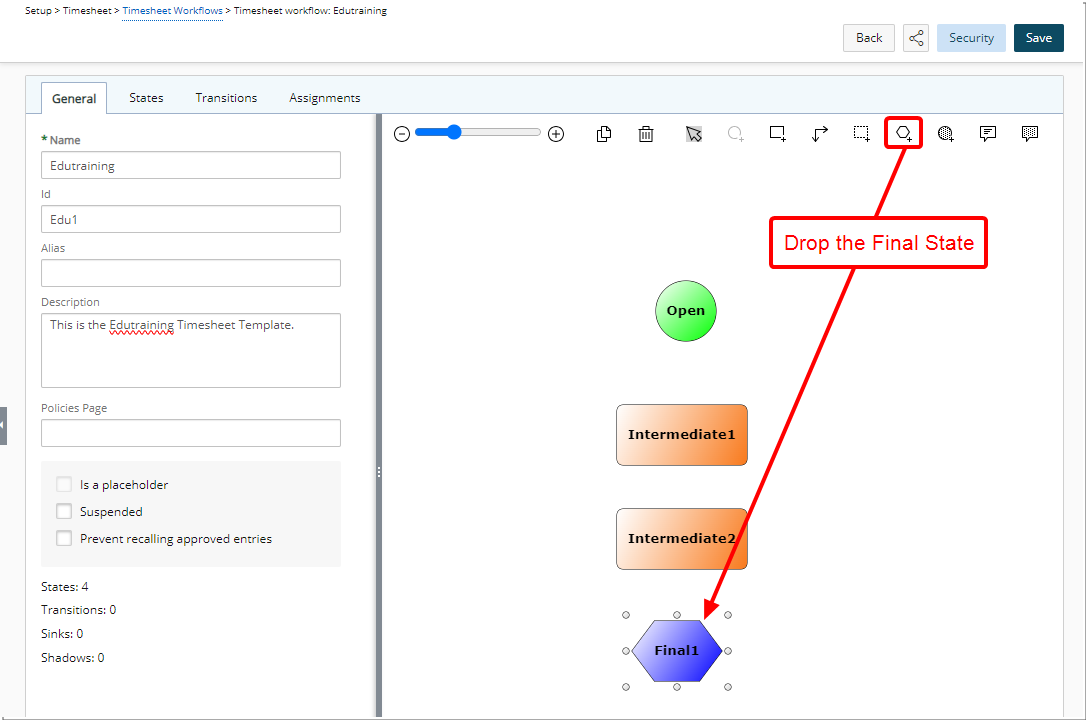
- On the Workflow toolbar, click and then drag-and-drop the Final State button in the design area.
- Click Save to save the changes.
- Upon saving, the following options become available in the upper-right corner of the Workflow Edit page:
- Version: Displays the workflow version number. This value is static and initially set to 1.
Note: Displayed for the following Workflows:Leave Request, Project, Timesheet and Work Item.
- Share Link: Opens a dialog that allows you to share the workflow link with a colleague.
- Setup: Opens the Setup dialog box.
Note: Available for the following Workflows: Expense, Leave Request, Project, Resource Request and Work Item.
- Security: Opens the Workflow Security dialog box.
Note: Available for the following Workflows:Expense, Invoice, Leave Request, Project, Resource Request, Timesheet and Work Item.
- Rules: Opens the Rules dialog box.
Note: Available for the following Workflows: Project,
- Transition Ordering: Opens the configuration dialog box for Workflow Transition Ordering.
Note: Available for Timesheet Workflows:.
- Transitions Criteria: Opens the configuration dialog box for Workflow Transitions Criteria.
Note: Available for Timesheet and Expense Workflows:.
- Version: Displays the workflow version number. This value is static and initially set to 1.
- Click the Security button to access the workflow Security dialog box where the Security Profiles are listed and the right level of security can be assigned.
- Assign the desired level of security to the Security Profile(s). Your selections are saved automatically.
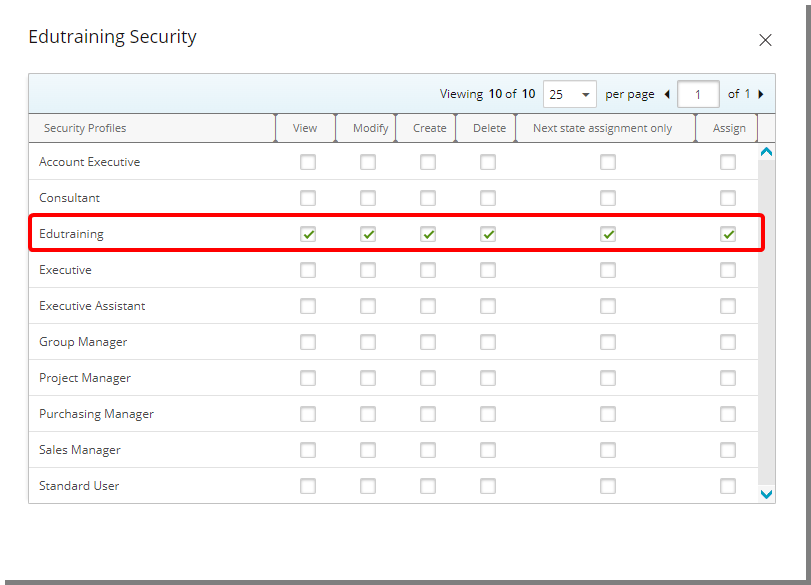
- Click the Close
 button to return to the Workflow Edit page.
Note: The Administrator Security Profile always has full access and is not displayed within the workflow Security table.
-
Modify the State(s)
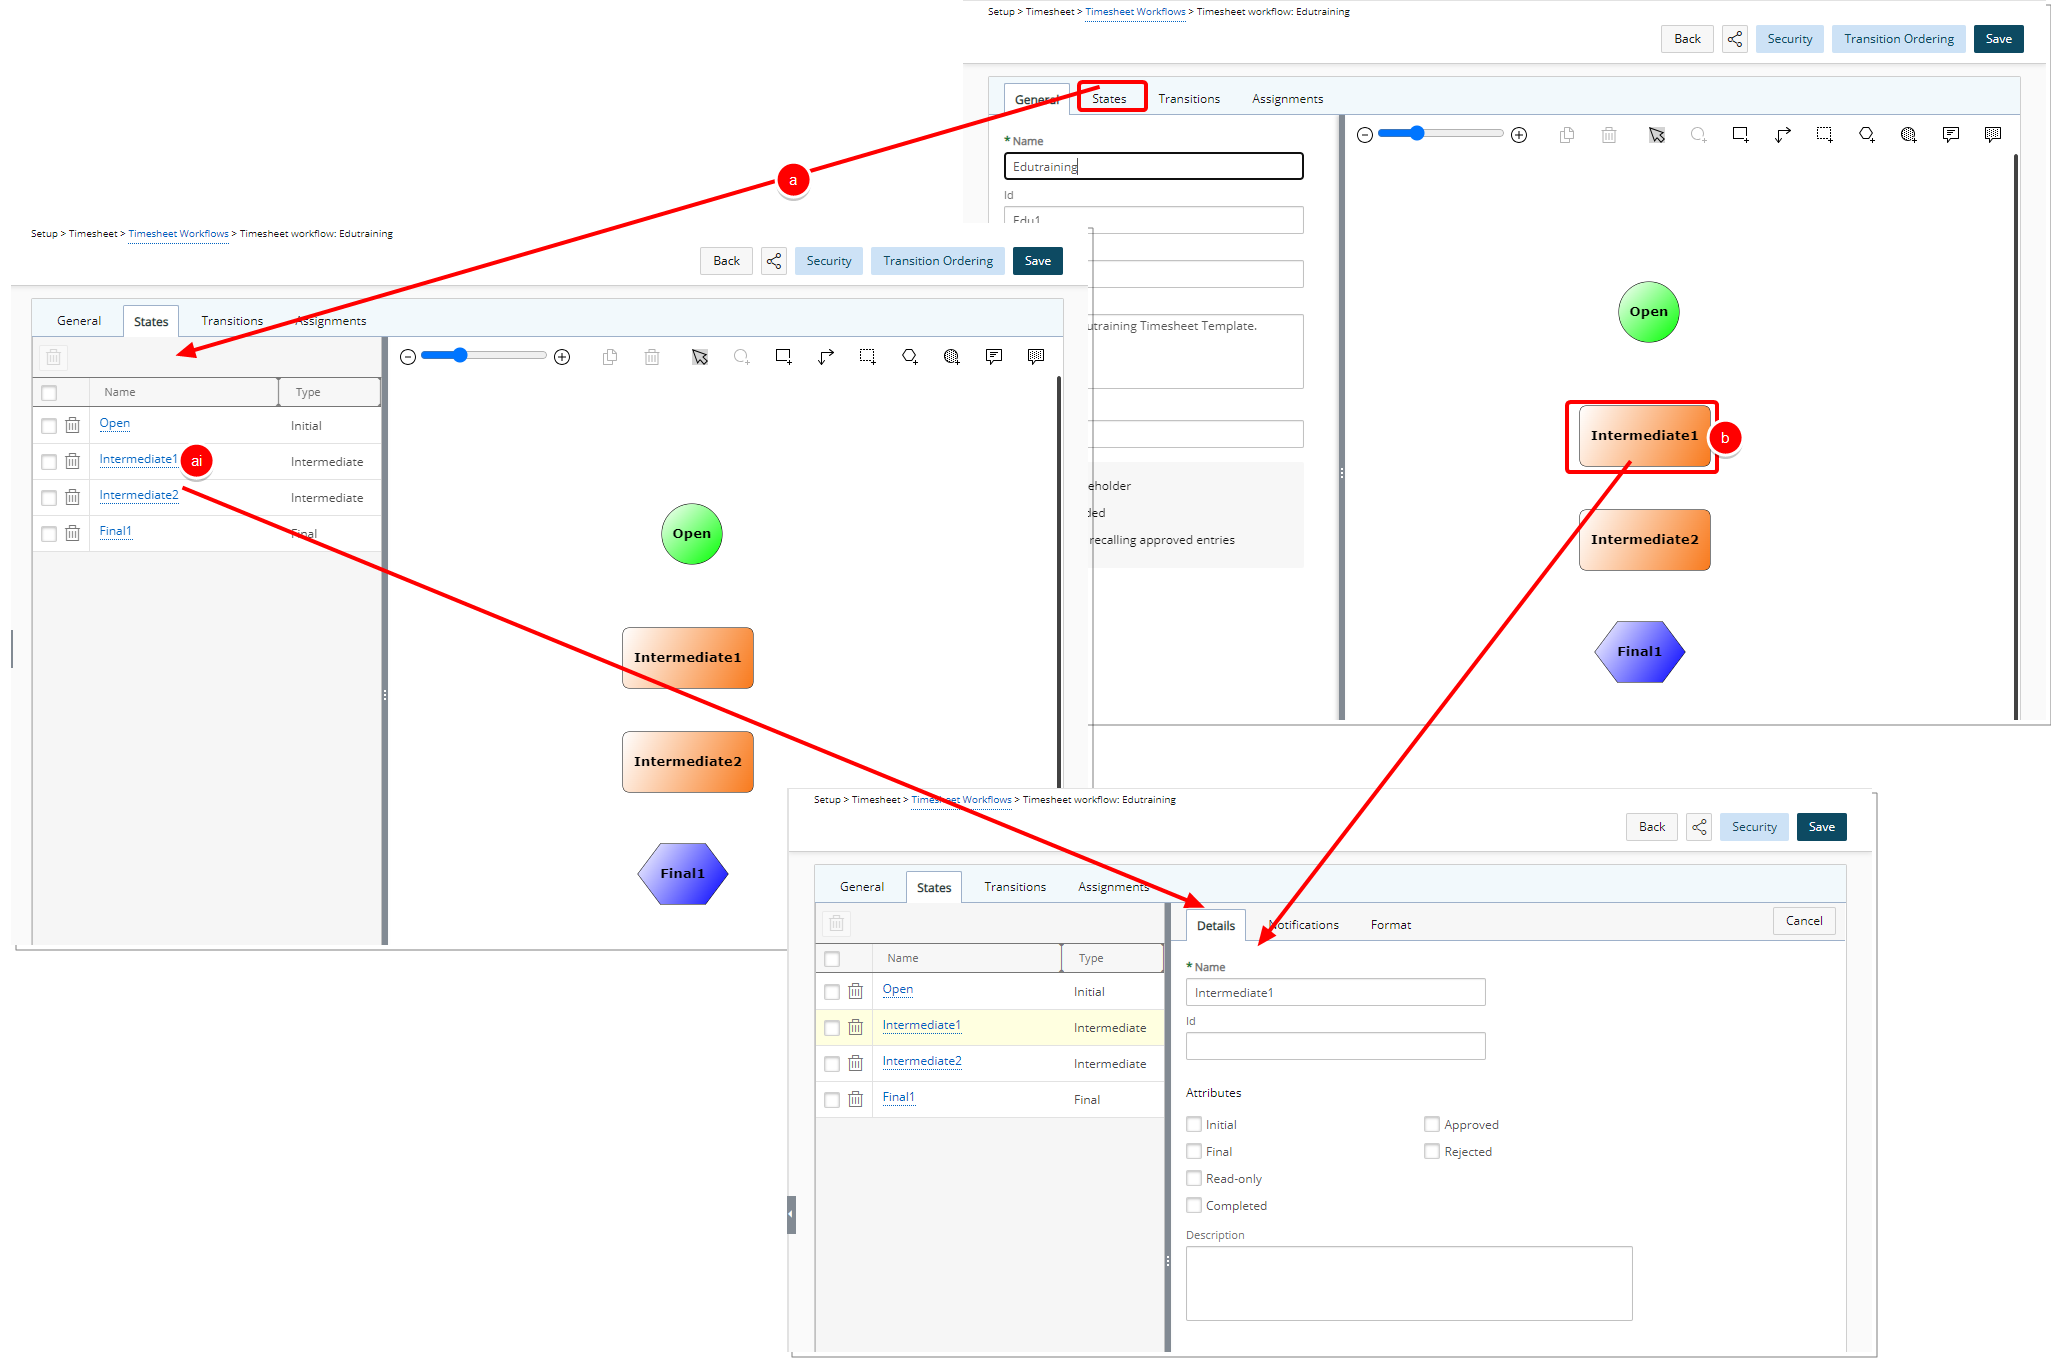
Open the States Detail tab by:
- Clicking the States tab located on the left pane
- Then click on the State Name you wish to modify.
- Or Double-click a State in the designer area to open the States Detail tab.
Note: Upon navigating to the States tab, you must first click on a State to access the Details, Notifications and Format sub-tabs on the right-hand pane. For more information, see Defining the Workflow States
- Change the default Name assigned to the State by entering descriptive name.
- Repeat the steps a to c above for all the States.
- Clicking the States tab located on the left pane
- Navigate to the General tab and note that the modifications in the State Name appear on the graphical interface. When making modifications in the Details you can navigate to other tabs and view your recent changes on the graphical interface. Click Save only once you are finished with all your modifications. To continue refer to: