The integration of Great Plains and the PSA application offers users the flexibility to handle financial and Customer Relationship Management (CRM) information in Great Plains, while using PSA to perform the following:
- Manage people, projects, and business processes efficiently by automating repetitive tasks.
- Track actuals (time and expense).
- Centralize internal business process activity.
- Generate detailed, real time analysis reports to analyze operations and reduce costs.
- Meet budget requirements, as well as improve project and service delivery.
Note: PSA - Great Plains Integration requires using Edge on IE mode, or Internet Explorer
PSA Technical Support is a team of Application Support Analysts trained to use, configure, and troubleshoot PSA in your specific enterprise environment.
If you have any questions, you can reach us by sending us an email.
The PSA Software license agreement was reviewed and accepted during the installation procedure of this software in your environment. ©2026 Upland Software, Inc. All rights reserved. You may not photocopy or share this document with any other party without express written permission from Upland Software Inc..
Table of Contents:
- Supported Microsoft Dynamics GP versions
- Browser Prerequisites
- Setting up the Connection
- Importing from Great Plains into PSA
- Company Association to Objects
- Setting Up Segmentation
- Exporting Objects to Great Plains
- Mapping Between PSA and Great Plains
- PSA Key Exporting Features
Supported Microsoft Dynamics GP versions
- Dynamics GP 18.8
- Dynamics GP 18.7
Note: Ensure that your ActiveX Control is up to date by verifying it is on version 1.3.30.
Browser Prerequisites
Before connecting to Great Plains make sure to:
- Enable IE mode on Microsoft Edge.
- Configure your Windows Internet Options.
Note: Ensure that your ActiveX Control is upgraded to 1.3.30 version.
Setting Up the Integration
For integration purposes, Great Plains is the primary and PSA the secondary to ensure that only one set of data exists in both applications. For example, if changes are applied to an object in Great Plains that has already been imported into PSA, then Great Plains (primary) performs the updates in PSA (secondary) when the object is re-imported.
The integration process between PSA and Great Plains consists of the following steps:
Setting Up the Connection
Communication must first be established between Great Plains and PSA.
Note: Only users with administrative rights can set up the integration.
Accounting System Setup
- From the Icon Bar click Setup
 .
. - From the Navigation Menu click Financial to expand the corresponding menu.
- From the Financial menu items, click System.
- Upon the Financial System page displaying, click the Accounting tab.
- From the Accounting System sub-section select Microsoft Dynamics GP as the Accounting system.
- Select either of the options to define the view for exporting the General Ledger (GL) transactions to Microsoft Dynamics Great Plains.
- Select the Export detailed transactions option to display all transactional information in detail.
- Select the Export summarized transactions option to display the amounts for the same accounts grouped in a single transaction.

- Within the Other Options section, select:
- Export negative Invoices as Credit Notes: When selected, invoices with negative totals are exported as A/R Credit notes.
OR Export negative Debits as positive Credits and negative Credits as positive Debits: When selected, all Negative Debits will be exported as Positive Credits and all Negative Credits will be exported as Positive Debits.
Note:
- The Export Negative Invoices as Credit Notes and Export Negative Debits as Positive Credits and Negative Credits as Positive Debits options are mutually exclusive.
- A Credit Note is equal to a negative Invoice in PSA.
- The Export payable taxes as GL transactions and Accounting system provides the permanent Invoice number options are grayed out and unavailable for Microsoft Dynamics Great Plains integration.
- Export negative Invoices as Credit Notes: When selected, invoices with negative totals are exported as A/R Credit notes.
- Click Save to apply your changes.
Company Setup
The Company Setup consists of configuring the General, Properties and WIP Policy.
- Access the Company edit page
- From the Icon Bar click Setup .
- From the Navigation Menu click Financial to expand the corresponding menu.
- From the Financial menu items, click System.
- Upon the Financial System page displaying, click the Accounting tab.
- Navigate to the Companies sub-section to open the Company List page, which displays the default company Main Accounting System and the base currency of the organization.
Note: The Company acts as a connector to the databases existing in Great Plains.
- From the Icon Bar click Setup
- Click New to create a new company or click the Main Accounting System link to modify the default company settings.
- Navigate the General, Proprieties or WIP Policy tabs to enter or select the required information:
- Name: This is the company name, if not the default company, Main Accounting System.
- Id: This is the designated Id for the company.
- Currency: This is the currency for the default company, Main Accounting System, this is set to the organization's base currency, therefore cannot be modified. When a new company is being created, click the browse icon (...) and select the currency for the company, if different from the default selection.
Note: Ensure the same Currency is set in both PSA and the Great Plains company to which the connection is being made.
- Calendar: Select a Financial Calendar from the list of available Calendars.

- Within the Connection Information section, enter the Great Plains connection information:
- Connection: Enter the name of the ODBC DSN pointing to the accounting system/server database, then add a semicolon and enter with the name of the ODBC DSN pointing to the company's accounting system database.
Note: For Great Plains connection: the ODBC DSNs referenced should exist on the client workstations to connect to the Great Plains database.
- User: Enter the user name to access the Accounting system database.
- Password: Enter the password to access the Accounting system database.

- Connection: Enter the name of the ODBC DSN pointing to the accounting system/server database, then add a semicolon and enter with the name of the ODBC DSN pointing to the company's accounting system database.
- Within the Override Global section:
- From the Invoice Number sub-section, select the Override global Invoice number option to override the Invoice number at the company level. Then, manually enter the following information:
- Invoice number prefix
- Current Invoice number
- Invoice - number of digits.
- From the Payable Batch Number sub-section, select the Override global Payable number option to override an Invoice number at the company level. Then, manually enter the following information:
- Payable number prefix
- Current payable number
- Payable - number of digits
- From the Payroll Batch Number sub-section, select the Override global Payroll number option to override an Invoice number at the company level. Then, manually enter the following information:
- Payroll number prefix
- Current payroll number
- Payroll - number of digits
- From the Revenue Batch Number sub-section, select the Override global Revenue number option to override an Revenue Batch Number at the company level. Then, manually enter the following information:
- Revenue number prefix
- Current Revenue number
- Revenue – number of digits

- From the Invoice Number sub-section, select the Override global Invoice number option to override the Invoice number at the company level. Then, manually enter the following information:
- Within the Address section, fill in or select the appropriate address information in the following boxes: Phone, Fax, Address, City, State, Country and Zip Code.

Note: The Address entered here and used in the Invoice Template is determined through the following precedence rule:
- Address defined at Company level.
- Address defined for Site marked as Default billing address.
- Address defined for Site marked as Organization's headquarters.
- Company Id: Enter the Company ID from Microsoft Dynamics Great Plains.
Note: In order for the integration to successfully complete, ensure that the Company ID entered:
- In both PSA and Great Plains, are identical
- Is not the company name.
- Select Export rate (override pay rate defined in Great Plains) option to override the Great Plains pay code rates with the cost rule rates of PSA.
- From the G/L Integration section, select:
- Use for Invoices, then click the Default G/L Account browse button (...) select an account to export the Accounts Receivable directly to the G/L.
- Use for Payable, then click the Default G/L Account browse button (...) to select an account to export the Accounts Payable transactions directly to the G/L.

Note: The G/L Integration options are selected only when exporting the accounts payable (payables) and accounts receivable (invoices/invoice batches) transactions directly to a G/L account; for more information, see Exporting Payables at the G/L Level and Exporting Invoices or Invoice Batches at the G/L Level. When exporting to the Great Plains G/L, the transactions can be viewed in the Great Plains Financial Transactions.
- Click Save to apply your changes.
- Click the Currency Mapping button: The page lists all the PSA currencies and the corresponding mapping information:
- Click Save and then Back to save your changes and return to the previous page.
| HEADING | DEFINITION |
|---|---|
| PSA Currency (read-only) | Displays the PSA currency code. |
| Great Plains Currency (editable) | Defines the Great Plains currency code corresponding to the PSA currency. |
| Sales Exchange Table Name (editable) | Defines the Great Plains Sales exchange table name corresponding to the PSA currency. |
| Purchase Exchange Table Name (editable) | Defines the Great Plains Purchase exchange table name corresponding to the PSA currency. |
| Purchase Exchange Table Type (editable) | Defines the Great Plains Purchase exchange table type corresponding to the PSA currency. |
- Under the WIP Accrual Number Defaults section, define the company defaults for the WIP Accrual Batch number:
- Current: Enter the batch number to generate the next time a WIP accrual batch is created.
- Prefix: Enter the prefix that precedes the Current WIP Accrual number.
- Number of digits: Enter the total number of digits for the WIP accrual batch number.

Note: If the WIP Accrual Number Defaults are not defined, the settings specified at the global level are used.
- Under the Default Accounts section, define the default WIP and revenue accounts:
- Default WIP Account: Click the browse button (...) to select the default account from the Account List page.
- Default Revenue Account: Click the browse button (...) to select the default account from the Account List page.

Note: The Account Defaults boxes are required that are set, by default, to the system default account.
- Under the Time and Material Policy Defaults section, define the default settings for the Time and Materials rule:
- Select the required Approved Entries type to recognize.
- Then click the browse button (...) to select the account from the Account List page for:
- WIP Account
- Revenue Account

Note: Separate WIP and Revenue accounts can be set up for each entry type. The entry types available are based on licensing. By default, the options are cleared. When a Time and Materials type WIP Policy rule is defined for a project, the Time and Material Policy Defaults defined at the company level are inherited by the project. However, if the project company changes at a later date, the rule settings are not updated.
- Click Save to apply your changes.
Importing from Great Plains into PSA
After successfully Setting up the connection to the Great Plains database, objects from Great Plains are imported into PSA.
Importing Objects from Great Plains
- From the Icon Bar click Tools
 .
. - Click Import to expand the Import menu options.
- Click Microsoft Dynamics GP to select the objects to import from Great Plains into PSA.
- Complete the information and select the options as required.
- Company*: Click Company browse button (...) to select the Great Plains company from which the objects will be imported into PSA.
Note: The Company box displays the default company from which all the selected Great Plains objects are imported. For more information refer to Setting up the connection between PSA and Great Plains.
Under Import List Selection section, select the appropriate options:
- Under the Clients subsection, select the Clients (map to Customers) option to import the customers from Great Plains
into PSA.Note: The import of Payment Terms is linked to the import of Clients; that is, when importing Clients into PSA, the Payment Terms will be imported at the same time. The correct Payment Term will be associated to the Client when the client is being created. The Apply to Net Amount option maps to the Apply to Tax option in Great Plains.
If a Payment Term is not selected for the Customer (Client) in Great Plains, the PSA system default Payment Term will be set.
Then choose:- When importing a Client automatically create a Project with the same name to automatically create a project using the same name as the imported customers
- Create Clients under the following placeholder to create a placeholder for all imported customers AND
- Accept the default name or enter a new name for the placeholder in the box.
Note: A placeholder allows users to design a hierarchy and organize the Client tree structure; for example, all clients imported from Great Plains can be grouped together under a placeholder named Great Plains Clients. If an object is set as a placeholder, it cannot be used as a regular object.
Accounts: Under Accounts sub section, specify the types of accounts to import from Great Plains into PSA:
- GL accounts: General Ledger (GL) accounts list all the available debit and credit accounts
- Pay codes: pay factors define how to handle employee earnings and deductions.
Note:
- The editing of the primary key of a Great Plains object is not recommended; for example, the ID of a distribution code. Since the re-importing of the object is not handled properly if the update is made in PSA.
- If Payment Term receivables account is associated to the Customer in Great Plains, it will also be imported to the Client in PSA.
- Select the Users map to Employees option to import the employees associated with either the US Payroll or Canadian Payroll module into PSA.
- Under Taxes, select Taxes (Tax Details map to tax details and Tax Groups to tax schedules) option to import both the tax details and tax schedules into PSA.
- Under the Clients subsection, select the Clients (map to Customers) option to import the customers from Great Plains
- Click Import to import the objects into PSA.
Note:
- If a placeholder option is selected but the placeholder box is left blank, the Import button is disabled.
- After the objects are successfully imported from Great Plains into PSA, locate the transferred objects in the PSA application. For more information see table Viewing the Imported Objects in PSA.
- The Import table below displays the names and the total number of objects imported, as well as warning or error messages encountered during the import process. For further details refer to Viewing Imported Objects in PSA.
Viewing Imported Objects in PSA
You can access and view the objects you have selected to import by following the navigational paths details detailed in this table.
| Imported Object | Path in PSA |
|---|---|
| Accounts
|
|
| Clients
|
|
| Users
|
|
| Tax Details
|
|
| Tax Groups
|
|
Company Association to Objects
To ensure that the information is exported to the correct Great Plains database, a company must be associated with all the PSA objects included in the Payroll, Payable, WIP Accrual, as well as the Invoice Batches.
For the following associations to be successful, prerequisite associations must first be established. Click one of the links below to view more details.
- Associating a Company to Payroll, Payable and WIP Accrual Batches
- Associating a Company to Invoices and Invoice Batches
Associating a Company to Payroll, Payable and WIP Accrual Batches
Before generating Payroll, Payable or WIP Accrual Batches, a Company(ies) must be associated with all the objects in the batches, including the Users and Sites.
If a Company(ies) is not associated with the users and sites, then the Default Company is automatically associated. For more information visit: Setting up the Default Company
During the Payroll, Payable or WIP Accrual Batch generation process, a Company is selected to process the Time, Expense, and Charge Entries of only the Users who are associated with the selected Company. However, when companies are associated at various levels, the Company hierarchy rule is applied to define the Users included in the batches.
The Company hierarchy rule precedence order is: User > Site > Default Company.
- If a selected Company is not associated with a User, the system validates the Sites.
- If the Site's Company matches the selected Company, then all Users associated with that Site (master) are processed.
- If no Users and Sites are associated with the selected Company, and if the selected Company is the Default Company, then all Users associated with the Default Company are processed in the Batch.
- From the Icon Bar click Setup .
- From the Navigation Menu click Organization.
- From the available options select Users.
- Upon the Users list page displaying, click the name of the User you wish to edit, to access the User Edit page.
Tip: You may wish to narrow your Users list so that you retrieve just the right amount of information you need. To do so you can perform a search. Select a search criterion from the list of available search criteria and then enter a corresponding value in the Search box. Click the Search icon to narrow down the Users list. For more information on the contains-in logic search click here.
- From the General sub-section of the User Settings page, click the Company browse button.
- From the Company List dialog box, select a Company from the list to associate it with the User.
Note: Upon selecting a Company you will automatically return to the User Edit page.
- Click Save to apply your changes.
- From the Icon Bar click Setup .
- From the Navigation Menu click Organization.
- From the available options select Sites.
- Click the name of the Site you wish to edit, to access the Site Edit page.
- Click the Company browse button to open the Company List dialog box.
- Select a Company from the list to associate it with the Site.
- Click Save to apply your changes.
- Click Back to return to the previous page.
Associating a Company to Invoices and Invoice Batches
Before generating Invoices and Invoice Batches, the Company must be associated with all the objects in the Invoices and Invoice Batches, including the Projects and Clients.
If a Company is not associated with the Projects and Clients, then the Default Company is automatically associated. For more information visit: Setting up the Default Company
During the Invoice and Invoice Batch generation process, a Company is selected to process the Time, Expense, and Charge Entries of only the Projects that are associated with the selected Company. However, when the Company is associated at various levels, the Company hierarchy rule is applied to define the Projects included in the Invoices and Invoice Batches.
The Company hierarchy rule precedence order is: Project > Client > Default Company.
- If a selected Company is not associated with a Project, the system validates its Client.
- If the Client's Company matches the selected Company, then all Projects associated with that Client are included in the Invoice and Invoice Batch.
- If no Projects and Clients are associated with the selected Company, and if the selected Company is the Default Company, then all Projects associated with the Default Company are processed in the Invoice and Invoice Batch.
- From the Icon Bar click Project List
 .
. - From the Project List page, select the Project you wish to edit by following one of these steps:
- Click the Project context menu button
 to expand it. From the available options click Edit.
OR - Click the name of the Project you wish to access.
Tip: Use the search capability for an efficient way of finding the specific project. For further details refer to Searching for a Project within the Project List page.
- Click the Project context menu button
- The Project edit page will be displayed with an open General tab. Click the Options tab located next to it.
- Click the Company browse button to open the Company List dialog box.
- Click a Company name from the list to associate it with the Project.
- Upon the Project Edit page automatically re-displaying, view the Company box with your selection.
- Click Save to apply your changes.
- From the Icon Bar click Setup .
- From the Navigation Menu click Work to expand the corresponding menu.
- From the Work menu items, click Clients.
- From the Clients list that displays, click the Name of the client you wish to access.
- From the Settings tab of the Client Edit page, expand the Financial navigation menu
- Click Invoice Options.
- Click the Company browse button to open the Company List dialog box.
- Click a Company name from the list to associate it with the Client.
- The dialog box will close automatically and you will return to the Client edit where your selected Company will be displayed within the Company selection box.
- Click Save to apply your changes.
Setting Up Segmentation
The purpose of segmentation is to map the different PSA OBS (Organization Breakdown Structures) and WBS (Work Breakdown Structures) objects to specific G/L Account Segment Codes in Great Plains.
With segmentation, an Account stored in the General Ledger (G/L) is defined by a set of segment codes. The segment codes can represent various account structures, such as actual account numbers, divisions or regions.
Assuming that all invoices created for the PSA group Administration and the site Organizations headquarters are sent to the Great Plains G/L account Cash Operating Account that has a defined segmentation code of 000-1100-00 with each segment code representing the following structure:
- 000 = Account
- 1100 = Client
- 00 = Site
Note: This serves only as an example of a segmentation code in Great Plains. The user is not required to set up a segmentation code using the same structure.
- From the Icon Bar click Setup .
- From the Navigation Menu click Financial to expand the corresponding menu.
- From the Financial menu items, click System.
- Upon the Financial Settings page displaying, navigate to the Chart of Accounts tab. The page lists all the chart of accounts that have been imported from Great Plains.
- Click the Segmentation button to open the Segmentation Setup page
- From the General tab specify the following under Segment Padding:
- Select either Space or 0 from the Padding character list to specify the padding character
- Select either Left or Right from the Pad from the list to specify in which direction the padding starts
Note: The Segment Padding option is used to override the AR/AP segment codes of any PSA object. The AP/AR segment codes can be overridden by clicking the Accounting button from any PSA object's edit page.
- Enter a character to separate the segments in the Segment separator box; by default, the dash (-) is specified; however, the dash can be replaced by an other character.
Note: If the Segment separator box is left empty, then the segments are displayed without a separator character.
- From the Segment Item tab under Maximum length for segment item section map the PSA objects to the specific segment codes; for example
- In the Account box, enter 3 for the Account (000)
- In the Client box, enter 4 for the Client (1100)
- In the Site box, enter 2 for the Site (00)
Note: If the length of Segment 1 is set to 4 (Account) under the General tab, but the Maximum length for segment item for the Account segment is set to 3, then one of the characters from the right or left is assigned either a zero or space. For example, if the account number is equal to 123 but the Segment Length is set to 4, then the account number is displayed as 0123 (if the padding is set to 0 from left).
- From the Receivable Transactions tab to set up the accounts receivable and then from the Time Entry sub-section specify to which PSA object the entries will be mapped. For example, to send all invoices with time entries to the Great Plains account Cash Operating Account (000-1100-00), set the following:
- Select Account from the Segment 1 list and then enter 000 in the corresponding box
- Select the Segment 2 option and then select Client from list and enter 1100 in the corresponding box
- Select the Segment 3 option and then select Site from the list and enter 00 in the corresponding box
Note: The Receivable Transactions tab contains the Time Entry, Expense Entry and Charge and Product Entry sub-sections. Perform the same setup for the expense and the charge and product entries from the Expense Entry and Charge and Product Entry sub-sections. Since only three segment codes are used in this example, do not use segments 4 to 10.
- From the Payable Transactions tab set up the account payables and then from the Expense Entry sub-section specify to which PSA object the entries will be mapped. For example, to send any expenses to the Great Plains account Cash Operating Account (000-1100-00), set the following:
- Select Account from the Segment 1 list and then enter 000 in the corresponding box
- Select the Segment 2 option and then select Client from list and enter 1100 in the corresponding box
- Select the Segment 3 option and then select Site from the list and enter 00 in the corresponding box
Note: The Payable Transactions tab contains the Expense Entry, Charge Entry and Purchase Entry sub-sections. Perform the same setup for the charge and purchase entries from the Charge Entry and Purchase Entry sub-sections. Since only three segment codes are used in this example, do not use segments 4 to 10.
- Click Save to apply your changes.
- Click Close to return to the previous page.
By default, any OBS and WBS object included in an Invoice, Invoice Batches, Payroll, Payable and WIP Accrual Batch is associated with the segment codes and accounts defined at the Financial System level. The segment codes or accounts of specific objects are overridden by clicking the Accounting button from each object's edit page.
For information on overriding the global segmentation setup of a selected object, see the following:
When overriding the global segmentation setup for objects at different levels, PSA uses the segmentation precedence rule to determine which segmentation codes to associate with the objects so that the transactions are mapped to the appropriate Great Plains accounts.
The segmentation precedence rule order is as follows:
- Segmentation defined at the account level.
- Segmentation defined at the segment code level.
- Segmentation defined at the global level.
The Segment Code option allows users to map the transactions of a selected item to a specific segment code without having to modify the global segmentation setup.
- Access the Accounting page of a specific OBS or WBS item
- Click Setup > Organization > Sites and then select a site from the list to open the Site Edit page. Click Accounting.
- Click Setup > Organization > Groups and then select a group from the list to open the Group Edit page. Click Accounting.
- Click Setup > Organization > Users and then select a user from the list to open the User Edit page. From the User navigation, click Accounting located under Financial.
- Click Setup > Work > Clients and then select a client from the list to open the Client Edit page. From the Client navigation, click Accounting located under Financial.
- Click Project List and then select a project from the list to open the Project Edit page and the Options tab. From the Project navigation, click Accounting located under Financial.
- Click Setup > Work > Work Types and then click a work type from the list to open the Work Type Edit page. Click Accounting.
- Select the Segment Code option
- Under Receivable Transactions or Payable Transactions, select the Segment Code option
- Enter a value to override the global segmentation setup for the selected object.
- If all invoices are mapped to the Sales, Accessories 4010-100-10 account in Great Plains, except for the invoices involving thePSA group Administration that are mapped to Sales, Accessories 4010-200-10. The second segment of the segmentation code for the account Sales, Accessories represents the group: 4010-100-10; therefore, a change is required at the object level for the Administration group.
Example: In this example, if a value of 2 is entered instead of 200, the system pads the 2 with 0s until the maximum length is reached for the segment code, as long as the Padding character is set to 0 and the direction is set to right. For more information see Setting up Segmentation at the Global Level.
- Click Save to apply your changes.
The Account option allows users to map the transactions of a selected object to a specific account, including, a G/L account.
- Access the Accounting page of a specific OBS or WBS item
- Click Setup > Organization > Sites and then select a site from the list to open the Site Edit page. Click Accounting.
- Click Setup > Organization > Groups and then select a group from the list to open the Group Edit page. Click Accounting.
- Click Setup > Organization > Users and then select a user from the list to open the User Edit page. From the User Settings navigation, click Accounting located under Financial.
- Click Setup > Work > Clients and then select a client from the list to open the Client Edit page. From the Client Settings navigation, click Accounting located under Financial.
- Click Project List and then select a project from the list to open the Project Edit page. From the Project Settings navigation, click Accounting located under Financial.
- Click Setup > Work > Work Types and then click a work type from the list to open the Work Type Edit page. Click Accounting.
- Under Receivable Transactions or Payable Transactions, select the Account option.
- Click the browse button to open the Account List page and then select an account for the object.
Example: If all invoices are mapped to the Sales, Accessories 4010-100-10 account in Great Plains, except for the invoices generated with the user Alan Acosta that are mapped to the Sales, 4000 account.
Note: The Accounting List page lists all the accounts in PSA, including the accounts imported from Great Plains. After an account is selected from the Accounting List, the Accounting Edit page is automatically updated.
- Click Save to apply your changes.
- From the Icon Bar click Setup .
- From the Navigation Menu click Organization.
- From the available options select Sites.
- Click the name of the Site you wish to edit, to access the Site Edit page.
- Click the Account Payable browse button to open the Account List page.
- Select a Great Plains G/L account to ensure that any payables generated for a User associated with this Site are linked to the selected Account as the debit account for the user transactions.
- Click the Save link to save the changes.
Note: When exporting at the GL level, the payable exported to Great Plains resides in the Great Plains list of transactions (Transaction > Financial > General); otherwise, the payable resides in Transaction > Purchasing > Purchasing Batches. To perform exports at the GL level, see Exporting Payables at the G/L Level.
- From the Icon Bar click Setup .
- From the Work menu items, click Clients.
- From the Clients list that displays, click the Name of the client you wish to access.
- From the Client edit side navigation, click the Invoice Options link located under the Financial section.
- Click the Accounts Receivable browse button to open the Account List page.
- Select a Great Plains G/L account to ensure that any payables generated for a User associated with this Site are linked to the selected Account as the debit account for user transactions.
- Click Save to apply your changes.
Note: When exporting at the GL level, the invoice exported to Great Plains resides in the Great Plains’ list of transactions (Transaction > Financial > General); otherwise, the invoice resides in Transaction > Sales > Receivable Batches.
Exporting Objects to Great Plains
The export process transfers information from PSA to Great Plains.
Note: When exporting objects from PSA to Great Plains, an object Id is required. The object Id is entered in the Id box from each object's edit page.
- From the Icon Bar click Tools .
- Click Export to expand the Export menu options.
- From the available menu options click Microsoft Dynamics GP.
- From the Microsoft Dynamics GP page, click the Company browse button (...) to select the Great Plains company from which the objects will be exported into Great Plains.
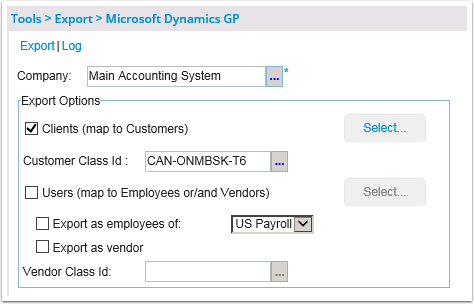
Note: The Company box displays the default company from which all the selected Great Plains objects are exported; for information on setting up the company connection, see Setting Up the Connection Between PSA and Great Plains.
- Under Export Options choose Clients (map to Customers):
- Then click the corresponding Select button to add the clients that will be exported from PSA into Great Plains.
- Click the Back link to return to the Export Options.
Note: When exporting Clients from PSA to Great Plains, the Payment Term is not exported.
- Click the browse button (...) button located against Customer Class Id to select a class Id retrieved from the Great Plains database to export only the customers associated with the selected class Id from PSA into Great Plains.
Note: After the selected clients are exported, they belong to the specified customer class Id in Great Plains.
-
choose Users (map to Employees or/and Vendors)
- Then click the corresponding Select button to add the users that will be exported from PSA into Great Plains.
- Click the Back link to return to the Export Options.
- Select either of these options to export the selected users as employees or vendors, respectively, into Great Plains; by default, the users are associated with the US Payroll module in Great Plains:
- Export as Employees of <x>
- Export as Vendor
Note: In Great Plains, all vendors are grouped by vendor group codes.
- When the Export as Vendor option is selected, click the Vendor Class Id browse button (...) to select a vendor class Id for the selected users from the Great Plains database. Click the Back link to return to the Microsoft Dynamics GP page.
- From the Microsoft Dynamics GP page, click the Export link to export the objects from PSA into Great Plains.
- The message grid displays the names and the total number of objects imported, as well as warning or error messages encountered during the export process.
After the objects are successfully exported from PSA into Great Plains, locate the transferred Viewing the Exported Objects in Great Plains.
| Object | Path in Great Plains |
|---|---|
| Clients
|
Click Cards > Sales > Customers |
| Employees
|
Click Cards > HR & Payroll > Employees |
| Vendors
|
Click Cards > Purchasing > Vendors |
Exporting to Great Plains
PSA Key Exporting Features
The PSA application supports the following export features:
- Exporting user Payable Expenses and Charges to the Great Plains A/P transactions list. For more information visit Exporting Payable Batches.
- Exporting Invoices/Invoice Batches (billable information) generated in PSA to the Great Plains A/R transactions list. For more information, visit Exporting Invoices and Invoice Batches.
- Exporting user payable Time to the Great Plains payroll transactions list. For more information visit Exporting Payroll Batches.
- Exporting WIP Accrual Batch to a G/L Batch in Great Plains. For more information visit Exporting WIP Accural Batches.
- Exporting Revenue Batch to a G/L Batch in Great Plains.
Exporting Payable Batches
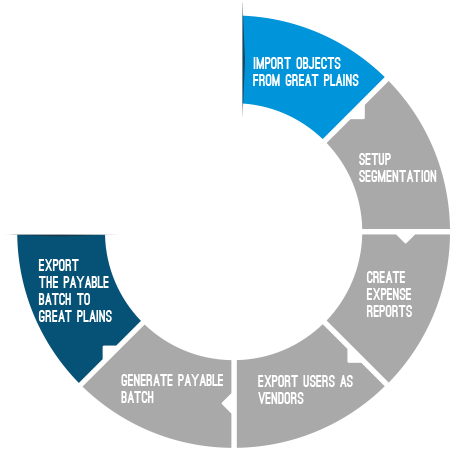
A payable batch is defined as a collection of payable amounts, such as expenses and charges, that are reimbursed to the user. With the payable exporting feature, user payable expenses and charges can be exported to the Great Plains A/P invoices. The following illustration overviews the process for exporting payable batches to Great Plains.
- Import Objects from Great Plains
- Setup Segmentation
- Create Expense Reports
- Export Users as Vendors
- Generate Expense Payable Batch
- Export the Expense Payable Batch to Great Plains
Before exporting the payable batches, the following objects are imported into PSA:
- Accounts: G/L accounts from Great Plains
- Users: users who create the expense reports
- Taxes: tax details and tax schedules for mapping the taxes associated with expense items that are taxable
For more information, visit Importing Objects from Great Plains.
Note: When importing taxes, the associated account is already mapped, provided that the accounts are also imported, to eliminate the need of manually associating the tax details to a Great Plains account. After the taxes and G/L accounts are imported, the accounts are automatically associated with the tax details.
The set up of segmentation is important when exporting payable batches since users specify through segmentation to which accounts the transactions are exported.
For more information, visit Setting Up Segmentation.
The expense reports are first created and then submitted for approval. After the expense reports are approved, they can then be exported to Great Plains. When an expense entry is created, it is associated with a tax group and an expense item imported from Great Plains, as well as flagged as reimbursable, to be included in the payable batch.
In Great Plains, only vendors are reimbursed for all reported expenses. Therefore, users are exported as vendors from PSA before a payable batch is exported. For more information on exporting users.
For more information visit Exporting Object to Great Plains.
Note: If a vendor already exists in Great Plains, instead of exporting the user as a vendor, the Great Plains vendor is created as a user in PSA with the same ID for both the Great Plains Vendor ID and PSA User ID.
After a payable batch is generated, it can then be exported from PSA into Great Plains. A payable batch can be exported with only the credit and debit amounts (transactional information) from PSA to a single Great Plains G/L account or with all the objects. When a payable batch is exported directly into a Great Plains G/L as a single transaction, only the G/L accounts and taxes are imported into the objects.
The Great Plains G/L account can also be overridden at the site level. For further details refer to Overriding the Default Payable G/L Account at the Site Level.
Note:
- When exporting a Payable Batch with a large number of transactions, it is recommended to free memory on your computer by closing any unnecessary applications or services.
- The maximum recommended number of transactions when attempting to export a Payable Batch is 1500.
- From the Icon Bar click Financial
 .
. - From the Navigation Menu click Expense Payable Manager.
Note: You must have the appropriate rights to access the Expense Payable Batches.
- Upon the Expense Payable Batches page displaying, select the Create Batch button to open the Payable Batch page and then create a new payable batch. For more information visit Managing Expense Payable Batches.
Note: When generating a payable batch, select the Company for which the batch is being processed to ensure that only the users associated with the selected company are displayed. For more information, visit Associating a Company to Payroll, Payable and WIP Accrual Batches.
When an Expense Payable Batch is exported directly into a Great Plains G/L as a single transaction, only the G/L accounts and taxes are imported into the objects.
- From the Icon Bar click Setup .
- From the Navigation Menu click Financial to expand the corresponding menu.
- From the Financial menu items, click System.
- Upon the Financial Settings page displaying navigate to the Accounting tab.
- Click the Companies sub tab to open the Company List page, which displays the default company Main Accounting System and the base currency of the organization.
- Click Properties to open the Great Plains Integration Properties tab.
- From the G/L Integration section select Use for Payable.
- Click the Default G/L Account browse button (...) to select the account to which all debit transactions of the payable batch will be exported.
Note: The Use G/L Integration for Payable option is selected when exporting payables at the G/L level. To create the entries in Great Plains as purchases during export, ensure that the Use for Payable option is cleared.
- Click Save to apply your changes.
- Export the Payable Batch.
When exporting a Payable Batch with a large number of transactions, it is recommended to free memory on your computer by closing any unnecessary applications or services.
Note: The maximum recommended number of transactions when attempting to export a Payable Batch is 1500.
- From the Icon Bar click Financial .
- From the Navigation Menu click Expense Payable Manager.
Note: You must have the appropriate rights to access the Expense Payable Batches.
- Upon the Expense Payable Batches page displaying, you will see the list of Expense Payable Batches.
Note: By default, the list is filtered based on Open Expense Payable Batches.
Tip: You may wish to narrow your list results so that you retrieve just the right amount of information you need. To do so you can perform a search. For more information click here.
- Click a payable batch to open the Expense Payable Batch page.
- From the left hand navigation click Transactions to open the Financial Transactions dialog box.
Note: The Financial Transactions dialog box displays all financial transactions in either a Summarized or Detailed View.
- Verify that no account information on the Financial Transaction page is displayed red
Note: If Accounts are not associated with the proper Segmentation Codes, they appear in red. For further details refer to Setting up Segmentation.
- Click the Post/Unpost to open the Post Expense Payable Batch dialog box.
-
Verify the following information and make any necessary changes:
- Post Date: Click the calendar icon to select the appropriate date; by default, the current date is displays.
- Payable Template: Select a template from the drop-down list.
- Click the Preview button to view the payable batch information (optional).
- Click the Close link to close the payable batch preview window.
- Batch Number: The Batch Number is a read-only box that displays the designated batch number.
- By default the Export option should be set to Microsoft Dynamics GP.
- From the read-only Overview section, you can view the following information:
- Total Expenses: Displays the total expense in the payable batch.
- Total Charges: Displays the total charges in the payable batch.
- Total: Displays the grand total of expenses and money charges in the payable batch.
- Click the Post button to post the Expense Payable Batch (marks the expense entries as paid)
- When prompted to confirm the posting of the Payable Batch, click either:
- Yes to proceed with the posting OR
- No to cancel the request
- Click Preview to preview the Payable Batch according to the selected Payable template.
- Click the Export button to Export it to Microsoft Dynamics GP.
- Click the Close
 button to exit the dialog box.
Exporting Invoices and Invoice Batches
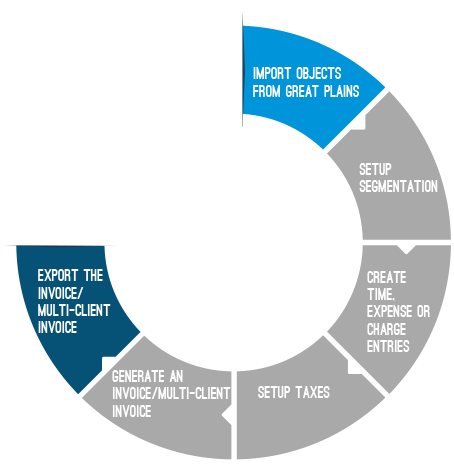
The invoicing module includes multi-currency processing, integrated tax assignment and an extensive rate engine to generate fully functional invoices that are easily exported to the Great Plains list of A/R invoices. The following illustration overviews the process for exporting the invoices to Great Plain.
- Import Objects from Great Plains
- Setup Segmentation
- Setup Taxes
- Create Time Expense or Charge Entries
- Generate Invoice or Invoice Batch
- Export the Invoice or Invoice Batch to Great Plains
Before exporting Invoices and Multi Client Invoice Batches, the following objects are imported into PSA.
- Accounts: GL accounts from Great Plains
- Customers as Clients: customers for whom invoices and multi-client invoices are generated
- Employees as Users: employees who create time entries
- Taxes: tax schedules and tax groups associated with the clients being invoiced
For more information, visit Importing Objects from Great Plains.
Note:
- If taxes and clients are not imported at the same time, then the taxes are imported first and subsequently the clients to ensure that the imported clients are always associated with the correct taxes. If taxes and clients are imported at the same time (during the same import process), the tax association is automatic.
- When importing Customers (Clients) into PSA, the Payment Terms are imported at the same time. The Payment Term associated to the Customer will be properly associated when the client is being created.
- If a Customer (Client) does not have a Payment Term configured in Great Plains, the system default Payment Term will be set.
- If a Payment Term receivables account is associated to the Customer in Great Plains, this account will also be imported to the Client in PSA.
- The Payment Term Apply to Net Amount option maps to the Apply to Tax option in Great Plains.
The setup of segmentation is important when exporting invoices and multi-client invoices since it is through segmentation that the accounts are set to the invoices being exported.
For more information, visit Setting Up Segmentation.
Before the invoices are exported into Great Plains, the sales taxes must be mapped to the appropriate Accounts in Great Plains.
To associate sales taxes to Great Plains accounts
- From the Icon Bar click Setup .
- From the Navigation Menu click Work to expand the corresponding menu.
- From the Work menu items, click Clients.
- From the Clients List page select the Client name to access the Client Edit page.
- From the Settings tab of the Client Edit page, expand the Financial navigation menu.
- Click Invoice Options.
- Navigate to the Expense Invoicing sub-section.
- Take note of the sales tax displayed on the Corresponding Taxes section.
Note: When generating an invoice with billable expense entries that are also taxable, settings can be defined on the Expense Invoicing page. For more information visit Accessing and Viewing the Summary Information of an Invoice or Exporting Invoices with Taxable Expenses.
- Open the Tax Detail List page:
- From the Icon Bar click Setup .
- From the Navigation Menu click Financial to expand the corresponding menu.
- From the menu click System.
- Upon the Financial Settings page displaying navigate to the Taxes tab
- Click the Tax Details sub-section to view the list of available taxes.
- From the Icon Bar click Setup
- Search for the noted Tax in step 8 and click it's name to View the details on the right panel.
- Ensure that Sales is displayed in the Type box since the invoices or multi-client invoices are being exported.
- Click the Account browse button (...) to open the Account List dialog box.
- Click the appropriate Great Plains G/L account to associate it to the sales tax. Note upon clicking an Account name the dialog box will close automatically and the Accounts field will be updated with your selection.
- Click Save to apply your changes.
The Time, Expense or Charge Entries are first created and then submitted for approval. After these billable entries are approved, they can then be exported to Great Plains. When a Time, Expense or Charge entry is created, it is associated with a Tax group imported from Great Plains, as well as flagged as Billable, to be included in the Invoice or Invoice Batch. When an expense entry is created, it is also associated with an expense item imported from Great Plains.
After billable entries are approved, they can be included in an invoice or multi-client invoice and billed to the appropriate clients. The invoices and multi-client invoices are generated through Invoice Manager.
- From the Icon Bar click Financial .
- From the Navigation Menu click Invoice Manager.
- To create a Multi Client Invoice Batch select the Batches tab then choose Create Batch. For further details refer to Creating a Multi Client Invoice Batch.
- To create an Invoice select the Invoices tab then choose Create Invoice.
For further details refer to Creating a new Invoice.
Note: When generating an invoice or Invoice Batch, select the Company for which the invoices are being processed to ensure that only the projects associated with the selected company are displayed. For more information visit Associating a Company to Invoices and Invoice Batches.
Before the invoices can be exported from PSA into Great Plains, the invoices must be Approved and in the Allow Invoice to be exported State of the Invoicing workflow.
- From the Icon Bar click Setup .
- From the Navigation Menu click Financial to expand the corresponding menu.
- From the Financial menu items, click Invoice Workflows.
- Click an Invoicing workflow from the list to open the Workflow Edit page.
- Navigate to the States tab
- Click a State from the list or double-click a State from the design area to view the Details of the state on the right pane.
- Verify that the Allow Invoice to be exported selection box is turned on.
- Click Save to apply your changes.
When an Expense Payable Batch is exported directly into a Great Plains G/L as a single transaction, only the G/L accounts and taxes are imported into the objects.
- From the Icon Bar click Setup .
- From the Navigation Menu click Financial to expand the corresponding menu.
- From the Financial menu items, click System.
- Upon the Financial Settings page displaying navigate to the Accounting tab.
- Click the Companies sub tab to open the Company List page, which displays the default company Main Accounting System and the base currency of the organization.
- Click Properties to open the Great Plains Integration Properties tab.
- From the G/L Integration section select Use G/L Integration for Invoices.
- Click the Default G/L Account browse button (...) to select an account to which all the debit transactions of the invoice will be exported.
Note: The Use G/L Integration for Invoices check box is selected only when exporting invoices at the G/L level. To create the entries in Great Plains as invoices during export, ensure that the Use G/L Integration for Invoices check box is cleared. If the settings are applied to the Default Company, then the settings are also applied to all other companies defined in the organization.
- Click Save to apply your changes.
- Export the Invoice or Invoice Batch.
The individual invoices can be exported from either the Post Invoice or Invoice Manager page.
- From the Icon Bar click Financial .
- From the Navigation Menu click Invoice Manager.
- From the Invoice Manager page, select the Invoices tab.
- Select an Invoice to open the Invoice Edit page.
- Navigate to the Transactions tab to open the Financial Transactions page.
- Verify that no account information on the Transactions page is displayed in red.
Note: The debit and credit amounts should balance at zero. If the accounts are not associated with the proper segmentation codes, they appear in red. For further details refer to Setting up Segmentation.
- Click Post/Unpost to open the Post Invoice dialog box.
- From the Post Invoice page, verify the information:
- Post Date *Click the calendar icon to select a date; by default, the current date is displayed.
- Invoice templateSelect a template from the drop-down list.
- Click the Preview link to view the invoice report.
Note: When downloading an Invoice Report in Excel, PDF, or Word format, the file name will follow the same naming convention defined for the Invoice File Name field, located within the Invoice tab of the Financial system setup page (Setup > Financial > System).
- When finished, click Close to close the invoice report preview window.
- Click the Preview link to view the invoice report.
- The Invoice Number is read-only.
- Select Email a copy of the Invoice to the Client to send an email to the client with the invoice report as a .pdf attachment.
Note: The Name of this file is generated based on the selection made for Invoice File Name located within the General Invoice tab of Financial Settings page (Setup > Financial > System). For further details refer to Invoice Setup.
- Billing Information: The Billing Information is read-only and displays an organization's billing information.
- Payment Overview: The Payment Overview section is read-only and displays the total of Time, Expense, Products and Charges. You can also view the Taxes Invoice Total, Balance due and Payments, credits, refunds amount.
- Click the Export button to open the Export A/R Invoice to Great Plains page.
- From the Export A/R Invoice to Great Plains page:
 Create a new Batch
- Click New.
- Specify the following information to create a new batch in Great Plains:
- Batch Id *: Enter the identification for the invoice, limited to 15 characters.
- Comment: Enter a comment for or description of the invoice batch, limited to 60 characters.
- Posting Date: Select the date the invoice batch is posted; by default, the current date is displayed.
- Click Save.
Note: The date selected should fall within the Great Plains Fiscal Calendar.
OR- Select an existing Batch
- Click the selection box located against an existing Batch.
Note:
- When exporting invoices to Great Plains, the system will pass the Payment Terms configured for the invoice being exported.
- If the payment term cannot be found in Great Plains, the transactions will still be exported.
- The individual invoices can also be exported from the Invoice Manager page by selecting the invoice options and then clicking the Export link to open the Export A/R Invoice to Great Plains page.
- Click the selection box located against an existing Batch.
Click the Next link to specify, if required, the below required information for the invoice batch.
Document Enter the name of the document, if different from the default entry of the Invoice No. Term Click the browse button (...) to select the appropriate Term from the T erm Codes page.
Click the Back link to return to the previous Export A/R Invoice to Great Plains page.PO number Enter the PO number. - Click Export to display the status of the export process.
Note: If the export process is successful, the export status page displays the message that the invoice was successfully exported with the amounts. If the export process fails, the export status page displays an error message listing the problems and possible solutions.
- Click Back to return to either the Post Invoice or Invoice Manager page when the export process is completed to post the invoice.
When an invoice with billable expense items that are also taxable is generated, the following options can be set for handling and displaying the taxes of an invoice from the Summary tab:
- Exclude From Invoice: does not calculate the taxes incurred from the taxable expense entry and displays only the expense entry's Net Amount in the Expenses box.
- Include in Amount: calculates the Gross Amount of the expense entry and display the expense entry's Net + Tax total in the Expenses box.
Note: If both the Exclude From Invoice and the Include in Amount check boxes are cleared, then the expense entry's amount and tax amount are displayed in the Expenses and Total taxes boxes respectively.
To set up the invoice summary expense entry display options:
Verify that the sales tax details are defined at the client level and the purchase tax details are defined at expense entry level.
Note: To display the taxes of an invoice from the Summary tab, the correspondence between the sales tax details at client level (Setup>Work > Clients > Client Edit > Invoice Options >Tax Group) and purchase tax details at expense entry level (Entries > Expense Report > Expense Report List > Expense Entry Edit) need to be defined.
- From the Icon Bar click Setup .
- From the Navigation Menu click Work to expand the corresponding menu.
- From the Work menu items, click Clients.
- From the Clients List page select the Client name to access the Client Edit page.
- From the Settings tab of the Client Edit page, expand the Financial navigation menu
- Click Invoice Options.
- From the Expense Invoicing sub-section to define how the billable expense items that are taxable are displayed in the invoice summary.
- Select Apply Client Tax Group when invoicing Expenses. If required Select to Include Expense Entry Taxes.
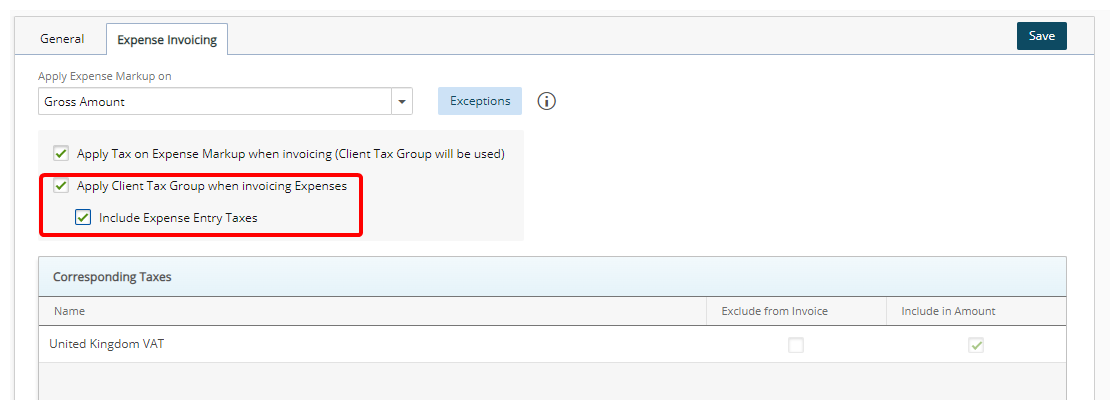
Note: Under Expense Invoicing Options (Setup>Work > Clients > Client Edit > Invoice Options), when the Apply Client Tax Group when invoicing Expenses option is selected, the Tax Group for the client is calculated at the client level and not at the expense entry level. If you wish to include the Expense Entry Taxes you must select the appropriate option.
- Click Save to apply your changes.
The Multi Client Invoice feature allows the generation of a single invoice for multiple clients and projects. The Multi Client Invoices can be reviewed and approved collectively, as well as exported to an accounting system in a single operation. Before exporting the Multi Client Invoices to Great Plains, the invoices must be approved and in the Allow Invoice to be exported state of the Invoicing workflow.
- From the Icon Bar click Financial .
- From the Navigation Menu click Invoice Manager.
- From the Batches tab, select an Invoice batch.
- Verify that no account information on the Financial Transactions dialog box is displayed in red. To do so:
- Access Transactions
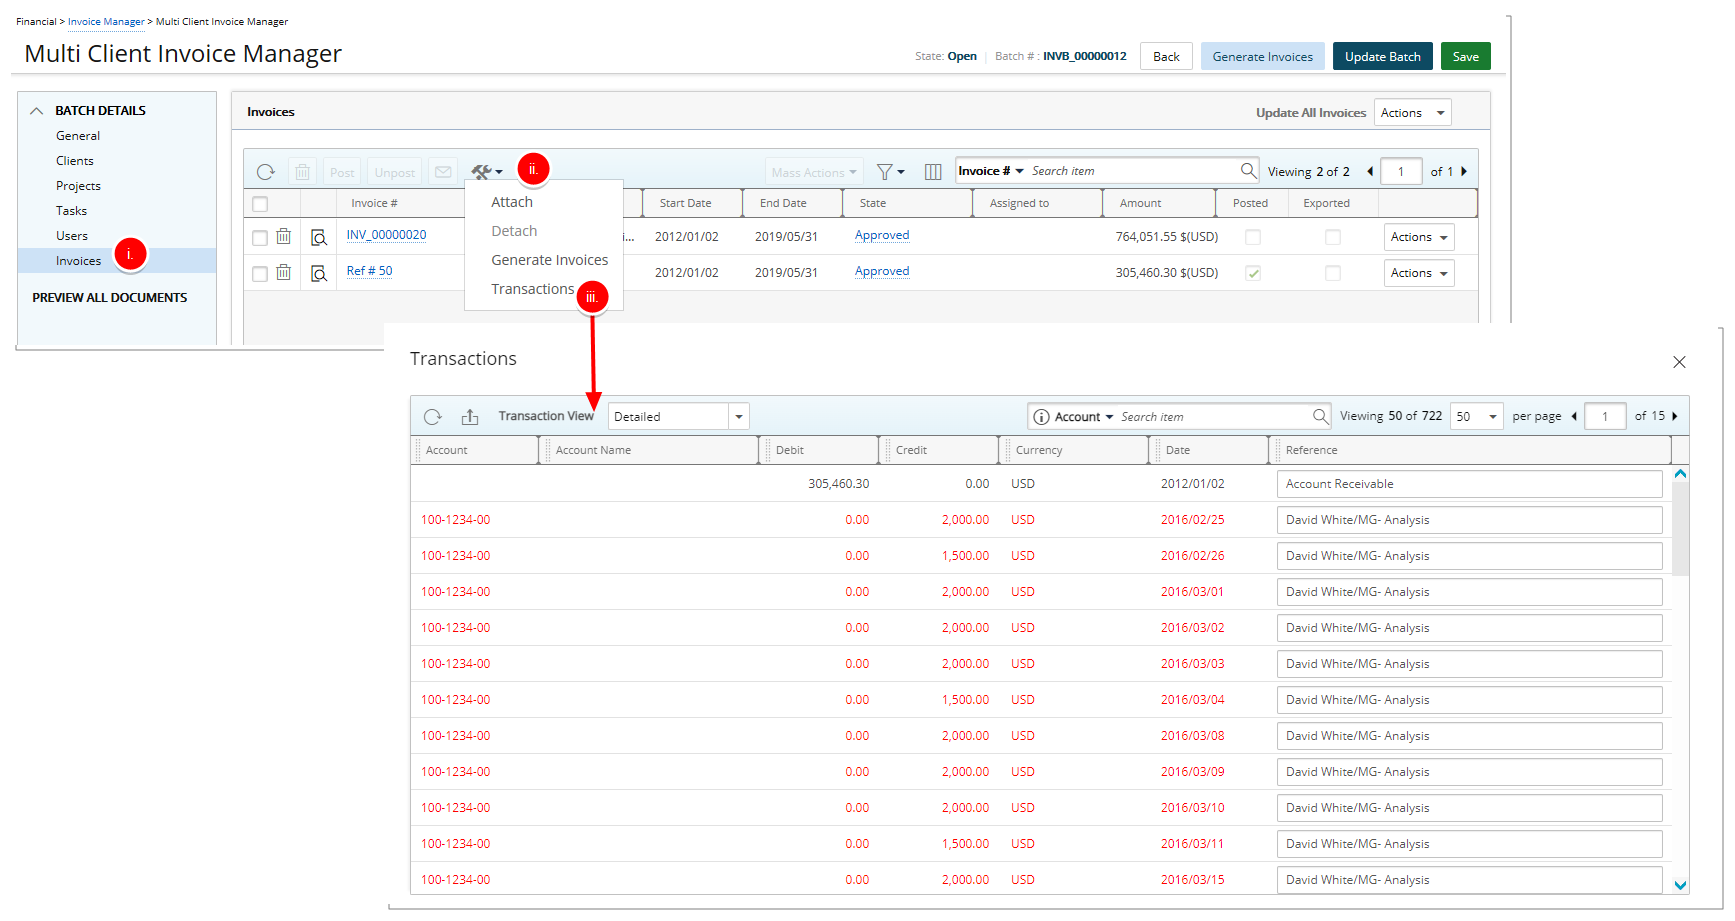
- Click Invoices from the menu.
- Click the Tools button to access the available options.
- Select Transactions to open the Financial Transactions dialog box.
Note: The Financial Transactions dialog box displays all financial transactions in either a Summarized or Detailed View.
- Verify Account information
- Verify that no account information on the Financial Transactions dialog box is displayed in red.
- Click the Close link to return to the Multi Client Invoice Manager Edit page.
Note: The debit and credit amounts should balance at zero. If the accounts are not associated with proper segmentation codes or if the taxes are not associated with the accounts, they appear in red. For further details refer to Setup Taxes.
- Select the Invoice Batch(es) to export.
Note: The Post and Export links are available only when one or more Invoice Batches are selected.
- Click the down arrow to access the export context menu.
- Select Microsoft Dynamics GP from the available options.
- Click Export.
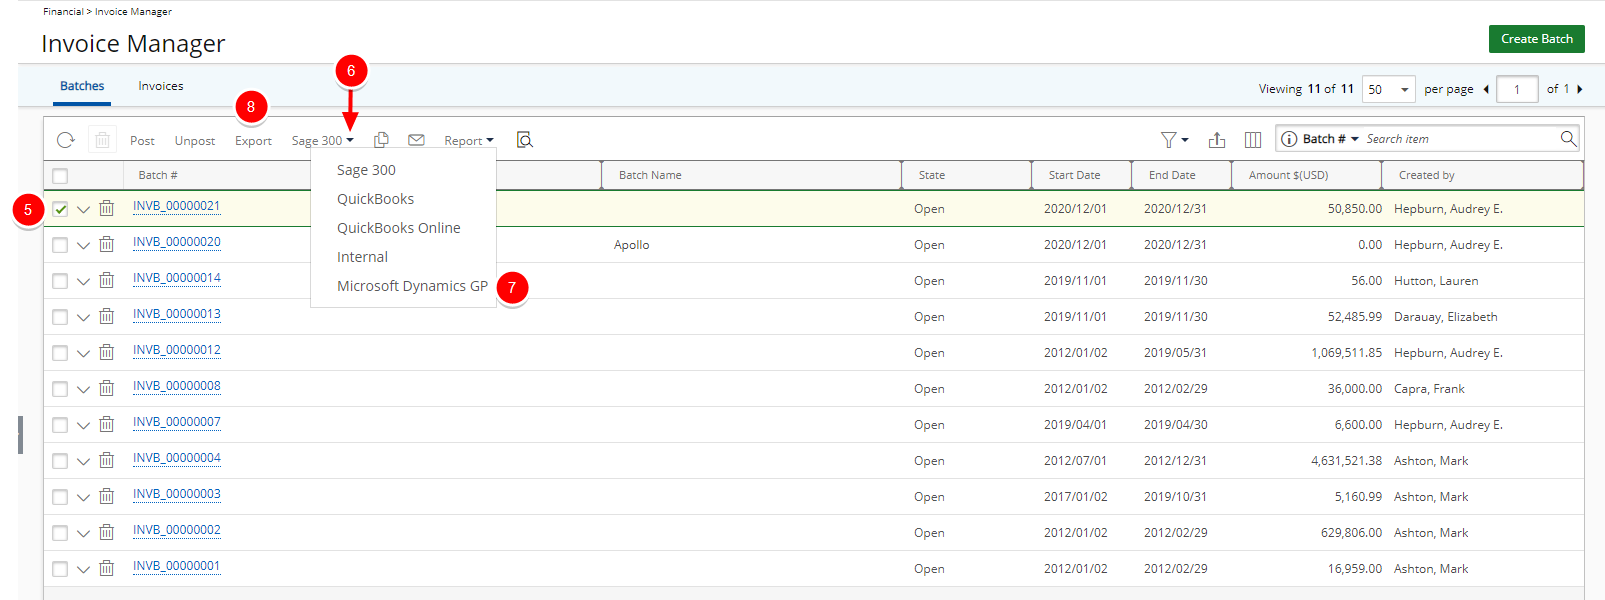
Caution: This functionality is available in Edge on IE mode, or Internet Explorer.
Note:
- When exporting invoice batches to Great Plains, the system will pass the Payment Terms configured for the invoice being exported.
- If the Payment Term cannot be found in Great Plains, the transactions will still be exported.
-
Select either an existing A/R invoice batch or click the New icon
Create a new Batch
- Click New to open the A/R Invoice Batch Edit page.
- Specify the following information to create a new batch in Great Plains:
- Batch Id *: Enter the identification for the invoice, limited to 15 characters.
- Comment: Enter a comment for or description of the invoice batch, limited to 60 characters.
- Posting Date: Select the date the invoice batch is posted; by default, the current date is displayed.
- Click the Save link to return to the Export A/R Invoice to Great Plains page.
Note: The date selected should fall within the Great Plains Fiscal Calendar.
Select an existing Batch
- Select an existing Batch.
-
Click Export to display the status of the export process.
Note: When exporting a multi-client invoice as a batch type item to Great Plains, ensure that the tax group selected for the invoice is the same as the tax associated with the items in Great Plains and not the clients tax group to avoid problems in cases where multiple items in the invoice are associated with different taxes. If the export process is successful, the export status page displays the message that the invoice batch was successfully exported with the amounts. If the export process fails, the export status page displays an error message listing the problems and possible solutions.
- Click the Back link to return to the Multi-client Invoice Manager page when the export process is completed.
- Select the invoice(s).
Note: Once a selection has been made the Post link become enabled.
- Click the Post link to post the multi-client invoices; marking all entries in the invoice as billed.
- When prompted to confirm the posting of the multi-client invoices, click either of the following:
- Click Yes to proceed with the posting of the invoice or
- Click No to cancel the request
Exporting Payroll Batches
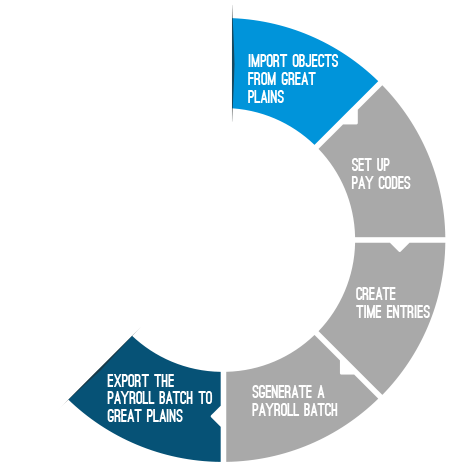
A payroll is generated to calculate the costed (compensation) amount that employers owe their employees. The payroll exporting feature allows the export of users costed time to Great Plains timecards. The illustration overviews the process for exporting the payroll batches to Great Plains.
- Import Objects from Great Plains
- Setup Pay Codes
- Create Time Entries
- Generate Payroll Batch
- Export the Payroll Batch Great Plains
Before exporting the payroll batches, the following objects are imported into PSA. For further details refer to Importing Objects from Great Plains.
- Pay Codes: codes that define how employee earnings and deductions are handled.
- Employees as Users: users whose time entries are tracked.
The pay codes define the type and rate of compensation for users when generating a payroll batch; therefore, the set up of pay codes is important for the export of payroll batches. The pay codes are applied to regular time, overtime, double overtime, leave time, and charge entries to ensure employees are properly compensated.
This article covers setting up global pay codes.
- Import the Pay Codes. For further details refer to Importing Objects from Great Plains.
- From the Icon Bar click Setup .
- From the Navigation Menu click Financial to expand the corresponding menu.
- From the Financial menu items, click System.
- Upon the Financial Settings page displaying, navigate to the Chart of Accounts tab.
- Click Pay Code Priorities to set the global pay codes for all users in the organization.
- The following sections are available to you:
- Regular Time Pay Code Priority: Defines the rate of compensation when users include regular hours in their timesheets; regular hours are typically defined as eight hours per day.
- Overtime Pay Code Priority: Defines the rate of compensation when users include overtime in their Timesheets.
- Double Overtime Pay Code Priority: Defines the rate of compensation when users include double overtime in their Timesheets.
- Charges Pay Code Priority: Defines the rate of compensation when users include specific payable charges in their Timesheets.
- Leave Time Pay Code: Defines the rate of compensation when users are on leave by tracking special work types, such as vacation and sick leave.
- For the Regular Time, Overtime, and Double overtime entries, the priority level can be set for the objects User, Project, Task, and Work Type.
- For the Charge entries, the priority level can be set for the objects User, Project, Task, Work Type and Charge.
- There is no priority level set for the Leave Time entries.
Note:
- For each of the above-mentioned sections:
- Click the browse button (...) located against the Default option to select a pay code type for the regular time, overtime, double overtime, charge and leave time entries.
- Select an object from the Priority 1,Priority 2, and Priority 3 lists to set the priority for each Pay Code type (excluding the Leave Time Pay Code section).
Note: The global pay codes settings can be overridden at the object level. For more information refer to Overriding a Pay Code at the Object Level.
- Click Save to apply your changes.
- Click the Close button to return to the previous page.
The global pay code setup can be overridden at the object level. The regular, overtime and double overtime pay codes can be overridden for users, projects, tasks and work types. For example, an hourly pay code can used for the regular time entries at the global level; however, a weekly hourly pay code can be used for the regular time entries at the object level.
Note: The pay code associated with a PSA User must be the same as the one associated with the Great Plains Employee.
To override a pay code at the object level:
- Select an object to override its global pay code setup:
OBJECT NAVIGATION Users - From the Icon Bar click Setup .
- From the Navigation Menu click Organization.
- From the available options select Users.
- Click a User name to access the User Edit page.
- From the user edit navigation, expand the Financial menu item.
- Click Pay Codes
For more info refer to: Associating Pay Codes to a User
Projects - From the Icon Bar click Project List .
- Upon the Project List displaying, click the name of the Project you wish to access.
- Expand the Financial menu item.
- Click Pay Codes
Tasks - From the Icon Bar click Setup .
- From the Navigation Menu click Work to expand the corresponding menu.
- From the Work menu items, click Tasks.
- From the Tasks list that displays, click the Name of the task you wish to access.
- Click Pay Codes
Work Types - From the Icon Bar click Setup .
- From the Navigation Menu click Work to expand the corresponding menu.
- From the Work menu items, click Work Types.
- From the Work Types list that displays, click the Name of the Work Type you wish to access.
- Click Pay Codes
For more info refer to: Associating Pay Codes to Work Types
Charges - From the Icon Bar click Setup .
- From the Navigation Menu click Financial to expand the corresponding menu.
- From the Financial menu items, click Charges.
- From the Charges list that displays, click the name of the Charge you wish to access.
- Click Pay Codes
For more info refer to: Associating Pay Codes to Money Charges
Note:
- The Charge Pay Code can be overridden for Users, Projects, Tasks, Work Types and Charges.
- For Leave Time Entries, each individual Leave Time Task can override the global Leave Time Pay Code.
- From the Icon Bar click Setup
- Click the Pay Codes to open the Pay Codes page
- Click the browse button (...) for the appropriate field to select the pay code type for the regular time, overtime, double overtime or charge entries.
Note: If there is an override at the object level, the system first checks the priorities set in the global pay code setup and then applies the appropriate pay codes.
- Click the Save to save the changes.
Before Timesheets are included in a Payroll Batch, they must be completed and then submitted for approval. The payroll batch process generates the payroll for all users in the selected period.
Note: The time entries must be marked as payable to appear in the payroll batch.
After the Timesheets are approved, they can be included in a payroll batch and exported. The Payroll Batch process generates the payroll for all users in the selected period. After a payroll batch is generated, it can then be exported in a single operation.
This article covers generating a payroll batch.
- From the Icon Bar click Financial .
- From the Navigation Menu click Payroll Manager.
Note: You must have the appropriate rights to access the Payroll.
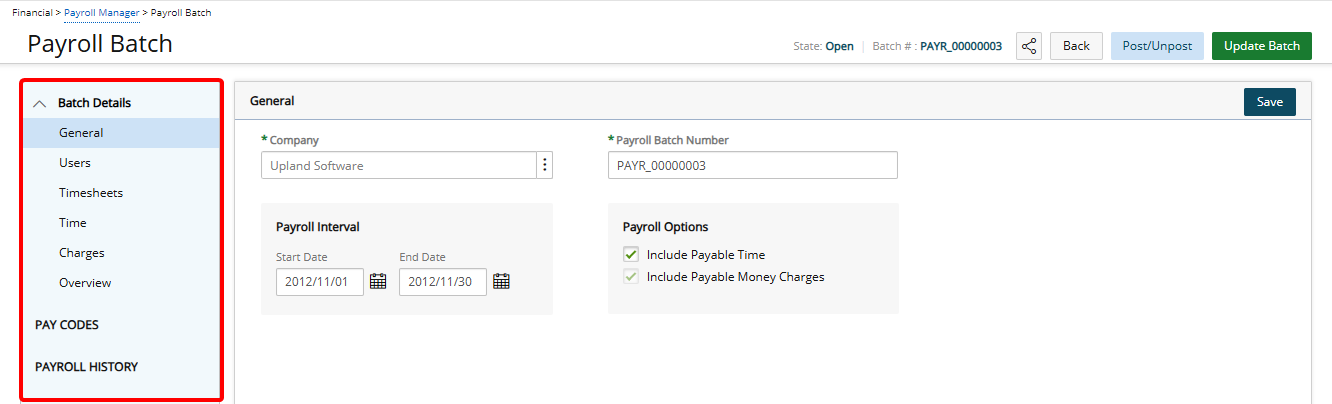
- Click Create Batch and access the Payroll Batch page.
- Click the Browse icon to the right of the Companies box to access the Multi-Company Selection page where you can select the company(ies) for which the payroll batches are to be processed. The company concept filters the list of users associated to the selected companies. Companies can be associated to users and sites from the User Edit (under Invoice Options tab) and Site Edit pages respectively.
Note: When generating a payroll batch, select the Company for which the payroll batches are being processed to ensure that only the users associated with the selected company are displayed. For further details refer to Associating a Company to Payroll, Payable and WIP Accrual Batches.
- Select the Companies from the available Items list.
- When a single Company is selected upon clicking the Create Batch(es) button a Payroll is created for this single selected company and opened in edit mode.
- When multiple Companies are selected upon clicking the Create Batch(es) button a Payroll is generated for each selected company and you are redirected to the Payroll Manager page where you can select and process/edit the individual Payroll Batches as necessary.
Tip: You may wish to narrow your available Company list. Select either Nameor Id from the available search criteria and then enter a corresponding value in the Search box. Click the search icon to narrow down the Available items list.
- Click the arrow button to add them to the selected items list.
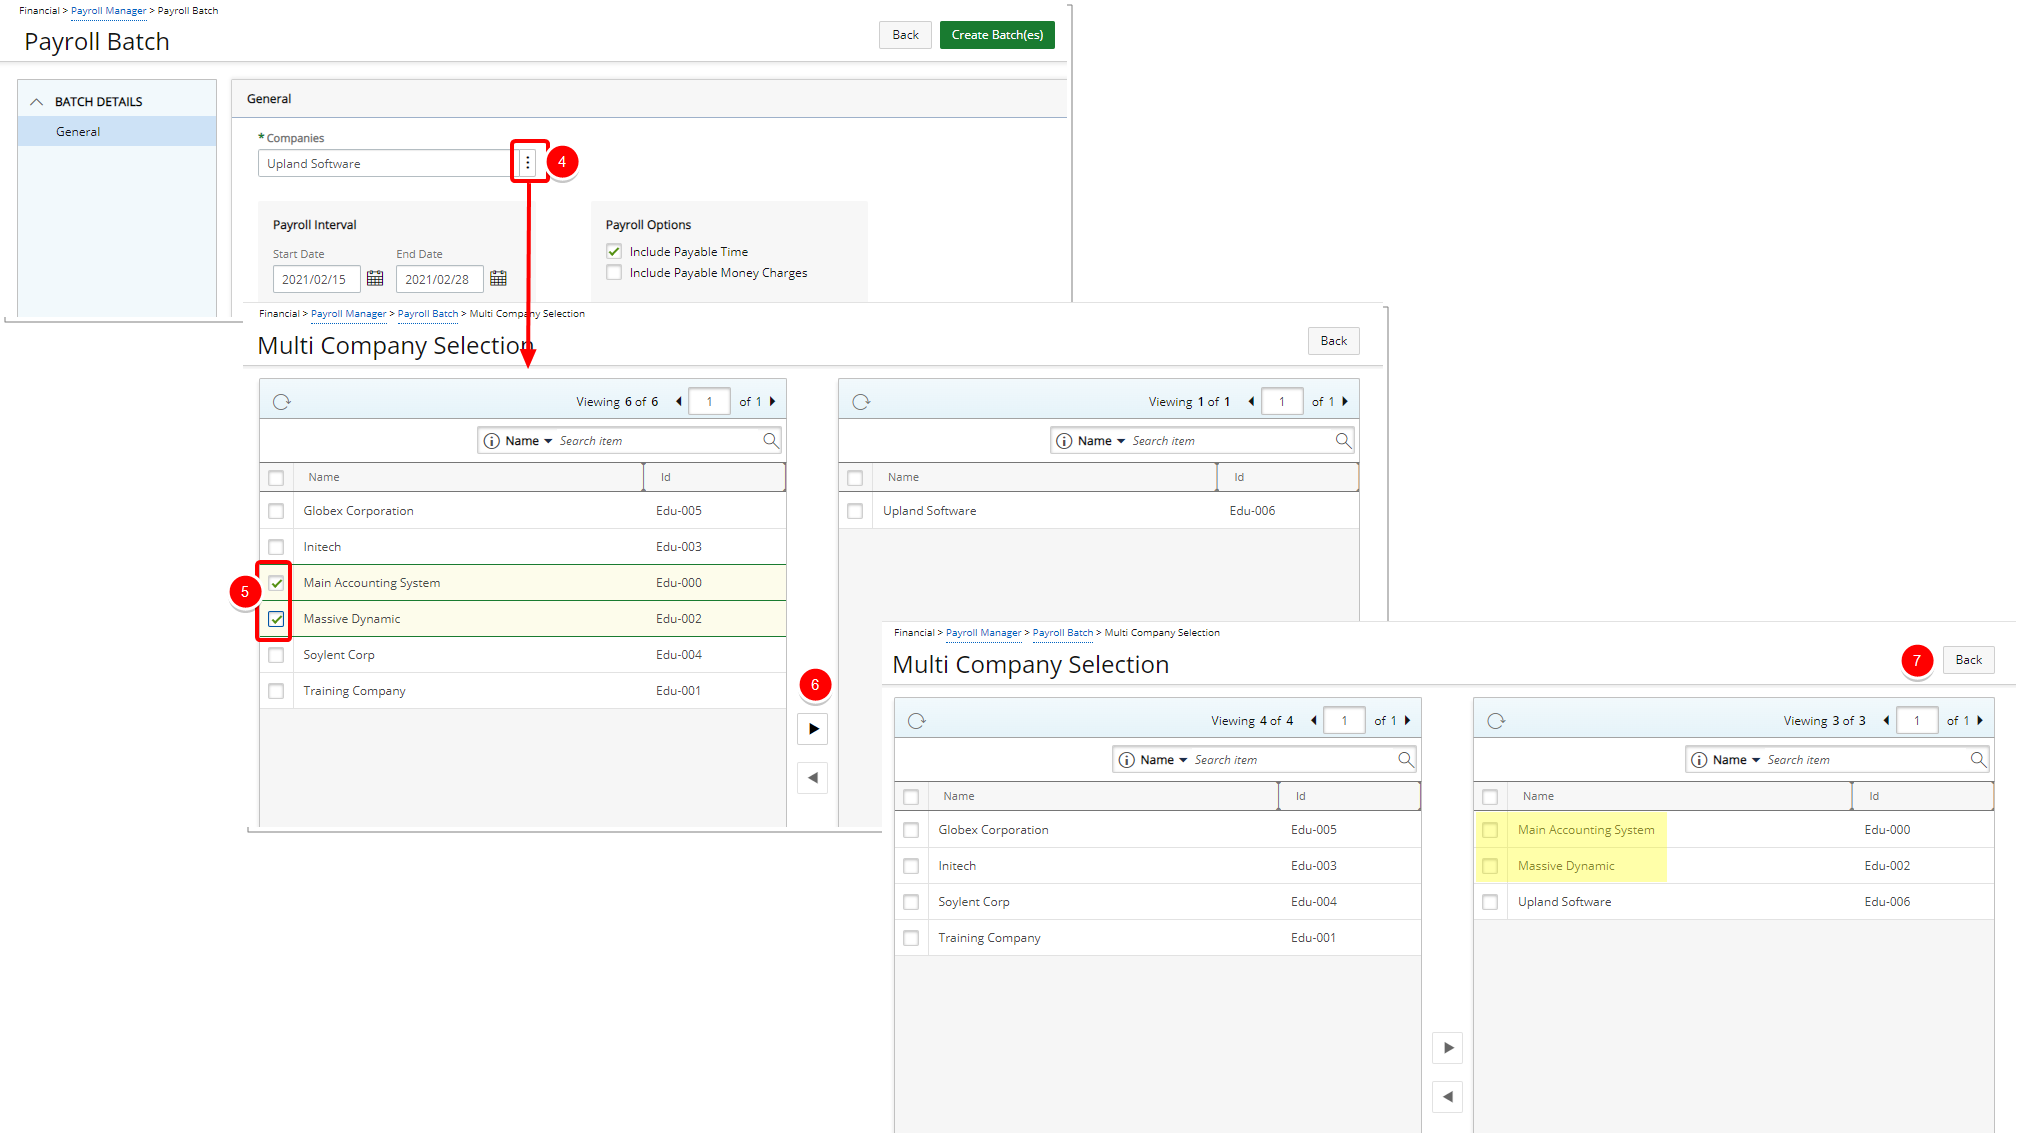
Note:
- During the payroll generation process, once a Company is selected, the system displays only those users associated with the selected Company.
- If the selected Company is not associated with the User, then the system validates the Site.
- If the companies match, then the payroll for all users associated with that Site is processed.
- If no Users and Sites are associated with the selected Company, and if the selected Company is the Default Company (set under Setup > Financial > System: Defaults), then all other users in the application are processed in the Payroll Batch.
- Click the Back button to return to the Create Payroll Batch page.
- Select the payroll interval by Selecting the Start and End Dates
- Enter or select the Start Date of your Payroll Batch.
- Enter or select the End Date of your Payroll Batch.
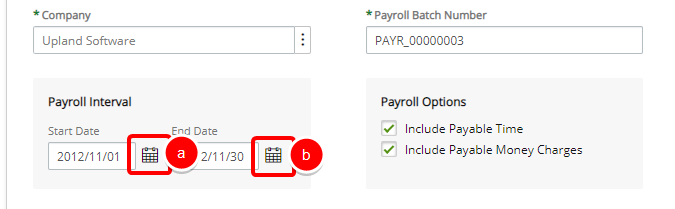
- In the Payroll options section, select any of the desired options:
- Include Payable time
- Include Payable Money Charges
- Click Create Batch(es). Note that two Payroll Batches are created. one for each company selected in step 3.
Note: When multiple Companies are selected upon clicking the Create Batch(es) button a Payroll is generated for each selected company and you are redirected to the Payroll Manager page where you can select and process/edit the individual Payroll Batches as necessary
The actual payroll amounts and processing are handled in Great Plains since the users timesheet entries are associated with a specific Great Plains pay code when exported. For further details refer to Setup Pay Codes.
Note:
- When exporting a Payable Batch with a large number of transactions, it is recommended to free memory on your computer by closing any unnecessary applications or services.
- The maximum recommended number of transactions when attempting to export a Payable Batch is 1500.
- From the Icon Bar click Financial .
- From the Navigation Menu click Payroll Manager.
Note: You must have the appropriate rights to access the Payroll.
- Click Create Batch and access the Payroll Batch page.
- Click Financial from the Icon Bar.
- Select Payroll from the Navigation Bar to open the Payroll Manager page.
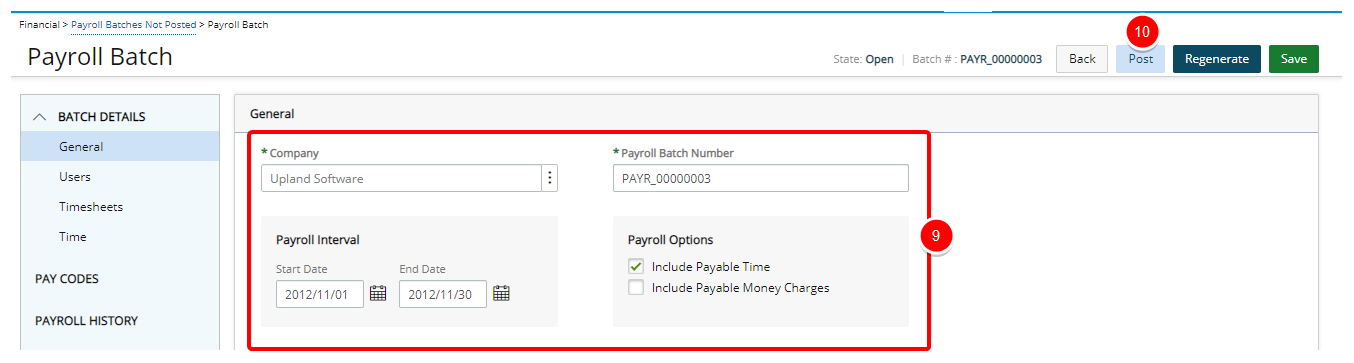
Note: A payroll batch cannot be posted until all time entries in the batch interval are approved.
- Click a payroll Batch Number to open the Payroll Batch page.
- From the navigation, click Pay Codes to view the payroll transaction information.
- From the navigation, click General to return to the Payroll Batch page.
- Verify the following information and make any necessary changes:
- Batch Number: Displays the designated batch number.
- Post Interval *: Click the calendar icon to select a date; by default, the current date is displayed.
- Payroll Options:
- Include Payable Time
- Include Payable Money Charges
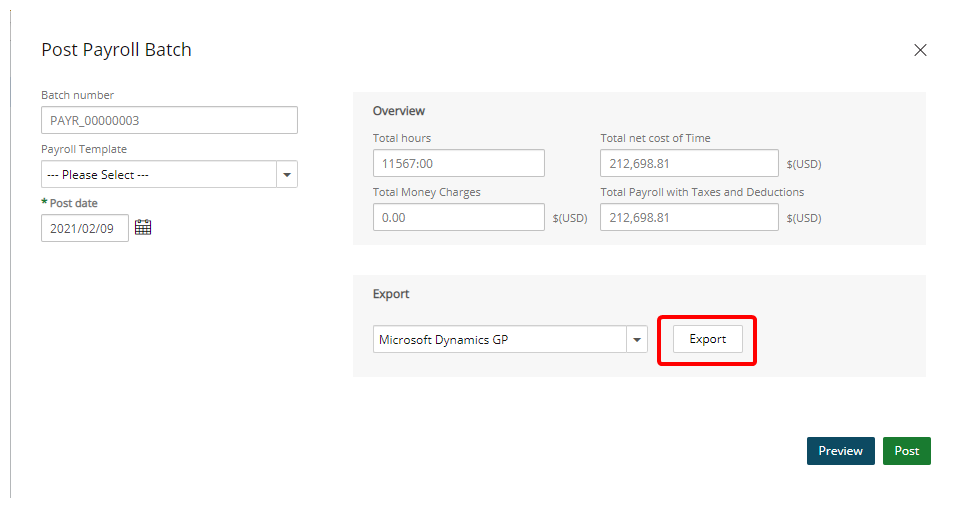
- Select Post to open the Post Payroll Batch dialog box.
- Click Export.
Note: If the export process is successful, the export status page displays the message that the payroll batch was successfully exported with the amounts. If the export process fails, the export status page displays an error message listing the problems and possible solutions.
Exporting WIP Accrual Batches
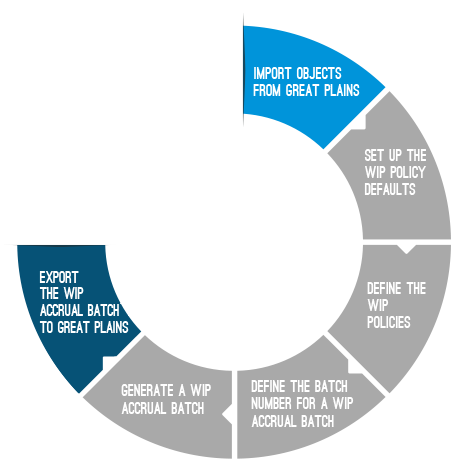
The WIP Accrual Manager creates batches to process the WIP transactions for selected projects. The WIP accrual batch exporting feature allows users to create a new or append an existing G/L batch in Great Plains. The illustration overviews the process for exporting the WIP accrual batches to Great Plains.
- Import Objects Into PSA
- Setting Up the WIP Policy Defaults
- Defining the WIP Policies
- Defining the WIP Accrual Batch Numbers
- Generating a WIP Accural Batch
- Exporting a WIP Accrual Batch to Great Plains/
Before exporting the Revenue batches, the GL Accounts must be imported into PSA. For further details refer to Importing Objects from Great Plains.
The WIP policy defaults are set up at the company level to allow users to define the WIP rule types on a per project basis.
To set up the WIP policy defaults
- From the Icon Bar click Setup .
- From the Navigation Menu click Financial to expand the corresponding menu.
- From the Financial menu items, click System.
- Upon the Financial Settings page displaying, navigate to the Accounting tab.
- Click the Companies sub-section to access the Company list page.
- Click the name of the required Company from the list to access the Company Edit page.
- Navigate to the WIP Policies tab.
- From the WIP Accrual Number Defaults section, define the company defaults for the WIP Accrual Batch number:
- Current:Enter the batch number to generate the next time a WIP accrual batch is created.
- Number prefix: Enter the prefix that precedes the Current WIP Accrual number.
- Number digits: Enter the total number of digits for the WIP of accrual batch number.
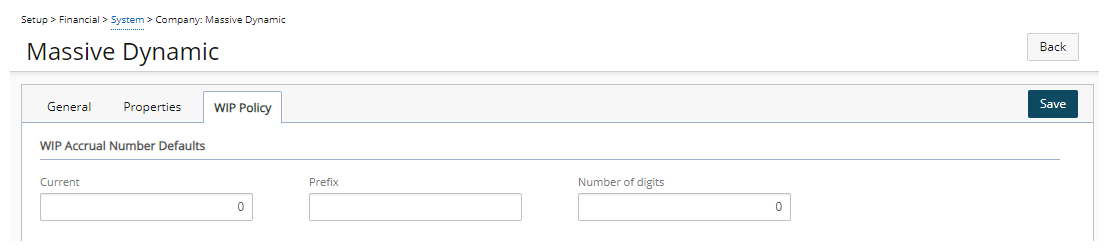
Note: If the WIP Accrual Number Defaults are not defined, the settings specified at the global level are used.
-
From the Account Defaults section, define the default WIP and revenue accounts:
- WIP Account *: Click the browse button (...) to select the default account from the Account List page.
- Revenue Account *: Click the browse button (...) to select the default account from the Account List page.

Note: The Account Defaults boxes are required that are set, by default, to the system default account.
-
Time and Material Policy DefaultsUnder this section, define the default settings for the Time and Materials rule:
- Select the entry type option.
- Click the browse button (...) to select the account from the Account List page for these boxes:
- WIP Account
- Revenue Account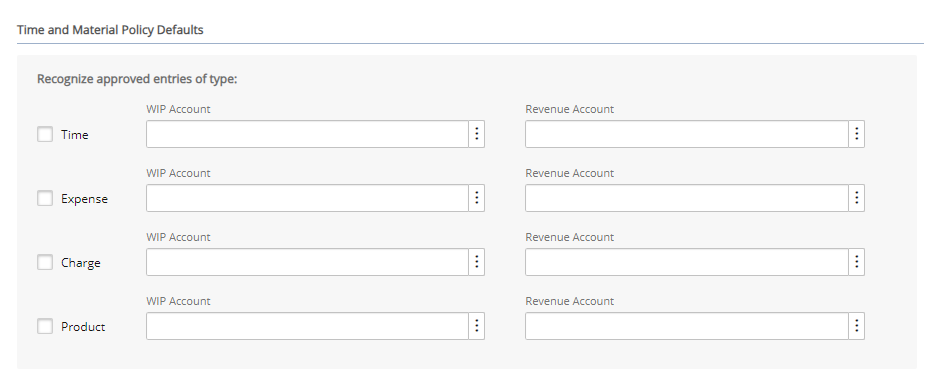
Note: Separate WIP and Revenue accounts can be set up for each entry type. The entry types available are based on licensing. By default, the options are cleared. When a Time and Materials type WIP Policy rule is defined for a project, the Time and Material Policy Defaults defined at the company level are inherited by the project. However, if the project company changes at a later date, the rule settings are not updated.
- Click Save and then Back to save your changes and return to the previous page.
A WIP policy is defined for a given project that is then used by the WIP accrual batch to calculate the revenue to be recognized. The total amount of revenue to recognize can be based either on a fixed amount or a project's running total amount.
When the WIP Policy option is accessed from the Project Edit page, the Project, Client, Currency (set to the client currency) and Company (set to company that the project belongs) boxes are read-only. This article covers defining a the project level.
- From the Icon Bar click Project List .
- From the Project List page, select the Project you wish to edit by following one of these steps:
- Click the Project context menu button to expand it. From the available options click Edit.
OR - Click the name of the Project you wish to access.
Tip: Use the search capability for an efficient way of finding the specific project. For further details refer to Searching for a Project within the Project List page.
- Click the Project context menu button
- From the Settings tab, expand the Financial navigation menu.
- Click WIP Policy to open the WIP Policy Edit page that displays the WIP policy for the selected project.
-
Note: The WIP Policy button is available for suspended projects but not for placeholder projects.
-
Select a Rule Type from the Rule Type list to display the corresponding WIP Rule Options.
Note: By default, None is displayed in the Rule Type box.
-
Upon selecting a Rule Type, in addition to the WIP Rule Options appearing, the following two account boxes also appear.
- WIP Account *: Click the browse button (...) to override the specified WIP account that is set by default at the company level;
- Revenue Account *: Click the browse button (...) to override thes pecified revenue account that is set by default at the company level
-
WIP Rule Options based on the Rule Type selected:
Fixed Price with Average Rate
WIP is based on the percent (%) complete between the time budget defined and the actual time using an average rate.
The available WIP Rule Options are:
- Budgeted Hours *: Specifies the Project Current Time Budget by default (the first time the rule is created) that can be overridden by the user; if multiple budgets exist for a project, they are summed up.
- Average Rate *: Specifies the hourly rate used to calculate the revenue; uses existing project and user forecasting rates as the average rate defined in the client currency.
Note: The Budgeted Hours and Average Rate can be updated while a project is included in an accrual batch. The entries in the batch are not be updated until the batch is updated. Changing the client currency does not rerate the average rate defined.
- Can override Percent to Recognize: Select the optionto override the % to recognize in the accrual batch that is calculated by the system; option is cleared by default.
Note: The Fixed Price with Average Rate rule only accounts for approved billable entries of type Time for all the project's tasks (including suspended and decommissioned tasks). For example, if an average rate of $100.00 and a time budget of 100.00 hours is defined, then for 80 hours of billable work completed, the % complete at accrual time is 80% and the revenue to recognize is $8,000.00 (80 hours * $100.00 average rate).
Time and Materials
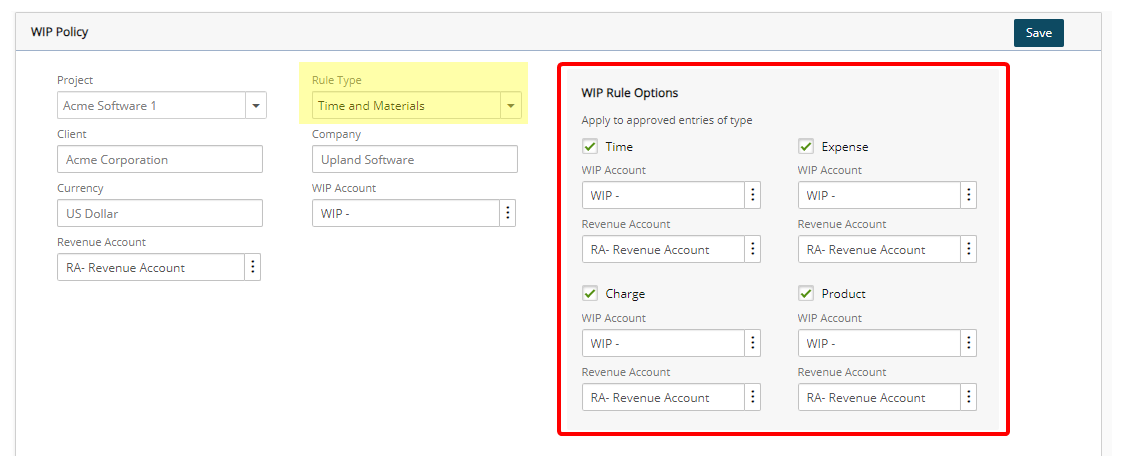
WIP is based on the work performed on a project (when billable entries are approved for all tasks in the project within the project's start date and the accrual batch date); for example, 10 hours of work at a billable rate of $100.00 per hour recognizes a revenue of $1,000.00.
The available WIP Rule Options are:
Apply to approved entries of type:
Under this section, select the options of the following entry types to include in the WIP accrual:
- Time
- Expense
- Charge
- Product
For each of the following boxes, click the browse button (...) to select the account from the Account List page:
- WIP Account
- Revenue Account
Note: If no accounts are specified for the entry types, the project accounts are used.
Percent Complete
An amount of the project milestone billing rule is recognized based on the Milestone % complete specified on the Milestone Edit page.
The available WIP Rule Options are:
- Total Revenue: (read-only) Specifies the sum of all amounts set for the project milestone billing rules (converted to the client currency using the exchange rate of the current date).
- Use system Milestone Percent Complete: Select the option to use the % complete defined for the Milestone in the accrual batch; by default the option is cleared.
- Can override Percent Complete: Select the option to override the % complete in the accrual batch that is specified on the Milestone Edit page; by default the option is cleared.
Note: Changing the client currency does not rerate the Total Revenue.
- Click Save to apply your changes.
The WIP Policy option can also be accessed from the Financial System page to display a list of all the projects in the application that are assigned WIP policies.
To create a WIP policy for a project:
- From the Icon Bar click Setup .
- From the Navigation Menu click Financial to expand the corresponding menu.
- From the Financial menu items, click System.
- Upon the Financial Settings page displaying navigate to the WIP tab.
- From the WIP Policies section, click New.
- From the Project list, select the required project.
Note: The list, displays only non-placeholder projects which are not associated to a WIP policy and where the Rule Type is set to None.
- Based on the project selected, the corresponding information in the following boxes automatically fill and remain in a read-only format:
- Client: Set to the one associated to the selected project.
- Currency: Set to the associated Client's currency.
- Company: Set to the one associated to the selected project.
Tip: The WIP Policy can also be set up for a project from the Project Edit page.
- Select a Rule Type.
Note: Upon selecting a Rule Type, the WIP Account and Revenue Account as well as the WIP Rule Options will be displayed.
- Select one of the following options for WIP Account:
- WIP Rule Options will vary depending on your selection made for WIP Account:
- Options specific to Fixed Price with Average Rate rule:
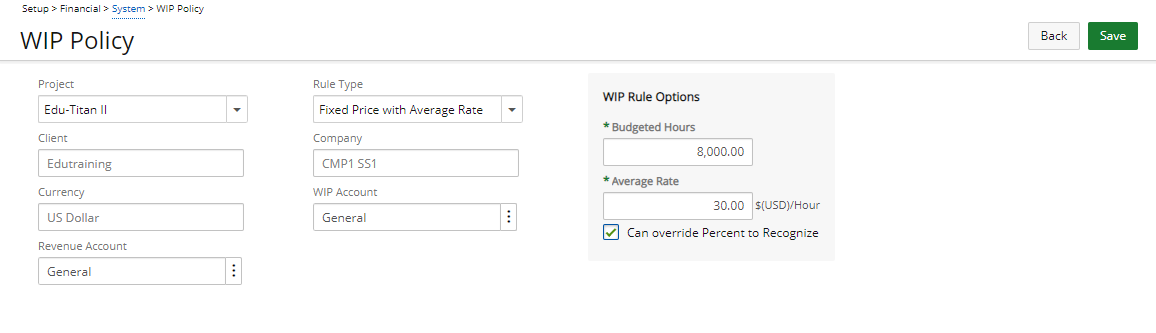
- Budgeted Hours: This is set to the Project Current Time Budget by default (the first time you create the rule). If there are multiple budgets for the project, they are summed up.
- Average Rate (in client currency): The hourly rate used to calculate the revenue.
- Can override Percent to Recognize: This option overrides the percentage to recognize, calculated by the system. This option is unselected by default. When selected, you can change the percentage to recognize in the Accrual batch.
- You can update any options (budgeted hours or average rate) on this page while a project is included in an accrual batch. The entries in the batch not be updated unless you update the batch.
- Changing the Client currency does not re-rate the already defined Average Rate.
For a more detailed information on Fixed Price with Average Rate rule, see "Details for Fixed Price with Average Rate Rule".
- Options specific to Time and Materials rule:
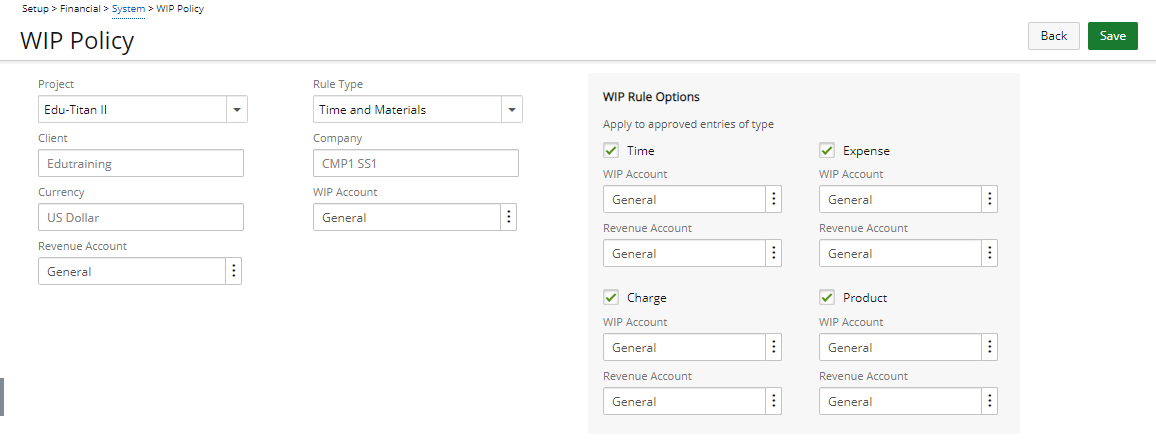
- Recognize approved entries of type: Option to select the type of entries (Time, Expense, Charge, Product) to include in the WIP accrual.
- The status of the selection boxes is inherited from the Company Time and Material Defaults.
- WIP Account: Specify a different WIP account for each type of entry. This account is set to the WIP account specified for this type of entry at the company Time and Material Defaults level, by default. If no value is defined at the company level, the account field remains empty.
- Revenue Account: Specify a different Revenue account for each type of entry. This account is set to the Revenue account specified for this type of entry at the company Time and Material Defaults level, by default. If no value is defined at the company level, the account field remains empty.
For further details refer to: Details for Time and Materials rule
- Options specific to Percent Complete rule:
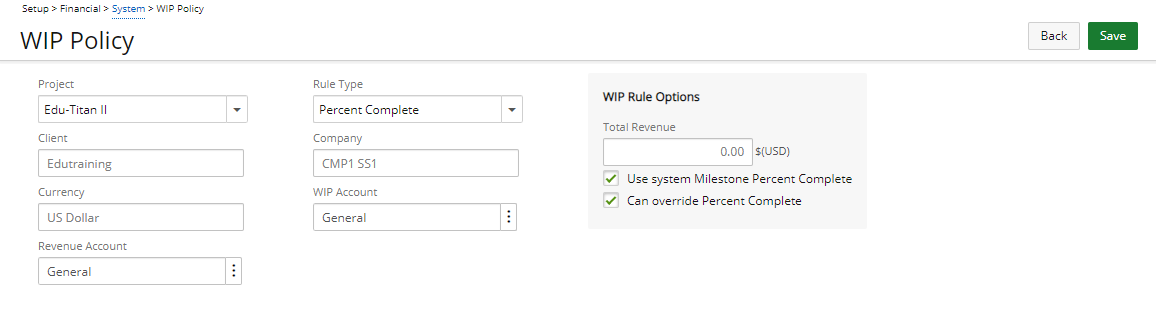
- Total Revenue: This field is set to the sum of all Amounts specified for the project milestone billing rules (converted to the Client currency using the exchange rate of the current date), and is read-only.
- Can override Percent Complete: This option allows overriding the percentage complete specified on the Milestone Edit page. This option is unselected by default. When selected, you can change the percentage complete in the Accrual batch.
- Changing the Client currency recalculates the Total Revenue, based on the new currency value.
- When you delete a milestone billing rule associated to a revenue recognition rule not yet included in an accrual batch, the Total Revenue field on the Revenue Recognition Policy page is updated.
For a more detailed information on Percent Complete rule, see "Details for Percent Complete Rule".
- From the Revenue Account list, select the required Revenue Account.
- From the WIP Account list, select the required WIP Account.
- Click Save and then Back to save your changes and return to the previous page.
Each WIP accrual batch is associated with a batch number that is used to process the WIP transactions for the selected projects. The global settings for the WIP accrual batches are defined before the batches can be created, generated or posted.
- From the Icon Bar click Setup .
- From the Navigation Menu click Financial to expand the corresponding menu.
- From the Financial menu items, click System.
- Upon the Financial Settings page displaying navigate to the WIP tab.
- From the WIP Accrual section:
- Current number *: Enter the batch number that is to be generated the next time a WIP accrual batch is created.
- Number prefix: Enter the prefix that is to precede the Current WIP Accrual number.
- Number of digits *: Enter the total number of digits for the WIP accrual batch number.
- Transaction type: Select the type of WIP transactions to be created by selecting the transaction type from the list; by default, reversal is selected as the transaction type. The available options are:
- Reversal - Select this type to roll back any WIP transaction for a project and send a new WIP transaction.
- Incremental - Select this type to create a WIP transaction for the difference between the last and the new WIP transaction for the project.
For example, if $10,000.00 is recognized at the end of January and $25,000.00 (additional $15,000.00) is recognized at the end of February, the following applies:
Example: Reversal example: One WIP transaction is generated that credits WIP with $10,000.00 and debits revenue with $10,000.00 and another WIP transaction is generated that debits WIP with $25,000.00 and credits revenue with $25,000.00
Example: Incremental example: One WIP transaction is generated that debits WIP with $15,000.00 ($25,000.00 -10,000.00) and credits revenue with $15,000.00; if the incremental amount is a negative amount of -$1,000.00 for example, one WIP transaction is generated that credits WIP with $1,000.00 and debits revenue with $1,000.00
- Allow WIP Accrual number override: Select this option to allow users to override the WIP accrual batch number from the WIP Accrual Batch Edit page; by default, the option is cleared.
- Click Save to apply your changes.
Note: If there are open batches when saving an updated WIP transaction type, a message indicates that changing the WIP transaction type will regenerate the WIP transactions for all non-posted WIP accrual batches. Click No to cancel the save action or Yes to regenerate the transactions for all open batches using the new transaction type (only the transactions are regenerated, the WIP accrual batch is not updated).
Before a WIP Accural Batch is generated, the projects are first included to the accrual batch. From the WIP Accrual Manager page, users can create, delete, post and export WIP accrual batches with transactions.
- Click Financial in the Icon Bar.
- Then click the WIP Accrual Manager link in the Navigation Menu.
- Click the New link to create a new WIP accrual batch, and if required, edit the following:
Company: Select the company from the drop-down list, if different from the system default company that automatically displays.
- Batch Date: Click the calendar icon to select a date.
Note: If different from the default, current date that automatically displays.
- Click the Save link to automatically generate the batch number using the defined accrual settings.
Note: After a WIP accrual batch is saved, the General and Transactions tabs are displayed, the Company and Batch Date boxes are no longer editable, and as long as the Allow WIP Accrual number override option is selected, the batch number can be edited. When a batch number is changed, the system verifies that the number entered is unique; otherwise, the batch number cannot be saved.
- From the General tab, view the information for the WIP accrual batches and expand each entry to view the details for each project.
Note: Suspended projects are displayed in red.
- Click the Select/Unselect Project link to add or remove projects from the WIP accrual batch.
- Click the Update link to update the entries and regenerate the transactions.
Note: The Update link is available as long as the batch is not exported or posted. The Update link can also be accessed from the Transactions tab.
-
Click Save to apply your changes.
-
Click the Transactions tab to view the generated debit and credit information grouped by project.
Column Description Account Displays the account ID. Account Name Displays the account name. Debit Displays either the WIP or revenue debited amount. Credit Displays either the WIP or revenue credited amount. Currency Displays the client currency. Reference (revenue rows) Displays for all the rule types the Client Name, Project Name and Type of rule, as well as the Type of entry for the Time and Materials rule type; if the transaction is intended for reversal purposes, Reversal is also added. Reference (WIP rows) Displays WIP Account and Project Name; if the transaction is for reversal purposes, Reversal is also added. Note: The transactions are generated every time the WIP accrual batch is updated. The Transactions tab displays the debit and credit information grouped by project. The Total Debit and Total Credit amounts are displayed in the system currency.
- Click the Post link to lock the WIP accrual batch and make the projects available for selection in other batches.
- Upon the prompt to confirm the posting displays, click either of the following:
- Yes to post the batch OR
- No to cancel the action
Note: Note: The Post link can also be accessed from the General tab.
-
Click the Export link to export the transactions; for more information, see Exporting a WIP Accrual Batch to Great Plains.
When a user selects a WIP accrual batch for export, either a new General Ledger (G/L) batch is created or appended to an existing G/L batch in Great Plains. Each G/L batch in Great Plains contains one or multiple Journal Entries with each Journal Entry containing one or multiple Journal Entry Details.
The PSA WIP accrual batch is sent to Great Plains as follows:
- WIP accrual batch is exported in a new or existing G/L batch.
- Each project within the PSA WIP accrual batch is created as a single Journal Entry in the G/L batch.
- Each project transaction in the PSA.
- From the Icon Bar click Financial .
- From the Navigation Menu click WIP Accrual Manager.
- Select a WIP accrual batch from the list.
- Click the Export button to open the Export G/L Batch page that displays a list of existing non-posted G/Lbatches in Great Plains.
Note: The Export link is enabled when Great Plains is set up as the accounting system.
- Select a Batch Number and click Export.
- When prompted to confirm initiating the export process, click either:
- Yes to proceed OR
- No cancel export process of the WIP accrual batch.
Note: After the WIP accrual batch is exported, it is automatically posted and a message confirming that the export was successful is displayed on the Export G/L Batch page. After a batch is posted, it can no longer be modified, deleted or re-exported to an accounting system. If the export process fails, the batch will not be posted and the Export G/L Batch page lists the reasons the export failed.
- Click the Back link to return to the WIP Accrual Manager page once the the status of the export process is displayed.
Exporting Revenue Batches
The Revenue Batch allows recognizing deferred revenue up to the selected date (revenue batch date) and sending it over to the accounting system.
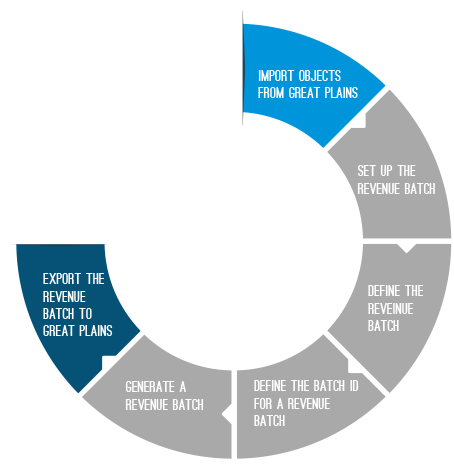
Import Objects Into PSA
Before exporting the Revenue batches, the GL Accounts must be imported into PSA. For further details refer to Importing Objects from Great Plains.
Export Process of a Revenue Batch
The export process creates a new G/L batch or append to existing G/L batch in Great Plains. Each G/L batch within Great Plains contains one or multiple Journal Entries. And each Journal Entry contains one or multiple Journal Entry Details.
The PSA Revenue Batch is sent to Great Plains as follows:
- The Revenue Batch is exported in the selected G/L Batch.
- Each Project within the PSA Revenue Batch is created as a single Journal entry in the G/L Batch.
- Each Project transaction within the PSA Revenue Batch is created as a single Entry Detail for that batch's corresponding Entry in the G/L Batch.
Exporting a Revenue Batch to Great Plains
You can Export a Revenue Batch to Great Plans either from the Revenue Batch Manger or Revenue Batch Edit page.
- From the Icon Bar click Financial .
- From the Navigation Menu click Revenue Batch Manager.
- Click Export:
- Upon the Revenue Batch Manager page opening, select a Revenue Batch.
Click the Export Link.
OR - click the corresponding Revenue Batch #. From the Batch Edit page click Export.
- Upon the Revenue Batch Manager page opening, select a Revenue Batch.
Click the Export Link.
- When prompted to confirm initiating the export process, click either:
- Yes to proceed OR
- No cancel export process of the WIP accrual batch.
- Select a Batch Number
- Click Export
-
View status of the export process.
-
Click the Back to return to the Revenue Batch Edit page.
Failed Export
If the Export fails for any reason, the batch is not set as exported and is not posted. The system displays the Export G/L Batch page which lists reasons as to why the export failed.
The Messages box reads:
Export for company: <Company Name>
Export of Revenue Batch: <Revenue Batch Number>
Export failed.
<Reasons for failure>
View Imported Revenue Batches in Great Plains
In Great Plains, you can view batches from the Batch Entry window and open the Transaction Entry window by clicking the Transactions button. From the Transaction Entry window, you can then open each transaction for the specified batch by using the Journal Entry lookup.

The following table depicts the data that is mapped between the PSA Revenue Batch and the Great Plains G/L Batch:
| Great Plains | PSA |
|---|---|
| Batch | |
| Batch ID
|
This box is set to the G/L Batch selected in PSA. |
| Comment
|
In the case that a new batch is being created, this box is set to the Description entered on the G/L Batch Edit page. |
| Origin
|
This box is set to General Entry. |
| Frequency
|
This box default to Single Use. |
| Transaction Entry (Journal Entry) | |
| Journal Entry (Number)
|
This box is generated by Great Plains. |
| Batch ID
|
This box is set to the G/L Batch selected in PSA. |
| Transaction Type
|
This box is always set to Standard in Great Plains. |
| Transaction Date
|
This box is set to the PSA Revenue Batch Date. |
| Source Document
|
This box is be set to GJ. |
| Reference
|
This box will be set to "<PSA Batch Number>_<PSA Project code>". For example: REV-000021_Prj1 Code |
| Currency ID
|
This box is set to the corresponding Client's currency. |
| Journal Entry Details boxes | |
| Distribution Reference
|
This box is set to the PSA transaction reference. |
| Account
|
This box is set to the PSA transaction account (Unearned Revenue account or Revenue account). |
| Debit/Credit
|
This box is set to the PSA debit or credit transaction Amount. This box cannot contain the currency code or the thousand separators. The amount is sent over in the client currency. |
| Exchange rate
|
The exchange rate in Great Plains is set at export time. The rate used is to be the PSA exchange rate on the Revenue Batch date. |