Upon accessing the new and improved Timesheet, note that this redesign provides a cleaner and simpler My Timesheet, significantly improving the user experience.
This article details My Timesheet page.
Note: To allow Users access to the new and improved My Timesheet in your Sandbox/Implementation/production environments, you must add them to the New Timesheet list. For further details refer to Adding users to the New Timesheet list. If you prefer, you can choose to enforce the use of New Timesheet for all Users at the global level.
Header

- Hovering over the Information icon
 next to it will trigger a tooltip allowing you to see:
- Timesheet Template Name
- Timesheet period Status (displayed when Timesheet is Closed)
- The following information is also displayed when a Timesheet is in an Approval State assigned to the Project Manager or Portfolio Manager:
- Project name
- Approver’s name
- The Action taken
- Approval or Rejection date/time in regional settings format (only if the Timesheet is Approved or Rejected)
- You can use the Refresh
 button to refresh the page.
 - Click the Share this page
 button to share your Timesheet with another user.
 Note: The Share this page button is only available when a Timesheet is in a read-only state such as Completed or Approved.
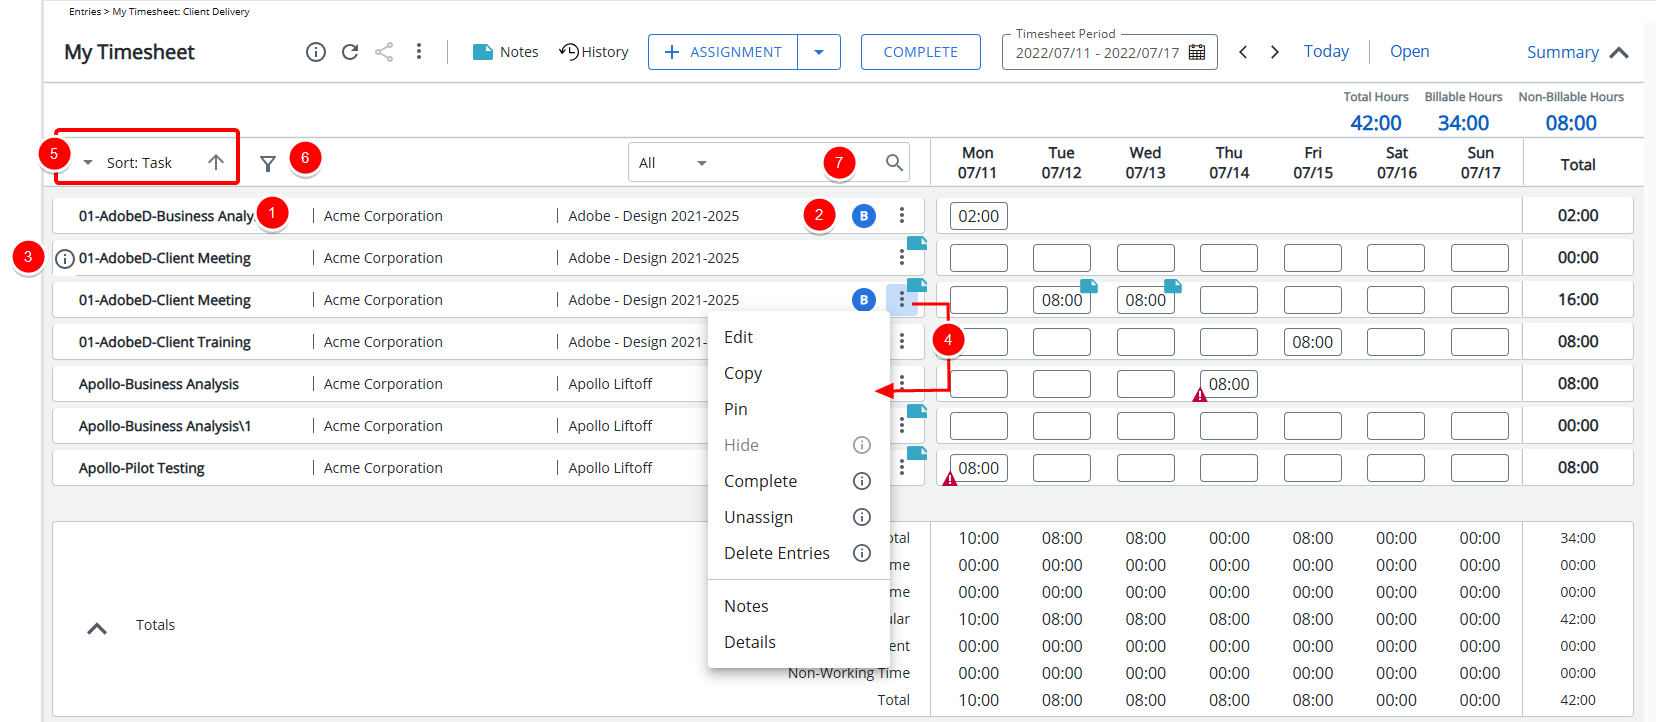
- Click the ellipsis
 to access the Timesheet context menu from where you can:
- Assign Tasks

- Copy Timesheet
- Create Leave Request
- Leave Time Summary
- Timesheet History
- Documents
- Reports
- Assign Tasks
- Timesheet Notes dialog box can be accessed by clicking the Timesheet Notes
 /
/  button. For further details refer to Timesheet Notes.
Note: A solid blue note icon indicates the presence of Note(s).
- Click the
 History button to view a detailed history of the State changes made on your Timesheet. The positionable dialog box displays the Source State, Destination State, Action, Date Modified and well as the Modified By information.
Note: All dates and time stamps are displayed in the logged Users Active Site Time Zone.
- Click the +Assignment button to access the New Assignment dialog box where you can pick new Assignments. For further details refer to Picking an Assignment.
You can also click the down arrow located against the +Assignment button to pick an Assignment, Adjustment or Non-Working Time. - From the Actions selection list you can choose to transition your Timesheet to the next State.
Note:
- If no Action is available, based on the assigned Workflow, the Actions button is disabled.
- If only one Action is available, the label of the Action button will be changed to read the Transition Name as defined in the assigned Workflow.
- Choose your Timesheet Period by clicking the calendar icon located next to the date or click the right/left arrows to navigate to the next/previous periods. Alternatively, you can click Today to navigate to the current period.
- View the State in which your Timesheet is currently at. You can click this link to access a visual representation of the Timesheet Workflow and corresponding States/Assignments.
- The Summary section displays fields selected in the Timesheet Template assigned to you such as:
Field Name Description Billable Hours Total Billable hours of Time Entries Future Planned Billable Hours * The Total Billable Hard Booked Hours for future periods until the end of the Project, excluding the current period. Future Planned Hours * The Total Hard Booked Hours for future periods until the end of the Project, excluding the current period. Future Planned Non-Billable Hours * The Total Non-Billable Hard Booked Hours for future periods until the end of the Project, excluding the current period. Non-Billable Hours Total Non-Billable hours of Time Entries Periodical Minimum (Available for Bi-weekly, Semi-monthly and Monthly Period types) Planned Billable Hours * Calculated as: The Total Billable Hard Booked Hours for the logged user for the current period Planned Hours * Calculated as: (The Sum of Hard Booking for each Project for the days defined in the period) Remaining Periodical Minimum Calculated as Periodical minimum - Actual hours (Available for Bi-weekly, Semi-monthly and Monthly Period types) Remaining Planned Billable Hours * Calculated as: Planned Billable Hours - Actual Hours Remaining Planned Hours * Calculated as: (The sum of Hard Booking for each Project for the days defined in the period) – (The sum of Actual Hours entered by the logged user for these projects) Remaining Weekly Minimum Calculated as: Weekly minimum - Actual hours(Available only for a Weekly Timesheet Period type) Remaining Working Hours Calculated as: Working Hours - Actual Hours - Non-working Hours Total Hours Total hours of Time Entries Weekly Minimum (Available only for a Weekly Timesheet Period type) Working Hours Total hours defined by the logged Users Calendar for the period Note: An asterisk (*) next to a field name indicates that the number displayed for that field in the Summary section is clickable. Clicking the number opens the Planned Hours dialog box, which displays detailed information pulled from the Work Plan. For further details refer to Accessing and viewing the Planned Hours.
- The Timesheet Template Name is displayed after the breadcrumbs at the top of Timesheet page.
Assignment panel
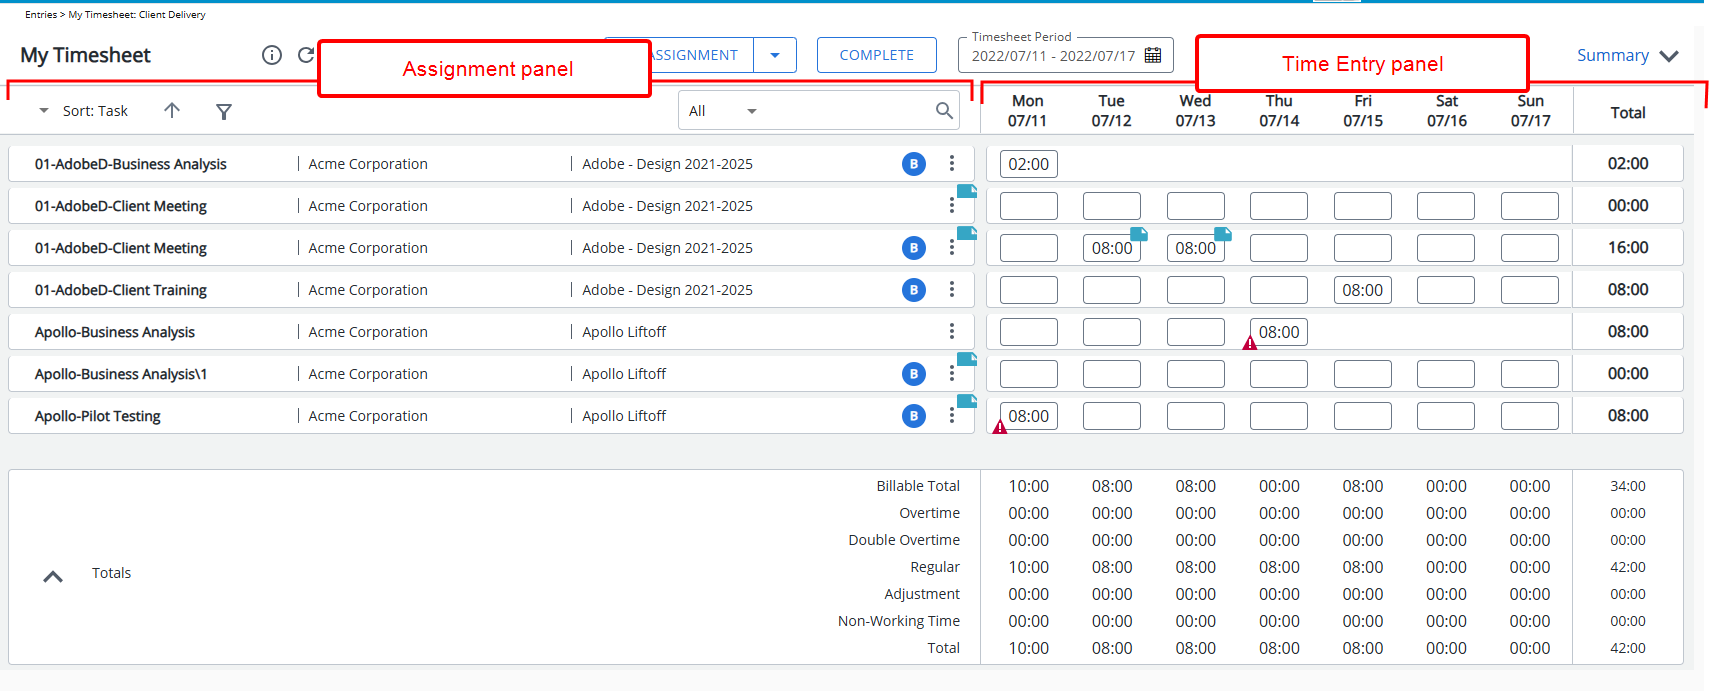
Each Assignment row has a left (Assignment) and right panel (Time Entry).
Regular Assignments
- From the Assignment panel, you can readily see the Assignment Heading (as defined within the Setup tab of the Timesheet Template). Below the Heading you will see the assignment Information such as: Client, Project, and Business Unit as defined in the Timesheet Template.
- The Assignment Attributes such as Billable are justified to the right. When an Attribute is applicable, the background color is blue.
- Hovering over the Information icon will trigger a tooltip allowing you to see the respective Assignment Information such as: Client, Project, Task, Billable and Payable as defined in your Timesheet Template.
- Click the ellipsis to access the Assignment context menu, from where you can choose to:
- Edit: Clicking this option will open the Edit Assignment dialog box where you can modify the details of your Assignment.
- Copy: Clicking this option will open the Copy Assignment dialog box where you can create a copy of your Assignment.
- Pin the most relevant rows on top of the list. Pinned items are identified with a Pinned
 button against them. You can unpin an item by clicking this button.
 - Hide A Hidden Assignment is no longer displayed in the Timesheet. It can be made visible again by using Add Assignment.
- Users with the Modify right to Assign Task permission (Entry > Time), defined for the Security Profile under which the User falls (Setup > Organization > System > Security), can Complete/Uncomplete Assignments.
- Unassign an Assignment directly from Timesheet
- Clicking the Delete Entries option will delete all Time Entries made against the Assignment.
- Access the Assignment Notes
Note: Assignment Notes are inherited to following periods until completion of the Assignment.
- Click Details to open the Assignment Details panel where you can view the details of your assignment
- Click KPIs to open the KPIs tab of Assignment Details panel.
Note: The KPIs tab and the KPIs option from the Assignments context menu will be hidden if no KPI Fields are present in your assigned Timesheet Template.
- By default, your Assignments are listed based on the Sort Order defined in your Timesheet Template, you can now choose to overwrite this order based on your preference and the Fields available to you such as Client, Project and Task in Ascending or Descending order.
- Click the funnel button to hide/show Assignments/Non-Working Time and/or Adjustment section(s).
Note:
- By default, all sections are visible.
- When section(s) are hidden, the funnel button is displayed in blue.
- When searching for an item in your Timesheet, the results exclude any items that are within a hidden Section.
- Search for Assignments based on the Fields defined in your associated Timesheet Template.
Note: When searching for an item in your Timesheet, the results exclude any items that are within a hidden Section.
Non-Working Time

The Non-Working Time assignments are grouped and listed below your regular Assignments.
- Click the ellipsis to access the context menu, from where you can choose to Delete all Time Entries made against the Non-Working Assignment.
- A Note is automatically added to Holiday Time Entries created through the Holidays Automation Service process. Theses Notes display the Name of the Holiday created by “System”.
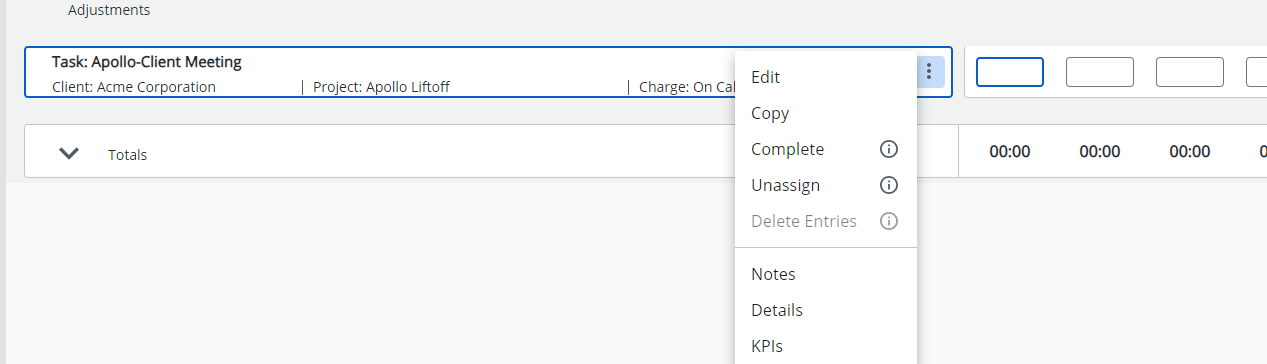
Adjustments
The Adjustments are grouped and listed just above the Totals.
- The Assignment Attributes such as Billable are justified to the right and formatted in a capsule. When an Attribute is applicable, the background color of the capsule is blue, otherwise it is white.
- Hovering over the Information icon will trigger a tooltip allowing you to see the respective Assignment Information such as: Client, Project, Task, Billable and Payable as defined in your Timesheet Template.
- Click the ellipsis to access the context menu, from where you can choose to Edit, Copy, Complete, Unassign, Delete Entries and access Notes, Details and KPIs tabs.
Time Entry panel
From the Time Entry panel you can enter Time against your Assignments, Non-Working Time or Adjustments by clicking a Time Entry cell corresponding to the required day.
Hovering your mouse over a Time Entry cell triggers the context menu:
- Click Notes
 to access the Time Entry Notes panel.
 - Click the ellipsis to access the Time Entry context menu from where you have the option view the Time Entry Details panel.
You will notice that various icons may be present on a given Time Entry cell. These icons mark:
- The Time Entry Notes: A solid cyan note icon
 located on the top right corner of the Time Entry cell. Clicking this icon will open the Time Entry Notes panel.
- Any Exceptions (based on your Timesheet Template settings) that might be activated upon entering your Time: Clicking these icons will open the Time Entry Details panel where you can view the exceptions and take the proper action.
Totals section
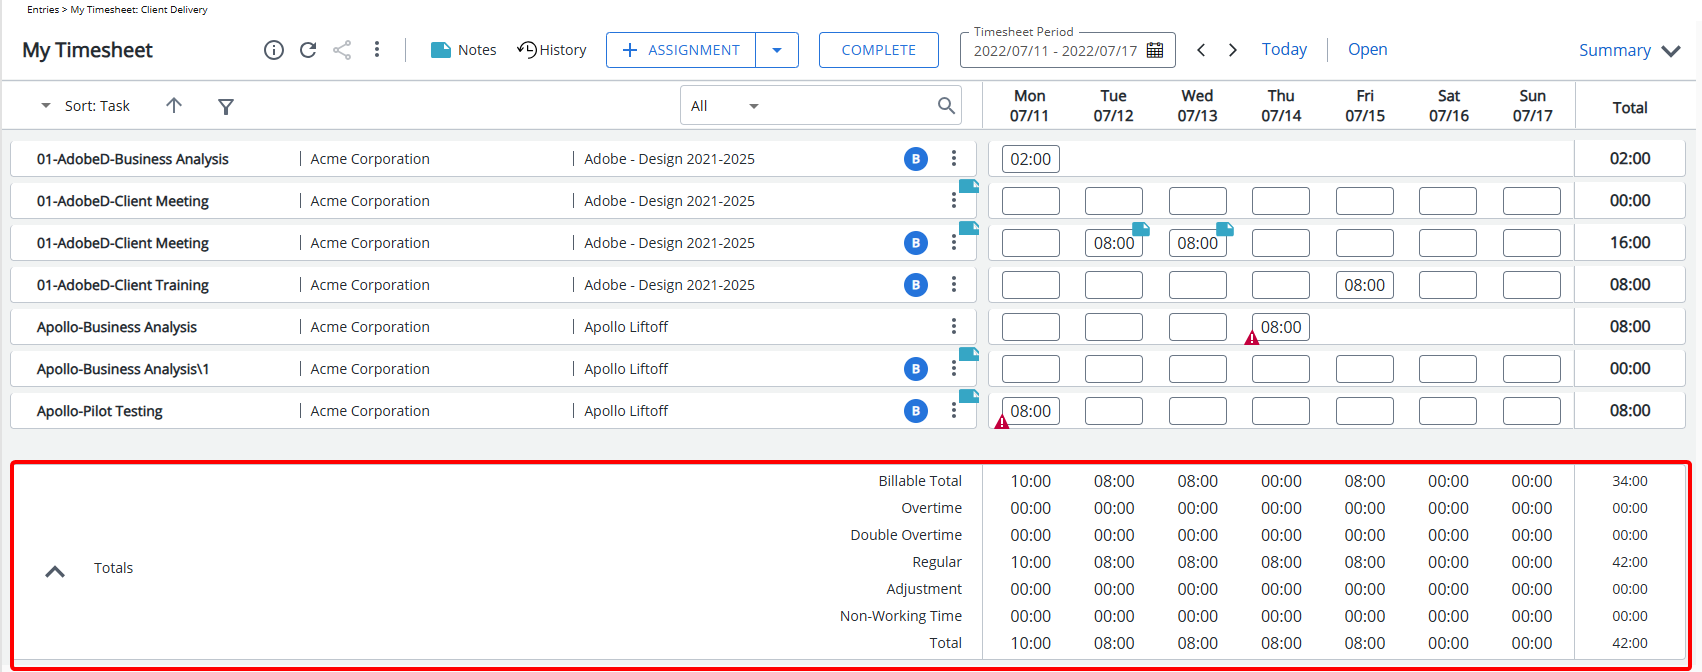
Expanding the Totals section allows you to view the Regular, Adjustment, Overtime, Double Overtime, Billable Total and Total values as set within the Show Totals section of the Timesheet Template.
The expanded or collapsed state of the Totals section in the new Timesheet is remembered upon subsequent visits to the page by the same user and browser either through Entries or Timesheet Manager.