2022R1 Release Notes
The 2022R1 version of Eclipse PPM is currently scheduled to be deployed to production on May 28th, 2022. At this time, more information on using the following features will be made available.
Note: Some of the new features are still under construction. Once they are finished, they will be listed on this page as well.
This release comprises of upgrades to the following components:
Also, the resolved issues for 2022R1 can be found here.
Tip: For a rundown on the central features of this release, take a look at the 2022 R1.0 What's New Webinar.
Dashboards
The following upgrade has been made to Eclipse PPM Dashboards. Click on it to learn more:
What's Different:
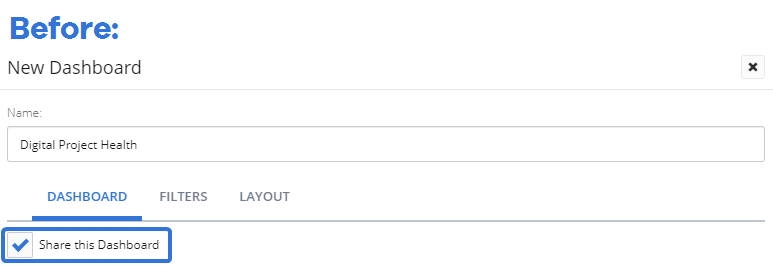
Eclipse PPM Dashboard creators now have the ability to share their Dashboards with specific Users or Groups. During creation, Dashboards can now be set to private, shared with everyone, or shared with a custom set of Users.
Prior to this release, Dashboard creators could choose the Dashboard's sharing settings under the "Dashboard" tab during creation. This only consisted of a "Share this Dashboard" checkbox that would allow other Eclipse PPM users to access it once it was created:
Now, a fourth tab named "Share" has been added to the Dashboard creation window. This tab includes a drop down menu that allows the creator to decide between three sharing settings:
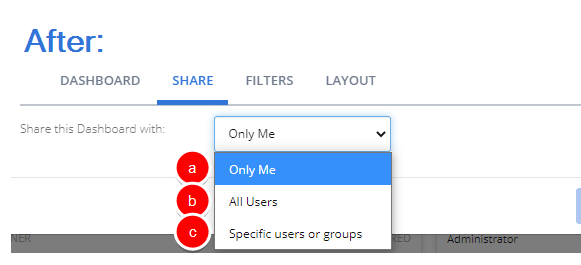
The three sharing options are as follows:
-
Only Me: The Dashboard will only be visible to the creator.
Note: If this is selected, the Dashboard will behave the same way it would if the previous "Share this Dashboard" checkbox was not selected.
-
All Users: The Dashboard will be visible to all Eclipse PPM users.
Note: If this is selected, the Dashboard will behave the same way it would if the previous "Share this Dashboard" checkbox was selected.
-
Specific users or groups: A table will appear allowing the creator to select which Users or Groups should be given access to the Dashboard:
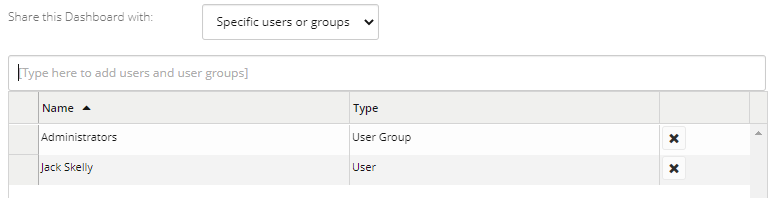
When creators enter the name of a User or User Group into the textbox, a drop-down menu will appear with suggestions that match what was entered.
Benefit:
The ability to mark Dashboards as private was helpful, but it did not go far enough. There are many scenarios in which Dashboard visibility should be restricted to more than just the creator of the Dashboard. For example, imagine you create a Dashboard that displays financial information for all of your organization's digital initiatives. Finances are often sensitive information, so you would like to restrict the visibility of this Dashboard. However, the entire Finance team would not be able to see this Dashboard if you simply selected the "Share this Dashboard" checkbox. The new sharing settings allow Dashboard creators to grant access to the Finance team by adding them as users or adding a "Financial Team" User Group as a whole. Dashboard creators now have much more flexibility in determining who can access their custom Dashboards.
Bulk Actions
The following upgrade has been made to Bulk Actions from any of the Advanced Search pages. Click on it to learn more:
What's Different:
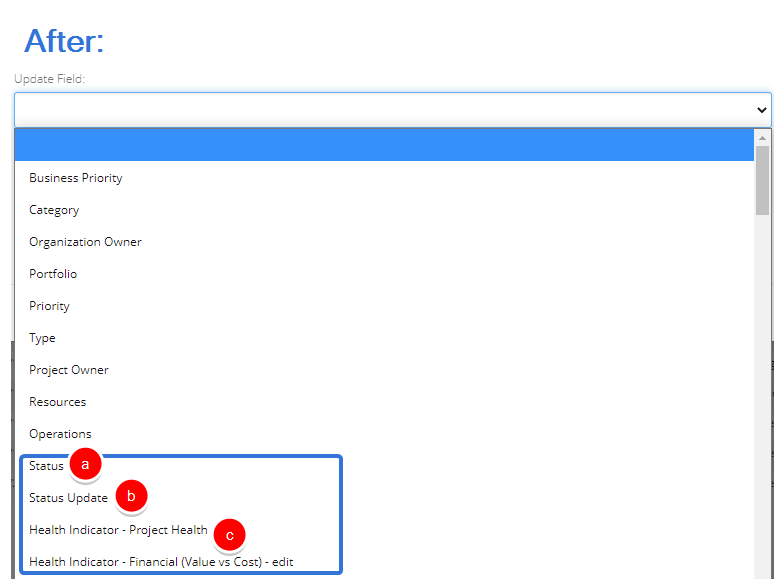
Eclipse PPM users can now edit three new fields while using Bulk Actions to update Projects: Status, Status Update, and Health Indicators.
Prior to this release, users could not access any of these three fields through Project Bulk Actions:
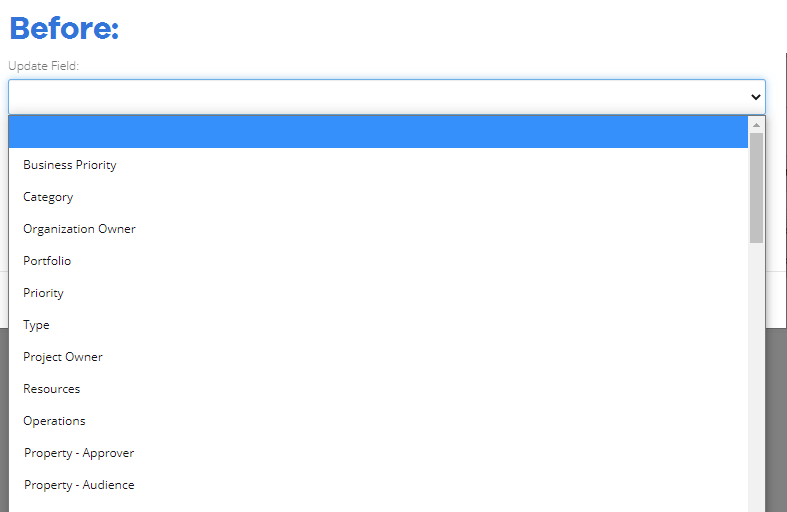
Now, all three of these fields can be found in the "Update Field" drop-down menu:
-
Status: The Statuses of multiple Projects can now be changed at once.
Note: Project Status changes might be attached to workflows. When updating Project Statuses through Bulk Actions, approval workflow settings are ignored and changes are applied immediately.
Note: Users will still require the “Update Project Status” permission on the selected Project(s) in order to execute the Status change successfully.
When this is selected, a "New Value" drop-down menu will appear that allows users to select a new Status for all of the selected Project:
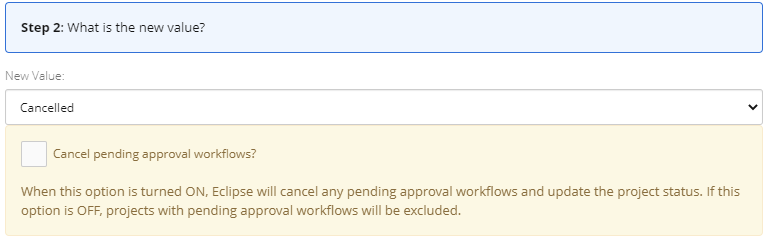
Users will also have the option to exclude any pending workflows. If the "Cancel pending approval workflows?" checkbox is selected, pending approval workflows will be canceled on Projects that have them and the Project Status will be updated. If the checkbox is not selected, the Statuses of Projects with pending approval workflows will simply not be updated.
-
Status Update: A new Status Update can now be entered for multiple Projects at once.
Note: Users will still require the “Project - Profile - Modify” permission on the selected Project(s) in order to change the Status Update(s) successfully.
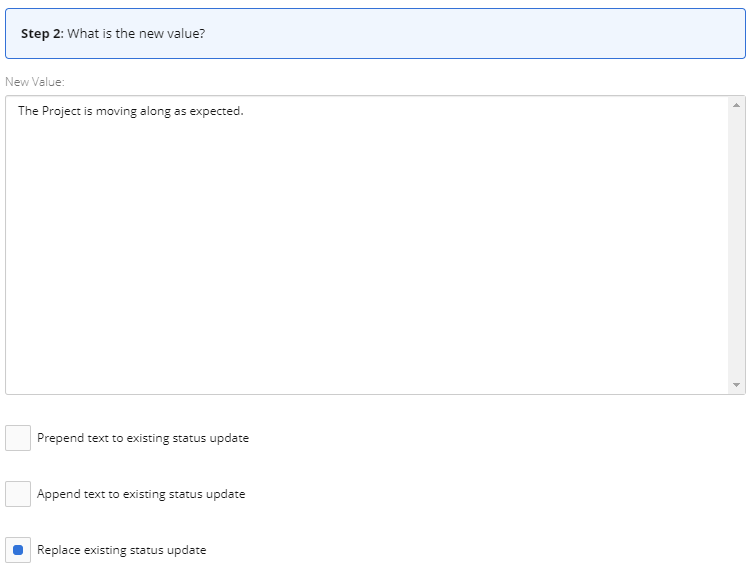
Users will have three options for dealing with existing Status Updates on the selected Projects:
-
Prepend text to existing status update: Selecting this will place the new Status Update before any existing Status Updates. Both Status Updates will be separated by a line break.
-
Append text to existing status update: Selecting this will place the new Status Update after any existing Status Updates. Both Status Updates will be separated by a line break.
-
Replace existing status update: Selecting this will simply replace any existing Status Updates with the new Status Update.
-
-
Health Indicators: The state of any Health Indicator on multiple Projects can now be changed at once.
Note: Users will still require the “Project - Profile - Modify” permission on the selected Project(s) in order to change the Status Update(s) successfully.
Note: Users can only update the chosen Health Indicator value if it is already configured on the selected Project(s). Selecting any Projects without the chosen Health Indicator will not add the Health Indicator to them. If any selected Projects do not have the chosen Health Indicator configured, an error will occur.
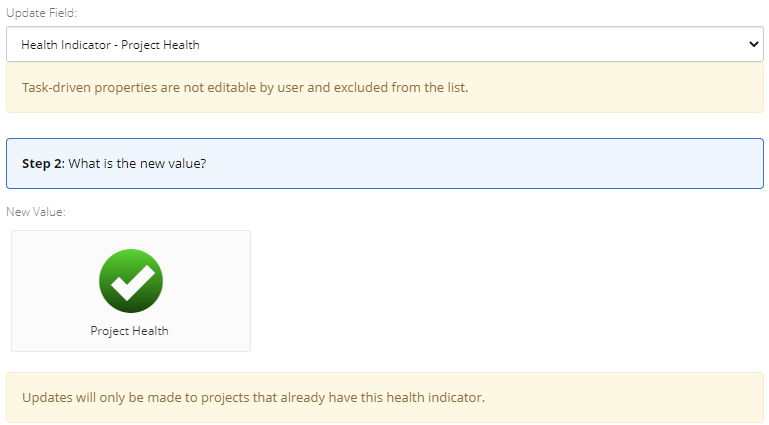
Users can select the box directly under "New Value" and choose a value for the Health Indicator on the selected Projects.
Benefit:
Bulk Actions exist for Projects in Eclipse PPM because many organizations have hundreds of Projects that all need to be maintained at once. Although every Project is (supposedly) different, many of them are quite similar and require the same actions to be taken on them. For example, an executive decision might require multiple Projects to be canceled at once. Prior to this release, an Eclipse PPM user would have had to tediously go through all of these Projects in order to change their Status to "Canceled". This would have taken twice as long if a new Status Update was required for each Project as well. With this update, the user can simply check off all of the necessary Projects and change their Statuses all at once, saving them both time and energy.
Work Planner
The following upgrades have been made to the Eclipse PPM Work Planner. Click on any of them to learn more:
What's Different:
Eclipse PPM users can now filter substitute Resources by Status while conducting an Advanced Substitute on the Resource Sheet of a Work Plan.
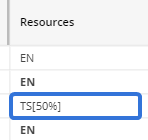
Prior to this release, the list of substitutable Resources in the Advanced Substitute window contained four columns: the Resource's name, Default Type, Default Rate, and Availability:
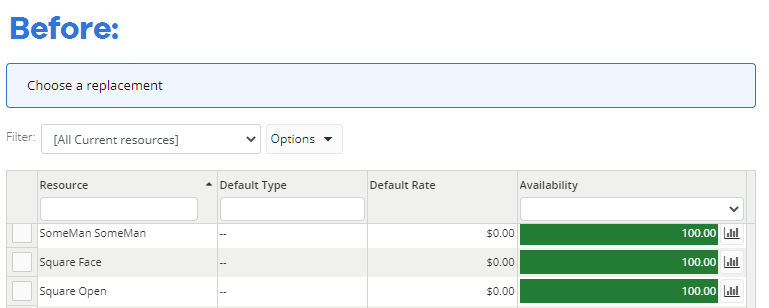
Now, a fifth column for the Resource's Status has been added to the list:
In the "Status" column header, the drop-down menu allows users to filter Resources by their Status. For example, selecting "Active" from the drop-down menu will eliminate all Resources from the list that do not have a Status of "Active":

Benefit:
While skimming through Resources during an Advanced Substitute, there was no way to immediately know the Resource's Status. For example, if a Project Manager wanted to ensure that the substitute Resource was not inactive, she would have to visit the Resource's profile page before adding him in. With this update, the Project Manager can see that the Resource has an "Active" status, so she can be sure that he is an appropriate choice. Also, she now has the ability to filter through all of the Resources by Status, allowing her to choose amongst multiple Resources of her preferred Status. This new feature will allow Project Managers to choose their preferred substitutes and prevent them from choosing unsuitable ones.
What's Different:
Eclipse PPM users can apply any Advanced Search Resource filters on a Detail Time window.
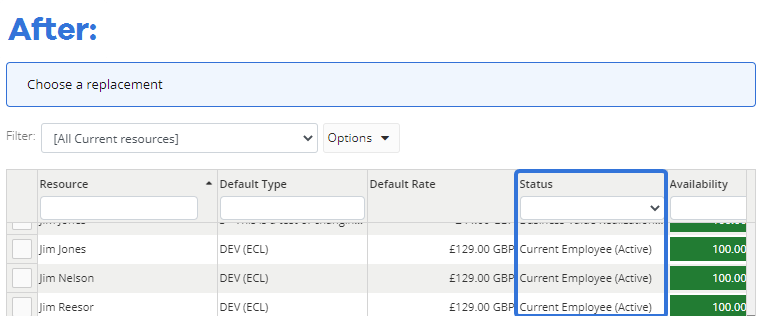
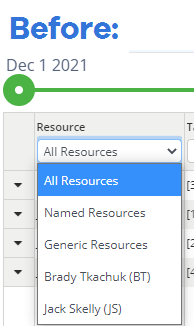
Prior to this release, Resources could only be filtered by Named Resources, Generic Resources, or specific Resources:
Now, the Resources on the Detailed Time page can be filtered by the same Resource filters that can be found while searching for Resources on the Advanced Search page:
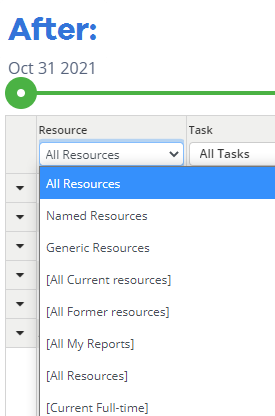
Note: Created filters for Resources will also be displayed in the drop-down menu.
Benefit:
Detailed Time windows can potentially contain numerous Resources. When this is the case, it can be difficult for users to go through all of the Resources attached to a Work Plan when they are only interested in a select few. For example, Project Managers might want to only look at the Resources that they are most responsible for: their own direct reports. By filtering Resources by the "All My Reports" filter, Project Managers can ensure that their Resources are being used appropriately on the Project.
What's Different:
Eclipse PPM users now have the ability to edit Resource assignment allocations in bulk on a Work Plan.
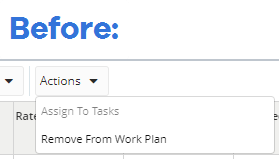
Prior to this release, the "Actions" drop-down menu found throughout the Work Planner only had two options:
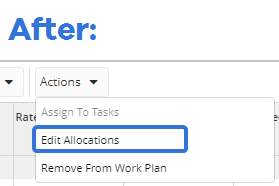
Now, a third option called "Edit Allocations" has been added to the drop-down menu:
The new "Edit Allocations" feature can be accessed from three different places on the Work Planner:
-
Resource Sheet (left): When the "Edit Allocations" feature is used from here, selected Resources will have their allocations changed on the Work Plan Tasks that they are already assigned to.
-
Resource Sheet (right): When the "Edit Allocations" feature is used from here, the Resource will have its allocations changed on all of the selected Tasks.
-
Task Sheet: When the "Edit Allocations" feature is used from here, selected Resources will have their allocations changed on the Task.
Tip: Read the information below on the three editing options for examples on how "Edit Allocations" works from each of these places.
There are three options for editing allocations:
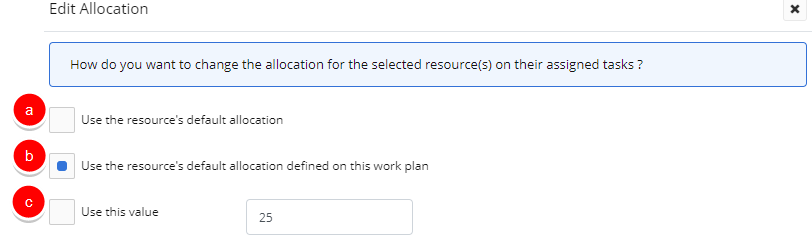
-
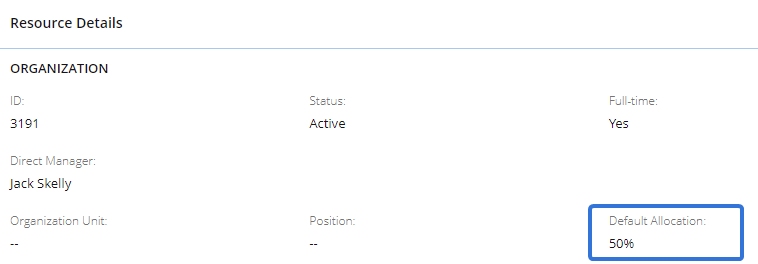
Use the resource's default allocation: The default allocations defined on the Resource's profiles will be applied. For example, Tim Stutzle has a default allocation of 50% on his Resource profile:
If he is being edited in the left-hand Resource Sheet, he will now have an allocation of 50% on all Tasks he is assigned to on the Work Plan:
-
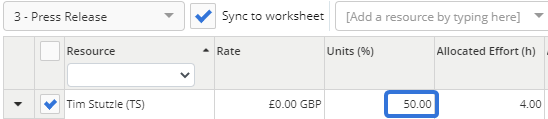
Use the resource's default allocation defined on this work plan: The default allocation for the selected Resources that is currently on the Resource Sheet will be applied. For example, Tim Stutzle has a default allocation of 50% on the Resource Sheet:

If he is being edited in the right-hand Resource Sheet, he will now have an allocation of 50% on all the selected Tasks on the sheet:
-
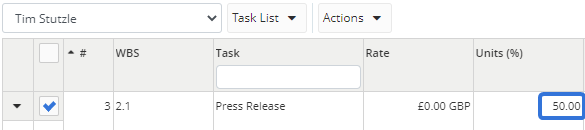
Use this value: A custom percentage allocation can be entered into the field and applied to the selected Resources. For example, Tim Stutzle was selected to be edited to an allocation of 50:

If he is being edited on the Task Sheet, his allocation on the selected Task will be updated to 50%:
For more information and examples, see Edit Resource Allocations in Bulk.
Benefit:
Work Plans have the potential to contain numerous Resources. When this is the case, Project Managers might have to waste a lot of time by updating the allocations of multiple Resources one by one. For example, the Project Manager might want to assign 10 Resources to a Task. She believes that each Resource should attribute a quarter of their time to this Task during its duration. Prior to this release, she would have been able to assign all 10 Resources to the Task all at once, but she could not have updated their allocations to 25% for the Task all at once. She would have had to tediously edit the allocation of each separate Resource. Now, she can simply use the Task Sheet and select every Resource on the Task and update their allocation to 25%, saving her time and energy that can be spent on more important endeavors.
Project Requests
The following upgrades have been made to Eclipse PPM Project Requests. Click on any of them to learn more:
What's Different:
Eclipse PPM administrators can now choose whether or not to configure Project Templates to auto-populate the "Requested By" field on Project Requests. Any Project Request created using the template as a Request Form will have to follow the auto-populate rule configured on the template itself:
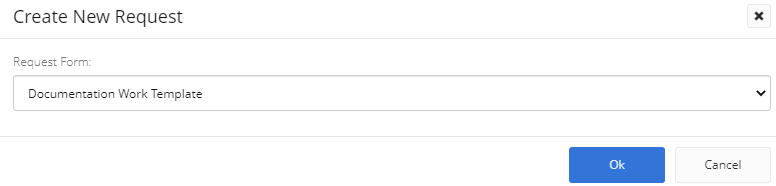
Project Templates serve as Request Forms while creating new Project Requests.
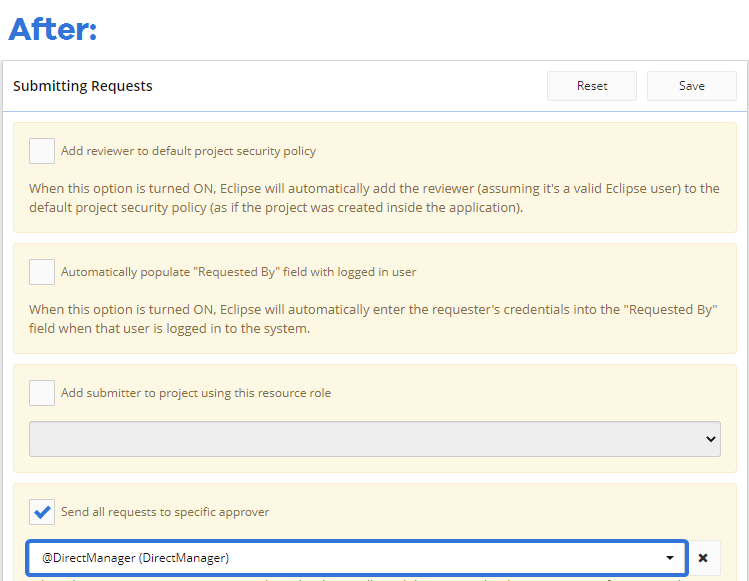
Prior to this release, the "Requested By" field would always auto-populate itself by detecting the user submitting the request. While configuring a Project Template's Project Request features, the "Submitting Requests" window did not offer any toggling options for this feature:
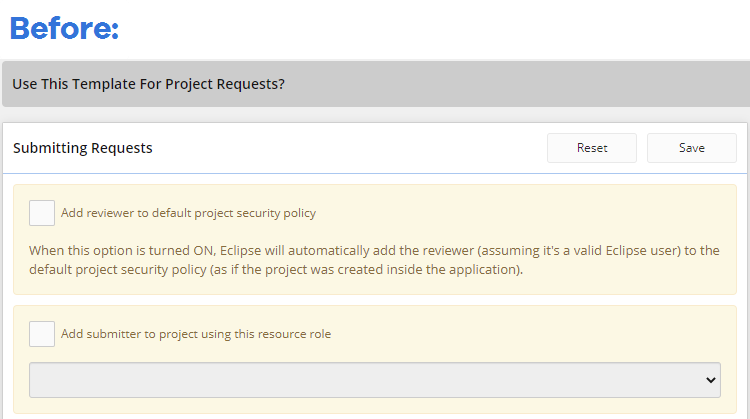
Now, administrators can decide whether or not to auto-populate this field while configuring the template's Project Request settings:
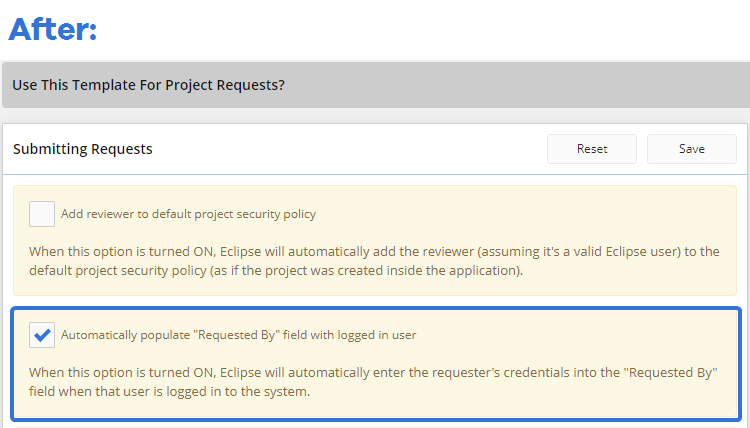
Administrators can now choose to deactivate the auto-populate function of the "Requested By" field, leaving it empty when users create a Project Request with the template as the Request Form:
![]()
Benefit:
Prior to this release, the "Requested By" field would always auto-populate itself by detecting the user who was creating the Project Request. While this might have been an intuitive design for many, it was inconvenient to many others. A lot of Project Requests are made on behalf of others. For example, a Manager might task one of her employees with creating Project Requests for her. Whenever the employee does this, he needs to put his Manager as the requester in the "Requested By" field. If the field is already populated whenever he opens up a Project Request form, he is much more likely to skim over the field and leave his own name in it. This is especially problematic if the "Send Approval To" field is populated with "@DirectManager of 'Requested By'" as pictured above; now the request will be sent to the incorrect approver, causing even more of a headache. By allowing administrators to toggle whether the "Requested By" field auto-populates, they can be certain that Project Requests will include the correct user as the requester.
What's Different:
Eclipse PPM administrators can now configure a Project Template's Project Requests to automatically be sent to the Direct Manager of the requester for approval. When this is configured, any Project Request created using the template as a Request Form will be sent to the Direct Manager of the user in the "Requested By" field.
Tip: A user's Direct Manager can be seen on their Resource details page: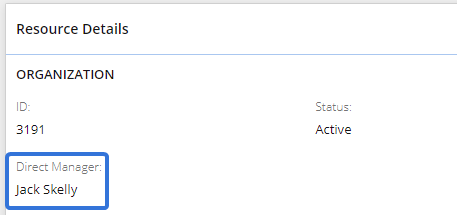
Prior to this release, administrators would have to designate an Eclipse PPM user as the specific approver on Project Requests submitted with the template. This involved typing out the name of a user and scrolling through suggestions in the drop-down menu. The approver would be the same for every Project Request submitted with the template, regardless of the requester:
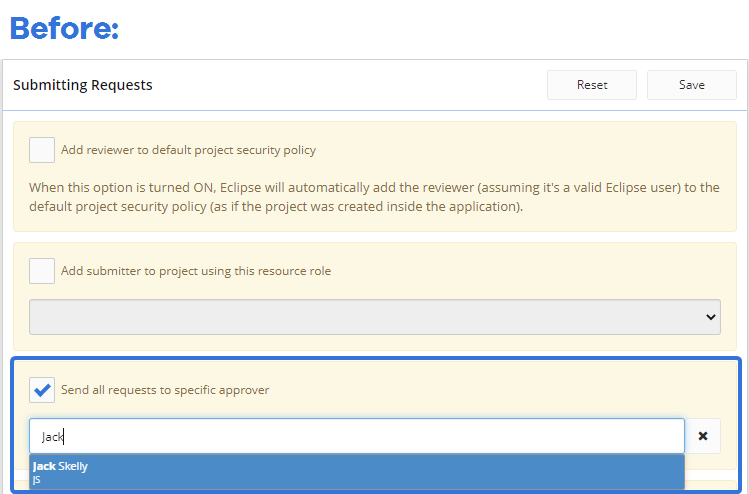
Now, administrators can select "@DirectManager" as the specific approver for Project Requests:
When this option is selected, Project Requests that use the template will automatically be sent to the Direct Manager of the user outlined in the "Requested By" field for approval:
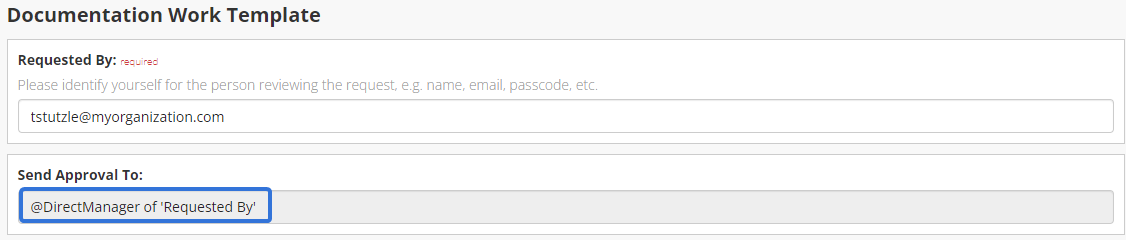
In this example, the Project Request will be sent to whoever is listed as the Direct Manager of "tstutzle@myorganization.com".
Note: If Eclipse PPM cannot detect a Direct Manager for the requester, the requester will automatically receive an email instead.
Benefit:
Prior to this release, Project Templates could only have one static approver configured for all of their Project Requests. This was not a very flexible design as many cases involve different approvers for different requests. In particular, requesters often need to run their Project Requests through their own manager. When this was the case, there was no way for administrators to designate the requester's Direct Manager as the approver because Eclipse PPM users have different managers. Administrators now have the flexibility to designate specific approvers based on the user submitting the Project Request.
Resource Management
The following upgrade has been made to the Eclipse PPM Resource Management window. Click on it to learn more:
What's Different:
Eclipse PPM users can now decide whether or not Resource Availability in the Resource Management window will reflect non-working days.
Prior to this release, a Resource's availability was always calculated by subtracting their allocations (according the default Organization Calendar's working days) from their maximum availability (also according to the default Organization Calendar's working days). This means that any allocations on the default Organization Calendar's non-working days would not be included in the calculation.
Example: Imagine your default Organization Calendar has 8 hour workdays (Monday to Friday, so 40 hours a week). On one of your Projects, you assigned Josh to a week long Task called "Sketches" on the Work Planner and allocated 50% of his time to it:
This 50% allocation is equal to 4 hours out of each 8 hour workday, which will add up to 20 hours over the work week. To calculate his availability for the week, the Resource Management window subtracted these 20 hours he is working from his maximum availability of 40 hours for the week, which equals 20 available hours. You could see this on the Resource Management "Availability" tab if your periods were set to "Weeks":
Please note that a filter was made for the specific Project and Josh has not been given any other allocations. In reality, the contents of the Resource Management window will not be so empty.
If a non-working day was introduced into the week on the default Organization Calendar, any availability or allocations on that day would not be included in the calculation; the availability is only calculated based on working days. This means that the new allocation on the week's working days is now 16 hours (4 hours per day over the remaining 4 days) and the new maximum availability for the week is 32 hours (8 hours per day over the remaining 4 days), which brings the total allocation to 16 hours. Before this new feature, the Resource Management window would always calculate availability like this: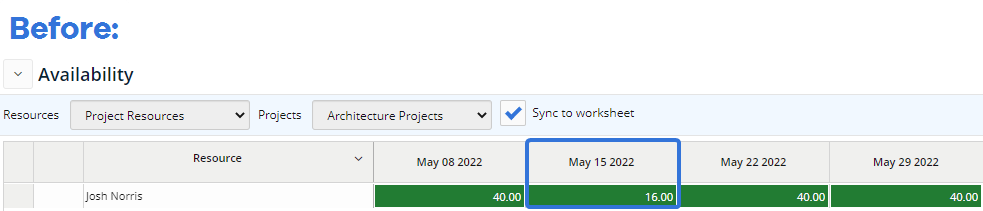
With this update, users now have the option to continue calculating availability like this or to include non-working day allocations in the calculation. This can easily be done by opening the "Options" drop-down menu on the "Availability" tab and selecting the "Include allocated time on non-working organization calendar days" checkbox:
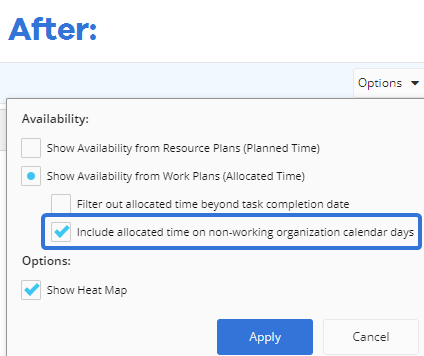
When this is selected, availability will be calculated by subtracting the total allocated hours (including those on the default Organization Calendar's non-working days) from the maximum availability (only on the default Organization Calendar's working days).
Example: Imagine you have selected the "Include allocated time on non-working organization calendar days" checkbox on the "Availability" tab. This changes how Josh's availability is calculated for the week he is working on the "Sketches" task. Now, the allocated hours that are subtracted from his maximum availability for the week will also include the hours allocated on the default Organization Calendar's non-working days, which is 20 hours. The maximum availability will still only include hours on working days, which is 32 hours. Therefore, Josh's new availability for the week is calculated by subtracting the 20 allocated hours from the 32 available hours, which is 12 hours: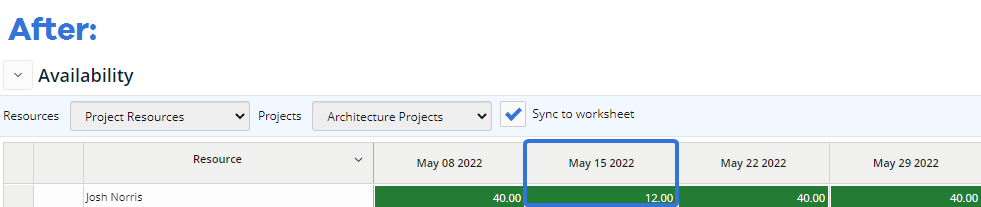
Note: This feature only takes into account non-working days on the default Organization Calendar. Non-working days on Project calendars or on non-default Organization Calendars that have been synced to the Work Plan will produce a different behavior. The "Include allocated time on non-working organization calendar days" checkbox will have no effect on these non-working days .
Benefit:
Before this upgrade, Eclipse PPM Resource availability was always calculated by subtracting the working day allocations from the working day maximum availability. This is helpful for Project Mangers who are familiar with the default Organization Calendar and wish to schedule around it. In Josh's example above, his Project Manager was probably aware of the company-wide day off when she scheduled his Task from Monday to Friday. If this is the case, the 16 available hours from the original example make sense.
However, it could very well be the case that a company-wide day off on the default Organization Calendar might slip the Project Manager's mind. In this case, she might have attempted to allocate 20 hours toward the week long task without knowing that there was a non-working day. The previous calculation would ignore the allocated hours on non-working days and assume that she only meant to allocate 16 hours to the Task; essentially, those 4 hours allocated on the non-working day would disappear. The "Include allocated time on non-working organization calendar days" checkbox ensures that these allocated hours do not just go to waste.
This checkbox is especially helpful if a Resource gets over-allocated because of any non-working days. For example, imagine that instead of a 50% allocation on the Task (averaging 4 of 8 hours per day), Josh had a 100% allocation on the Task (8 of 8 hours per day). The Project Manager wanted him to work on this Task for 40 hours during the week, but she forgot about a company-wide retreat on Wednesday. By selecting the "Include allocated time on non-working organization calendar days" checkbox, the "Availability" tab in Resource Management will let her know that she has over-allocated Josh by 8 hours:

Reports
The following upgrades have been made to Eclipse PPM Reports. Click on any of them to learn more:
What's Different:
Eclipse PPM report builders can now choose to sort their Adhoc Project and Task Reports by custom Properties.
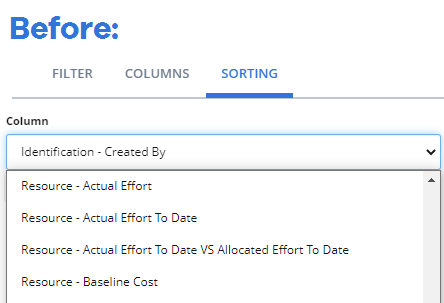
Prior to this release, Properties were not sorting options on Adhoc Reports. When report builders opened up the "Columns" menu under the Sorting tab while creating an Adhoc Report, they could not select any Properties:
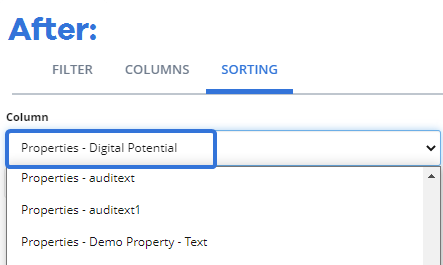
Now, report builders have the option to choose Project / Task Properties from the "Column" menu:
After choosing a Property to sort by, report builders can use the "Direction" drop-down menu to order the Report results in ascending or descending order:

When this occurs, the Adhoc Report will order all of the results based on the value of the Project / Task's Property.
Example: If you choose to sort your Adhoc Project Report by a Project Property in "Ascending" order, the results will order themselves alphabetically / numerically by the Property's value: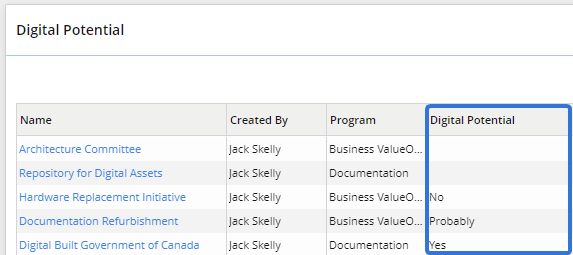
Imagine creating a Project Adhoc Report called "Digital Potential". It is a very simple report; you want to see the potential each Project has to become digital. An administrator has already created a Single Select Project Property used to indicate this, so you choose "Properties - Digital Potential" as a reportable column.
Benefit:
Properties can be added as columns in Adhoc Project and Task Reports, so it only makes sense to allow report builders to sort by them as well. This is especially helpful for Adhoc Reports that are built with the sole purpose viewing Property values on Projects or Tasks. In the example above, the Adhoc Report was created to see which Projects have the potential to become digital. Imagine the viewer wants to see which Projects "probably" have the potential to become digital. Prior to this update, she would have to scroll through the entire report and tally up the Projects that had a value of "Probably". Now, she can easily see all of the Projects with a value of "Probably" in one place because they are sorted accordingly.
What's Different:
Eclipse PPM report builders can now include custom Task Properties as columns in both Resource Extract and Resource Time Eclipse Reports.
Prior to this release, Task Properties could not be added to either of these Eclipse Reports. In Resource Extract Reports, no Task Properties were visible as columns in the report. The exported Report would end after the "Actual Cost" column:
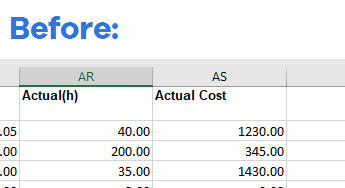
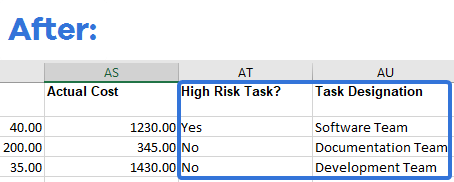
Now, each Task Property will appear in columns directly to the right of the "Actual Cost" column in the report:
In Resource Time Reports, report builders could not select any Task Properties as columns:
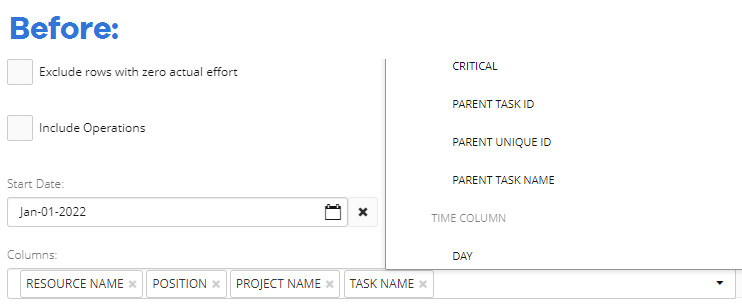
Now, all Task Properties can be found in the "Columns" drop-down menu and added to the report:

Benefit:
Task Properties allow Eclipse PPM users to further define Tasks with additional information. For example, a supervisor might want to see how many "High Risk" Tasks her Resource has been working on. With this update, she can easily extract a Resource Time report and tally up all of the Resource's Tasks that are marked "Yes" under the "High Risk" custom Task Property. This upgrade allows users to see custom information such as this whenever they extract a Resource Time or a Resource Extract Report.
What's Different:
A new Eclipse Report called "Organization Structure Unit Extract" has been added to Eclipse PPM:
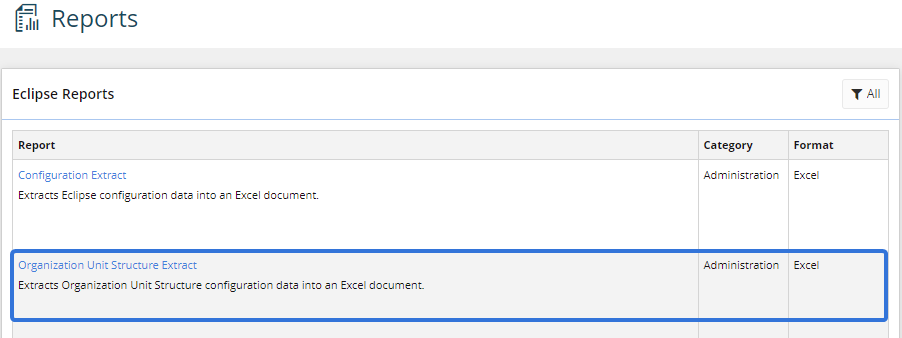
This report extracts Organization Unit Structure configuration data into a Microsoft Excel document. This is the same structure that administrators can view and edit on the Organization Structure page:
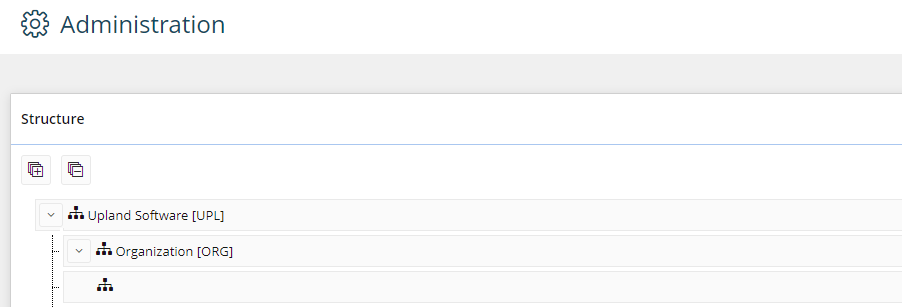
The report output lists all of the Organization Units and Resource Types that can be found in the structure. It includes columns for the name, type, and abbreviation (if provided) of each listed entity, as well as Default Allocations and Default Rates for every Resource Type:

Benefit:
Eclipse PPM administrators now have the ability to export their Organization Structure into a spreadsheet. This feature was available in a previous version of Eclipse PPM, but due to popular request it has been brought back.
This report allows administrators to share their organizations' "Work Tree" structures with non-Eclipse PPM administrators. For example, a Human Resources director might be interested in seeing the Default Rates for Human Resources roles; this way, she will know how much of a salary to offer new hires. She can even compare these rates to Default Rates in other departments to ensure that her employees are being compensated fairly. This is just one example of how this "bird's eye view" of the organization structure will help professionals make important decisions.
Upland Analytics
The following upgrades have been made to Upland Analytics. Click on it to learn more:
Note: Please be aware that the data views for Project and Program Properties will be removed from Upland Analytics in the next Eclipse PPM release (2022R2). The soon-to-be-deprecated Project Property views can be found in the Project List data source: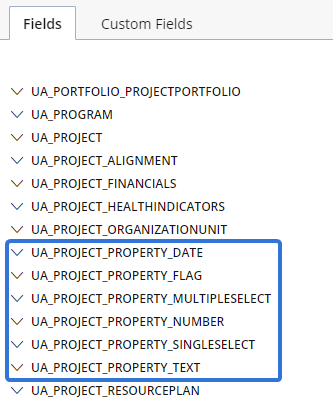
The soon-to-be-deprecated Program Property views can be found in the Program List data source: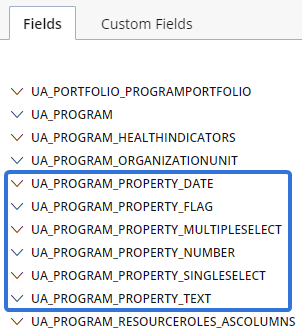
Fields for Project and Program Properties can now be found in the "UA_Project" and "UA_Program" views instead. If any of your reports are using any fields from the soon-to-be-deprecated views, please be sure to change them over to the new ones before 2022R2 (expected later this year).
What's Different:
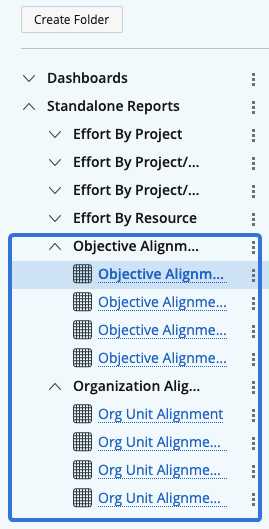
Eight new Standalone Reports that detail alignment information are now available in Upland Analytics. These reports fall under two new categories of Standalone Reports: Objective Alignment and Organization Alignment:
These new reports allow Eclipse PPM users to directly view how closely their Projects, Programs, and Portfolios are aligning with their objectives and their organizations.
Example: Imagine you are trying to measure the Objective Alignment of your Eclipse PPM Portfolios. To do this, you can simply run the "Objective Alignment by Portfolio" Standalone Report: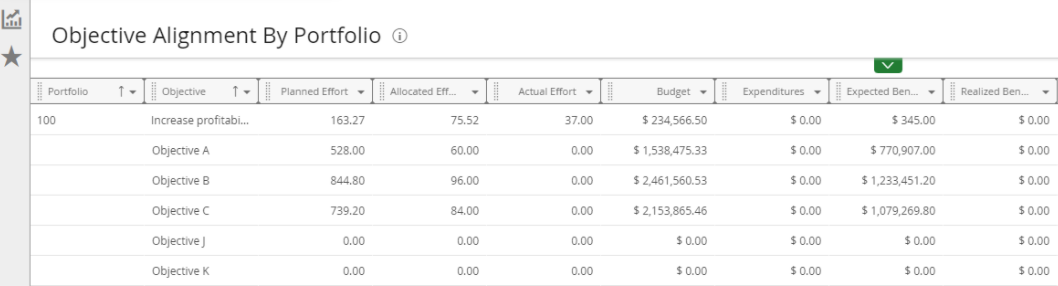
This report will list out each Portfolio and display the Planned Effort, Allocated Effort, Actual Affort, Budget, Expenditures, Expected Benefits, and Realized Benefits towards each defined Objective.
Benefit:
Eclipse PPM can help users keep track of a multitude of Projects and Portfolios all at once. However, a great deal of this work could be meaningless if it does not align with any organizational goals or objectives. These new alignment reports allow users to see how closely their organization's work is aligned to its current targets, which will help them make better-informed decisions on prioritization and coordination.
What's Different:
A new date field that reports dates in a simple "mm/dd/yyyy" format has been added to multiple views in Upland Analytics.
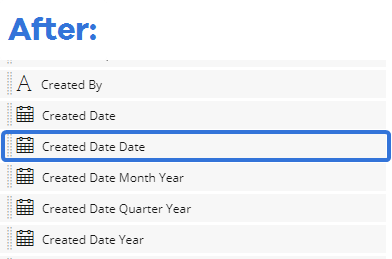
Prior to this release, there were four types of date fields that formatted dates in different ways: Date, Date Month Year, Date Quarter Year, and Date Year. For example, if an Eclipse PPM user was creating a report using the "Project List" data source, she would have seen four different fields that could be used for reporting Project creation dates:
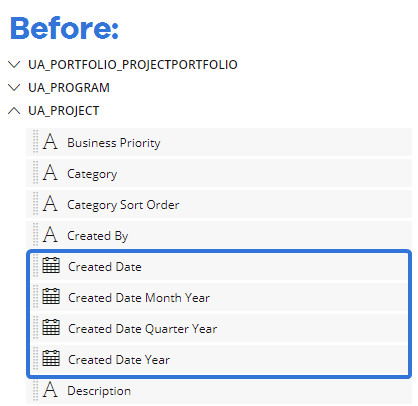
Now, she will be able to see a fifth field called "Created Date Date":
When she includes this field in her report, she can see each Project's created date formatted as "mm/dd/yyyy":

Note: The new "Date Date" fields are not to be confused with the "Date" fields, which include a timestamp: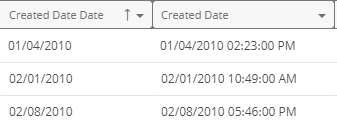
Benefit:
The timestamp on the "Date" fields is useful for many Upland Analytics report builders and viewers, but it can lead to an information overload for others. Many users simply do not have any interest in both the date and the time; many just need the date. For example, report viewers might not have much interest in the time a Project was created if it has been going on for months and years. Giving report builders the option to exclude the timestamp on dates allows them to create more concise reports and avoid unnecessary information.