2024R1.1 - New Features
Below is a summary of the new additions to PowerSteering in the 2024R1.1 release. PowerSteering 2024R1.1 is set to be deployed to the staging site on July 31st, 2024 and deployed to the production site on August 18th, 2024. When this happens, the listed features will become available.
Note: This page will be updated as new functionality becomes available.
The following key features will be made available with the 2024R1.1 PowerSteering release:
What's Different:
PowerSteering users can now save their Metric Bulk Actions. From here, the actions can be run at any time or scheduled to automatically run later.
Note: Metric Bulk Actions always respect the permissions that users have on the work items they are attempting to adjust. For example, a user will not be able to use Metric Bulk Actions to unlock Metrics on work items that they do not have the "Lock Metrics" Project Tasks permission on.
Prior to this release, Metric Bulk Actions could not be saved. Each Metric Bulk Action had to be enacted by manually going through each step of the Metric Bulk Action wizard.

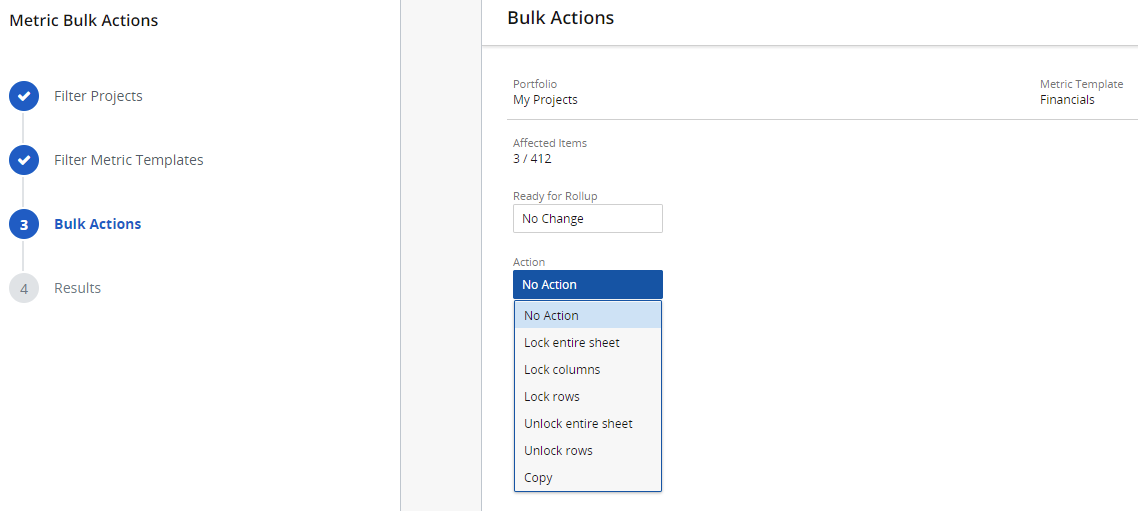
The Metric Bulk Actions wizard. Prior to this release, this was the landing page when users selected Metric Bulk Actions from the Navigation Menu.
With this update, users will now be directed to the new "Metric Bulk Action Jobs" page when they select Metric Bulk Actions from the Navigation Menu.


This page lists all of the Metric Bulk Actions that have been saved to run at a later date (more on saving Metric Bulk Actions below). Each Metric Bulk Action is now referred to as a "job".
The "Metric Bulk Action Jobs" page contains the following columns:
-
Metric Bulk Action Job: The name of the Metric Bulk Action job.
-
Created By: The name of the user who created the Metric Bulk Action job.
-
Description: A description of the Metric Bulk Action job's purpose.
-
Last Run Details: Some information on the last time the Metric Bulk Action job was run. Users can select Results for information on each Metric that was updated or failed to update.
-
Last Run Start: The date (mm/dd/yyyy) and time the last run of the Metric Bulk Action job started.
-
Last Run End: The date (mm/dd/yyyy) and time the last run of the Metric Bulk Action job finished.
-
Next Run: The date (mm/dd/yyyy) and time the Metric Bulk Action job is scheduled to run again.
Note: Columns can be removed and added by opening the "Columns" drop-down menu  .
.
Users looking to create a new Metric Bulk Action job can do so by selecting the Create button in the top right-hand corner of the page.
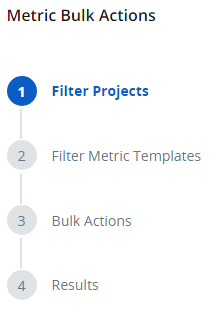
This will open up the Metric Bulk Actions wizard that users may be familiar with. Prior to this release, however, creating a new Metric Bulk Action was a 4-step process.

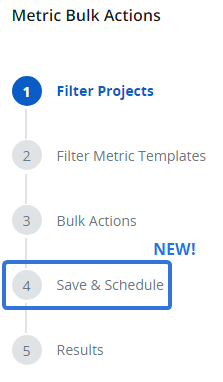
With this update, users will notice that a new "Save & Schedule" step has been added.

The following fields can be filled out during this step:
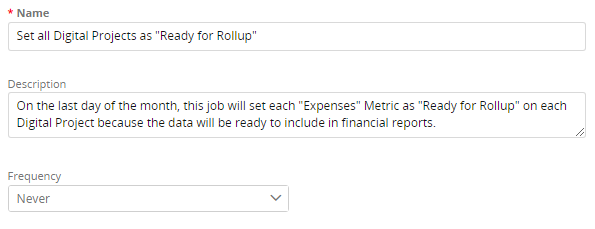
Note: These fields are only relevant if you plan on saving the Metric Bulk Actions Job. If you select Run instead of Save, the Metric Bulk Action will run immediately and it will not be saved to the "Metric Bulk Action Jobs" page. Values in these fields will be discarded if this is the case.
-
Name (required): Enter an informative name for your new Metric Bulk Action job.
-
Description: Enter a description of your new Metric Bulk Action job's purpose.
-
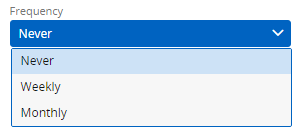
Frequency: Determine when the Metric Bulk Action job will run.
-
Never: The Metric Bulk Action job will be saved, but it will not have any scheduled run times in the future.
Tip: This option should only be selected if a schedule has not been determined yet or if a temporary pause should be placed on the job.
-
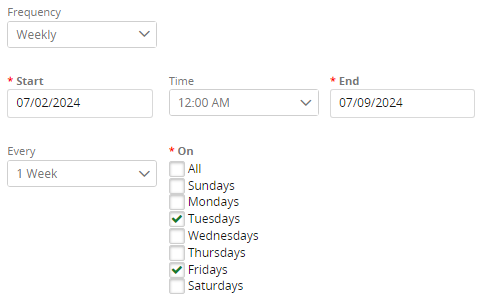
Weekly: The Metric Bulk Action job will run on a weekly basis. The fields that appear can be used to specify the run schedule.
-
Start: Select a start date for the Metric Bulk Action job.
Note: The job will not necessarily run on this day. This date determines when the job becomes active. It will run based on the "Every" and "On" selections below.
-
Time: Select the time of day the Metric Bulk Action job will run.
Tip: It is best to schedule jobs to run outside of working hours. This will reduce the likelihood of users editing their Metrics during a Metric Bulk Actions job.
-
End: Select an end date for the Metric Bulk Action job.
Note: The job will not necessarily run on this day. This date determines when the job becomes inactive. It will run based on the "Every" and "On" selections below.
-
Every: Determine the weekly interval for the Metric Bulk Action job.
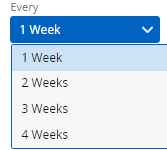
Example: If "2 Weeks" is selected from the "Every" menu and "Tuesday" and "Friday" are selected from the "On" menu (below), the job will run on the Tuesday and Friday of every second week. During the first week, the job will run on Tuesday and Friday. During the second week, the job will not run. During the third week, the job will run on Tuesday and Friday again. This pattern will continue until the "End" date is reached.
-
On: Determine the days of the week that the job will run on.
-
-
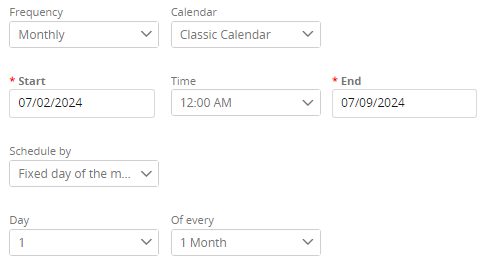
Monthly: The Metric Bulk Action job will run on a monthly basis. The fields that appear can be used to specify the run schedule.
-
Calendar: Determine which Calendar will be used to schedule the Metric Bulk Action job.
Note: Administrators can create Alternative Calendars in PowerSteering.
-
Start: Select a start date for the Metric Bulk Action job.
Note: The job will not necessarily run on this day. This date determines when the job becomes active. It will run based on the fields below.
-
Time: Select the time of day the Metric Bulk Action job will run.
Tip: It is best to schedule jobs to run outside of working hours. This will reduce the likelihood of users editing their Metrics during a Metric Bulk Actions job.
-
End: Select an end date for the Metric Bulk Action job.
Note: The job will not necessarily run on this day. This date determines when the job becomes inactive. It will run based on the fields below.
-
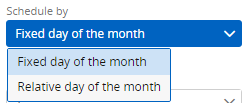
Schedule By: Determine how the schedule will search for the day to run the Metric Bulk Action job.
-
Fixed day of the month: A fixed date of the month will be used to identify when the job runs. This will open up drop-down menus that can be used to specify when the job will run.

Example: Selecting "5" from the "Day" menu and "2 months" from the "Of every" menu will cause the Metric Bulk Action job to run on the 5th of every second month.
-
Relative day of the month: A relative day of the week will be used to identify when the job runs. This will open up drop-down menus that can be used to specify when the job will run.

Example: In the image above, the Metric Bulk Action job will run on the third Thursday of every second month.
-
-
-
Once the settings on the "Save & Schedule" page have been determined, the Save button must be selected.

Note: If Run is selected instead, the Metric Bulk Action job will run immediately and the job will not be saved. All of the "Save & Schedule" settings will be discarded.
Note: When a Metric Bulk Action job is scheduled, there is no way to temporarily delay it. If a user requests more time to edit a Metric before a Metric Bulk Action job occurs, it is best to wait for the job to complete and then manually edit the Metric afterward.
Tip: It might be wise to designate a specific PowerSteering administrator to create and schedule Metric Bulk Actions Jobs. Users who belong to the Admin Group have permission to edit Metrics on all work items, so this will ensure that all Metrics in the chosen Portfolio will be affected when the job runs.
Benefit:
Metric Bulk Actions exist to save PowerSteering users time and effort whenever they make uniform changes to multiple Metrics at once. However, many customers find themselves repeatedly conducting the same Metric Bulk Actions time and time again. Although it prevented users from having to make identical changes to each individual Metric at once, having to run the exact same Metric Bulk Actions over and over again is tedious in itself. Furthermore, forgetting to run a Metric Bulk Action was a costly mistake because it affected every Metric that would have been changed; failing to run a bulk lock, for example, could result in a great number of Metrics receiving edits when they were not supposed to.
With this update, PowerSteering users no longer need to repeatedly run the exact same Metric Bulk Actions; they can simply create a Metric Bulk Action job that runs on a set schedule. This will also prevent any issues that occur due to forgetting to run a Metric Bulk Action.
Example: Mary, a Financial Manager, is responsible for overseeing the Metrics of each work item in the "Digital Projects" Portfolio. Every Friday, the executive team runs reports on the total projected expenses for the portfolio, which are tracked using the "Expenses" Metric. This is why Mary uses a Metric Bulk Action to set every "Expenses" Metric as "Ready for Rollup" every Thursday evening.
Prior to this release, Mary could have forgotten to conduct this Metric Bulk Action, resulting in the executive team wondering whether or not the data was ready to be used for reports. With this update, Mary can now easily create a Metric Bulk Action job that is scheduled to lock these Metrics and set them as "Ready for Rollup" every Thursday night. Also, she can create another job that unlocks each of these Metrics and removes their "Ready for Rollup" label on Friday night so the Metrics can be edited the following week.
What's Different:
PowerSteering users can now receive reminder notifications when all of a gate's Conditions have been met and the gate is ready to be advanced. This new ability comes in the form of two new features that work in conjunction with each other: the "Gate is ready to be advanced" Alert Subscription and the "Gate Advance Reminder" agent.
Users can now subscribe to the new "Gate is ready to be advanced" Alert Subscription on a Gated Project. It can be found under the "Gate approvers" category on the Alert Subscriptions page.
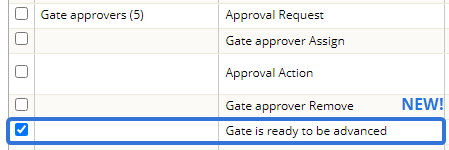
Note: Alert Subscriptions under the "Gate approvers" category will only appear on Gated Projects.
Note: Administrators can set Alert Notifications by Role or users can select their own Alert Subscriptions on specific work items.
Users who are subscribed to this alert for a Gated Project will receive reminder when all of the Conditions of the current gate are satisfied. The reminders are sent out by the new "Gate Advance Reminder" agent.
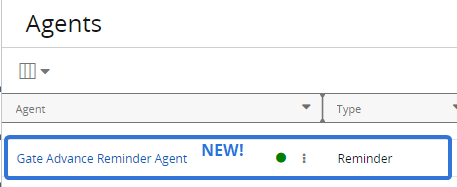
When this agent runs, it will search for Gated Projects with "Active" work statuses that have completed Conditions on the current gate. Users who are subscribed to the "Gate is ready to be advanced" Alert Subscription on these Gated Projects will receive a reminder alert stating that the gate is ready to be advanced.
Tip: See the Work Status Names page to see which work statuses are considered "Active".

Tip: Users can configure the alert to be sent by email as well by enabling "Notify by email" on the Alert Subscriptions page.
Administrators can configure how the agent operates by selecting the name of the agent from the Agents page and selecting the Edit button in the top right-hand corner of the screen.

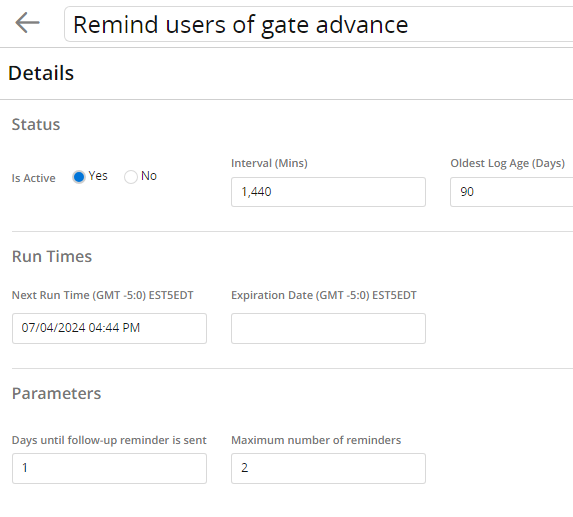
The following fields can be configured on the agent:
-
Title: Select the title field to change the name of the agent task.
Note: This will only change the name of the agent task, not the agent itself.
-
Is Active: Determine whether the agent is active or not. Inactive agents will not run.
-
Interval (Mins): Determine the time interval (in minutes) between runs. This means that whenever the agent runs, its next run will automatically occur again after the indicated interval.
Note: A reminder will not necessarily be sent for the same Gated Project every time the agent runs. After sending an initial reminder for a Gated Project with completed Conditions on the current gate, the agent will not automatically send another if the gate has still not been advanced by the time the agent runs again. See "Days until follow-up reminder is sent" and "Maximum number of reminders" below for information on sending additional reminders for the same Gated Project.
Tip: The recommended interval is 1,440 minutes (24 hours).
-
Oldest Log Age (Days): Enter the number of days that the oldest logs will be saved. Runs that occurred after the indicated number of days will be removed from PowerSteering.
Tip: Try to enter the lowest number of days possible in order to ensure that PowerSteering runs efficiently.
-
Next Run Time: Click on the field to select a date and time for the agent's next run. The currently-scheduled next run will auto-populate the field.
-
Expiration Date: Click on the field to select a date and time for the agent to automatically expire (turn off).
-
Days until follow-up reminder is sent: Enter the number of days that will serve as an interval between the initial reminder and each follow-up reminder.
After the initial reminder is sent when the agent first identifies a gate that is ready to advance, follow-up reminders can be sent afterward if the gate has still not been advanced and the Conditions are still satisfied. Follow-up reminders will continue to be sent until the gate is advanced or the maximum number of reminders is reached (see below).
Note: If the "Interval (mins)" is a longer time period than this value, it will not result in multiple follow-ups being sent at once. Each run will only send one reminder per Gated Project.
-
Maximum number of reminders: Determine how many reminders should be sent when a gate has still not been advanced. This includes both the initial reminder and any follow-up reminders.
Tip: Enter "1" if you would not like follow-up reminders to be sent after the initial reminder.
Benefit:
Prior to this release, PowerSteering would only send notifications to gate approvers when gate approval was requested. A notification that alerted users when gate Conditions were satisfied did not exist. Although this might appear to be enough to many users, some actions outside of Conditions may need to be taken before gates can be advanced.
Example: Erin is in charge of creating Project Reports for each gate of a specific Gated Project. Once the gate is ready to be advanced, she runs a report to show the management team. If the management team is happy with the results, they will advance the gate.
Erin is not a gate approver, so prior to this release, she would never know when a gate was ready to be advanced. The management team would often have to reach out to her in order to request the report before they could determine whether the gate could be advanced or not.
With this update, Erin can subscribe to the "Gate is ready to be advanced" Alert Subscription on the Gated Project. If an administrator has enabled the "Gate Advance Reminder" agent to send notifications, Erin will be notified when the Conditions of the current gate are met. She can now create her report without having to be reminded by the management team.
What's Different:
PowerSteering users can now see an "EER" column on the right-hand side of their Timesheets.
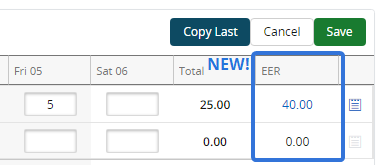
"EER" stands for Estimated Effort Remaining. This column displays the remaining number of hours allocated to the selected Role on a work item after today (the day the users views the Timesheet).
Note: Keep in mind that the value reflects the amount of time assigned to the Role on the work item after the current day. This value will not change after time is entered or submitted toward the Role.
Example: Jack is assigned to the "Infrastructure Bill Press Release" as a Contributor.
A total of 72 hours have been allocated to this Role over 9 working days between July 2nd and July 12th, which equals 8 hours per day.
Jack views his Timesheet on July 5th. After July 5th is over, he will be 4 working days into the allocated time. Over these 4 days, a total of 32 allocated hours have passed (remember that 8 hours per day were assigned to the Task). So, when Jack enters "Infrastructure Bill Press Release" as a work item and "Contributor" as a Role on his Timesheet, he will see that these 32 hours have been subtracted from the total 72 hours that were originally allocated to the Role. Only 40 allocated hours remain after today.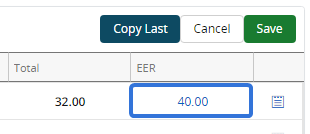
Furthermore, Timesheet viewers can use the EER value to request a change to the remaining effort. Selecting the value itself will open up the "Estimated Effort Remaining" window, which can be used to propose a new EER.
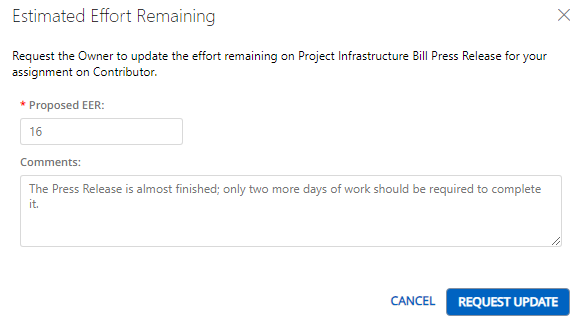
Selecting the Request Update button will send an Inbox notification to the Owner of the work item indicating that the Timesheet viewer has proposed a change to the Estimated Effort Remaining.
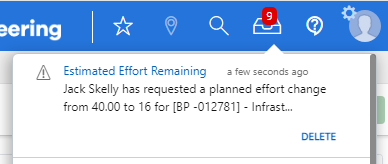
Tip: If a comment has been included, viewing the email notification instead of the Inbox notification makes it easier to read it.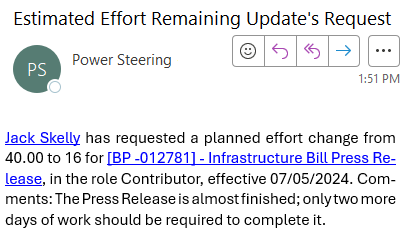
From here, Owners can choose to navigate to the work item and change the schedule to accommodate the recommendation.
Benefit:
Although Project Mangers do their best to schedule work and allocate effort before their Projects begin, Project schedules will often inevitably require changes over time. The original effort estimates may no longer reflect the actual remaining work as the Project progresses. As time goes on, the Resources who are assigned to these work items have the best perspective of how much more effort will be required. Encouraging Resources to propose EER changes allows for more agile Resource management by ensuring that effort is allocated effectively, avoiding overallocation and underutilization.
Example: Jack views his Timesheet at the end of his workday on July 5th. After entering the work item (a press release) and his assigned role on the work item, he sees that his EER after today is 40 hours.
However, the press release is almost finished; he determines that he can comfortably finish it within two more work days. With this in mind, he selects the 40.00 and uses the "Estimated Effort Remaining" window to propose a new EER of 16 hours. He uses the "Comments" field to explain that he has been overallocated for the work item.
The Owner of the work item receives a notification containing the proposed EER and makes the appropriate changes to the schedule. Jack now has 24 free hours that can be allocated to other work.
Alternatively, Jack might have realized that the remaining 40 hours were not enough to finish his work. In this case, he can request a new EER that is higher than 40. When the Owner receives this request, she has the option to rework the Project schedule ahead of time before a conflict arises.
What's Different:
Gated Projects can now be configured to create new Document versions after a gate is advanced. If the Document requires approval on the gate, the new version will need to be approved before the gate can be advanced.
Prior to this release, Documents that were required Deliverables for multiple gates would not require approval during each gates. If the Document was approved for one gate, it would be approved for every other gate on the Gated Project.


"Measure" is the second gate on this Gated Project. The "Gate Summary" Document Deliverable was approved on the previous gate, so it is automatically approved on this gate as well.
Example: A "Gate Summary" Deliverable Document was added to each gate of a Gated Project. One of the Team Members on the Project is expected to complete it for every gate. Approval is required for the Document.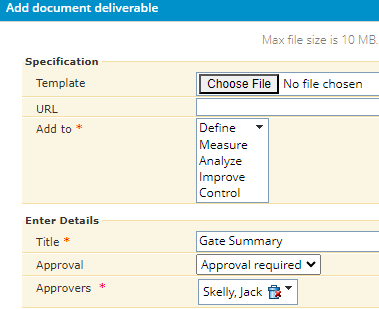
This automatically creates a "Required Deliverables" Condition for each gate; a gate cannot be advanced until the "Gate Summary" Document is approved.
Once the first gate ("Define") is complete, Jack (the approver) approves it.
This satisfies the "Required Deliverables" Condition on the "Define" gate, allowing the gate to be advanced.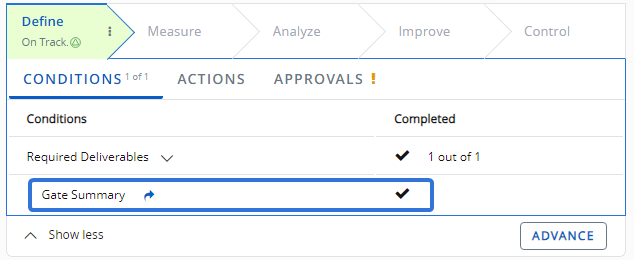
However, once the Gated Project is advanced to the "Measure" gate, the same document has already been approved without Jack addressing it.
This is because approving a Document on one gate approves it for the entire Gated Project. Even though Jack has not approved the Document on the "Measure" gate, it is already approved and the "Required Deliverables" Condition is already satisfied on it.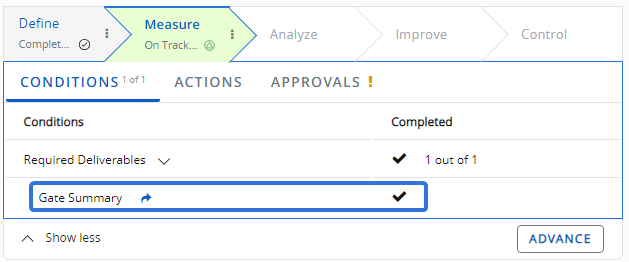
However, Documents require approval once again after a new version is added. A Document is only considered "Approved" if its latest version has been approved.

With this update, Gated Projects now come with a new "Version Deliverable Documents on Gate Advance" Configuration option while editing the Gated Project's details.

Note: Users require the "Edit Controls" Project permission on the Gated Project to configure this checkbox.
When this checkbox is selected, a new version will automatically be added to the Document whenever the gate is advanced.


Note: A comment will automatically be generated for the version indicating that it was created by advancing the gate.
This means that once the gate is advanced, the "Required Deliverables" Condition will not be automatically satisfied. This requires the original Document to be approved again for the gate.

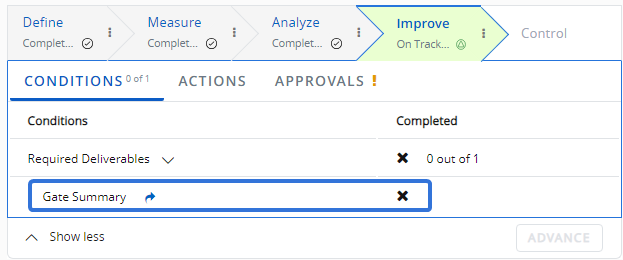
The latest version of the "Gate Summary" Document that was created during a gate advance has not been approved yet.
Note: This new feature also includes a new "Deliverable status" column in the "Documents" module.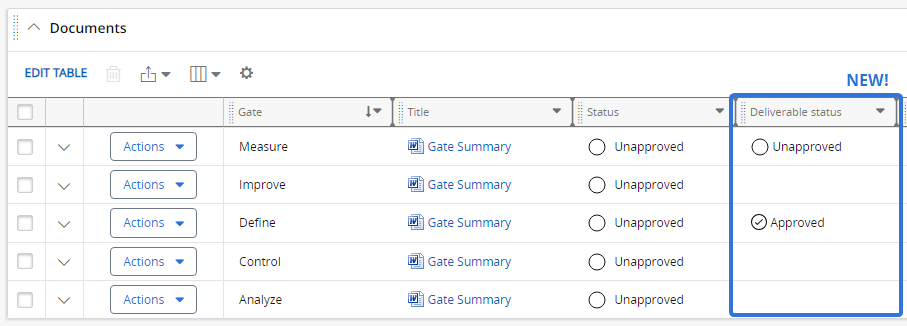
This column indicates which gates the Document has already been approved for as well as the gates it has not. In the example above, the "Gate Summary" Document has been approved on the "Define" gate, but it requires approval on "Measure" gate. The other gates have not been reached yet, so they do not have a value in the column.
Benefit:
Prior to this update, approving a Document Deliverable on a Gated Project would approve it for the entire Gated Project. This is useful for Documents that transcend specific gates and apply to the Project as a whole. However, many customers add Document Deliverables to multiple gates with the intention of requiring the approvals on the same Document for each gate. When a single approval applies to the Document on every gate, it defeats the purpose. This new configuration option gives Project Managers the choice between both approval options based on the Document Deliverable.
Example: Imagine the "Gate Summary" Document in the examples above. This Document has been added to every gate of the Gated Project as a "Required Deliverable" because a Team Member is expected to write and upload a quick summary of how the gate progressed. The designated approver is expected to read this summary and approve it before the gate can be advanced.
Prior to this release, approving a Document on one gate would approve it for the entire Gated Project. This means that the "Gate Summary" Document that was approved in the first gate would not require approval in order for any more gates to be advanced. The only workaround was to add another version to the Document as soon as the previous gate was advanced so it would once again require approval.
With this update, Document versions can be configured to appear on their own as soon as the gate is advanced. This means that the "Gated Summary" Document will require approval on any other gates it has been attached to before those gates can be advanced. The gate cannot be advanced until the approver reads and addresses the "Gated Summary" Document on each gate.
What's Different:
By default, non-admin PowerSteering users will no longer be allowed to act as proxy users for PowerSteering administrators. This can be overturned for specific users by contacting your PowerSteering representative.
Prior to this release, users could always impersonate administrators if they were added as a proxy for an administrator. This gave the user full administrative permissions while acting as a proxy.
With this update, this ability has been limited. PowerSteering users will no longer be able to proxy as administrators by default. If a user has been added as a proxy for a user in the Admin Group, the administrator's name will be grayed-out when the user attempts to act as a proxy for them.
However, certain users can still be given permission to act as proxies for admin users. Customers can reach out to their PowerSteering representative to add specific individuals to a list of trusted users that are allowed to act as proxies for users in the Admin Group.
Benefit:
The main purpose of PowerSteering permissions is to prevent users from making significant changes to the application that could potentially cause harm or disorganization. The Admin Group is only supposed to consist of users who can be trusted with this responsibility. Although proxying will sometimes give certain users permissions they would not have otherwise, regular users should not be given the option to inherit administrator permissions. Regular users with administrator permissions may intentionally or unintentionally cause configuration mishaps that can affect the organization as a whole.
Action Required:
When PowerSteering 2024R1.1 is released, regular users will no longer be able to proxy as administrators right away. Administrator names will be grayed-out when a regular user attempts to proxy as one of them. However, certain regular users can be granted this permission upon request. If there are any regular users that you would like to give this ability to, reach out to your PowerSteering representative. Only the indicated users will be able to act as proxy users for administrators going forward.
The following enhancements will also be available with the 2024R1.1 release:
Agents
What's Different:
The user interface of the Agents page has been updated.
Note: Only PowerSteering administrators can access the Agents page and edit PowerSteering Agents.
Prior to this release, the Agents page resembled the legacy PowerSteering interface.

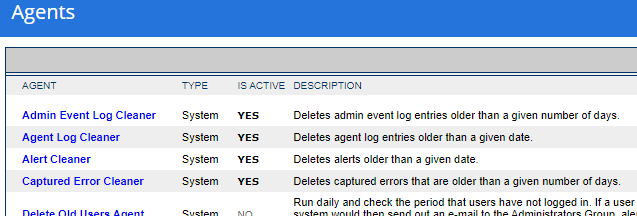
With this update, the page has been refreshed to match the new PowerSteering interface.


The following columns are now available for the Agents page:
-
Agent: The name of the agent. Similar to the legacy page, administrators can select the name to edit the agent's details. A green circle in the column indicates that the agent is active; a red circle indicates the agent is inactive.
-
Type: Indicates the type of agent (System, Reminder, or Importer).
-
Is Active: Indicates whether the agent is currently active.
-
Interval (mins): The interval between runs, expressed in minutes.
-
Last Run Time: The date and time the agent last ran.
-
Next Run Time: The date and time the agent is scheduled to run again.
-
Description: A description of the agent's purpose.
Additionally, users can add or remove any of these columns from the Agents page using the "Select columns" drop-down menu. Only selected columns will be displayed on the page.
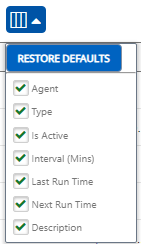
Note: Similar to other PowerSteering tables, changes to selected columns will only be saved for the user that adjusts them. Other users will not be affected when you select or deselect certain columns.
A search bar has also been added to the top right-hand corner of the Agents page. This can be used to search for key terms in Agent names and descriptions.

Users will find differences when they select Agents from the page as well. Prior to this release, selecting an Agent would navigate the user to a list of the Agent's tasks.


From here, users could either activate / deactivate the Agent, run one of the Agent's tasks, or select the name of the Agent task to edit it and view its run history.

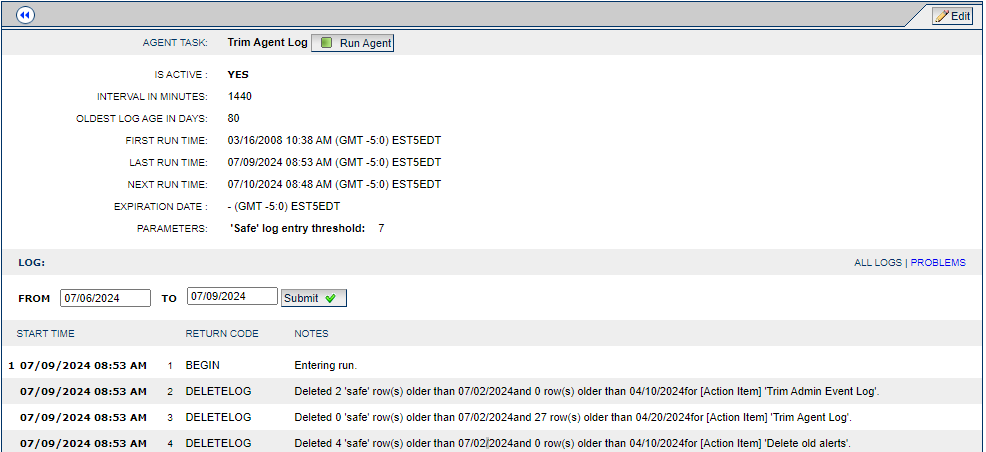

However, most of the listed Agents only have one task available. With this update, administrators will be navigated directly to a page that allows them to edit the Agent's parameters and view its run history when they select the name of an Agent with only one task.

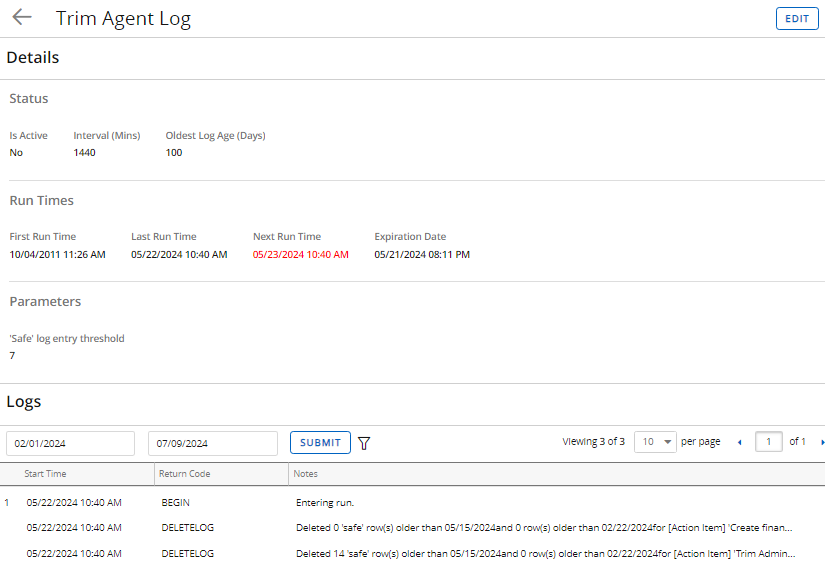
Administrators will only be navigated to a page that lists Agent tasks if the Agent contains more than one task.


Benefit:
The new Agents page now matches the updated interface of PowerSteering. This cleaner, more intuitive design is more appealing to the user's eye and makes it easier to look through the listed Agents.
Also, the new structure of the page makes it much easier for administrators to edit their Agents. The additional Agent task page that administrators were directed to caused the interface to be more confusing than it needed to be. Now, Agents that only have one task will skip this buffer page, making it easier to navigate to the Agent's run history as well as its "Edit" page.
What's Different:
Administrators can now edit Signup Reminder Email content directly from the Signup Reminder Agent.
Note: Only PowerSteering administrators can edit PowerSteering Agents.
Prior to this release, administrators would use the Branding page to edit the System Invitation Email content.

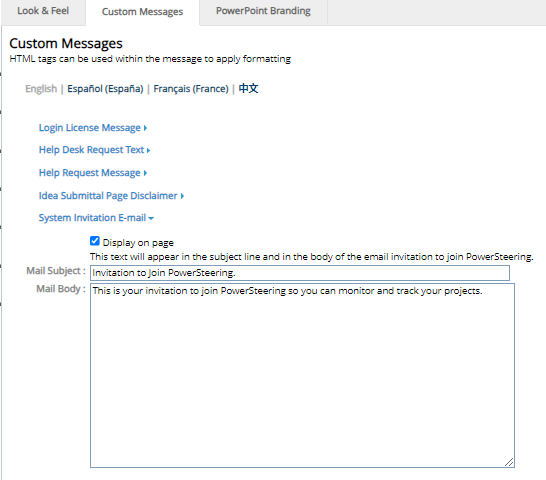
With this update, the "System Invitation Email" portion of the Branding page has been deprecated and moved to the Signup Reminder Agent as parameters.

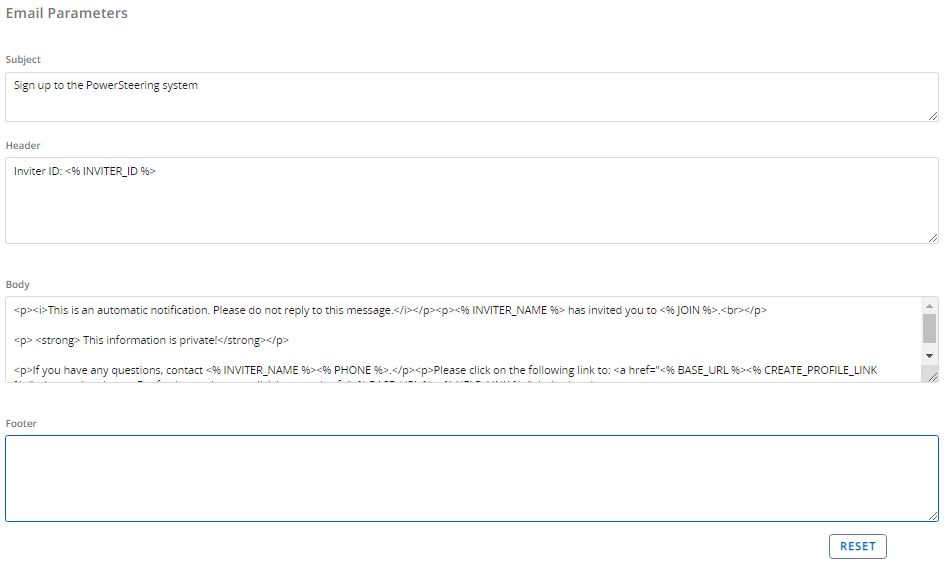
These parameters can now be changed while editing the Signup Reminder Agent.
Tip: HTML elements (such as <p>, <strong>, and <i> in the example above) can be used to format the text.
The following tokens can be entered into the email text in order to be replaced by PowerSteering data:
-
<% INVITER_NAME %>: The name of the user who invited the new user.
-
<% INVITER_NAME_HTML %>: The name of the user who invited the new user represented by an HTML string equivalent. Use this option for HTML emails.
-
<% INVITER_ID %>: The 26-digit user ID of the user who invited the new user.
-
<% PHONE %>: The phone number of the user who invited the new user.
-
<% CREATE_PROFILE_LINK %>: A link the invited user can select to create their new PowerSteering profile.
-
<% BASE_URL %>: A link to the PowerSteering site.
-
<% HELP_LINK %>: A link to the PowerSteering online help site.
-
<% COMPANY_NAME %>: The name of the organization.
-
<% COMPANY_NAME_HTML %>: The name of the organization represented by an HTML string equivalent. Use this option for HTML emails.
-
<% JOIN %>: The standard "join PowerSteering" backend message.
-
<% MESSAGE %>: The personal message entered when the user is created.

Note: This will automatically be placed in the email body. Use this token if you would like to place it into the header or the footer as well.
Additionally, this migration comes with the ability to edit the header and footer of the reminder email. Prior to this release, the header and footer could not be edited at all. With this update, they are fully customizable using the new parameters.
Note: The automated header and footer from before this release will populate the head and footer fields by default.
Administrators who wish to return to the default header, footer, and body can select the new Reset button at the bottom of the page.

Benefit:
Prior to this update, administrators would have to navigate between the Branding page and the Signup Reminder Agent page to configure Signup Reminder emails. This was unnecessarily tedious and time consuming; editing both the email's content and operations from one place will save administrators time and energy.
Also, the inability to edit the email's header and footer caused frustration amongst administrators who wanted to customize these areas. With this update, this content can be properly tailored to organizational needs.
What's Different:
Administrators can now edit the content of emails sent by the Disable Old Users Agent.
Note: Only PowerSteering administrators can edit PowerSteering Agents.
Prior to this release, emails sent from this agent could not be edited. Both the "Account Disabled" email and the "Login Reminder" email would always comprise of PowerSteering-provided content. The Agent itself did not offer any options to change this.

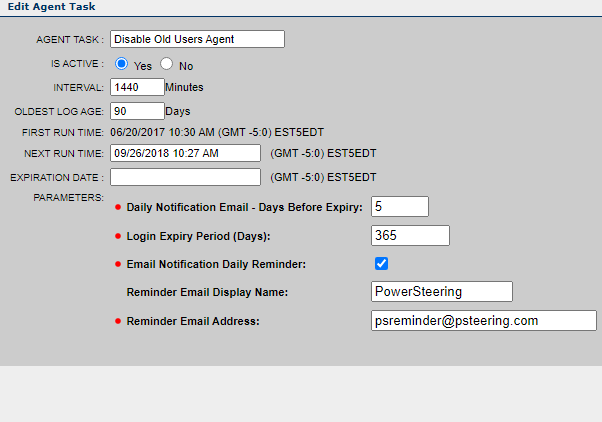
With this update, administrators can now writer customized content for both the "Account Disabled" email and the "Login Reminder" email while editing the Agent.

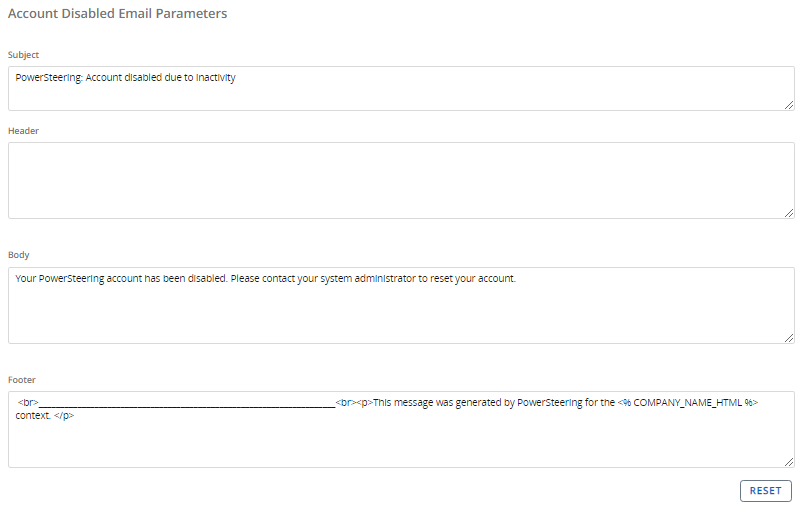
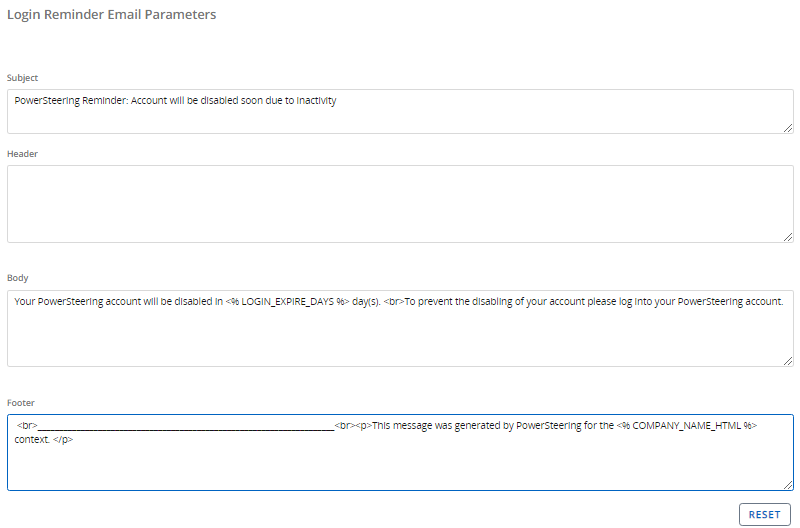
If administrators wish to revert back to the content provided by PowerSteering, they can simply press the Reset button and save the Agent.

Benefit:
The "Account Disabled" and "Login Reminder" email content provided by PowerSteering is universal enough to all customers. However, certain administrators may wish to provide content that is more specific to their organization. For example, an administrator might want the "Login Reminder" email to warn its users of the consequences that might arise if they refuse to login to PowerSteering ("You may miss out on tasks assigned to you", etc.). The administrator might also want the "Account Disabled" email to provide a contact that users can reach out to so they can login again.
Branding
What's Different:
PowerSteering administrators can no longer use the Branding page's Custom Messages tab to edit System Invitation Email content.
Prior to this release, the Custom Messages tab contained a "System Invitation Email" drop-down that allowed administrators to edit the subject line and body text of the invitation email users would see when they were invited or reminded to join PowerSteering.

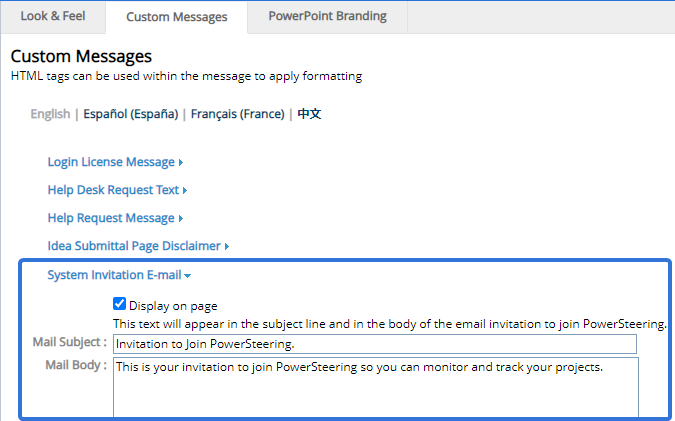
With this update, the "System Invitation Email" drop-down has been removed from the page.

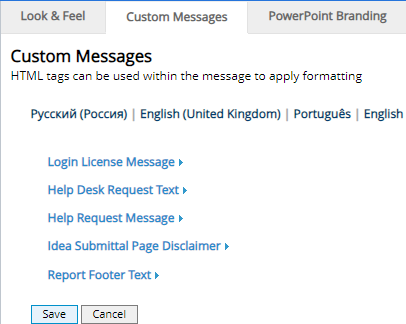
Instead, these options have been moved to the Signup Reminder Agent. Administrators can use this agent's parameters to customize invitation and signup reminder content.

Additionally, this migration comes with the ability to edit the header and footer of the email. Prior to this release, the header and footer could not be edited at all. With this update, they are fully customizable using the new parameters.
Note: The automated header and footer from before this release will populate the head and footer fields by default.
Benefit:
Prior to this update, administrators would have to navigate between the Branding page and the Signup Reminder Agent page to configure Signup Reminder emails. This was unnecessarily tedious and time consuming; being able to edit the email's content and operations from the Signup Reminder Agent page will save administrators time and energy.
Additionally, the inability to edit the email's header and footer caused frustration amongst administrators who wanted to customize these areas. With this update, this content can be further tailored to organizational needs.
Custom Fields
What's Different:
PowerSteering no longer allows Custom Fields to have the same name. Attempting to create a new Custom Field with the same name as an existing Custom Field will result in an error.

When this occurs, users will need to restart the creation process.
Note: Existing Custom Fields with duplicate names will automatically receive sequence numbers placed before them when the 2024R1.1 release is deployed. This will allow users to tell them apart.
Benefit:
When multiple Custom Fields share the same name, it becomes challenging to distinguish between them. This can lead to confusion about which field's data is being referenced or modified, potentially causing errors in data retrieval, and reporting. For users, multiple Custom Fields with the same name can be confusing and lead to incorrect data entry. Preventing Custom Fields from sharing the same name will avoid these problems and lead to accurate information on work items and other PowerSteering entities.
Action Required:
Existing Custom Fields with duplicate names will automatically receive sequence numbers placed before them when the 2024R1.1 release is deployed. PowerSteering administrators should have a look at their Custom Fields once the release has been deployed to ensure that each Custom Field is named appropriately. If any Custom Fields have received sequence numbers, be sure to explain them to your users to mitigate confusion.
Gated Projects
What's Different:
PowerSteering users can now determine whether or not skipping gates is allowed on Workflow Projects.
Prior to this release, skipping gates on Workflow Projects was not allowed; users would have to go through every gate on the Project.
With this update, this ability is still disallowed by default. However, users can reach out to their PowerSteering representative in order to enable this ability for specific users.
Note: When enabled, users will be able to skip gates just like they would on Gated Projects.
Note: Any Workflow Action Items that belonged to the skipped gate will be canceled.
Benefit:
Similar to Gated Projects, many scenarios can arise that require users to skip a gate. Each project is inevitably different and certain gates might not be required in all cases. When this occurs, users must be given the option to skip the gate without fulfilling the Conditions.
What's Different:
PowerSteering administrators can now set new Metric Rules on Pre-Advance Conditions that requires Metrics to only contain numeric Metric entries either before or after Project dates.
Note: Only PowerSteering administrators can create and edit Pre-Advance Conditions.
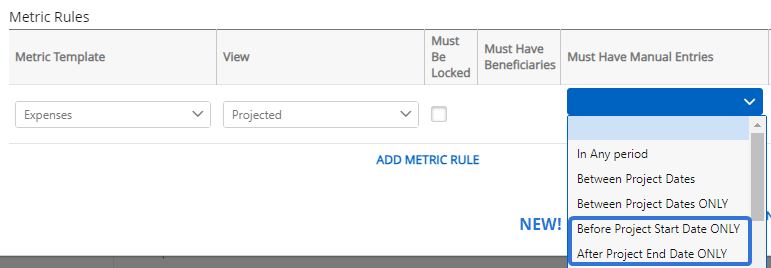
While adding Metric Rules to a Pre-Advance Condition, administrators will find the new "Before Project Start Date ONLY" and "After Project End Date ONLY" selections under the "Must Have Manual Entries" column.
-
Before Project Start Date ONLY: A specific view on a Gated Project's Metric (established by the "Metric Template" and "View" selections) must only contain numeric values before the Project dates to satisfy the Condition. If there are values anywhere else on the Metric view, the Condition will not be satisfied.
-
After Project End Date ONLY: A specific view on a Gated Project's Metric (established by the "Metric Template" and "View" selections) must only contain numeric values before the Project dates to satisfy the Condition. If there are values anywhere else on the Metric view, the Condition will not be satisfied.
Note: If the "Include 0 values" checkbox is selected for the Metric Rule, "0" will be treated as a legitimate value. This means that no zeros can either before or after the Project dates if one of these options is selected. If the checkbox is not selected, zeros will be treated as empty cells.
Note: By default, PowerSteering will search for values up to 10 years after the Project end date. If you would like to change this limit, reach out to your PowerSteering representative.
Tip: The Project dates can always be seen on the Metric instance:
They reflect the Scheduled Start and End dates of the Gated Project.
Example: Amber has created a new Pre-Advance Condition with a "Before Project Start Date ONLY" Metric rule for the "Expenses" Metric Template. She associates the Condition with the "Define" gate on one of her company's Gated Work Templates.
John is the Project Manager for a Gated Project that was created using this template. He notices that the "Define" gate has a "Before Project Start Date ONLY" Metric Rule for the "Projected" view of the "Expenses" Metric:
In order to advance the gate, this Metric view must contain at least one value before the Project start date, which is January 1st, 2024:
John enters values for November 2023 to January 2024 on the Metric view:
However, the Condition is not satisfied because the month of January is after of the Project start date:
John removes the value from the month of January:
Once he saves the Metric, the Condition is satisfied:
Benefit:
These new Metric Rules were added because some users prefer to do all of their Metric work either before or after the Project takes place. In these cases, any values that are entered between Project dates might cause disorganization.
Example: Amber uses the "Define" gate to define the benefits that her Project will bring about once the Project has run its course. She wants her team to enter the savings and revenue that will be available to them once the Project is over. In order to ensure that this is completed during the "Define" gate, she creates a Metric Rule that requires the "Benefits" Metric to contain values ""After Project End Date ONLY". This way, she will be sure that the "Benefits" Metric will contain the end-of-Project calculations without any values that have been mistakenly entered before or during the Project dates.
Metrics
What's Different:
While creating or editing Metric Templates, administrators can now determine whether required Tags and Custom Fields must contain values on calculated Metric line items.
Note: Calculated line item add up the totals of other Metric cells. They have a white background and use bold-fonted values: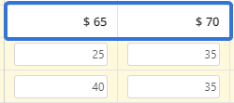
Note: Only Power administrators and users with the "Metric Template Administration" Context permission can create and edit Metric Templates.
Prior to this release, Metric line items would not mandate values on required Tags and Custom Fields for calculated line items. Administrators could only use the Tags and Custom Fields Tab to mandate values for required Tags and Custom Fields only for line items that contain data.

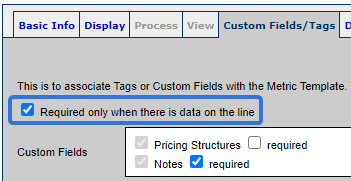
With this update, a new checkbox has been added to this tab.


Note: This new checkbox will be selected by default.
Note: The checkbox above this new checkbox behaves just like the "Required only when there is data on the line" checkbox from before. The wording has been adjusted for clarity.
When this checkbox is selected, Metrics created with this template will not mandate values on required Tags and Custom Fields on calculated line items. Any Tags or Custom Fields marked as "required" on the Metric Template will not require values on Metric line items that are only used for calculations.
Benefit:
Calculated line items are a lot different than other line items; Metric Tags and Custom Fields often do not apply to them. When this occurs, requiring values to be entered for them can lead to confusion and disorganization. However, this is not always the case. Certain Tags and Custom Fields might actually be relevant to calculated line items as well. With this in mind, it makes sense to leave this decision up to the template administrator.
Reporting
What's Different:
Report builders using the Report Wizard can now add Resource Pool Manager data to reports created from the "Effort Reconciliation by Period" report type.
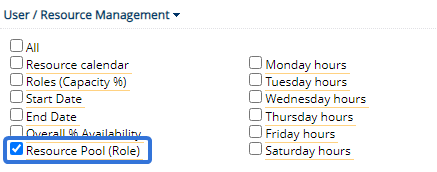
Prior to this release, only the "Resource pool" and "Resource Pool (Role)" columns could be selected for these reports.


-
Resource pool: The Resource Pool set on the demand, not necessarily a Resource Pool that the allocated user belongs to.
-
Resource Pool (Role): A list of Resource Pools that the allocated user belongs to. The associate Role on the Resource Pool will be placed in parentheses.
With this update, additional Resource Pool-related columns has been added to the report type.


-
Resource Pool Manager ID: The 26-digit ID number of the user who is the Manager of the Resource Pool. Keep in mind that this is the Resource Pool set on the demand, not necessarily the Resource Pool that the allocated user belongs to.
Note: This can be seen at the end of the browser URL when users navigate to the Manager's user profile.
-
Resource Pool Manager Name: The name of the user who is the Manager of the Resource Pool. Keep in mind that this is the Resource Pool set on the demand, not necessarily the Resource Pool that the allocated user belongs to.
Benefit:
When the "Effort Reconciliation by period" report type was introduced to PowerSteering in 2023, reports viewers were able to compare each Resource's planned time against their actual time. However, many organizations rely on Resource Pools to organize their Resources and allocations. This update allows report builders to create reports that group Resources by the Resource Pool Managers of their designated Resource Pools. When readers come across an issue with a Resource's planned or actual time, they can contact the Resource Pool Manager to let them know.
Upland Analytics
What's Different:
A new "Work History" Data Source is now available in Upland Analytics.
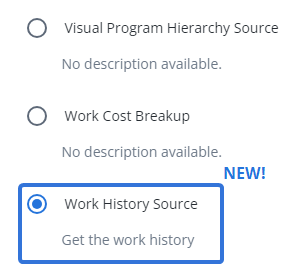
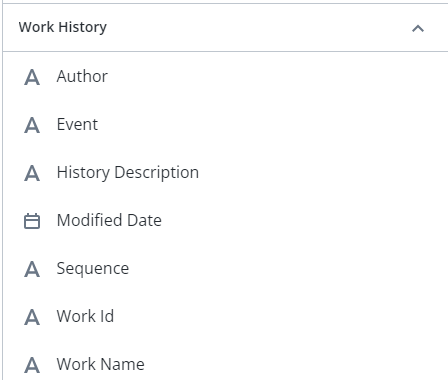
Report builders will be able to use this Data Source to create reports that expose data on the History of PowerSteering work items. In particular, the new "Work History" view can be used to add History data to the report:
Benefit:
With this new Data Source, users can create Upland Analytics reports that report on everything that happens to particular PowerSteering work items. This gives report viewers a granular perspective on the work items that they are interested in.
What's Different:
Report builders can now add Resource Pool data to reports created from the "Effort Reconciliation by Period" Data Source in Upland Analytics.
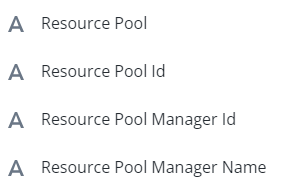
Four new columns can be added to reports:
-
Resource Pool: The name of the Resource Pool.
-
Resource Pool Id: The 26 character ID number of the Resource Pool.
Note: This can be seen at the end of the browser URL when users navigate to a Resource Pool.
-
Resource Pool Manager Id: The 26 character ID number of the Manager of the Resource Pool.
Note: This can be seen at the end of the browser URL when users navigate to the Manager's user profile.
-
Resource Pool Manager Name: The name of the Manager of the Resource Pool.
Benefit:
When the "Effort Reconciliation by period" Data Source was introduced to PowerSteering in 2023, reports viewers were able to compare each Resource's planned time against their actual time. However, many organizations rely on Resource Pools to organize their Resources. This update allows report builders to create Upland Analytics reports that group Resources by their designated Resource Pools. When readers come across an issue with a Resource's planned or actual time, they can contact the Resource Pool Manager to let them know.
Work Items
What's Different:
The user interface of the work item History page has been updated.
Note: This feature refers to the work item History page, not general PowerSteering History.
Prior to this release, the work item History page resembled the legacy PowerSteering interface.

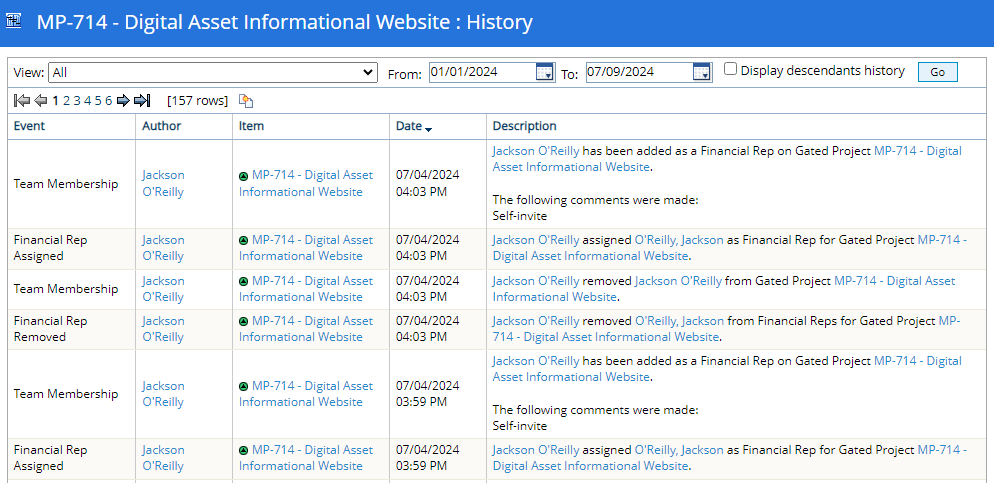
With this update, the page has been refreshed to match the new PowerSteering interface.

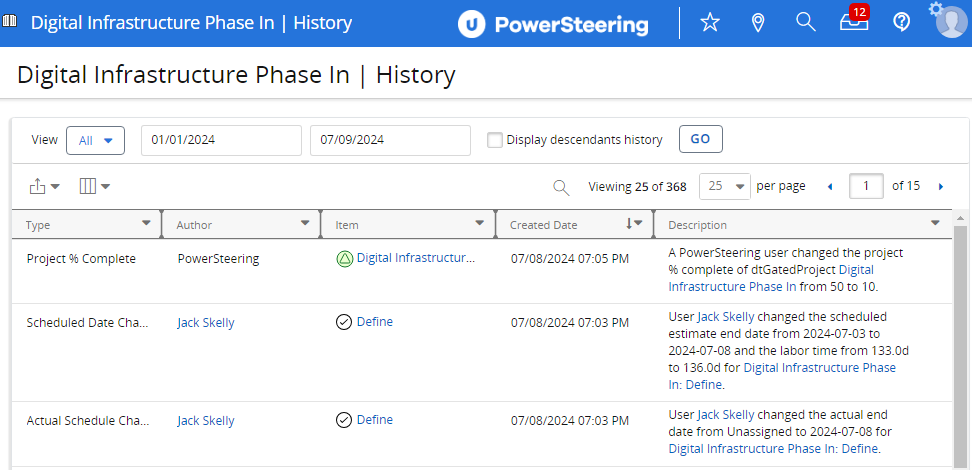
Functionally, this new page behaves exactly like the legacy page with a few additional features: search, export options, and column options.
Search
A search function has been added to the History page.

Selecting the Search icon  allows users to search through every column of every row of results on the page.
Export Options
Users can now export a work item's History page to a downloaded file. By selecting the "Export" drop-down menu, the History page can be downloaded as a Microsoft Excel spreadsheet, a CSV file, or a PDF file.
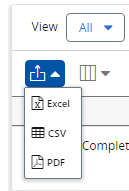
Note: The exported file will reflect the current look of the History page. Any items that have been filtered out of the page using the "View" drop-down menu will not appear on the file. Additionally, any columns that have been removed from the page will not appear on the file.
Column Options
Users can now remove columns from the History page using the "Select columns" drop-down menu. Only selected columns will be displayed on the page.
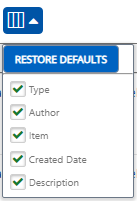
Note: Similar to other PowerSteering tables, changes to selected columns will only be saved for the user that adjusts them. Other users will not be affected when you select or deselect certain columns.
Benefit:
The new work item History page now matches the updated interface of PowerSteering. This cleaner, more intuitive design makes is more appealing to the user's eye and makes it easier to navigate through the application.
Additionally, the new features included with this update allow users to interact with the History page in ways they could not before. The Search function allows users to search for specific events that occurred to the work item.
Example: Searching for the name of a specific Custom Field will result in a list of times the Custom Field was changed on the work item. Alternatively, searching for a specific user will result in a list of changes the user made to the work item (assuming "All" is selected from the "View" menu and the "Author" column is present).
Additionally, the "Export" options can be used to create a quick report on certain actions (i.e. approvals, Budget changes, etc.) that have been taken on the work item. Also, users can remove columns from the History page if they do not find them useful.