2022R1.2 - New Features
Below is a summary of the new additions to PowerSteering in the 2022R1.2 release. PowerSteering 2022R1.2 will be deployed to staging on October 26th, 2022 and deployed to production on November 13th, 2022. When this happens, the listed features will become available.
Note: This page will be updated as new functionality becomes available.
The following areas of PowerSteering have been upgraded as part of the 2022R1.2 release:
For more information on this upgrade, click here to watch the 2023R1.0 "What's New Webinar".
Agents
The following improvements have been made to PowerSteering Agents. Click on any of the upgrades to learn more about them:
What's Different:
The Completed Work Archival agent has been redesigned with the options to specifically archive work with "Canceled" and "Deferred" statuses as well as "Completed" statuses.
The Completed Work Archival agent (now renamed to the Work Archival agent) is responsible for archiving finished Projects and their descendants after the works' status had been changed for a defined number of days. Prior to this release, the agent would only do this for work that had its status changed to "Completed" or "Canceled". While editing the agent's task, administrators could only set the defined number of days for "Completed" or "Canceled" work, even though the parameter text only mentioned "Canceled" work:

With this update, the agent can now also search out and archive work with "Deferred" statuses. Furthermore, administrators can now define a separate number of days before work with any of the three statuses becomes archived:

Administrators can also configure the agent to ignore work with any of the three statuses. Notice that each of the new parameters above states "set -1 to ignore". If an administrator enters "-1" into any of the fields, the agent will not archive any work with the outlined status.
Note: Please be advised that the name of the agent has been changed to accommodate this new functionality. Previously, the agent was known as the Completed Work Archival agent: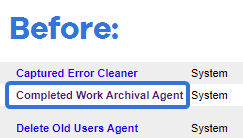
Because the agent no longer only archives "Completed" work, it has been renamed to the Work Archival agent: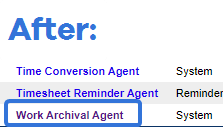
Note: The new parameter text will respect any replaced status names in your PowerSteering environment. For example, if the "Canceled" status name has been updated to "Won't Do", this new name will be seen in the parameter:
Benefit:
Archiving work is a great way to keep PowerSteering "clean". When inactive work is archived, the application's search speed is increased and its filters are clearer. By taking advantage of the Work Archival agent, administrators can optimize PowerSteering's performance. Also, it is safer than simply deleting the work because archived work can still be unarchived at any time.
Before this upgrade, the agent would only archive "Completed" or "Canceled" work after a set period of time. As useful as this was, a lot of inactive work in PowerSteering with a "Deferred" status also exists. By including "Deferred" work and allowing administrators to set separate time periods for work of each status, the Work Archival agent can now get inactive work out of the way much more accurately and efficiently.
What's Different:
The Work Status Change agent task (part of the Status Change agent) can now work in both directions; it will detect work with "Off Track", "Delayed" or "Needs Attention" statuses and revert them back to a different status if their due dates have been updated appropriately.
Prior to this release, this task would only change the statuses of work with expired due dates. Work would have its status changed to either "Needs Attention", "Delayed", or "Off Track" based on the following rules:
-
When "On Track" work was past its due date, the status was changed to "Needs Attention".
-
When "Needs Attention" work was a number of days past its due date, the status was changed to "Delayed".
-
When "Delayed" work was a number of days past its due date, the status is changed to "Off Track".
While editing the Work Status Change task, administrators could use the parameters to configure which work types the agent applied to as well as the number of days past their due dates before their statuses would change:

With this update, a new parameter is available for administrators. It allows them to enable the agent to apply a "Reverse Status Check" on work with a status of "Needs Attention", "Delayed", and / or "Off Track" which will return the work to a different status if the due date has been updated:

The new work status will depend on the days inputted into "Number of days where status is set to Needs Attention before it turns to Delayed" and "Number of days where status is set to Needs Attention (Delayed) before it turns to Off Track".
Example: Imagine you have checked all three boxes in the new parameter ("Needs Attention", "Delayed", and "Off Track"). Imagine you have a work with a Planned End Date of September 10th, 2022 (in this example, the "Due date is based on" selection is "Planned End Date"). In the image above, the agent will change "Needs Attention" work to "Delayed" 5 days after the Planned End Date. Also, it will change "Delayed" work to "Off Track" 2 days after it has been changed to "Delayed" (same as pictured above). If you have checked all three boxes in the new parameter ("Needs Attention", "Delayed", and "Off Track"), the agent will behave differently based on the new Planned End Date. Assuming the agent runs on September 20th, here is how it will behave:
If the Planned End Date is changed to September 21st, the work will be given an "On Track" status because the new Planned End Date is later than the current date.
If the Planned End Date is changed to September 17th, the work will be given a "Needs Attention" status. This is because the current date is three days later than the Planned End Date, which has not yet reached the 5 days it takes to change "Needs Attention" work to "Delayed" work.
If the Planned End Date is changed to September 14th, the work will be given a "Delayed" status. This is because the current date is 6 days later than the Planned End Date, which is later than 5 days after "Needs Attention" work should be set to "Delayed", but not long enough where "Delayed" work is changed to "Off Track".
If the Planned End Date is changed to September 12th, the work will be given an "Off Track" status. This is because the current date is 8 days later than the Planned End Date, which is later than the 5 days after "Needs Attention" work should be set to "Delayed" AND the 2 days (a total of 7 days) after "Delayed" work should be set to "Off Track".
Note: This agent will respect any replaced status names in your PowerSteering environment.
Benefit:
Before this update, the agent would only change the status of late work so PowerSteering users would understand when certain Projects / Tasks / Milestones were not on schedule. However, this only occurred in one direction. If a work's end date had changed to a later date, there was no way to automatically adjust the work's status to reflect it. Users would have to manually change the statuses themselves. Now that the Status Change agent can be configured to adjust statuses based on later end dates, Project Managers / Owners will no longer have to manually change the statuses themselves when due dates are changed. This ensures that users are better aware of which work is running as expected and which work is not on schedule.
Gated Work
The following improvements have been made to Gated Work in PowerSteering. Click on any of the upgrades to learn more about them:
What's Different:
The Gate Information panels that appear at the top of Summary pages for Gated Work have been redesigned to include additional information and functionality.
Prior to this release, each Gate Information panel simply displayed the Conditions for the current Gate when expanded:

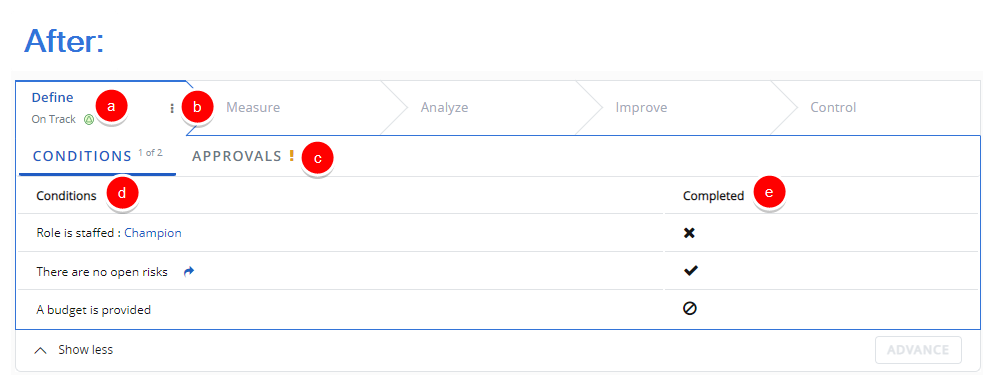
With this update, the Gate Information panel is much more dynamic. It provides the user with additional information and allows them to carry out functions directly from the panel:
-
Work Status: The status of the Gated Work is now displayed directly under the Gate name. Prior to this release, the current Gate panel would display the icon of the Gated Work's current status. Also, the entire panel would reflect the color of the icon. This did not clearly articulate the current work status; many users do not have the statuses and icons memorized, so the icon by itself was not very helpful. Now that the status name is displayed in the panel, users will immediately know the Gated Project's status.
-
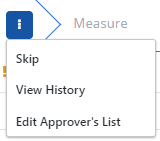
Options: The current Gate panel now contains an "Options" menu. This menu allows users to carry out the following functions:
-
Skip: This allows users to skip the current Gate and automatically move to the next one.
Note: The Project's Phase Advancement Configuration. will determine if users can access the Skip button.
-
View History: This brings the user directly to the Project's History page. By default, the Approval Action view will be displayed, which lists out the Gate approval history.
-
Edit Approver's List: This brings the user directly to the Assign Approval Roles page. From here, they can define which Roles will be given approval authority over each Gate.
Note: Users can also select the "Options" menu on previously advanced or skipped Gates in order to reactivate them. See "Ability to view the details of previous Gates" below for more information.
-
-
Approvals: An Approvals tab can now be selected on the current Gate. This tab lists all of the Gate's approvers and their approval action on the Gate:

If approver roles have not yet been specified, the tab will display an exclamation mark icon next to it. Once the tab is selected, it will notify the user that the Gate requires approval roles to be set:
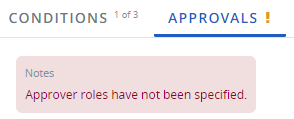
If approvals are not required for the Gate, the tab will display "N/A" next to it. Once the tab is selected, it will notify the user the Gate does not require any approvals:
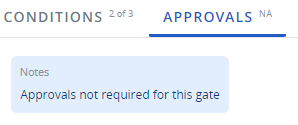
-
Conditions: The listed Conditions on the Gate panel now contain hyperlinks that bring the user directly to a page that allows them to resolve it.
Example: Imagine the current Gate has a Pre-Advance Condition that requires there be no open Risks on the Gate. The listed Condition now contains an arrow icon that serves as a hyperlink:

Selecting this arrow will bring the user directly to the Risks page, where Risks can be closed if necessary. -
Completed: The "Conditions" tab contains a column that indicates whether the listed Condition has been completed or not. There are three indicator icons that can be displayed:
 : The Condition has been fulfilled.
 : The Condition has not yet been fulfilled.
 : The Condition does not apply to the Gate.
Benefit:
The new Gate Information panels allow users to carry out Gate-related tasks directly from the top of the Summary page. Prior to this upgrade, they would have to navigate to different Project pages in order to ensure that the Gate was ready to be advanced.
Example: Imagine one of the conditions for the Gate required a Budget to be provided. Prior to this release, a user would read the Condition on the Gate panel and then navigate to the "Budget" page by selecting the "Project" menu from the icon bar, opening up "Costs" and finally selecting "Budget". With this update, the user can easily select the arrow icon next to the Condition to be taken directly to the "Budget" page, saving them from having to open up multiple menus:
Furthermore, imagine that "Control Cost" was not enabled for the Project. This would mean that a budget could not be set. Prior to this release, there was no way the user would know this by looking at the list of Conditions on the Gate panel; it would only state that the Condition was "Not completed". This might cause the user to search through the Project's menus trying to find out how to add the budget before finally calling a PowerSteering administrator. With this update, the user will immediately see that the Condition is not applicable to the Gate because "Control Cost" has not been enabled, preventing them from unsuccessfully attempting to add one:
These new dynamic, interactive panels will save PowerSteering time and energy by allowing them to fulfill their Gate Conditions and approval roles all in one place instead of requiring them to search through multiple Project pages.
What's Different:
PowerSteering users will now be able to see the Request Approval and Advance buttons directly on the Gate Information panels at the top of the Summary page. Even if the Gate cannot be requested for approval or advanced, the buttons will still appear as greyed-out disabled buttons for those who would have permissions to see them if the Conditions were met.
Note: Users will be able to use these buttons based on the Phase Advance Configuration and their permissions.
Prior to this release, the Request Approval and Advance buttons would not be visible at all when the user was not able to select them. If the Pre-Advance Conditions were not met, for example, a user would not be able so see the Request Approval or Advance buttons:
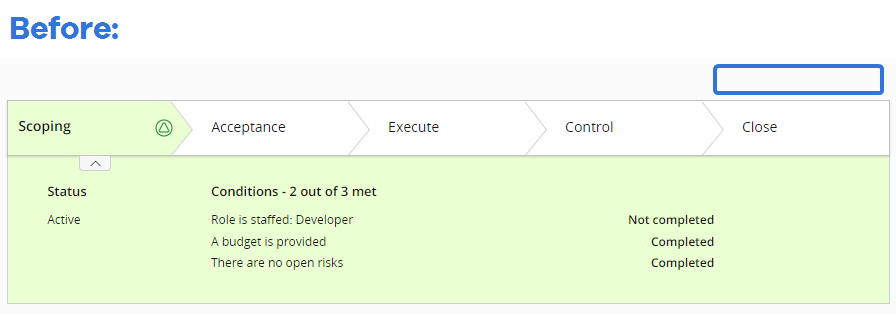
Once the Conditions were satisfied, the buttons would appear on the screen.
With this update, inactive versions of these buttons will appear at the bottom of the Gated Information panels when users have permissions to press them but the Conditions have not been met:
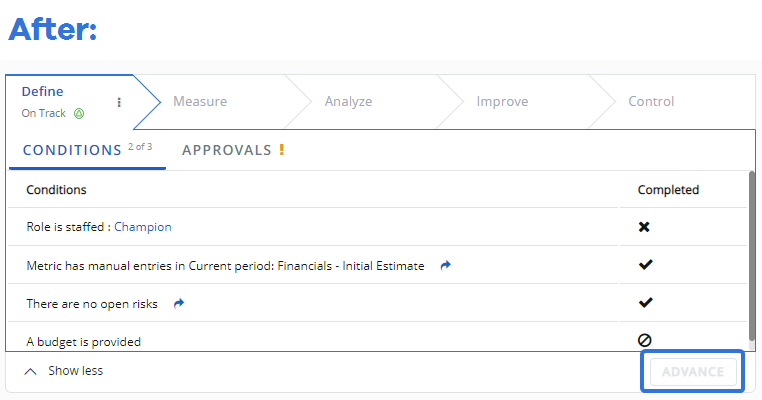
Benefit:
Prior to this update, users would not be able to see which buttons would be available once the Gate's Pre-Advance Conditions were fulfilled. The buttons would only appear once they could be selected. Now that they can see an outline of the Request Approval and Advance buttons, they will have a better understanding of how the interface behaves. For example, users who see the outline of the Advance button (pictured above) will understand what they will be able to do once they satisfy all of their Gate's Conditions.
What's Different:
Administrators now have the option to prevent Post-Advance Actions from taking place if a Gate they are associated with is skipped instead of advanced.
Prior to this release, Post-Advance Actions would always execute when a Gate was either skipped or advanced. There was no way to prevent this from happening while creating or editing the Post-Advance Actions:

With this update, administrators can now select a checkbox that will cause Post-Advance Actions to execute even when the Gate is skipped:

Note: This checkbox is deselected by default.
When this box is checked, the actions will apply directly after a PowerSteering user with adequate permissions skips the Gate:

Note: See Phase Advance Configuration for information on who can skip Gates.
Benefit:
Before this upgrade, Post-Advance Actions would apply even if Gates were skipped instead of advanced. Project Managers and administrators might prefer that certain Post-Advance Actions stay reserved for actual advances; if all the Gate Conditions are not met, certain actions might not be appropriate. This new option gives administrators the freedom to determine whether or not certain actions should still occur when Gates are skipped.
What's Different:
Users can now view the details of previously advanced / skipped Gates on Gated Projects. This will also allow them to reactivate the previously advanced / skipped Gate differently than before.
Prior to this release, users could not view any of the Condition details of previous Gates. Gate Information panels for previous Gates could not be selected:

With this update, users can select the panel of a previously advanced or skipped Gate to view its Conditions and Approval details:
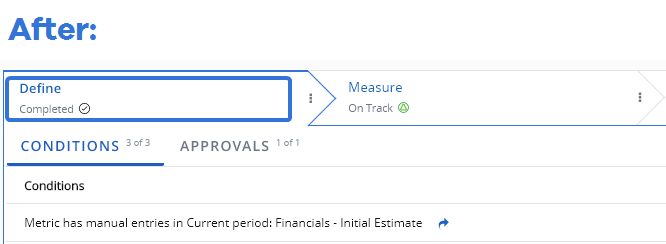
This new ability also introduces a new way for users to reactivate old Gates. Prior to this release, users would simply select the name on one of the previous Gate Information panels:

With this update, users now must first select the Gate Information panel of the previous Gate they would like to reactivate. Then, they can choose Reactivate from the Gate's "Options" menu:
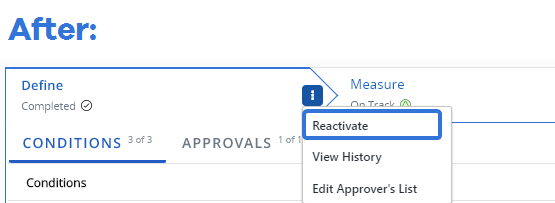
Note: Users will require the "Re-activate Gate" Project Task permission to reactivate Gates in PowerSteering.
Benefit:
Prior to this upgrade, users would have to scroll to the bottom of the Gated Project's Summary page and open up the "Gate Information" table to see Conditions for previous Gates. Also, users would have to go one step further and select Approval History from this table to see which users approved the previous Gates. After this release, users can easily view this information directly in the Gate Information panels at the top of the Summary page, eliminating the need for unnecessary scrolling and navigation away from the page.
Measures
The following improvement has been made to Measures in PowerSteering. Click on the upgrade to learn more about it:
What's Different:
If users select the "Project Lifetime" Effective Dates option while creating or editing a Measure Template, users can now set a custom buffer period that will allow the Measure to continue to calculate after the end date of the work it is attached to. Also, the "Always" Effective Dates option has been removed.
Prior to this release, selecting the"Project Lifetime" Effective Dates option would cause the Measure to calculate and send Inbox reminders to users between the earliest start date and the latest end date of the Project:
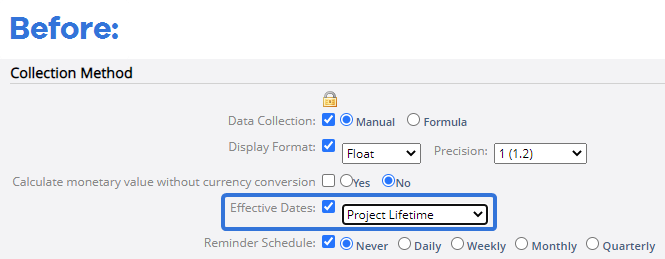
Once the end date of the Project arrived, the Measure would no longer calculate.
With this update, users now have the option to add a buffer period that will allow the Measure to continue to calculate for a time period after the Project end date:
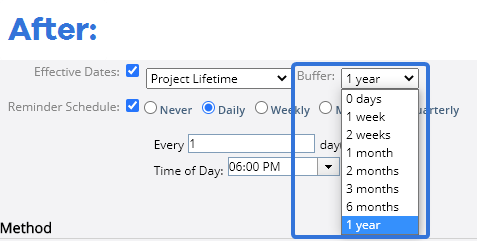
Any PowerSteering environments that had "Always" set as their Effective Dates option will automatically have their new Effective Dates option set to "Project Lifetime" with a 1 year buffer period.
Note: Due to the massive amount of data created by the "Always" option, PowerSteering will be deleting all of the Measure data that would not have existed if the "Project Lifetime" and buffer options were available. This means that any Measure data that was calculated over a year after a Project's end date will be deleted. Please reach out to your PowerSteering representative if you think this will be an issue.
Benefit:
The "Project Lifetime" buffer period is essentially replacing the "Always" Effective Dates selection by allowing Measures to run for up to a year after the Project's end date. This change was implemented because a recent investigation discovered that many PowerSteering customers have hundreds of Measures that are set to "Always". Organizations with a large portfolio of Projects can end up evaluating over a billion Measures after a few years, which can lead to a database table that uses over 700 GB of space. Using the "Project Lifetime" buffer instead of the "Always" options will relieve this unnecessary effort on the system and ensure that PowerSteering runs as efficiently as possible.
Metrics
The following improvement has been made to Metrics in PowerSteering. Click on the upgrade to learn more about it:
What's Different:
Administrators can now enable certain Metric Templates to remind Project Owners to lock their Metrics either before or after the Metric period begins.
Note: In order for Metric reminders to be sent (either for data entry or locks), the Metric Reminder Agent must be active. See Agents Overview for more information about this agent.
Prior to this release, administrators could only enable Metrics to send data entry reminders. While creating or editing a Metric Template, they could use the Basic Info tab to remind the Project Owner to enter Metric data either before or after the Metric period began:
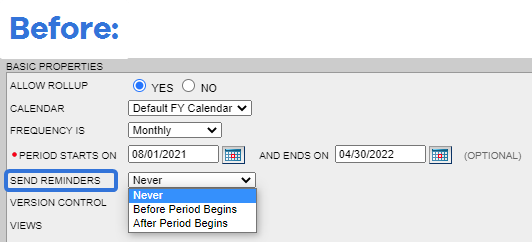
With this update, this option has been split in two; administrators can now configure a Metric Template to remind Project Owners about entering Metric data and locking Metrics:
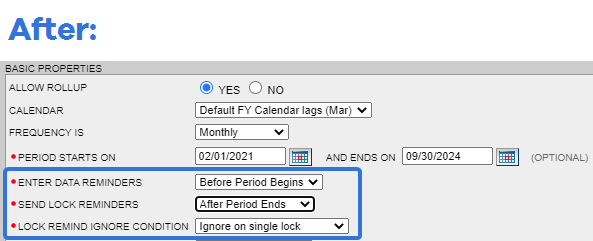
The "Enter Data Reminders" is the same option as the "Send Reminders" option from before this update. It will send the Project Owner a reminder to enter data into the Metric either before the Metric period begins (the last Sunday, or other day that has been configured as the first day of the week, before the Metric period begins) or after the Metric period begins (the first Sunday, or other day that has been configured as the first day of the week, within the current Metric period).
The "Send Lock Reminders" is a new option that will remind Project Owners to lock their Metrics either before the Metric period ends (the last Sunday, or other day that has been configured as the first day of the week, of the Metric period) or after the Metric period ends (the first Sunday, or other day that has been configured as the first day of the week, after the Metric period ends).
The "Lock Remind Ignore Condition" is another new option that will only appear if lock reminders are enabled on the Metric Template. It allows administrators to select when the lock reminders will not be sent for a Metric:
-
Ignore on single lock: If at least one cell is locked in the Metric period, the lock reminder will not be sent.
-
Ignore on entire sheet lock: If the entire Metric sheet is locked, the lock reminder will not be sent.
Note: Metric reminders are not sent out for work with a status of "On Hold", "Not Started", "Canceled", or "Complete".
Benefit:
Reminding Project Owners to enter Metric data has always been a useful tool; one a Metric period is missed, it can be difficult to retroactively enter data for previous periods. However, remembering to lock Metrics can be just as important. If a Metric goes unlocked, many PowerSteering users might continue to enter data into incorrect periods.
Example: A Metric period has just ended, but you (a Project Owner) have not yet locked your Project's "Expenses" Metric up to the end of the period. One of the team members recently purchased a new software subscription, but he accidentally enters the cost into the previous period (he was able to because it was not locked). Once you realized this, you have to go back into the previous Metric and subtract the cost of the software subscription and add it to the new Metric period.
Now that administrators can configure Metric Templates to remind Project Owners to lock their Metrics, preventable data entry errors are less likely to occur each Metric period.
Project Central
The following improvement has been made to PowerSteering Project Central. Click on the upgrade to learn more about it:
What's Different:
New options are available under the drop-down menus of Action Items in Project Central that allow users to move them around the grid.
Note: "Action Item" is a Replaceable Term. It might be named something else in your version of PowerSteering.
Prior to this release, users would have to drag and drop Action Items in order to move them around in Project Central.
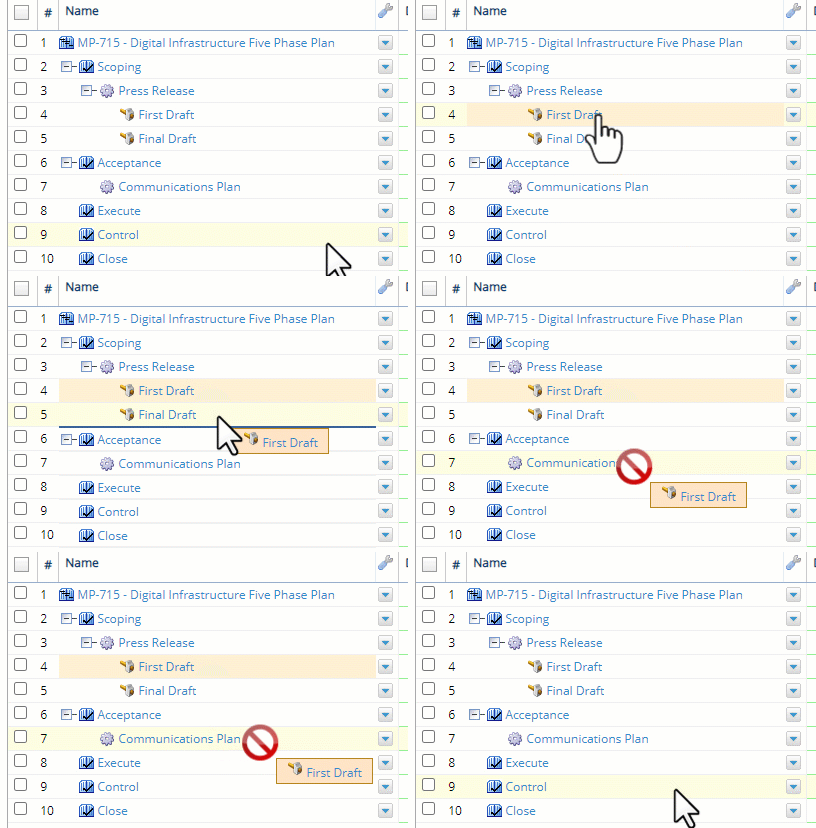
However, this caused problems because it did not work when users tried to move them under non-expandable Parent items that were direct children of non-valid Parent items. For example, a user might have wanted to move an Action Item so it would become a child of a Project Task. However, the Project Task did not contain any children of its own, so it was not expandable (it does not have a ![]() icon that can be used to expand it). When the user tried to drag and drop the Action Item under this Project Task, Project Central assumed that it was trying to drop it at the same level as the Project Task, which would make it a direct child of the Gate. In this user's PowerSteering environment, a Gate is not a valid Parent for the Action Item, so it would not work:
icon that can be used to expand it). When the user tried to drag and drop the Action Item under this Project Task, Project Central assumed that it was trying to drop it at the same level as the Project Task, which would make it a direct child of the Gate. In this user's PowerSteering environment, a Gate is not a valid Parent for the Action Item, so it would not work:

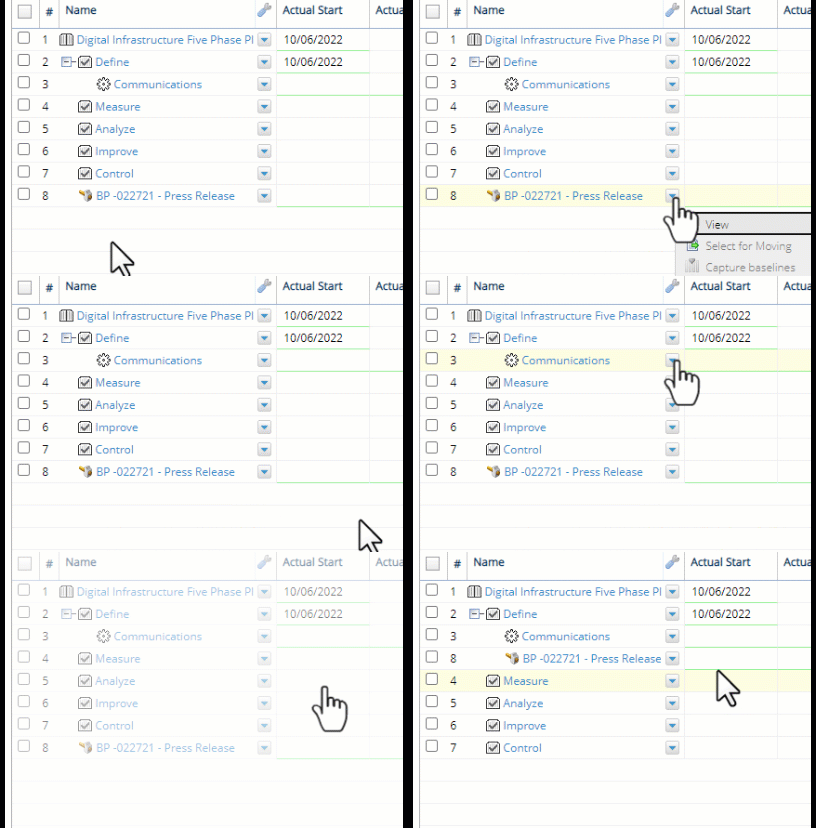
With this upgrade, users can now use an Action Item's drop-down menu to place it anywhere in the Project Central grid. To move an Action Item, a user will need to select Select For Moving from the drop-down menu of the item to be moved, and then Move Here from the drop-down menu of the item it will be moved under:

Note: This new feature still respects the Parenting configurations of Object Types. For example, users will not be able to move an Action Item as a direct child of a Gate if a Gate is not a valid Parent of an Action Item. For more information on your PowerSteering environment's Parenting relationships, see Update the Parenting Rules Associated with an Object Type.
Benefit:
Before this update, users were very limited while moving Action Items around in Project Central. The drag and drop feature was useful, but it only worked vertically. PowerSteering could not understand when users were attempting to move an Action Item as a child of a valid, unexpandable Parent item when the Parent item itself was the direct child of an unvalid Parent item to the original Action Item. The only was around this was to manually create the item under the unexpandable Parent item using the Add Under drop-down menu selection. This new movement selections allow users to easily place Action Items under any valid Parent items they wish.
Resource Review
The following improvement has been made to the Resource Review page. Click on the upgrade to learn more about it:
What's Different:
When users sort the Resources on the Resource Review page by "Resource pool", the listed Resources will now be organized alphabetically by name.
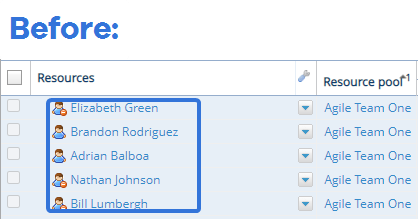
Prior to this release, sorting Resources by "Resource pool" did not organize the Resources at all. They would all appear out of order after the user clicked on the "Resource pool" column header:
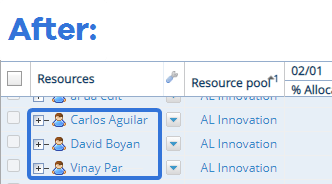
With this update, the Resources will be listed alphabetically after the user sorts them by "Resource pool":
Note: This option will only work if the group allocation is set to "By Person" in the Display options: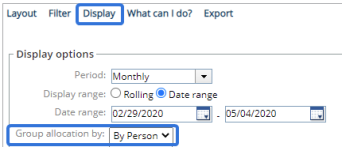
Also, you must first add the "Resource Pool" column to the Resource Review grid before you sort by it. This can be done using the "Additional column" drop-down menu, which can also be found under Display:
Note: Selecting Save Layout from the Layout drop-down menu will not save any sorting preferences.
Benefit:
The 2022R1.0 release introduced the ability to sort the Resource Review page by Resource Pool, which made it easier for PowerSteering users to find and edit the assignments and availability of their Resources. Due to the sheer size of many Resource Pools, however, it would still be difficult to find certain Resources on the grid. Alphabetically sorting the Resources in each Resource Pool allows users to easily navigate to their desired Resource in the Resource Review.
Timesheets
The following improvement has been made to Timesheets in PowerSteering. Click on the upgrade to learn more about it:
What's Different:
Users can now log time towards specific Roles while filling out their Timesheets.
Prior to this release, Timesheets did not allow users to specify their Project Roles. Instead, they could only specify which Work Item they worked on as well as the Activity they carried out:

With this update, users can now specify which Role they were taking while they attribute time to the Work Item:

Note: The new "Role" field is not mandatory; users can still submit a Timesheet without having to specify a Role.
Note: Each entry for a Work Item must have a different Role associated with it. For example, the Timesheet pictured above cannot have another entry for the "Digital Infrastructure Five Phase Plan" under the "Project Manager / Owner" Role. This goes the same for blank entries in the "Role" field; there cannot be more than one blank "Role" field for each Work Item on the Timesheet.
Tip: When users are already assigned to a Role on a Work Item, the "Role" field will automatically populate with the Role when the Work Item is selected. If users have more than one Role on the Work Item, one of the Roles will automatically populate the "Role" field when the Work Item is selected, and then another one of the user's Roles will populate the field when the Work Item is added again, and so on.
If the user is not assigned to a Role on the Work Item, the "Role" field will appear blank. However, users can still choose whichever Role they like.
Benefit:
Prior to this release, there was no way for users to attribute time towards specific Roles. Although the "Activity" field allowed them to specify what kind of work they were carrying out, they could not record time for the actual Role.
Attributing time to specific Roles is especially important because many users have more than one Role on a Work Item. When this is the case, simply recording the hours that were spent on a Work Item does not tell the whole story.
Example: A Project Manager might have allocated one person to spend 3 hours a day on a Work Item as a Developer and 2 hours a day on the same Work Item as a QA Engineer. If that person simply attributes 5 hours a day to the Work Item, it does not tell the entire story; the user might not have split up her time on the Work Item appropriately by Role.
By allowing users to enter time towards Roles, Project Managers can be sure that their Project teams are spending the correct amount of time in the correct Roles.
Upland Analytics
The following improvement has been made to Upland Analytics in PowerSteering. Click on the upgrade to learn more about it:
What's Different:
A new Data Source has been added to Upland Analytics that exposes Cost-related data. This Data Source includes two views: "Basic Details for Work" and the new "Work Cost Breakup" view, which contains fields that match the Cost-related fields from the Report Wizard:
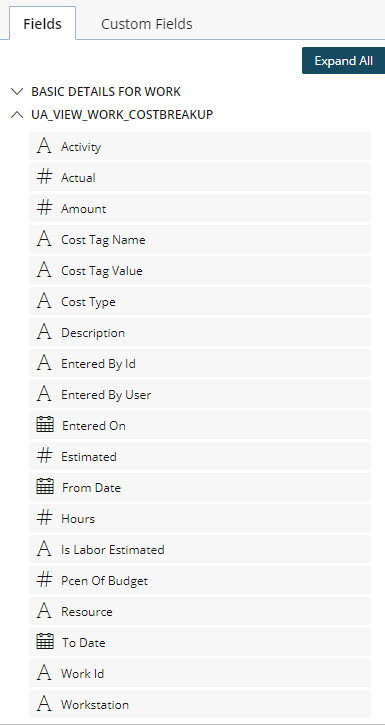
For more information on using Upland Analytics in PowerSteering, see the Upland Analytics Overview.
Benefit:
By including Cost-related data in their Upland Analytics reports, users can analyze and compare the estimated and actual costs of different Work Items in PowerSteering. They will no longer need to rely on the Report Wizard to create these kinds of reports.
Upland Assist
Upland Assist is a brand new feature that has finally made its way to PowerSteering. Click on the upgrade below to learn more about it:
What's Different:
PowerSteering is introducing Upland Assist as a part of the 2022R1.2 release.
Upland Assist is a new single point of access for self-service and customer support directly within the PowerSteering application. It provides a seamless way to access the Online Help Center, the Upland Community, and more.
Prior to this release, the Online Help and Community could be accessed directly from the Header by selecting the question mark icon:
![]()
With this update, the question mark icon within the Header has been updated:
![]()
When users select this icon, the Upland Assist window will open up in PowerSteering:
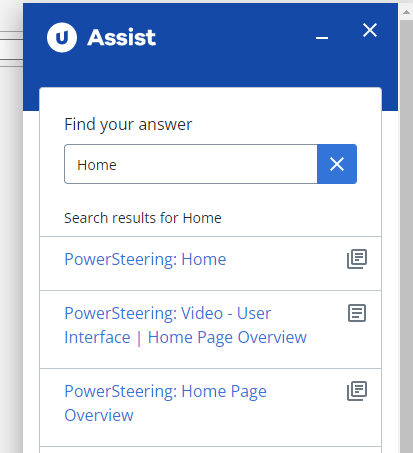
The first thing displayed in the window is a search bar. Upon opening, the window will automatically conduct a search based on the page you are visiting in PowerSteering. For example, the user who selected the question mark icon in the image above was currently viewing the Home page. Because of this, the Upland Assist window has automatically searched for "Home". Below the search bar, the user will see a collection of online resources centered around the Home page, including both Help Center ![]() and Community
and Community ![]() pages.
pages.
The selected pages will open up directly in the Upland Assist window, eliminating the need to open up a new browser tab to access supportive resources:
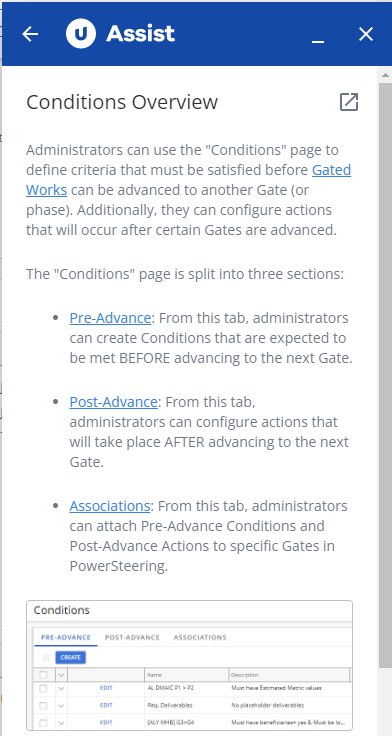
In this example, an administrator has selected the "Conditions Overview" Online Help Center article after opening Upland Assist from the "Conditions" page in PowerSteering. The article has opened up directly with the Upland Assist window.
Users can select the  icon in the top right-hand corner of the window to open up the article in a separate browser tab.
Note: Our team is currently in the process of editing the images in the Upland Assist version of the Online Help Center to make them appear clearer in the window. If you come across any unclear images that have not been addressed yet, you should select the  icon to open the window in a new tab to see them in full.
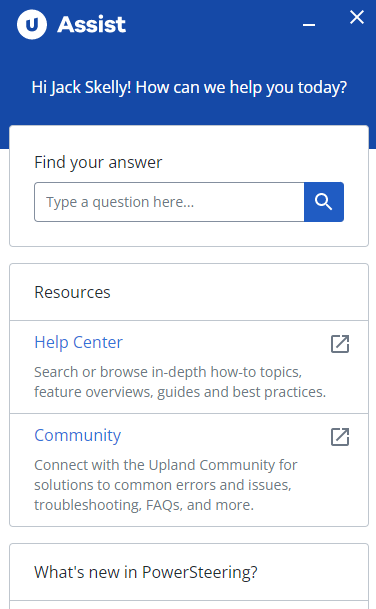
Scrolling down in the Upland Assist window (or selecting the ![]() button on the search bar) will reveal direct links to the PowerSteering Online Help Center and the Upland Community, as well as a "What's new in PowerSteering" link that spotlights some new, useful features that PowerSteering has implemented:
button on the search bar) will reveal direct links to the PowerSteering Online Help Center and the Upland Community, as well as a "What's new in PowerSteering" link that spotlights some new, useful features that PowerSteering has implemented:
Benefit:
Prior to this update, users would have to navigate away from the PowerSteering application in order to access support resources. This caused users to temporarily remove themselves from their work in order to seek out support information. Upland Assist removes the need for this, allowing users to access these resources directly within PowerSteering.
Example: Imagine a new user is trying to enter time into their Timesheet for the first time. They would like to access an online help page to assist them with this process to ensure they do not miss anything.
Prior to this update, the user would have to open up a new browser tab so they could view the Enter Time help page. The user would then have to navigate back and forth between the PowerSteering tab and the help page tab to carry out the procedure.
With this upgrade, the user never needs to leave PowerSteering to access the help page. Furthermore, the user can easily follow along with the steps directly in the Upland Assist window within PowerSteering instead of tediously swapping browser tabs.
By offering these resources directly within the application, Upland Assist is providing users with a seamless way to learn how to use and navigate PowerSteering.
User Interface
The following improvement has been made to the general PowerSteering user interface. Click on the upgrade below to learn more about it:
What's Different:
PowerSteering users can now freeze up to three columns at a time on data grids. In this context, "freezing" refers to grid columns that will stay still on the screen while the user scrolls horizontally through the grid:

Prior to this release, data grids could be primarily customized by selecting columns and rearranging their positions on the grid. Users could select the "Columns" icon ( ![]() ) to decide which columns to include in the grid:
) to decide which columns to include in the grid:

With this update, a new "Grid Settings" icon (![]() ) is available as well:
) is available as well:
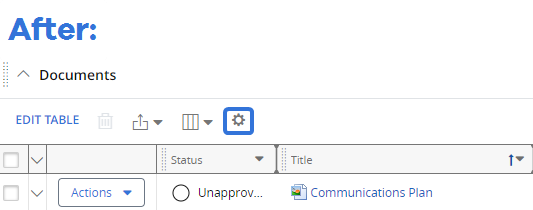
Selecting this icon also allows users to add columns (including Tags / Custom Fields as columns) onto the grid, similar to the "Columns" icon:
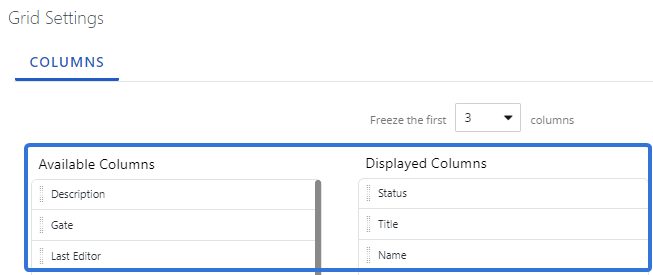
Users can use the "Grid Settings" window to drag and drop available columns into the "Displayed Columns" list to add them to the grid and vice versa. Also, the order of the columns can be rearranged from here; users can drag and drop the displayed columns in the list to change how they are ordered in the grid (the top-to-bottom order will be reflected left-to-right in the actual grid).
However, it also includes a drop-down menu that allows users to freeze up to three columns on the left-hand side of the grid:

When columns are frozen, they will remain still while the user scrolls horizontally through the grid:

Note: The grid column that includes the "Actions" drop-down menus will always remain frozen. Because of this, it will not be included in the count when users select an option from the freezing drop-down menu. In the example above, the user has only chosen to freeze two columns; this means that only the "Status" and "Title" columns will remain frozen along with the column of "Actions" drop-down menus.
Tip: If you would like certain columns to be frozen, ensure that they are on the left-hand side of the grid and within the range you have selected from the drop-down menu. For example, if you would like to freeze the "Title" column and you have chosen to "Freeze the first 2 columns", you should drag and drop the "Title" column to make it one of the first two columns on the grid.
Benefit:
Freezing columns allows certain columns to remain visible on a grid at all times. This becomes extremely helpful while scrolling horizontally through grids with a great deal of columns because users can easily forget which row they are viewing. For example, imagine you would like to use a "Documents" grid to see when a "Communications Plan" document was most recently modified. The "Last modified" column is located at the end of the grid, so you need to scroll quite a bit to the right in order to see it. Prior to this release, your eyes would of had to be glued to the row as you scrolled so you did not accidentally lose your place and look at the wrong row. Now, the "Title" column can be frozen, which allows you to scroll all the way to the end of the grid while still seeing which information lines up with the "Communications Plan" document.
Work Generation
The following improvement has been made to Work Generation in PowerSteering. Click on the upgrade below to learn more about it:
What's Different:
Users can now facilitate Work Generation directly from a work's Summary page.
Prior to this release, users would have to use the Project menu to access Work Generation options. This involved opening the Project menu, opening the "Work Generation" sub-menu, and selecting one of the applicable Work Generation templates:
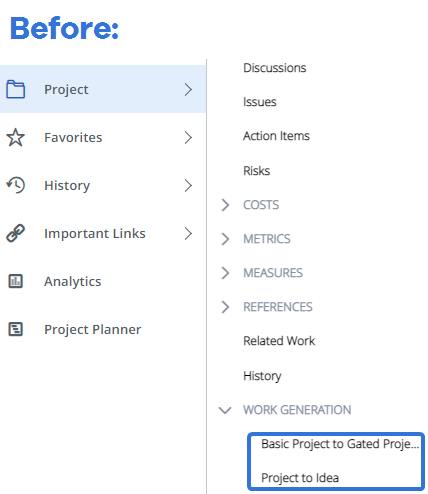
With this upgrade, a new "Work Generation" drop-down menu has been added to the top right-hand corner of the Summary page:

Users can open this menu to choose one of the applicable Work Generation templates just like they would from the "Work Generation" sub-menu. From here, they can generate new work.
Note: The "Work Generation" sub-menu will still be available from the Project menu.
Note: This new drop-down menu will be visible based on the rules outlined in the Work Generation Overview.
Benefit:
With the growing popularity of Work Generation, it makes little sense to hide the option behind two menus. For example, a common practice amongst PowerSteering users is to convert Ideas to Projects once they are approved. Because of this, Work Generation has become a central component to Ideas and should be featured on their Summary pages. This is another example of PowerSteering's commitment to creating a more intuitive interface that reflects how users interact with the application.