2022R1 - New Features
Below is a summary of the new additions to PowerSteering in the 2022R1 release. PowerSteering 2022R1 will be deployed to staging on February 23rd, 2022 and deployed to production on March 13th, 2022. When this happens, the listed features will become available.
Note: This page will be updated as new functionality becomes available.
The following areas of PowerSteering have been upgraded as part of the 2022R1 release:
Click here to watch the 2022R1.0 "What's New Webinar" for more information on these new features.
Agents
The following improvement has been made to the Due Date Reminder agent. Click the upgrade to learn more about it:
What's Different:
When PowerSteering users receive an email from the Due Date Reminder agent, it will now include the name of the Parent work as well as the name of the Work Item that is set to expire. Both of these names will serve as direct links to the Work Items in PowerSteering.
Prior to this release, the email would only include the name of the Work Item that was set to expire. For example, if a single Gate within a Gated Project was set to expire, the email would only contain the name of that particular Gate. With this upgrade, these emails now display the name of the Parent work as well. In the case of the Gated Project example, this means that both the name of the Gate and the overarching Gated Project will be included in the email. Both of these names will serve as links to the Work Items in PowerSteering:

Benefit:
Adding the Parent work to Due Date Reminder email notifications offers users more information on which Work Item is set to expire. Not being able to see the Parent can easily cause confusion. For example, a Gate named "Define" might belong to many different Gated Projects at once. When users received this email, they would ultimately have to guess which Gated Project the Gate belonged to. Now that the Parent work is included, users will immediately know which Work Item is nearing its expiration date.
Documents
The following improvement has been made to Documents in PowerSteering. Click on the upgrade to learn more about it:
What's Different:
PowerSteering users can now add Documents to Descendants of any level from the Work Item Summary page.
Prior to this release, users could only add Documents to Descendants one-level down. In a Gated Project, for example, Documents could only be added to direct Gates:
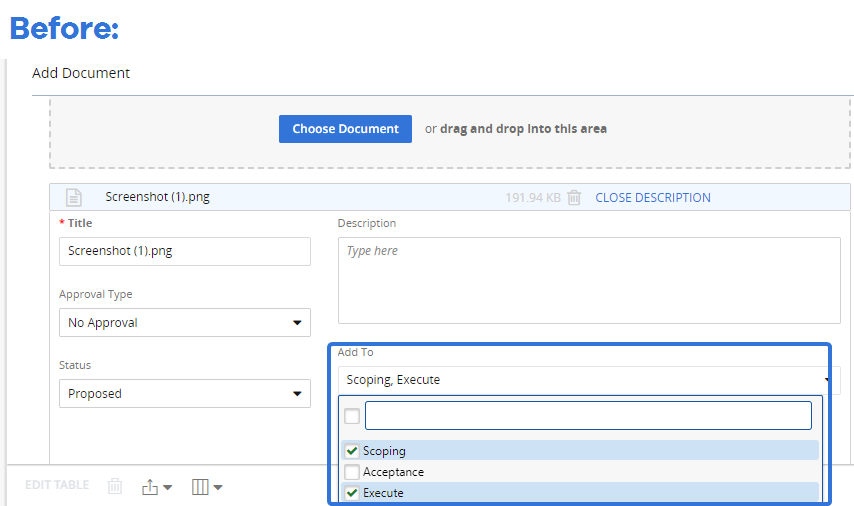
Users would have to manually search for other Descendants if they wanted to add the same Document to those as well.
With this upgrade, the same Document can be added to Descendants at any level:
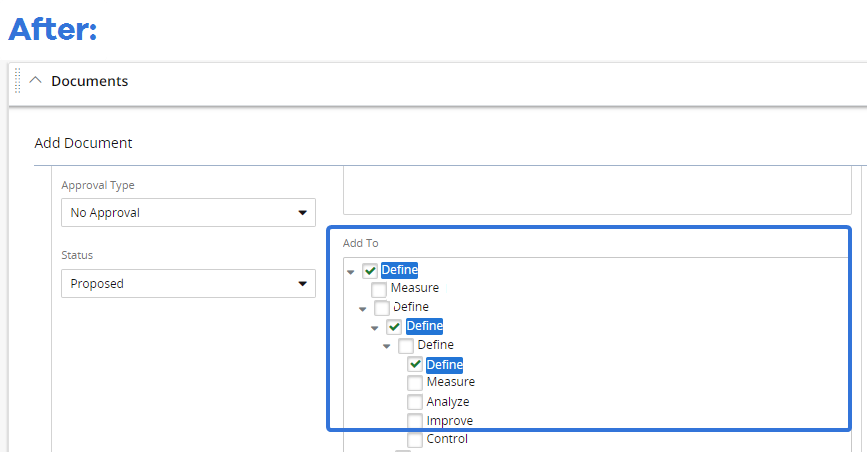
By clicking the arrow  on a Descendant, you can open up and simultaneously add the Document to Descendants of different levels.
Benefit:
As mentioned above, PowerSteering users could only add documents to Descendants that were one-level down. This led to problems for users with Gated Projects that had similar Tasks.
For example, imagine a Gated Project that has a Gate called "Define" and a Gate called "Measure". Both of these Gates have a common Descendant: an Action Item called "Statement of Work". Previously, users would have to go into both the "Define" Gate and the "Measure" Gate to add a Document to both of their respective Action Items. Now, this task can be done at once from the Gated Project itself.
The above example is quite common, but also quite simple. Many PowerSteering users have experienced this issue with more than only one level of Descendants. By being able to add Documents to multiple levels of Descendants at a time, users will save themselves the time and effort of having to manually seek out each level.
Home Page
The following improvements have been made to the PowerSteering Home page. Click on any of the upgrades to learn more about them:
What's Different:
The "My Action Items" module on your PowerSteering Home Page now includes a new column to indicate the status of the Work Item the Action Item is attached to:
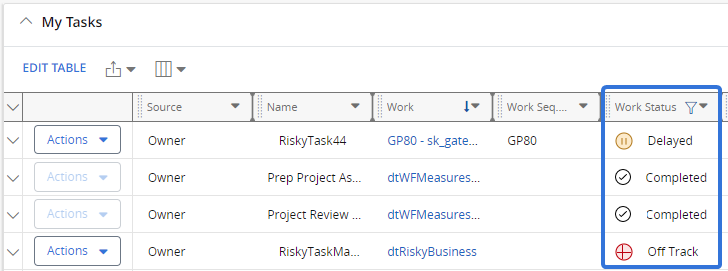
Tip: Just like other columns, you can click the arrow  in the column header to sort or filter the items.
Note: In order to see the "My Action Items" module, you will need to configure your Home Page to display it.
Note: This column can be added or removed by opening the "Columns" menu  .
.
Caution: The "Work Status" column can easily be confused for the "Status" column, which displays the status of the Action Item itself, not its Work Item. Be sure you are not confusing one for the other while viewing the "My Action Items" module.
Benefit:
Prior to this release, users could only see a Action Item's status on the "My Action Items" module. Although a Action Item's status helps users prioritize which Action Items require their attention, the status of the Action Item's Work Item is just as important if not more. For example, imagine you have decided to work on Action Items with an "Off Track" status because you think these Action Items are the most pressing. After you finish working on these Action Items, you might realize that some of them belonged to Projects that were "On Hold" or even "Canceled". Providing visibility into each Action Item's Work Status will allow PowerSteering users to make better decisions while prioritizing their assigned Action Items.
What's Different:
The "My Action Items" module on your PowerSteering Home Page now includes a new column to indicate the Sequence Number of the Work Item that the Action Item is attached to:
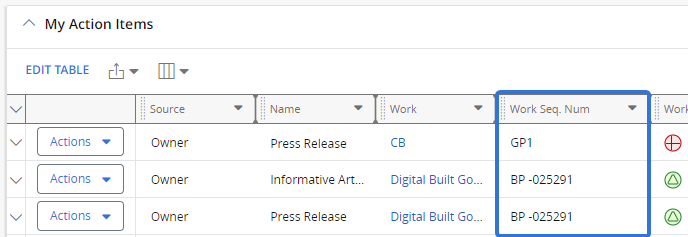
Tip: Just like other columns, you can click the arrow  in the column header to sort or filter the items.
Note: In order to see the "My Action Items" module, you will need to configure your Home Page to display it.
Note: This column can be added or removed by opening the "Columns" menu  .
.
Caution: The "Work Sequence Number" column can easily be confused for the "Sequence Number" column, which displays the Sequence Number of the Action Item itself, not its Work Item. Be sure you are not confusing one for the other while viewing the "My Action Items" module.
Benefit:
Prior to this release, users could only identify the Action Item's Work Item by the "Work" column, which displayed the Work Item's name. Although this is useful, many PowerSteering users track their Work Items by Sequence Number, not name. This is especially true in the case of Work Items that have similar names, which can cause confusion. Being able to verify the Work Items by Sequence Number ensures that users will know which Action Items belong to which Work Item.
What's Different:
PowerSteering users can now add Tags and Custom Fields as columns on their Home Page grids. Using a grid's "Columns" menu  , users can select from a list of Tags or Custom Fields that apply to items in the grid.
Note: You can configure your Home Page to display and exclude certain grids.
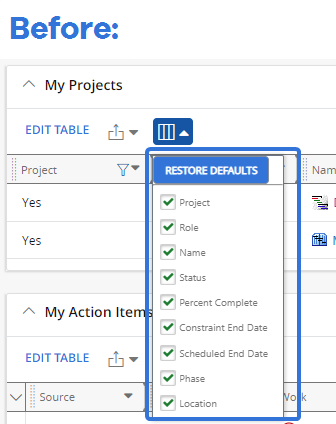
For example, take the "My Projects" grid on your Home Page. Prior to this release, you would only see the standard grid columns when you opened up the "Columns" menu  on a Home Page grid:
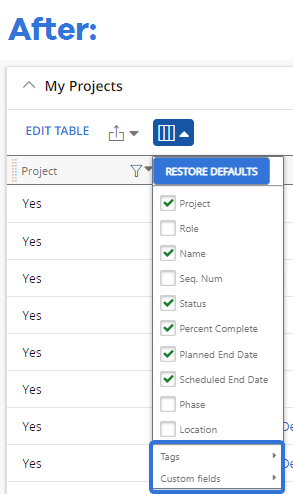
With this update, two new options for "Tags" and "Custom Fields" can now be found at the bottom of this menu:
From here, users can decide which Tags or Custom Fields they would like to add to their grid as columns:
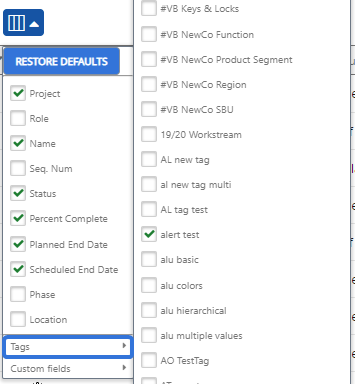
Tip: These lists can be quite long. In order to scroll through them properly, make sure to keep your mouse cursor on the list itself:
Click thumbnail to enlarge and play.
Once you select the checkbox of a Tag or a Custom Field, it will appear as a column in your grid. This column will display any values that have been attached to the Tag or Custom Field:
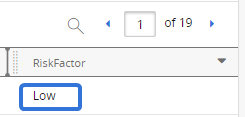
Note: The Tags and Custom Fields on the "Columns" menu  will reflect whatever Tags and Custom Fields are available to every Work Item in the grid. For "My Projects", you can choose from and Tags and Custom Fields that have been attached the Work Item types in your grid.
You can now find Tag and Custom Field column options for the following Home Page grids: My Projects, My Ideas, My Organizations, My Folders, and My Action Items.
Benefit:
Tags and Custom Fields can contain important information that cannot be captured by any of the other standard grid columns. For example, a Tag column named "RiskFactor" on a "My Projects" grid allows users to easily see which of their Projects are highly vulnerable directly on their Home Page. PowerSteering grids are now able to display more information, allowing users to know more about their work by simply looking at their Home Page.
What's Different:
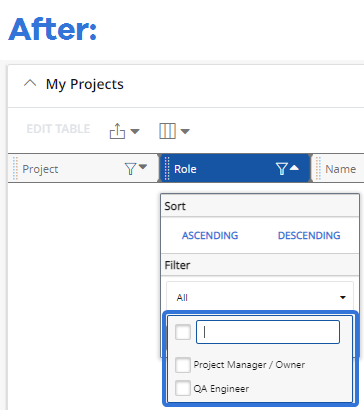
On the "My Projects" module on the Home page, a multi-picker filter has replaced the text box filter on the "Role" column.
Note: "Project" is a Replaceable Term in PowerSteering. Check your Replaced Terms to make sure it will not display as a different term for your organization in PowerSteering.
Prior to this release, users had to type a role into the text box and click the Apply button in order to filter the Projects by that Role:
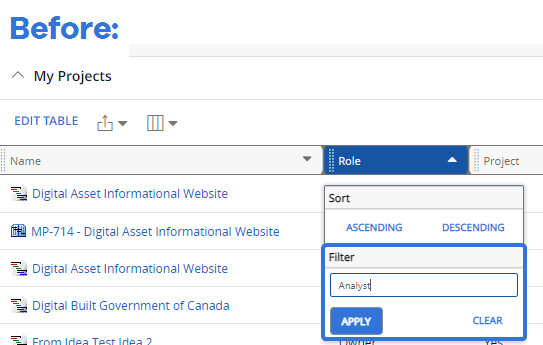
With this update, users can now use the multi-picker filter to filter the module by Roles. This allows users to select the checkboxes of the Roles they wish to filter their Projects by:
Benefit:
The text box filter did not make a lot of sense on the "Roles" column. Having to type out the name of a Role in full instead of simply checking a box was unnecessarily tedious. Also, the text boxes did not allow users to enter multiple Roles, which meant that users could only filter the "My Projects" module by one Role at a time.
The multi-picker, on the other hand, allows users to filter by Roles simply by selecting their checkboxes. Also, they can check more than one checkbox at once, allowing them to filter by multiple Roles at a time.
Integrations
The following improvements have been made to PowerSteering integrations. Click on any of the upgrades to learn more about them:
PowerSteering users who make use of the Microsoft Teams integration must note that the API permissions have changed for the 2022R1 version of PowerSteering. This means that customers will have to modify these permissions in Microsoft Azure.
Previously, the API permissions should have been set up as follows:
-
Directory.Read.All
-
Group.ReadWrite.All
-
User.Invite.All
-
User.Read.All
For use in 2022R1, they will need to be changed to the following:
-
Directory.Read.All
-
Team.Create
-
TeamMember.ReadWrite.All
-
TeamSettings.ReadWrite.All
-
User.Invite.All
-
User.Read.All
For more information, see "Adding API permissions in Azure" from the Setting up a Microsoft Teams Integration with Microsoft Azure page.
PowerSteering users can now view a preview of what the Project's workflow will look like. A new Workflow Design button has been added to the Project Summary page of workflow Projects:

After selecting this button, you can see a preview of the current workflow design:
Click image to enlarge.
Note: The Workflow Design button will only appear on Workflow Projects that have successful integrations. For example, if the "Workflow status" of the Project is "Not synchronized", the button will not be available:
Benefit:
Prior to this release, the matrix that laid out all of the workflow routing rules could only be accessed in FileBound. In PowerSteering, users could approve / not approve an Action Item and assign it to another user. However, PowerSteering users would not have any visibility into the full workflow path of the Project. PowerSteering users could only see the list of completed Action Items and active Action Items; there was no way to view any anticipated Action Items that occurred before Project closure. With the addition of the Workflow Design button, users can now view the workflow in its entirety directly within PowerSteering.
What's Different:
Action items created in FileBound will now automatically display the FileBound description on their correspond PowerSteering action items.
Note: "Action Item" is a replaceable term in PowerSteering.
Prior to this release, the API could not link the "Description" field from FileBound to PowerSteering. Because of this, the PowerSteering Action Item would simply state "n/a":

With this release (as well as a recent FileBound upgrade), the description is now correctly returned and displayed:

For more information on workflow, see Upland Workflow Manager.
Benefit:
The "Description" box is a crucial part of PowerSteering Action Items. Not only does it allow the Action Item creator to provide a summary of expectations, it also allows them to provide links to helpful resources that might help the Action Item assignee. Now that FileBound descriptions appear on PowerSteering Action Items, working on Action Items will be easier for both the creator and the assignee.
Metrics
The following improvements have been made to PowerSteering Metrics. Click on any of the upgrades to learn more about them:
What's Different:
The 2021R1.1 release introduced the ability to lock specific Metric line items (rows). Building off of this, PowerSteering users can now lock Beneficiary rows as well as part of the 2022R1 release.
Note: Users will require the "Lock Metrics" Project permission to lock and unlock line items or columns.
Note: "Metric" is a replaceable term in PowerSteering.
Prior to this release, only the "Parent" line item of Metric Beneficiaries could be locked. In the case of Metrics with percent allocations, this is not an issue; the "Parent" line items are the only rows that user can enter Metric data into. The Beneficiary rows are populated based on their percent allocation. In the case of manual beneficiaries, however, this process is reversed; users enter data into the Beneficiary line items. In this case, the "Parent" line item displays the sum of the Beneficiaries below it.
This would cause an issue because in order to lock a Beneficiary line, users would have to lock all of the other Beneficiaries at once:

The "Parent" line item ("Software") has been locked, which means that all of its Beneficiaries are also locked.
When this was the case, there was no way to lock specific Beneficiary line items without locking all of them.
With this update, PowerSteering users now have the ability to lock and unlock Beneficiary line items on Metrics with manual Beneficiaries. This means that users can choose to lock certain Beneficiaries under a "Parent" line item while leaving other Beneficiaries unlocked:
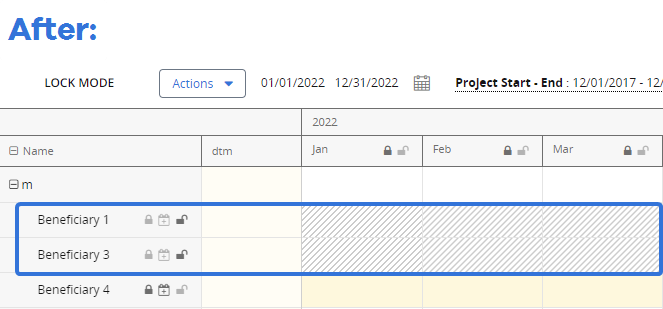
Note: Ask your PowerSteering administrator if your Metric uses manual Beneficiaries or percent allocated Beneficiaries if you are unsure.
It should be noted that this new ability has changed how line items are locked / unlocked by Metric Bulk Actions. Prior to this release, the "Parent" line items could only be locked in bulk, not their Beneficiaries:
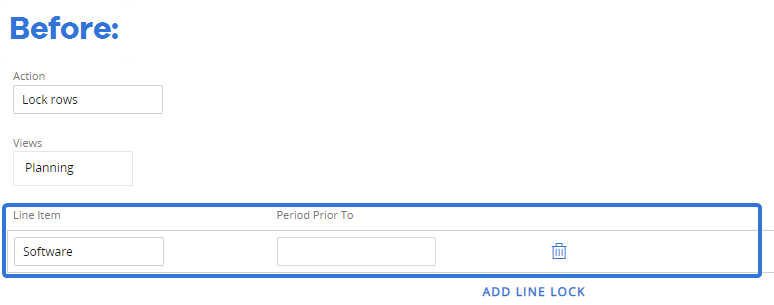
With this update, users can still lock "Parent" line items to lock all of their Beneficiaries. After selecting a line item, however, users will see an extra drop-down menu that gives them the option to lock / unlock manual Beneficiaries in bulk as well:
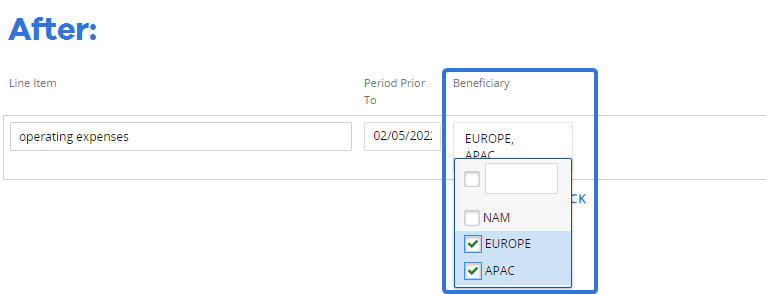
Any number of Beneficiary lines can be locked by selecting their checkboxes in the "Beneficiary" drop-down menu. If no Beneficiaries are chosen, the entire "Parent" line item will be locked, including all of its Beneficiaries.
Note: Beneficiary locks will be supported when importing Metric data. Similar to other locked Metric cells, locked Beneficiary cells cannot have values imported into them when they are locked. Attempting to import Metric data into locked Metric cells will result in either the imported value being ignored or an import error.
Benefit:
With the 2021R1.1 release, the main goal was to allow users to lock all editable fields on a Metric. This began with line items, rows, and Tags / Custom Fields, and now it finishes up with manual Beneficiaries.
There are many use cases that can lead to users having to lock specific Beneficiaries. Take the example from the "Before" shot above; imagine that $110 was the maximum "Software" cost that a city could accumulate in a month. Seeing as Miami has currently reached that, the Financial Officer might want to lock the "Miami" Beneficiary to ensure that no one adds any additional costs. Before this release, this was not possible; the Officer would have to lock all of the "Software" beneficiaries in order to lock Miami. This might cause her to take unnecessary additional steps, such as lock the "Software" line item and ask the team members to reach out to her directly to add costs for other cities. Now that specific Beneficiary lines can be locked, there is no longer a need to put a blanket lock on the rest of them.
What's Different:
The 2021R1.2 release introduced different colors for monthly periods on Alternative Calendars. When applied to a Metric, these colors could be seen on column headers:

Note: "Metric" is a replaceable term in PowerSteering.
Building off of this new feature, the 2022R1 release is introducing colors for Metric cells under the columns as well, not just column headers:

Note: Alternative Calendars cannot be configured in PowerSteering. To set up an Alternative Calendar, speak with your PowerSteering representative.
Benefit:
Colors were initially introduced to Alternative Calendars to point out which periods should be treated differently. For example, a period might be highlighted in red to indicate that not all PowerSteering users should enter Metric data into it. However, users would always have to look from the header down to the Metric data below to know which column to avoid. This left a lot of room for users to mistakenly enter data into the red period. Now that the entire Metric column can be colored in, it will be much easier for users to determine which periods need to be treated differently.
What's Different:
The 2021R1.2 release introduced different colors for monthly periods on Alternative Calendars. When applied to a Metric, these colors could be seen on column headers:

Note: "Metric" is a replaceable term in PowerSteering.
With the 2022R1 release, PowerSteering is introducing the option to add scroll-over tooltips on colored column headers to describe their significance. This means that whenever users scroll their cursor over a colored column, they will be able to see a description that explains why the period is special.
Note: Alternative Calendars cannot be configured in PowerSteering. To set up an Alternative Calendar, speak with your PowerSteering representative.
Benefit:
Colored Alternative Calendar periods were initially introduced to warn other users about special Metric columns. However, simply implementing a color might not be enough to communicate why the period itself is special. For example, imagine you have applied a "13 month Calendar" to a Metric in order to make it easier to roll Metric data upwards. If this is the case, not all users might be expected to enter data into the extra Metric period, so the Financial Officer has requested that the extra month show up red on Metrics. Not all users will immediately understand that red means "do not edit" in this case. By adding a quick tooltip to the column, users in charge of Metrics can effectively articulate why the period is special and how it should be treated.
What's Different:
The Financial Review page has been updated to reflect line item and column locks that have been placed on Metrics.
Note: "Metric" is a replaceable term in PowerSteering.
The 2021R1.1 release introduced the ability to lock Metrics by line items and columns. However, some users might remember that these changes would not reflect on the Financial Review page. Whenever a lock of any kind was attached to the Metric grid, that entire Metric would become locked from Financial Review. For example, if you only locked the January 2020 column on a Metric, the entire Metric would be locked on the Financial Review page:
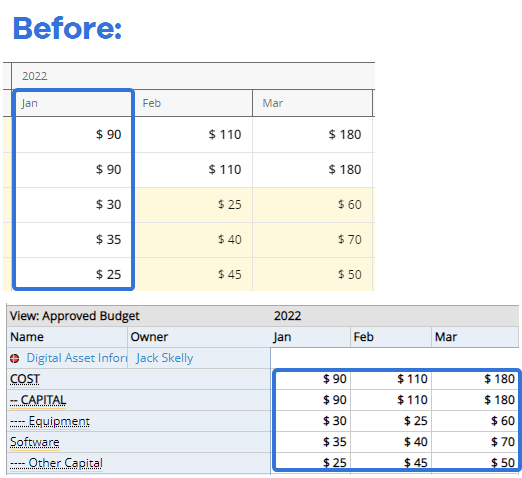
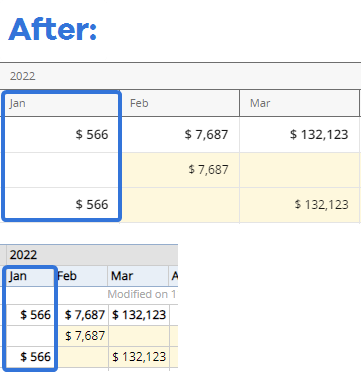
With this update, partial Metric locks no longer trigger a total lock on the Financial Review page. The locks on the Financial Review page now reflect the same locks from the Metric grid. For example, if you decide to only lock the January 2022 column, the Financial Review page will only lock the January 2022 column as well:
Benefit:
Many PowerSteering users prefer to deal with Metrics on the Financial Review page. For example, Financial Officers can use the Financial Review page to update multiple Metrics at once instead of going into Projects one at a time. Now that the correct locks can be replicated between pages, the same numeric data that can be edited on a Metric can now also be edited from the Financial Review page.
Project Central
The following improvements have been made to Project Central. Click on any of the upgrades to learn more about them:
What's Different:
PowerSteering users can now add a column and filter for "Sequence Number" for Projects in Project Central.
This column can simply be added by opening the "Columns" menu, selecting "Project" and then selecting the "Sequence Number" checkbox:
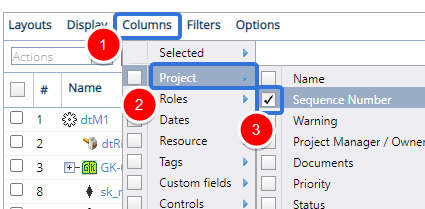
After doing this, the "Sequence Number" column will appear for each Project:
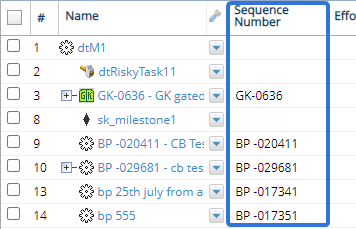
In addition to this, PowerSteering users can now filter Projects by their Sequence Number in Project Central. This can be done by opening up the "Filter" menu and filling in the "Sequence Number" field:
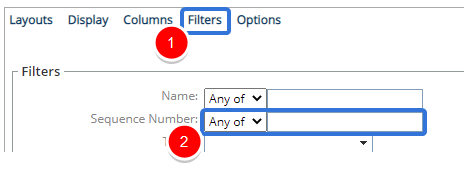
Note: Users can still filter by Sequence Number even when the "Sequence Number" column has not been added to the Project Central layout.
Tip: If you with to save a layout after adding columns or filters, remember to open the "Layouts" menu and select Save Layout: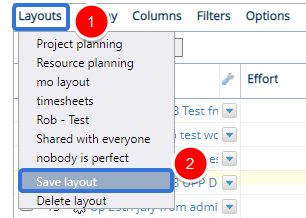
From here, you have the option of overwriting a previous layout or creating a new one. You can also decide whether or not to make it available to other PowerSteering users: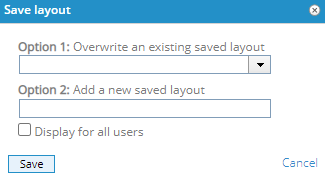
Benefit:
Many organizations use Project Sequence Numbers to organize and differentiate between their Projects. For example, a company might have many Projects that share similar names. To avoid confusion, users might verify Projects by their Sequence Number instead.
Also, filtering by Sequence Numbers is a simple way to see relevant items in Project Central. For example, a number of items might have sequence numbers that begin with "BP". Users can easily filter for "BP" Sequence Numbers for a much more simplified Project Central layout.
Reviewing Data
The following improvement has been made to reviewing data in PowerSteering. Click on the upgrade to learn more about it:
What's Different:
PowerSteering users can now sort Resources in the Resource Review by the "Resource pool" column. This can easily be done by clicking on the "Resource pool" column heading. Clicking once will sort the Resources by their Resource Pool in alphabetical ascending order (A-Z); clicking again will sort them in alphabetical descending order (Z-A):
Click thumbnail to play.
Note: This option will only work if the group allocation is set to "By Person" in the Display options: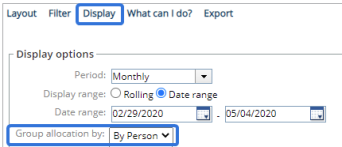
Also, you must first add the "Resource Pool" column to the Resource Review grid before you sort by it. This can be done using the "Additional column" drop-down menu, which can also be found under Display:
Note: The "Resource Pool" column can include multiple Resource Pools if certain Resources belong to more than one. When this is the case, they will be ordered alphabetically by the first Resource Pool listed.
Note: Selecting Save Layout from the Layout drop-down menu will not save any sorting preferences.
Benefit:
The ability to sort Resources by their Resource Pools can make it much easier for PowerSteering users to view and edit the assignments and availability of their Resources. For example, a manager might be in charge of multiple Resource Pools. By sorting the Resources by Resource Pool, these managers can better organize the Resource Review grid and make better Resource-based decisions.
Status Reports
The following improvement has been made to PowerSteering Status Reports. Click on the upgrade to learn more about it:
What's Different:
PowerSteering users now have the ability to delete Status Reports directly from the "Status Reports" module on a Work Item.
Note: To do this, users will need to be given the "Administer Status Reports" permission from the "Projects" permission list.
Prior to this release, a Status Report's Actions drop-down menu only included options to copy, edit, or export the Status Report:
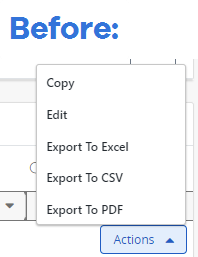
Now, users with the required permissions will see a Delete option in the Status Report's Actions drop-down menu:
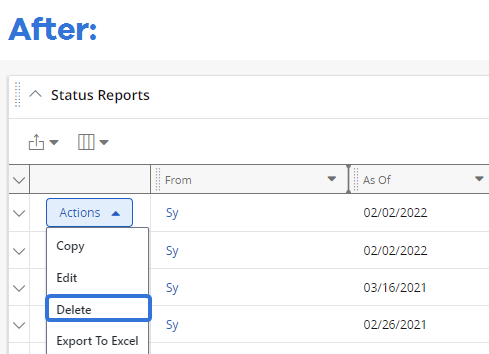
After deleting the Status Report, it will be removed from the "Status Report" module.
Benefit:
Many Status Reports are unfortunately created either in error or with irreversible mistakes (i.e. incorrect Calendar settings). Simply editing the Status Report to fix these errors might not be possible when this occurs. Even when it is, the report might have to be sent out to stakeholders again, which can easily result in confusion and email bombardment. Being able to delete the Status Report altogether is often a much easier fix than trying to constantly edit and resend problematic Status Reports.
Upland Analytics
The following improvements have been made to Upland Analytics. Click on any of the upgrades to learn more about them:
What's Different:
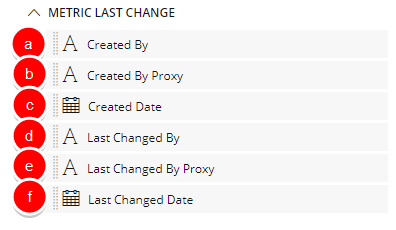
Reports in Upland Analytics can now include data on the last time Metrics were changed. A new data view called "Metric Last Change" has been added to the Metrics Data Source. Including fields from this view will allow PowerSteering users to see who most recently edited data in a line item (row).
Note: This includes Beneficiary line items.
Note: This only includes numeric Metric data; it will not track any changes made to the Tags or Custom Fields of a Metrics line item.
This new view contains the following fields:
-
Created By: This will display the user who initially edited the line item.
-
Created By Proxy: This will display the name of the proxy user who initially edited the line item if a proxy user was used.
-
Created Date: This will display the initial date and time the line item was edited.
-
Last Changed By: This will display the name of the user who most recently edited the line item.
-
Last Changed By Proxy: This will display the name of the proxy user who most recently edited the line item if a proxy user was used.
-
Last Changed Date: This will display the date and time that the line item was most recently edited.
Note: Unfortunately, these fields do not work retroactively. This means that it will only be able to track modifications going forward. Please remember this if you are trying to report on line items that have not been modified recently.
Benefit:
Being able to include data on users who recently edited Metric data will allow PowerSteering report builders to keep much better track of Metrics. For example, if a Financial Officer finds a mistake on a Metric line item, she can easily consult a report to see which user entered the incorrect data.
What's Different:
PowerSteering Groups are now synchronized with Upland Analytics User Groups. This means that when a Group is created in PowerSteering, that Group and all of its users will become a User Group in Upland Analytics as well.
Note: Only those given "Super-User" permission can access the Upland Analytics administration menu.
Note: Only active users will be carried over to the Upland Analytics User Group. Inactive and no-access users will be excluded.
Changes that are made to a PowerSteering Group while editing will be reflected in the corresponding Upland Analytics User Group. This can be seen in three different examples:
-
Name: any changes made to the name of the PowerSteering Group will be reflected in the corresponding Upland Analytics User Group.
-
Description: any changes made to the "Description" of the PowerSteering Group will be reflected in the "Label" of the corresponding Upland Analytics User Group.
-
Users: any active users that are added to or removed from the PowerSteering Group will automatically be added to or removed from the Upland Analytics User Group.
Note: Once a PowerSteering user becomes a no-access user, it will be removed from any Upland Analytics User Groups.
Benefit:
Upland Analytics User Groups is a relatively new feature that can be used to share folders and files with multiple users at a time. However, PowerSteering Groups have existed for quite a while. Instead of making administrators create new User Groups in Upland Analytics, it saves much more time and effort to simply bring in the same Groups that were created in PowerSteering. Administrators no longer have to create replica groups from scratch, nor do they have to create two groups (one in PowerSteering and one in Upland Analytics) going forward.
What's Different:
The Status names on Upland Analytics reports can now reflect any custom Work Status Names in PowerSteering. This can easily be done by including the new "Status Replaced Term" field available in the "Basic Details for Work" data view in your report.
Prior to this release, Status names would always reflect the replaced PowerSteering names instead of the custom Work Status Names in Upland Analytics. For example, imagine you changed the "Completed" Status name to "Finished":

Even though "Finished" would appear throughout PowerSteering, the Status would still display as "Completed" on Upland Analytics reports:
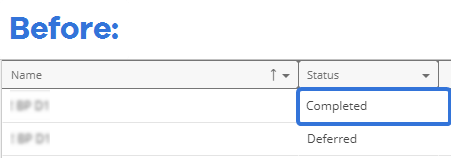
With this update, users now have the option to include the "Status Replaced Term" field, which will display the replaced status name:

Note: The "Status" field will still display the original PowerSteering Status name.
Benefit:
Just like Replaceable Terms, Work Status Names are an integral part of PowerSteering customization features. Different organizations use different terms to refer to Statuses. For example, an organization might prefer the term "Finished" instead of "Completed" because it better fits the context of their type of work. If their Upland Analytics reports list some of their Projects as "Completed" when the status displays as "Finished" everywhere else in PowerSteering, report recipients can easily get confused. The new "Status Replaced Term" field will ensure that Upland Analytics reports use the same language used throughout the rest of the application.
User Interface
The following improvements have been made to the general PowerSteering user interface. Click on any of the upgrades to learn more about them:
What's Different:
Along with the 2022R1 release, PowerSteering is updating the current look and feel of its user interface to match the new look and feel of Upland Software. This new "UI 2.0" interface includes an updated Header Bar and Icon Bar / Navigation Menu.
Prior to this release, this is what the Header Bar looked like:

With this update, the Header Bar now looks like this:

Prior to this release, the Icon Bar / Nagivation Menu looked like this:
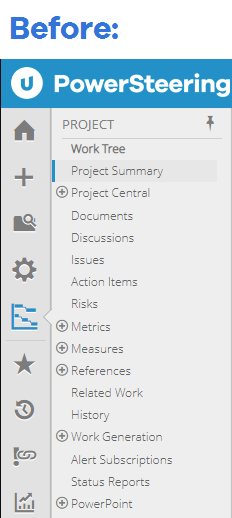
Users could decide to "pin" or "unpin" the Navigation menu to the screen using the Pin  icon.
icon.
With this update, the Icon Bar / Navigation Menu now looks like this:
![]()
Instead of pinning the menu open, users can simply expand or collapse it by selecting the Menu ![]() icon.
icon.
The functionality of the Icon bar is the same as before. The following rules are true both before and after "UI 2.0":
-
Scrolling over any of the Icons on the Icon bar will open up the menu for that icon.
-
Clicking on the Home Icon will bring you to your Home page.
-
Clicking on the Project Icon will bring you to the Summary Page of the most recent Work Item you have visited.
-
Clicking on the Upland Analytics Icon will bring you to the Upland Analytics page.
Also, sub-menus behave the same way they did prior to this update, despite looking different:
Click thumbnail to play.
Benefit:
Over the past year, Upland Software has made great strides in its efforts to redesign the look and feel of its products. PowerSteering is no exception; it now features a refreshed, modern theme that matches the rest of the company. Although it might only be aesthetic, "UI 2.0" reflects PowerSteering's commitment to constantly improve our product.
What's Different:
The "Actions" drop-down menus on PowerSteering grids, which allow users to perform such actions as editing and copying items, are now featured on the left-hand side instead of the right-hand side.
Prior to this release, the "Actions" drop-down menus could be found on the right-hand side of PowerSteering grids. They were always locked into place, which means that they could not be dragged-and-dropped to another place in the grid the way other columns can:

With this upgrade, these menus are now locked into place on the left-hand side of the grid instead:

This column can now always be found directly beside the checkbox column and the "View Details" column  . Similar to the "Actions" column, neither of these columns can be moved around the grid or removed from the grid.
The following grid types feature "Actions" menus and are therefore affected by this update: Documents, Action Items, Risks, Issues, and Status Reports.
Benefit:
The "Actions" drop-down menus, although useful, have caused some inconvenience by being placed on the right-hand side of the page. First of all, it was usually difficult to see at first. The natural user tendency is to read the screen from left to right, which means that the "Actions" menus are usually the last things that users see. This often caused users to open up the "View Details" menu  first, hoping to see some further actions listed there instead.
Also, the menus often caused scrolling issues for users. On smaller screens or within smaller browser windows, the "Actions" drop-down menus could easily be cut off:

By locking the "Actions" drop-down menus to the left-hand side of the grid instead of the right-hand side, users no longer have to scan or scroll through the width of the page to find them.
What's Different:
PowerSteering users will now see a new message whenever an empty grid finishes loading. Prior to this release, a very simple "No items to show" message would appear whenever a grid contained zero items. If a Project had no Risks attached to it, for example, the "Risks" grid would simply state "No risks to show":
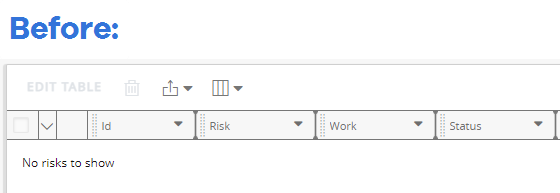
This message only included a string of text; it did not present the user with any additional actions. In order to create a new item, users would have to select the Create button in the top right-hand corner of the screen.
The new message has been updated to include more information and a new graphic. Also, two new buttons have been added to allow the user to take additional steps:
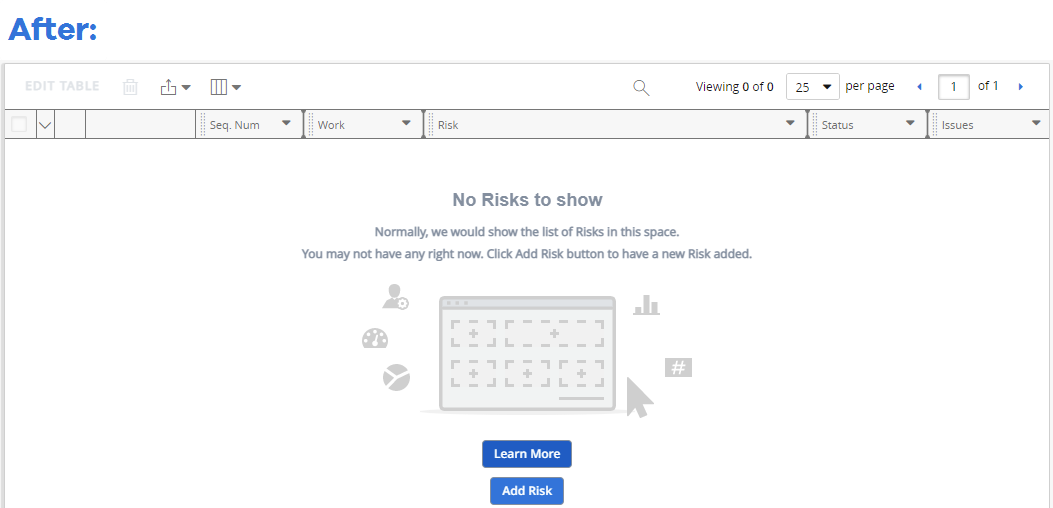
The two new buttons are as follows:
-
Learn More: Selecting this will redirect the user to the corresponding online help page for the item. For example, the Learn More button in the example above will open up the Risks Overview page.
-
Add Item: Selecting this will allow the user to create a new item that will be added to the grid upon completion. For example, the Add Risk button in the example above will open up the Create Risk page.
Note: The Create button is still available in the top right-hand corner of the page.
This message will be visible on the following empty grids: Documents, Action Items, Issues, Risks, Measures, Status Reports, and Descendants.
Note: This message will also appear if you are filtering all of the objects out. If you think there are no objects available in the list, be sure that they have not been filtered out.
Benefit:
The previous "empty list" message accomplished its objective of informing users that there were not any items in the grid. However, many users would not notice it due to its small, bland text font. This led some users to think that the list of objects was still loading. The eye-catching image in the new message is not just meant to be visually appealing; it ensures that the message is not missed by any users who are waiting for the page to load.
Also, the previous message did not offer any additional steps for the user to take. If users wanted to create a new item for the list, they would have to use the Create button in the top right-hand corner of the screen (which was often missed). If users wanted to learn more about the item, they would have to select View Online Help from the Help menu. Both of these actions can now be easily carried out with the Learn More and Add Item buttons.
What's Different:
Users' preferred ascending / descending properties will now be saved throughout most of the data grids in PowerSteering. This means that whenever users decide to sort a grid alphabetically in either ascending or descending order, these changes will be saved for them whenever they leave and return to the page (or if they view another grid of the same type).
For example, imagine you would like "Approved" documents to appear at the top of any "Documents" grid you see in PowerSteering. An easy way to achieve this would be to sort documents ascendingly (alphebetically) by "Status" on the grid:
Click thumbnail to play.
Prior to this release, this sorting preference would not be saved when the user left and returned to the page:
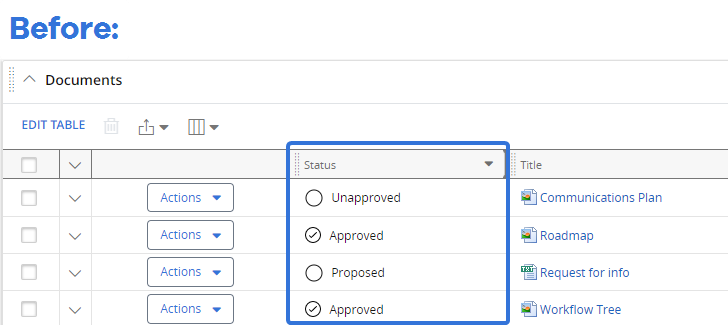
The documents are no longer sorted ascendingly by "Status". Notice that the statuses are out of order and the "ascending" arrow cannot be seen in the column header.
With the 2022R1 release, this sorting preference will be saved whenever users return to the page or view another grid of the same type on another page:
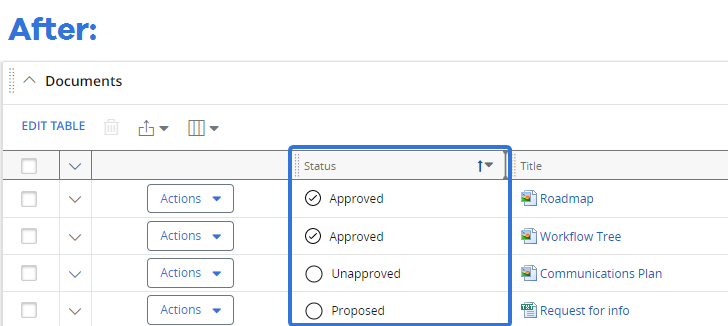
The documents are still sorted ascendingly by "Status". Notice that the status are in alphabetical order and the "ascending" arrow can be seen in the column header.
All of a user's preference properties for grids (sort order, column selection, column order, and filters) will be reflected on every grid of that type in PowerSteering. For example, if you make the above changes to a "Documents" grid on a certain Project, you will see those changes reflected on every other "Documents" grid in PowerSteering, including those on other Projects.
Note: This excludes the personal grids on a user's Home page. For example, if you sort a "Documents" grid on a Project by Sequence Number, this change will NOT be reflected on the "My Documents" grid on your Home page.
Note: PowerSteering administrators still have the power to overwrite the preference properties of any grid using the Edit Preferences button:
When administrators select this button, they can make changes to the preference properties that will be saved for every user who sees that grid type.
Benefit:
There are four preference properties for grids: column selection, column order, filters, and sort order. Prior to this release, the first three were always saved on different grid types for each user (unless changed by an administrator). The only preference property that would not be saved across grids was sorting order.
Sorting order allows users to better organize their grids to their liking. For example, imagine you are looking at an "Action Items" grid. You might wish to have similar Action Items appear together in the grid; if a three-stage press release is required on the Project, you might wish for all of these stages to appear together ("Press Release 1", "Press Release 2", and "Press Release 3"). With this addition to the 2022R1 release, PowerSteering users can decide to sort their grid items by whichever parameter they choose and keep those sorting options after they leave the page.
What's Different:
PowerSteering users now have the option to decide the default for displaying large amounts of text in Custom Details fields on Summary pages. These long fields can now either appear expanded or collapsed by default, or the user's preference can be saved.
Prior to this release, text fields on the Custom Details widget would automatically collapse whenever too much text was entered. This caused less text to appear on the widget and offered the user the option to see all of the text by clicking Show more:
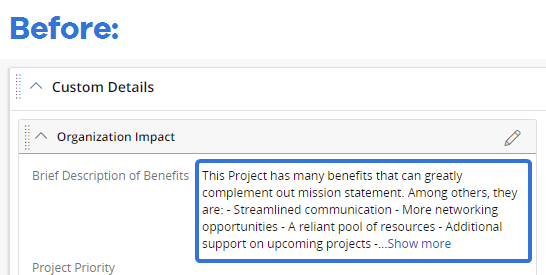
Even when users would click Show more to expand the text, it would still always appear collapsed after they left and then returned to the page.
With this update, users can now decide how this text appears by default. A new "Expand/Collapse Custom Field Text" accessibility preference allows users to do this on the Preferences page. This preference has three options for displaying large amounts of text:
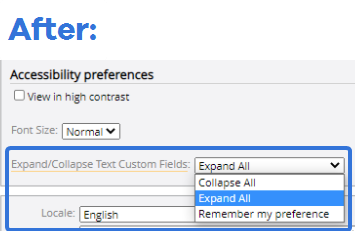
This preference has three display options:
-
Collapse All: Long text fields will behave just as they did prior to this release. If the text is too long, only a limited amount of text will appear at first. Users will have the option to click Show more to display the rest of the text.
Note: This will be the default option until changed from the Preferences page.
-
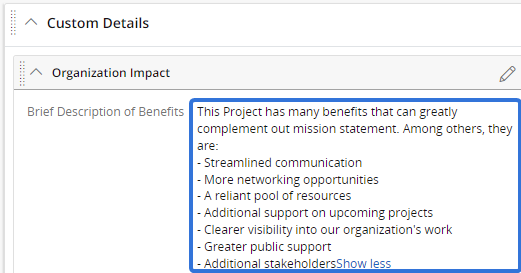
Expand All: Long text fields will always display in full whenever the user visits a Summary page. If the text is too long, users will have the option to click Show less and display only a limited amount of text.:
-
Remember my preference: Long text fields will individually remain either expanded or collapsed depending on how the user left them. For example, if you click Show more to expand a long text field, the text will remain expanded even after you leave and return to the Summary page. If you then decide to click Show less to collapse it, it will remain collapsed until you decide to expand it again.
Note: Long text fields will be collapsed by default when this option is selected.
Benefit:
Prior to this release, long text fields on the Custom Details widget were collapsed by default to decrease page scrolling; these fields can contain massive amounts of text, so users who are not interested in viewing this information would have to needlessly scroll through all of it to reach the modules below it. However, this is something that differs between users. While some users might not want to scroll through all of those long text fields, for example, other users who are responsible for approving a Project Gate might want to read all of the details before giving approval. They will have to tediously open up each long text field before reading, which takes more time and effort. Giving users the option to view long text fields however they like reflects PowerSteering's commitment to creating the most customizable product possible.
Work Generation
The following improvement has been made to Work Generation in PowerSteering. Click on the upgrade to learn more about it:
What's Different:
PowerSteering administrators can now determine how permissions will appear on new Work Items created through Work Generation.
Prior to this release, the permissions would always match those that were defined for the target object type by default. For example, if the Work Generation was being used to create a Project, the new Work Item would have the default "Project" permissions attached to it.
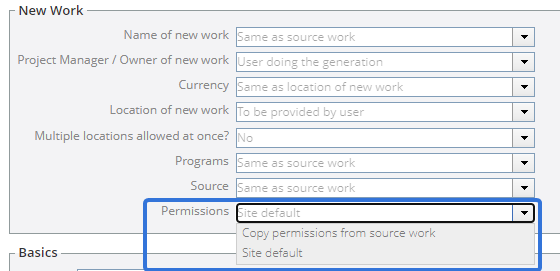
With this update, administrators can determine the permissions of new Work Items while creating or editing a Work Generation template. On the "New Work Basics" tab, a new "Permissions" field can be configured with one of two options:
-
Copy permissions from source work: If this is selected, the existing permissions from the source work will automatically be copied to the new target work.
-
Site default: If this is selected, the permissions of the new Work Item will match those that are defined for the target object type. For example, if the Work Generation was being used to create a Project, the new Work Item would have the default "Project" permissions attached to it.
Note: This was how Work Generation permissions worked prior to this release.
Benefit:
Many PowerSteering administrators preferred their new Work Items to contain the same permissions as their source work items. After all, this is essentially the point of Work Generation; to create a new Work Item that mirrors the Work Item it came from. By configuring permissions on Work Generation templates, administrators no longer have to constantly check and change the permissions of any new Work Items that come from Work Generation.


