This article covers the various options when setting up the Target Utilizations for a Group.
- Display actual Utilization % on Home Page: Renamed from Display Utilization % on Home Page.This option is only be visible when the page is accessed from Group Edit.

- The options within the Utilization Calculation (Utilization = Utilized Hours/Total Hours) section allow defining how the utilization will be calculated.
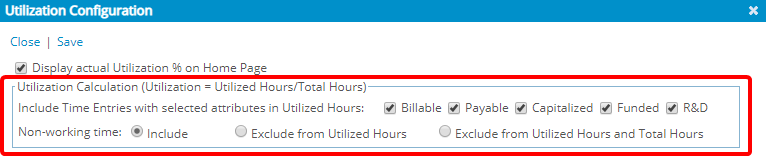
Note: The options available within this section do not change from the previous version. All options within this section are available whether the Display actual Utilization % on Home Page option is or is not selected.
- Target Utilization section:
- Search
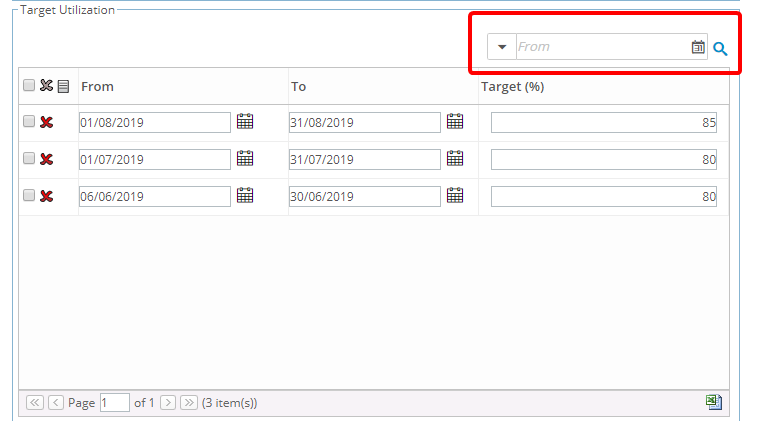
- Search by: This allows defining which criteria to perform the date filter on. The options available are: From and To.
- Filter: These fields allow filtering the targets based on a date range. Targets with dates overlapping with the filter will be returned. Selecting an option will reset the From/To dates. The options available are: Today; This Week; Last Week; This Month; Last Month; This Quarter; Last Quarter; This Year; Last Year; Year to Date; This Fiscal Month; Last Fiscal Month; This Fiscal Quarter; Last Fiscal Quarter; This Fiscal Year; Last Fiscal Year; and Custom. The Custom option will be selected by default with the From date set to the database start date and the To date set to Open ended.
- From: This allows selecting the start of the date range. Selecting a date that does not match the selected Filter will reset the filter to Custom. Open ended is not be an option.
- To: This allows selecting the end of the date range. Selecting a date that does not match the selected Filter will reset the filter to Custom.
- The table: The grid displays the list of targets for the user (25 targets per page). When there are no targets, a message will be displayed on the grid that reads "There are no targets setup. Click the New button to create a new target." Editing can be done directly on the grid row. On creation, once all the information is entered, the row will be saved. On edit, the row will be saved as the cursor focus moves away from each box.
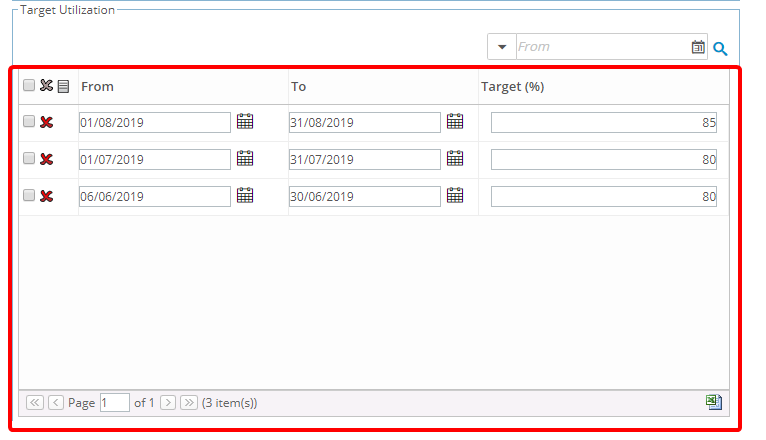
- New (button): Click this button to insert a new row at the end of the grid.
- Delete (button): Click this button to allow deleting the selected rows. This button will be disabled in the header until at least one row is selected.
- Undo (button): Available when creating a new target, allowing you to cancel the creation. Click this button to remove the row from the grid.
- From: The date from which (inclusive) the target is applicable. Open ended will not be available in the calendar. When creating a new target, this date will be set to the current date. By default, the targets will be sorted in descending order based on the From date. You will be able to resort the targets by clicking the column header.
- To: The date up to which (inclusive) the target is applicable. When creating a new target, this date will be set to Open Ended. You will be able to resort the targets by clicking the column header.
- Target: The target value. Only values from 1 to 100 will be accepted. When creating a new target, the default value is zero (0). Hovering over the box will display a tooltip that reads "This is a required field."You will be able to resort the targets by clicking the column header.
- Export to Excel (button): An export to Excel icon will be available allowing to export all the data (from all pages) to Excel.
- Search