This article details how to create a Group with basic information as well as an overview of next steps.
Create a Group with General information:
- From the Icon Bar click Setup
 .
. - From the Navigation Menu click Organization.
- From the available options select Groups.
- Upon the Groups list page displaying, click the Create Group button.
- Enter basic information
- Name*: In the Name box, enter a name for the group.
- Id: If there is an ID, enter it in the ID box.
- Parent*: Click the Browse button, located beside the Parent box to open the Group List page. Select a Parent group.
Note:
- Suspended Groups are hidden by default on the Groups List page, allowing you to focus on active groups. If needed, you can check the Show Suspended Groups box to display the suspended Groups.
- A suspended Group can be selected when choosing a Parent Group.
- Manager: Click the Browse button, located beside the Manager box to open the User List page. Select the name of the primary person in charge of the group.
- Alternate manager: Click the Browse button, located beside the Alternate Manager box to open the User List page. Select the name of the person to contact if the primary Manager is not available.
Note: If the Alternate manager is not selected then the Out of Office feature does not function.
- Default Task: If there is a Default Task for the group, click the Browse button to open the Task List page. Select a task from this list.
- Is a placeholder:If the group is to act as a placeholder, then check the Is a placeholder option.
- Suspend: Select to suspend the Group.
- Description: Enter the description in the Description box.
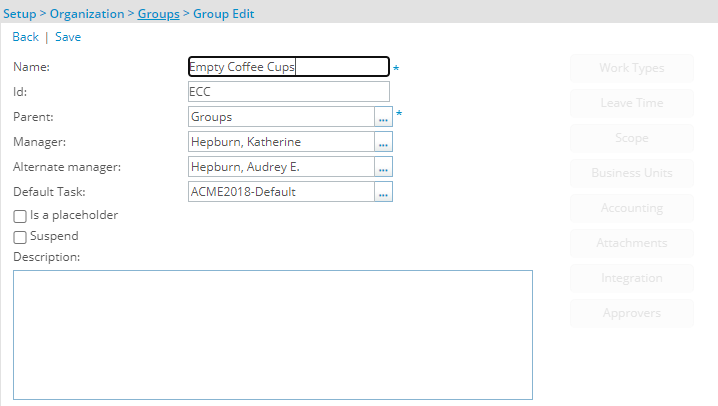
- Click Save.
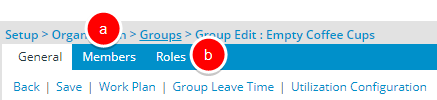
Note: Upon saving the Group, several new tabs, links and buttons are now available to you and you can further configure your Group. For further details see Next Steps below.
Next Steps:
- Associate Members and Roles:
- Click the Members tab to associate Members to a Group.
- Click the Roles tab to associate Roles to a Group.
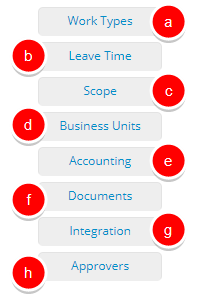
- Work Types, Leave Time, Scope, Business Units, Accounting, Documents, Integration and Approvers buttons:
- Click the Work Types button to associate Work Types to a Group.
- Click the Leave Time button to access the Group Leave Time.
- Click the Scope button to configure the Group Scoping.
- Click the Business Units button to configure the Group Business Units.
- Click the Accounting button to access the Accounting page.
- Click the Documents button to access the Document List page where you can Attach Links or Upload Files.
- Click the Integration button to access the Integration page where you can configure the group integration settings.
- Click the Approvers button to assign Approvers to the Group.
- Work Plan, Group Leave Time and Utilization Configuration links:
- Click the Work Plan link to access the Group Work Plan.
- Click the Group Leave Time link to access the Group Leave Time Calendar.
- Click the Utilization Configuration link to set the Utilization configurations and Calculation.
