Tenrox 2019 R1 - Release Notes
Below is a summary of the features included in the Tenrox 2018 R1 release.
- Audit Trail
- Conversion from ASP to .NET & UI/UX
- Expense
- Integrations
- Invoicing
- Leave Request Manager
- Leave Request Workflow
- Login
- Project List
- Project Overview
- Reporting
- REST API/SDK Development
- Resource Management
- SSO
- Tenrox Project Planner
- Upland Analytics
- Upland Project Planner
- Work Breakdown Structure (WBS)
Note: This page could be updated as new information becomes available.
Audit Trail
Addition of a new audit trail option to track changes made to the Expense Report State. Any updates to the Expense Report State can now be tracked to indicate when it was made, by whom and to identify the modification.
For more information on:
- Configuring Audit Trail click here.
Addition of a new Audit trail options to track any changes made to Task Edit such as Create, Read, Update, Delete, Suspend, Activate, and Decommission.
For more information on:
- Configuring Audit Trail click here.
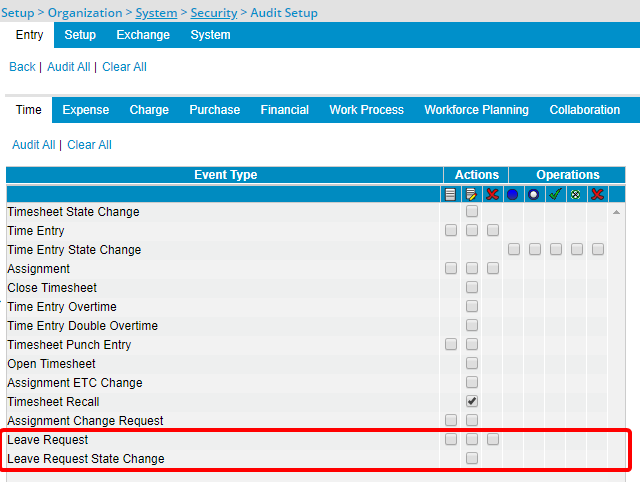
Addition of new audit trail options to track any changes made to the Leave Requests. These new audit trail Events are added to the Setup > Organization > System > Security > Audit Trail) under Entry>Time tier:
- Leave Request
- Leave Request State Change
Any changes to the Leave Requests can now be tracked to indicate when it was made, by whom and to identify the modification.
For more information on:
- Configuring Audit Trail click here.
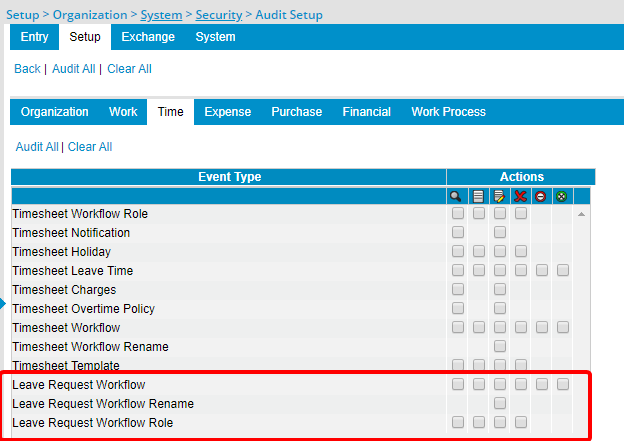
Addition of three new audit trail options to track any changes made to the Leave Request Workflow.
These new audit trail Events are added to the Setup > Organization > System > Security > Audit Trail under Setup > Time tier:
- Leave Request Workflow: Available options are to audit Query, Insert, Update, Delete, Suspend and Unsuspend actions.
- Leave Request Workflow Rename: Available option is to audit the Update action.
- Leave Request Workflow Role: Available options are to audit Query, Insert, Update and Delete actions.
For more information on:
- Configuring Audit Trail click here.
Conversion from ASP to .NET & UI/UX
Classic ASP pages have been updated to ASP.Net pages throughout the application. See below for the list of pages converted from ASP to .NET. The improved Grids, Buttons, Options, Dialog Boxes, Icons and Search all fall in line with the upgraded standards that had already been applied on several pages during the recent releases.
- The grid layout has been updated in the following list pages to match the rest of the application:
- Setup > Work > Components
- Setup > Work > Phases
- Setup > Work > Clients
- Setup > Work > Products
- Setup > Work > Work Types
- Setup > Work > Tasks
- Setup > Work > Project Workflows
- Setup > Financial > Cost Rules > Rate Rule Delete
- Portals > Resource Central > Payable Batches Not Posted
- Portals > Resource Central > Payroll Batches Not Posted
- Portals > Resource Central > Payroll Batches Not Posted > Payroll Batches Posted
- Setup > Financial > System > Currency Setup > Currency Edit
- Setup > Expense > System > Expense Payment Methods > Payment Method Edit
- Financial > Payable Batches Not Posted > Payable Batch > Post Payable Batch
- Entries > My Timesheet > Assign Tasks > Assignment Edit
- Organization > Sites
- Organization > Business Units
- Organization > Resource Types
- Organization > Groups
- Organization > Teams
- Organization > Roles
- Organization > Titles
- Organization > Users
- Inline Editing has been enabled for
- Setup > Organization > Users > User Edit > (Browsing for a Team)
- Setup > Organization > Users > User Edit > Employment Tab > (Browsing for Work Schedule)
- Setup > Organization > Users > User Edit > Employment Tab > (Browsing for Work Schedule)
- The icons in the Icon Bar have been replaced with new ones.
- The calendar symbol was changed globally within the application.
- The button hover highlight color was modified globally within the application.
- The Modal window overlay background color was changed globally within the application.
- Update Add button to New
The search criteria Search by Last Name and First Name have been combined into a single criterion called User Name. Upon selecting the User Name criterion, entering the characters in the Search box and performing a search, the results will return the list of all names containing the characters found anywhere within the first or last name of the User Name.
Expense
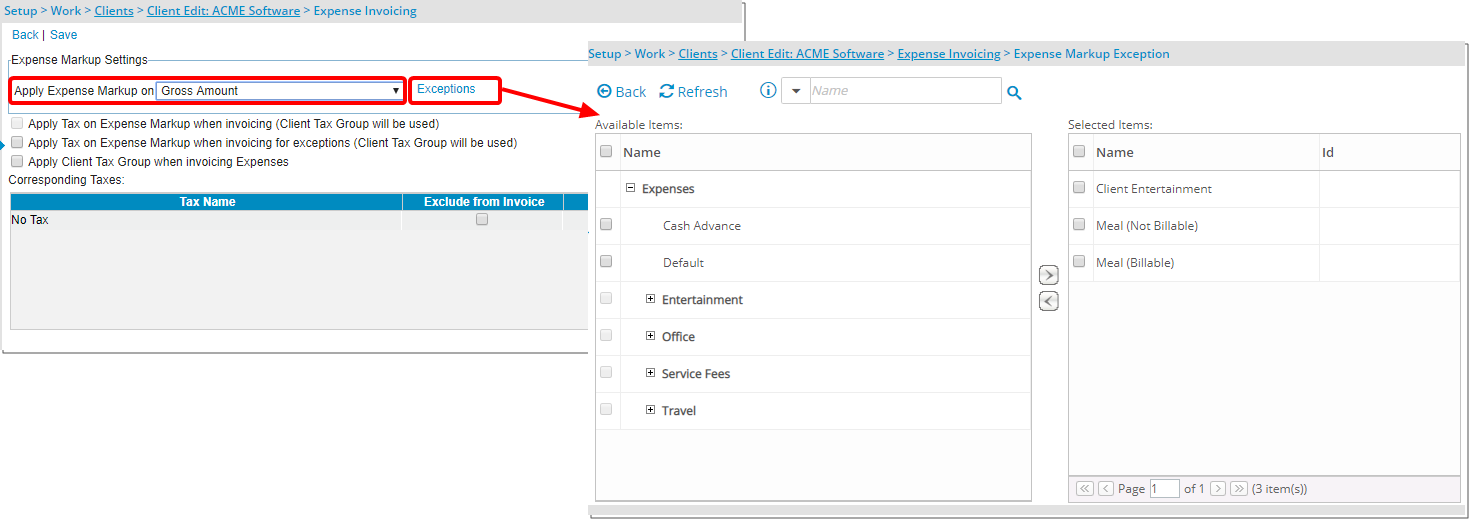
A new Exceptions capability has been added to the Expense Markup Settings within the Expense Invoicing settings under the Client Edit page (Setup > Work > Clients > Client Edit) giving the ability to choose to Apply Expense Markup on Net Amount and Gross Amount to different expense items. When applying markup on:
- Net Amount; you have the option to Apply Tax on Expense Markup when invoicing (Client Tax Group will be used) or not.
- Gross Amount; you have the option to Apply Tax on Expense Markup when invoicing for exceptions (Client Tax Group will be used) or not.
Provides the ability to apply Expense Markup on Net Amounts and Gross Amounts to different Expense items for a given Client.
Use case: One of Software Inc’s clients, Acme Corporation, should have its expense invoicing be set up such that the markup for the Travel Expense Item be calculated based on Gross Amount, while the Book Expense Item be based on Net Amount. The Tenrox Administrator, John Billings, can configure this requirement by selecting to Apply Expense Markup on Net Amount, and then selecting the Travel item from the Exception List.
Therefore, when a project team member, who creates an Expense Report against a project for client Acme Corporation with these two items, the following will occur:
- Expense entry for Travel will have its markup calculated based on Gross Amount.
- Expense entry for Books will have its markup calculated based on Net Amount.
Note: Changes made here will only apply on Invoices generated going forward.
Integrations
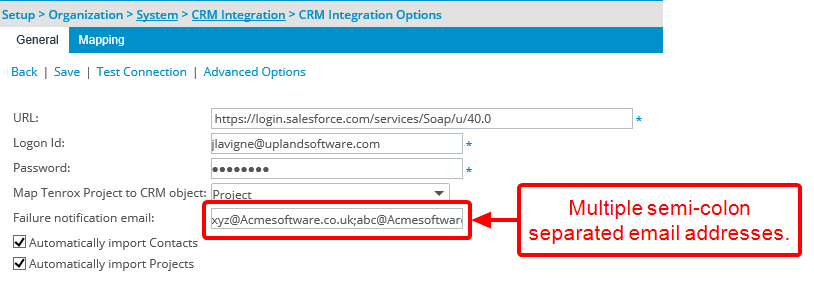
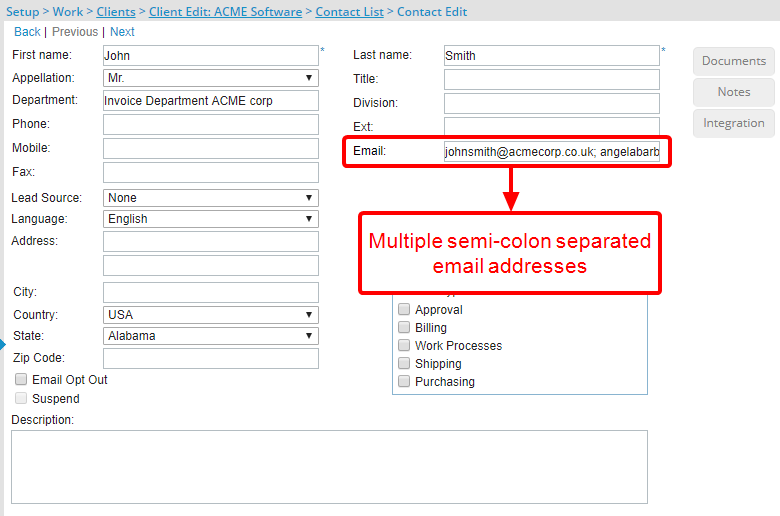
With the addition of the ability to include multiple recipients when emailing a failure notification, you can add multiple, semi-colon-separated email addresses in the Failure notification email box (Setup > Organization > System > CRM Integration > CRM Integration Options > General tab). When the email is generated, it will be sent to each recipient email address as specified.
This accommodates the need for multiple recipients to be notified of a failure that has taken place in the CRM-Tenrox integration process.
Use case: Adam is tasked with setting up the Salesforce CRM failure notification email so that multiple stakeholders receive the notification. He can now easily complete the task by entering multiple semi-colon separated email addresses, in the Failure notification email box of the Salesforce CRM Integration Options page.
For more information on:
- How to send the CRM-Tenrox Failure notification email to more than one recipient click here.
Invoicing
With the addition of the ability to include multiple recipients when emailing an Invoice, you can now add multiple, semi-colon-separated email addresses. When the system generates an Invoice email it will be sent to each recipient email address as specified in the client Contact Email box.
This accommodates the need for multiple recipients to receive a copy of the Invoice.
Use case: Adam is tasked with setting up the Invoice Issued Notification template so that multiple recipients will receive the Invoice. He can now easily complete the task by entering multiple semi-colon-separated email addresses, in the Email box of the Client Contact for which the Invoice is being generated. After generating the Invoice and selecting Email a copy of the Invoice to the Client, the invoice will be sent to all recipients.
Leave Request Manager
The Leave Request Manager accessed through Entries, from the icon bar, replaces the previously available Leave Request. It combines the new UplandOne look with all the necessary functionalities to use, manage and administer Leave requests.
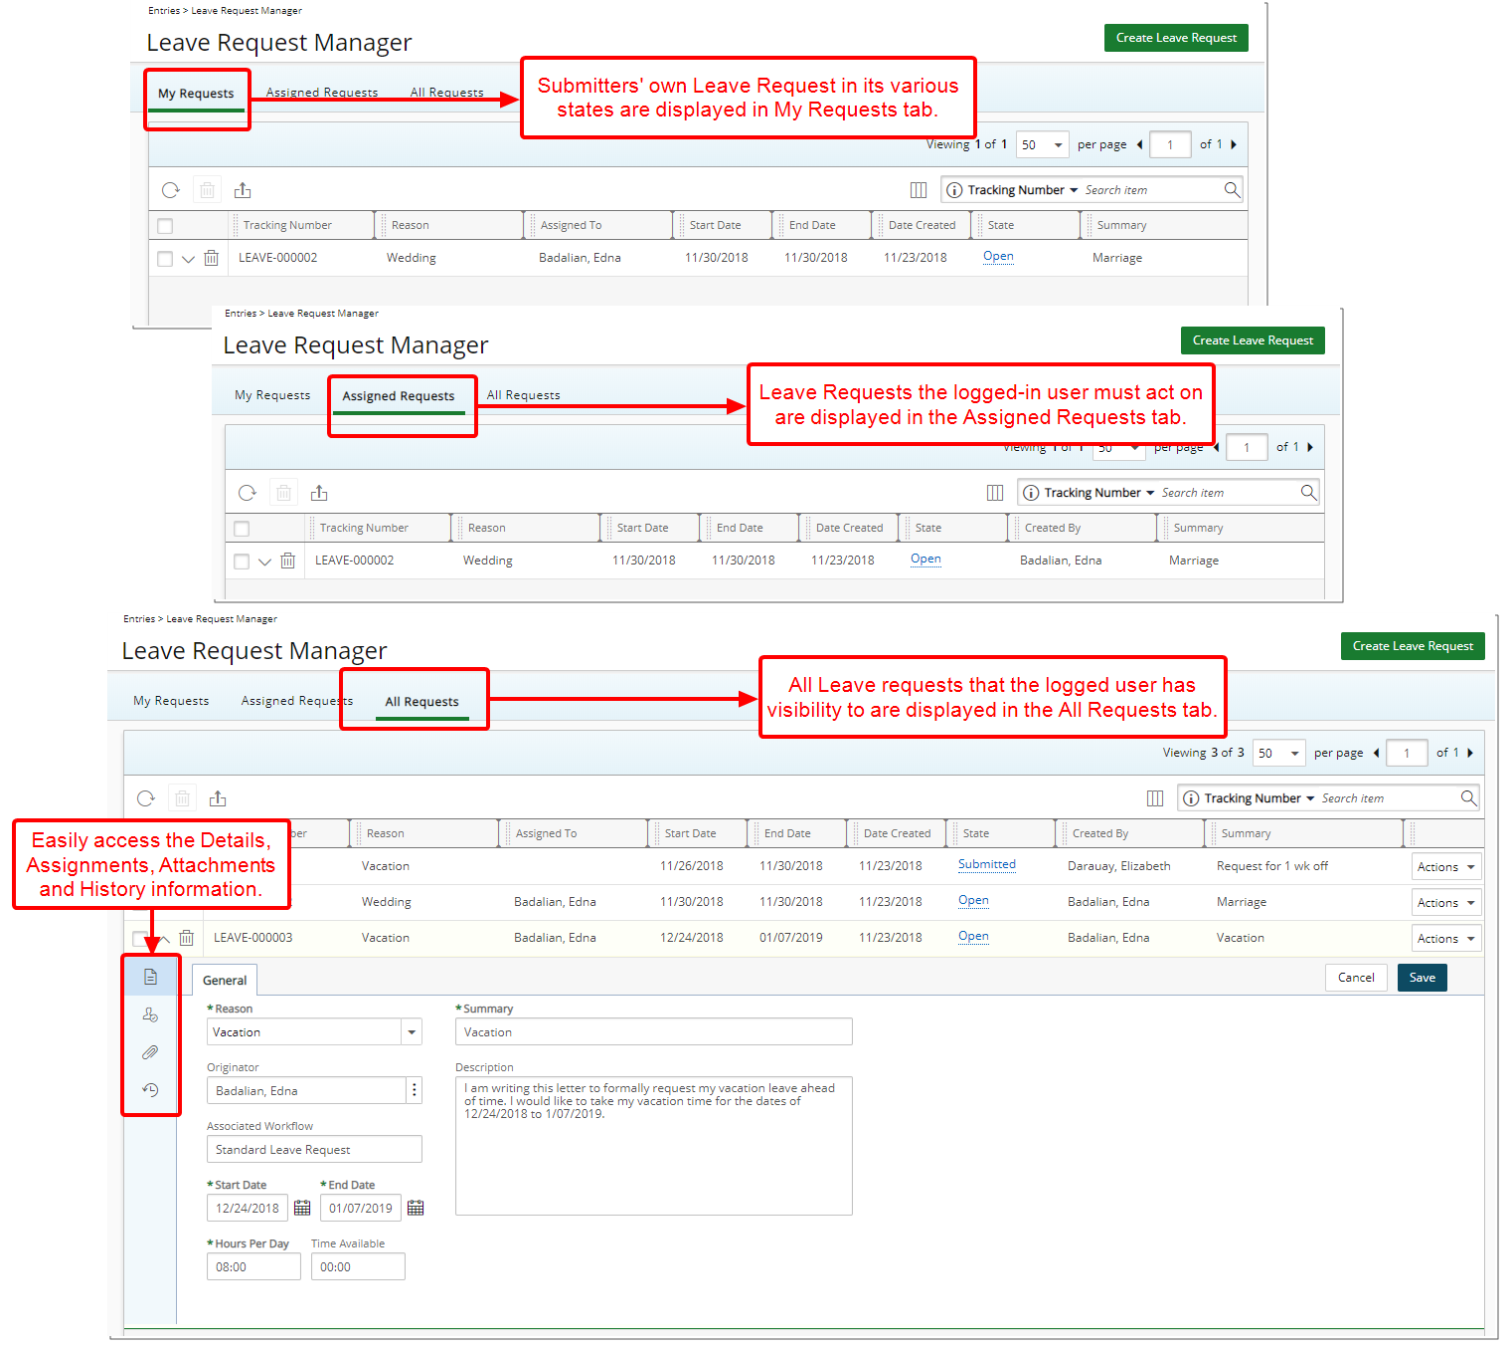
The tabs on the Leave Request Manager dashboard are:
- My Requests: Submitters' own Leave Request in its various states are displayed.
- Assigned Requests: Leave Requests the logged-in user must act on are displayed.
- All Requests: All Leave requests that the logged user has visibility to are displayed.
From any tab, based on permissions granted, you can Create, Edit, Delete and Action on a Leave Request.
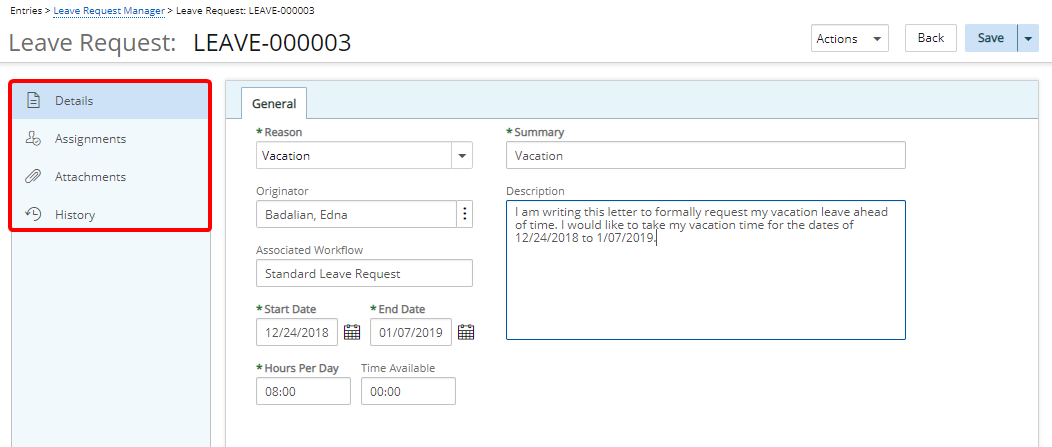
When creating or editing a Leave Request the corresponding information and attachments can be accessed from the Leave Request left navigation pane. They are:
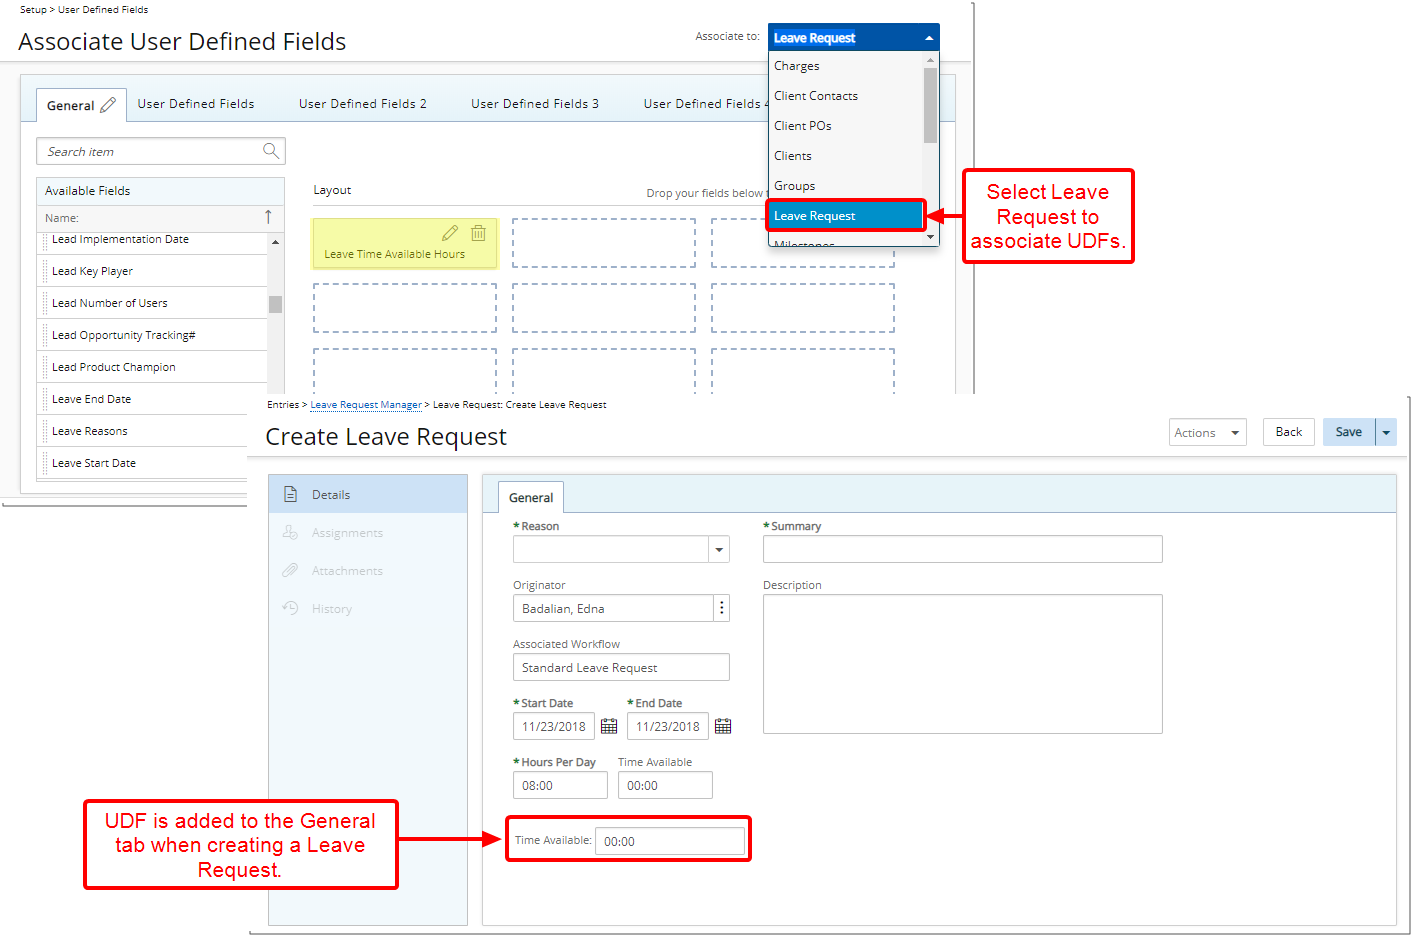
- Details: The General Leave Request, as well as any applicable User Defined Field, information can be viewed or edited here.
- Assignments: Shows the various Leave Request Workflow states and who they are assigned to. Provided you have the appropriate permissions, you may edit assignments from here.
- Attachments: Allows you to View, Create, Edit and Export Notes and Documents & Links.
- History: Shows how the Leave Request has moved through the workflow, specifically the different Source and Destination States as well as Actions that were taken on the Leave Request
For more information on:
- Working with Leave Requests (Entries) click here.
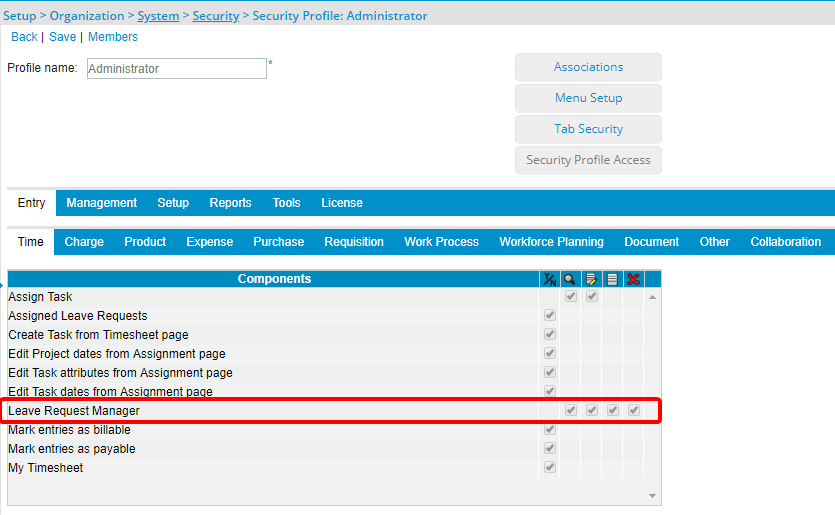
- The new Security Profile Component Leave Request Manager has been added to the Time subtab under Entry. Giving the options to allow View, Modify, Create or Delete Leave Requests.
Note: For the Administrator security profile, this security option is enabled by default.
- Addition of the ability to associate User Defined Fields to Leave Requests, the option for which is found on the Associate User Fields page. When creating a Leave Request the UDFs will be displayed on the Create Leave Request page.
For more information on:
- User Defined Fields (UDFs) click here.
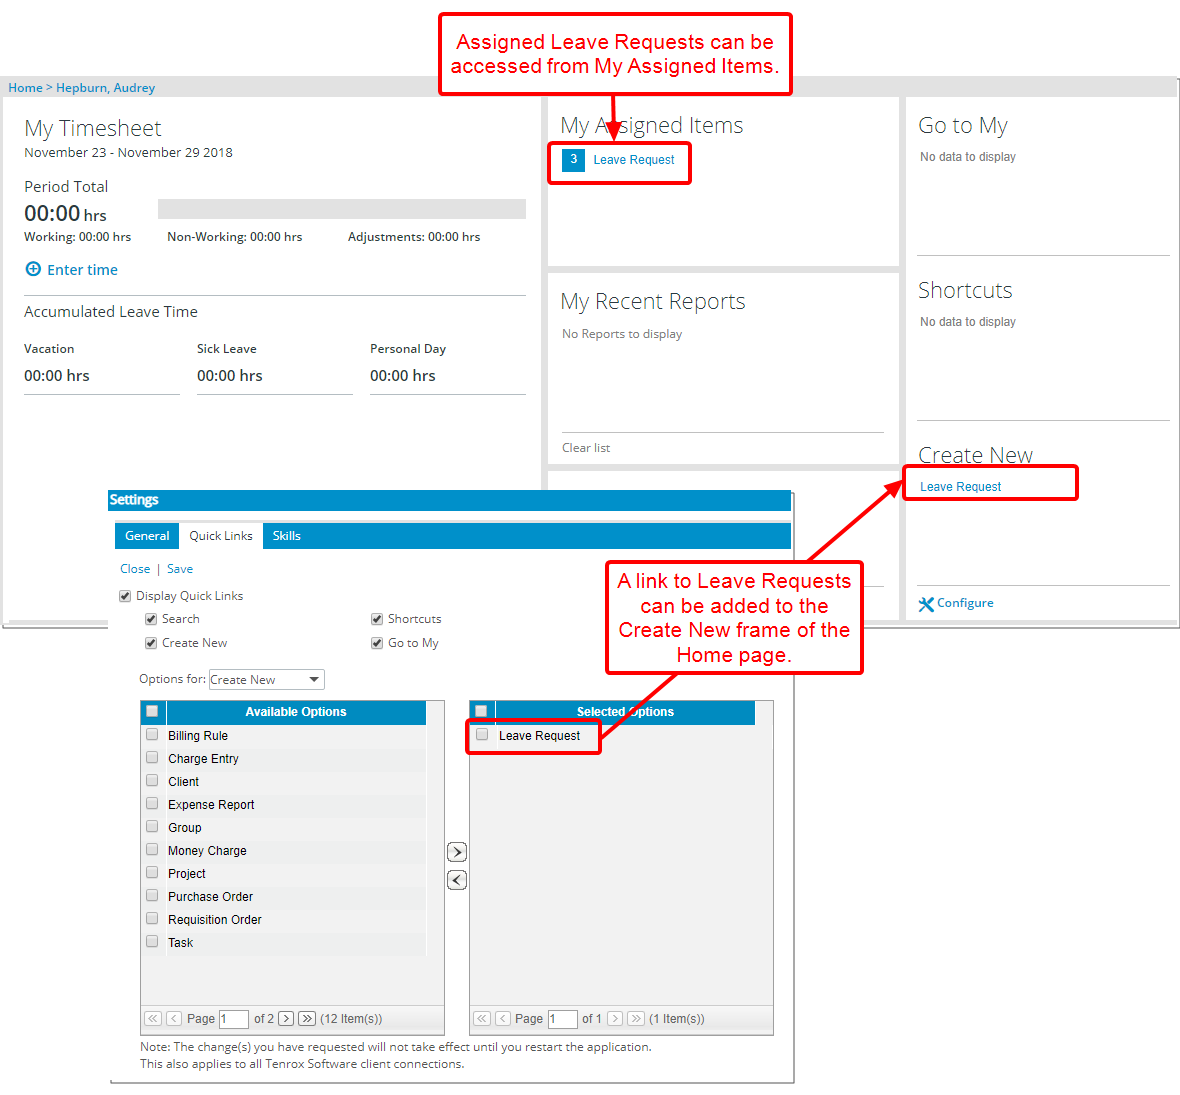
The Assigned Leave Request can be accessed from the Home page under My Assigned Items provided the logged User has assigned Leave Requests.
Moreover, upon selecting Leave Request from the available Quick Links options a link to Leave Requests will be available under the Create New frame of the Home Page.
For more information on:
- How to select the Quick Links to be made accessible on the Home Page click here.
Ability to view the details of a Leave Time from a Calendar have been added to:
- Entries > My Schedule, provided Leave Request is selected under Options
- Setup > Organization > Groups > Edit a group > Group Leave Request link
- Project List > Context menu on "Internal" project > Calendar showing only approved entries)
- From a Dashboard, created on the Systems page under OBS, containing either Group or Project Leave Time as the desired calendar will show the Leave Requests of Team members as part of the selected Group or Project.
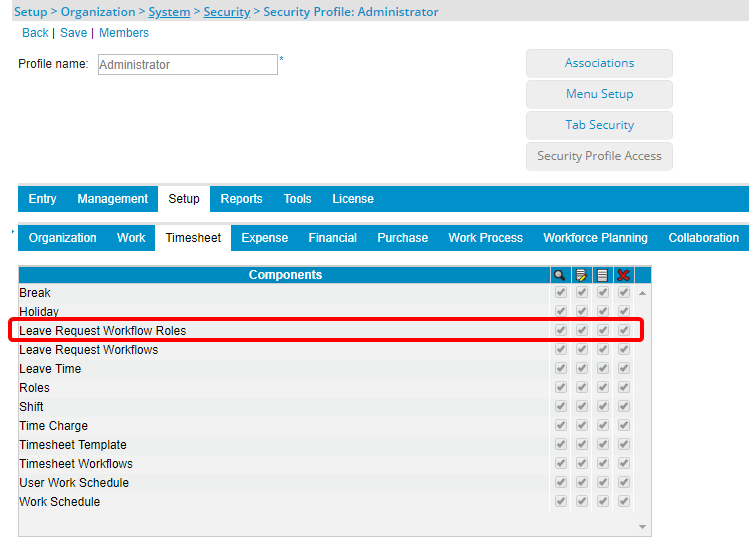
The new Security Profile option, Leave Request Workflow Roles has been added to the Timesheet subtab under Setup. Giving the option to allow for Search, Modify, Create or Delete Leave Request Workflow Roles.
For more information on:
- Available Security Permissions for Security Roles click here.
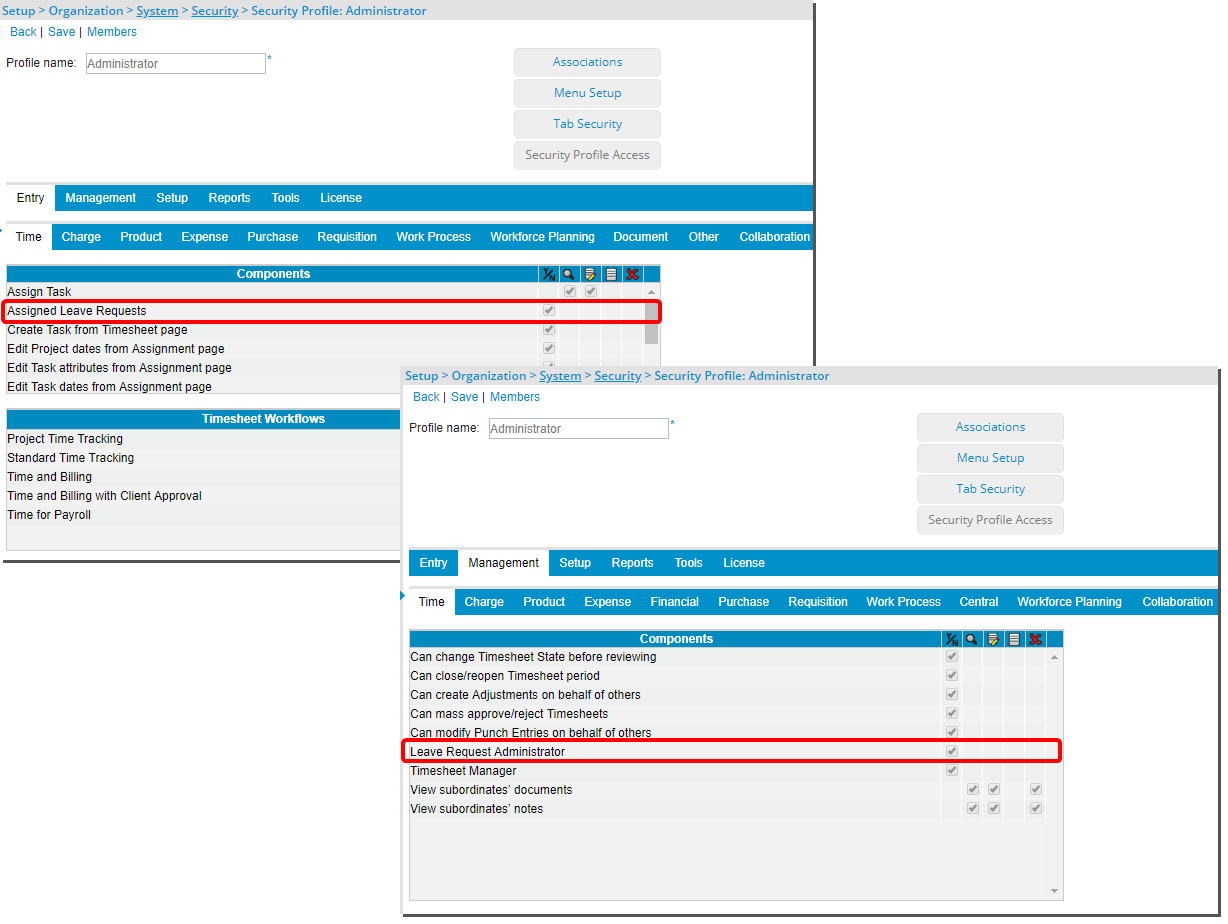
A new security Profile option, Assigned Leave Requests has been added to the Time subtab, under Entry. The available options are Yes/No. When selected the Assigned Requests tab within the Leave Request Manager will be available to users with the chosen Security Profile.
A new security Profile option, Leave Request Administrator, has been added to the Time subtab under Management. The available options are Yes/No. When selected the All Requests tab within the Leave Request Manager will be available to users with the chosen Security Profile.
Leave Request Workflow
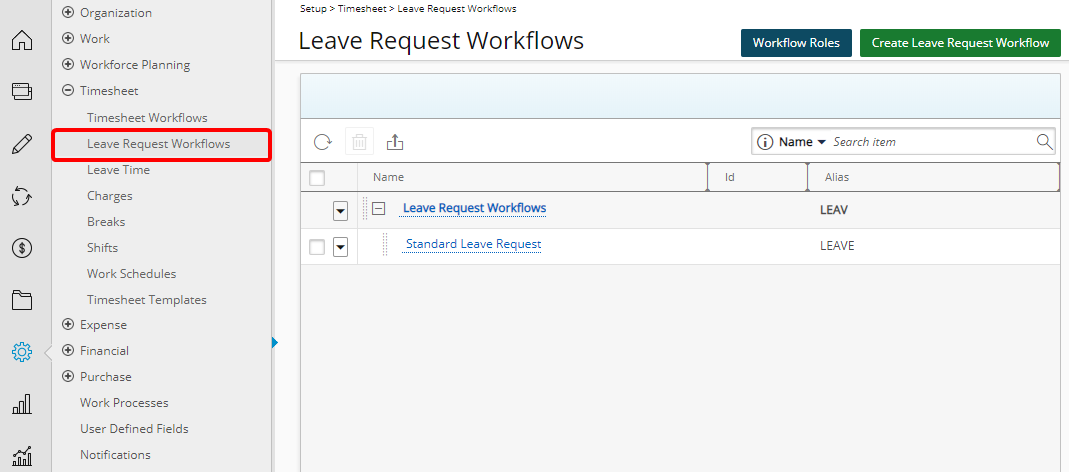
Addition of the Leave Request Workflows option under Timesheet in the Navigation Menu under Setup.
The Leave Requests Workflows page contains a list of all available Leave Requests Workflows in the system under a root placeholder called Leave Request Workflows.
Within this page you can:
- Create new Leave Request Workflows
- Edit Leave Request Workflows
- Delete Leave Request Workflows
- Refresh the page
- Export to Excel
- Access to Leave Request Roles though the Workflow Roles button
Note: By default, Leave Request Workflows menu item is enabled for the Administrator security profile and disabled for all other profiles and default menu configurations.
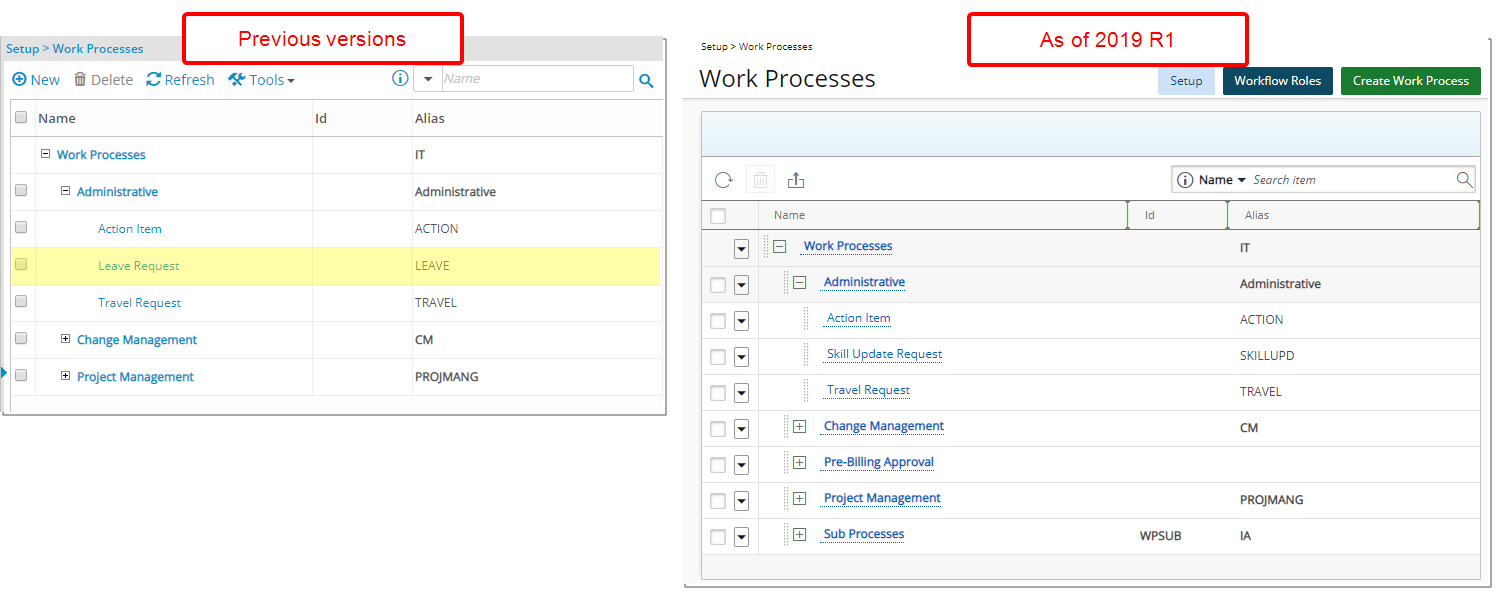
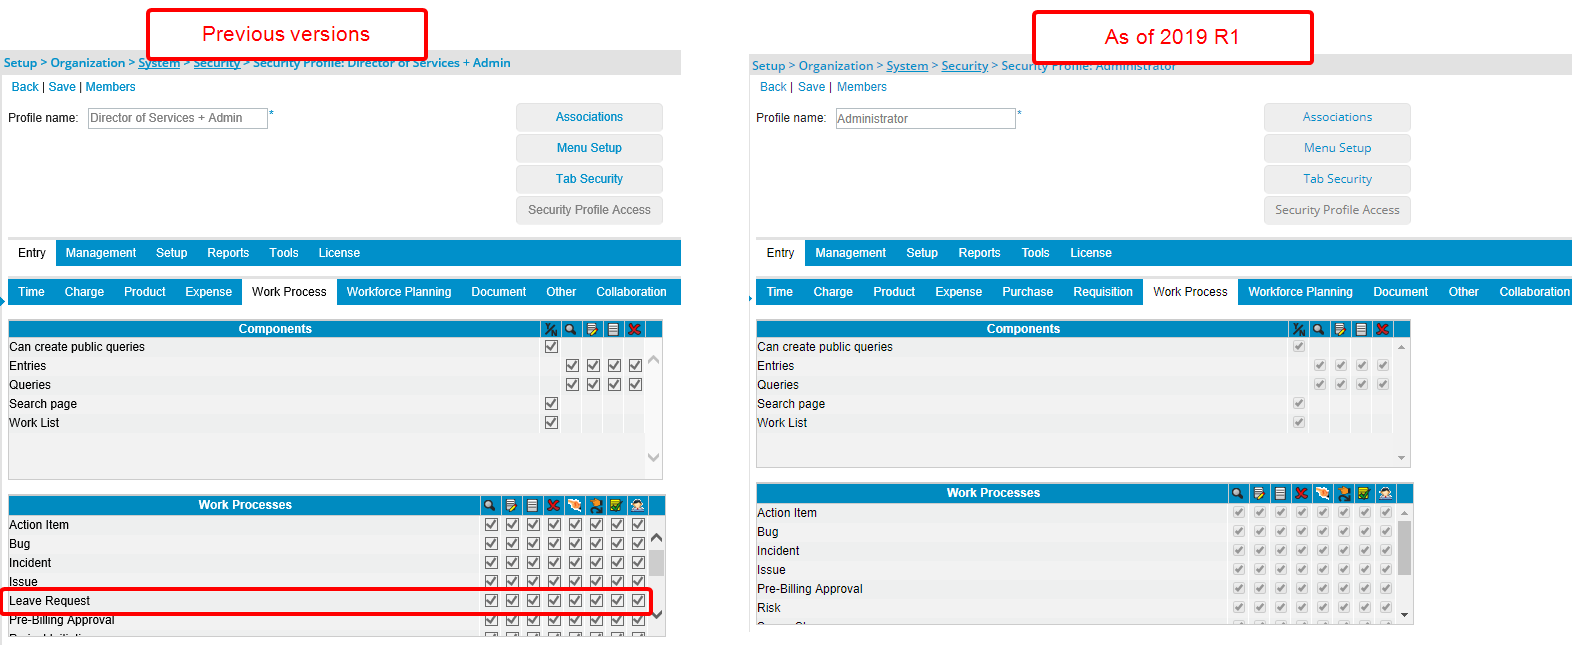
With the addition of the new Leave Request Workflows, the existing Leave Request security options located under Entry tab > Work process subtab >Work Processes section for a selected Security Profile has been removed.
Thus, upon upgrading, the existing Leave Request access rights will remain as is. The existing Timesheet Workflow access will define the Leave Request Workflow access and the existing Leave Request access will define the Leave Request Manager access as follows:
- User Profiles without visibility to "Timesheet Workflows" under Setup tab > Timesheet subtab, will not have visibility to "Leave Request Workflows".
- User Profiles without visibility to "Leave Request" under Entries, will not have visibility to "Leave Request Manager".
For more information on:
- Available Security Permissions for Security Roles click here.
The following screens have been removed:
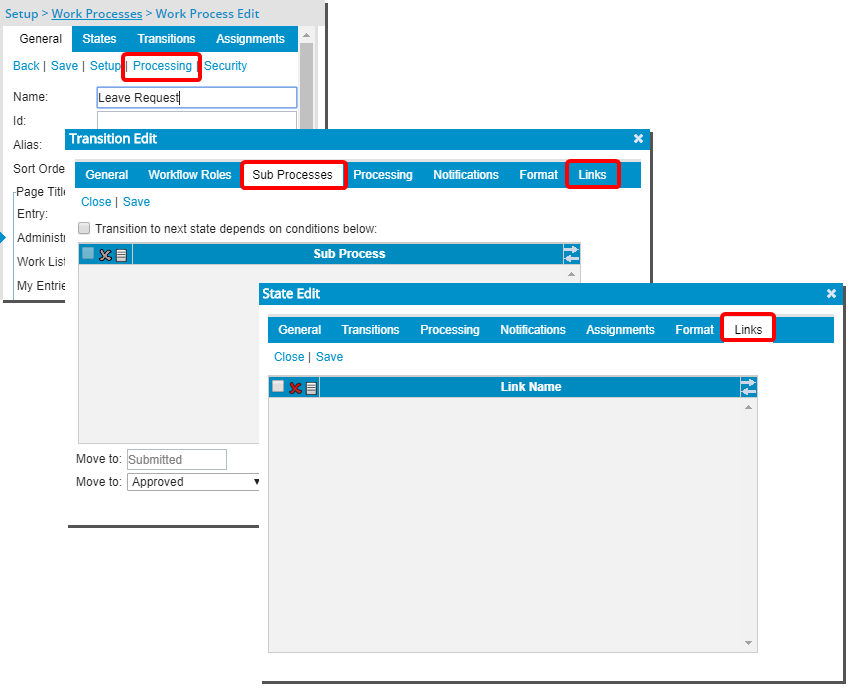
- The Processing link, located on the General tab when editing a Leave Request Workflow, has been removed.
- The Sub Processes tab has been removed from the Transition Edit page.
- The Links tab was removed from both State Edit and Transition Edit pages.
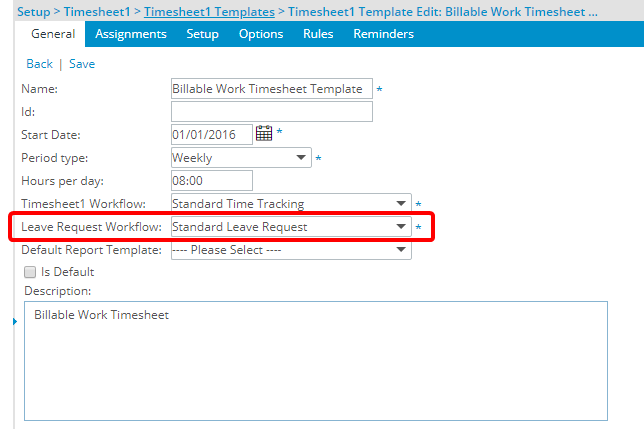
- Addition of new Leave Request Workflow option to the General tab of the Timesheet Template Edit page where a Leave Request Workflow can be associated to a Timesheet Template. The Leave Requests are created based on the Timesheet Template association.
Note: Changing a Timesheet Template for a User will not affect the users’ existing Leave Requests.
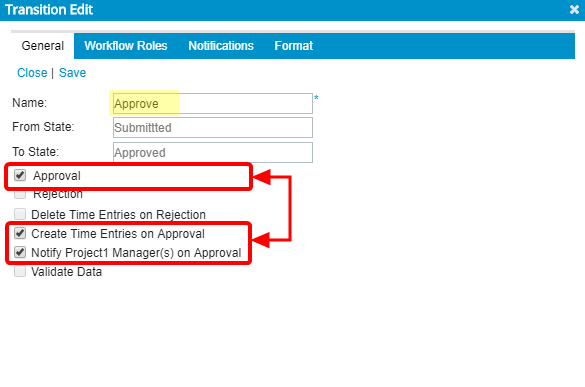
- With the addition of the workflow transition options, Create Time Entries on Approval and Notify Project Manager(s) on Approval, you can now choose whether to Create Time Entries and/or Notify Project Manager(s) against the Leave Time when it’s approved.
Note: The option, “Create Time Entries on Approval”, applicable only on Approval, will insert the approved Leave Time in the Time Sheet and set those dates as “Non-Working” in the Calendar.
For more information on:
- Defining the Workflow Transitions click here.
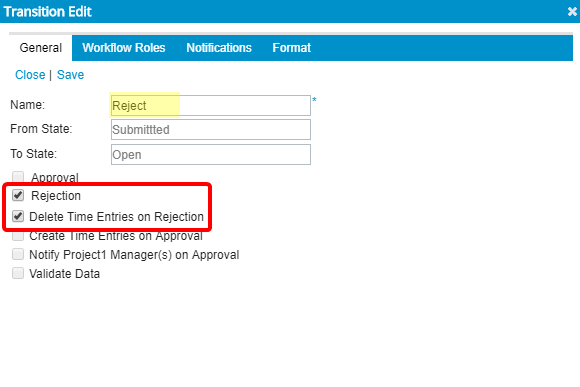
- With the addition of the workflow transition option, Delete Time Entries on Rejection, you can now choose whether to delete time entries against the Leave Time when it’s rejected.
For more information on:
- Defining the Workflow Transitions click here.
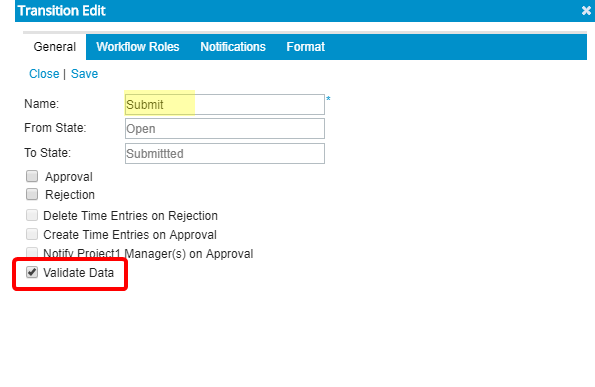
With the addition of the workflow transition option, Validate Data, on Submit , the system validates
- That Reason is not created against a Holiday.
-
That the selected Reason exists for that user, based on the Timesheet Template settings.
Note: If an error is generated based on either of the above, the state change is halted.
For more information on:
- Defining the Workflow Transitions click here.
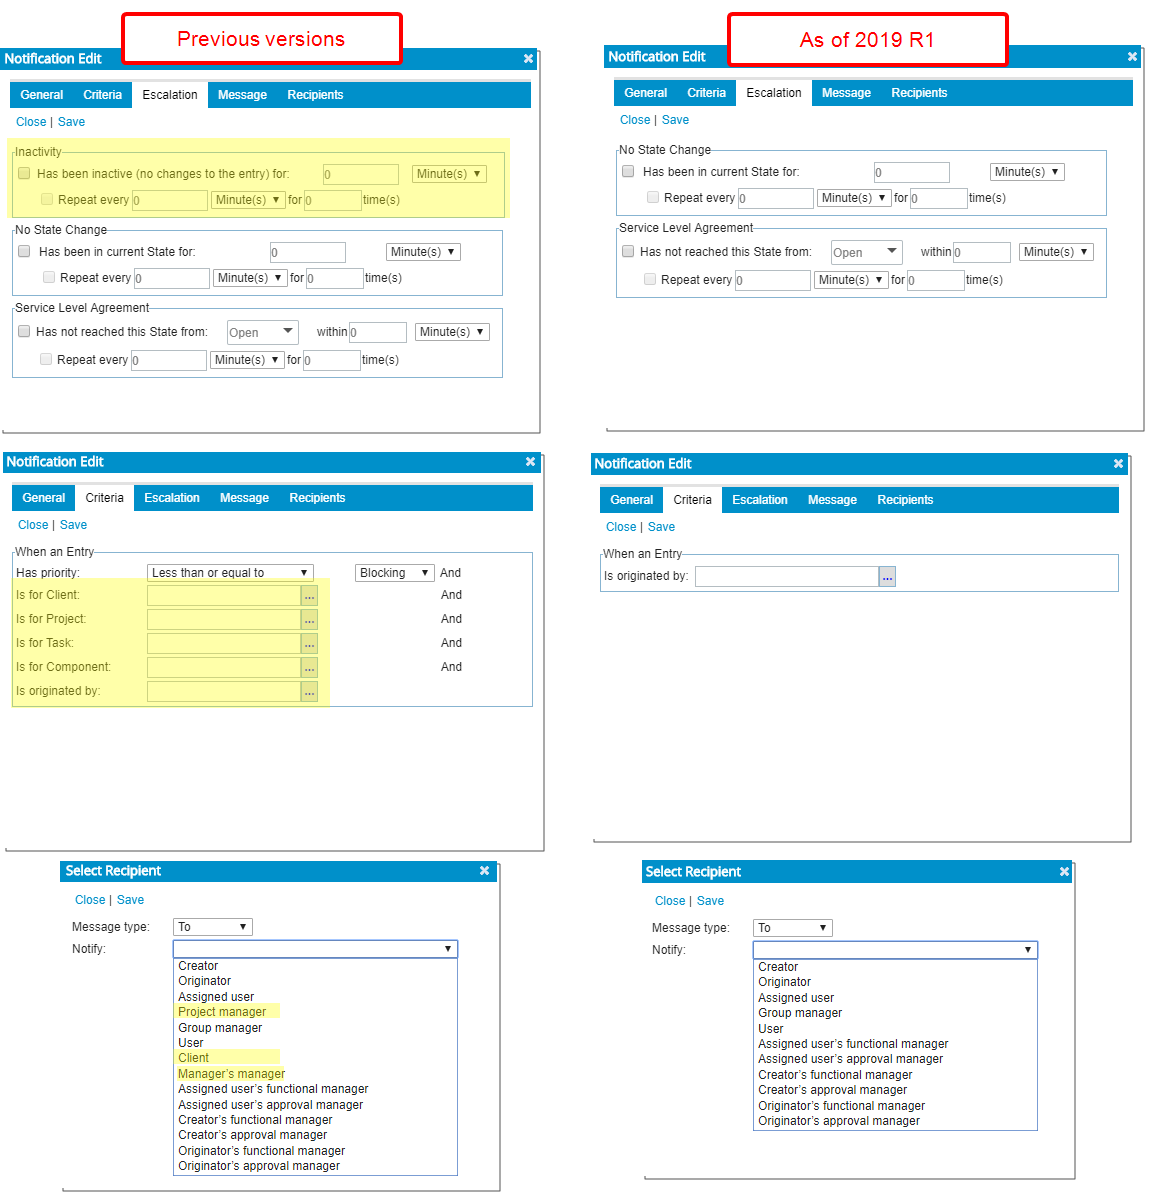
Within the Notification Edit dialog box:
- From the Escalation tab, the Inactivity condition has been removed.
- From the Criteria tab within the Notification Edit page, Has priority, Is for Client, Is for Project, Is for Task, and Is for Component options have been removed, with Is originated by being maintained.
- From Select Recipients, accessed through the Recipients tab, these options have been removed from the Notify list: Client, Project manager and Manager's manager
Project List
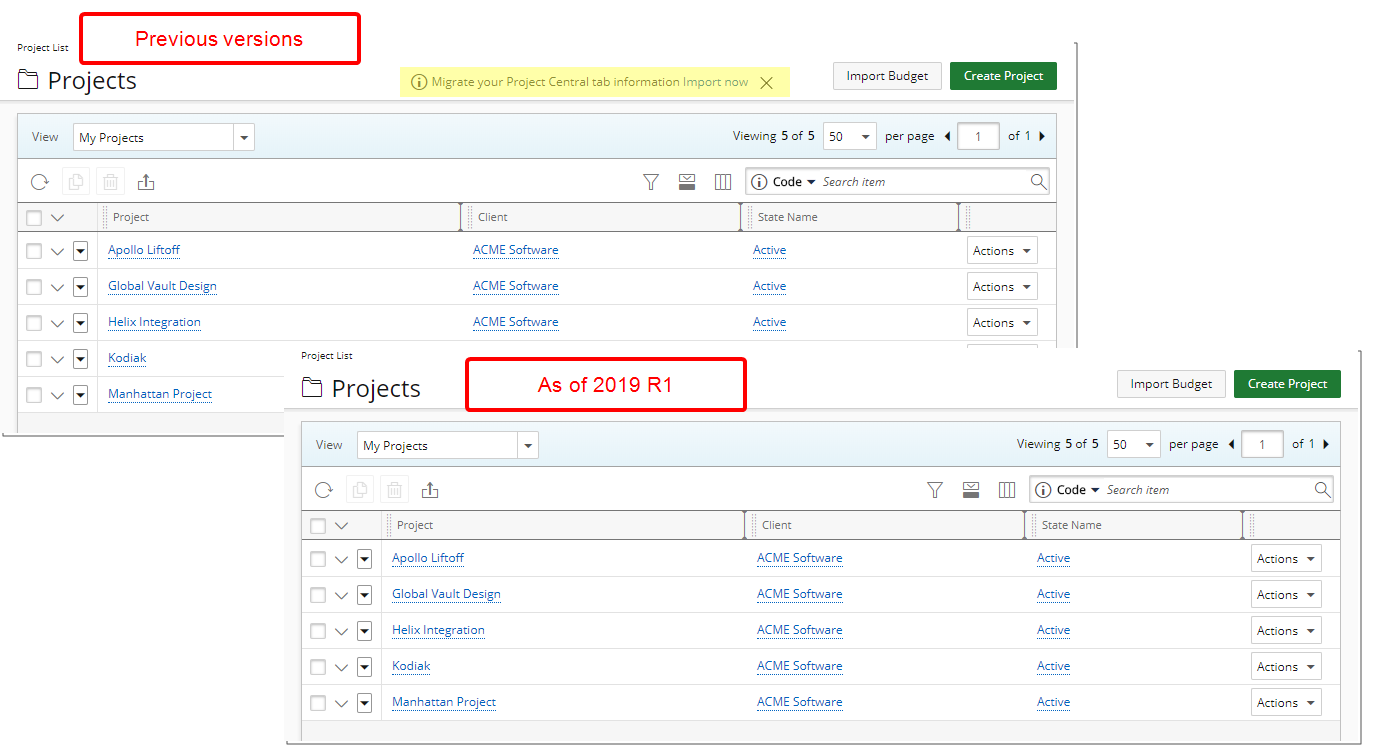
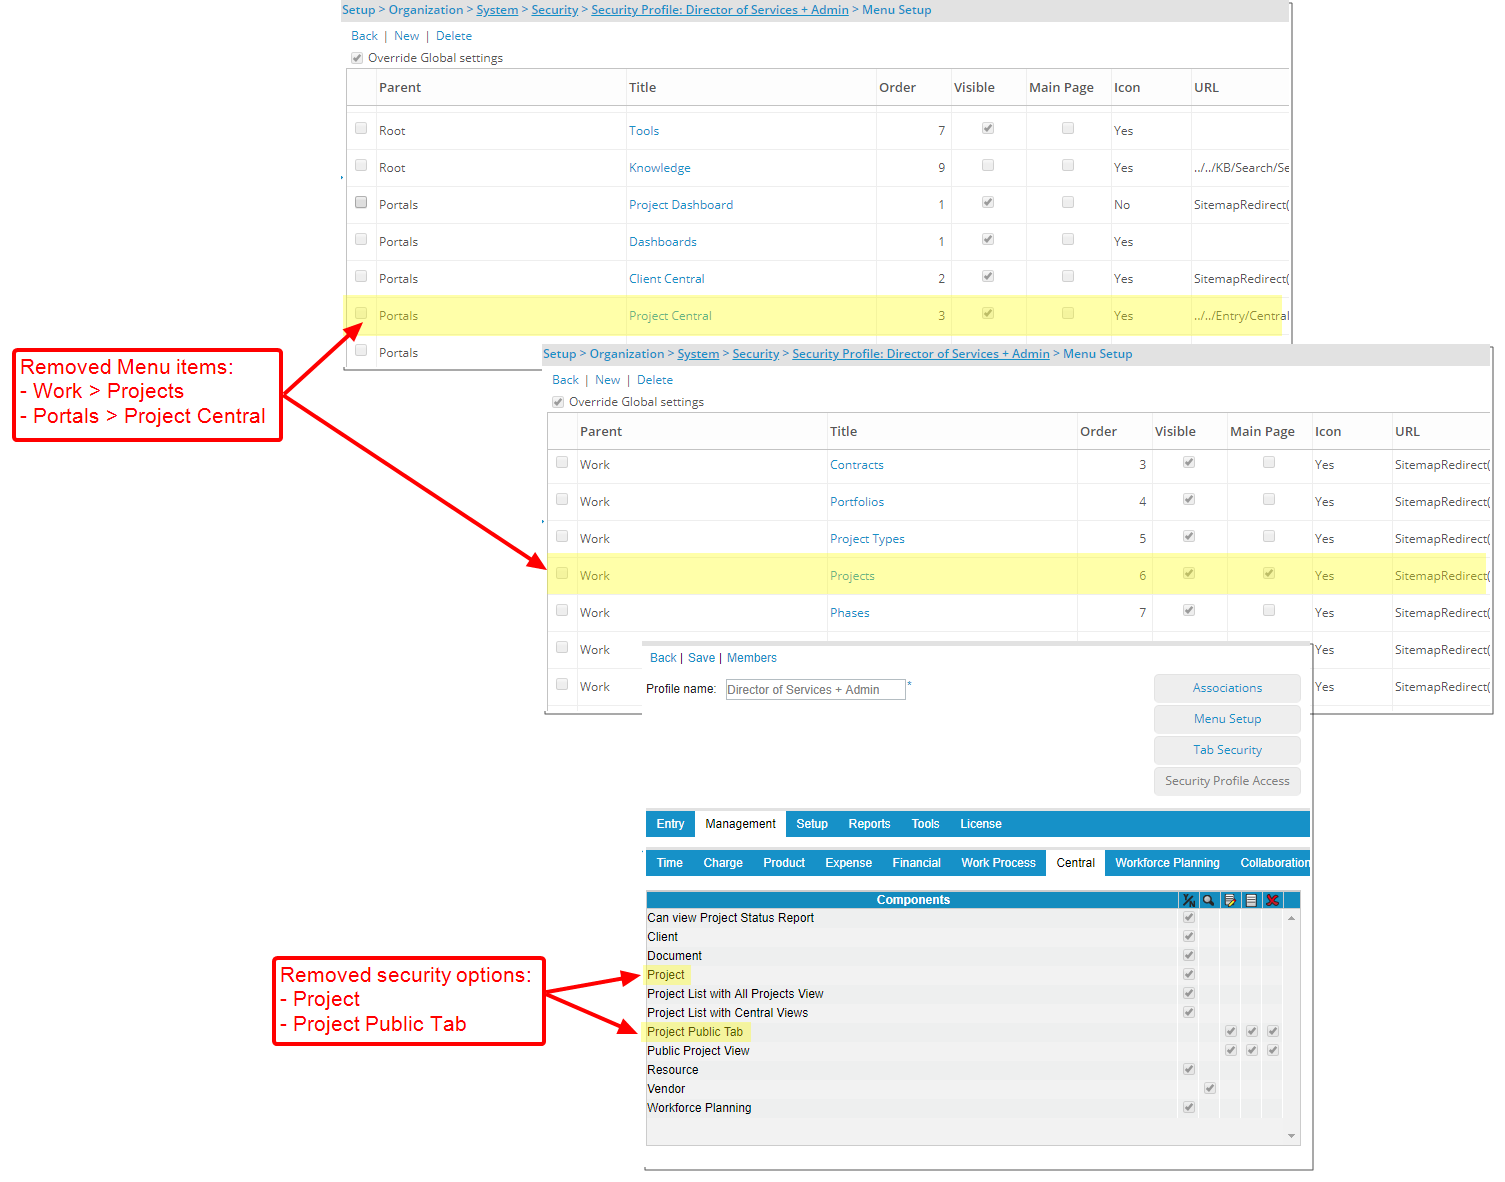
The following options have been removed to fully accommodate the removal of Project Central:
- The following have been removed from the Menu Setup page:
- Project Central menu item under the Portals Parent
- Projects menu item under the Work Parent
- Project and Project Public Tab security Components are removed from Security Profile>Management > Central tab
For more information on:
- Available Security Permissions for Security Roles click here.
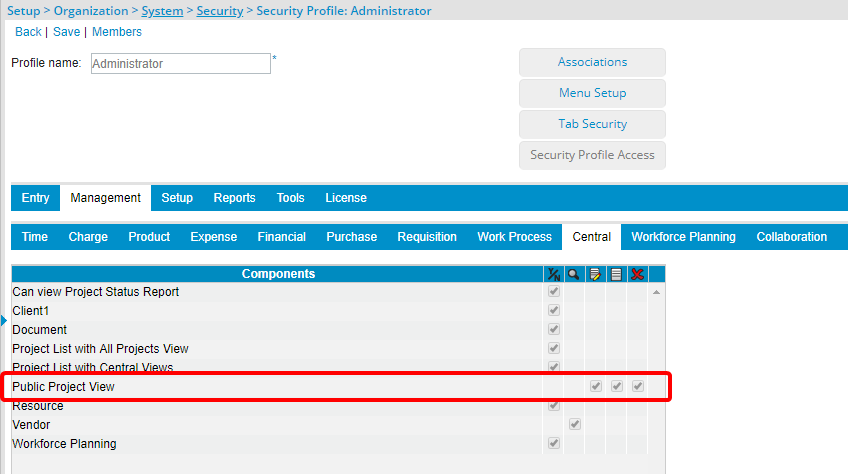
- A new permission, “Public Project View”, has been added to the Security Profile under the Central subtab of the Management tab to allow/disallow users to Modify, Create and Delete the Public Project Views. In the absence of the Public Project Views permission, the Column Selection, Expanded Row and the Filter buttons as well as the ability to re-order Columns are not available.
For more information on:
- Available Security Permissions for Security Roles click here.
The rules for View names have changed as follows:
- Two different users can have the same Private View name.
- A User’s View names must be unique.
- Public View names must be unique.
- All Projects View is unique.
For more information on:
- Adding or managing Views click here.
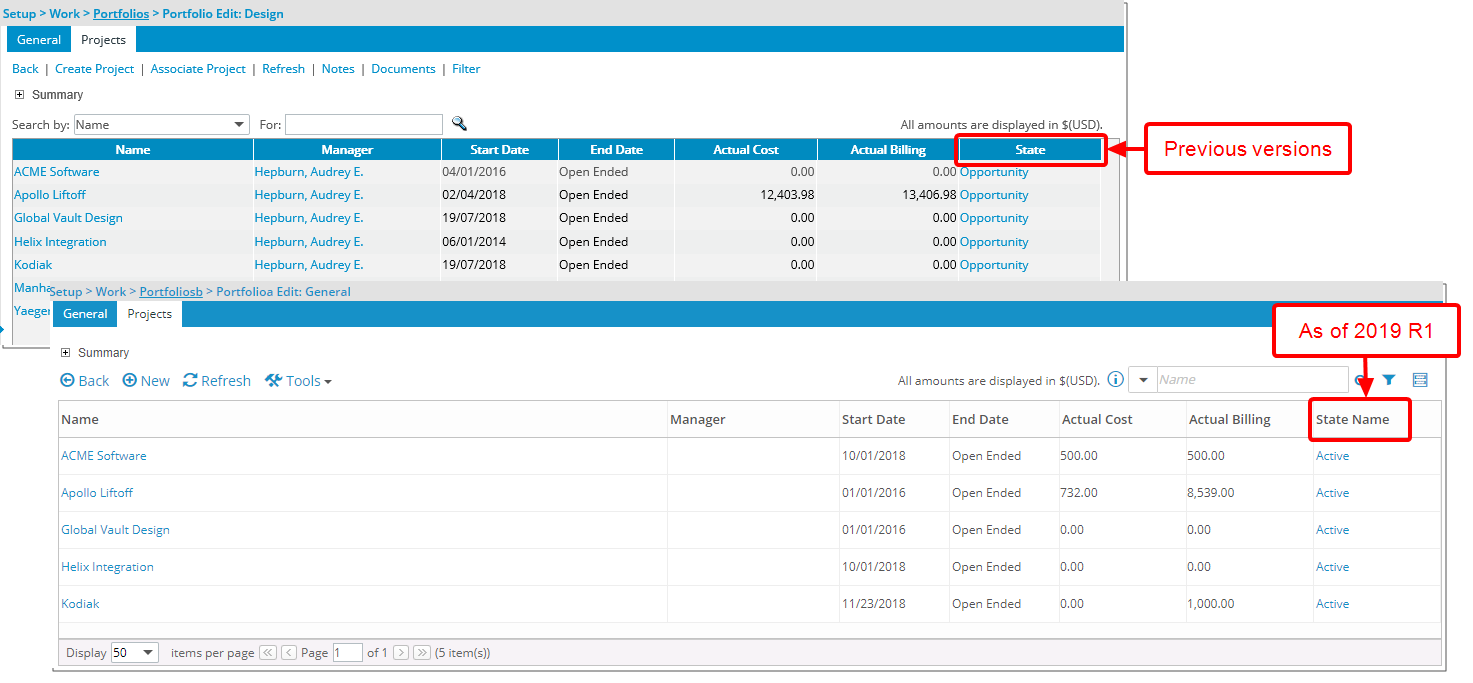
The “State” label has been renamed to “State Name” or “State Attribute”, where applicable, across the entire application.
The following pages were modified to reflect this change:
- Setup > Work > Portfolios > Portfolio Edit > Projects tab
- Setup > Work > Portfolios > Portfolio Edit > Projects tab > Column Selection
- Setup > Work > Project Status Reporting
- Entries > Project Status Reporting
- Setup > Organization > System > Dashboard Setup > Dashboard Edit > Project Status Report
- Setup > Organization > System > Dashboard Setup > Dashboard Edit > Portfolio View
- Setup > Organization > System > Dashboard Setup > Dashboard Edit > Project View
- Setup > Work > Project Workflows > Rules
- Setup > Work > Project Workflows > Assignments tab > Assignment Rule Edit
- Setup > Work > Portfolios > Portfolio Edit >Projects tab > Filter > Project List Filter
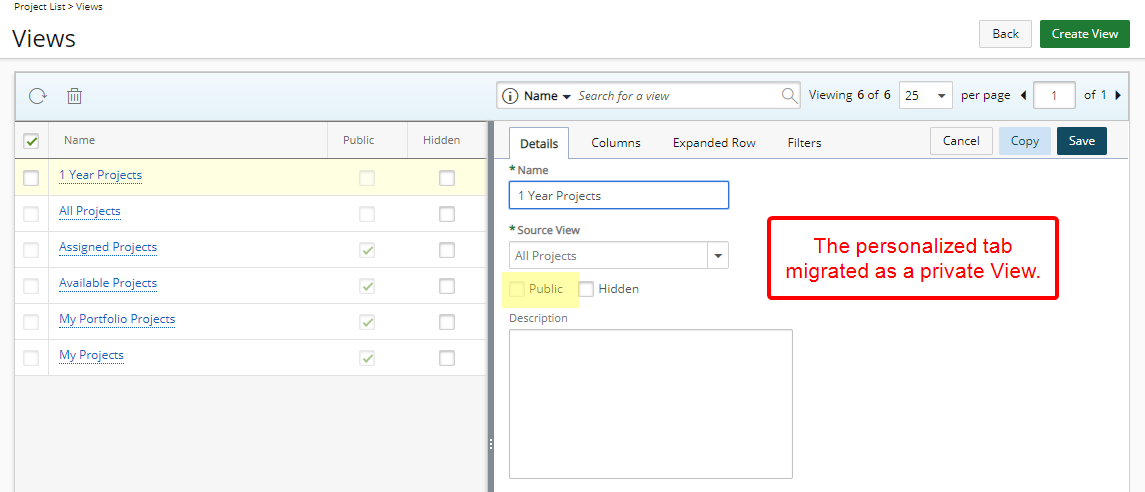
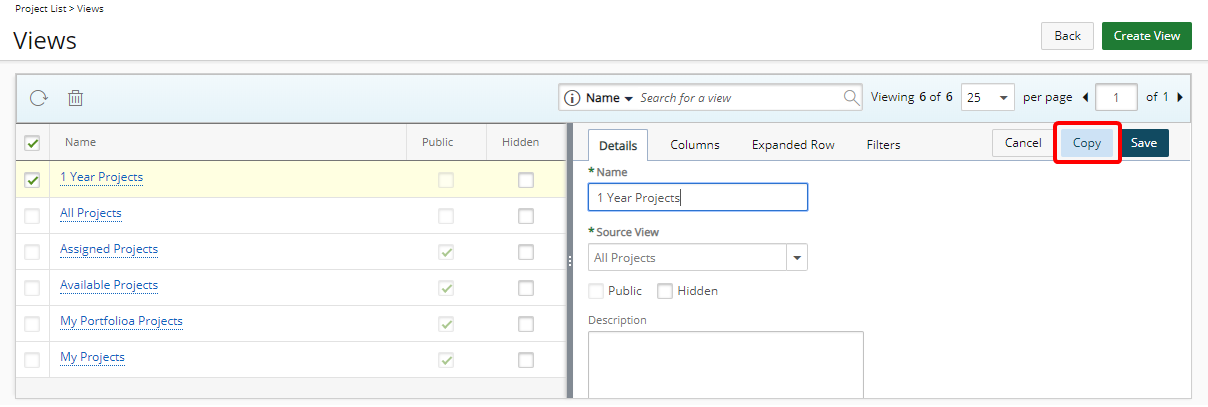
- A new button has been added to the Manage Views page that allows for the copying of a View. When clicked the Details tab is displayed and the user has the possibility to edit the Name and Description of the View. Upon saving; all other tabs (Columns, Expanded Row and Filters) will become available.
Note: All settings within the Columns, Expanded Row and Filters tabs are copied from the original View.
For more information on:
- Copying Views click here.
Project Overview
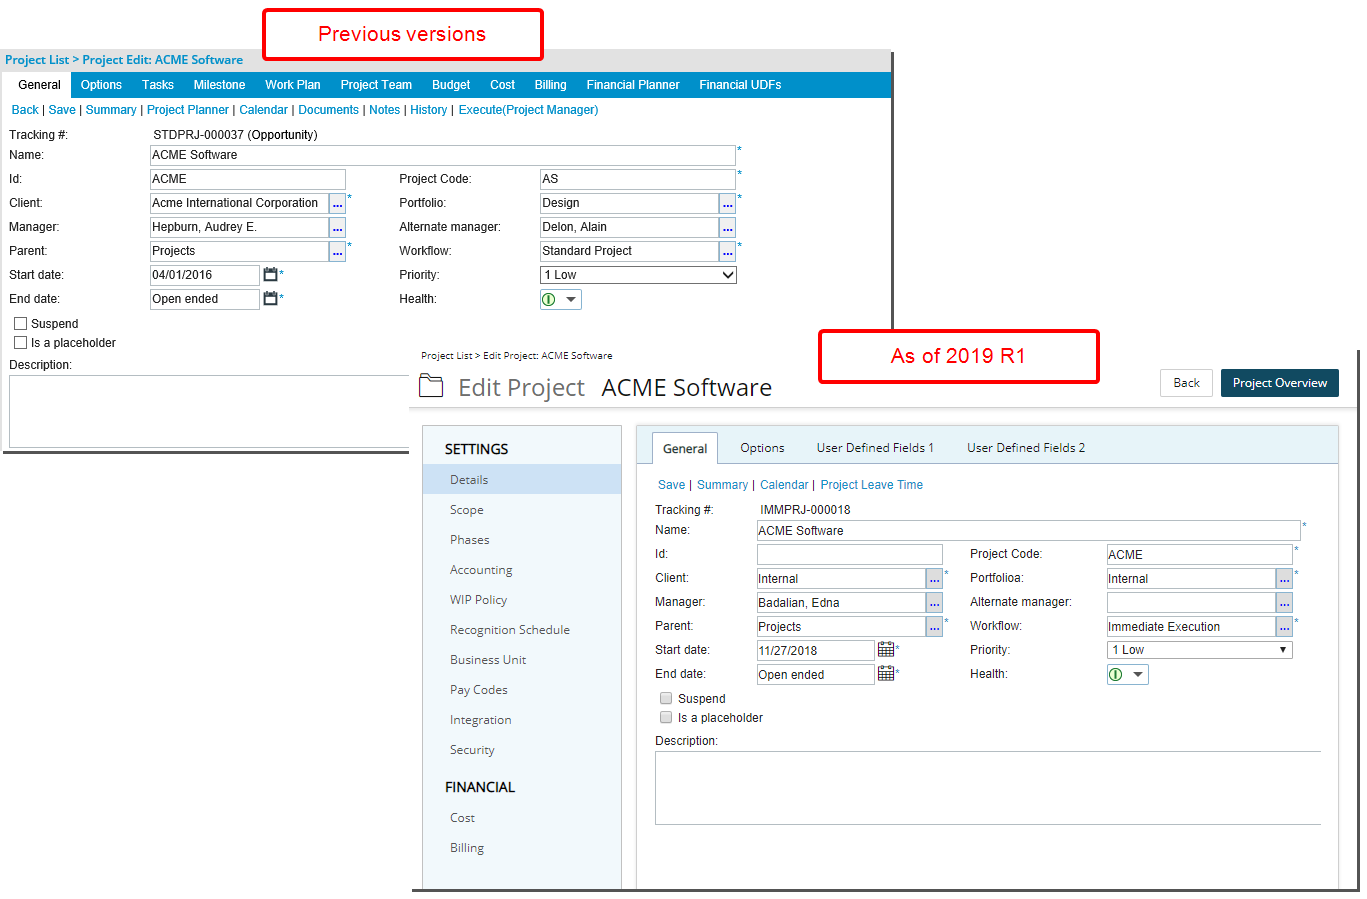
The interface for creating and editing a Project has been revamped with an upgraded look and a new navigation. The Project information is broken down in two major sections, Settings and Financial, each of which are further broken down into components. When editing a project, the Details of the project is the first component to display showing the General and the Options tabs along with any available UDF tabs.
- Under the Settings section, you can find the: Details, Scope, Phases, Accounting, WIP Policy, Recognition Schedule, Business Unit, Pay Codes, Integration and Security components of your project.
- Under the Financial section, you can find the: Cost and Billing components of your project.
Note: When creating a new project, the only visible navigation item is Details. Once the minimum required information have been entered for creating a project are met, upon clicking Save the page will refresh and show all the other project elements that can be completed.
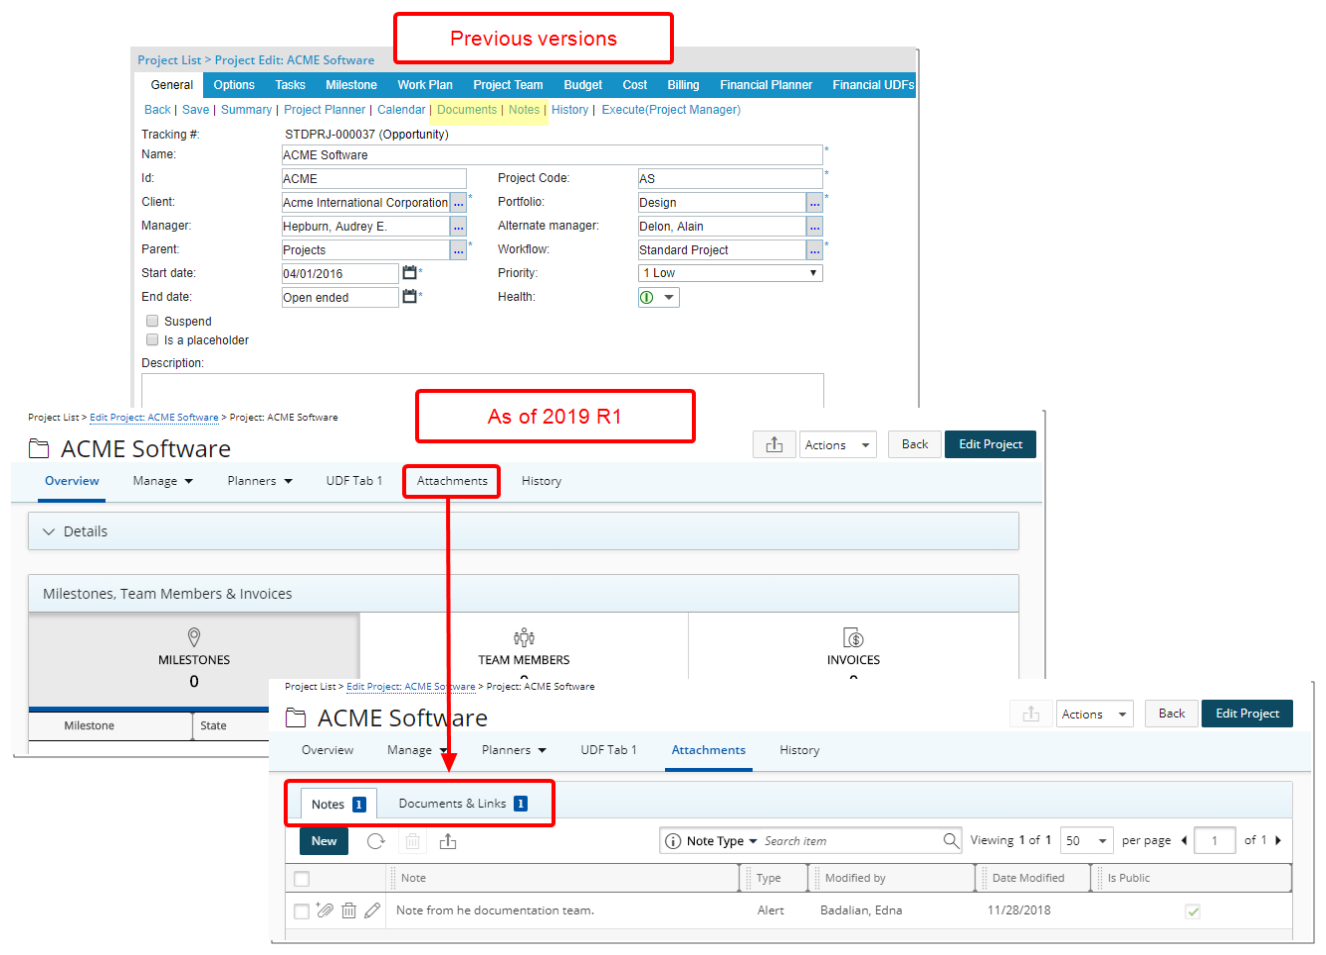
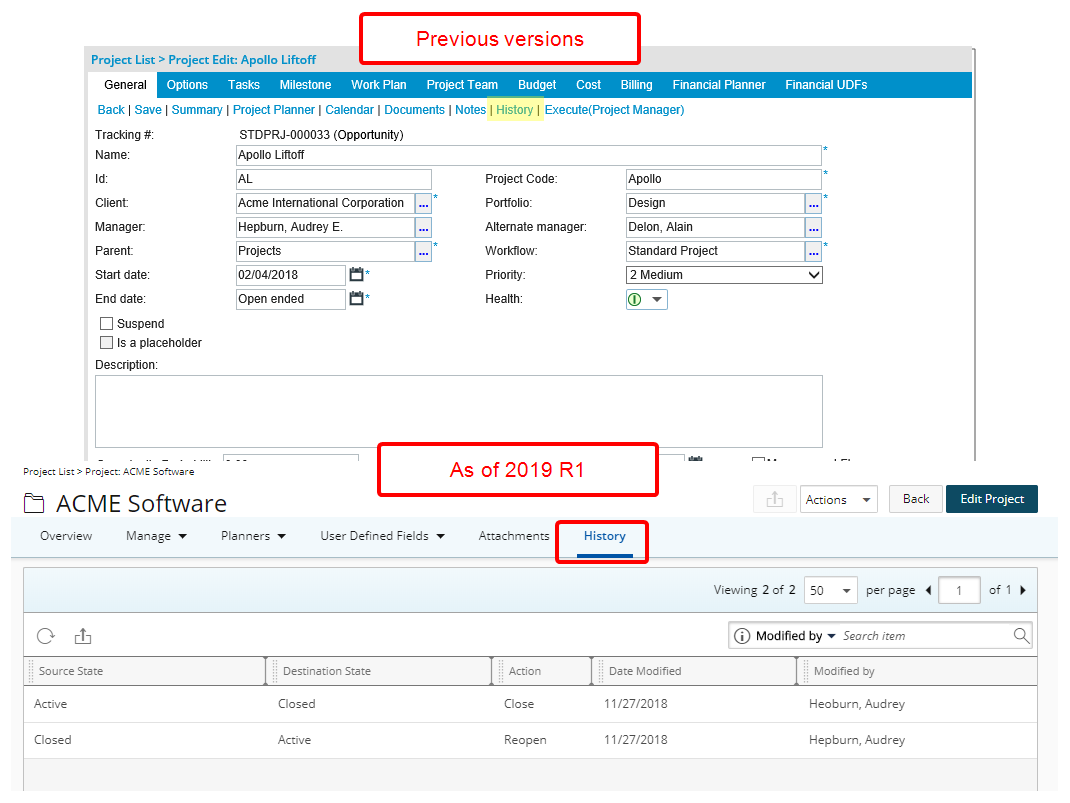
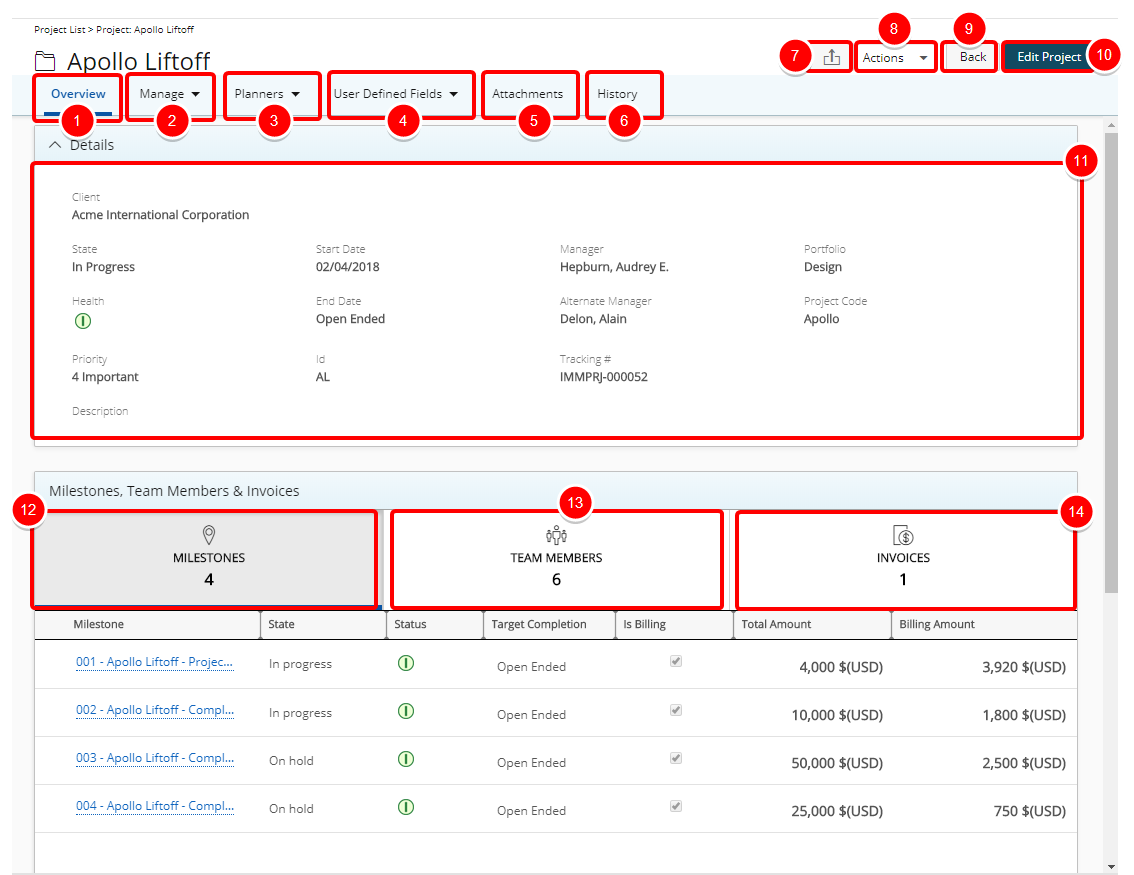
The Improved Project Overview interface has been revamped with an upgraded look. Having combined key components such as an Overview of the project Details, Summary Milestones, Team Members and Invoices it allows to manage the Tasks, Milestones and the Project Team as well as an easy access to the Planners (Project Planner, Work Plan, Financial Planner & Budget), Attachments (Notes, Documents& Links) and the Project History page. Tooltips in the Project Overview page provide users with additional information. The improved breadcrumbs allow users to easily navigate to previously visited pages.
Styling enhancements, in line with UplandOne look, have been made to the following items:
- Add buttons
- Symbol sizes and style
- Disabled Button color and opacity
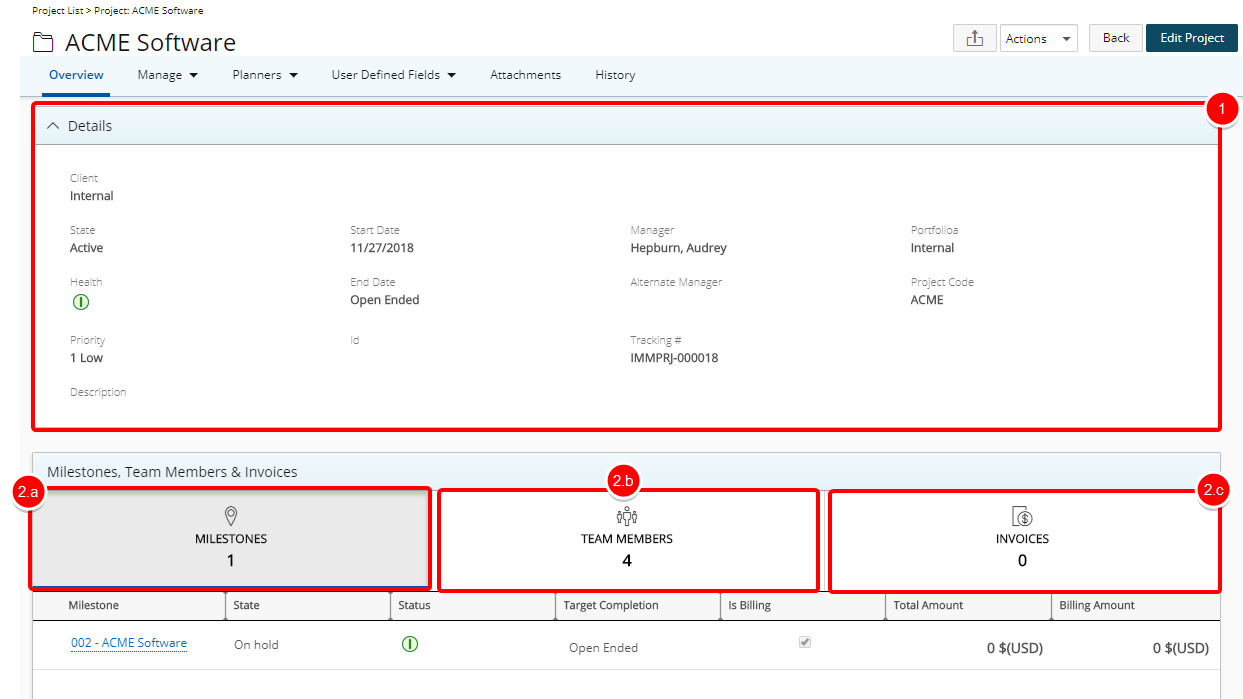
The Overview tab gives you an overview of your Project. The available information is displayed in 3 sections:
- The Details section allows you to view the details of your Project as set on the General tab when creating a project.
- The Milestones, Team Members and Invoices section contains 3 tabs:
- a) Milestones tab: Within the Milestones tab a list of all Milestones/Billing Milestones is displayed.
- b) Team Members tab: The Team Members tab contains a list of all Project Team members.
- Invoices tab: The Invoices tab contains a list of all Project Invoices.
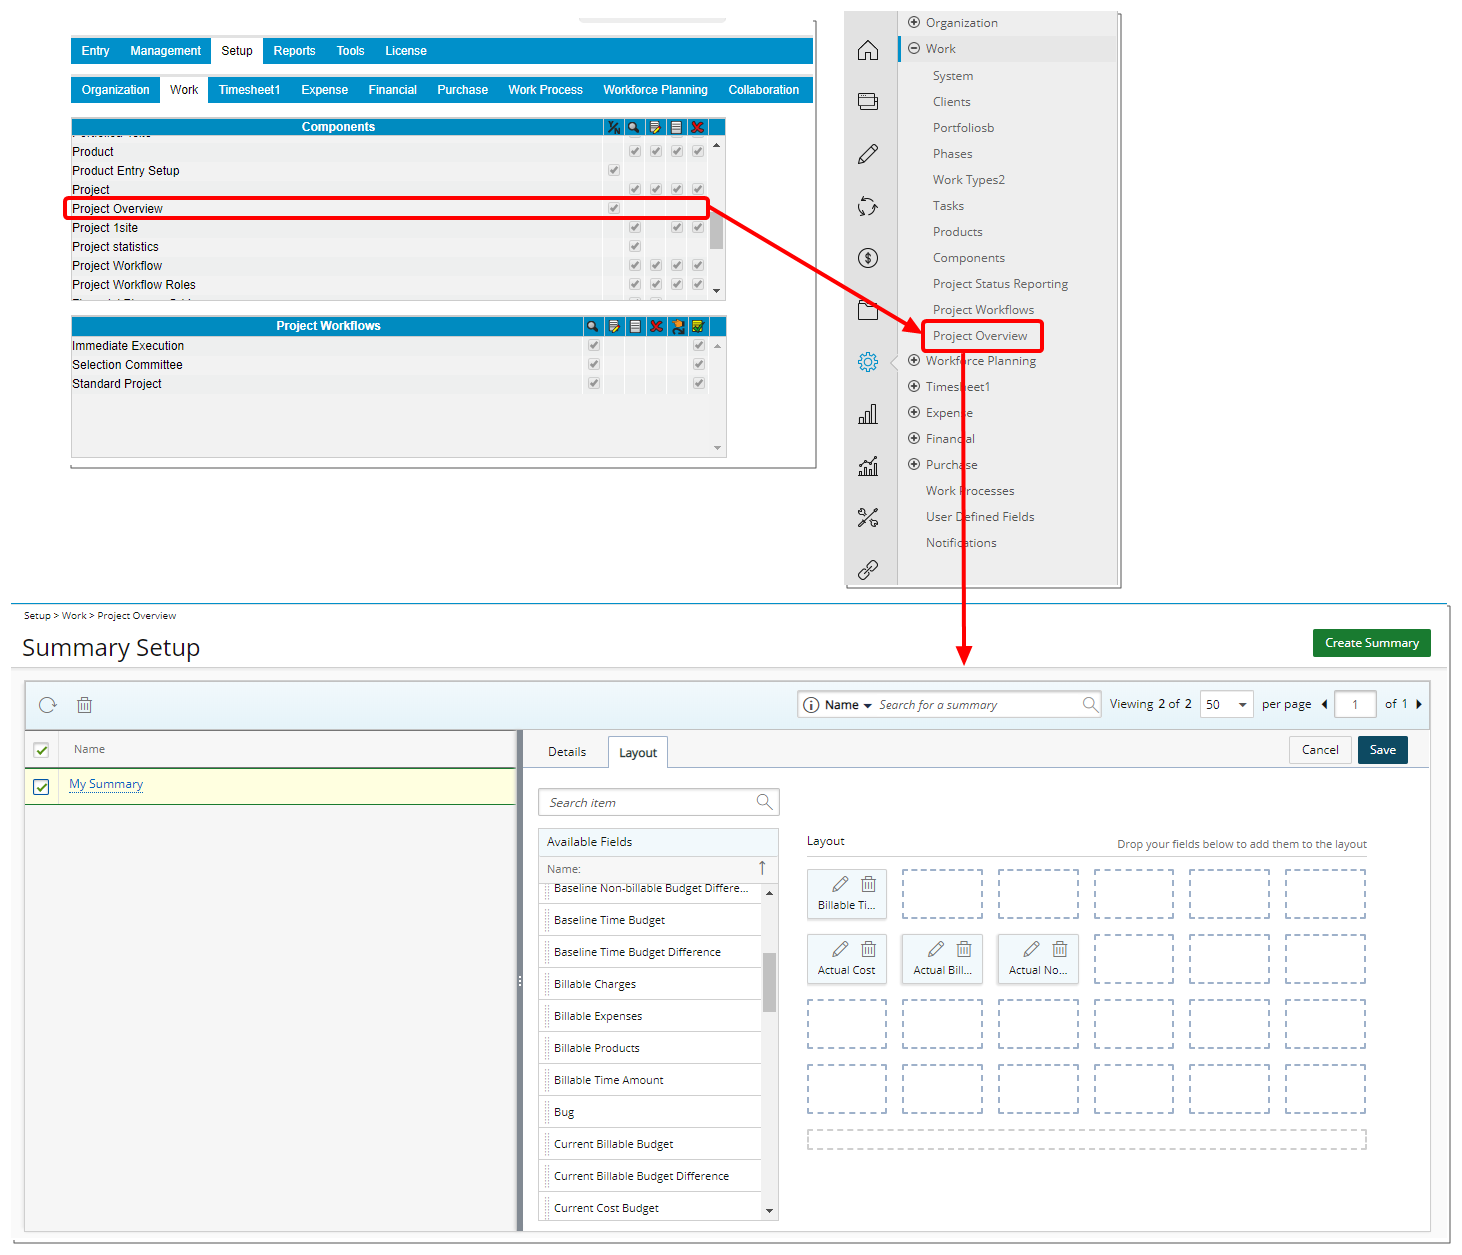
- The Summary section allows you to view a summary overview of your Project as defined in the Summary Setup page accessed through Setup > Work > Project Overview.
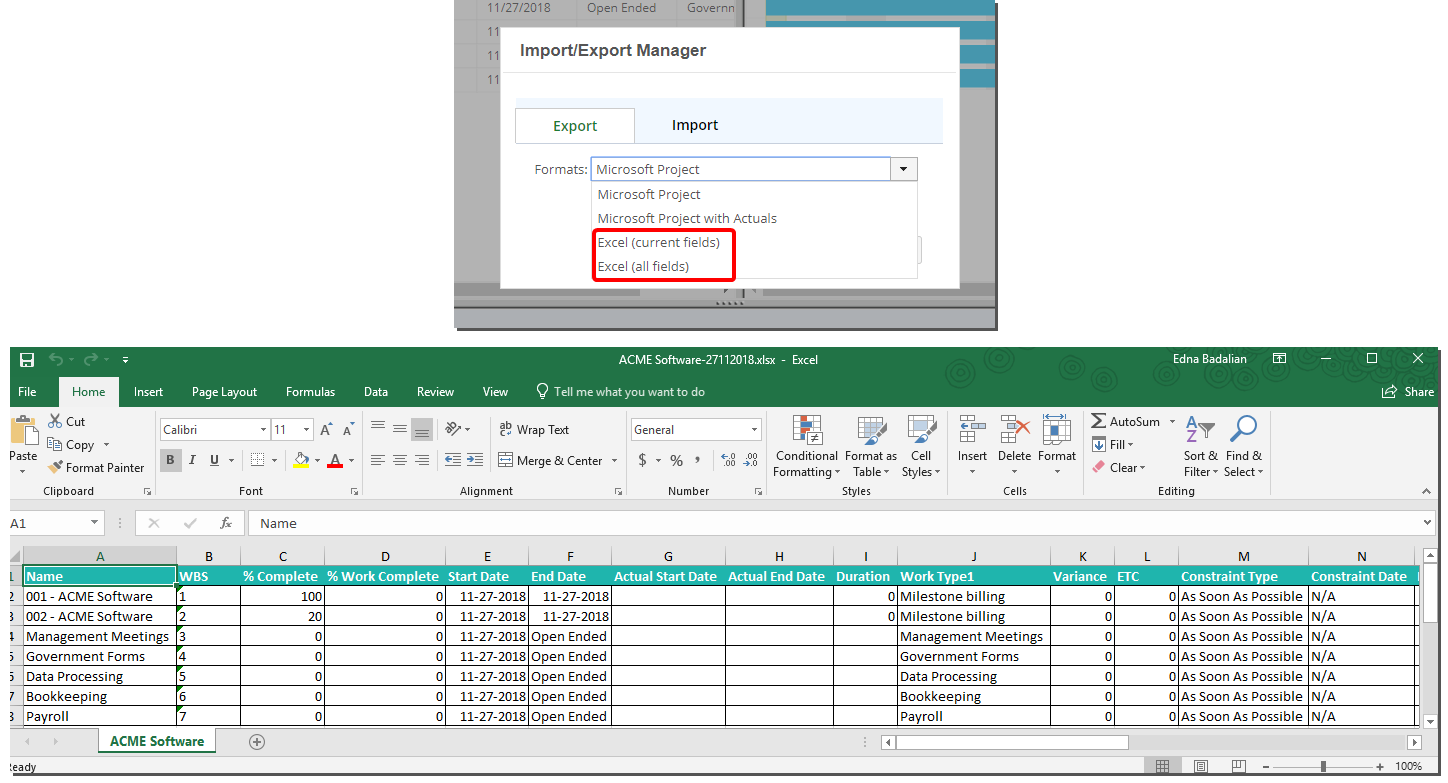
From the Overview tab you can easily export the information available within the Details, Summary and Milestones, Team Members and Invoices sections of your Project to Excel.
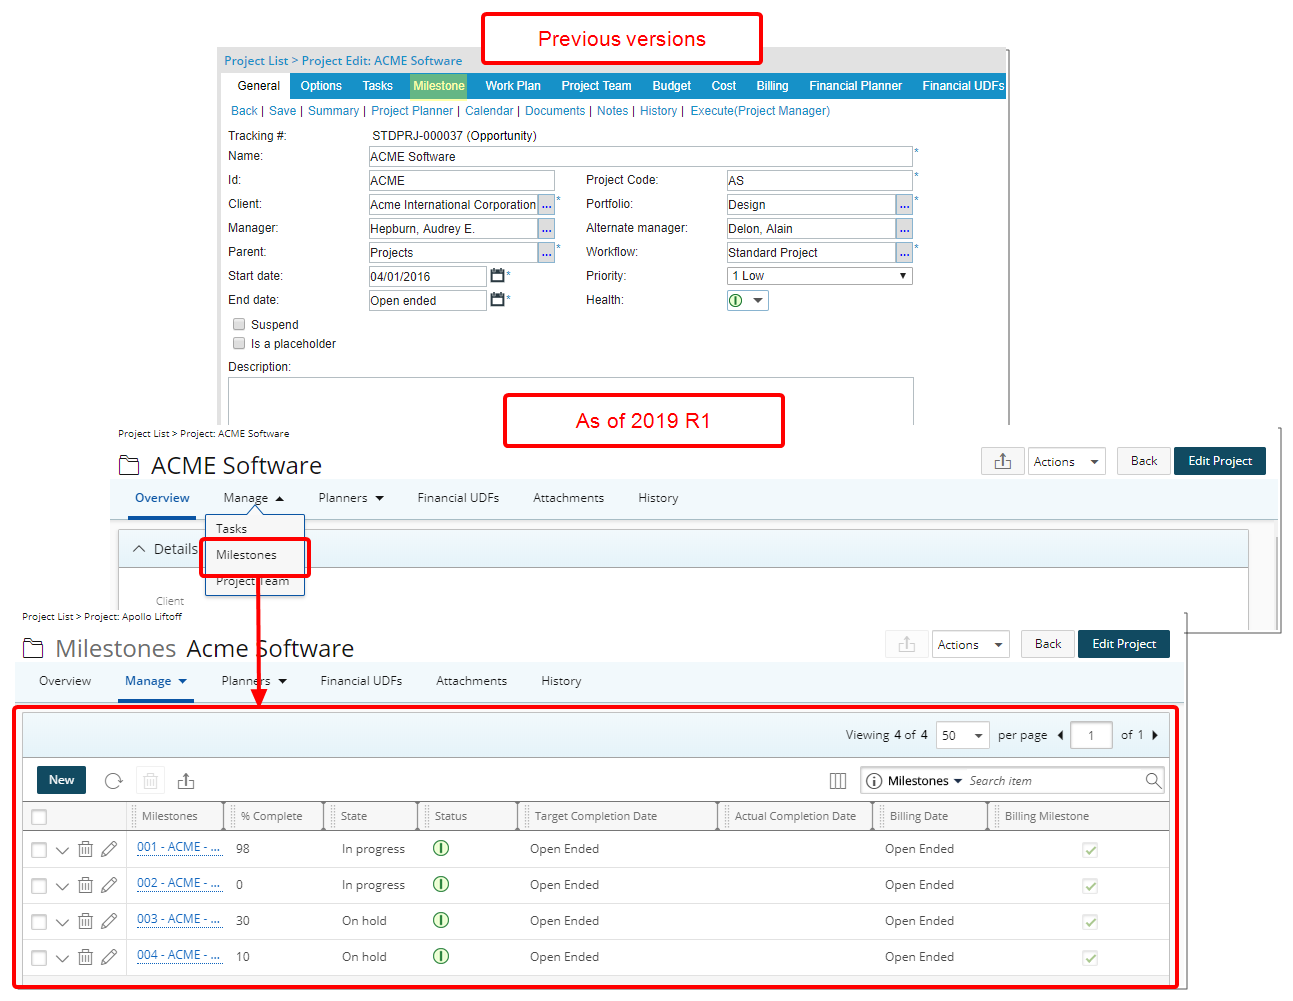
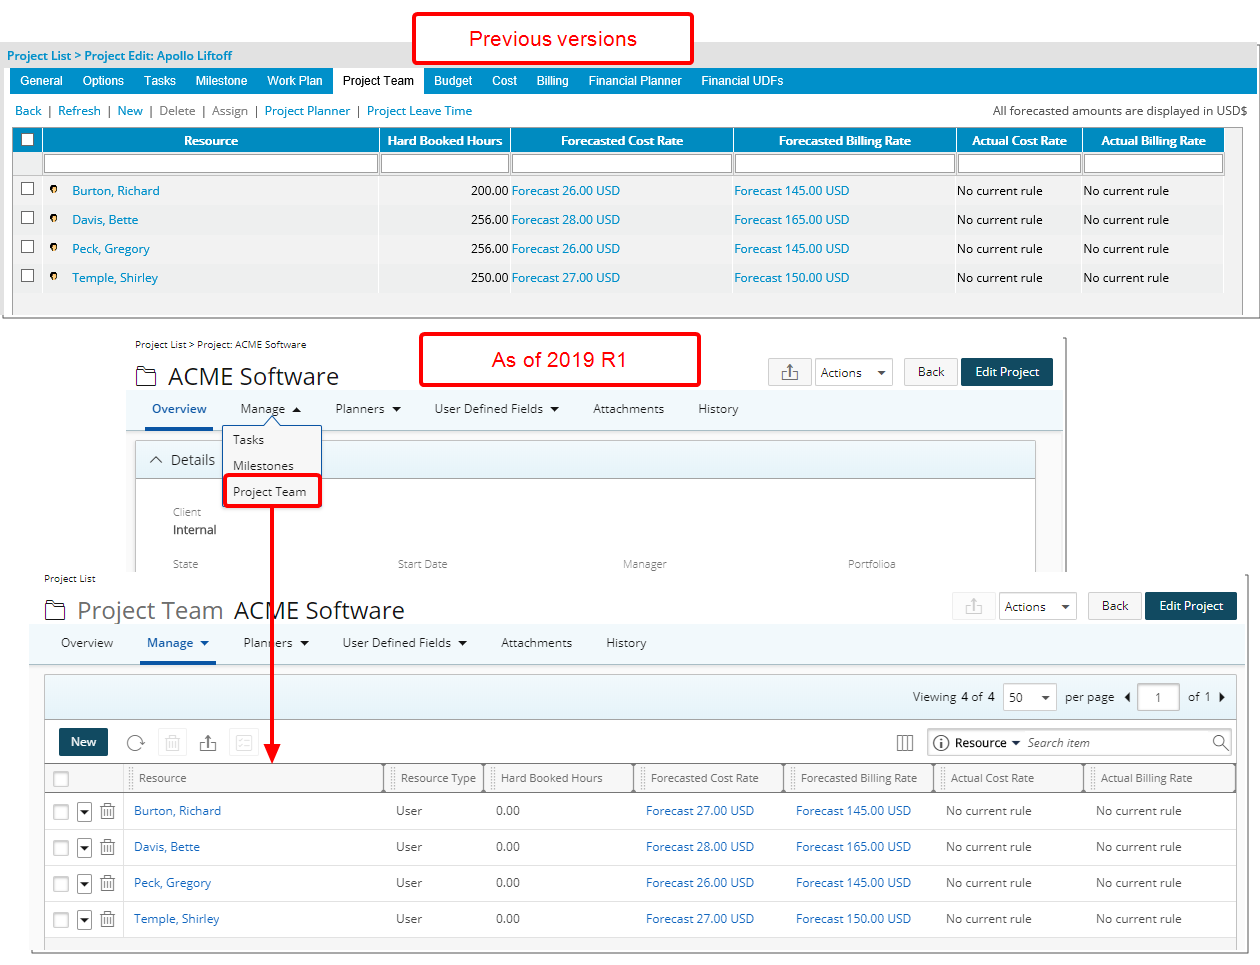
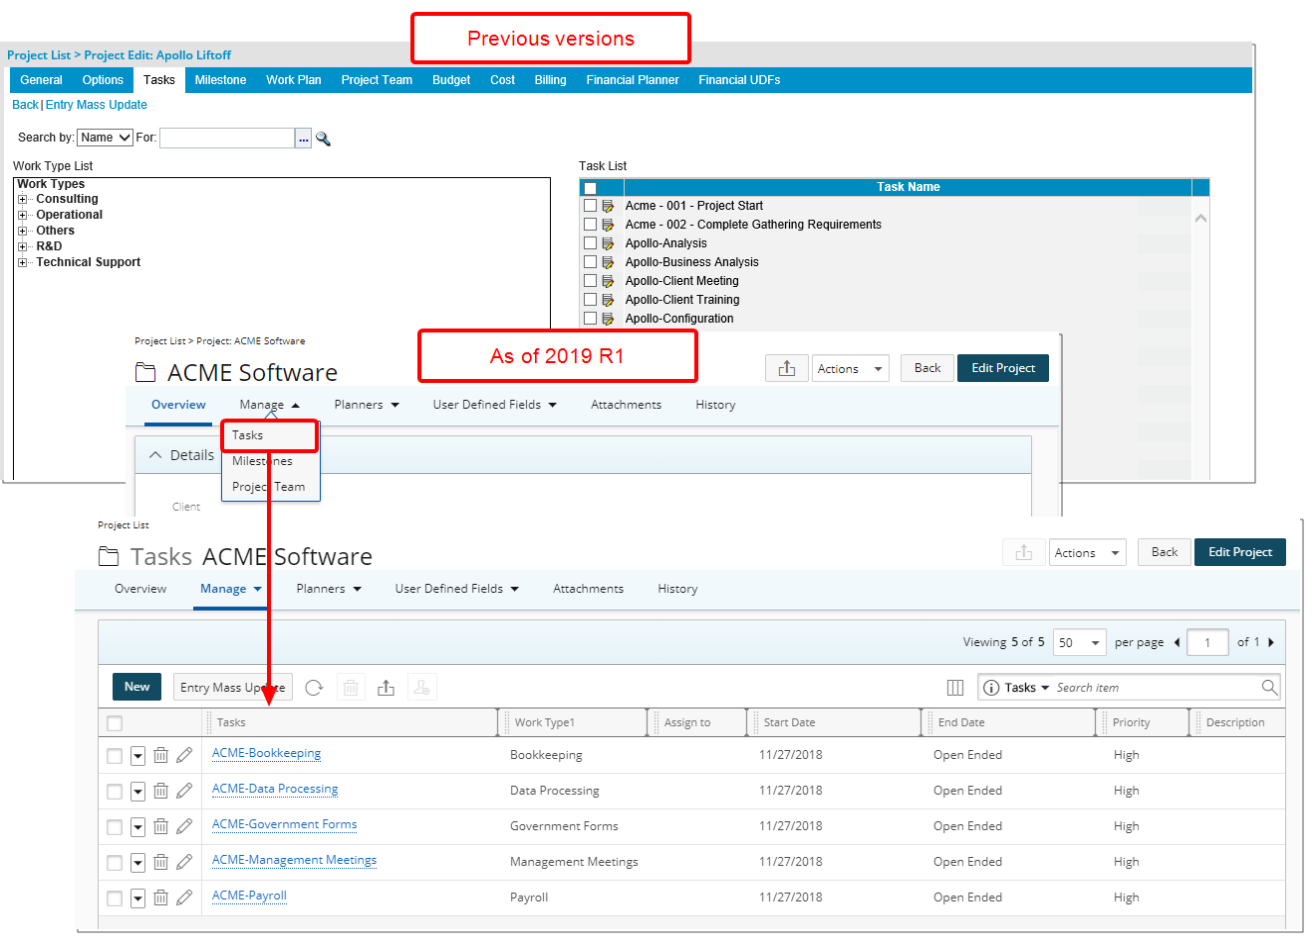
The Manage context menu gives you access to Manage: Tasks, Milestones and Project Team
- Tasks: The Tasks option opens a list of all available Tasks and you can choose to associate the necessary ones to your project. Upon selecting available tasks you can either Delete, Export or Assign to a user.
- Milestones: Upon creating a Milestone, the context menu will allow you to Edit, Assign, Forecast Rate Association, Edit Billing Rate Association or Edit Cost Rate Association. Any User Defined Fields are displayed within the tabs accessible from the Milestones.
- Project Team: The Team members page reflects a list Project Team Members. Here you can add Resources to your Project Team or remove them.
The Project Overview Setup page available through Setup > Work > Project Overview, allows users to configure the Summary section on the Project Overview based on given criteria.
This menu option is visible only when the logged user has rights to the Project Overview Setup Security Profile located at Setup > Organization > System > Security Profile > Setup> Work> Project Overview.
For more information on:
- Available Security Permissions for Security Roles click here.
Reporting
As of 2019R1 OLAP reporting capabilities are no longer available.
Upon using the Ad Hoc Reporting capabilities, a message is displayed as the AdHoc Reporting solution will be phased out in an upcoming release.
REST API Development
Tenrox can be interacted with programmatically via a set of APIs.
Introduction of new Task Edit webservices that allows for:
- Create events
- Read events
- Update events
- Delete events
- Suspend events
- Activate events
- Decommission events
For more information on:
- How to access the REST API documentation please refer to: How do I access the REST API Online Help?
Introduction of new User Skill association webservices that allows for:
- Create User skill association
- Edit User skill association
- Delete User skill association
- Query User skill association
For more information on:
- How to access the REST API documentation please refer to: How do I access the REST API Online Help?
Introduction of new Query Proficiencies webservices that allows for:
- Query Proficiencies
For more information on:
- How to access the REST API documentation please refer to: How do I access the REST API Online Help?
When Using the API, the Project State function was modified to return the Project Workflow State Name.
For more information on:
- How to access the REST API documentation please refer to: How do I access the REST API Online Help?
Resource Management
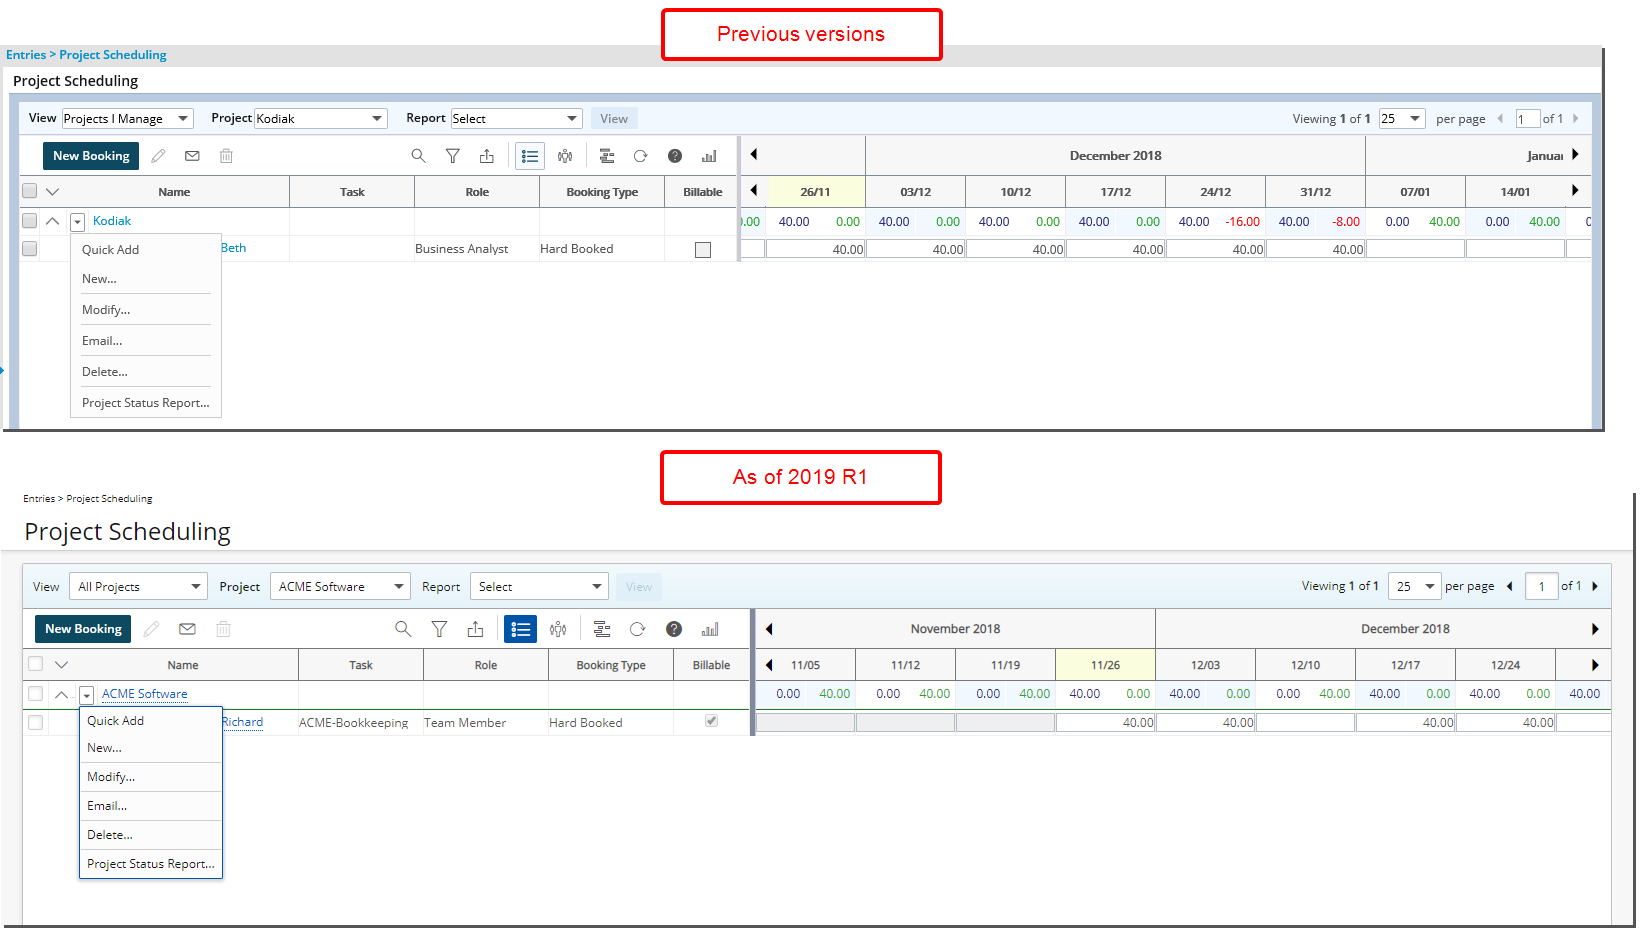
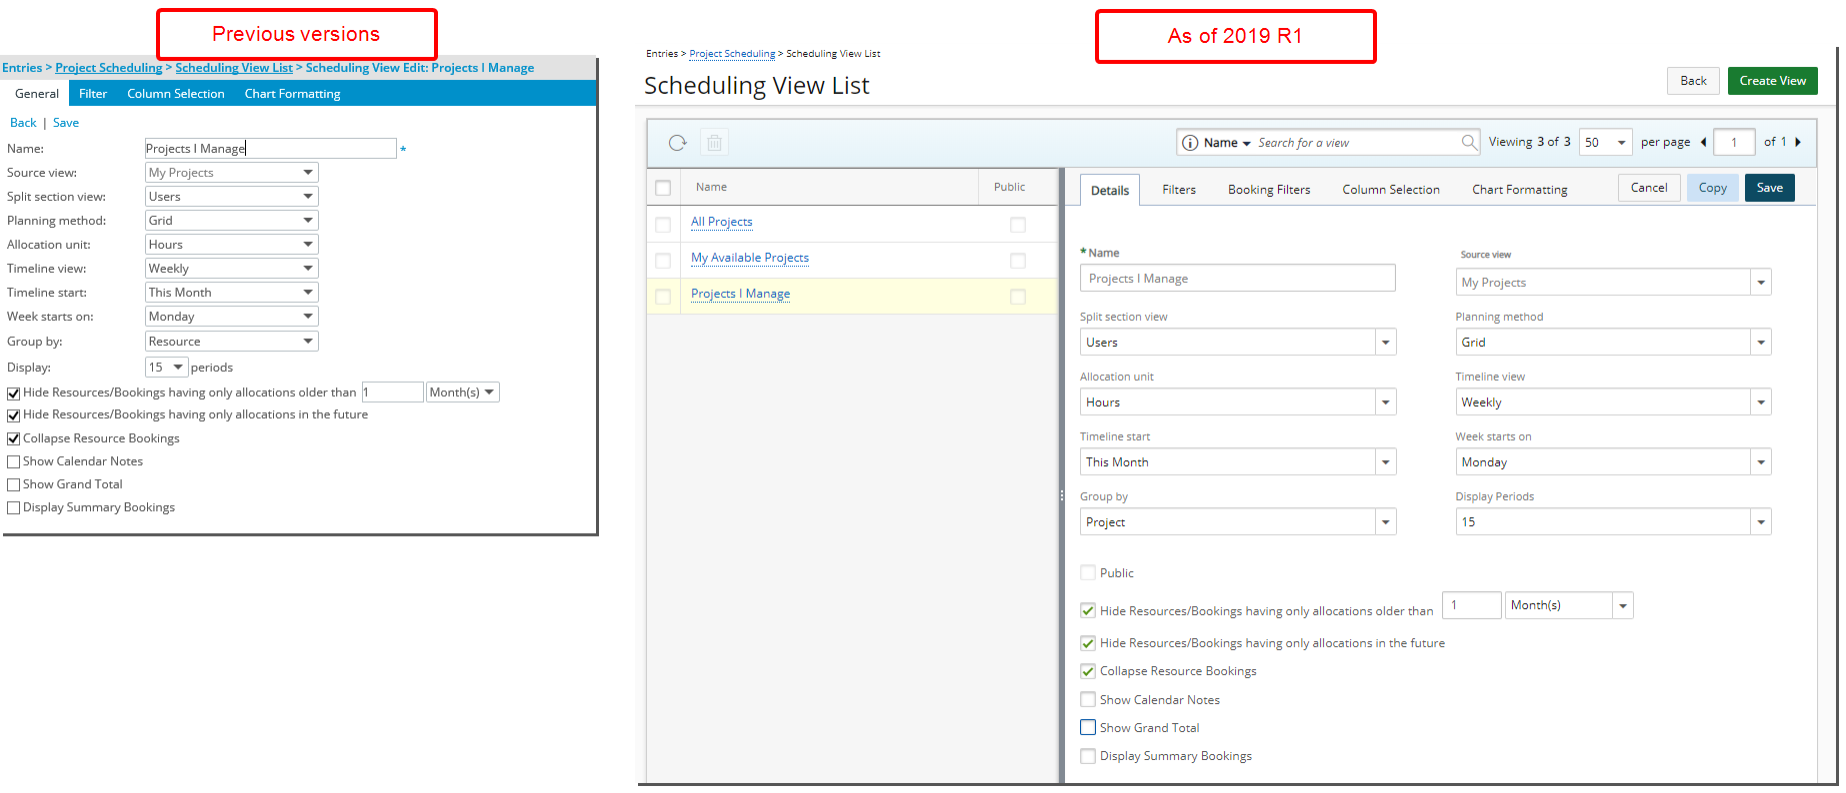
My Work Plan, Resource Scheduling and Project Scheduling pages have undergone several User Interface (UI) improvements, all intended to improve overall user experience and to establish consistency across all pages. Styling enhancements have been made to the following items:
- Disabled Button color and opacity
- Context menu
- Selection boxes
- Save and Undo buttons.
- Link colors and borders
- Row paddings
- Symbol sizes
- Expanded Rows
- View Manager
The identical Source Views within Project List and Project Scheduling pages are now consolidated. The following views were merged together as a result:
- Available Projects within the Project List and Project Scheduling
- My Projects within the Project List and Project Scheduling
- System Projects within Project List and All Projects within Project Scheduling
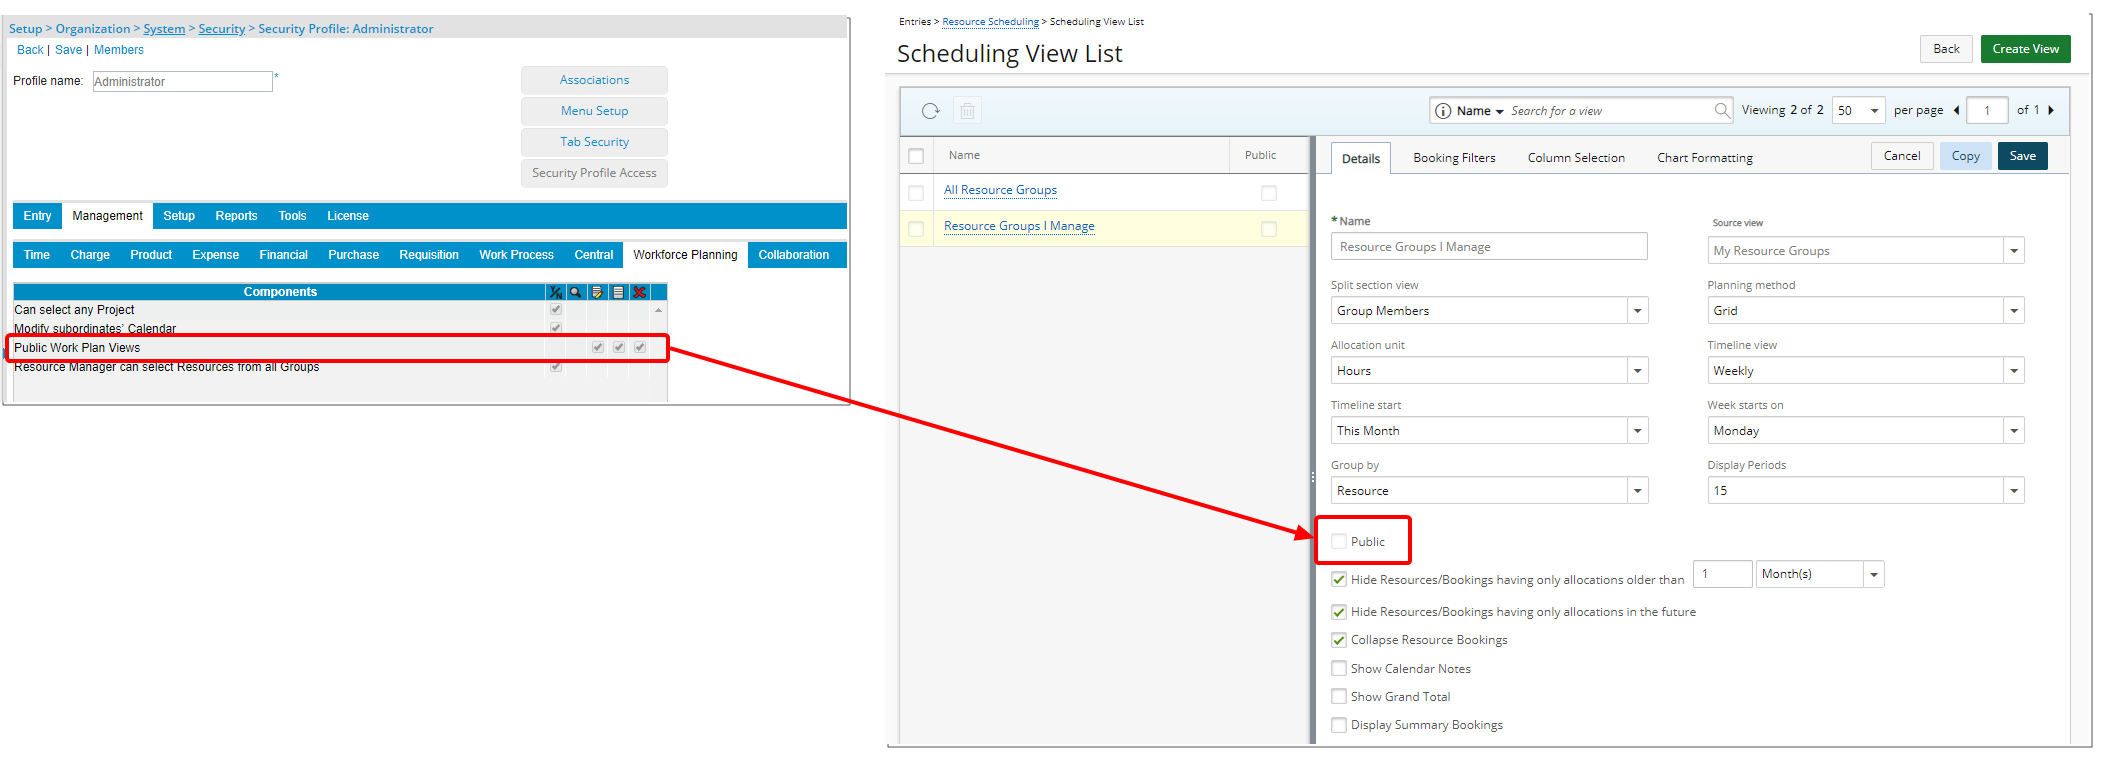
The new Security option Public Work Plan Views is added to the Management > Workforce Planning security tab with the following options:
- Edit: Users with permissions to Edit public views, can edit the view.
- Create: Users with permissions to Create public views can create public views.
- Delete: Users with permissions to Delete public views, will be able to delete public views or convert a public view into a private view.
The options are selected by default for the Administrator security profile and unchecked for all other security profiles.
The new option Public has been added to all Work Plan views. By default, this option is unchecked for all new and all existing views.
For more information on:
- Available Security Permissions for Security Roles click here.
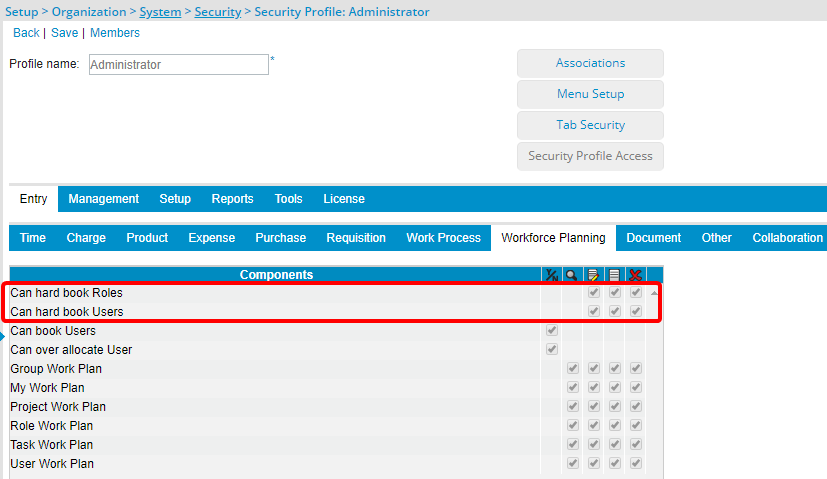
The new security profile option "Can hard book Roles" is now available under Entry > Workforce Planning with the options Edit, Create and Delete. By default, these options will be enabled for new profiles and will default to the same selected options as those of Can hard book Resources for existing profiles.
The existing security profile option "Can hard book Resources" under Entry > Workforce Planning has been renamed to "Can hard book Users".
The combination of these two security profile options will allow for certain users to only book Users and for other to book based on Roles.
For more information on:
- Available Security Permissions for Security Roles click here.
Due to the changes in security, when copying a Project, the logic applied to determine which options are available for Work Plan copy have been modified as follows:
- If the User has the rights to Create hard bookings for Roles only:
- When selecting Roles as the copy type, the Soft booking option is unchecked and enabled
- When selecting Users as the copy type, the Soft booking option is checked and disabled
- When selecting Users and Roles as the copy type, the Soft booking option is unchecked and enabled; when copying, the booking creation for Users that are hard booked will be soft booked instead.
- If the User has the rights to Create hard bookings for Users only:
- When selecting Roles as the copy type, the Soft booking option is checked and disabled
- When selecting Users as the copy type, the Soft booking option is unchecked and enabled
- When selecting Users and Roles as the copy type, the Soft booking option is unchecked and enabled; when copying, the booking creation for Roles that are hard booked will be soft booked instead.
Note: No modifications have been made:
- If the User has the rights to Create hard bookings for both Roles and Users.
- If the User has no rights to Create hard bookings for Users OR Roles.
For more information on:
- Available Security Permissions for Security Roles click here.
SSO
Enabled Support for Google SSO Authentication (G Suite SAML) for Tenrox Web and Tenrox Mobile.
Tenrox Project Planner (TPP)
As a result of the improved Upland Project Planner, the Tenrox Project Planner has been deprecated and no longer be supported as of the 2019 R1 release.
Upland Analytics
The latest Upland Analytics release features many powerful new enhancements as well as improvements to user experience. For more information on Upland Analytics click here.
Addition of the following Data Sources and Views
Leave Request
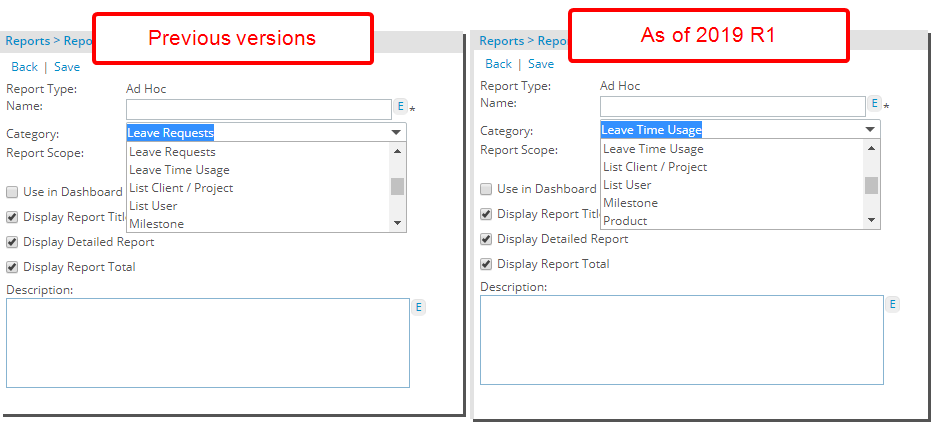
- Views related to Leave Request
Normalize Product Entry Rules View
- View_BI_Product_Entry_Rules view containing only normalized data.
For more information on:
- Data Sources and Views in Upland Analytics click here.
A new license for Enterprise edition of Upland Analytics is now available with which one can manage the Views and Data Sources.
Upon opting for the Enterprise license, a new security profile Upland Analytics Administrator is added and enabled, by default, only for the Administrator security profile.
Upon upgrading to 2019R1, in the absence of an Enterprise license, users with previous Read/Write permissions on Upland Analytics will now have Read-only permissions. Only the Master Administrator will have Read/Write permissions.
Upon Accessing Upland Analytics, the system will validate whether the user’s existing security profile option is valid and adjust the Upland Analytics permissions as needed.
For more information on:
- Available Security Permissions for Security Roles click here.
Upland Project Planner
Work Breakdown Structure (WBS)
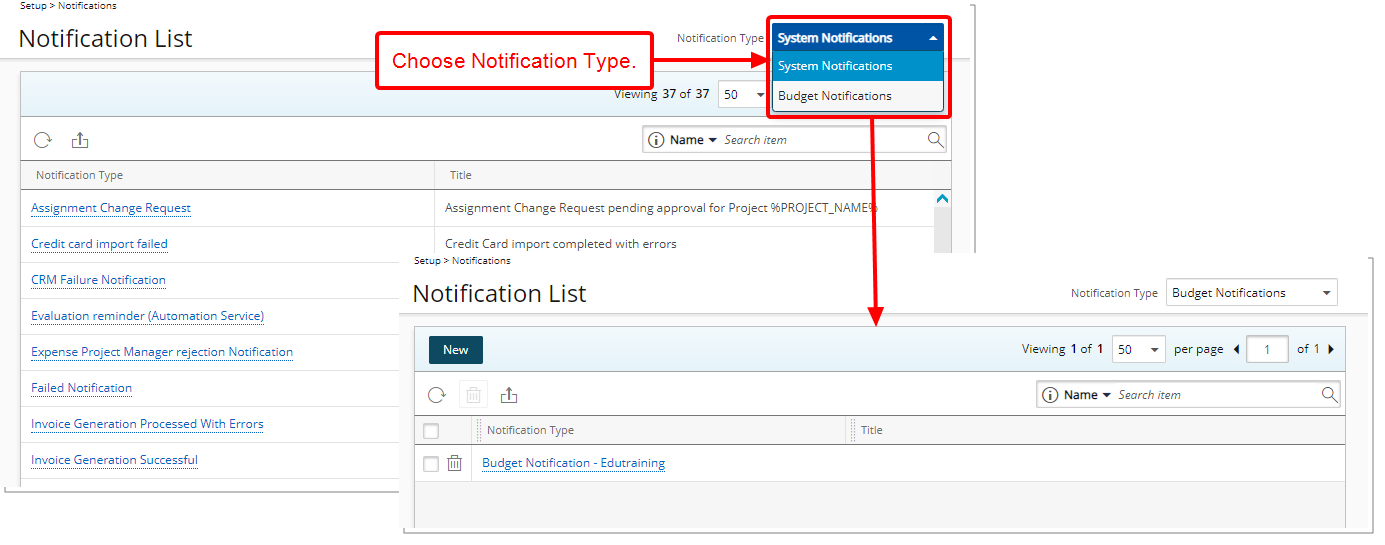
The accessibility and management of System and Budget Notifications have been relocated to a centralized location (Setup > Notifications).
- Selecting System Notifications will open the list of existing Email Templates from where you can access any one to modify.
- Selecting Budget Notifications will open the Budget Notifications page where you may Create, Edit and Delete Budget Notification Templates at the system level.
Improved User experience with the reduced need to navigate to different pages to access and manage the notifications as they now fall under one centralized area. Moreover, having a system level Budget Notification template allows for it to be used across multiple projects, reducing the effort to create the same notification multiple times.
Use case: Todd, the Tenrox Administrator, has been tasked with adding a couple of Budget Notifications that upper management would like to duplicate across a number of projects. He can accomplish this task more efficiently by creating these email templates within Budget Notification under the Notification List page, found under Setup.
Note:
- The Email Template List page located at: Setup> System > System Setup > Email Template List has been moved and can now be accessed from the centralized Notifications page (System > Notifications).
- The ability to create project level Budget Notifications remains available.
For more information on:
- Notifications List click here.
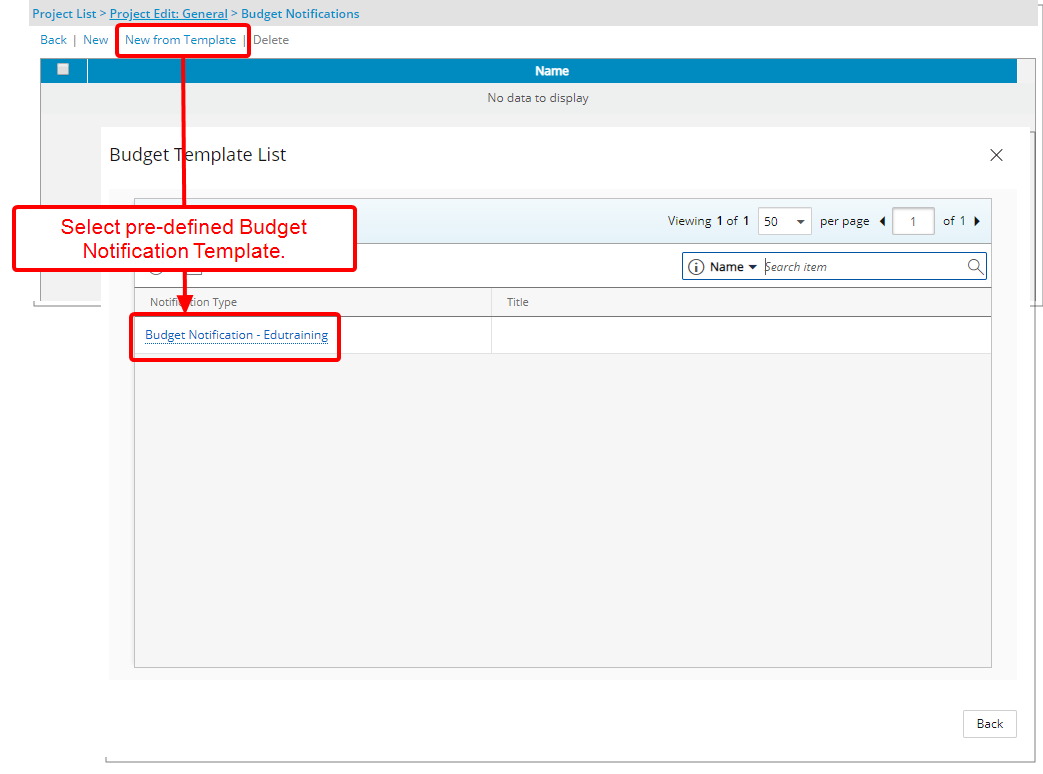
When creating a new Budget Notification within a Project, you can now opt to use a pre-defined Template by clicking the new link “New from Templates”, which displays Budget Template List that lists the Budget Notifications created at the system level under the new Notifications List page.
Users can more efficiently create budget notifications by using a pre-defined Budget Notification Template and optionally customize it at the project level.
Use case: Audrey is tasked to create budgets for 3 of her projects. She can now easily and efficiently accomplish this by choosing New from Templates and then customize the budget at the project level, if necessary.
Note: Editing or Deleting a Budget Template from the System level will not cascade to existing Project Budgets using a copy of a template.
For more information on:
- Notifications List click here.
Menu
