2021R2 Release Notes
The 2021R2 version of Eclipse PPM will be deployed to customers on December 4th, 2021. At this time, more information on using the following features will be made available.
Note: Some of the new features are still under construction. Once they are finished, they will be listed on this page as well.
This release comprises of the following components:
Also, the resolved issues for 2021R2 can be found here.
Key Features
The following are the central new features of Eclipse PPM 2021R2. Click on any of the new features to learn more:
What's Different:
Eclipse PPM administrators can now apply the characteristics of custom calendars to multiple Projects or Project Templates at a time while managing calendars from the Administration page.
Note: Eclipse PPM users will require "Modify" Project Schedule permissions to apply a calendar to Projects. To apply a calendar to Project Templates, they will have to have either created the Project Template themselves or have "Allow" Manage Project Templates permissions.
Prior to this release, administrators could only edit or delete a calendar from the calendar's drop-down menu from the "Calendars" page. Now, two options have been added to apply the calendar to a number of Projects or Project Templates at once:
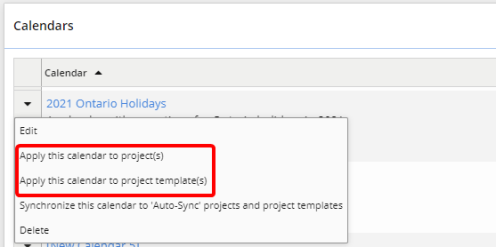
Selecting one of these options will open up the "Apply Calendar" window:
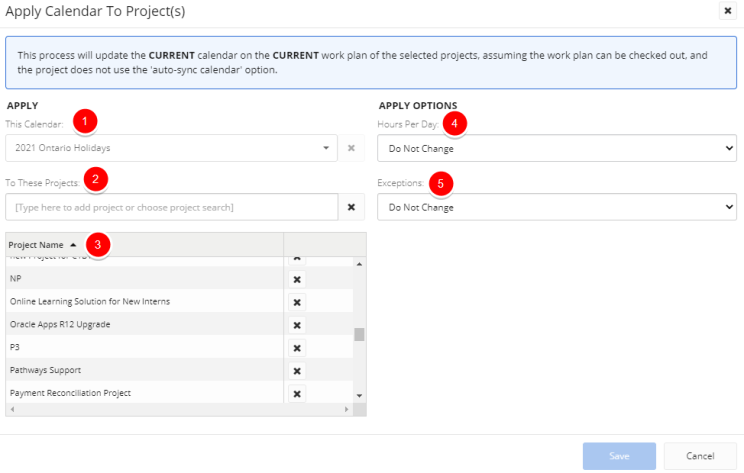
1. This Calendar: This uneditable field displays the chosen calendar.
2. To These Projects: This field allows you to select the Projects / Project Templates that the calendar will be applied to. You can type in a Project / Project Template name to specify the results. If applying a calendar to Projects, you can click on the field to scroll through the available Project filters; selecting one will add all of the Projects that fit into that filter.
3. Project / Project Template List: This list displays all the Projects / Project Templates that have been selected.
4. Hours Per Day: This drop-down menu allows you to apply the "Hours Per Day" of your chosen calendar ( ) to the Projects / Project Templates.
-
Do Not Change: The hours per day on each Project / Project Template's current schedule will not be updated.
-
Update to calendar value: The hours per day on each Project / Project Template's current schedule will be updated to match the "Hours Per Day" of the chosen calendar (
).
5. Exceptions: This drop-down menu allows you to apply Exceptions of your chosen calendar ( ) to the Projects / Project Templates.
-
Do Not Change: The Exceptions on each Project / Project Template's current schedule will not be updated.
-
Add missing exceptions to project: The Exceptions from the chosen calendar that are not already on the current Project / Project Template schedules will be added to them.
-
Add missing 'working days' to project: Only the "Working" day Exceptions from the chosen calendar that are not already on the current Project / Project Template schedules will be added to them.
-
Add missing 'non-working days' to project: Only the "Non-Working" day Exceptions that are not already on the current Project / Project Template schedules will be added to them.
-
Synchronize exceptions with calendar: The Exceptions from the chosen calendar will completely replace the Exceptions on the current Project / Project Template schedules.
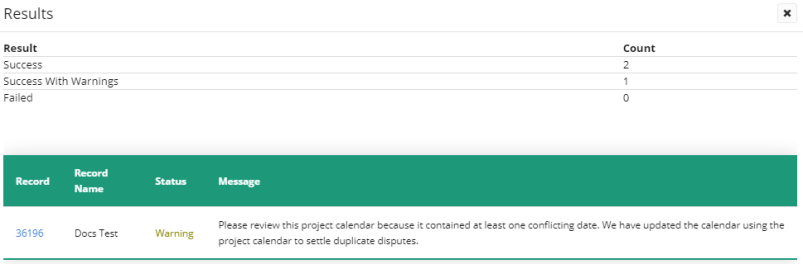
Once a value for either "Hours Per Day" or "Exceptions" has been chosen, you can click the Save button to apply the calendar to the Projects / Project Templates. A "Results" window will appear to notify you of all the successful applications, failures, and conflicts:
Note: A calendar can only be applied to Project / Project Template Work Plans that can be checked out. Also, the Work Plan cannot be set to "Auto-Sync," described below.
Benefit:
Prior to this release, Eclipse PPM administrators and Project Managers would have to manually change Project calendars at the beginning of the calendar year. For example, certain holidays do not fall on the same calendar date each year, causing the "Non-working" days to change. Having to manually change all of the "Non-working" days of each Project calendar is unnecessarily tedious and time-consuming. By updating Project / Project Template calendars in bulk, Eclipse PPM users will save time and resources while reducing the likelihood of data entry errors.
What's Different:
Eclipse PPM users can now synchronize a custom calendar with a Project or Project Template from the Configuration page. When this occurs, the Project's Work Plan(s) will automatically update to match a custom calendar's Hours Per Day and Exceptions when opened.
While configuring a Project or Project Template, users will see two new "Calendar Exceptions" drop-down menus under Work Plan Settings:
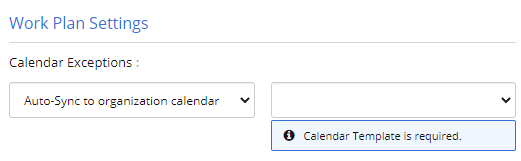
The first menu contains two options for Calendar Exceptions: "Independent" and "Auto-Sync to organization calendar."
-
Independent: The Work Plan schedule will work independently from any custom calendar in Eclipse PPM. Users with "Modify" Project Schedule permissions will be able to manage calendars on each Work Plan attached to a Project / Project Template.
-
Auto-sync to organization calendar: All of the Work Plans on the Project / Project Template will use the calendar selected in the second drop-down menu. If selected, the second drop-down menu will be enabled, allowing users to select a calendar. The Project's Work Plan(s) will automatically update to match both the Hours Per Day and the Exceptions of the chosen calendar, which can be set while managing the calendar from the Administration page.
The next time the Work Planner is opened, a pop-up will allow the user to apply or refuse the changes:

Although Work Plans set to "Auto-sync to organization calendar" will automatically update whenever they open, Eclipse PPM administrators can go ahead and push calendar updates to these Work Plans while managing the calendar. A new selection on each custom calendar's drop-down menu can be used to push this synchronization:
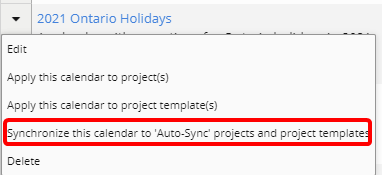
When this option is selected, a window will appear. This window allows administrators to synchronize the calendar with the Project / Project Template Work Plans that have been configured to auto-sync with it:
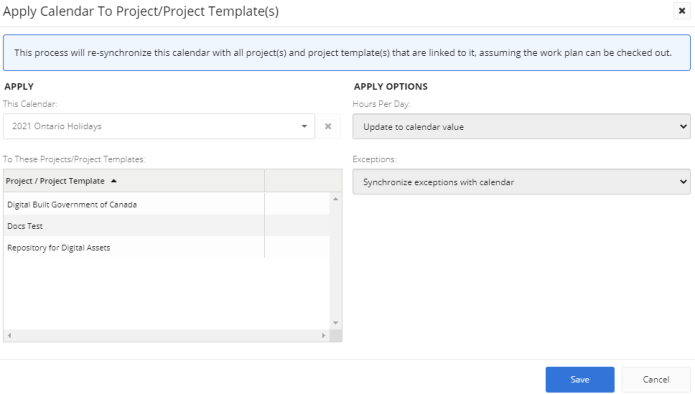
Note that none of the fields in this window are editable. This window cannot be used to add any Projects / Project Templates to the synchronization; Projects / Project Templates must already be configured to "Auto-sync..." to the calendar.
After clicking the Save button, the calendar will synchronize with all current Work Plans of the attached Projects / Project Templates. A "Results" window will appear to notify you of all the successful synchronizations, failures, and conflicts:

Benefit:
Prior to this release, Eclipse PPM users would have to open up each Work Plan and manually update the calendar if any changes had been made to the calendar from the Administration page. For example, a calendar with yearly holidays should probably be updated every year because many holidays do not always fall on the same calendar date. When this was the case, administrators would have to either edit the old calendar or create a new one, which required someone to update each Work Plan. Now that "auto-sync" can be configured, any changes made to a calendar can either be directly pushed onto Work Plans from attached Projects / Project Templates, or be automatically applied to Work Plans once they are opened. This will save time and resources, decrease the likelihood of errors, and ensure consistency across similar Project schedules.
What's Different:
Eclipse PPM managers can now impersonate Resources that directly report to them on the Kanban view of a Work Plan. This allows managers to both view and manage the Tasks assigned to their Resources.
On the top toolbar of the Kanban board, managers will see a new "Impersonate Resource" text box:
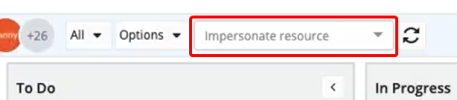
After selecting a Resource, managers will be able to both view and organize Tasks on behalf of the user.
Benefit:
Eclipse PPM Project Managers will often benefit from extra visibility into their Resource's Tasks. By impersonating as their Resources on a Kanban view, Project Managers will have a more detailed view of their Tasks and be able to reorganize them as they see fit.
Upland Analytics Enhancements
The following features have been added to the Upland Analytics application in Eclipse PPM. Click on any of the new features to learn more:
What's Different:
A new Data Source named Resource Roles has been exposed in Upland Analytics. This Data Source contains the Resource view and the new Resource Role Info view:
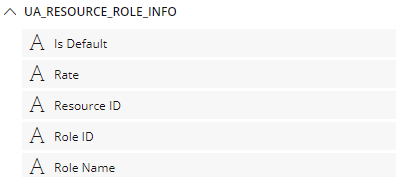
With this new view, report builders will be able to expose rates and roles per Resource in their reports.
Note: "Rates" are considered sensitive information in Eclipse PPM. Users will only have access to the "Rate" field from the Resource Role Info view if they have been given "Resource Administration" permissions on an Application Policy.
Benefit:
For the first time, report builders in Eclipse PPM can now construct reports that contain role information for Resources. This will be especially helpful while reviewing roles against rates across the Resource pool.
What's Different:
The Project Workplan data view in Upland Analytics (available on both the Project and the Project Work Plan Data Sources) has been updated to include four new fields:
-
Project Workplan Created By
-
Project Workplan Created Date
-
Project Workplan Modified By
-
Project Workplan Modified Date
Benefit:
Report builders now have the ability to attach Resource names to Work Plans in Eclipse PPM. Their reports can now display who created or last modified a Work Plan and when. In particular, many Eclipse PPM users have requested the ability to include the most recent Work Plan modifier as well as when it was modified.
What's Different:
The three permission-based data views in Upland Analytics have been hidden from report builders. The fields within these views can no longer be used to create or run reports in Upland Analytics.
These fields are as follows:
-
UA_User_Permissions_Projects
-
UA_User_Permissions_Programs
-
UA_User_Permissions_Resources
Caution: Running reports that contain fields from any of these views may cause errors or timeouts. Additionally, these fields may simply be labeled as "Unknown" if the report actually runs.
Eclipse PPM report builders that have used fields from these views should either amend their reports themselves or contact Eclipse PPM Support for assistance.
Benefit:
The permission-based data views should be used to restrict visibility of the report to specific users; they should not actually be used for data in reports.
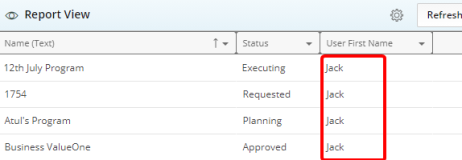
Example: Imagine that I am creating a report with the Program Issue List Data Source. My report will be a simple list of Programs and their Statuses: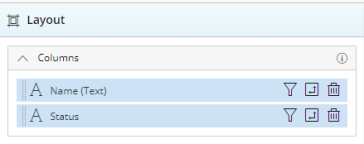
I can use fields from the "UA_User_Permissions_Programs" data view to restrict who can see my report. For instance, I can filter with the "User First Name" field to my report as a "Used but not reported on" field in order to restrict viewers by first name: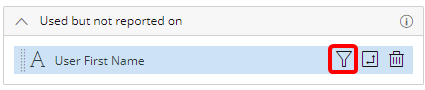
I can create a condition where every "User First Name" that tries to view the report must be "Jack":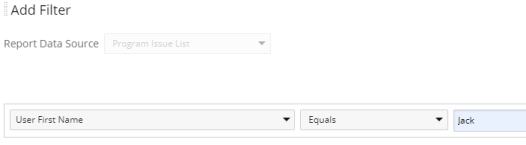
To test this field, I can simply click the Preview button on the "Report View" window. Because my first name is Jack, I can see my report: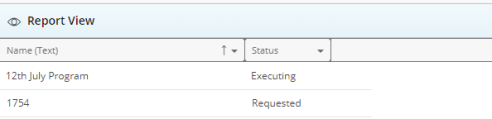
However, if I change the filter to only allow "User First Names" to equal "Joe," I will not be able to see the data once I click the Refresh button on the "Report View" window because my first name is not Joe: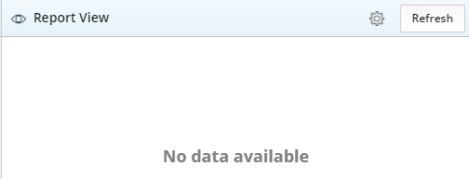
If "User First Name" is added as a column field instead, the report will retrieve data from the user viewing the report, which is not helpful: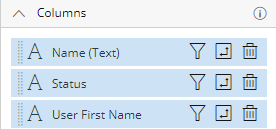
These fields became a problem because report builders would often use them to retrieve data when other fields outside of these views should have been used instead. For example, a report might contain the "User is Active" field from the "UA_User_Permissions_Projects" view instead of the "Status" field from the "UA_Resource" field. The "User is Active" permission field is not meant to be used for data in the report; it is checking to see whether or not the report viewer should be permitted to see the report. No inactive users will be filtered out of the report, meaning that the report builder will not receive the intended data. Because of confusion like this, these permission-based data views have been removed.
Customer-Driven Enhancements
The Eclipse PPM 2021R1 Release features the following enhancements based on customer requests. Click on any of the enhancements to learn more:
What's Different:
Ten new Financial Indicators can now be attached to Project through the Project Configuration page. All of these new indicators display information related to the "Current Year":
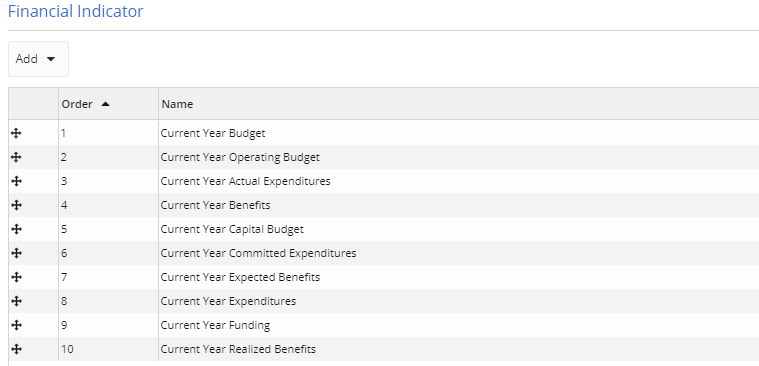
These ten Financial Indicators are new to Eclipse PPM.
The new "Current Year" Financial Indicators can be used across multiple components of Eclipse PPM, including Financial Plans, Dashboards, Project Filters, and Reports.
Benefit:
Many Eclipse PPM users base their financial strategies and goals by the calendar year. When this is the case, "Current Year" Financial Indicators become extremely useful on Projects. For example, an organization might be interested in forecasting a Project budget based on the calendar year. Using the "Current Year Expenditures" indicator along with the "Current Year Budget" indicator, users can create a Report that compares the amount spent on a Project over the calendar year with the forecasted budget of the calendar year. Also, certain organizations might wish to use "Current Year" Financial Indicators to differentiate between small- and large-scale Projects. For example, a Project Filter named "Small-Scale Projects" could be created to include Projects with a "Current Year Funding" that is "< $100,000."
What's Different:
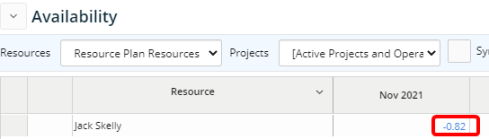
The "Effort Details" window in the Resource Management tool has been updated to include information at the Task level as well as the Project level.
Users can access the "Effort Details" window by clicking on a user's availability in the "Availability" tab at the bottom of the page:
Prior to this release, the "Effort Details" window only displayed rows for Project-level information under the Resource row:
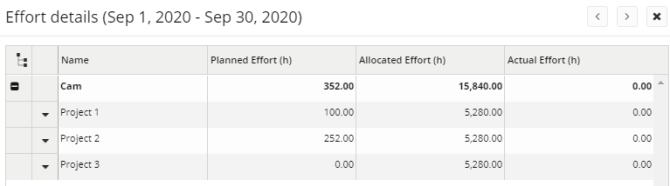
With this update, the "Effort Details" window will now display rows for Task-level information under the Project rows:
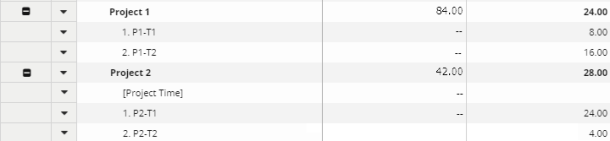
Note: Tasks are not included in "Planned Effort," so the Task-level rows under the "Planned Effort" column will always display "--".
Benefit:
When reviewing Resource availability, it's helpful to know details about specific assignments instead of the total value. Prior to this release, Resource Managers could only see Project-specific assignments in the "Effort Details" window, but now they can see Task-specific assignment as well. This provides further insight into how the availability is calculated, improving Resource planning across the Portfolio.
What's Different:
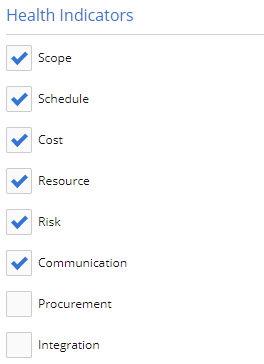
Eclipse PPM users can now determine the order of Health Indicators on a Project Home page. They can be reordered from the Configuration page at four levels: Project, Project Template, Program, and Program Template.
Prior to this release, Health Indicators could not be reordered from the Configuration page. Instead, the page contained a simple checklist with all of the available Health Indicators:
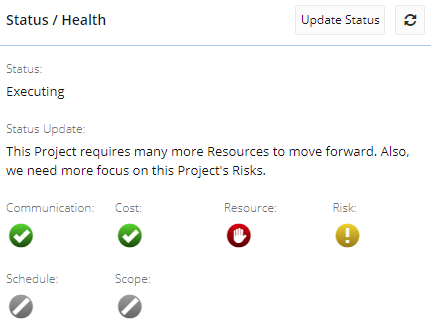
The Health Indicators would always appear in alphabetical order within the "Status / Health" panel on the Project's Home page:
With this update, the "Health Indicators" section of the Configuration page contains an ordering table, similar to the "Project Properties," "Task Properties," and "Financial Indicators" sections:
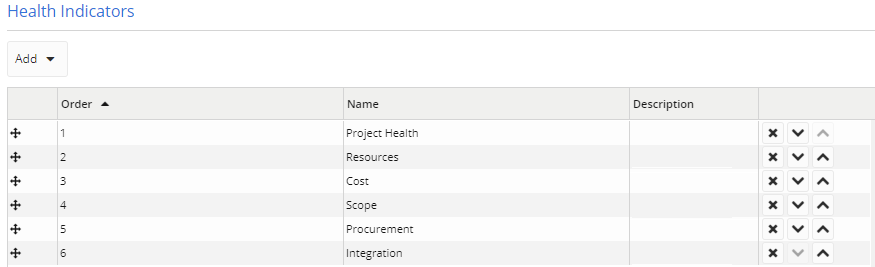
Instead of checking off which Health Indicators to include, users can add them from the "Add" drop-down menu. Once they have been added, users can reorder them either by dragging and dropping them with the Directional icon ( ) or moving them up or down the list with the Up and Down icons (
 or
or  ).
).
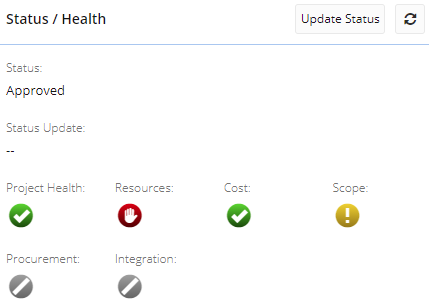
The Health Indicators will show up on the Project Home page in the same order they were set on the Configuration page:
Benefit:
In many instances, Project teams value certain Health Indicators more than others. When this is the case, the most important indicators should be first in the "Status / Health" window of the Project's Home page. For example, a Project Team might be mostly interested in the overall "Project Health," so they need to visually navigate to it each time they want to view its status. Administrators would often add a number at the beginning of a Health Indicator name to workaround this, but this strategy does not work if different Project Teams value other Health Indicators (for example, another team might care more about "Cost" than "Project Health"). Now that Health Indicators can be ordered, Project teams can prioritize whichever indicators they wish.
What's Different:
The Custom Task Properties that were introduced to Eclipse PPM in the 2021R1 release can now be updated in bulk from the Tasks page.
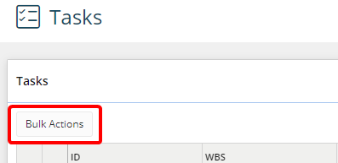
Users can update their Custom Task Properties in bulk through the Bulk Actions button at the top of the Tasks list:
From here, users can select Update task from the "More Actions" drop-down menu:
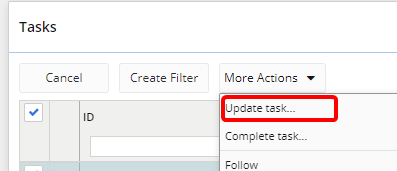
Note: The Update task selection will remain unclickable until the checkbox of at least one Task from the list is selected.
Prior to this release, the "Update Field" drop-down menu from the "Update Tasks" window only contained two fields to update: Percent Complete and Task Category:
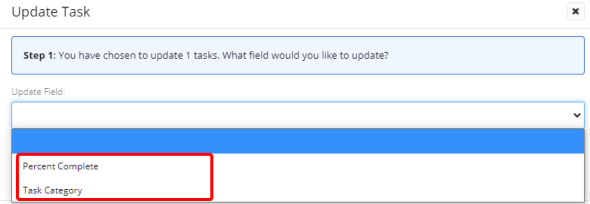
With this update, the "Update Field" drop-down menu now contains all of the available Custom Task Properties, along with those two original fields. Each Custom Task Property is prefixed by "Property -":
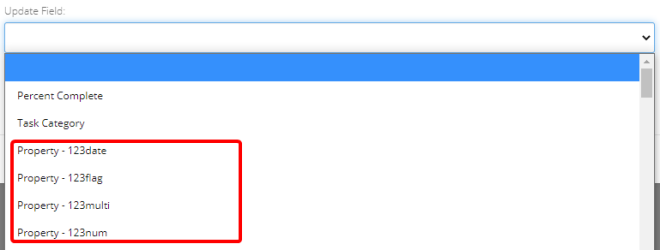
Once a property is chosen, users can indicate a new value for the property and click the Save button to push that value to all of the selected Tasks.
For "Multiple Select" Task Properties, users have two choices for pushing new values:
-
Merge existing selections with these items: The selected values will be added on top of the current values of the selected Tasks.
-
Replace existing selections with these items: The selected values will erase the current values of the Task and replace them.
Note: Bulk updates will only apply to Tasks that have the property attached to them. It will not add the property to any Tasks.
Benefit:
Custom Task Properties were originally introduced to classify Tasks and provide information about them. By including these properties in a bulk update, Eclipse PPM users will no longer have to manually edit the values of each Task Property, which will save time and prevent user errors.
What's Different:
The "Resources" panel on the Project / Program Home page has been updated to include a column for "Contact Info."
Prior to this release, the "Resources" panel only included an "Email" column that displayed a user's email address:
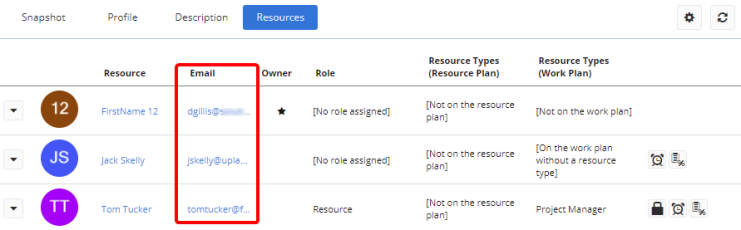
With this update, the "Email" column has been replaced with a "Contact Info" column. This new column includes (if available) the Resource's email address, phone number, and phone extension:
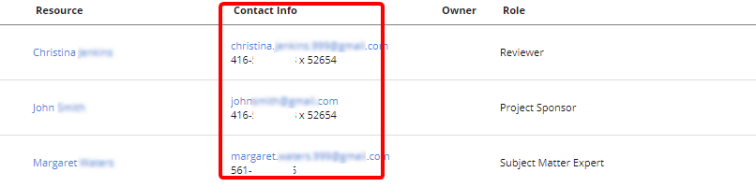
Benefit:
Although displaying the Resource email addresses was useful, email is not always the most helpful piece of contact information. For example, if Eclipse PPM users needed to contact a Resource urgently, they would have to go to the Resource's profile to find a phone number. This defeats the purpose of the "Resources" panel, which is supposed to serve as a quick reference for Resource information. With this update, Eclipse PPM users no longer have to navigate to Resource profiles in order to reach them by phone.
What's Different:
A new GET API endpoint has been developed to return a list of Project Templates and their basic information:

The retrieved attributes can be seen in the Response body after executing the endpoint in Swagger:
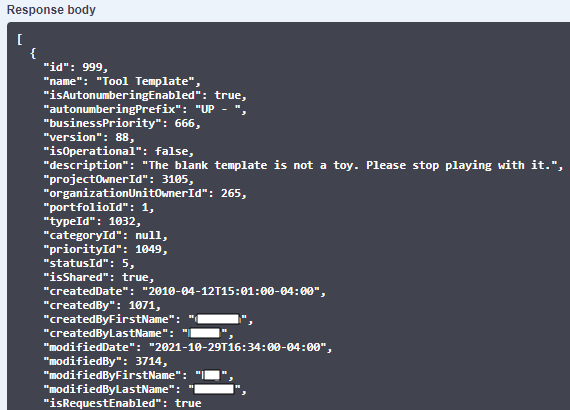
See the API help for more information on working with the Eclipse PPM API.
Benefit:
Prior to this release, there was no to retrieve that basic information of a Project Template. With this API update, developers will be able to access and manipulate this data outside of Eclipse PPM.
What's Different:
A timestamp will now be included along with the date in both the "Created Date" and "Modified Date" columns of an Adhoc Report.
Timestamps always been included in both of these columns when viewing an Adhoc Report from the Eclipse PPM user interface:
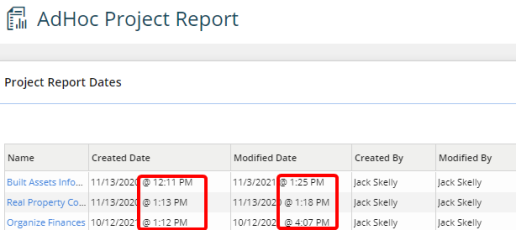
Prior to this release, however, the timestamps would not appear alongside the dates once the report was exported to a CSV:

With this update, the CSV export for Adhoc Reports has been upgraded to include the timestamps from the Eclipse PPM user interface:

These timestamps will be included in all six types of Adhoc Reports (Projects, Resources, Risks, Issues, Tasks, and Notes).
Benefit:
Including timestamps alongside dates in exported Adhoc Reports provides additional detail and prevents users from having to refer to the Eclipse PPM Adhoc Reports list. For example, imagine an Eclipse PPM user views a Project Adhoc report. This user is not sure whether or not another user modified the Project earlier that day. If there is no timestamp in the "Modified Date" column (as well as no "Modified By" column, for the purpose of this example), this user cannot be sure that her modifications were the most recent. If the exported report contained a timestamp, however, this user would see that the last modification was made around 12:30 PM, which is when she made her changes.