Project Template Configuration
Configuration allows you to apply functional details to a Project Template. Configuration options can be found under the Template Menu of a Project Template page:

Note: To edit the Identification and Classification details of a Project Template, see Add and Manage Project Templates.
To configure a Project Template:
-
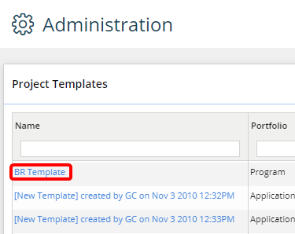
Select Project from the "Templates" menu of the "Administration" page:

Click to enlarge.
-
Select a Project Template from the list to edit:
-
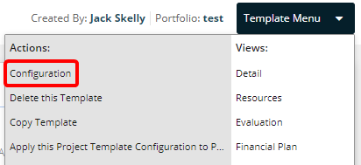
Open up the Template Menu.
-
Select Configuration:
-
Edit the Configuration details to your liking:
-
Health Indicators: Check the boxes of the Health Indicators that you would like to include on Projects created from the template.
-
Work Plan Settings: Check the appropriate boxes to apply the default Work Plan Settings for Projects created from the template.
-
Use the 'Adjust task duration when resource allocation is changed' option: Select the "Enable the option inside the task popup" checkbox to include the "Adjust task duration when resource allocation is changed" option within every task popup (which appears whenever you click on a task) on each Project created with the template. Select the "Automatically select the option on new tasks" to select this checkbox by default on each new task created for the Projects.
Note: When "Adjust task duration when resource allocation is changed" is selected, the duration of the task will automatically change based on any changes in resource allocation. For example, imagine that Jack has allocated 100% of his effort towards a task that has a duration of 20 days. Now, imagine that his allocation gets split in half (he will only spend 50% instead of 100%):

Presumably, it will take twice as long to complete the task if Jack is only allocating half the time he originally planned to. So if the checkbox has been selected, the task duration will automatically adjust itself to 40 days instead of 20:
-
Use the 'Adjust assignment units when duration is changed (fix work)' option: Select the "Enable the option inside the task popup" checkbox to include the "Adjust assignment units when duration is changed (fix work)" option within every task popup (which appears whenever you click on a task) on each Project created with the template. Select the "Automatically select the option on new tasks" to select this checkbox by default on each new task created for the Projects.
Note: When "Adjust assignment units when duration is changed (fix work)" is selected, the resource allocation percentages will automatically change based on any changes made to the Planned Duration of the task. For example, imagine that Jack has allocated 100% of his effort towards a task that has a Planned Duration of 20 days. Now, imagine that the Planned Duration of the task gets extended from 20 days to 40 days:
If Jack now has twice as long to complete the task, he presumably only needs to allocate half of the effort that he originally planned. So if the checkbox is selected, his allocated effort will automatically adjust itself from 100% to 50%:
-
-
Time Entry Settings: Check the appropriate boxes to indicate how time entry will work for Projects created from the template.
-
Enable Time Entry against this project: Select this checkbox to allow Resources to enter time towards Projects created from this template on their Timesheets.
Note: Deselecting this checkbox will "grey-out" the rest of the Time Entry Settings, leaving them uneditable.
-
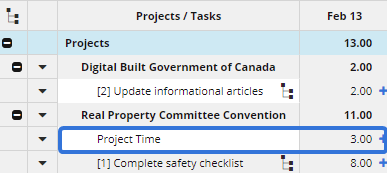
Allow Time Entry at the project level: Select this checkbox to allow Resources to enter general time towards Projects created from this template. This "Project Level" time will not be associated with any Tasks on the Project.
Note: Selecting this checkbox will add a "Project Time" row under the Project on a Timesheet:
-
Allow Time Entry once the project is closed: Select this checkbox to allow Resources to enter time towards Projects created from this template even after the Projects have been given a "Non-Active" status type.
-
Restrict Time Entry only to the following: Select the checkboxes to only allow Resources to enter time for the selected entities on Projects created from the template: Summary Tasks and / or Milestones.
Note: Summary Tasks are essentially "parent" Tasks that are only completed when their "child" Tasks are complete. If this checkbox is selected, only top-level Summary Tasks will be included on a Resource's Timesheet. Even if a "child" Task has children of its own, it will not count as a Summary Task.
Note: Selecting both checkboxes will only allow Resources to enter time for both entities and nothing else.
-
Enforce Timesheet Approval for: Use the drop-down menu to define which Resources must enter time on Projects created with the template:
-
No Resources: No Resources need to enter time for Projects created with the template.
-
Full-time Resources: Only Full-Time Resources need to enter time for Projects created with the template.
Note: A Resource can be marked as "Full-Time" during creation or editing.
-
Variable Resources: Only Variable Resources (not "Full-Time") need to enter time for Projects created with the template.
Note: A Resource can be marked as not "Full-Time" during creation or editing.
-
All Resources: All Resources need to enter time for Projects created with the template.
-
-
Approver: User the drop-down menu to define who is responsible for approving time entries on Projects created with the template.
-
[Add a resource by typing here]: Type the name of a Resource into the drop-down menu to choose a Resource as the time entry approver.
-
@DirectManager: The Resource's direct manager will be responsible for approving time entries for the Project.
-
@ProjectOwner: The Project's owner will be responsible for approving time entries for the Project.
-
-
Override resource-level approval settings: Select this checkbox if you would like the "Approver" in the field above to override the Resources' "Time Entry Approver" settings, which can be chosen while creation or editing a the Resource.
-
Timesheet Notes: Use the drop-down menu to determine whether or not Timesheet Notes are necessary during Time Entry. Resources will be blocked from submitting time on Projects with Note requirements if they do not include the necessary Notes:

-
Not Required: Notes will not be required on time entries.
-
Notes are required per day: Timesheet notes must be entered daily.
-
Notes are required per week: Timesheet notes must be entered weekly.
-
Notes are required per week per task: Timesheet notes must be entered weekly; each Task must have its own note.
-
Notes are required per week per project: Timesheet notes must be entered weekly; each Project must have its own note.
-
-
-
Documents: Check the appropriate boxes to allow each document type for Projects created from the template. Documents can then be managed from the Project Document page.
Note: If no checkboxes are selected, no documents can be added to the Projects. The following message will appear on the Project Document page:

-
External Documents: Select this checkbox to enable external documents to be uploaded to Projects.
-
Eclipse Docs: Select this checkbox to enable Eclipse Docs to be attached to Projects.
-
Google Drive: Select this checkbox to enable Google Drive documents to be attached to Projects.
Note: A Google Drive integration must be set up in order to take advantage of this feature. Speak to your Eclipse PPM administrator if you are interested.
-
-
Financial Worksheet Settings: Use these fields and checkboxes to determine the Financial Plan settings of Projects created with the template:
-
Time Scale: Use this drop-down menu to determine the time periods of the Projects' Financial Plan View:
-
Year: Displays the Financial Worksheet View by annual periods:

-
Month: Displays the Financial Worksheet View by monthly periods:

-
-
Budget Details: Use this drop-down menu to determine whether or not Budget Category items should be displayed on the Projects' Financial Plan View:
Note: Eclipse PPM administrators can configure Budget Categories from the Admin page.
-
Category: Only Budget Categories will be displayed under the "Budget" section of the Financial Plan view.
-
Category and Items: Both Budget Categories and their items will be displayed under the "Budget" section of the Financial Plan view.
-
-
Include these financial areas: Select the checkboxes of the Financial Areas (Funding, Expenditure, and Benefits) that you would like to include on the Financial Plan view.
Note: The Budget checkbox is greyed-out; it cannot be deselected.
-
Expenditures: Select the "Use manual reconciliation on this project" checkbox to disable the Reconcile Committed function on Financial Plans of Projects created with the template. This will cause users to have to manually update "Committed" expenditures after entering "Actual" expenditures.
-
Fulltime Resources: Use the checkboxes to define how Fulltime Resources will appear on the Financial Plan of Projects created with this template.
-
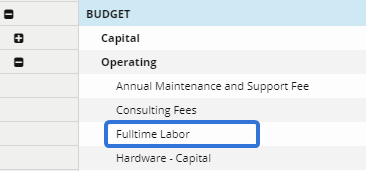
Include Category: Select the checkbox to include a Labor Category to represent Fulltime Resources under "Operating" Budget costs. If you decide to select the checkbox, use the drop-down menu to identify which Labor Category will represent Fulltime Resources.
Note: Selecting this checkbox will include the category under "Operating" section of the Budget on the Financial Plan:
-
Calculate budget using allocated effort: If this checkbox is selected, the Fulltime Resources budget will be calculated based on the Allocated Time and Rates of Fulltime Resources on the Project. Whenever Fulltime Resource hours are allocated towards a Project, the costs will appear in the "Fulltime Labor" Budget line item.
-
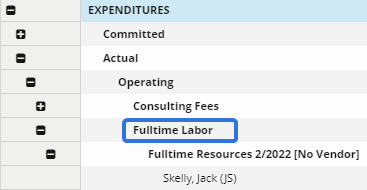
Calculate actuals using time entries: If this checkbox is selected, the Fulltime Resources actuals will be calculated based on timesheet entries and Rates of Fulltime Resources towards the Project. Once Fulltime Resources enter time towards the Project, a "Fulltime Resources" line item will be added to the "Actuals" section of the Expenditures on the Financial Plan:
-
-
Variable Resources: Use the checkboxes to define how Variable Resources will appear on the Financial Plan of Projects created with this template.
-
Include Category: Select the checkbox to include a Labor Category to represent Variable Resources under "Operating" Budget costs. If you decide to select the checkbox, use the drop-down menu to identify which Labor Category will represent Variable Resources.
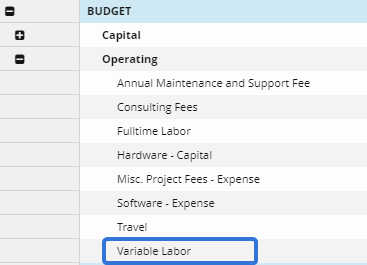
Note: Selecting this checkbox will include the category under "Operating" section of the Budget on the Financial Plan:
-
Calculate budget using allocated effort: If this checkbox is selected, the "Variable Resources" budget will be calculated based on the Allocated Time and Rates of Variable Resources on the Project. Whenever Variable Resource hours are allocated towards a Project, the costs will appear in the "Variable Labor" Budget line item.
-
Calculate actuals using time entries: If this checkbox is selected, the "Variable Resources" actuals will be calculated based on timesheet entries and Rates of Variable Resources towards the Project. Once Variable Resources enter time towards the Project, a "Variable Resources" line item will be added to the "Actuals" section of the Expenditures on the Financial Plan.
-
-
-
Project Properties: Use the grid to determine which Project Properties will be automatically included on Projects created with this template. For more information on handling Project Properties, see Add and Manage Project Properties.
-
Task Properties: Use the grid to determine which Task Properties will be automatically included on Projects created with this template. For more information on handling Task Properties, see Add and Manage Project Task Properties.
-
Financial Indicator: Use the grid to determine which Financial Indicators will be automatically included on Projects created with this template. For more information on handling Financial Indicators, see Add and Manage Financial Indicators.
-
Workflow: Use the drop-down menus to determine how Project Statuses / schedule changes will work on Projects created with this template through the use of an automated approval workflow. For more information on handling Workflow, see Managing Workflow.
-
Visible Areas: Use the checkboxes to select which items will appear on the Home pages of Projects created with this template.
-
Evaluation: Use the checkboxes to select which criteria will be included on the Evaluation page of Projects created with this template. For more information, see Project Evaluation.
-
-
Select the Save button.
After clicking Save, your Configuration changes will be applied to any new Projects created with the template.