2023R1.0 - New Features
Below is a summary of the new additions to PowerSteering in the 2023R1.0 release. PowerSteering 2023R1.0 will be deployed to staging on March 29th, 2023 and deployed to production on April 16th, 2023. When this happens, the listed features will become available.
Note: This page will be updated as new functionality becomes available.
The following areas of PowerSteering have been upgraded as part of the 2023R1.0 release:
For more information on this upgrade, click here to watch the 2022R1.2 "What's New Webinar".
Agents
The following improvement has been made to PowerSteering Agents. Click on the upgrade to learn more about it:
What's Different:
PowerSteering administrators can now determine whether the Signup Reminder Agent deletes new user profiles or converts them into "No-Access" users after the grace period expires without the invited user creating a profile.
Prior to this release, the end of the grace period resulted in the new user profile being deleted. If the user did not accept the invitation before the end of the grace period, the user profile would cease to exist. There was no way for administrators to configure this while editing the "Remind New Users" Signup Reminder Agent task:
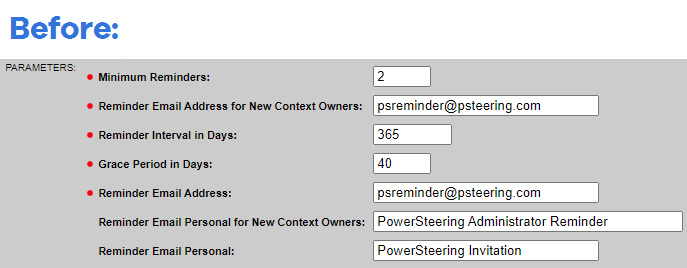
With this update, a new "Grace Period Expiry Action" parameter has been added:
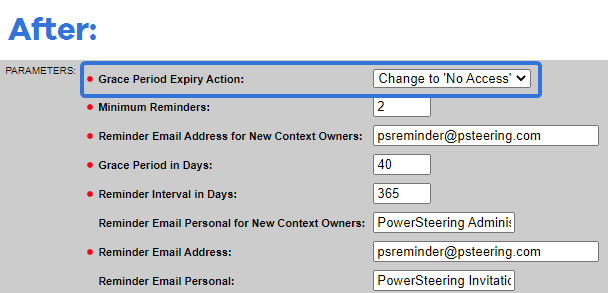
This parameter allows administrators to determine what happens to the new user profile if the invitation is not accepted before the end of the grace period.
Two options are available from the drop-down menu:

-
Change to 'No Access': The new user profile will convert into a 'No Access' user if the invitation is not accepted within the grace period.
-
Delete User: The new user profile will be deleted from PowerSteering if the invitation is not accepted within the grace period (same behavior from before this upgrade).
Benefit:
Prior to this update, users who did not accept their invitations would automatically have their user profiles deleted after the grace period expired. This would often cause extra work for administrators whenever new users forgot to accept their invitations; the administrator would have to recreate their profiles from scratch before re-inviting them to PowerSteering. With this update, administrators can set the Grace Period Expiry Action to "Change to No Access" instead. This way, they will only need to convert the user from a "No-Access" user to a PowerSteering user.
Tip: This can easily be done by deselecting the "No-Access User" checkbox while editing the user's profile: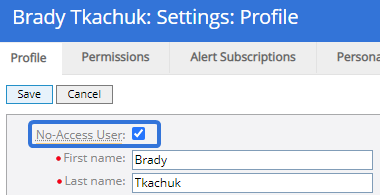
After filling all of the required fields and selecting Save, the user will once again be given access to PowerSteering.
API
The following improvement has been made to the PowerSteering API. Click on the upgrade to learn more about it:
What's Different:
A new API endpoint has been added to PowerSteering's REST API. This PUT endpoint can be used to update the work types that belong to a Portfolio.
The endpoint is as follows:
PUT <http://<host>/<context>/rest/portfolioservice/v1/portfolio/<portfolio id>>
Content-type: application/xml or application/json
Basic Auth
This endpoint can be used to add or remove work types to or from a PowerSteering Portfolio.
Example: Take a look at the following request body: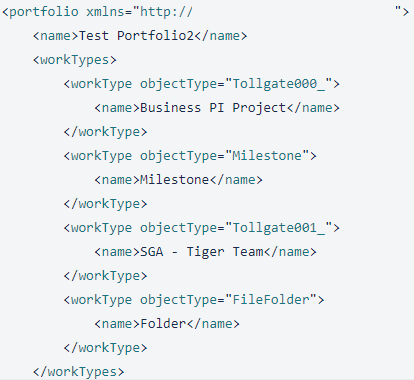
Any of the listed work types between the <workTypes> tags will be reflected in PowerSteering. For instance, imagine the "SGA - Tiger Team" work type did not originally belong to the Portfolio. Once this call is made, the "SGA - Tiger Team" work type will be listed under the Portfolio's Work Types within PowerSteering.
Similarly, if one of the work types is removed from the list in the request body, it will be removed from the Portfolio in PowerSteering.
Note: Only the onbject type ID is required in the body to successfully add or remove work types from the Portfolio:
The name of the work type (within the <name> tags) is not necessary.
Benefit:
The API allows third party platforms, applications, and systems to connect and share information with PowerSteering and vice versa. This new API endpoint makes it possible for users to update their Portfolios from these platforms. This reflects PowerSteering's commitment to becoming as integrative as possible.
Conditions
The following improvement has been made to Conditions in PowerSteering. Click on the upgrade to learn more about it:
What's Different:
PowerSteering administrators can now sort and filter the Pre-Advance, Post-Advance, and Associations tables by any columns they choose.
Prior to this release, none of the tables on the Conditions pages had sort or filter options. For example, administrators would not be able to sort or filter any of the Pre-Advance Conditions:

Notice how none of the table's column headers contained the downwards arrow ( ) that is used to open up the sort / filter windows.
With this update, these arrows can now be found on every column header in the table:

Selecting one of the arrows allows the administrator to sort the list items in ascending or descending order by the chosen column's values. It also allows them to filter out certain list items based on column values:
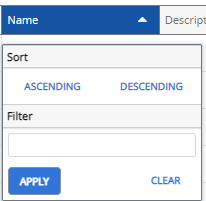
Sorting
Selecting Ascending will order the Conditions in alphabetical or chronological order by the column header's values. Selecting Descending will order the Conditions in reverse alphabetical or chronological order by the column header's values.
Columns that have been sorted in ascending order will display an upwards arrow in the column header:
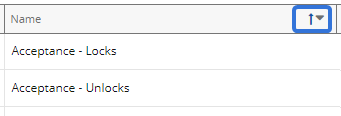
Columns that have been sorted in descending order will display a downwards arrow in the column header:

Filtering
Almost all of the filter windows on the Conditions pages feature "Textfield" style filters. These areas feature a textfield that users can enter text into. Grid items with column values that contain any of the entered text will be displayed in the grid.
Example: Imagine typing "jack" into the filter textfield on the "Last Editor" column header: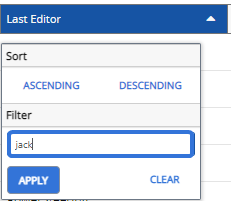
Selecting the Apply button will filter out all listed items that do not contain "jack" within the "Last Editor" value:
Notice the filter icon (![]() ) in the "Last Editor" column header. This indicates that a filter has been applied.
) in the "Last Editor" column header. This indicates that a filter has been applied.
Note: Values that contain any of the text characters in order will be included in the filter. For example, a grid item with "Jack Skelly" as the "Last Editor" will be displayed in the grid if "jack" is entered into the textfield because "jack" can be found in "Jack Skelly". Even if "a" is simply entered into the textfield, the grid item will still appear because "a" can be found in "Jack Skelly". However, entering "ak" into the textfield will not include the grid item with "Jack Skelly" as the "Last Editor" because "a" and "k" cannot be found together within the value.
The only column that does not use a textfield filter is the "Last Updated" column. Instead, it uses a "Date" style filter. This filter window features both a drop-down menu and a date field. The drop-down menu allows users to select either "before", "equals", or "after" and the date field allows users to select a date. Only grid items that contain "Last Updated" values with a date that meets the requirements will be displayed:
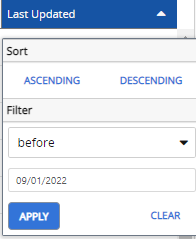
Example: In the image above "before" has been selected from the drop-down menu and "09/01/2022" has been selected from the date field. After selecting the Apply button, only list items with a "Last Updated" date that occurred before September 1st, 2022 will be included in the table: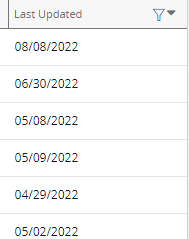
Notice the filter icon (![]() ) in the "Last Updated" column header. This indicates that a filter has been applied.
) in the "Last Updated" column header. This indicates that a filter has been applied.
Benefit:
As the new Conditions page becomes more popular, the number of Pre-Advance Conditions, Post-Advance Conditions, and Associations will begin to pile up. This will make it more difficult for administrators to navigate to the conditions that they would like to edit. By filtering and / or sorting the tables on the Conditions page, administrators can now save themselves from having to tediously scroll through the grids to find their desired conditions.
Data Grids
The following improvement has been made to PowerSteering Data Grids. Click on the upgrade to learn more about it:
What's Different:
Filters can now be added to Tag and Custom Field columns on PowerSteering Data Grids.
Prior to this release, users could only sort their Data Grids by Tag and Custom Field values. After selecting the downwards arrow ( ) on a Tag or Custom Field column header, a window would appear with sorting options. For example, take a look at this "Business Area" Tag on a Data Grid before this release:
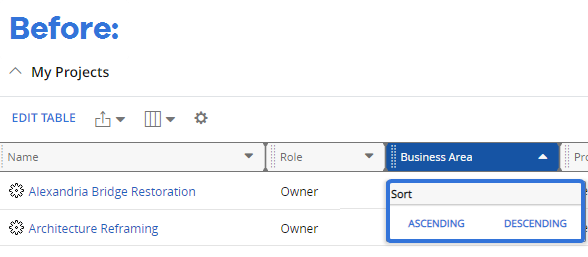
Although users could sort the grid by Tag / Custom Field values, they could not add any filters.
With this update, users can now use Tag / Custom Field columns to apply a filter to the Data Grid. After selecting the drop-down arrow ( ), the window will now display filter options as well as sorting options:
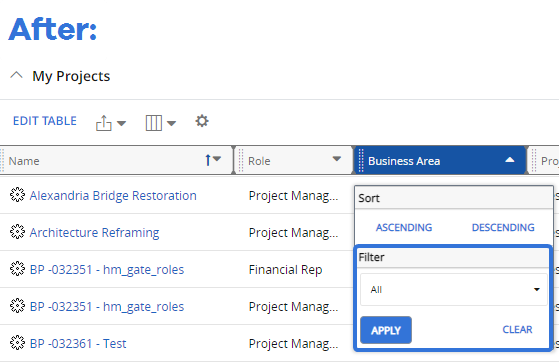
In the case of the "Business Area" Tag, users can open up the "Filter" drop-down menu and select the "Business Intelligence" and "Invoicing" Tag values:
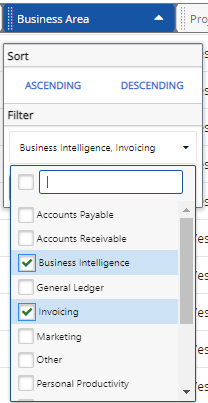
After selecting the Apply button, only grid items that contain the "Business Intelligence" and "Invoicing" Tag values will be displayed. Grid items without these values will be filtered out:
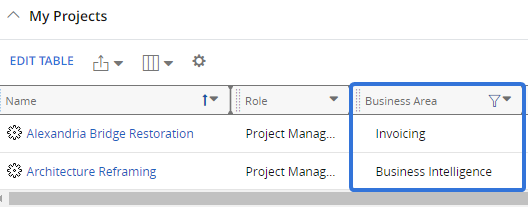
Tip: The "Filter" drop-down menu will often get in the way of the Apply button. Make sure to close the drop-down menu and then select the Apply button after selecting your Tag / Custom Field values:
Click thumbnail to play.
Clicking outside of the window will close it without saving any of your sorting or filtering preferences.
Note: The filter icon (![]() ) in a column header indicates that a filter has been applied to the column:
) in a column header indicates that a filter has been applied to the column:
Remember that PowerSteering will remember user preferences on Data Grids. If a user filters or sorts a grid by a column, the sorting / filtering options will remain on the grid even after the user navigates away from the page and returns. The only way to get rid of a filter is to select the filter icon (![]() ) in the column header and select the Clear button.
) in the column header and select the Clear button.
Tag / Custom Field columns on Data Grids will feature one of the following filters:
-
Multiple select (same as above): Selecting the "Filter" drop-down menu allows users to select as many Tag / Custom Field values as they like. Only grid items that contain Tags / Custom Fields with any of the selected values will be displayed after the filter is applied:

Note: All Tag columns will feature a multiple select filter. "Menu" and "Checkboxes" Custom Field types will also feature a multiple select filter.
Tip: The "Filter" drop-down menu will often get in the way of the Apply button. Make sure to close the drop-down menu and then select the Apply button after selecting your Tag / Custom Field values:

Click thumbnail to play.
Clicking outside of the window will close it without saving any of your sorting or filtering preferences. -
Date: The "Filter" area features a drop-down menu and a date field. The drop-down menu allows users to select either "before", "equals", or "after" and the date field allows users to select a date. Only grid items that contain Custom Fields with a date that meets the requirements will be displayed:
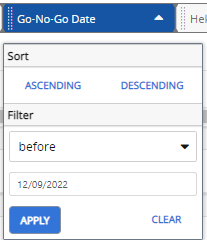
In this example, only grid items with a "Go-No-Go Date" that occurs before December 9th, 2022 will be included in the filtered results.
Note: "Date" Custom Field types will feature the date filter.
Note: If the Custom Field date is equal to the date on the filter and the drop-down menu is set to either "before" or "after", the date will not be accepted. In the example above, grid items with a "Go-No-Go Date" of 12/09/2022 will not be included in the grid because "before" as been selected.
-
Yes/No: The filter allows users to choose either "Yes" or "No". Only grid items that contain Custom Fields with the selected value (either "Yes" or "No") will be displayed in the grid:
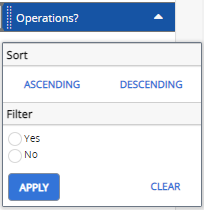
Note: "Yes/No" Custom Field types will feature the Yes/No filter.
-
Number: The "Filter" area features a drop-down menu and a number field. The drop-down menu allows users to select either "< (less than)", "= (equals)", or "> (greater than)" and the number field allows users to enter a number. Only grid items that contain the Custom Field with a number that meets the requirements will be displayed:
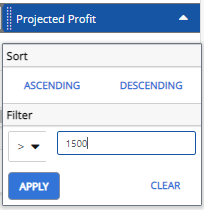
In this example, only grid items with a "Projected Profit" that is greater than 1500 will be displayed in the grid.
Note: "Number", "Percentage", and "Monetary" Custom Field types will feature the Number filter.
-
Textfield: The "Filter" area features a textfield that users can enter text into. Grid items with Custom Field values that contain any of the entered text will be displayed in the grid:
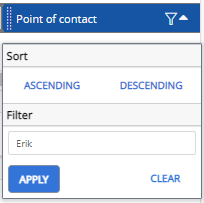
In this example, only grid items with a "Point of contact" that contains "Erik" will be displayed in the grid.
Note: "Textfield" and "URL" Custom Field types will feature the Textfield filter.
Note: Custom Field values that contain any of the text characters in order will be included in the filter. For example, a grid item with "Erik Brannstrom" as the "Point of contact" will be displayed in the grid if "Erik" is entered into the textfield because "Erik" can be found in "Erik Brannstrom". Even if "e" is simply entered into the textfield, the grid item will still appear because "e" can be found in "Erik Brannstrom". However, entering "em" into the textfield will not include the grid item with an "Erik Brannstrom" point of contact because "e" and "m" cannot be found together within the value.
Benefit:
PowerSteering Data Grids can be cumbersome; many of them contain more listed items than a user would like to see at once. Being able to filter grids by Tag / Custom Field values allows users to simplify their view by only displaying grid items that are relevant to what they are currently interested in.
Example: Rhea is currently viewing her "My Ideas" Data Grid on her Home page. She is interested in reviewing her Ideas related to marketing, but she has plenty of Ideas that are all related to multiple business areas. Thankfully, a Tag named "Business Area" has been created for PowerSteering Ideas. Prior to this release, she would of had to sort the table by "Business Area" and then scroll all the way to the list items that had "Marketing" selected as a value for the Tag. With this release, however, she can simply filter the grid by the "Marketing" value, removing all of the clutter that she is not interested in.
Documents
The following improvement has been made to PowerSteering documents. Click on the upgrade to learn more about it:
What's Different:
Two new columns have been made available for the data grids of PowerSteering documents: "Completed" and "Completed By". Both of these columns can be added to the data grid through the "Select Columns" drop-down menu ( ):
):
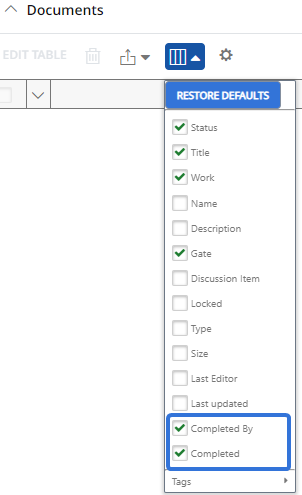
These new columns will display the following info:
-
Completed By: This column will display the name of the PowerSteering user that either completed or approved the document.
-
Completed: This column will display the date (mm/dd/yyyy) that the document was either completed or approved.
Note: Status names for finished documents (either "Completed" or "Approved") are dependent on the document's Approval Type. If the Approval Type is set to "No Approval", the document's status can be toggled between "Proposed" and "Completed". If the Approval Type is set to "Approval Required", the document will have an "Unapproved" status until it is approved by one of the specified approvers. The document will automatically be given an "Approved" status after this occurs. See Edit Document Details for more information on a document's Approval Type.
Although the new column names are "Completed By" and "Completed", approving a document will also count as completing it.
Benefit:
The "Completed" and "Completed By" columns allow PowerSteering users to access additional information about the document's history directly within the "Documents" data grid. Prior to this upgrade, users could not see any information related to a document's completion on the grid; they would have to view the "Document Status Change" table from a work item's "History" page. Users could add a "Last editor" or a "Last Updated" column to their "Documents" grid, but these columns record any edits made to the document's details; any edits made to the document would override the original completion / approval.
With this release, users no longer need to navigate to the "History" page for this information; they can simply add these new columns to the "Documents" data grid.
Example: Christine is reviewing the "Documents" grids from one of her Projects when she realized that a particular Statement of Work document has an "Approved" status. As the Project Manager, she knows that this Statement of Work was not supposed to be reviewed for another week. She would like to see who approved the document in order to ask them if they may have approved it prematurely.
Prior to this release, she would have to go to the Project's "History" page to find out who this was. After this update, however, she can simply scroll to the "Completed By" column to see which PowerSteering user approved it.
Financial Review
The following improvements have been made to the Financial Review page in PowerSteering. Click on any of the upgrades to learn more about them:
What's Different:
A new version of the Financial Review page is available to PowerSteering users as part of this release.
Prior to this release, the Financial Review page reflected the legacy PowerSteering user interface:

With this update, users can select See the new Financial Review page above the top right-hand corner of the grid to access the new Financial Review interface. This new page resembles the current look of Metrics and PowerSteering Data Grids:
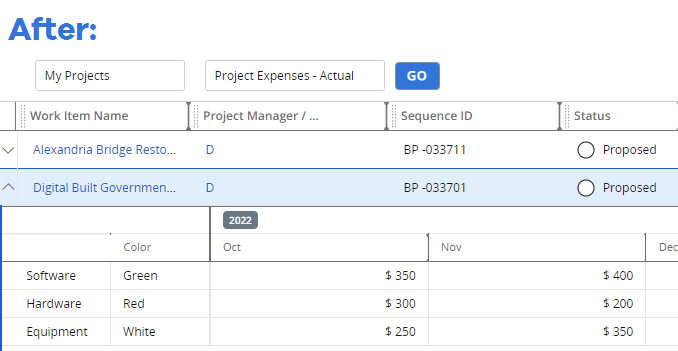
Similar to the legacy view, the drop-down menus at the top of the Financial Review page allow users to choose which Portfolio of Work Items will appear on the page and which Financial Review Layout will be applied to them:

Note: Only PowerSteering administrators can create Financial Review Layouts.
After selecting the Go button, a grid that lists all of the chosen Portfolio's Work Items will appear on the screen:

Note: PowerSteering administrators can determine which columns appear on the Work Item grid while creating or editing Financial Review Layouts: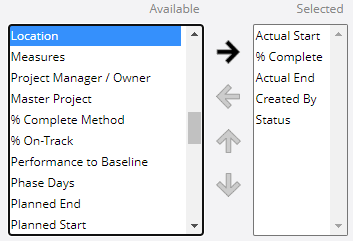
This "Column Selection & Ordering" portion is also new with this release. See "Add / Remove Columns to Financial Review Layouts" directly below for more information.
Selecting the downwards arrow ( ) next to one of the Work Items will reveal its financial information:
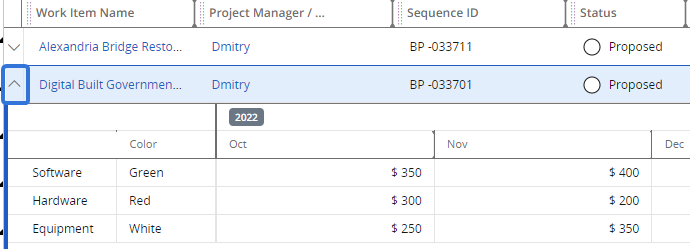
Note: PowerSteering administrators determine how Metric data is displayed and formatted while creating or editing Financial Review Layouts.
Users can enter "Edit Mode" on the Financial Review page by selecting the Edit Table button in the top right-hand corner of the Financial Review page:

Once in "Edit Mode", users can edit any of the numeric data under a Work Item, just like they would on a Metric:
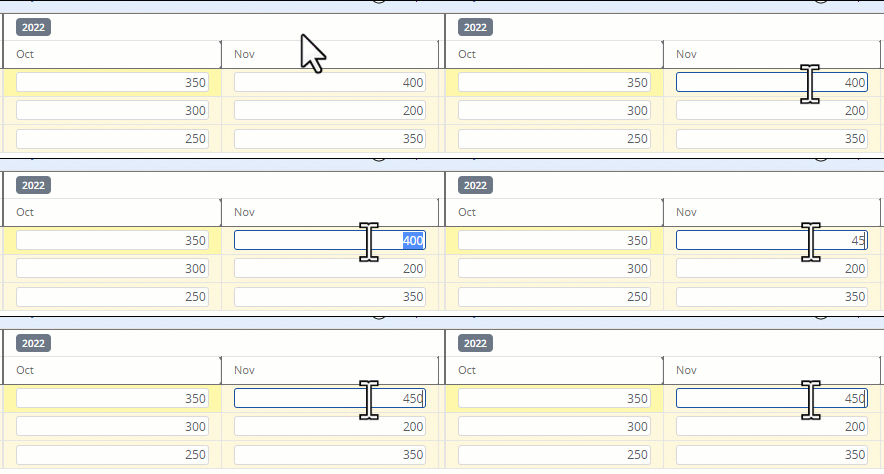
Tags and Custom Fields on line items can also be edited while in "Edit Mode":
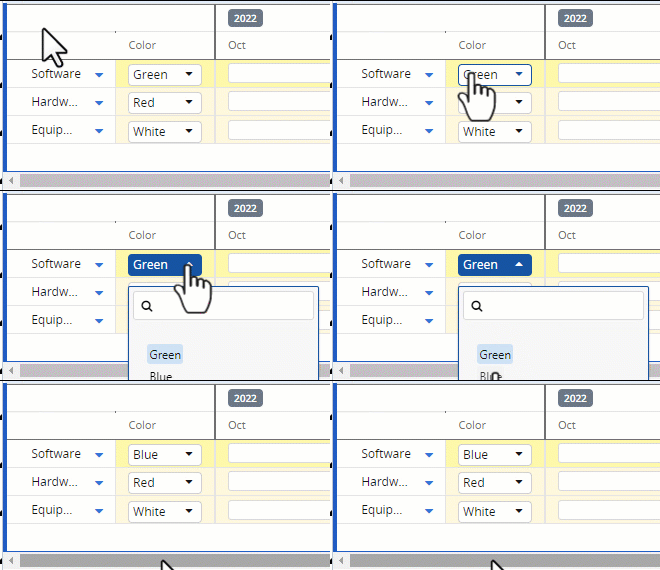
Note: Table cells with a white background and a lock icon have been locked from editing. Users will not be able to edit them until they are unlocked:
Also, cells with a gray background are totals, so they cannot be edited either:
PowerSteering administrators can configure how totals are displayed while creating or editing Financial Review Layouts.
Users can even copy Tag or Custom Field values from one line item to another by selecting the blue drop-down arrows ( ) next to the line item labels:
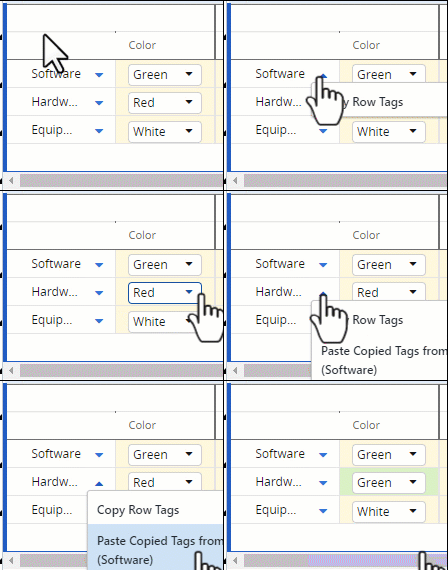
After making all of your desired changes, select the Save Changes button in the top right-hand corner of the screen to finalize them:

Once Save Changes is selected, the changes will be reflected on whichever Metric views were edited.
Tip: Users can make changes to more than one Work Item's financial grid before selecting the Save Changes button.
Benefit:
The new Financial Review interface is an improvement in both aesthetics and functionality.
First, the new look and feel of the page strongly resembles current PowerSteering Metrics. Prior to this upgrade, Financial Review layouts did not match Metric layouts very closely at all:

This made little sense because the Financial Review page is used to edit the same data as Metric pages. Users would essentially have to learn how to use two different types of Metric pages in order to take advantage of both features. This unnecessary confusion prevented many users from using the Financial Review page in the first place. Thankfully, this new page allows users to enter information just like they would in an actual Metric, which means they do not need to learn an entirely new interface to properly utilize the Financial Review.
Second, the new Financial Review page offers much more functionality that is not available on the legacy page. For example, PowerSteering administrators can also customize their Financial Review Layouts by adding / removing Work Item columns. While creating or editing Financial Review Layouts, administrators can add columns that will display information about the Work Items in the Portfolio (more info on this new feature below):

This gives users information about Work Items as they navigate through the Financial Review page, allowing them to make more informed decisions as they update the financial information.
Looking Forward:
In an upcoming release, Metric Lock will be introduced to the Financial Review page. Users will be able to place locks on the numeric data under a Work Item, just like they would on a Metric. The legacy Financial Review page only allows users to lock Metrics up to a certain date using the "Set Metric Lock" column:
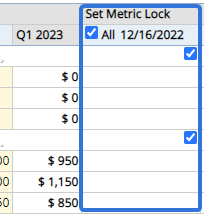
As a part of a future upgrade, Financial Review locking will match the current Metric Lock functionality, which means users will be able to lock line items as well as columns.
What's Different:
PowerSteering administrators can now customize which columns will appear on Financial Review Layouts while creating or editing them.
Prior to this release, the legacy Financial Review page would not display any columns that contained information about the listed work items. The page only displayed Metric information:

With this update, a brand new Financial Review page interface has been introduced (see "New Financial Review User Interface" above for more information). The new Financial Review table displays information on each listed work item included in the chosen Portfolio:

Note: Users can access financial information by selecting the downwards arrow ( ) next to the listed work item:
See "New Financial Review User Interface" directly above for more information on the new interface.
PowerSteering administrators can configure which columns will appear on Financial Review Layouts while creating or editing them. A new "Column Selection and Ordering" section is now available on the create / edit Financial Review Layout screen:
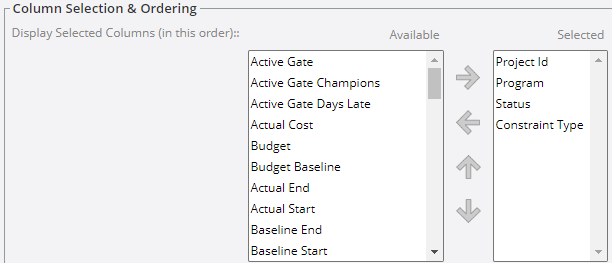
The "Available" box lists columns that have not been added to the Financial Review Layout and the "Selected" box lists columns that are currently displayed on the layout. The top-to-bottom order of the columns in the "Selected" window will be reflected from left to right on the Financial Review page:

Note: Neither the "Name" column nor the "Can be Rolled Up" column can be removed or reordered.
To add a column to the layout, highlight it in the "Available" list and select the right-hand arrow:
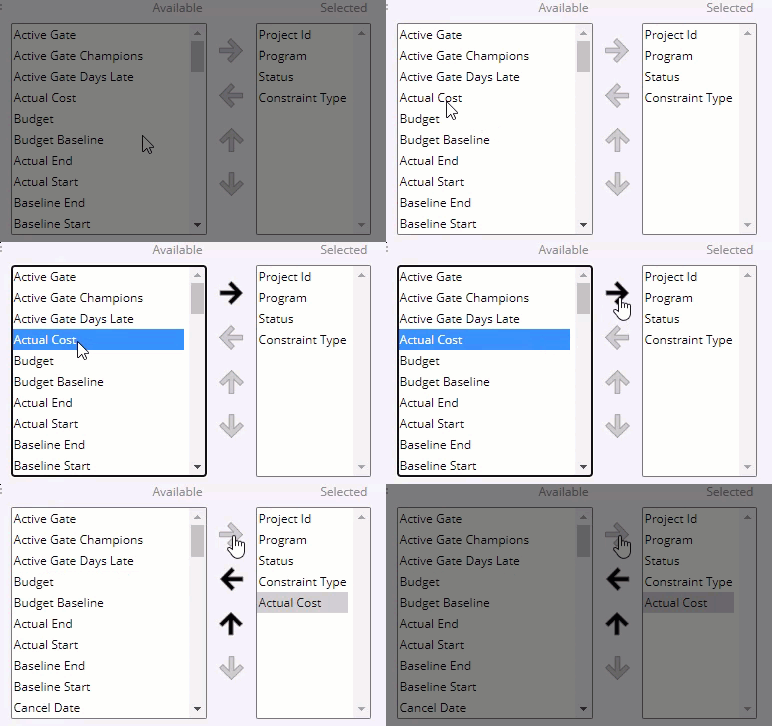
To remove a column from the layout, highlight it in the "Selected" list and select left-hand arrow:
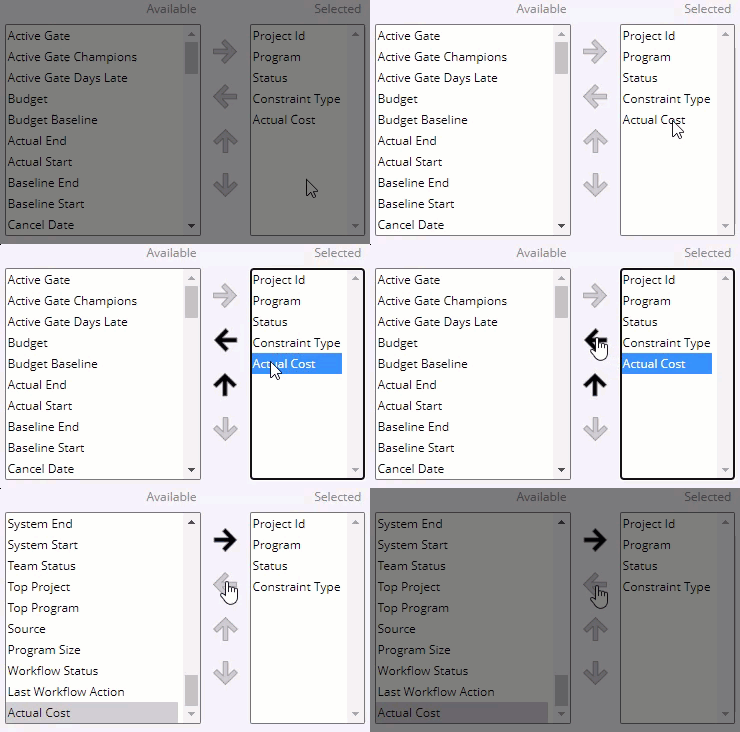
To reorder columns, highlight one of them from the "Selected" list and use the up and down arrows to move it around:
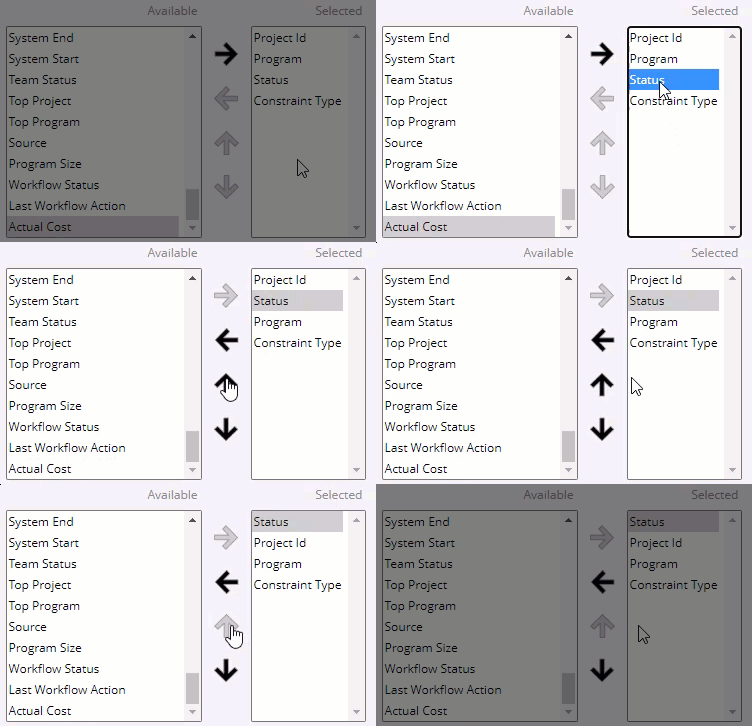
Tip: After editing the layout, be sure to select the Save Changes button.
Benefit:
One of the reasons that PowerSteering Dashboards are so popular is because users can customize their layouts with any columns they like. This allows users to see their desired data whenever they access the Dashboard.
Prior to this release, the Financial Review page would not give users any information about the listed work items. Its only purpose was to allow users to view the financial information of multiple work items at once. This did not give users much incentive to use the Financial Review page instead of simply viewing the Metrics from their separate work items. With this update, users no longer need to navigate to multiple pages in order to see both Metric information and work item information; all of this is now accessible from the Financial Review page.
Gated Projects
The following improvements have been made to Gated Projects. Click on any of the upgrades to learn more about them:
What's Different:
After advancing a gate, PowerSteering users will now see a status banner at the top of the page. This banner will confirm whether the gate was successfully advanced as well as whether the Post-Advance Actions were successfully executed.
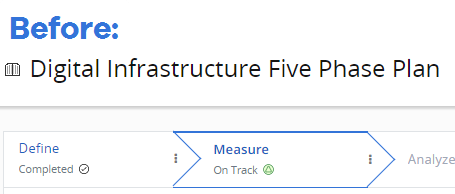
Prior to this release, no banner would appear after advancing a gate. A new gate panel would be highlighted, but the user would not be notified about the success or failure of the gate:
With this update, a status banner will appear displaying the status of the gate advance:
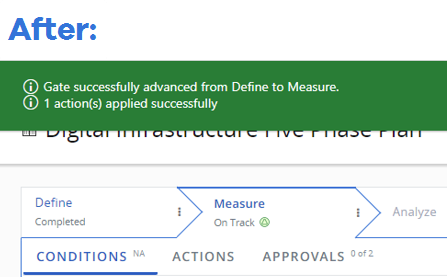
Note: The status banner will also appear if a previous gate is reactivated.
Users will see one of three banners after advancing a gate:
-
Successful gate advance and Post-Advance Actions: A green banner will appear if the gate advance is successful and the Post-Advance Actions (if any) have been applied:

-
Successful advance but unsuccessful Post-Advance Actions: A yellow banner will appear if the gate advance is successful but at least one Post-Advance Action has not been applied:

Note: This banner will continue to appear whenever the Project Summary page is opened until the banner is closed by the user.
Tip: To see which actions failed and why, users can view the "Actions" tab under the gate panel. This is another new feature with PowerSteering 2023R1.0; see "Post-Advance Actions listed in the 'Actions' tab under gate panels" directly below for more information.
-
Unsuccessful gate advance: A red banner will appear if the gate could not be advanced:

Benefit:
Prior to this release, Gated Projects would never display any banners after a gate advance. This is partly because the next gate panel on the Project Summary page would be highlighted, indicating that the gate had successfully advanced. With the recent addition of Post-Advance Actions, however, users need to know whether or not the actions were successfully applied. If certain actions are prevented from taking place (e.g., trying to copy Metric values to a locked Metric view), users need to be notified. If this is the case, they can refer to the "Actions" tab under the gate panel (more info on the new "Actions" tab directly below).
What's Different:
A new "Actions" tab has been added directly under gate panels on the Summary page of Gated Projects. This tab lists each Post-Advance Action that has been attached to the gate as well as its current status.
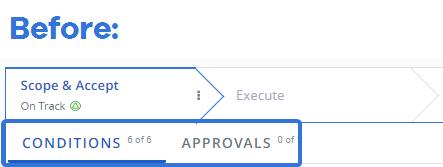
Prior to this release, gate panels only had two tabs under them: "Conditions" and "Approvals".
With this update, a new "Actions" tab has been added:
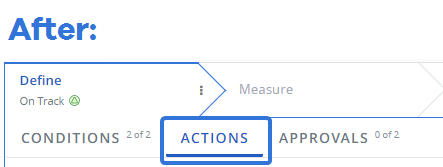
When selected, this tab displays all of the Post-Advance Actions that have been associated to the gate, as well as their selected actions, descriptions, and current statuses:

The "Status" column displays an icon that reflects one of the following statuses:
 : The action has not been applied yet.
Actions on current gates will always display this symbol because the gate will not have been advanced yet.
 : The action was not successfully applied after the gate was advanced.
 : The action was successfully applied after gate advance.
Tip: Users can click directly on the icon to view more details. This is especially useful when actions fail to apply ( )because it allows users to see the reason(s) behind the failure:
Tip: This feature should be used in conjunction with the new gate advance banner (see the upgrade directly above for details). For example, the banner might claim that certain actions failed to be applied after a gate advance:
When this occurs, simply select the previous gate and open the "Actions" tab to view details on the failures:
Click thumbnail to play.
Benefit:
Prior to this release, users were only able to see a gate's Post-Advance Actions as the gate was being advanced. A confirmation window would appear indicating which actions were set to take place:
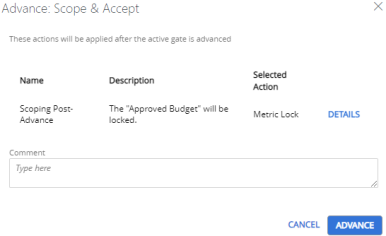
However, this window was only seen by the PowerSteering user who advanced the gate. Also, there was no way to know whether the actions were successfully implemented once the gate had been advanced. If any actions failed, users would remain unaware until they manually checked themselves.
With this upgrade, users now have total visibility into the status of each Post-Advance Action attached to the gate. They can always find out which actions failed and the reason behind each failure.
Ideas
The following improvement has been made to PowerSteering Ideas. Click on the upgrade to learn more about it:
What's Different:
PowerSteering users will receive a new message after submitting Ideas through Idea Hoppers that are not configured to automatically request Idea approval.
Note: PowerSteering administrators can enable Idea Hoppers to automatically request approval for Ideas submitted through them. This can be done by selecting the "Behavior" checkbox while creating or editing the Idea Hopper:
Prior to this release, users would receive the following confirmation message after successfully submitting an Idea through and Idea Hopper that did not automatically request Idea approval:

With this update, the message has been simplified; it now excludes the portion about requesting approval:

Note: This change does not affect any of the Idea submission functionality.
Note: Ideas submitted through Idea Hoppers that are configured to request approval will still display a message mentioning the approval request:
Benefit:
Although the previous message was an accurate statement, its negative wording was confusing. Users were often concerned that they had made a mistake during the Idea creation process when in reality, the Idea Hopper was working as configured. This new message avoids mentioning approval submission at all, causing less users to believe that they forgot something while submitting a new Idea.
Navigation Menu
The following improvement has been made to the Navigation Menu. Click on the upgrade to learn more about it:
What's Different:
All available Resource Review layouts will now appear in alphabetical order within the Navigation Menu.
Prior to this release, there was no order logic applied to these layouts. When users opened the "Resource Review" portion of the "Review" menu, the layouts were listed sporadically:
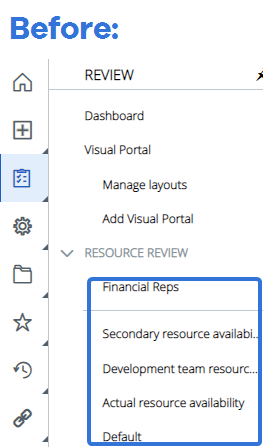
With this update, each Resource Review layout will now be listed in alphabetical order:
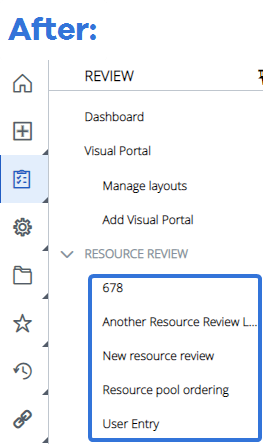
Note: Numeric digits and special characters (e.g. @,#,[], etc.) will be featured at the top of the list.
Benefit:
The "Resource Review" section of the "Review" menu displays both personal and shared Resource Review layouts. Accessing a specific layout from this list can be tedious, especially for users who are in charge of handling PowerSteering Resources. Sorting the list of layouts alphabetically makes it much easier for users to quickly navigate to their preferred layout.
Project Summary
The following improvement has been made to the Project Summary page. Click on the upgrade to learn more about it:
What's Different:
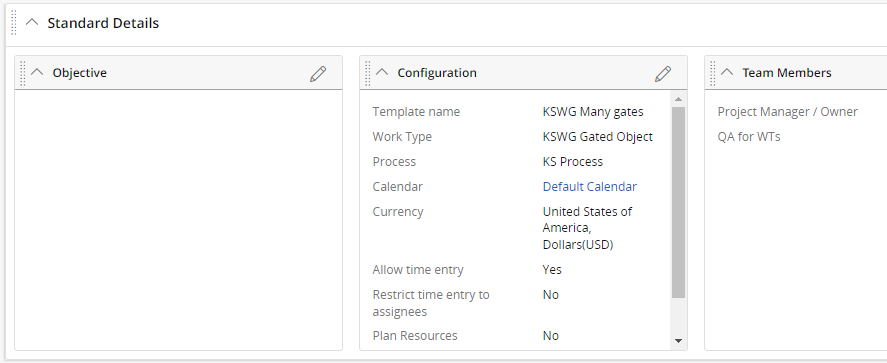
PowerSteering administrators now have the option to hide the "Schedule" widget from Project Summary pages while editing preferences.
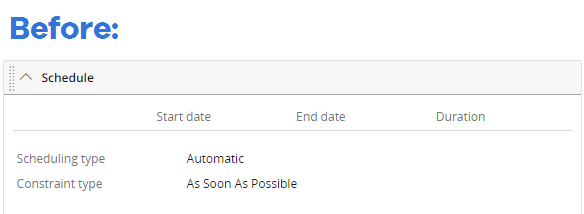
Prior to this release, the "Schedule" widget was always visible along with the "Standard Details" tab. If "Standard Details" was visible, so was the "Schedule" widget. There was no way to hide the "Schedule" widget while editing Summary page preferences:
With this update, administrators can now choose to hide the "Summary" widget from the "Standard Details" tab while editing preferences:
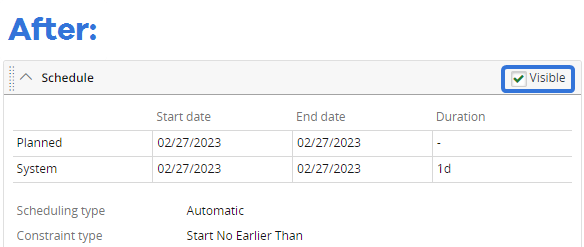
When the Visible checkbox is selected, the "Schedule" widget will remain on the Summary page. If it is unselected, it will be hidden from sight once the preferences are saved
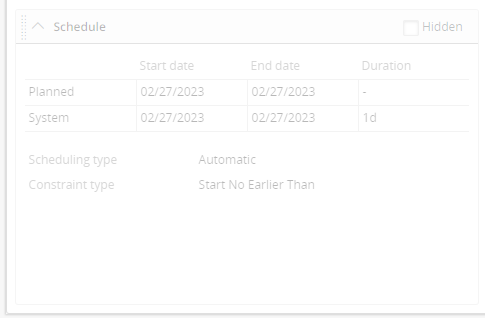
When the checkbox is unselected, the widget will appear grayed-out and the checkbox will be relabeled as Hidden while the user edits preferences:
Note: When administrators save Summary page preferences, the changes will be reflected on the Summary pages of identical work types for all PowerSteering users.
Note: This feature needs to be enabled by PowerSteering in order to work. If you do not see the Visible checkbox on the "Schedule" widget while editing preferences, speak to a PowerSteering representative.
Benefit:
The "Schedule" widget allows users with sufficient permissions to edit a work item's constraint type, start date, end date, actual start date, and actual end date directly from the Summary page. Although this might be convenient, many PowerSteering Project Managers prefer to have these edits made from one location: Project Central. The "Schedule" widget does not present the user with as many high-level details as Project Central, which can cause users to make less-informed changes to the schedule. Users will have to use Project Central to make these changes when the "Schedule" widget is hidden, leading them to make more informed decisions as they edit the schedule.
Reporting
The following improvement has been made to PowerSteering Reporting. Click on the upgrade to learn more about it:
What's Different:
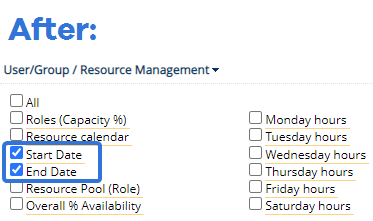
PowerSteering Reports can now contain columns that display a user's "Start Date" and "End Date". Both of these columns can be added while creating Reports through the Report Wizard.
Note: A user's "Start Date" and "End Date" can be established while editing the "Project Availability" section of a user's profile. See Edit a User Profile for more details.
Prior to this release, neither of these columns were available. The "User/Group / Resource Management" column category did not contain any columns that reflected this information:
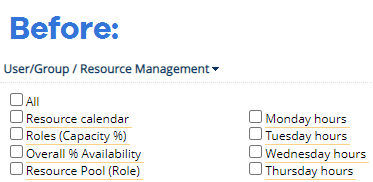
With this update, "Start Date" and "End Date" columns can be found under this category:
Selecting these columns will add them to the Report:

Benefit:
User-based reports are very popular in PowerSteering. Many customers use the Report Wizard to create reports on user profiles. "Start Date" and "End Date" are new fields on user profiles, but they can be valuable information for managers who wish to see when users started working or left the organization. Adding these new fields reflects PowerSteering's commitment to customizable reporting.
Upland Analytics
The following improvements have been made to Upland Analytics in PowerSteering. Click on any of the upgrades to learn more about them:
What's Different:
Two new columns have been added to the "Timesheet" data view that allow users to include Role information in their Upland Analytics reports.
The new columns are the following:
-
User Role: The name of the specified Role on the Timesheet row.
-
User Role Id: The 26-character ID of the specified Role on the Timesheet row.
Benefit:
Users could begin specifying Roles on their Timesheets as of the 2022R1.2 release. With this update, Role information can now be captured in Upland Analytics reports. This reflects PowerSteering's commitment to allowing users to customize their Upland Analytics reports to their liking.
What's Different:
Two new columns have been added to "User" data views that allow users to include user "Start Date" and "End Date" information in their Upland Analytics reports.
Note: A user's "Start Date" and "End Date" can be established while editing the "Project Availability" section of a user's profile. See Edit a User Profile for more details.
Selecting these columns will add each user's Start Date and End Date to the report:

Note: "User" date views refer to any views that contain user information. "Created By" and "Owned By" are examples of these views.
Benefit:
User-based reports are very popular in PowerSteering. Many customers use Upland Analytics to create reports on user profiles. Both "Start Date" and "End Date" are new fields on user profiles, but they can be valuable information for managers who wish to see when users started working or left the organization. Adding these new fields reflects PowerSteering's commitment to customizable Upland Analytics reports.