2026R2.0 - New Features
Below is a summary of the new additions to PowerSteering in the 2026R2.0 release. PowerSteering 2026R2.0 is currently scheduled to be deployed to the staging site on September 23rd, 2026 and to the production site on October 18th, 2026. When this happens, the listed features will become available.
Note: This page will be updated as new functionality becomes available.
The following key features will be made available with the 2026R2.0 PowerSteering release:
 New Metric view permissions
What's Different:
Administrators can now apply additional visibility and editing permissions to specific views (tabs) on Metric Templates. These permissions restrict PowerSteering users from viewing or editing certain Metric views based on their assigned work item Roles.
While editing a Metric Template, administrators will now notice a "View Permissions" tab.
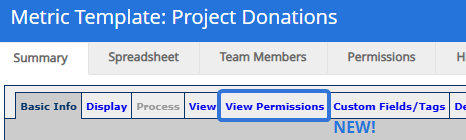
Note: This tab is only visible while editing Metric Templates. It will not be available while creating them.
This tab contains an "Apply custom permissions by role" checkbox for each of the Metric's views.
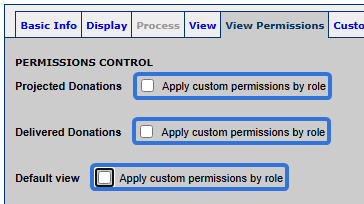
Selecting a view's checkbox allows administrators to configure custom permissions by Role for that specific view.
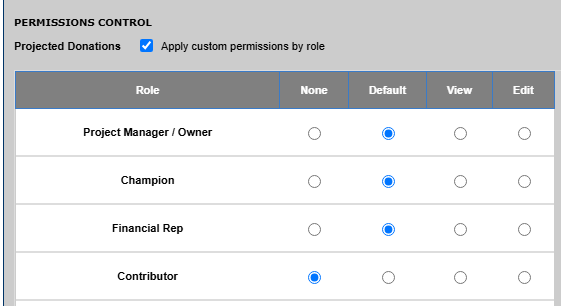
When the Metric is attached to a work item, users assigned to the listed Roles on the work item will inherit the corresponding permissions.
Note: This tab cannot grant any Metric permissions beyond a work item's Project Task permissions. In other words, this tab cannot grant any additional Project Task permissions; it can only limit them.
For example, imagine a work item that does not grant the "Update Metric numbers" Project Task permission to the Contributor Role. If "Contributor" is given the "Edit" permission for a view on the Metric Template's "View Permissions" tab, the Contributor will still not be able to update any numeric values on the Metric when it is attached to that work item.
Instead, imagine that the Contributor Role is granted the "Update Metric numbers" Project Task permission on the work item, but only the "View" permission on the Metric Template's "View Permissions" tab. Any assigned Contributors will be able to access the Metric view, but they will not be able to update any numeric values. Their Project Task permissions on the work item are limited by the Metric Template's "View Permissions" tab.
Note: Metric view permissions do not have any effect on a user's ability to select Beneficiary tags or set the Metric as "Ready for Rollup".
The following Metric view permissions are available for each Role:
-
None: Users assigned to the Role can not access the Metric view nor can they see any data entered into it.
-
Default: Users assigned to the Role will not have their permissions changed. Their permissions are still determined by the work item's Project Task permissions.
-
View: Users assigned to the Role will be able to access the view and see any data entered into it. However, they will not be able to edit any numeric data, Tags, or Custom Fields. Additionally, they will not be able to lock or unlock any parts of the Metric view.
Note: Users without the "View Metric Values" Project Task permission will not be able to view the work item's Metrics even if granted this permission.
-
Edit: Users assigned to the Role will be able to edit data on the Metric view, including numeric data, Tags, and Custom Fields. Additionally, they will be able to lock or unlock any parts of the Metric view.
Note: Users without permissions to edit or lock/unlock Metric data will not be able to do so even if granted this permission.
Click here for an example of the "View Permissions" tab in action:
Example: Joanna is in charge of a Metric that keeps track of a Project's charitable donations. The Metric contains a view for "Projected Donations" (donations that are committed, but not yet paid) and "Delivered Donations" (donations that have been paid).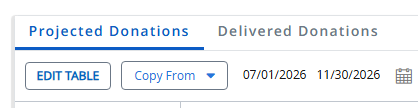
Certain employees are responsible for keeping track of donation commitments while others are responsible for keeping track of paid donations. Joanna would like these individuals to use the Metric to track these amounts, but she wants to limit their access so they do not accidentally add projections or deliveries into the wrong view.
To prevent this, she creates a "Projected Donation Manager" Role and a "Delivered Donation Manager" Role. She ensures that both of these Roles have the "Update Metric numbers" Project Task permission on her Project (which, in her PowerSteering environment, belong under "Edit").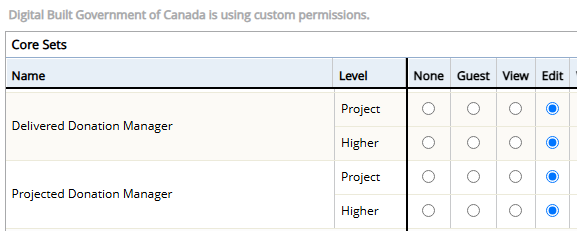
While editing the "Project Donations" Metric Template, she uses the "View Permissions" tab to grant special permissions to these Roles. On the "Projected Donations" view, she gives Projected Donation Managers "Edit" permissions while limiting Delivered Donation Managers to "View" permissions.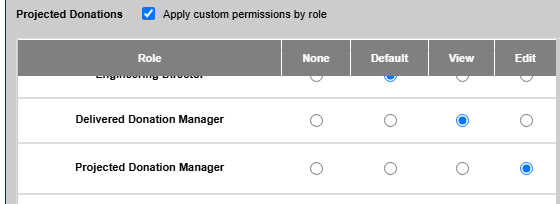
On the "Delivered Donations" view, she gives Delivered Donation Managers "Edit" permissions while limiting Projected Donation Managers to "View" permissions.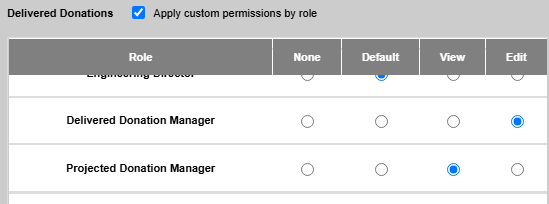
Users assigned to the "Projected Donation Manager" Role on her Project will be able to edit the "Projected Donations" view, but not "Delivered Donations".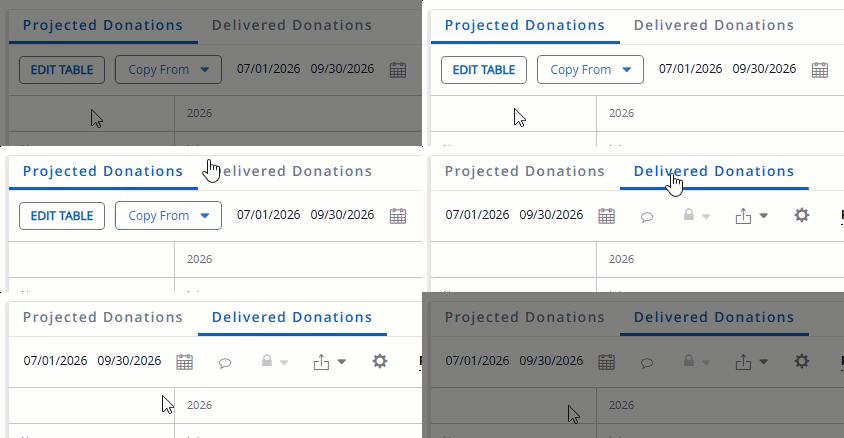
Notice that the Edit Table button is only available under the "Projected Donations" tab.
Conversely, users assigned to the "Delivered Donation Manager" Role on her Project will be able to edit the "Delivered Donations" view, but not "Projected Donations".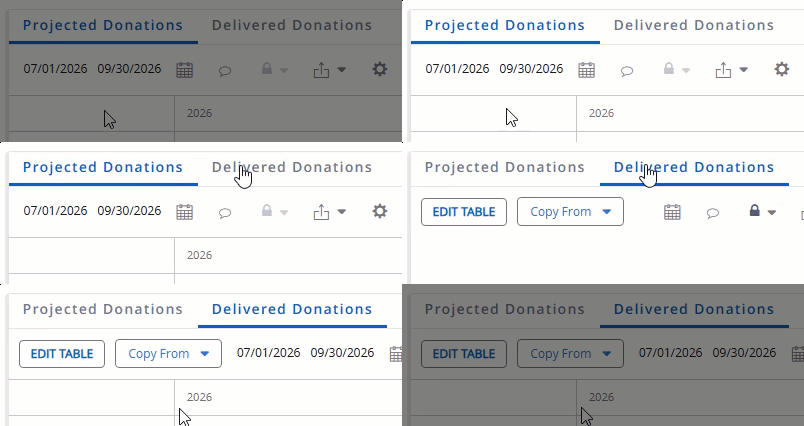
Notice that the Edit Table button is only available under the "Delivered Donations" tab.
Benefit:
Prior to this release, Metric-based Project Task permissions were applied to every Metric on a work item. This means that a user who was only required to work on a specific Metric would have to be given permission to edit every single one attached to the project. Users would often be able to see and even update Metric data that was ideally meant to remain confidential.
With this update, administrators can now restrict viewing and editing permissions to not only specific Metrics, but specific Metric views as well. This ensures that sensitive Metric information is accessible only to authorized users.
New AI-powered Metric comment validation
What's Different:
PowerSteering now leverages artificial intelligence (AI) to determine whether users leave meaningful comments on their Metrics. Comments that are not descriptive enough will be not be immediately saved. Instead, the comment author will be prompted to review the comment before saving.
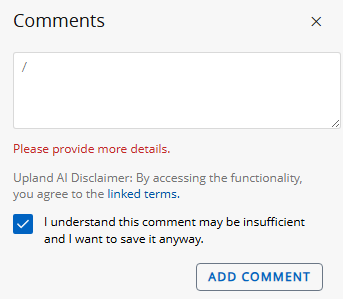
Note: AI-powered features might not always work as expected. See Upland Software's AI disclaimer for information.
Note: The AI validation process only analyzes the text entered in the comment. No other Metric, work item, or system data is accessed during validation. However, reach out to your PowerSteering representative at any time if you would like to disable AI features.
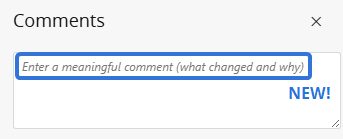
When users leave a comment on a Metric, they will notice that the textbox now asks them to leave a meaningful comment.
After the user selects Add Comment, a large language model (LLM) evaluates its meaningfulness. Comments that are deemed too vague, irrelevant, cryptic, or devoid of information will be flagged. These comments will not be immediately saved and the AI will respond in red text with suggestions on how to revise the comment.
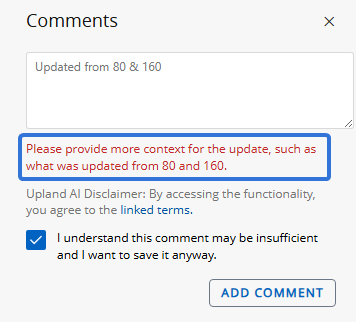
From here, users can either revise their comment or they can select the "I understand this comment may be insufficient and I want to save it anyway" checkbox to save the comment to the Metric as is.
Tip: Administrators can configure Metric Templates to require comments after edits are made. See Basic Info Metric Tab for more information.
Tip: If you find the AI is either too strict or too lenient on Metric comments, contact your PowerSteering representative to adjust it. Also, please feel free to submit any feedback to your PowerSteering representative to help refine the AI model for future use.
Benefit:
Metric comments are meant to provide context and clarity around changes to a Metric, especially when they are required after making updates. When this is the case, users in charge of maintaining Metrics expect comments that contain useful and meaningful information rather than brief or vague responses.
Prior to this release, users could bypass required comments by typing anything into the textbox (a single character, some quick gibberish, etc.) and selecting Add Comment. This is not necessarily done out of laziness;users often might not believe that their changes are impactful enough to require an explanation. In reality, all comments make Metric data easier to understand and reference later on.
This upgrade offers guidance when a comment may not provide enough value while still giving users the flexibility to save their comment as written. It reflects Upland Software's commitment to harnessing the power of AI to enable a more efficient workplace.
New API endpoints for Measure instances and values
What's Different:
The PowerSteering REST API Measure service has been updated with new endpoints for specific Measure instances and Measure values.
Note: A Measure instance occurs when a Measure Template is attached to a work item.
The service now includes the following endpoints for handling Measure instances:
-
GET <http://{host}/{context}/rest/measureservice/v1/instance>
This endpoint retrieves data for a single Measure instance. The following parameter must be added to specify the Measure instance:

-
id (required): The 26-digit ID number of the Measure instance.
Tip: Measure instance ID numbers can be retrieved by running the GET <http://{host}/{context}/rest/measureservice/v1/instances> endpoint (below) and locating the "id" value.
It can also be retrieved by navigating to the Measure instance and viewing the first (not last) 26 digit ID number in the URL after "sp=U".
The response will include all "measureInstance" objects. See the "Object types reference" page in the REST API Help for a full list.
-
-
GET <http://{host}/{context}/rest/measureservice/v1/instances>
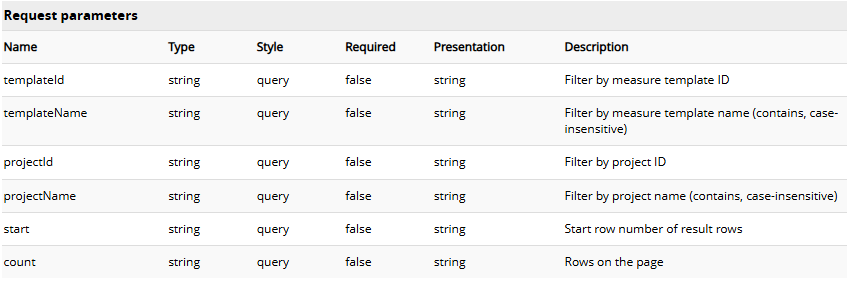
This endpoint retrieves a list of Measure instances and their data. The following request parameters can be added to filter the Measures that appear in the response:
-
templateId: Filter the Measure instances by the 26-digit ID number of their Measure Templates.
Tip: Measure Template ID numbers can be retrieved by running the GET <http://{host}/{context}/rest/measureservice/v1/measuretemplates> endpoint. Individual numbers can also be retrieved by navigating to Measure Library, selecting the template, and viewing the 26 digit ID number after "sp=U" in the URL.

-
templateName: Filter the Measure instances by their names. Only Measure instances that contain the parameter value within their names will be included.
-
projectId: Filter the Measure instances by the 26-digit ID numbers of the work items they are attached to. Only Measure instances attached to the indicated work items will be included.
-
projectName: Filter the Measure instances by the names of the work items they are attached to. Only Measure instances attached to the indicated work items will be included. Work items must contain the parameter value within their name.
-
start: Indicate how many results should be skipped in the response.
Example: Entering "start=50" will omit the first 49 Risks that would have been included in the response.
-
count: Indicate how many Metric instances should be included in the response.
Example: Entering "start=50" will only include the first 50 Measure instances that would have been included in the response.
The response will include all "measureInstance" objects for each included Measure instance. See the "Object types reference" page in the REST API Help for a full list.
-
-
POST <http://{host}/{context}/rest/measureservice/v1/instance>
This endpoint can create a new Measure instance on a work item. The request payload must include the following parameters:

-
measureTemplateId: The 26-digit ID number of the Measure Template you would like to add to a work item.
Tip: Measure Template ID numbers can be retrieved by running the GET <http://{host}/{context}/rest/measureservice/v1/measuretemplates> endpoint. Individual numbers can also be retrieved by navigating to Measure Library, selecting the template, and viewing the 26 digit ID number after "sp=U" in the URL.
-
projectId: The 26-digit ID number of the work item you would like to attach the Measure to.
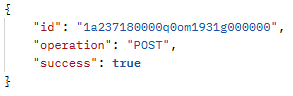
Successful attachments will be indicated in the response.
-
-
DELETE <http://{host}/{context}/rest/measureservice/v1/instance>
This endpoint can delete a Measure instance from a work item.
Caution: Deleting a Measure instance will also delete all of its values. This cannot be undone.
The following parameter must be added to specify the Measure instance:

-
id (required): The 26-digit ID number of the Measure instance.
Tip: Measure instance ID numbers can be retrieved by running the GET <http://{host}/{context}/rest/measureservice/v1/instances> endpoint and locating the "id" value.
It can also be retrieved by navigating to the Measure instance and viewing the first (not last) 26 digit ID number in the URL after "sp=U".
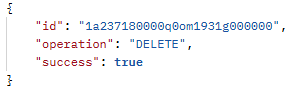
Successful deletions will be indicated in the response.
-
Additionally, the service now includes the following endpoints for handling Measure values:
-
POST <http://{host}/{context}/rest/measureservice/v1/measurevalues>
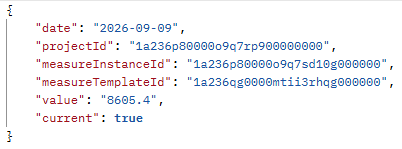
This endpoint can add values to a Measure in bulk. The request payload can include the following parameters for each new value:
-
date: The date of the value. If this field is not included, the new value will automatically inherit the current date.
-
projectId: The 26-digit ID number of the work item that the Measure instance is attached to. This field is only required if "measureInstanceId" is not provided.
-
measureInstanceId: The 26-digit ID number of the Measure instance. If this field is provided, there is no need to include "projectId" or "measureTemplateId".
Tip: Measure instance ID numbers can be retrieved by running the GET <http://{host}/{context}/rest/measureservice/v1/instances> endpoint and locating the "id" value.
It can also be retrieved by navigating to the Measure instance and viewing the first (not last) 26 digit ID number in the URL after "sp=U". -
measureTemplateId: The 26-digit ID number of the Measure Template used for the Measure instance. This field is only required if "measureInstanceId" is not provided.
Tip: Measure Template ID numbers can be retrieved by running the GET <http://{host}/{context}/rest/measureservice/v1/measuretemplates> endpoint. Individual numbers can also be retrieved by navigating to Measure Library, selecting the template, and viewing the 26 digit ID number after "sp=U" in the URL.
-
value: The value you would like to add to the Measure instance.
-
current: Indicates whether the value will be the current value for the Measure instance. Enter "true" for yes or "false" for no.
Successful runs will be indicated in the response.
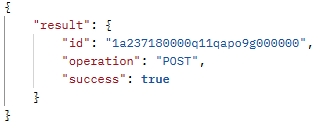
-
-
PUT <http://{host}/{context}/rest/measureservice/v1/measurevalues>
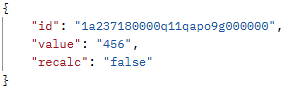
This endpoint updates existing Measure values. The request payload can include the following parameters for each new value:
-
id (required): The 26-digit ID number of the Measure value you would like to update.
Tip: Measure value ID numbers can be retrieved by running the GET <http://{host}/{context}/rest/measureservice/v1/measure/{measureId}/measureValues> endpoint.
-
value (required if "recalc" is set to "false"): The updated value you would like to replace the indicated value with. If "recalc" below is set to "true", this value will be ignored.
-
recalc (required): Indicates whether to calculate a new value for the Measure using a formula included in the Measure Template. Enter "true" for yes or "false" for no.
Successful runs will be indicated in the response:
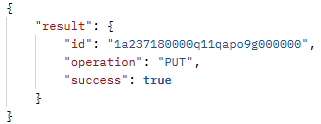
-
-
DELETE <http://{host}/{context}/rest/measureservice/v1/measurevalues>
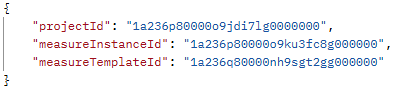
This endpoint deletes all values of a Measure instance. The request payload can include the following parameters:
-
projectId: The 26-digit ID number of the work item that the Measure instance is attached to. This field is only required if "measureInstanceId" is not provided.
-
measureInstanceId: The 26-digit ID number of the Measure instance. If this field is provided, there is no need to include "projectId" or "measureTemplateId".
Tip: Measure instance ID numbers can be retrieved by running the GET <http://{host}/{context}/rest/measureservice/v1/instances> endpoint and locating the "id" value.
It can also be retrieved by navigating to the Measure instance and viewing the first (not last) 26 digit ID number in the URL after "sp=U". -
measureTemplateId: The 26-digit ID number of the Measure Template used for the Measure instance. This field is only required if "measureInstanceId" is not provided.
Tip: Measure Template ID numbers can be retrieved by running the GET <http://{host}/{context}/rest/measureservice/v1/measuretemplates> endpoint. Individual numbers can also be retrieved by navigating to Measure Library, selecting the template, and viewing the 26 digit ID number after "sp=U" in the URL.
Successful deletions will be indicated in the response.
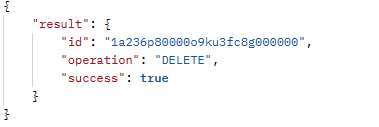
-
-
DELETE <http://{host}/{context}/rest/measureservice/v1/measurevalue/{id}>
This endpoint deletes an individual Measure value. The value to be deleted is indicated by substituting {id} with the Measure value ID number of the value to be deleted.
Tip: Measure value ID numbers can be retrieved by running the GET <http://{host}/{context}/rest/measureservice/v1/measure/{measureId}/measureValues> endpoint.
Successful deletions will be indicated in the response.
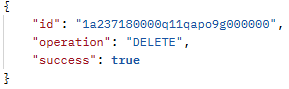
Benefit:
Prior to this release, the REST API Measure service provided limited support for working with Measure instances. Users could not create or delete Measure instances on work items, and Measure instance information could only be retrieved using a Measure Template ID. In addition, these responses contained less information than the new "measureInstance" object type provides. With this upgrade, users can create, retrieve, and delete Measure instances through the REST API and integrate Measure instance data with external tools and workflows.
Additionally, there were not many options for working with specific Measure values. Users could retrieve them using GET endpoints, but there was no way to add them, update them, or delete them. With this upgrade, the REST API can be used to create integrations that allow users to update their Measure values through tools external to PowerSteering.
If you would like some help taking full advantage of PowerSteering's REST API, contact your PowerSteering representative.
Improved Updated Dashboard user interface
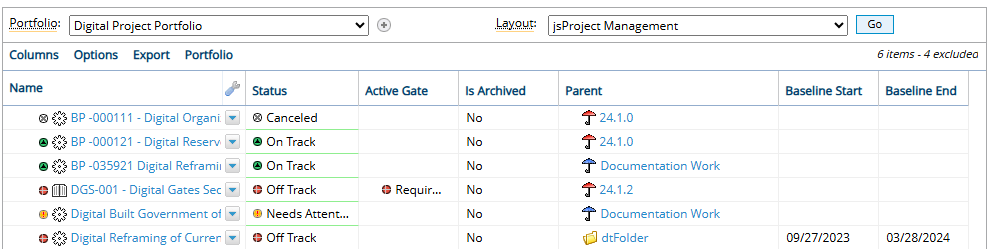
The PowerSteering Dashboard has been redesigned with a more modern and responsive interface.
Prior to this release, many parts of the Dashboard reflected the legacy PowerSteering design.

With this update, users can now select Review  → Dashboard (New) from the Navigation Menu.
This opens up the new PowerSteering Dashboard that resembles PowerSteering's updated "UI 2.0" design.

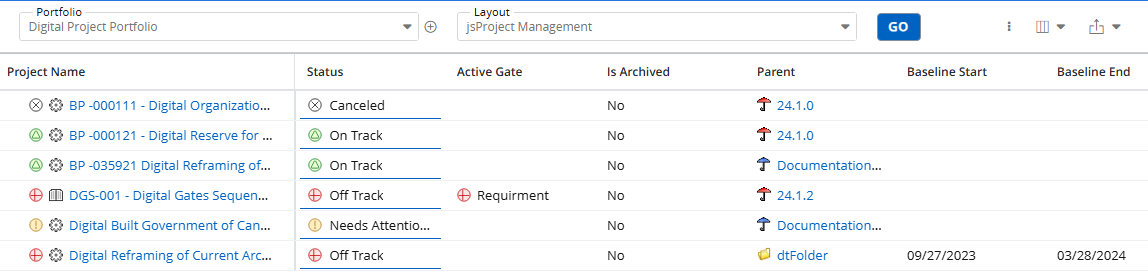
Note: Please note that the new Dashboard configuration options have been moved from the top left-hand corner of the page to the top right-hand corner.
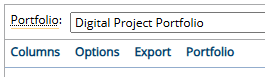
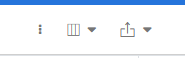
Note: The "Portfolio" configuration has not yet been applied to the new Dashboard interface. This will be introduced in a future release, but the original Dashboard interface must be used for Portfolio planning in the meantime.
Additionally, this new Dashboard includes the following new features:
Search for filter values
Prior to this release, users would filter Dashboard items by scrolling through a drop-down menu to select the specific values that they wanted to include.
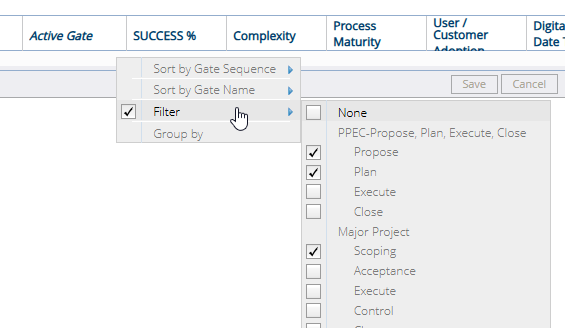
With this update, users can now search for these values directly within the menu itself.
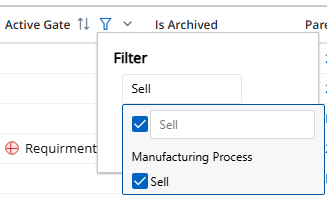
Users can then select the filter value(s) from the search results and select the Apply button. The Dashboard will only list items with the selected value(s) under the column.
Benefit:
Prior to this upgrade, users would have to scroll through a drop-down menu of potential column values whenever they wished to add a filter. This was a problem because these menus can contain extremely long lists of values, requiring the user to scroll for a long time.
For example, adding a filter to the "Active Gate" column opened up a drop-down menu that contained every Gate from every Process in the PowerSteering environment.
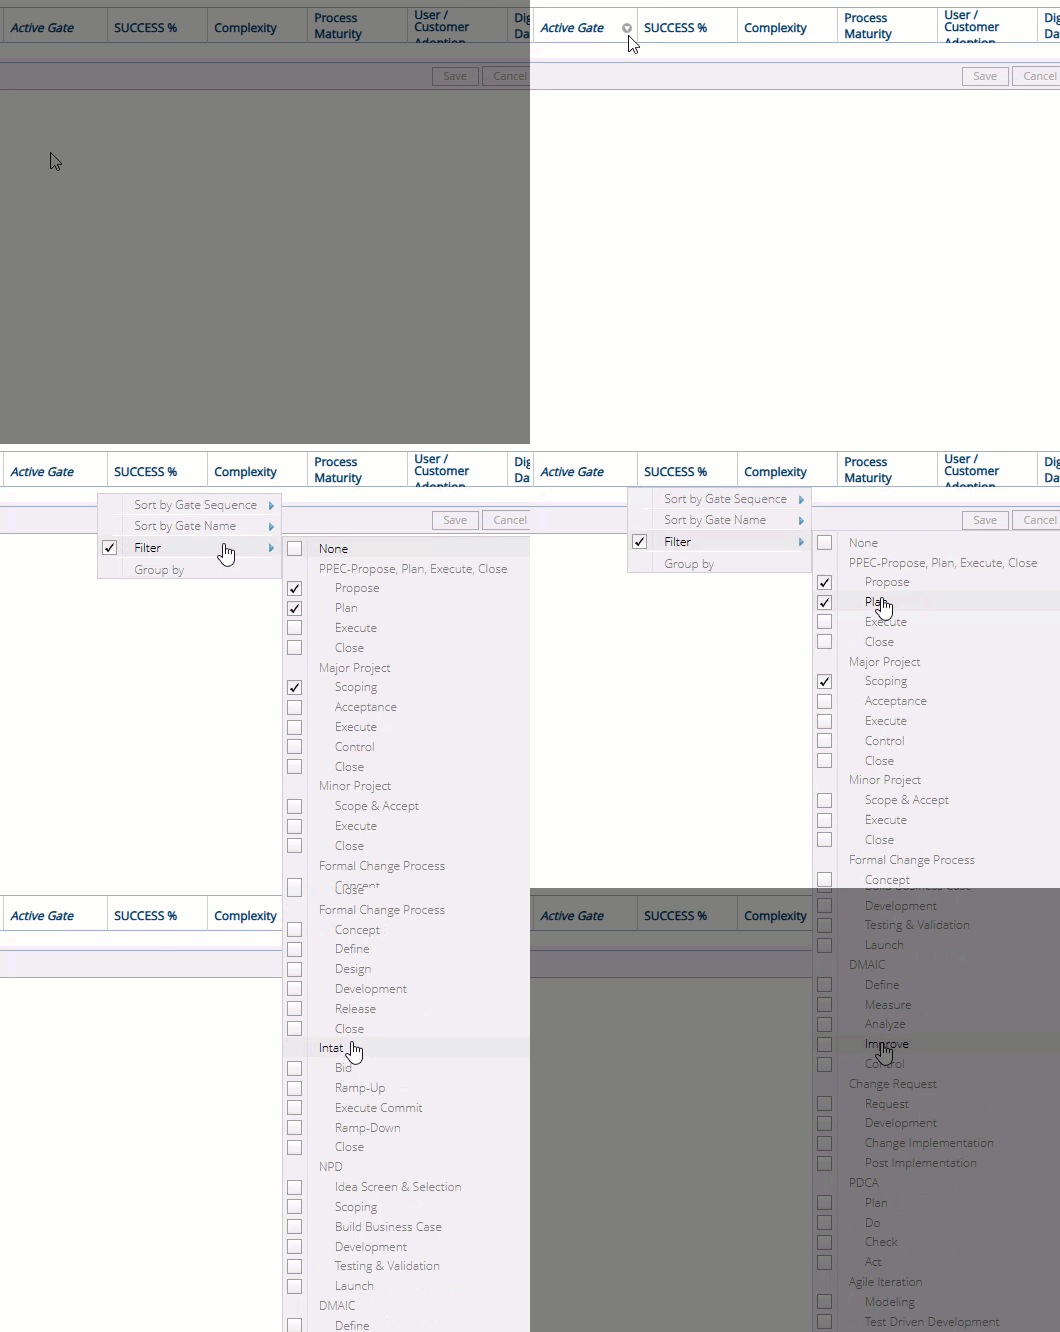
Click thumbnail to play.
Instead of navigating through long lists, users can simply type their desired values directly into the menu, saving time and creating a more seamless Dashboard experience.
Baselines included in Gantt charts
Prior to this release, Dashboard Gantt charts did not display anything for work item Baselines.

The green bar represents the Start and End Dates for the work item.
With this update, the new Dashboard displays a gray line that represents a work item's Baseline, located directly under the line that represents Start and End Dates.

Note: The gray line on the Dashboard Gantt chart represents the work item's main Baseline (known simply as "Baseline"). It will not represent any of the numbered Baselines.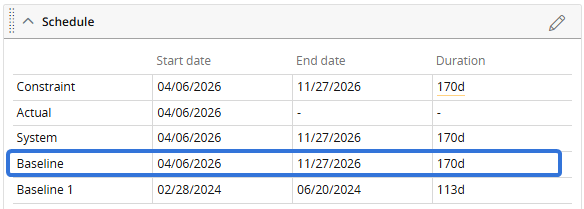
Tip: See Capture a Baseline from the Summary Page or Capture a Baseline from Project Central for more information on multiple Baselines.
Benefit:
A Baseline can be used to measure Project performance by reporting on schedule variance (how far a Project is ahead or behind the original schedule). As the start and end dates of a Project change, the Baseline dates can be referred to in order to see how the current dates differentiate from the original schedule. With this upgrade, users can now receive this information directly from the Dashboard.
Improved Run reports multiple times a day
What's Different:
PowerSteering reports and Data Extracts can now be scheduled to run multiple times a day.
Prior to this release, the Details and Schedule tab only allowed users to run their reports once per day at most. Selecting Daily from the "Frequency" field allowed users to choose how many days they wanted the report to run, but they could not configure it to run more than once during the same day.
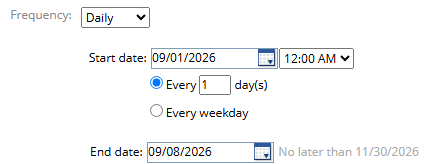
With this update, users can choose an hourly interval for running reports.
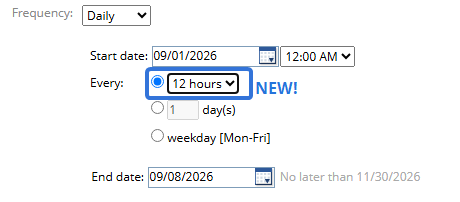
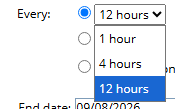
Note: Speak to your PowerSteering representative to customize these intervals.
Tip: Avoid running large reports more frequently than necessary. Running large reports too often can lead to slower application performance. Reach out to your PowerSteering representative for tips on the correct interval for your report.
Benefit:
In a fast-paced work environment, PowerSteering data can change rapidly and running reports once per day is often not enough. Users can now receive reports multiple times per day, making it easier to monitor changing information and make timely decisions based on the latest available data.
Improved Target the Timesheet Reminder agent at specific users
What's Different:
Administrators can now specify which users will receive reminders from the Timesheet Reminder agent. Users can be selected directly, by User Group, or by associated Tags.
Note: Users only need to satisfy one of the criteria to receive the reminder. In other words, a user must be selected directly OR have the associated Tag value on their profile. They do not require both.
While editing this agent, users will find three new parameters that can be used to select which users will receive reminders.

-
Select users/groups to notify: Directly select the checkbox of any user or User Group to send them reminders. Leaving the field empty will send the reminders to all users (unless a Tag has been selected from the "Select a Tag" field below).
Note: Selecting a User Group will send reminders to all member of the group.
-
Select a Tag: Select a Tag that will be used to determine which users receive reminders. This field works in conjunction with the "Select a Tag value" field below. Leaving the field empty will send the reminders to all users (unless any users or User Groups have been selected from the "Select users/groups to notify" field above).
-
Select a Tag value: Select which Tag value users must have associated with them in order to receive reminders.
Example: In Christie's organization, users only submit PowerSteering Timesheets if their hours are billable. She would like to take advantage of the Timesheet Reminder agent to remind users to complete their Timesheets, but she does not want to send unnecessary emails to users who do not need to submit them. To overcome this, she creates a new Tag called "Resource Billable?" and associates it with users. Whenever she adds a new user with billable time, she sets the "Resource Billable?" Tag to "Billable" on their profile.
She targets these users with the Timesheet Reminder agent by selecting the Tag and its corresponding value from the parameters:
Alternatively, she could have created a User Group called "Billable Users" and added each user who uses the Timesheet. Then, she could simply select the User Group from the "Select users/groups to notify" parameter to target them for reminders.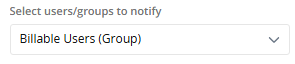
Benefit:
Not all PowerSteering users are expected to use Timesheets. Sending out Timesheet reminders to users who do not submit Timesheets can cause confusion and unnecessary email traffic. By targeting specific users, administrators can make sure that reminders are always send out to relevant users.
The following enhancements will also be available with the 2026R2.0 release:
API
Improved User start dates available in "User" object type
What's Different:
A new "startDate" property is available in PowerSteering's REST API "User" object type.
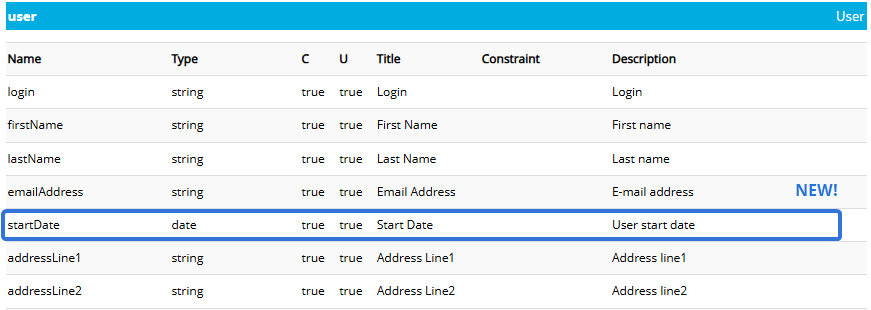
This property represents the user's PowerSteering start date, formatted as "yyyy-mm-dd".
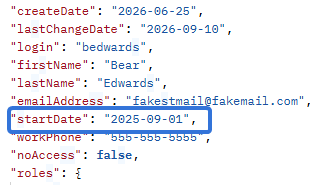
Note: A user's "startDate" represents the day the user was onboarded to the organization and the first day the user is available to be assigned to work. It should not be confused with "createDate", which represents the date the user was created in PowerSteering.
Benefit:
The new "startDate" property provides the date a user became available for work, giving external systems greater visibility into user availability. It allows users to both retrieve and update user start dates using integrations external to PowerSteering.
If you would like some help taking full advantage of PowerSteering's REST API, contact your PowerSteering representative.
Costs
New Force Default Personal Rates to be applied when users are not assigned to work
What's Different:
The Timesheets Configuration page now allows administrators to apply Default Personal Rates as Actual Labor Costs when unassigned users submit Timesheets against work items.
Note: Only PowerSteering administrators can access the Timesheets Configuration page.
Note: Personal Rates will only be used to calculate Actual Labor Costs if "Use personal rates" is enabled from the work item's standard details.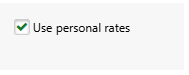
Also, "Allow Time Entry" must be set to Yes and "Restrict time entry to assignees" must be set to No for unassigned users to be able to submit time against the work item.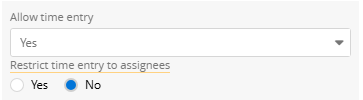
Prior to this release, the Actual Labor Costs for users who were not assigned to the work item would almost always be calculated using their Default Personal Rate. However, an exception occurred when unstaffed demand (unassigned effort) existed on the work item. When this was the case, the user's Actual Labor Cost was calculated using the Personal Rate for the unstaffed demand's Role.

This project has 15 hours of unstaffed demand for a Delivered Donation Manager. If an unassigned user submitted time for this project, their Personal Rate for Delivered Donation Manager would be used to calculate their Actual Labor Cost.
With this update, administrators can now use the Timesheets Configuration page to override this by selecting the new "Enable to use Default Personal Rate when user is not assigned in the project" checkbox.
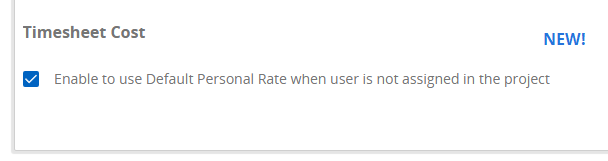
When this checkbox is selected, Default Personal Rates will always be used to calculate the Actual Labor Costs of unassigned users, regardless of any unstaffed demand on the work item.
Note: Default Personal Rates will only apply to time submitted after the checkbox is selected. Previously submitted time will not be affected. If you would like it to apply to users who have submitted their time already, you must ask them to resubmit it.
Example: Will is not assigned to the Digital Built Government of Canada project.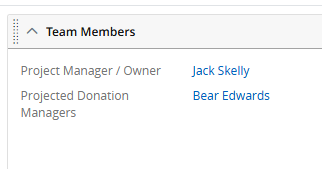
However, he is asked to help out for one hour because his other projects are on hold. After he finishes working, he submits his time for the single hour against the project on his Timesheet.
When Jack accesses the Manage Time page, he sees that Will's rate for the hour is $25.00.
This matches his Personal Rate for Delivered Donation Manager, which is not his Default Personal Rate.
This is because the project has unstaffed demand for a Delivered Donation Manager.
Jack would prefer Will's Default Personal Rate be used instead of his Delivered Donation Manager Rate, so he selects the "Enable to use Default Personal Rate when user is not assigned in the project" checkbox from the Timesheets Configuration page.
He then rejects Will's Timesheet and asks him to resubmit it. Once he checks the Manage Time page again, he can see that Will's Default Personal Rate of $22.00 is used instead.
Benefit:
Prior to this update, PowerSteering would always assume that effort from unassigned users should be used to help out with the project's unstaffed demand. This is why Actual Labor Costs were calculated using the Personal Rate for those roles. However, this assumption is not always the case because unassigned users can contribute to projects in ways that do not always align with the unstaffed demand. Additionally, the labor costs of many organizations are based on each user's Default Personal Rate rather than roles they temporary fill on projects. Administrators can ensure that these Personal Rates are always used, providing greater consistency and predictability in labor cost calculations.
Custom Fields and Tags
New Export Tag values and update their labels using Tag Import
What's Different:
Users can now export a .txt file of a Tag import file from the Tag Import page that includes PowerSteering ID numbers for Tag value. These ID numbers can then be used to update value names as well as parent Tag values.
Note: Only PowerSteering administrators can import (and export) Tag data from the Tag Import page.
Prior to this release, users could not update any existing Tag value names through the import page. Tag import files could only be used to create new values and delete unused ones. Attempting to edit an existing value's name would create a new value if "Ignore" or "Lock" was selected from "What to do with missing categories".
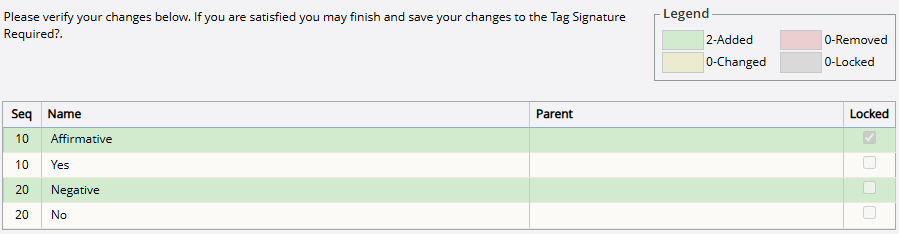
Instead of updating the "Yes" and "No" value names, the importer created two new values.
If "Delete" was selected, the existing values would be removed and replaced by the new ones. This would remove the values from any Tags they were selected on in PowerSteering, altering existing data.
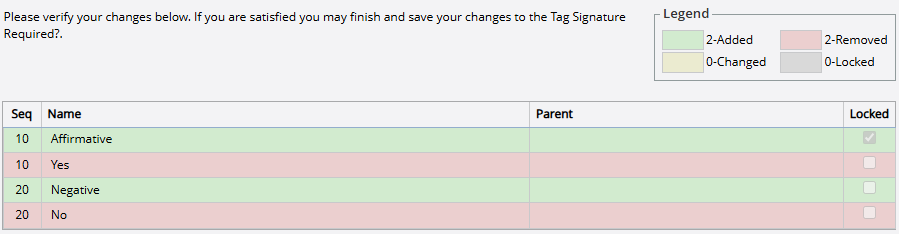
Instead of updating the "Yes" and "No" value names, the importer created two new values and deleted the values that were not listed.
With this update, PowerSteering has introduced a new way to update Tag value names using the Tag Import page. Users will now notice an Export Tag Values button directly under the "Which tag would you like to update?" field.
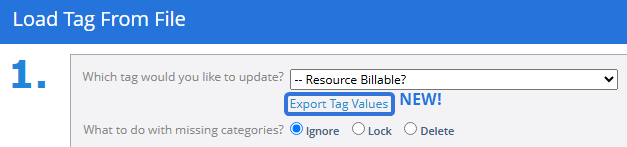
Selecting this button will automatically export a .txt file of Tag value labels from the Tag selected from "Which tag would you like to update".
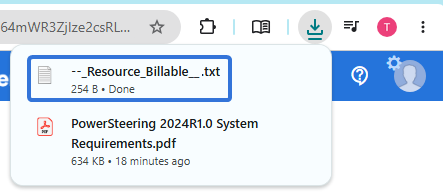
The downloaded file is formatted just like a Tag import file. However, it contains an additional column that displays a PowerSteering ID number for each listed Tag value.

These ID numbers help the system identify which value is which, which means it will know which values the administrator is updating when the import file is uploaded. With this update, administrators can now export Tag value files, edit the value names directly in the file (first column on the left), and then re-upload the file into PowerSteering.
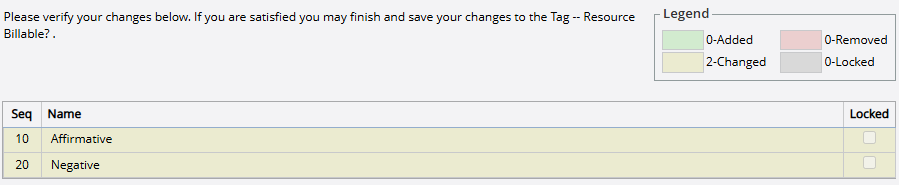
The importer has updated both of the value names without deleting any existing ones.
Example: Julie would like to update the values of the "Resource Billable?" user Tag using the Tag importer. To do this, she navigates to the Tag Import page, chooses the "Resource Billable?" Tag, and selects Export Tag Values.
She then opens up the .txt file that automatically downloads onto her device. Each listed Tag value has a PowerSteering ID that distinguishes it from all other values.
She edits the name of a value label directly in the .txt file.
Finally, she re-uploads the file back into PowerSteering. The system knows which value label she edited because of its associated ID number.
Additionally, this new process changes how the Tag importer reads hierarchical Tags. It will now use the PowerSteering ID numbers to identify each value's parent value.
Prior to this release, the "Parent" column (third from the left) in the import file used Tag value names to indicate the parent value.
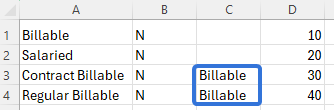
With this update, the new PowerSteering ID numbers must be used instead. This means that updating Tag value parents is now a two-step process; administrators must first select Export Tag Values to download a file that contains each value's PowerSteering ID number.

Next, these ID numbers must be plugged into the "Parent" column on the import file to indicate a value's parent value.

After the file is imported back into PowerSteering, the system will recognize parent values by their ID numbers.
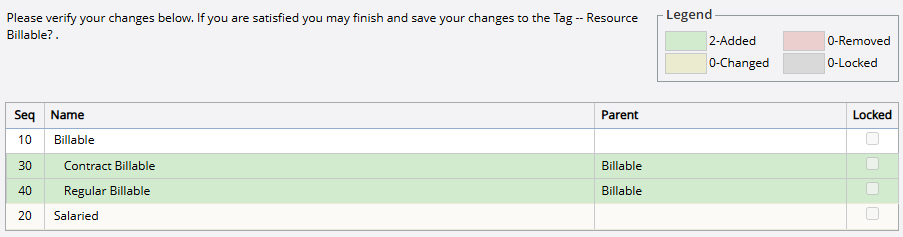
Note: PowerSteering Tags must be set to "Hierarchical" to accept parent values. 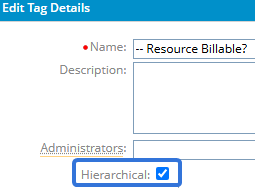
Import files with parent values for non-hierarchical Tags will result in an upload failure.
Benefit:
Prior to this upgrade, there was no way to update Tag value names through the Tag import page. Administrators could change value names and then select "Delete" from "What to do with missing categories", but this would delete the original values and replace them with new ones, which would erase those values if they were already selected on Tags in PowerSteering. The implementation of PowerSteering IDs for Tag values allows administrators to edit value names through the Tag import page without disturbing any current PowerSteering data, saving them time and effort that they would have to expend if they edited their Tag values directly.
Additionally, the ability to update Tag value parents provides greater flexibility. Prior to this upgrade, the Tag importer could not update parent values when the parent values shared duplicate names. Adding a "Parent" to another value would fail if the desired parent value shared its name with another value. With the introduction of PowerSteering IDs for Tag values, the correct parent values can be identified by the system and applied to child values regardless of duplicate names.
Dashboard
New Creation wizard for Dashboard Layouts
What's Different:
The Dashboard Layout pages have been updated to match PowerSteering new "UI 2.0" interface, including updated data grids and a creation wizard for adding and editing Dashboard Layouts.
Note: Users require the "Dashboard Layout Administration" Context permission to access the Dashboard Layouts page and create new Dashboard Layouts.
Prior to this release, the Dashboard Layouts page still resembled the legacy PowerSteering interface.
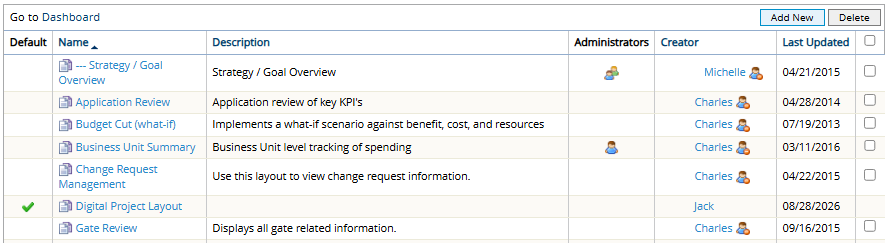
With this update, the page now reflects "UI 2.0". The new design for PowerSteering data grids has been applied.

Tip: Select See the old view in the top right-hand corner to switch your view back to the legacy page. However, please be aware that the legacy Dashboard Layouts page will be deprecated with a future release.
Additionally, new interfaces have been introduced for creating and editing Dashboard Layouts. Prior to this release, these pages also resembled the legacy PowerSteering interface.
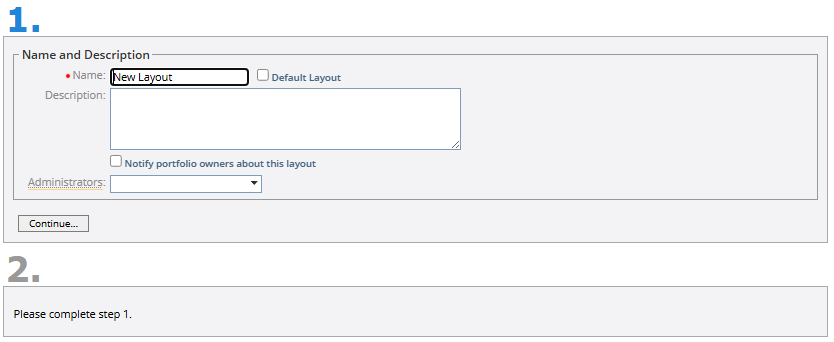
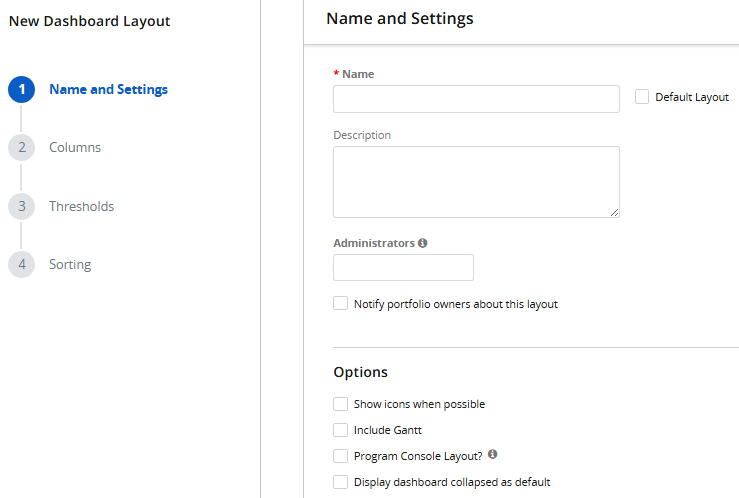
With this update, these pages have been updated to reflect the "UI 2.0" create work wizards that guide users through each stage of the creation/editing process step-by-step.
Benefit:
These new interfaces match the new look and feel that has been implemented across PowerSteering over the last couple of years. Also, the new interface for creating and editing Dashboard Layouts breaks down the process of creating new layouts from six steps to four simplified steps, alleviating the informational overload that comes with lengthy layout creation pages.
Documents
New "Canceled" status for documents
What's Different:
Users can now cancel documents (including document Deliverables) on PowerSteering work items.
While adding or editing work item documents, users will now see a Canceled option under the "Status" drop-down menu.
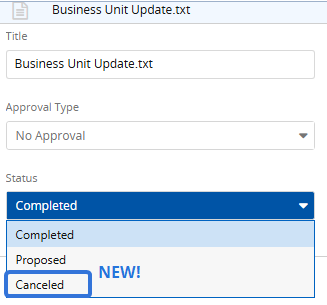
Note: Users require the "Add Document" Project Task permission on a work item to add a document to it, as well as the "Edit Document" Project Task permission to edit its status.
Additionally, users will notice a new Cancel option under each document's "Actions" menu. Selecting this option will give the document a "Canceled" status.
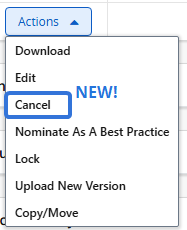
Finally, opening the drop-down arrow  of any document will reveal a Cancel button that can also be used to cancel the document.

Benefit:
Prior to this release, there was no way to indicate that a document was no longer meant to be associated with a work item. Although the document could simply be deleted from the work item, setting the document's status to "Canceled" instead preserves the history of the document. It indicates that the document originally existed on the work item and was intentionally canceled. In PowerSteering environments where records are maintained, changing the document's status is more helpful than permanently deleting it from the application. Additionally, canceled documents can be easily restored if needed, preventing accidental loss and eliminating the need to obtain the original document again.
General
Improved Upgraded interface for data grids
What's Different:
A new interface has been introduced to PowerSteering data grids.
Prior to this release, data grids resembled the legacy PowerSteering design.

With this update, data grids have been enhanced to reflect PowerSteering's new "UI 2.0" interface.
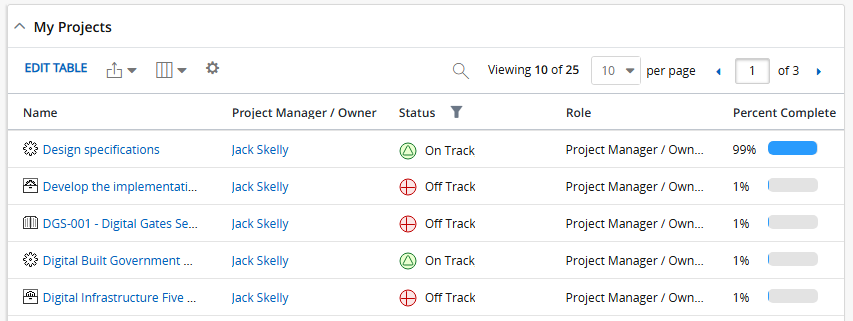
Users will notice that grid display options (such as the filter/sort drop-down menu and the column separators) are no longer visible at first. This is because users will have to hover the cursor over column headers to reveal them.
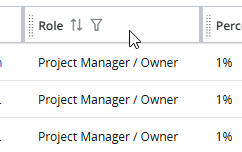
Similar to legacy data grids, icons will be displayed when filters or sorting options have been applied.
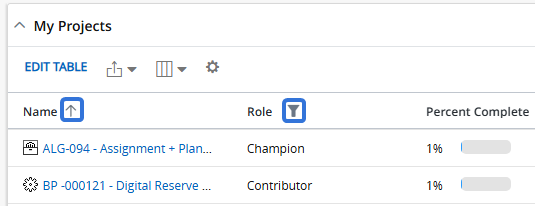
Benefit:
This new interface matches the new look and feel that has been implemented across PowerSteering over the last couple of years. This is one of many ongoing updates being worked on to make PowerSteering more usable, unified, and intuitive.
Improved "Description" and "Message" columns added to work item modules
What's Different:
Columns for "Descriptions" have been added to the following work item grids:
-
Issues (named "Messages")
The column can be added to the grid on each Summary page module or on each entities specific page. The Select columns drop-down  now contains an option for "Description".
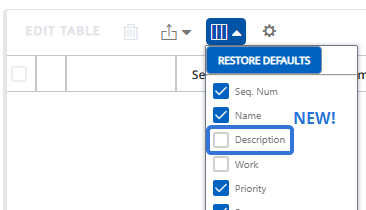
Benefit:
The "Description" column gives users a quick synopsis of the entity as they scroll through the data grid, preventing them from having to open each individual item up to see what it is about. Additionally, many users export these grids so they can save them as files on their devices. With this upgrade, they can choose to include descriptions in their downloaded files as well.
Improved Character limits removed on descriptions
What's Different:
There are no more character limits on "Description" text fields in PowerSteering.
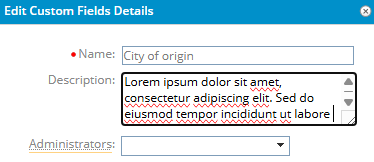
Prior to this release, a character count was displayed under description boxes.
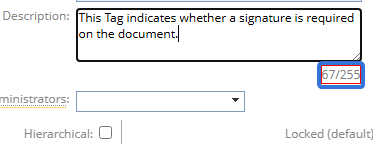
With this update, the character count has been removed.
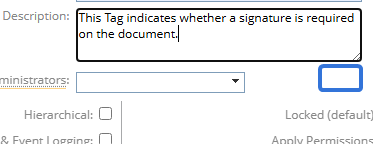
Caution: Excessively long descriptions on too many entities can lead to slower application performance. Reach out to your PowerSteering representative for tips on sustainable description sizes.
Benefit:
PowerSteering description boxes often contain in-depth details that cannot be articulated in a short amount of characters. Removing these limits gives users the freedom to describe their work items and entities without making any concessions or trimming out important details.
Home Page
Improved "Owner" column available for "My Projects" Home Page module
What's Different:
Users can now add an "Owner" column to the optional "My Projects" Home Page module. This column can easily be added to the module by opening Select columns  and selecting Owner.
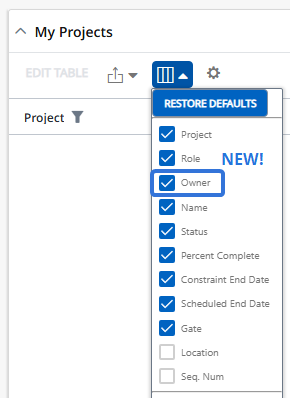
Note: "Owner" is a replaceable term in PowerSteering. It might be named something else in your PowerSteering environment.
This column displays the Owner of each listed work item in the "My Projects" module.
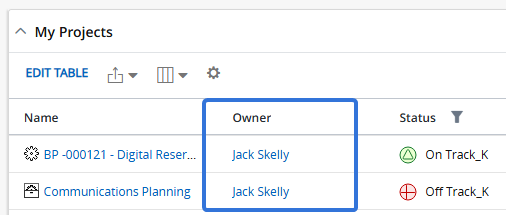
Benefit:
The new "Owner" column gives users greater visibility into work item ownership, making it easier to identify the user responsible for each work item without having to open them manually.
Logs
Improved Log views for user profile changes
What's Different:
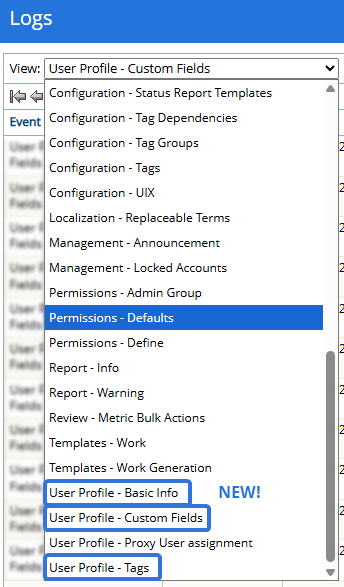
The Logs page now includes views that record changes to user profiles in PowerSteering.
Note: Only PowerSteering administrators can access the Logs page.
The following views can now be selected from the "View" menu:
-
User Profile - Basic Info: These logs record any changes made to basic fields on a user profile.
 Click here for a list of fields that will create a log if edited
Profile information
-
Username
-
Full name
-
Phone
-
Mobile
-
Fax
-
Pager
-
Primary email
-
Department
-
Title
-
License type
-
Groups
Business information
-
Company name
-
Address
-
City
-
State
-
Zip
-
Country
Project availability
-
Start date
-
-
User Profile - Custom Fields: These logs record changes to any Custom Field values on a user's profile, including values that are added, removed, or changed.

-
User Profile - Tags: These logs record changes to any Tag values on a user's profile, including values that are added, removed, or changed.

Benefit:
These new log views give administrators visibility into all changes made to user profiles, making it easier to identify changes, troubleshoot issues, and maintain an accurate history.
Metrics
New Copy specific Metric line items
What's Different:
Users can now copy data from specific Metric line items (rows) on one Metric view to another.
Note: Users can only copy Metric data that they have permission to edit. They require the "Update Metric Numbers" Project Task permission on the work item to copy numeric data, the "Update Metric Custom Fields" Project Task permission to copy Custom Field data, and the "Update Metric Tags" Project Task permission to copy Tag data.
Prior to this release, copying Metric data required users to copy all data from one Metric view into another view. Selecting Copy From → (Metric view) would copy all of the data from the selected view into the current view, including numeric, Custom Field, and Tag data.
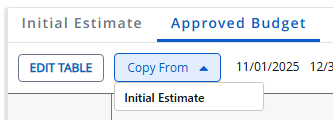
With this update, selecting a Metric view will not immediately copy all data from the selected view into the current one. Instead, a new "Copy Data" window will open up.
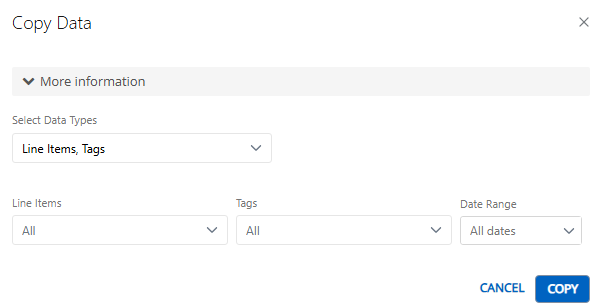
Users can configure these fields to determine which data will be copied from the selected view to the current view.
-
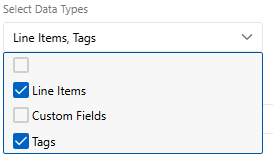
Select Data Types: Select which types of data will be copied over: line item data (numeric data), Custom Field data, and/or Tag data.
-
Line items: Select which line items will be copied over. Only data from the selected line items will be copied.
-
Custom Fields / Tags: Select which of the Custom Fields and/or Tags will be copied over. Only data from the selected Custom Fields and/or Tags will be copied.
-
Data Range: Select a date range for the numeric data that is to be copied. Only data that falls within the date range will be included.
Note: This option will only appear if Line Items is selected from "Select Data Types".
After selecting the Copy button, only the selected data will be copied from the selected view over to the current one.
Additionally, this feature is also available for Metric Bulks Actions. While setting up Metric Bulk Action jobs for copying Metric data, users will notice changes.
Prior to this release, selecting Copy from the "Action" menu would always copy all data from one Metric view to others.
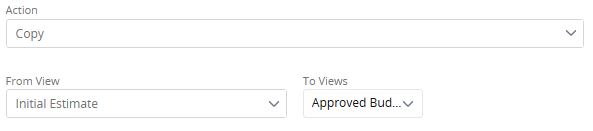
With this update, selecting Copy reveals the same drop-down menus from the "Copy Data" window above.
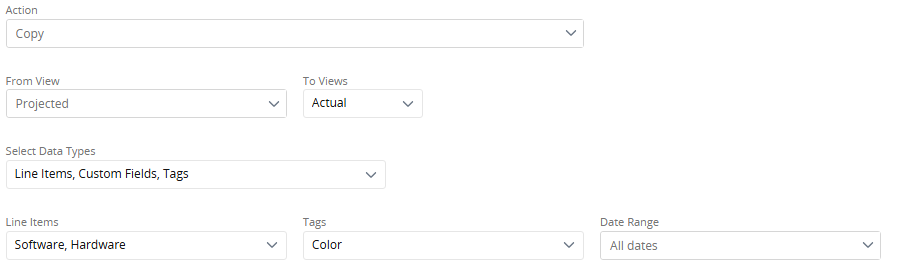
These fields can be used to determine which data will be copied from one view to others, just like they on individual Metrics.
Note: With this release, all existing Metric Bulk Action jobs set to copy data will still copy all of a view's data just like they did prior to this release. However, users can edit them to only copy specific data.
Benefit:
The ability to only copy specific Metric data gives users much more control over how information is transferred from one view to another. It reduces unnecessary data that might not need to be copied, saving users time from having to manually remove this data themselves. Also, selecting specific data reduces the chance of unintentionally carrying over outdated or irrelevant information that could be misleading or problematic.
Microsoft Teams
Improved Create private Microsoft Teams
What's Different:
Microsoft Teams spaces can now be created as either private or public in PowerSteering.
-
Private: Non-members can not see the Team. They can only see the Team if they are invited as a member.
-
Public: Non-members can search for and join the Team.
Before creating a Microsoft Teams space, reach out to your PowerSteering representative to configure it as public or private.
Benefit:
This new configuration allows PowerSteering users to choose between public and private Microsoft Teams spaces based on their collaboration and access needs. Teams spaces that are more collaborative and open can be set to public while spaces that require confidentiality and sensitive topics can be set to private.
Reporting
Improved Role removed from "Resource Pools at Period" column
What's Different:
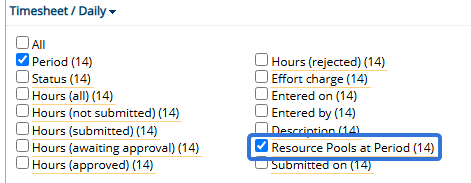
The "Resource Pools at Period" Report Wizard column will no longer display a Role when included in reports.
Prior to this release, this column was named "Resource Pools at Period (Role)". It displayed the Resource Pools that the user belonged to during the Timesheet period along with the assigned Role on the work item.
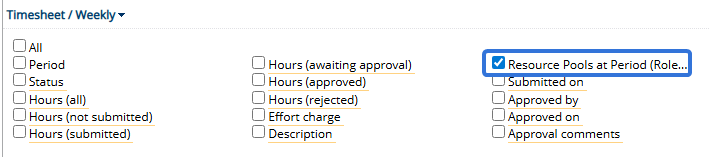
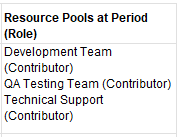
With this update, Roles have been removed from the column's values.

Benefit:
The original "Resource Pools at Period (Role)" column included a bit of information overload. Removing the Role makes column values simpler and easier to scan, reducing clutter from already data-heavy reports.
Users
Improved "Default location in Work Tree" retained for reactivated users
What's Different:
Reactivated no-access users will now have their "Default location in Work Tree" selection retained.
Prior to this release, PowerSteering would not store this information. Users that had a "Default location in Work Tree" selected would no longer have it after they full profiles were restored.
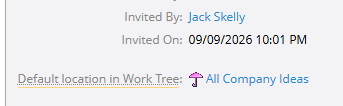
This user's "Default location in Work Tree" has been set to "All Company Ideas".
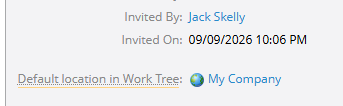
Once the user was set as "No-Access" and then re-invited to PowerSteering, they received the default value instead of their original one.
With this update, the "Default location in Work Tree" value will be remembered once the no-access user is re-invited to PowerSteering.
Benefit:
Omitting the "Default location in Work Tree" would sometimes cause workflow problems for users who were expected to create new work in the same Work Tree location. With this update, re-invited users no longer need to worry about searching through suitable Work Tree locations while adding new work, and administrators no longer need to manually record and then add each user's "Default location in Work Tree" while re-inviting them to PowerSteering.
Work Tree
Improved Faster loading Work Tree for administrators
What's Different:
A new version of the Work Tree has been implemented for PowerSteering administrators. This Work Tree will load almost immediately, requiring very little loading time even when the structure is complex.
Note: This Work Tree will be implemented for other users at a later date.
Benefit:
Prior to this upgrade, complex Work Trees would often take a long time to load onto the page. Expanding certain elements could cause extremely long loading times that resulted in timeouts. With this update, administrators can browse through work items quickly without wasting time waiting for parts of the Work Tree to load or for child items to appear.