2026R1.0 - New Features
Below is a summary of the new additions to PowerSteering in the 2026R1.0 release. PowerSteering 2026R1.0 is currently scheduled to be deployed to the staging site on March 25th, 2026 and deployed to the production site on April 12th, 2026. When this happens, the listed features will become available.
Note: This page will be updated as new functionality becomes available.
The following key features will be made available with the 2026R1.0 PowerSteering release:
What's Different:
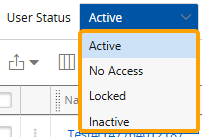
A new "Users" page can be reached by selecting Review → User Mangagement → Users (New) from the Navigation Menu.

This new page features a sortable, filterable, and searchable data grid of all users in your PowerSteering environment.

Note: All PowerSteering users can access this page regardless of their permissions. However, their permissions will determine which data they can view.
The users listed on this page are determined by the "User Status" drop-down menu above the grid. Selecting any of the options will only display users that meet the criteria of the selected status.
-
Active: Users with active PowerSteering profiles that can currently log in to the application.
-
No Access: Users who are designated as No Access Users. They represent real-world individuals who do not have access to PowerSteering.
-
Locked: Users with profiles that are currently locked due to account expiry.
-
Inactive: Users who have been deleted from PowerSteering.
The grid on the "Users" page contains many of the same features as other PowerSteering data grids, including an Export button  , Column selector
  , Search bar
  , and page selector.
Note: The Search bar will search through all displayed data in the grid, not just the names of users. For example, imagine a user searches for "Jack":
Users named Jack (or with "Jack" in their name) will be included. However, the "Invited By" column is currently displayed on the grid, so its values will also be included in the search. This means that every user invited by someone named Jack (or with "Jack" in their name) will be included in the search results.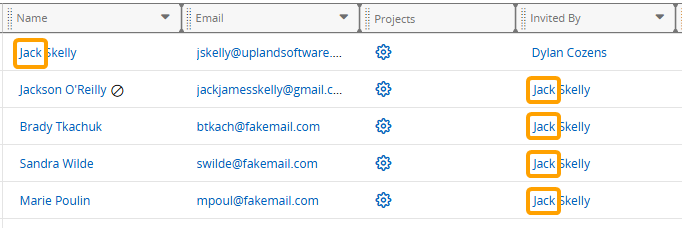
Note: Changes to the data grid (column selection, ordering, sorting, etc.) will be saved for individual users. This means when you make any changes to the grid, the changes will only be seen by you. Other users will not see these changes when they access the page.
Selecting Restore Defaults from the Column selector will revert any changes you make and return to the default layout.
The following columns can be included using the "Select columns" drop-down menu.

-
Name: The user's name. Selecting the name will direct you to the user's profile.
-
Email: The user's email address. Selecting the address will automatically open up your device's email application as well as an email addressed to the user.
-
Projects: Select the Projects icon
 to display a table of all work items assigned to the user.
Tip: By default, the table is sorted by "Role" values. Select any column header (excluding "Gate" and "Location") to sort the table by other values.
-
Invited By: The user who originally invited/created the user.
-
Last Login: The date the user most recently logged in to PowerSteering.
-
Invited Date: The date the user was originally invited/created, formatted mm/dd/yyyy.
-
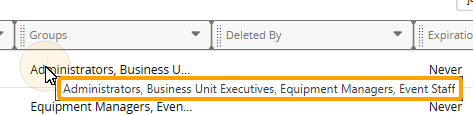
Groups: A list of each Group the user belongs to.
Tip: If all of the Group names do not fit in the column, scroll your cursor over them to reveal the full list.
-
Deleted By: The user who deleted the user.
-
Expiration Date: The date the user's profile is set to expire in PowerSteering.
-
Deleted Date: The date the user was deleted from PowerSteering, formatted mm/dd/yyyy.
-
No Access: Indicates whether the user is a No Access User.
-
Days Since Invited: The number of days since the user was originally invited/created.
-
Locked: Indicates whether the user's profile is currently locked.
-
Online: Indicates whether the user is currently logged in to PowerSteering.
-
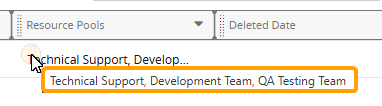
Resource Pools: A list of each Resource Pool the user belongs to.
Tip: If all of the Resource Pool names do not fit in the column, scroll your cursor over them to reveal the full list.
-
Roles: A list of each Role that has been added to the user's profile.
Tip: Scroll your cursor over the Roles to reveal the maximum capacity of each Role.

-
Tags: Select the checkboxes of any Tags you would like to add as columns. Each column will contain the user's value(s) for the Tag.
Note: Only Tags that have been associated with users will be available. See Edit Tag Details for more information.
-
Custom Fields: Select the checkboxes of any Custom Fields you would like to add as columns. Each column will contain the user's value(s) for the Custom Field.
Note: Only Custom Fields that have been associated with users will be available. See Edit a Custom Field for more information.
Benefit:
The new centralized "Users" page provides visibility into user data across PowerSteering, allowing users to review Roles, Resource Pools, login information, work, and other configuration details all in one place.
This page also provides more powerful search capabilities, making it much easier to locate users and their associated information. Prior to this release, the "Find a Person" page could be used to search for users based only on their Tag values. With the users page, users can be searched for using values under any of the exposed data columns. They can also be filtered and sorted by these values, making it easier to locate specific users based on your desired criteria.
Looking Ahead:
You may notice a column of checkboxes on the left-hand side of the data grid, as well as a column of grayed-out menu icons:
In a future release, these columns will be used to take action on users directly from the data grid itself.
What's Different:
A new GET endpoint for capturing report results has been added to the PowerSteering REST API. This endpoint will specifically capture data from the report's last scheduled run. Running the endpoint will download the report directly onto your device in your preferred file format (CSV by default).
Note: Users require the "REST API - Read" Context permission to run GET endpoints. Users with this permission can use their PowerSteering username and password as Basic Authentication credentials when calling the endpoint.
Note: While editing a report's Details and Scheduling, users can select a "Default action" of "Retrieve from last run".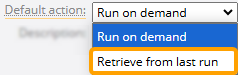
This gives users the option to run the report using data from the last time the report was run instead of triggering a new run.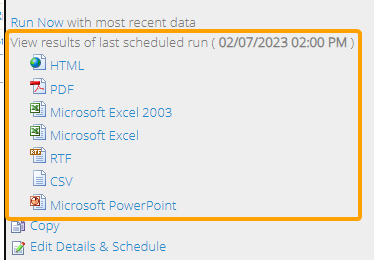
This is the data that will be used for the report; no new data will be generated from PowerSteering.
The endpoint is as follows:
GET <http://{host}/{context}/rest/reportservice/v1/download-stored-results/{reportId}>
Users can obtain the endpoint for a report by visiting the report's Details & Schedule page. Selecting the Copy  icon will automatically copy the endpoint to the clipboard.
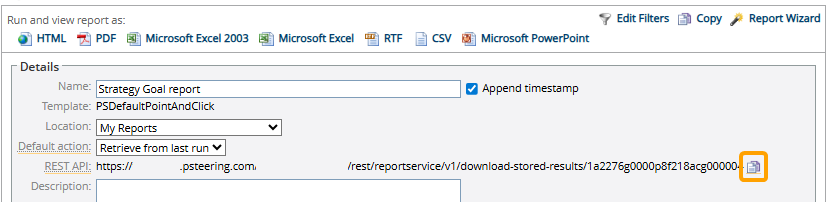
Note: The endpoint will only be displayed if Retrieve from last run is selected from the "Default action" field directly above. Additionally, the endpoint will only appear for users with the "REST API - Read" Context permission to view the endpoint.
The following request parameters are available for the endpoint:

-
reportId (required): The 26-digit ID number of the report.
-
format: Indicate which format the report will be downloaded as. The options are: "CSV", "EXCEL", "PDF", "RTF", and "PPT". If this parameter is not included, the report will be downloaded as a CSV file by default.
Benefit:
This new endpoint makes it easier to access report data outside of PowerSteering. Prior to this release, integrating report data with third-party tools (such as Microsoft Power BI) required users to download a report and reform the data so it would fit correctly. Exposing this data through a REST API endpoint enables more efficient reporting workflows and supports automated data ingestion for advanced analysis through external tools.
What's Different:
Users can now use the Formula Builder to create EML functions that will automatically calculate Target Dates and Target Values while creating new Measures with Goal Indicators.
Prior to this release, users could only select static dates and values for the "Target Date" and "Target Value" fields, respectively.

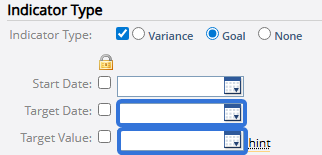
With this update, users can still decide to select specific dates or values, but they can also elect to use a formula instead.

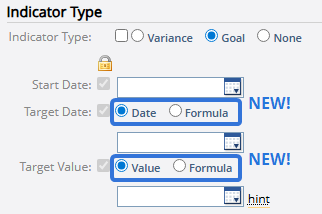
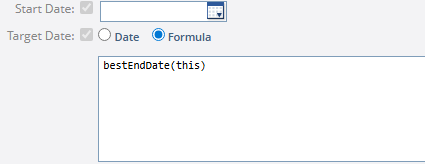
Selecting Formula will open up the Formula Builder, allowing the user to enter a formula that will automatically calculate the date or value.
Benefit:
Prior to this upgrade, values selected for the "Target Date" and "Target Value" fields were always static; they were always the same regardless of the work item they were attached to. This was a problem because these fields are not meant to follow a "one-size-fits-all" approach to each work item. Different work items have different characteristics, so selecting a single, specific "Target Date" or "Target Value" for a Measure Template does not make much sense. By using the Formula Builder, users can create dynamic "Target Dates" and "Target Values" that adapt to the unique characteristics of each work item.
Example: Phoebe wants to create a simple Measure to track when "Project Wrap-Up" documents are submitted for her team's Projects. She attaches the Measure to each Project and instructs her Project Managers to manually enter the submission date into the Measure once they receive the Project's document.
Ideally, these documents should be submitted by the Project's End Date, so Phoebe decides this is a suitable "Target Value". With this update, she can now select Formula and enter a formula to capture the Project's end date. This way, the "Target Value" is unique to each Project.
What's Different:
The Upland Assist window will now use generative AI (GenAI) to produce helpful content in response to search queries. When users enter text into the Upland Assist search bar, the window will immediately begin generating an answer to the user's search. Each generated response will suggest help articles that contain additional information on the topic.
Tip: Be aware that although the generative AI, it can sometimes make mistakes. Please refer to help articles or your PowerSteering representatives if you require a deeper understanding of specific topics.
Example: Hailey wants to know more about deleting PowerSteering users, so she opens the Upland Assist window and types "delete users" into the search bar. Within seconds, Upland Assist begins generating some basic information about deleting users from the application.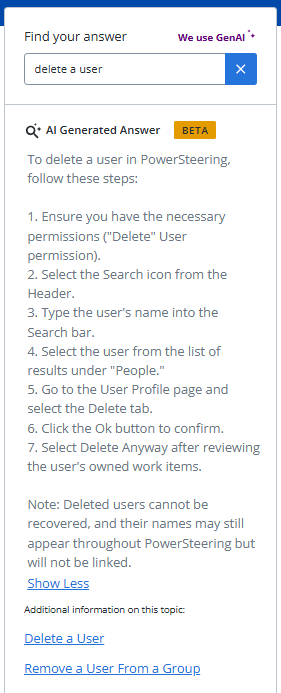
If the automated content does not answer Hailey's question, she can navigate to the "Delete a User" page under additional information.
Benefit:
Upland Assist was designed to provide users with a seamless way to learn about PowerSteering without having to navigate away from the application and interrupt their workflow. The introduction of GenAI takes this one step further by giving users information without even requiring them to select a help link. This combination of simplified guidance with online help links improves efficiency and reduces time spent searching through the help site and contacting support.
The following enhancements will also be available with the 2026R1.0 release:
API
What's Different:
A new Risk service has been added to the PowerSteering REST API. This service includes two new GET endpoints for retrieving data from work item Risks:
-
GET <http://{host}/{context}/rest/riskservice/v1/risk/{id}>
This endpoint retrieves Risk data based on Risk ID. Only one request parameter is available:

-
id (required): The 26-digit ID number of the Risk.
Tip: A Risk's ID number can be retrieved by running the new .../risks endpoint (below).
It can also be manually retrieved by editing the Risk and viewing the 26 digits at the end of the URL.
The response will include all "risk" objects. See the "Object types reference" page in the REST API Help for a full list.
-
-
GET <http://{host}/{context}/rest/riskservice/v1/risks
This endpoint can retrieve data for multiple PowerSteering Risks at once. The following request parameters can be added to filter the Risks that appear in the response:

-
name: Filter the Risks by their name. Only Risks that contain the value in their name will be included in the response.
-
onlyFirst: If the value is set to "true", only the first Risk that satisfies the parameters will be included in the response.
-
status: Filter Risks by their current status (Assigned, Unassigned, or Closed). Only Risks with the selected status(es) will be included in the response. If more than one status is selected, they must be separated by commas (i.e. "assigned,closed").
-
projectId: Filter Risks by the 26-digit ID numbers of the work items they belong to. Only Risks that belong to the selected work item(s) will be included in the response. If more than one work item is selected, they must be separated by commas.
-
modFrom: Filter Risks by the date they were most recently changed. Only Risks that were most recently edited (or received an attached document) on or after the date will be included in the response. Dates must be formatted as mm/dd/yyyy.
-
modTo: Filter Risks by the date they were most recently changed. Only Risks that were most recently edited (or received an attached document) on or before the date will be included in the response. Dates must be formatted as mm/dd/yyyy.
-
start: Indicate how many results should be skipped in the response.
Example: Entering "start=50" will omit the first 49 Risks that would have been included in the response.
-
count: Indicate how many Risks should be included in the response.
Example: Entering "start=50" will only include the first 50 Risks that would have been included in the response.
The response will include all "risk" objects for each included Risk. See the "Object types reference" page in the REST API Help for a full list.
-
Benefit:
The new REST API Risk service provides users with a way to integrate Risk information with tools and workflows external to PowerSteering. It allows developers to pull Risk data directly into other systems, such as Business Intelligence (BI) tools, custom dashboards, or data warehouses. Risk-related API endpoints make Risk data accessible, integratable, and automatable, allowing customers to use the information beyond the PowerSteering interface.
If you would like some help taking full advantage of PowerSteering's REST API, contact your PowerSteering representative.
What's Different:
A new "gateDetails" object is now available in the response of four Project service REST API GET endpoints:
-
GET <http://{host}/{context}/rest/projectservice/v1/project/{id}>
-
GET <http://{host}/{context}/rest/projectservice/v1/projects>
-
GET <http://{host}/{context}/rest/projectservice/v1/download>
-
GET <http://{host}/{context}/rest/projectservice/v1/downloadAllWorks>
Whenever the "includeResourceDetails=true" request parameter is included, the "gateDetails" object will be displayed for all Gated Projects included in the response. This object contains the following fields for each Gate:

-
id: The 26-digit ID number of the Gate.
-
link: A link to further data about the Gate.
-
name: The name of the Gate.
-
resourceDemands: An object containing data about each Role demand attributed directly to the Gate.
Note: Demand occurs when a Role been assigned to a work item (or, in this case, a Gate) but no Resource. It is essentially an unstaffed position on the Gate.
Note: This object will not include any effort demands on work items that belong to the Gate. The demand must be made against the Gate itself.
This object contains the following fields for each unstaffed "role":
-
id: The 26-digit ID number of the Role.
-
link: A link to further data about the Role.
-
name: The name of the Role.
-
effort: The number of unstaffed hours attributed to the Role on the Gate.
-
-
resourceAllocations: An object containing data about each Resource allocation made directly on the Gate.
Note: An allocation occurs when a Resource has been assigned to a work item (or, in this case, a Gate).
Note: This object will not include any allocations on work items that belong to the Gate. The allocation must be made against the Gate itself.
This object contains the following fields for each allocation, organized by "role":
-
id: The 26-digit ID number of the assigned Role.
-
link: A link to further data about the Role.
-
name: The name of the Role.
-
user: An object containing data about the assigned Resource. It includes the following fields:
-
id: The 26-digit ID number of the assigned Resource.
-
name: The name of the assigned Resource.
-
-
effort: The number of hours assigned to the Resource allocation.
-
Benefit:
Prior to this release, Resource allocation and demand information on Gated Projects was available whenever any of the above endpoints were hit. However, the response would only include allocations and demands made directly against the Gated Project itself; there was no way to display assignments made directly on specific Gates.
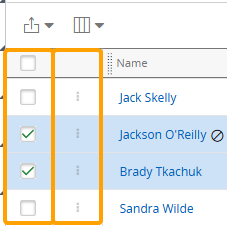
Example: Have a look at the two assignments below.
Prior to this upgrade, Sandra's allocation (which is made directly against the Gated Project) would be included in API responses while Brady's allocation (which is made directly against a Gate) would not.
With this update, data from allocation and demand toward specific Gates can be integrated directly into other systems, such as Business Intelligence (BI) tools, custom dashboards, or data warehouses.
What's Different:
The PowerSteering REST API can now be used to retrieve information on a specific Tag by its ID number.
The GET <http://{host}/{context}/rest/tagservice/v1/tags> endpoint has received a new parameter:
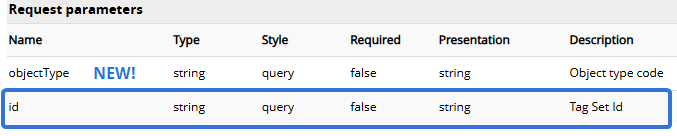
-
id: The 26-digit ID number of the Tag(s) you would like to include in the response.
Tip: All Tag ID numbers can be retrieved by running this endpoint without any parameters.
It can also be manually retrieved by navigating to the Tag and viewing the 26 digits at the end of the URL.
Note: This parameter only supports one ID number at a time. It does not support comma-separated values.
The response will include the "tagset" objects for the Tag identified in the request parameter.
Benefit:
Prior to this release, there was no way to retrieve specific Tags using the REST API. Users would usually have to comb through a larger responses full of unwanted Tags before identifying the one they were interested in. By filtering the response by a Tag ID number, API users will retrieve faster and more precise data while searching for Tags. Additionally, they can create simplified integrations that use unique Tag identifiers.
Costs
What's Different:
Each work item's Estimated Costs page now features an "Hours" column, as well as a total count of all assigned hours.

The column displays the total number of hours each Resource is assigned to the work item. These hours (along with the Resource's rate) are used to calculate the Estimated Cost of the assignment under the "Amount" column.
Tip: See Estimated Labor Costs for information on how Estimated Costs are calculated from Project Central assignments.
Note: The "Hours" column will only display values for estimated labor costs. Manually entered Estimated Costs will not display any values under this column.
Benefit:
By displaying the number of assigned hours next to each estimated labor cost, Project Managers are provided with increased visibility into the financial impact of work effort. This allows them to plan Resources more efficiently and make better staffing decisions before their estimated labor costs become actual labor costs that must be compensated.
Field Management
What's Different:
Visibility rules defined for work item Tags and Custom Fields on the Field Management page are now applied to work item Summary pages as well as the Create Work wizard.
Note: Users require the "Field Management Administration" Context permission to access the Field Management page and configure visibility rules.
Note: If visibility is not configured for your PowerSteering environment, reach out to your PowerSteering representative to enable it for you.
Prior to this release, work item visibility rules only applied to the Create Work wizard. When administrators edited the visibility rules for an Object Type, the rules would not apply to Tags and Custom Fields that existed on the Summary page once the work item was created.
Example: Alex's PowerSteering environment has two location-based Tags attached to Projects: "Texas Cities" and "New York Cities". If a Project has a Texas location, it does not need a New York location, so Alex would only like the "New York Cities" Tag to be visible when the "Texas Cities" Tag is empty.
Under the "Project/Work Types" menu on the "Field Management" page, he selects "Project" and adds the following function into the "New York Cities" Formula Builder: isEmpty(this, @Tag[Texas Cities]).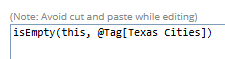
This function is helpful while creating Projects; the "New York Cities" Tag disappears whenever a value is selected for "Texas Cities".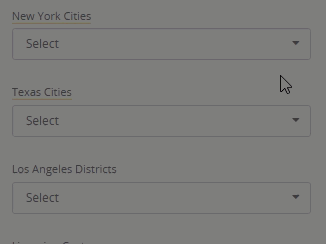
Click thumbnail to play.
Prior to this release, however, this would not be the case once the Project was created. Selecting a value for "Texas Cities" on the Project's Summary page would not cause the "New York Cities" Tag to disappear.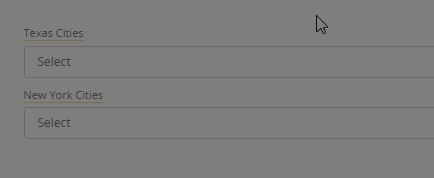
Click thumbnail to play.
With this update, Tag and Custom Field visibility rules will be respected on work item Summary pages as well as the Create Work wizard.
Benefit:
Prior to this release, the lack of visibility rules on Summary pages would lead to inconsistencies and confusion, especially because these rules were respected while creating work. Project circumstances change constantly and Tags and Custom Fields often require new values after projects are created. When this is the case, the same visibility rules applied to Tags and Custom Fields should be applied. It ensures that users only see relevant Tags and Custom Fields, helping them focus on key details without distraction from unnecessary fields.
Manage Time
What's Different:
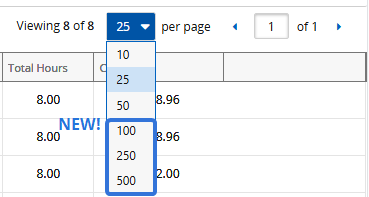
Users now have the option to view up to 500 Timesheets at once on the Manage Time page.
Prior to this release, the Manage Time page featured a pagination of 50 Timesheets at once.
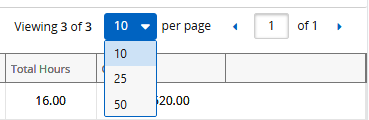
With this update, users can now view 100, 250, and 500 Timesheets at once on the page.
Benefit:
Increased pagination options reduce navigation and improve efficiency while reviewing and approving large amounts of Timesheets at once.
Reporting
What's Different:
The "My Reports", "My Data Extracts", and "Public Reports" pages now feature a "Last Run By" column for each listed report. This column indicates the user who most recently ran the report. If the report ran automatically due to a schedule, the column will simply display a "Scheduler" value.
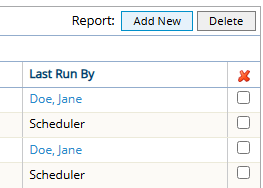
Like other columns, select the "Last Run By" column header to sort the table alphabetically (or twice to sort it in reverse alphabetical order) by these values.
Tip: Select any name under the column to reveal some basic information about the user. From here, select More... to navigate to the user's profile.
Benefit:
The new "Last Run By" column provides visibility into who most recently ran each PowerSteering report. It also indicates whether the report was manually run by a human or generated automatically by a report schedule. This improves transparency into how report data is refreshed and whether it was run manually or by a schedule.
What's Different:
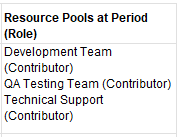
A new "Resource Pools at Period (Role)" column is now available for reports created using the Report Wizard. This column is available for "User/Timesheet" and "User/Timesheet by Period" report types under the "Timesheet" section.
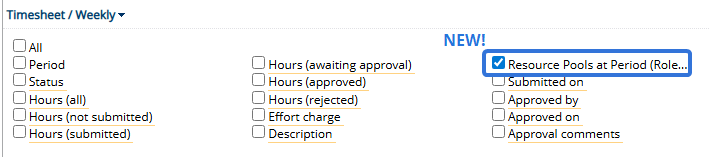
When included in reports, this column displays the Resource Pool(s) the user belonged to during the Timesheet period. Additionally, the user's assigned Role on the work item will be included in parentheses.
Note: This is the Role that has been assigned to the user on the work item, not the Role the user selected while submitting the Timesheet.
Example: Brady belongs to three different Resource Pools. On March 24th, he was reassigned from the "Development Team" Resource Pool to the "Public Relations" Resource Pool.
When a user runs a "User/Timesheet by Period" report, the "Resource Pools at Period (Role)" column will display different values based on the "Period" (which, in this case, is daily). The March 23rd submission indicates he belonged to "Development Team", but the March 24th submission indicates he belongs to "Public Relations" instead.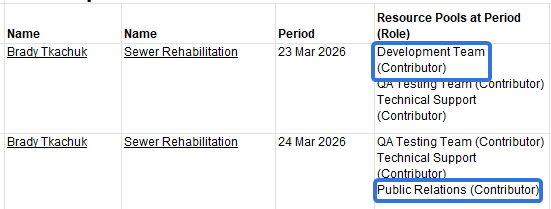
Benefit:
Prior to this release, users could apply a "Resource Pools (Role)" column to these report types. This column would only display the Resource Pool(s) the listed user currently belongs to, not the ones the user belonged to during the indicated Timesheet period. Many organizations use Resource Pools for cost tracking or capacity planning, so Resource Managers would have to manually inspect specific Resource data themselves in order to find this information. By implementing the "Resource Pools at Period (Role)" column, report builders can ensure that User/Timesheet reports will display the correct historical context and organizational grouping for each Timesheet submission.
What's Different:
Users can now include the sequence numbers for work item Programs while creating PowerSteering Report Wizard reports. While editing the report's columns, users will now find two new columns under the "Project" section: "Program sequence" and "Program sequence and name".
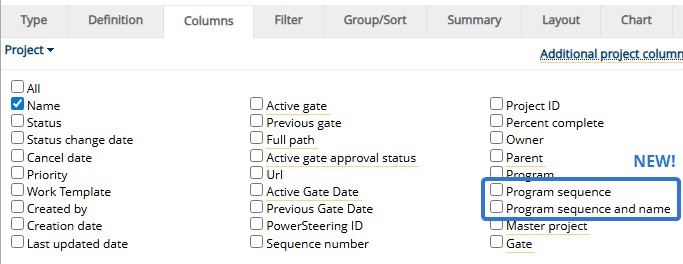
-
Program sequence: The sequence number of the Program the work item belongs to.
-
Program sequence and name: The sequence number of the Program the work item belongs to as well as the name of the Program itself.
Benefit:
Sequence numbers provide an easy way to view Programs in their intended sequence and track where they fall in the Work Tree. Including them in reports provides context into the structure and order of work items, making reports easier to interpret and align with Program planning.
Prior to this release, there was no way to include this data in reports; report builders would have to rely on other tools such as Upland Analytics to retrieve Program sequence numbers and match them with work items. With this update, Program sequence numbers can be included directly within PowerSteering reports, eliminating the need to navigate through the application to provide them.
Resource Review
What's Different:
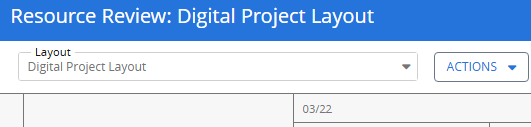
Resource Review Layouts can now be shared with specific users and User Groups in PowerSteering.
Prior to this release, layouts could only be public or private. While editing layouts through the Manage Resource Review page, users could use the "Display for all users (Public Layout)" checkbox to determine whether the layout could be seen by all PowerSteering users or only the creator of the layout.
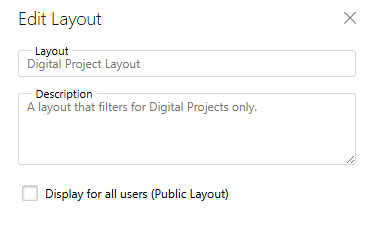
With this update, deselecting the "Public Layout" checkbox reveals a new "Shared With" field.
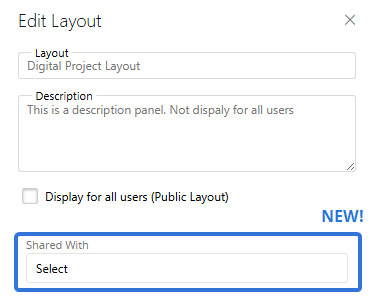
Selecting the field allows users to search for users and groups that they would like to share their layout with.
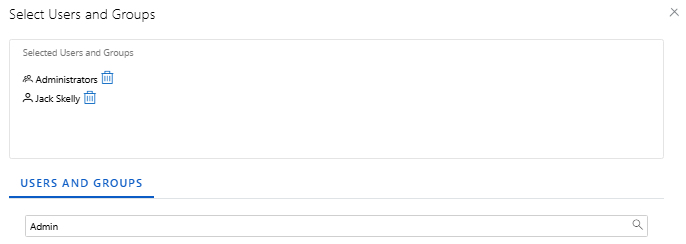
The selected users will be allowed to apply the layout to the Resource Review page.
Note: Sharing only allows other users to apply a Resource Review Layout to the Resource Review page. It does not give them permission to edit the layout themselves. Additionally, keep in mind that users can only see data that they have permission to see on the Resource Review page. Sharing a layout will not allow them to view any data that they do not have permission to view.
Benefit:
Targeted sharing provides more control over the visibility of your Resource Review Layouts. It ensures that users will only have access to layouts relevant to their own roles, which reduces confusion and supports more tailored workflows.
Summary Page
What's Different:
Source work item summary pages will now display a list of generated child work items. Whenever a work item is used as source work, its child work items will be listed under "Generated work items" at the top of the Summary page.
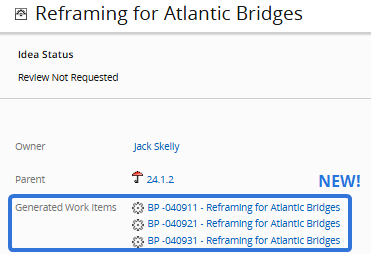
This feature is enabled for every PowerSteering work item by default, but administrators have the ability to disable it by deselecting the "Display work generated items" checkbox while editing Object Types.
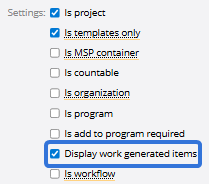
Note: Only PowerSteering administrators can configure Object Types.
Benefit:
Prior to this release, users would have to navigate to a work item's References page to view all of its generated work. With this update, these work items are now listed directly on the Summary page of the source work, eliminating the need to tediously switch from page to page while trying to view generated work items. This is especially beneficial for source work items that are created specifically as vessels for work generation.
What's Different:
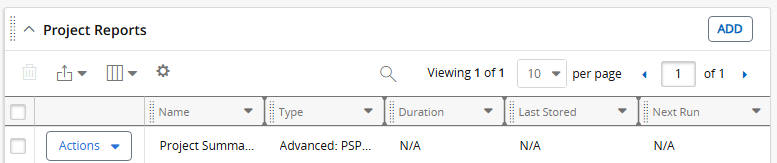
The "Project Reports" Summary page module has been updated to reflect the new PowerSteering data grid interface.
Prior to this release, the module reflected the legacy PowerSteering interface for data grids.

With this update, the "Project Reports" module has been upgraded to the new interface. It now matches the other modules on the Summary page.
Benefit:
With this upgrade, the "Project Reports" module now contains the same features that are available for other PowerSteering data grids, including the ability to customize columns and export the grid data. Additionally, it matches the interface of other modules, contributing to a uniform look and feel of the Summary page.
What's Different:
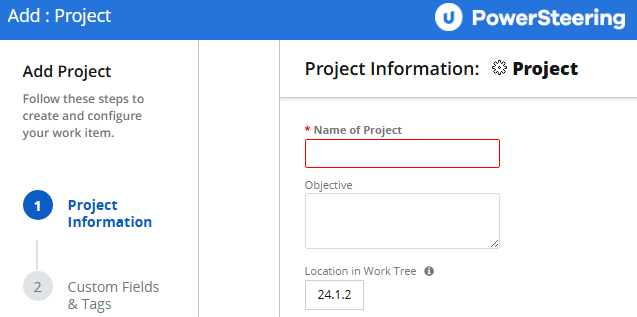
The Copy page has been updated to reflect the new PowerSteering "UI 2.0" interface.
Prior to this release, selecting Project → Copy from the Navigation Menu would automatically open up the legacy Create Work page.

With this update, selecting Project → Copy will open up the new Create Work wizard.
Benefit:
The new Create Work wizard breaks down the process of creating new work into separate steps, alleviating the informational overload that comes with lengthy "Create New" pages. Additionally, it matches the new "UI 2.0" interface, contributing to a refreshed look and feel PowerSteering.
Timesheets
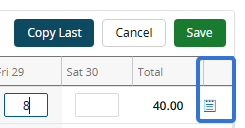
What's Different:
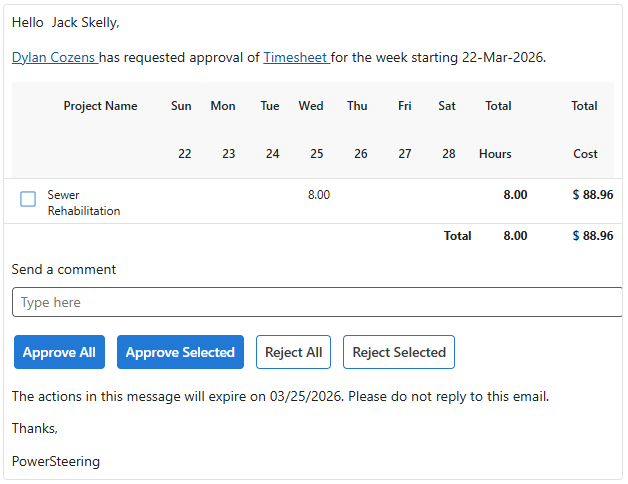
Timesheet approvers can now receive email notifications when Timesheets are ready for their approval. Also, time approvers can accept and/or reject Timesheets directly within the email itself.
Each email is modeled after the Manage Time page; the work items, hours, and labor cost of each Resource Timesheet are all displayed in the email.
Note: To receive these emails, a user must have the "Approve / Reject Timesheets" Manage Time permission or the "Approve/Reject Time" Project Task permission on the work item that time is being entered against.
Additionally, users must configure the "Timesheet Approval Notification preferences" from their Edit Preferences page.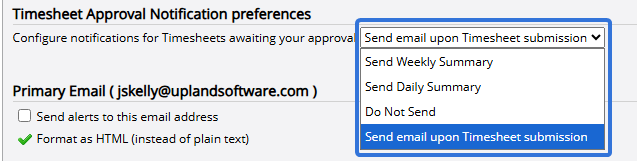
Tip: See Actual Labor Costs for information on how the "Total Cost" value is calculated.
Time approvers can select the checkboxes of any Timesheet submissions directly within the email and then select any of the buttons near the bottom to approve or reject them. They can also include additional information for the Timesheet submitter by entering a comment in the "Send a comment" field.
Note: You may not receive the actionable emails if you are not using Microsoft Outlook. If this is the case, you will still receive the email but you will not be able to make rejection comments directly from the email itself.
Benefit:
Prior to this upgrade, time approvers would always have to log in to PowerSteering to address the Timesheets on the Manage Time page. There was no option to enable an email notification when the Timesheets were ready, so they would have to open up the application and check for themselves. This tedious process was especially irritating for time approvers who were responsible for a large number of Timesheets throughout the week; they would constantly have to open up PowerSteering to make sure there were no submitted Timesheets waiting for them.
With this update, not only are time approvers notified when Timesheets are ready for them, but they can also quickly address them without logging in to PowerSteering, making it more likely that they will promptly respond and less likely that they will procrastinate and forget. Additionally, emails allow time approvers to easily approve or reject Timesheets from their mobile devices, which is especially helpful for users who are away from their workstations but would still like to take actions on Timesheets.
What's Different:
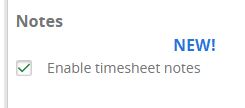
PowerSteering administrators can now determine whether Timesheets will allow notes.
The Timesheets Configuration page now includes a new "Enable timesheet notes" checkbox.
Note: Only PowerSteering administrators can access the Timesheets Configuration page.
When this checkbox is selected, the "Notes" column will be visible and accessible whenever users enter time into their Timesheets.
When it is not selected, the column will be removed from all Timesheets, preventing users from entering notes.
Benefit:
Timesheet notes allow users to provide context around the hours they submit into PowerSteering. However, free-text notes can result in large amounts of unhelpful or irrelevant data. Disabling Timesheet notes helps Resource managers focus on essential Timesheet information such as hours, work items, and Activities.
What's Different:
The Timesheets Configuration page now includes a new "Entry Limits" section.
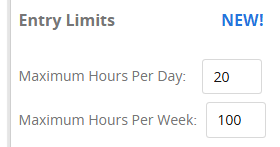
Administrators can use it to determine the maximum number of hours per day and per week that users can enter into their Timesheets.
Note: Only PowerSteering administrators can access the Timesheets Configuration page.
Example: The "Maximum Hours Per Day" value is set to "20".
Jack attempts to add a total of 21 hours into his Timesheet for Monday.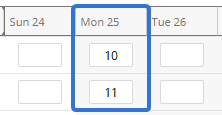
When he attempts to save his Timesheet, the save fails. An error message indicates that he has entered more than the maximum number of daily hours.
Benefit:
Daily and weekly Timesheet hour limits help maintain accurate and realistic Timesheet data across PowerSteering. While entering time, users sometimes make mistakes while inputting numbers (i.e. entering "15" instead of just "5" for the day). This is especially harmful when actual labor costs are used because a user's pay rate is directly tied to their Timesheet hours. Limiting hours helps users catch these exaggerated numbers at the point of entry, preventing others from having to track down cost inaccuracies later on.
Additionally, time limitations help with compliance and labor regulations. Many organizations track Timesheet hours very carefully to comply with labor/overtime laws and contractual limits. Setting a maximum on time entries helps ensure that these requirements are followed.
User Interface
What's Different:
Announcements can now be viewed on pages in PowerSteering that reflect the new "UI 2.0" interface.
Prior to this release, users could only view announcements on PowerSteering pages that still retained the legacy interface. Pages that featured the new interface (New Resource Review, Financial Review, Add Work, etc.) would not display any current announcements at the top of the page.
With this update, pages with the new "UI 2.0" interface will also display active announcements.

Benefit:
Announcements provide an effective way to communicate important updates and notices to PowerSteering users. Unlike emails or other external communications, all users can see them as soon as they log in to PowerSteering. However, many users may find themselves working exclusively within "UI 2.0" pages, especially if their roles are specific (i.e. creating work items, managing Resources, etc.). When this is the case, they may not get a chance to read certain announcements for a significant amount of time. Adding announcements to "UI 2.0" pages helps keep all PowerSteering informed and up-to-date, regardless of where they spend most of their time in the application.