2025R1.0 - New Features
Below is a summary of the new additions to PowerSteering in the 2025R1.0 release. PowerSteering 2025R1.0 is currently scheduled to be deployed to the staging site on March 26th, 2025 and deployed to the production site on April 13th, 2025. When this happens, the listed features will become available.
Note: This page will be updated as new functionality becomes available.
The following key features will be made available with the 2025R1.0 PowerSteering release:
What's Different:
The Resource Review page is currently going through a renovation to reflect the new "UI 2.0" PowerSteering user interface. The 2025R1.0 release introduces Phase 1 of this transformation.
Prior to this release, users would navigate to a Resource Review page by selecting Review → Resource Review from the Navigation Menu and choosing the Resource Review Layout they would like to view.

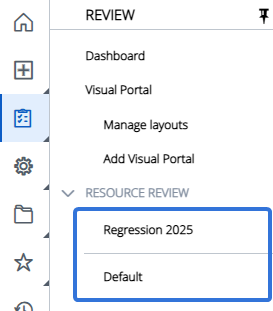
This option is still available with this update; users can still access the standard Resource Review interface by selecting a layout from the "Resource Review" drop-down menu. However, a new Resource Review - New UI option is available directly under the drop-down menu.

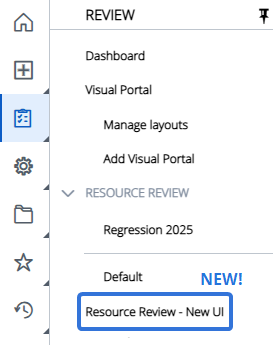
When this option is selected, users will be able to try out the new Resource Review interface.
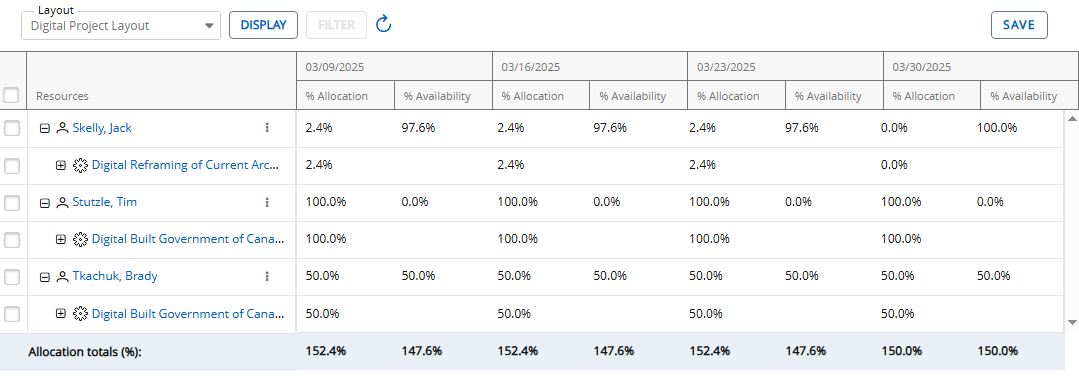
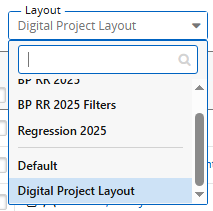
Instead of selecting a Resource Review Layout from the Navigation Menu, users can directly apply one from the "Layout" drop-down menu at the top of the page.
Phase 1 of this transformation allows users to configure some display options for their Resource Review Layouts. Prior to this release, this was done through the "Display" tab.


With this update, users will find a Display button at the top of the page.


Selecting this button will open up the "Display Settings" window on the right-hand side of the screen.
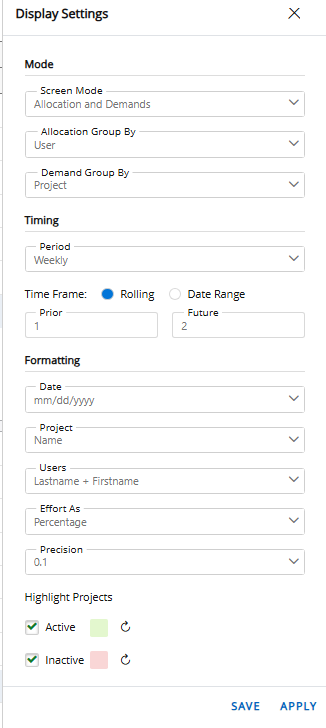
Click on any of the settings below to learn more about their options:
-
Screen Mode: Determine which components of the Resource Review page will be displayed.
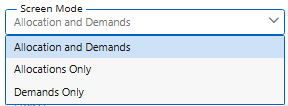
Note: "Demands" is the new name of the former "Unstaffed Demand" section.
-
Allocations and Demands: Both the "Allocations" and "Demands" section will be displayed.
-
Allocations Only: Only the "Allocations" section will be displayed.
-
Demands Only: Only the "Demands" section will be displayed.
-
-
Allocation Group By: Determine how the data in the "Allocations" section will be grouped.

-
Project: The data will be primarily grouped by work items.
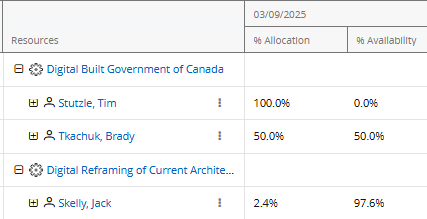
-
User: The data will be primarily grouped by Resources.
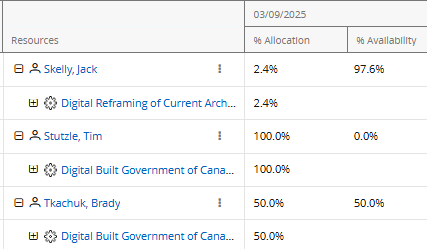
-
-
Demand Group By: Determine how the data in the "Allocations" section will be grouped.

-
Role: The data will be primarily grouped by Resource Role.
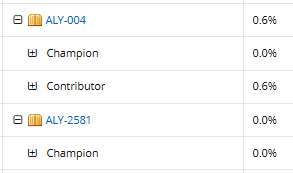
-
Project: The data will be primarily grouped by work item.
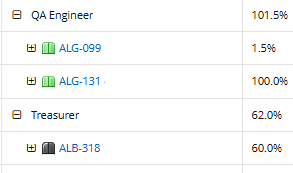
-
- Period: Determine whether the time periods on the Resource Review page will be daily, weekly, or monthly.
-
Time Frame: Determine how the time periods will be displayed on the Resource Review page.
-
Rolling: The date range will be a rolling period that stays up to date as time goes on. It will always display a set number of time periods before and after the current period. When this option is selected, the user will have to determine how many periods will be displayed before and after the current period:

Example: Imagine it is April and the Resource Review page uses "Monthly" periods. If the settings pictured above are applied, the months from March (1 month prior) to June (2 months in the future) will be displayed.
-
Date range: The date range will be a static set of time periods that will not change over time. When this option is selected, the user will have to determine the start and end dates.

-
- Date: Determine how dates will be formatted on the Resource Review page.
-
Project: Determine how work item names will be formatted on the Resource Review page. Users can decide to display work item names, sequence numbers, or both.
-
Users: Determine how Resource names will be formatted on the Resource Review page. Resource names can be formatted with the first name before the last name or vice versa.
-
Effort As: Determine how effort will be displayed on the Resource Review page (both the "Allocations" and "Demand" sections):

-
Hours: The effort and demand data will be displayed as hours.
-
Percentage: The effort and demand will be displayed as percentages of the Resource's total availability.
-
-
Precision: Determine how precise the figures will be:

-
0: Each value will be rounded to whole numbers; they will not contain any decimal numbers.
-
0.1: Each value will be rounded to the nearest tenth; they will all contain one decimal number.
-
-
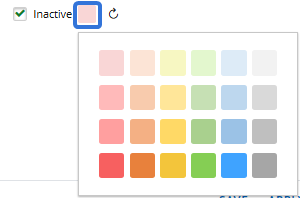
Highlight Projects: Apply a highlight to active and/or inactive work items on the page.

Selecting the "Active" or "Inactive" checkboxes will highlight active and/or inactive work items with the color.

Select the colors themselves to determine the highlight color for the status type.
Tip: View the Work Status Names page to see which Statuses are considered "Active" and "Inactive".
Once you have finished editing the "Display Settings", you can select Save or Apply at the bottom of the window.

Selecting Save will apply your changes to the current Resource Review Layout. Selecting Apply will apply the changes to the Resource Review page, but it will not permanently save them to the layout.
Note: Phase 1 of the Resource Review transformation essentially only allows users to change the display options mentioned above. Other functionality has not yet been implemented.
For example, notice that the Filter button at the top of the page is currently grayed out.
This is because filtering is not part of Phase 1. An upcoming release will implement filtering into the new Resource Review user interface.
If you would like to add filters to a Resource Review Layout, you will need to select the layout from the Navigation Menu and add filters. After that, you can view the updated layout on the new Resource Review page.
Benefit:
This new interface matches the new look and feel that has been implemented across PowerSteering over the last couple of years. This is one of many ongoing updates being worked on to make PowerSteering more usable, unified, and intuitive.
Going forward, the new Resource Review page will introduce more user-friendly components that will offer users the same Resource Review functionality they are used to, as well as additional features that will make it even easier to view and edit Resource assignments and availability.
What's Different:
Users can now express Measure values as dates in PowerSteering. While creating new Measures, users can select "Dates" from the "Display Format" drop-down menu.
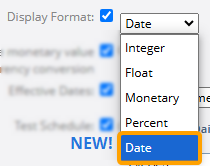
Selecting this option will open up an additional drop-down menu that allows the user to choose a preferred date format for each Measure value.
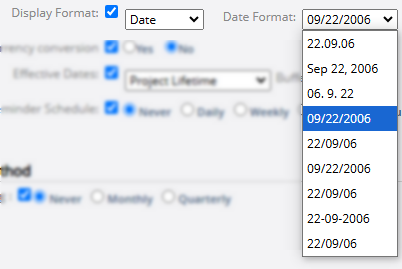
The values that appear on the Measure will be dates displayed in the selected format.

Note: Date values are calculated using the EPOCH time concept. This means that they are calculated by the number of days since January 1st, 1970.
On each Measure, Date values will be displayed in the selected "Date Format" on the "Historical data" table (just like above). However, the y-axis will display EPOCH date values.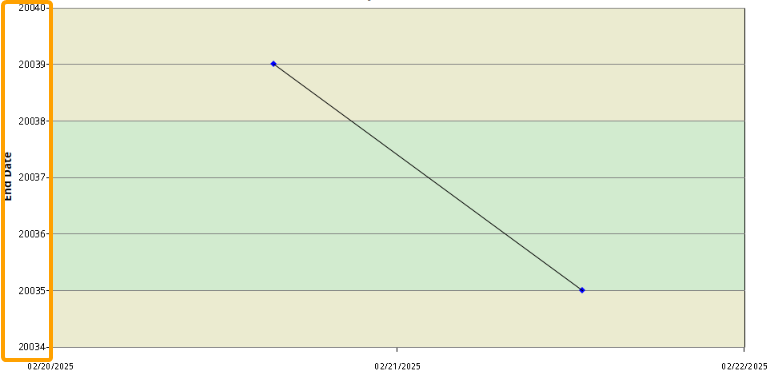
However, users can simply hover over the chart's data points to see the actual date.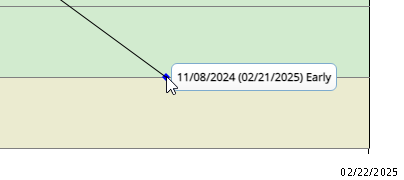
Users who create and edit Measures will also need to enter EPOCH values while determining indicator thresholds. While configuring "Variance" or "Goal" indicator thresholds, users will need to enter their date values as EPOCH numbers.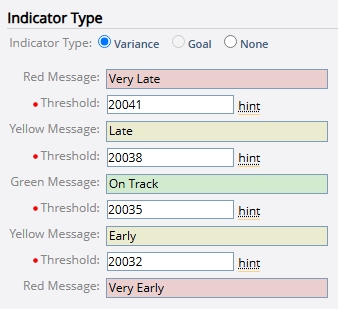
In this example, a date will need to fall between November 8th, 2024 and November 11th, 2024 to be considered "On Track".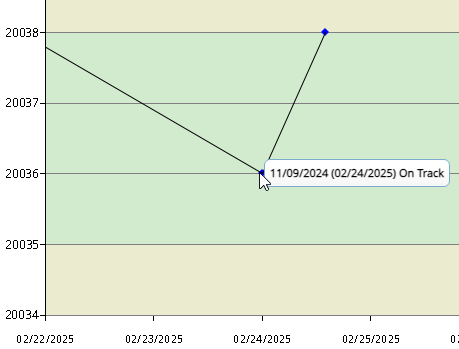
What's Different:
Comments on Metrics from the source work will now be carried over to Metrics on the target work during Work Generation.
Prior to this release, comments from Metrics on the source work would never carry over to the same Metric on the target work. Numeric data, Custom Field / Tag data, and Metric version information could all be transferred to Metrics on the newly-generated work item, but there was no way to include comments.
With this update, any comments that were added to a source work Metric will be automatically included on the target work Metric along with the rest of the data.
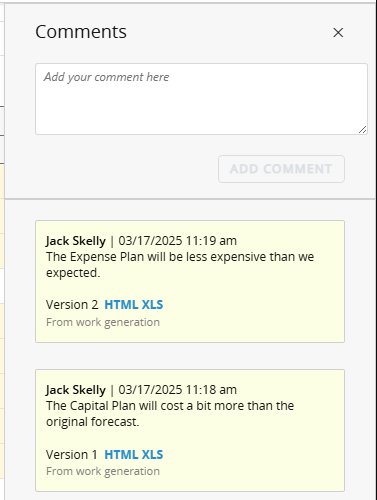
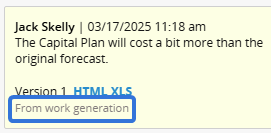
Each comment carried over through Work Generation will display the date and time it was created on the source work item's Metric. These comments will also display a "From work generation" label so they can be differentiated from comments applied directly to the Metric on the target work item.
Note: In order for Metric data to be carried from source work to target work during Work Generation, Metric settings must be configured while creating or editing a Work Generation Template.
Metrics on the template the that are set to any option apart from Ignore will transfer comments from the source work to the target work.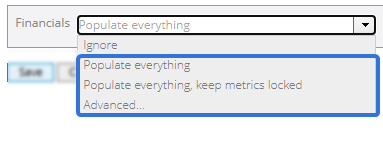
Benefit:
Metric comments provide valuable context about Metric data that helps users understand and make informed decisions about the Metric. This is why Metric comments can be set to mandatory after changes are made to a Metric; without them, Metric editors often need to be contacted for further information. With this upgrade, Metric readers will receive this context for Metric data that is transferred from one work item to a newly-created one through Work Generation.
What's Different:
New Replaceable Term options for "Gate" and "Gates" are now available.

Terms entered into the "Display As" column for these options will replace "Gate" and "Gates" throughout the PowerSteering application.
Example: Piper's organization prefers to use the term "Phase" instead of "Gate" for Gated Projects. This is because the word "Phase" is included in every Gate name.
She decides to use Replaceable Terms to change "Gate" and "Gates" to "Phase" and "Phases" because these terms are so prevalent in her company.
Now, the term "Phase" will appear wherever the term "Gate" used to appear in PowerSteering.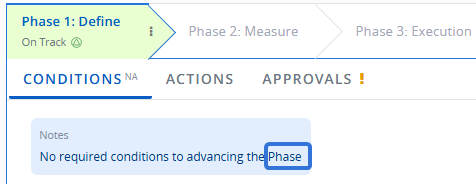
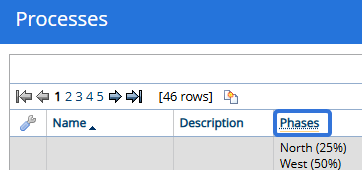
Note: Replaceable Terms will not affect any names of PowerSteering entities. For example, any work items or templates with the work "Gate" in the name will not have their names changed.
Benefit:
Replaceable Terms are used to customize PowerSteering's language to better suit the terminology used in your organization. The term "Gate" is potentially one of the most flexible terms in PowerSteering; users refer to them as "Phases", "Stages", and many other things. With this in mind, it makes sense to add "Gate" as a Replaceable Term and let administrators decide how they should be referred to in the application.
What's Different:
The new Manage Time page will now be the default page for all PowerSteering users. This means that all users will land on the new interface when they navigate to the Manage Time page.
Prior to this release, PowerSteering users would land on the old Manage Time page by default. They could select See the new Manage Time page in the top right-hand corner if they wished.


Note: Prior to this release, PowerSteering administrators would instead land on the new Manage Time page by default.
With this update, the new Manage Time page is now the default landing page for all PowerSteering users. See the old Manage Timesheets page can still be selected by those who prefer the legacy Manage Time user interface.


Tip: The See the old Manage Timesheets page option will eventually be deprecated with a future release. All users responsible for managing Timesheets should be familiarize themselves with the new Manage Time page in preparation.
Benefit:
The new Manage Time page is much more dynamic and intuitive than the legacy user interface. It allows Timesheet managers additional functionality that is not available on the old page. For example, users can filter Timesheets by their statuses instead of selecting one of the status tabs at the top of the screen. This allows them to include Timesheets of more than one status on the page.
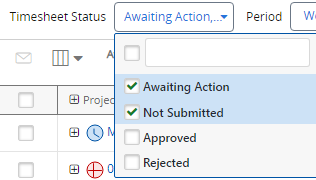
Example: Amira is reviewing the Timesheets of her employees for the week. She is interested in viewing Timesheets that have not been approved or rejected yet. On the legacy page, she would have to switch back and forth between the "Awaiting Action" tab and the "Not Submitted" tab to view these Timesheets. With this new interface, she can simply select both statuses from the "Timesheet Status" drop-down menu and view all of these Timesheets at once.
The new page also includes a count of Timesheets per status for the time period and the option to display periods as weeks or months.

Looking Forward:
Eventually, the legacy Manage Time page will be deprecated from PowerSteering; the See the old Manage Timesheets page link will no longer be available. All users who interact with the old Manage Time page should begin familiarizing themselves with the new layout so they are not taken by surprise when the page is finally removed.
The following enhancements will also be available with the 2025R1.0 release:
API
What's Different:
A new "isManual" attribute has been added for Cost-related API endpoints that are part of the "Transaction" service. This attribute indicates whether the Cost was entered manually from the Costs page or computed from a Timesheet or Resource Planning page.
This attribute will display a boolean value:
-
true: The Cost was entered manually.
-
false: The Cost was computed externally from the Costs page.
Example: Take the "Find all costs" endpoint that returns information on all of a work item's Costs: GET <http://<host>/<context>/rest/transactionservice/v1/project/{project id}/costs>.
Running this endpoint will now include a "isManual" attribute for every Cost included in the API response.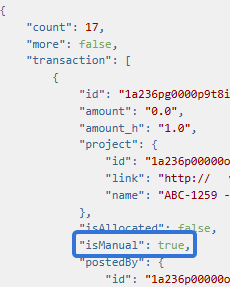
In the response above, the "isManual" attribute indicates that the Cost was manually entered into the work item's Costs page.
Benefit:
The new "isManual" attribute provides important context for listed Costs in API responses. It clearly indicates which Costs were entered manually by PowerSteering users and which Costs were derived from an external source, which ensures transparency and provides accountability for manual Costs. For example, Project Managers performing an audit on their Project's expenses can easily see which Costs were entered by individuals as opposed to Timesheets or the Resource Planning page. If they would like to verify any Costs with the users who entered them, the "isManual" attribute will allow them to skip any Costs that were not entered manually.
What's Different:
Team Member data in the "Get project" REST API endpoint response can now be listed by the work item's Team Members instead of grouped by their assigned Roles.
Prior to this release, Team Member data was always grouped by Role in the endpoint response. When the "Get projects" GET endpoint was called for a work item (GET <http://<host>/<context>/rest/proectservice/v1/project/<projectID>), each of the work item's Team Members were organized based on the Role they were assigned on the work item.

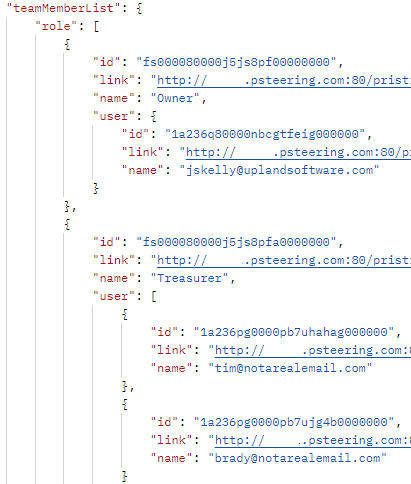
In this example, the work item contains one Owner and two Treasurers. Each Team Member is grouped under their assigned Role.
With this update, the request can be configured to abandon this grouping. A new "roleFlatStructure=true" parameter can be included to list the Team Members in a "flat" list instead of listing them by their Role. The new endpoint can now look like this: GET <http://<host>/<context>/rest/proectservice/v1/project/<projectID>?roleFlatStructure=true.
Running the endpoint with this new parameter will list all of the work item's Team Members without grouping them by Role. All of the Team Members will be presented in a "flat" list.

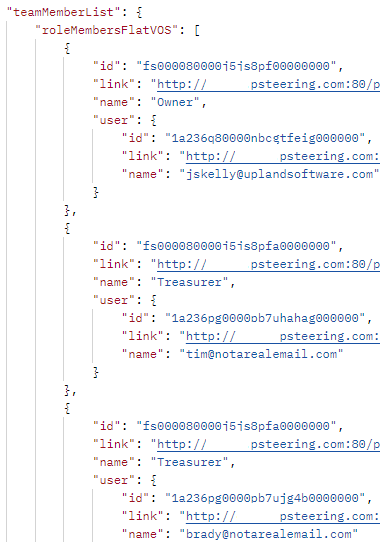
Notice that the two Treasurers are no longer grouped together.
Note: In the context of API responses, "flatness" refers to a single-level array of objects (in this case, Team Members) instead of a hierarchical structure. The Role-based hierarchy will be abandoned when this parameter is included.
The "roleMembersFlatVOS" field directly under the "teamMemberList" field indicates that the parameter has been included and the list of Team Members has been flattened.

Benefit:
A "flat" list of Team Members in the response offers several benefits to REST API users. A flat list allows for easier iteration through Team Members without needing to navigate nested structures. When Team Members are grouped by their Roles, retrieving specific users requires iterating through Roles first, then through their members. This requires the query to check multiple groups of Roles to find one specific user.
Additionally, many external integrations prefer "flat" data over hierarchies because "flattened" responses align well with databases that use table-like structures.
Discussions
What's Different:
Work item Summary pages now feature a new "Discussions" module that lists all of the work item's Discussions and their associated data.
Note: Users will require the "View Discussion" Project Task permission on a work item to see the "Discussions" module.
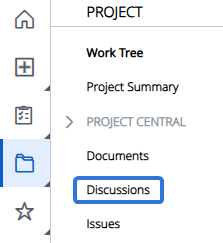
Prior to this release, users would have to select Project → Discussions from the Navigation Menu while viewing a work item to access its Discussions page.

With this update, all of a work item's Discussions can now be accessed and interacted with directly from the new "Discussions" module.


Note: If you cannot see the "Discussions" module, its visibility settings may have been edited. An administrator will need to configure the Summary page to display it.
Users can select the Add button in the top right-hand corner of the module to create a new Discussion for the work item.

This will navigate users to the work item's "Add Discussion" page, allowing them to create a new Discussion.
Note: Users will require the "Add Discussion Item" Project Task permission on a work item to add a new Discussion.
Within the "Discussions" module, selecting any Discussion's drop-down arrow  allows the user to view its original message as well as its replies.
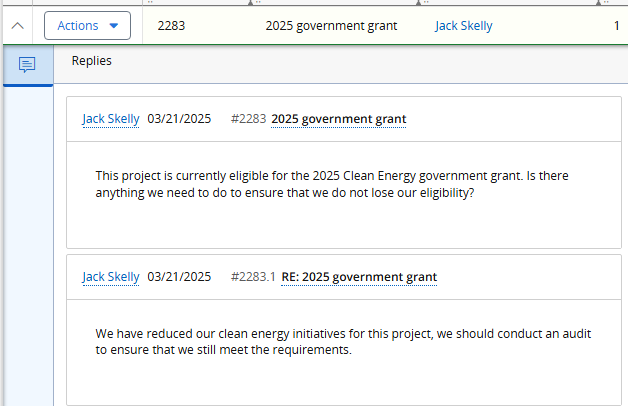
Each Discussion's Actions menu currently only has one option: Edit.
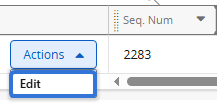
Selecting Edit will navigate users to the Discussion's "View Thread" page, where they can edit the Discussion, escalate the Discussion into an Issue, or move the Discussion to another work item.

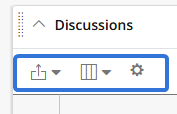
Additionally, the top left-hand corner of the module contains an Export button  , a Select Columns button
  , and a Grid Settings button
  that are commonly found on PowerSteering data grids and modules.
Benefit:
Similar to modules for components like Issues and Action Items, the "Discussions" module allows user to review and interact with all of a work item's Discussions directly from the Summary page. This prevents users from having to navigate back and forth between the work item's Discussions page and Summary page, saving them time and effort by reducing the amount of clicking and page loading.
Gated Work
What's Different:
New Replaceable Term options for "Gate" and "Gates" are now available.

Terms entered into the "Display As" column for these options will replace "Gate" and "Gates" throughout the PowerSteering application.
Example: Piper's organization prefers to use the term "Phase" instead of "Gate" for Gated Projects. This is because the word "Phase" is included in every Gate name.
She decides to use Replaceable Terms to change "Gate" and "Gates" to "Phase" and "Phases" because these terms are so prevalent in her company.
Now, the term "Phase" will appear wherever the term "Gate" used to appear in PowerSteering.

Note: Replaceable Terms will not affect any names of PowerSteering entities. For example, any work items or templates with the work "Gate" in the name will not have their names changed.
Benefit:
Replaceable Terms are used to customize PowerSteering's language to better suit the terminology used in your organization. The term "Gate" is potentially one of the most flexible terms in PowerSteering; users refer to them as "Phases", "Stages", and many other things. With this in mind, it makes sense to add "Gate" as a Replaceable Term and let administrators decide how they should be referred to in the application.
Metrics
What's Different:
PowerSteering users can now determine who can access their Metric Bulk Actions Jobs.
Prior to this release, all users were able to see every Metric Bulk Action Job whenever they accessed the Metric Bulk Actions page. There was no way to limit who could access Metric Bulk Action Jobs created by other users. Users could view details of jobs they did not create.

In this example, a user named Piper is viewing the Metric Bulk Actions page. She did not create either of these jobs (the "Created By" column indicates they were created by Jack Skelly), but she is able to see data associated with each one ("Last Run Details", "Next Run", etc.).
Additionally, users could select jobs they did not create to open the Metric Bulk Action wizard.

Although users could not edit the "Filter Projects" fields of Metric Bulk Action jobs created by other users (notice that the "Portfolio" field is grayed-out in the example above), they could still edit other aspects of the job. They could also run the job for the Metrics that they had permission to change.

Note: PowerSteering administrators were always able to view and edit all Metric Bulk Action jobs, regardless of creator. This includes the "Filter Projects" fields.
With this update, users can no longer see the Metric Bulk Action jobs they did not create by default. They will only be able to see the jobs they created themselves.
However, the Metric Bulk Actions wizard now has a new "Shared With" field on the "Save & Schedule" page.

Metric Bulk Action job creators can use this field to determine which users will be able to view, edit, and run the Metric Bulk Action job.
Selecting the field will open up the "Search Entities" window.

Type the name of a user or User Group into the "Search" textbox and select it from the suggestions that appear.
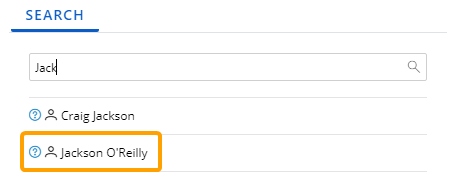
Note: When a User Group is selected, every member of the user group will be able to access the Portfolio.
Repeat this until all of your desired users and User Groups are added. The selected users and User Groups will appear in the "Selected Entities" box.
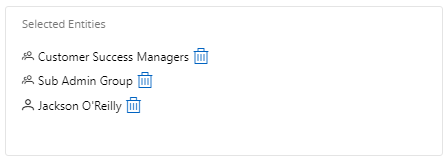
Note: The single-person icon  indicates a user and a multi-person icon
  indicates a User Group.
From here, you can select the Trash icon  next to a user or User Group to remove it from the share list.
Select the OK button once you are done editing the share list.

Users that the job has been shared with will be able to view the job on the Metric Bulk Actions page as well as run the job for Metrics they have permission to change. Although they will not be able to make any changes to the "Filter Projects" fields, they can still edit other aspects of the Metric Bulk Action job and run the job whenever they like.
Note: PowerSteering administrators will still have the ability to view and edit all Metric Bulk Action jobs, regardless of "Shared With" settings. This includes the "Filter Projects" fields.
Benefit:
Prior to this update, any user could view and run any Metric Bulk Action job for Metrics they had permission to change. Although they could not make any changes to the jobs themselves, there was no way to stop random users from triggering an unscheduled Metric Bulk Action and making unwanted changes to a large number of Metrics at once. With this upgrade, users who did not create a Metric Bulk Action job will no longer be able to trigger it. Instead, Metric Bulk Action job creators can now determine which users are allowed to access and run their jobs.
Reporting
What's Different:
PowerSteering report and Data Extract outputs can now be transferred over an API endpoint via HTTPS protocol.
Prior to this release, PowerSteering remote sites would only send data through Secure File Transfer Protocol (SFTP). While creating or editing a remote site, SFTP was the only protocol option available.


With this update, HTTPS can now be selected from the "Protocol" drop-down menu as well.


Selecting this option will reveal a "URL" field that an administrator can enter the API endpoint into.

Note: The Data Extract or Report file must be specified using {FILE_NAME}.
The {FILE_NAME} token will automatically be replaced by the actual file name in the endpoint when the Data Extract or Report job runs. Although the actual file name can be entered here, the {FILE_NAME} token should be used because an appended timestamp will change the file name every time the job runs.
For example, https://restapi/upload/{FILE_NAME} will automatically become https://restapi/upload/mydataextract_20250319085151.csv when the Data Extract or Report job runs.
Please note that REST API endpoints are very unique and your endpoints will most likely not resemble the example above. Speak to someone familiar with the API in your organization to find out where to place the {FILE_NAME} token in the URL.
The following fields will also appear when HTTPS is selected.

-
Http Method: Select the function of your API endpoint. POST and PUT are the only available options.

-
Http Authentication Type: Determine how the site will authenticate the user calling the API endpoint.

-
BASIC: The HTTPS remote site can be accessed through a username and password. Enter the username and password into the fields that appear.
-
MSGRAPH: The HTTPS remote site will send data over the Microsoft Graph API. Additional fields will appear allowing the administrator to enter the required information.
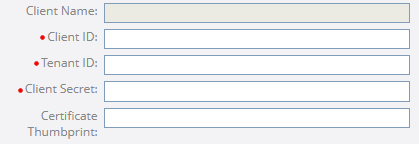
Note: Microsoft Graph API allows developers to access and integrate data from various Microsoft services (Microsoft Teams, Outlook, Azure, Sharepoint, etc.). If you are unfamiliar with this API, reach out to your PowerSteering representative for assistance.
-
Once the remote site is complete, create a new Data Extract job and select the site as the "Remote Location" while editing the "Details & Schedule" tab.

When the Data Extract job runs, the file will be sent over the API endpoint.
Additionally, users can create Report Wizard reports and Advanced reports from the Data Extract Jobs page in order to transfer them over an API endpoints as well. This can be done by selecting the Add Report button in the top right-hand corner of the page.

Note: If the Add Report button is not visible on the Data Extract Jobs page, it has not been configured for your PowerSteering environment. You will need to reach out to your PowerSteering representative to turn it on for you.
From here, administrators can create a Report Wizard report or an Advanced report just like they would from the Reports page. However, the "Details & Schedule" tab will allow them to select a "Remote Location" just like Data Extracts.

Whenever the report runs, it will be sent over the API endpoint just like a Data Extract.
Benefit:
Setting up an HTTPS site and transferring reports and Data Extracts over an API allows users to seamlessly integrate their PowerSteering data with external applications. When this method is used, reports and Data Extracts can be directly consumed and displayed by programs outside of PowerSteering. Additionally, the secure authentication ensures that only authorized users and systems can access the reports and Data Extracts, eliminating the risk of data leaks from accidental email forwarding and incorrect recipients.
What's Different:
Report builders now have the option to include the name of the selected Portfolio in the header of their reports.
While creating or editing reports with the Report Wizard, a new "Display Portfolio filter in report header" checkbox is available at the bottom of the "Definition" tab.
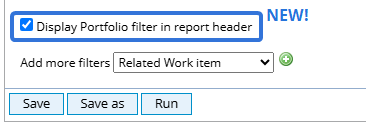
Note: Report creators and editors can also select the Portfolio from the "Definition" tab.
When this checkbox is selected, the name of the selected Portfolio will be displayed at the top of the report whenever it runs.

Selecting the Portfolio name will automatically navigate the user to the Portfolio's details page.
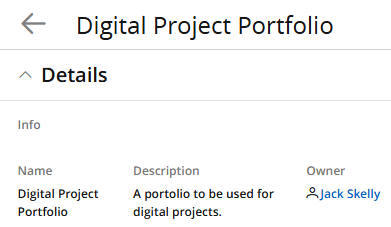
Note: If users do not have sufficient access to the Portfolio (it has not been shared with them or they do not have the "Portfolio Administration" Context permission), they will be navigated to the main Portfolios page instead.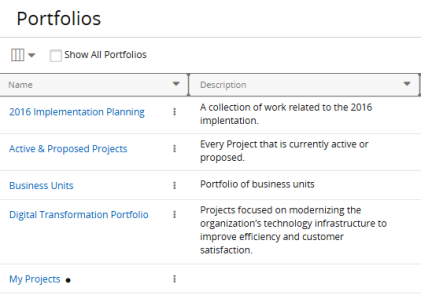
Benefit:
A PowerSteering Portfolio is a collection of work items that are grouped together to facilitate effective management and alignment with an organization’s strategic objectives. Providing the name of the Portfolio in the report itself gives report readers important context; it will help them understand which work items are listed in the report. It helps avoid any ambiguity, especially in situations where similar reports are created for different Portfolios.
What's Different:
PowerSteering users now have the option to append a timestamp into the file names of reports created from the Report Wizard. This timestamp will display both the date and the time the report was run.
While editing the Details & Schedule of a report, users will now see an "Append timestamp" checkbox.

Note: This checkbox will always be selected by default.
When this checkbox is selected, the date and time of running will be appended to the report file name whenever a user runs a report.

Note: The numbers represent the date and time the report was run. The first eight digits represent a date that is formatted yyyy/mm/dd, so this report was run on March 19th, 2025. The final six digits represent the time it was run in hours, minutes and seconds, so this report was run at 8:51:51 AM.
Benefit:
Appended timestamps to report file names ensures that different versions of a report are easily distinguishable by their run time. Prior to this upgrade, file names would only distinguish themselves from one another by adding a number to the end of the file name.
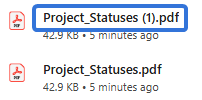
Although this would prevent any accidental overwrites, it did not provide any context to the report reader. With this update, individuals can now easily sort and locate reports based on the time their reports were run.
What's Different:
The My Reports and Public Reports pages now feature a "Type" column that displays how the report was created as well as the type/template of the report.
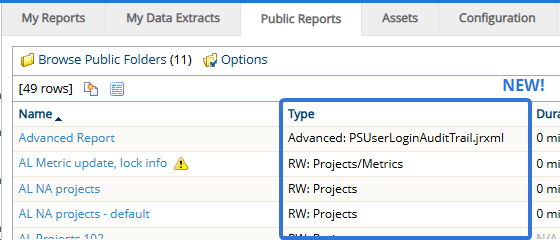
Note: This new column has also been added to the "Project Reports" module that can be found on work item Summary pages.
Each "Type" value is prefixed with the feature that was used to create the report: "RW" indicates that the report was created with the Report Wizard and "Advanced" indicates that the report was created using the Advanced Report feature.
Additionally, Report Wizard reports will display the "Type" that was selected while creating the report and Advanced reports will display the template that was used to create the report.
Example: Take a look at these two "Type" values.
The first value is prefixed by "Advanced", which indicates that it is an Advanced Report. Also, it includes the template that was used to create it.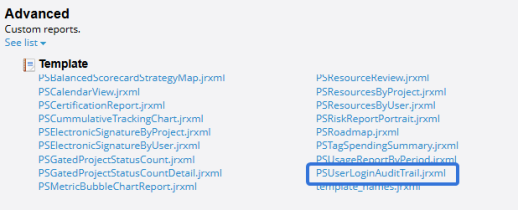
The second value is prefixed by "RW", which indicates that the report was created using the Report Wizard. Also, it includes the "Type" that was used to create it.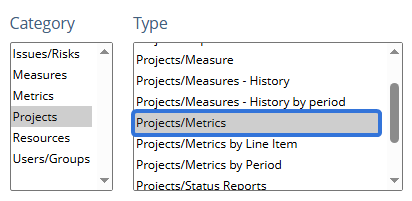
Note: Selecting the "Type" column header will sort the reports alphabetically by their report types.
Benefit:
The new "Type" column provides additional context for each listed report. Prior to this upgrade, report builders would sometimes have to include the type in the report name so users would know what kind of report they were accessing before they opened it. With this update, report readers will know exactly which type of report they are opening before they run it.
What's Different:
PowerSteering administrators can now determine whether to send email notifications when the first file of a Data Extract is successfully transferred.
Prior to this release, email notifications were always sent twice per successful Data Extract transfer: when the first file was successfully transferred and when the last file was successfully transferred. There was no way to configure these notification emails.
With this update, administrators will find a new "Send notification when first file is transferred successfully" checkbox while managing Data Extract settings.

When selected, email notifications will be sent when the first file of a Data Extract is successfully transferred as well as the final file. When unselected, email notifications will only be sent when the final file is successfully transferred.
Benefit:
Prior to this update, users would always receive two email notifications whenever their Data Extracts ran. Two emails per Data Extract could sometimes lead to email clutter, especially for administrators who were responsible for multiple Data Extracts at once. Additionally, receiving an email when the first file is transferred might mislead users into thinking the process is done when it is not. Deselecting this new checkbox ensures that administrators will only receive email notifications when the transfer is fully complete.
Many administrators still prefer receiving emails when the first file is successfully transferred, so this option is now configurable by managing your PowerSteering environment's Data Extract settings.