2023R1 Release Notes
The 2023R1 version of Eclipse PPM was deployed to production on Sunday, June 4th, 2023. The listed features are now available.
Note: Some of the new features are still under construction. Once they are finished, they will be listed on this page as well.
The following areas of Eclipse PPM have been updated as part of this release:
Tip: For more information on this upgrade, click here to watch the 2023R1 Release Highlights Video from the Upland Software website. Click here to watch it from the Upland Community.
Alerts and Notifications
The following enhancement has been made to Eclipse PPM Alerts and Notifications. Select the upgrade to learn more:
What's Different:
Administrators can now access a new "Administrator Enabled Notifications" page that allows them to enable certain notifications that cannot be disabled by end users.
The link to this new page can be found on the Administration page under "Settings Manager":

After selecting this link, Eclipse PPM administrators can apply notifications that Eclipse PPM users will receive if the criteria are met. Currently, only one notification can be enabled for users with locked Work Plans:
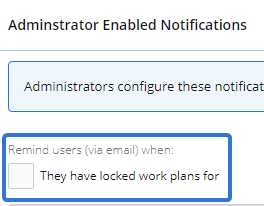
This notification will be sent to Eclipse PPM users via email when they have checked out a Work Plan for a certain amount of time.
Note: User "check out" a Work Plan when they open it for editing. Other Eclipse PPM users cannot open (or "check out") the same plan if it is already open for editing. If a user leaves a Work Plan open, that plan cannot be checked out by other users.
Administrators can select the checkbox above to enable the notification. This will allow them to determine a checkout time period:

Users who have checked out a Work Plan for the selected time period will receive a notification via email.
Benefit:
Users often find excessive notifications irritating and distracting, which leads them to turn them off. However, they sometimes turn off notifications that they might actually need to receive. When this is the case, administrators or other users might need to manually notify them, which can be extremely tedious in Eclipse PPM environments that contain large numbers of users. The new "Administrator Enabled Notifications" page gives administrators the ability to ensure that users are receiving important notifications that should not be ignored.
The new notification for locked Work Plans will prevent users from having to constantly contact other users who have left Work Plans open. Users will commonly leave Work Plans open without saving and closing them. This becomes especially problematic if they leave them open after they finish work for the day. This notification will keep users aware of their open Work Plans and promote the practice of closing a Work Plan once editing is finished.
Approvals
The following enhancements have been made to Eclipse PPM Approvals. Select any of the upgrades to learn more:
What's Different:
Eclipse PPM users who use the "Timesheet Approval" window will now be able to customize how the Timesheet is displayed.
Prior to this release, no customization options existed for the window. With this update, a new View Options button has been added to the upper right-hand corner of the window:

After selecting this button, the approver will be presented with various display options:
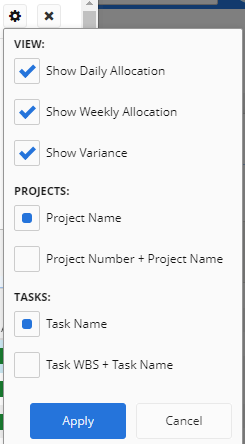
The "View" group contains the following options:
Note: Prior to Eclipse PPM 2023R1, the "Timesheet Approval" window behaved as if all of these options were selected. When users first open the window after 2023R1 is deployed, each of these options will be selected by default. Once a user applies new "View" options, those selections will be saved even after the user leaves and returns to the page.
-
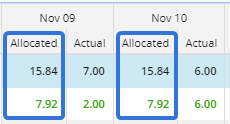
Show Daily Allocation: If selected, each daily time period will include a column for allocated time:
-
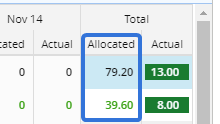
Show Weekly Allocation: If selected, the weekly total at the right-hand side of the Timesheet will include a column for allocated time:
-
Show Variance: If selected, a color will be assigned to the weekly "Actual" column based on how much it deviates from the weekly allocation:

Note: The color displayed is based on the "Time Entry Variance Indicator Settings" from the Environment Details page.
The "Projects" group contains the following options:
Note: Only one of these options can be selected.
-
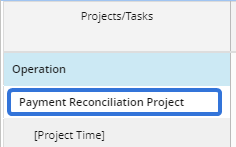
Project Name: Only the Project Name will be displayed in the "Projects/Tasks" column:
-
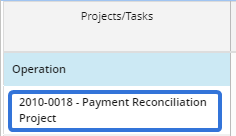
Project Number + Project Name: Both the Project Number and the Project Name will be displayed in the "Projects/Tasks" column:
The "Tasks" group contains the following options:
Note: Only one of these options can be selected.
-
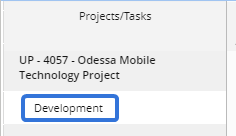
Task Name: Only the Task Name will be displayed in the "Projects/Tasks" column:
-
Task WBS + Task Name: The WBS number and the Task Name will be displayed in the "Projects/Tasks" column:
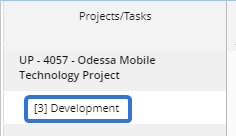
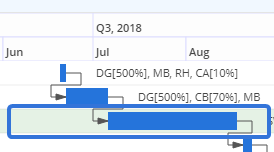
Tip: The WBS (work breakdown structure) number refers to where the Task falls in the WorkPlan structure. For example , the "Development" Task from the picture above has a WBS of "3". This is because the Task is the third Task in the Work Plan's workflow:
Benefit:
Prior to this update, there were no customizable options for the "Timesheet Approval" window. Users could not change how Project and Task names were displayed, nor could they decide which allocations were included in the Timesheet. This was a problem because some of the information would clutter up the window for users who were not interested in it. For example, many Eclipse PPM users do not take allocated time into account while approving Timesheets. Giving users the ability to customize the "Timesheet Approval" window allows them to create an organized view that only contains information that is important to them.
What's Different:
The Timesheet column headers on the "Timesheet Approval" window will remain frozen as users scroll vertically through the submitter's Timesheet. This allows the approver to see the column headers at all times.
Prior to this release, the column headers would not freeze as the user scrolled through the Timesheet. This caused the headers to disappear when the approver would scroll down:

Click thumbnail to play.
With this update, the column headers will remain at the top of the table as the approver scrolls up and down the Timesheet:

Click thumbnail to play.
Benefit:
Prior to this upgrade, time approvers could not view the Timesheet column headers as they scrolled through a Timesheet. This was especially problematic because the Timesheet contained multiple columns for time periods, and each time period contained columns for both "Allocated" and "Actual" values. Approvers would have to scroll carefully and keep their eyes on the column they were interested in as they scrolled to the Project or Tasks they wanted to view. With this update, approvers can simply scroll to whichever Project or Task they wish and the column header will still be displayed, preventing them from having to tediously scroll up and down.
What's Different:
The Timesheet on the "Timesheet Approval" window will now feature banded rows. Every second row in the table will be slightly shaded.
Prior to this release, the Timesheet table on the "Timesheet Approval" window did not contain any formatting to separate the rows. Only the columns were separated by borders:
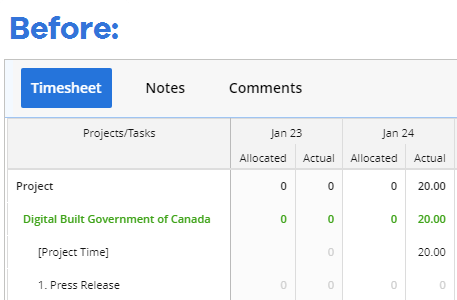
With this update, banding has been added to the rows:

Benefit:
Prior to this upgrade, it was difficult for users to differentiate between Timsheet table rows. They would have to rely on the alignment of the rows, which becomes difficult with values on the right-hand side of the table. Banding makes data easier to read and interpret, ensuring that the rows do not blend into each other.
Dashboards
The following enhancement has been made to Dashboards in Eclipse PPM. Select the upgrade to learn more about it:
What's Different:
Eclipse PPM users can now add a "Program" column to the Timeline. This column will display the Program that each listed Project belongs to:

Tip: Similar to other columns on the Timeline, the width of the "Program" column can be adjusted:
Click thumbnail to play.
The "Program" column can bee added to the Timeline by selecting the Grid Options button:

Next, Projects must be selected from the "Available Columns" drop-down menu:
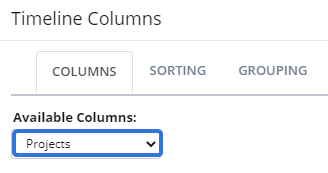
Finally, users can select the "Programs" checkbox to add the column to the Timeline:

Benefit:
As part of the 2022R2 release, a "Program" column was made available to Dashboard panels. However, the column was not immediately made available to the Timeline as well. Now that the column is available, users can view the Program of each listed Project on the Timeline.
Financial Plans
The following enhancements have been made to Project Financial Plans in Eclipse PPM. Select any of the upgrades to learn more about them:
What's Different:
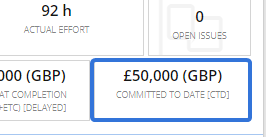
A new "Committed To Date [CTD]" Financial Indicator is now available for use. This indicator will capture the total amount of Committed Expenditures on the Project's current Financial Plan prior to the current time period.
Note: This might be confusing for Financial Plans that use yearly periods instead of monthly periods. Keep in mind that CTD will calculate all Committed Expenditures BEFORE the current period. If yearly periods are used, that means it will calculate the Committed Expenditures prior to the current year. No expenditures from the current year will be included.
For example, this Project's approved Financial Plan has a total of £50,000 Committed Expenditures before the current year (2023):

Therefore, the Project's CTD is £50,000.
The "Committed to Date [CTD]" Financial Indicator can be added to the Financial Plan view through Project Configuration or Project Template Configuration:
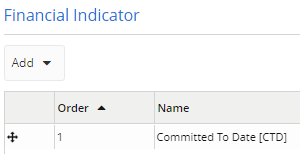
Whenever users edit a Financial Plan, they can see the selected indicator on the right-hand panel:

Also, the Financial Indicator can be added to the Project's Home page through the Project Snapshot Configuration button:

From here, the "Committed To Date [CTD]" Financial Indicator can be selected from the list and added to the Snapshot:
Benefit:
Both "Actual to Date" and "Budget to Date" have been Financial Indicators in Eclipse PPM for quite some time. It only makes sense to add "Committed to Date" to the list of Financial metrics available to Eclipse PPM users. This indicator will keep users aware of the amount of money that has been committed on their Projects.
What's Different:
Eclipse PPM administrators can now determine how many empty Expenditure Line Items will appear in the "Edit Expenditure" window when users edit Expenditures on a Financial Plan.
Prior to this release, the "Edit Expenditure" window would only contain three Line Items for Expenditures:
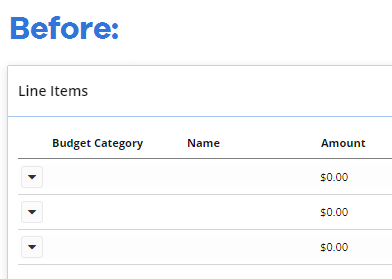
This only enabled users to add a maximum of Expenditure rows to the Financial Plan at a time.
With this update, administrators can now use the Financial Settings to determine how many line items will appear in the window:
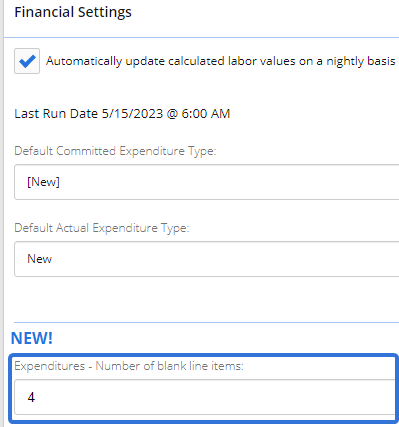
The number of line items in the "Edit Expenditure" window will reflect the number entered into the "Expenditures - Number of blank line items" field:
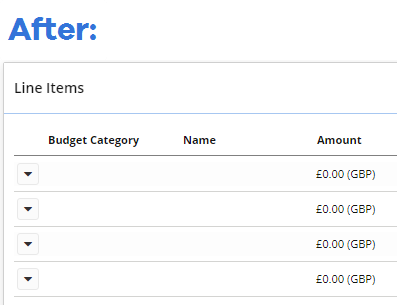
Benefit:
Prior to this update, users could only add three Expenditure rows to the Financial Plan at a time. This became tedious whenever users wanted to add Expenditures in bulk. For example, a user adding 12 new Expenditures that were all part of the same Expenditure document would have to open the "Edit Expenditure" window four separate times. On the other hand, however, some organizations want to limit the number of Expenditure items that can be added at once in order to prevent laundry lists of Expenditures that can get out of hand. To remedy this, administrators have been given the power to customize the number of available line items to an amount that is appropriate for their own organizations.
Project Evaluation
The following enhancement has been made to Project Evaluation in Eclipse PPM. Select the upgrade to learn more about it:
What's Different:
Eclipse PPM users can now hover their cursors over the "Objective Alignment", "Portfolio Prioritization", "Portfolio Evaluation", and "Risk Scoring" descriptions on the Project Evaluation page to see them in full.
Prior to this release, the Project Evaluation page would not display lengthy descriptions in full . Any descriptions that were too long for the column would be cut off. For example, users were not able to read this objective that was added to the Objective Alignment table:
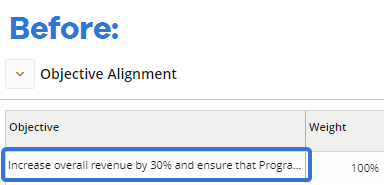
This was especially problematic because users cannot expand the width of the description columns, which prevents them from being able to see the full description.
With this update, a tooltip has been added to each description. This means that users can simply hover their cursors over a description to read it in full:
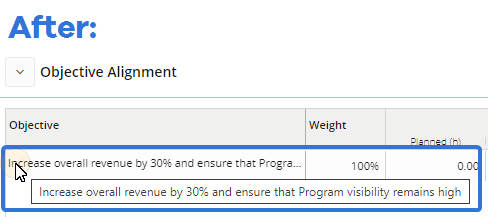
Note: In the "Objective Alignment" table, the tooltip will be available for values in the "Objective" column (pictured above).
In the "Portfolio Prioritization", "Portfolio Evaluation", and "Risk Scoring" tables, the tooltip will be available for values in the "Criteria" columns:
Benefit:
Prior to this update, there was no way for users to view objective / criteria descriptions that were too long for the columns. This was especially problematic because users cannot expand the width of the description columns, which prevents them from being able to see the full description. Users who wanted to read the full descriptions would have to contact administrators, who would then have to access the objective / template pages to provide them. This additional tooltip allows users to read long descriptions directly on the Project Evaluation page, preventing them from having to contact administrators and wait for their response. Furthermore, administrators who create and manage Project Evaluation objectives and criteria no longer need to worry about keeping their descriptions short so they can fit into the columns; each description can be as detailed as possible.
Properties
The following enhancement has been made to Eclipse PPM Properties. Select the upgrade to learn more:
What's Different:
The banners reminding Eclipse PPM administrators to synchronize their properties with Upland Analytics have been removed from the Project and Program Property pages.
Prior to this release, these banners existed at the top of the pages to remind administrators that any changes to their properties needed to be synchronized:
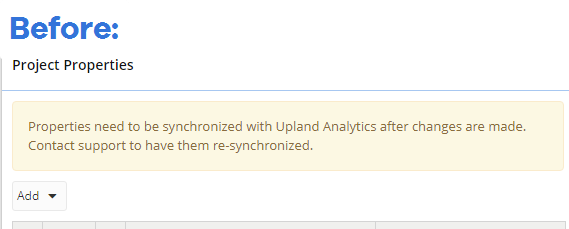
With this update, these banners have been removed from both pages:

Benefit:
Prior to this upgrade, administrators had to synchronize their properties with Upland Analytics after any changes were made. This would ensure that Upland Analytics reports would not contain any out-of-date information on Project or Program Properties. However, this synchronization is no longer necessary so these warning banners have been removed.
Reports
The following enhancements have been made to Eclipse PPM Reports. Select any of the upgrades to learn more about them:
What's Different:
Eclipse PPM users will now be able to see information about their Adhoc reports in Microsoft Excel directly within the "Eclipse PPM" tab after exporting them from the application.
Note: Users will need to Install the Eclipse PPM Excel Add-In in order to see this tab in Microsoft Excel.
Prior to this release, there was no way to view the Adhoc report's name once it had been exported as a CSV file. Neither the file name nor the "Eclipse PPM" tab would reflect it:
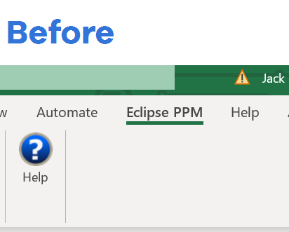
With this update, a "Report Information" box can be seen directly in the tab:

This box contains some metadata for the Adhoc report, including the Report Name, the Report ID, the Report Creator, the Modified Date, and the Refresh Date.
Benefit:
Prior to this update, exported Adhoc reports did not contain any information about the report apart from the report data itself. This especially caused confusion for report viewers who would export and view multiple Adhoc reports at once; there was no way to differentiate between them. This required users to manually change the name of the Excel file to reflect the report title.
With this upgrade, this information can be seen directly in the "Eclipse PPM" tab, preventing users from having to change the file name of each of their exported Adhoc reports in order to see the report titles.
What's Different:
"Programs" are now an object type for Adhoc reports.
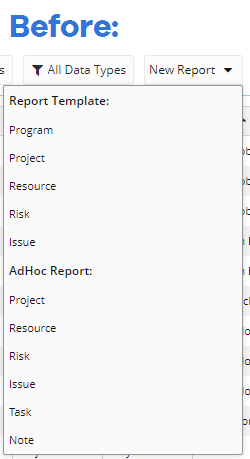
Prior to this release, users could not build Adhoc reports based on Eclipse PPM Program-related data. It was not one of the listed object types users could choose while creating a new Adhoc report:
With this update, users can now select Program from the "AdHoc Report" list:
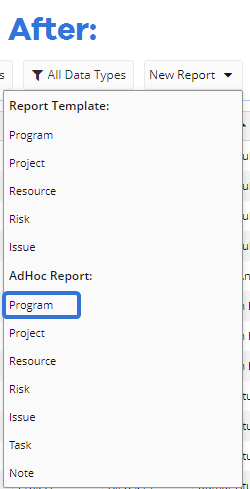
This will allow users to create an Adhoc report using Program-related data. The following report columns will be available under 6 different groups:
-
Identification: Created By, Created Date, Description, ID, Modified By, Modified Date, Name, Number
-
Classification: Organization Owner, Portfolio, Program Owner
-
Health Indicators: The Program Health Indicators that have been defined for the organization.
-
Properties: The Program Properties that have been defined for the organization.
-
Resource Role: The Resource Program Roles that have been defined for the organization.
-
Status /Health: Status Update, Last Status Update, Status, Status Type
Tip: Similar to Adhoc reports using other object types, Program Filters can be applied to the report.
Benefit:
Prior to this upgrade, Eclipse PPM report builders could not create Adhoc reports with Program-related data. They could only upload Program-based Report Templates to create their own custom reports. There was no option to create quick, real-time Program reports that could be run on demand. Instead, some users had to rely on the Eclipse PPM API to retrieve data. With the addition of Program Adhoc reports, users can easily create and run on-demand reports that contain their preferred Program-related data.
What's Different:
Additional columns can now be added to "Task" Adhoc reports.
While creating or editing a "Task" Adhoc report, users can navigate to the "Columns" tab to decide which Task-related columns will be included in the report:
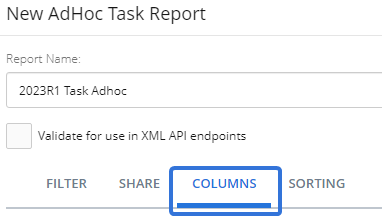
Prior to this release, the columns fell into these categories:
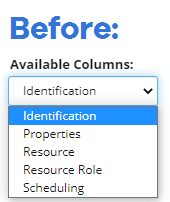
With this update, the categories have been updated:

The categories contain the following Task-related columns:
-
Task Fields: Task ID, Task Name, Task #, Task Actual End Date, Task Actual Start Date, Task Assigned By, Task Created By, Task Created Date, Task Is Critical, Task Is Current Schedule, Task Is Summary, Task Is Milestone, Task Modified By, Task Modified Date, Task Priority, Task Category, Task Code, Task Description, Task UID, Task WBS, Task Resources, Task % Complete, Task Baseline Duration, Task Baseline End Date, Task Baseline Start Date, Task Completed Through, Task Constraint Date, Task Constraint Type, Task Deadline, Task Duration, Task Expected Work % Complete, Task Planned End Date, Task Planned Start Date, Task Predecessors
-
Task Custom Properties: The Task Properties that have been defined for the organization.
-
Project Fields: Project Category, Project ID, Project Name, Project Number, Project Portfolio, Project Program, Project Priority, Project Status, Project Type, Project Owner, Project Organization Owner, Project Business Priority
-
Project Custom Properties: The Project Properties that have been defined for the organization.
-
Project Work Plan Fields: Schedule Title, Schedule End Date, Schedule Start Date
-
Program Fields: Program ID, Program Owner, Program Portfolio, Program Organization Owner, Program Name, Program Number, Program Status
-
Program Custom Properties: The Program Properties that have been defined for the organization.
"Task" Adhoc reports can be sorted by any of the above fields.
Benefit:
Prior to this upgrade, "Task" Adhoc reports were limited in the data they could expose. For example, additional details about the Task's Project can be included in the report, such as Project Owner, Project Organization Owner, and Project Business Priority. This allows reports builders to create more dynamic reports that are customizable to their unique business needs.
What's Different:
A new Eclipse Report titled "Project Policy Extract" is now available from the "Reports" page. This report contains the Project Policies, the permissions they enable, and the users/groups that belong to them.
Note: Eclipse Reports (as opposed to Custom Reports) are reports that are already pre-built into Eclipse PPM. They can be run at any time.
This new report can be found in the "Eclipse Report" table on the left-hand side of the "Reports" page:
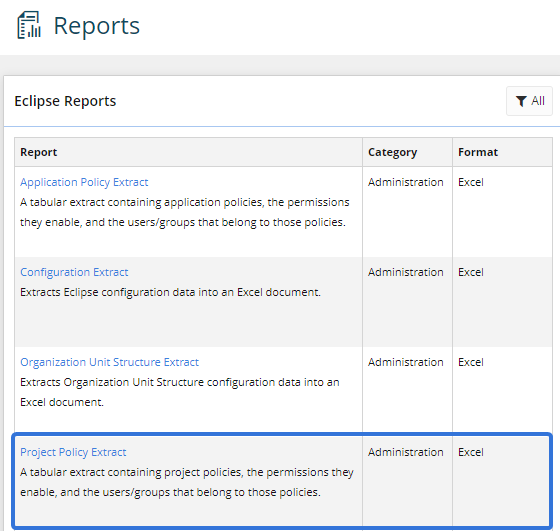
Selecting Project Policy Extract will allow users to customize the title of their report:
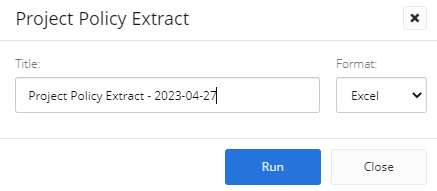
Note: "Excel" is the only formatting option available.
After selecting the Run button, the report will automatically download onto the user's device in a Microsoft Excel spreadsheet.
The Excel file will include two worksheets:

-
Policy Permissions: Each Project-related permission will be listed as a row and each Project Policy will be displayed as a column. The letter "X" will indicate if the policy includes the listed permission:

-
Policy Members: User groups and users will be listed alphabetically as rows (with user groups at the top) and Project Policies will be displayed as columns. The letter "X" will indicate if the user / user group belongs to the policy:

Benefit:
Users can now quickly build a report on their organization's Project Policies. This will be helpful whenever administrators wish to review both the permissions and members of their Project Policies; they can see which permissions and which members belong to certain policies by simply viewing both worksheets.
What's Different:
A new Eclipse Report titled "Application Policy Extract" is now available from the "Reports" page. This report contains all Application Policies, the permissions they enable, and the users/groups that belong to them.
Note: Eclipse Reports (as opposed to Custom Reports) are reports that are already pre-built into Eclipse PPM. They can be run at any time.
This new report can be found in the "Eclipse Report" table on the left-hand side of the "Reports" page:

Selecting Application Policy Extract will allow users to customize the title of their report:
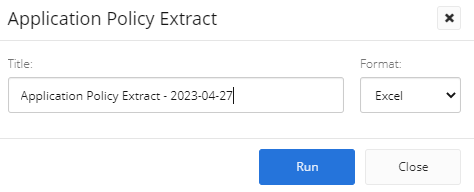
Note: "Excel" is the only formatting option available.
After selecting the Run button, the report will automatically download onto the user's device in a Microsoft Excel spreadsheet.
The Excel file will include two worksheets:

-
Policy Permissions: Each Application-related permission will be listed as a row and each Application Policy will be displayed as a column. The letter "X" will indicate if the policy includes the listed permission:

-
Policy Members: User groups and users will be listed alphabetically as rows (with user groups at the top) and Application Policies will be displayed as columns. The letter "X" will indicate if the user / user group belongs to the policy:

Benefit:
Users can now quickly build a report on their organization's Application Policies. This will be helpful whenever administrators wish to review both the permissions and the members of their Application Policies; they can see which permissions and which members belong to certain policies by simply viewing both worksheets.
What's Different:
A new Eclipse Report titled "Project Security Extract" is now available from the "Reports" page. This report will display the permissions that users have on specific Projects.
Note: Eclipse Reports (as opposed to Custom Reports) are reports that are already pre-built into Eclipse PPM. They can be run at any time.
This new report can be found in the "Eclipse Report" table on the left-hand side of the "Reports" page:
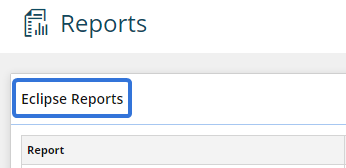

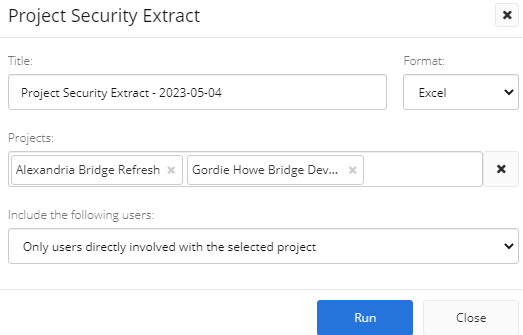
Selecting the Project Security Extract report title will open up a window that allows the user to customize the report:
-
Title: Enter a unique title for your report.
Tip: Keep in mind that you will likely run this report more than once and for a variety of different Projects each time. Including the date in the title as well as an indication of which Projects are included is recommended.
-
Format: Choose a format for the downloaded report.
Note: "Excel" is the only option for this report.
-
Projects: Determine which Projects will be included in the report. Both Project filters and specific Projects can be included:

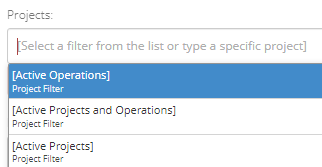
Tip: Project filters (both pre-built and custom) can be found at the top of the list after selecting the field. Each filter is displayed in brackets:
-
Include the following users: Determine which Eclipse PPM users will be listed on the report:

-
All Users: Every Eclipse PPM user in the environment will be included in the report.
-
Only users directly involved with the selected project: Only users who have a specified role on the Project will be included in the report.
Tip: If a Resource has a role on the Project but still does not appear on the report, make sure the Resource is also an Eclipse PPM user.
-
After selecting the Run button, the report will automatically download onto the user's device in a Microsoft Excel spreadsheet.
The Excel file will contain a worksheet for each Project included in the report:

Each Project Permission will be listed in the "Permission" column, ordered exactly as they appear when a Project Policy is opened. Each user included in the report will appear as a column to the right of the "Permissions" column. The Policies that the user belongs to will be displayed directly under the user's name:

The letter "X" will indicate if the user has the permission on the Project.
Tip: Users can also run the "Project Security Extract" report from a Project's Home page by selecting the Reports button in the upper right-hand corner:
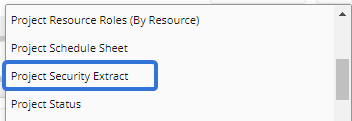
If the report is run from here, it will only include the current Project. Users will not be able to add any other Projects to the report.
Benefit:
Prior to this release, there was no way to report on the permissions users had on certain Projects. Individuals who were interested in this would have to navigate to the Project Security pages of each Project. This would become extremely tedious if the individual was interested in multiple Projects. Furthermore, the Security pages themselves are not always straightforward. Individuals interested in the Project's permissions would have to check the "Members" tab of each Policy on the Project in order to see what each user was permitted to do. With this update, this data can be easily extracted and individuals can clearly see each user's permissions on any given group of Projects.
What's Different:
Expenditure items listed in the "Project Financial Extract" Eclipse Report will now include any Linked Budget Items in the same row.
Tip: In order to take advantage of "Linked Budget Items", the Project's "Financial Worksheet Settings" will need to be configured to display "Category and Item" Budget Details: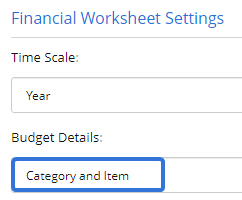
Note: The "Project Financial Extract" report extracts detailed financial data on a custom selection of Projects. Report builders can choose the level of detail required and also specify which fiscal periods and financial plans (drafts, approved plans, etc.) to include.
Each row in the report represents a Financial Item entered into a Financial Plan. For example, imagine a Committed Expenditure of $10,000 for a "Backup Server". This row will only have values for relevant columns; basic details like "Project Name", "Financial Plan", and "Amount" will be populated as well as Expenditure-specific columns such as "Expenditure Document Number", "Expenditure Type", and (of course) "Expenditure Name". However, non-relevant columns such as "Funding Category" will not contain a value for the row because the item is an Expenditure, not a Fund.
Note: Eclipse Reports (as opposed to Custom Reports) are reports that are already pre-built into Eclipse PPM. They can be run at any time.
Prior to this release, the "Budget Items" column in the "Project Financial Extract" report would only contain values for Budget Item rows. The columns would always be empty for any rows that contained data on Expenditures. For example, imagine that an Expenditure called "Eclipse PPM" was linked to a Budget item called "PPM Software":

Upon running the "Project Financial Extract" report prior to this release, there was no way to know that the "Eclipse PPM" expenditure had a Budget Item linked to it. The "Budget Item" column would only be populated for the "PPM Software" Budget row:
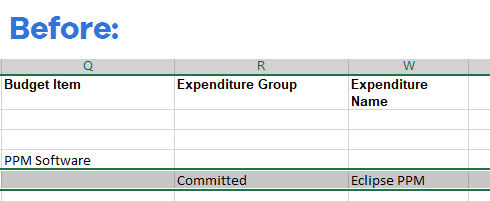
In this example, "PPM Software" has its own row as a Budget Item. However, there is no way to know that it has been linked to the "Eclipse PPM" expenditure.
With this update, the "Budget Item" column will be populated for Expenditure rows if the Expenditure has a Linked Budget Item:

The "Eclipse PPM" Expenditure row now contains a value in the Budget Item column because it has been linked to the "PPM Software" Budget Item.
This will let report readers know that the Expenditure has been linked to a Budget Item on the Financial Plan.
Tip: Users can also run the "Project Financial Extract" report from a Project's Home page by selecting the Reports button in the upper right-hand corner:

If the report is run from here, it will only include the current Project. Users will not be able to add any other Projects to the report.
Benefit:
Prior to this upgrade, there was no way for report readers to know whether Expenditures were linked to Budget Items on a Financial Plan. In fact, this information was not exposed anywhere in Eclipse PPM; the only way to see if an Expenditure had a Linked Budget Item was to edit the Expenditure itself and view the "Line Items" table:

The Financial Plan table on a Project's "Finances" page does not contain any columns to display Linked Budget Items for Expenditures:
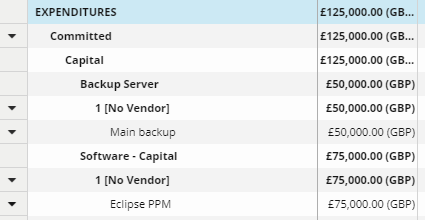
Now that linked items are exposed in the "Project Financial Report", report readers will know exactly which Budget Items the Expenditures are linked to.
Resources
The following enhancements have been made to Eclipse PPM Resources. Select any of the upgrades to learn more about them:
What's Different:
The table on the Resources page now contains more available columns based on the user account associated with the Resource.
Tip: See Create and Manage Users for information on creating user accounts for Resources.
Prior to this release, only one column that contained user information was available. This was the "User" column, which simply indicated whether the Resource has an Eclipse PPM user profile associated with it:
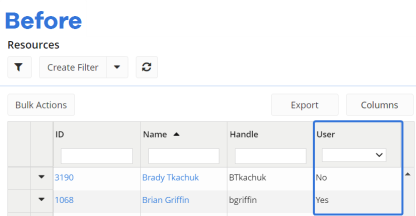
With this update, users can select the Columns button to add more columns that provide further information about the user profile:

Note: If there is no user account associated with the Resource, the new user-based columns will be empty.
The following user-based columns are now available:
-
User ID: The user's ID number. Use the textbox in the column header to filter Resources by ID numbers.
-
User Login: The email address associated with the user account. Use the textbox in the column header to filter Resources by their login email addresses.
-
User Account Status: Indicates whether the user account is active or inactive. Use the drop-down menu in the column header to filter the Resources by their user account statuses.
Tip: This is not to be confused with the "Status" column, which displays the Resource's status.
-
User Account Type: Indicates the user's account type (Standard, Light, or View Only). Use the drop-down menu in the column header to filter Resources by their user account type.
Tip: See Create and Manage Users for information on each user account type.
Benefit:
Prior to this update, users were able to use the Resources table to see which Resources had user profiles associated with them. However, they could not access any additional information about the user profiles of Resources. This was especially difficult for users that wished to uncover more information about the user. For example, an individual might select "Yes" from the drop-down menu in the "User" column header in order to retrieve a list of users in Eclipse PPM. However, there was no way to retrieve a list of active Eclipse PPM users. With this upgrade, the individual can simply select "Active" from the drop-down menu in the "User Account Status" column header to retrieve a list of active Eclipse PPM users instead.
What's Different:
Eclipse PPM users can now use the "Time Entry Variance Indicator Settings" (formerly "Timesheet Settings") to associate colors to "Actual" cells on the Resource Management page based on their variance from the "Allocated" value.
Prior to this release, administrators could use the "Timesheet Settings" spectrum (found on the Environment Details page) to determine how "Actual" time cells would be colored if they deviated too far from the "Allocated" time on a Timesheet:

If users had "Show Variance" selected from the Timesheet's Options menu, the "Actual" cells in the "Total" column would be colored based on their variance from the "Allocated" value. The cells would be colored in either green, yellow, or red based on how far the "Actual" value was from the "Allocated" value:
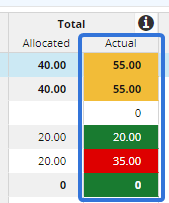
Tip: The "Variance" value is calculated using the following equation: Variance = (Actual ÷ Allocated) x 100. For example, the top row in the image above would be calculated like this: (55 ÷ 40) x 100 = 137.5. As we can see, the yellow portion of the "Timesheet Settings" spectrum has been set between 100-150, so the "Actual" cell is displayed in yellow.
Please keep in mind that the equation is still used if values are displayed as FTE instead of hours.
With this update, the "Timesheet Settings" spectrum has been renamed to "Time Entry Variance Settings":

Also, these colors can now be applied to the Resource Management page as well as the Timesheet. After opening the Options menu in Resource Management, users can now select the "Show Variance Indicator" checkbox under the "Actual Time" checkbox:

When this is selected, the same variance colors will be applied to the "Actual" cells on the Resource Management page:
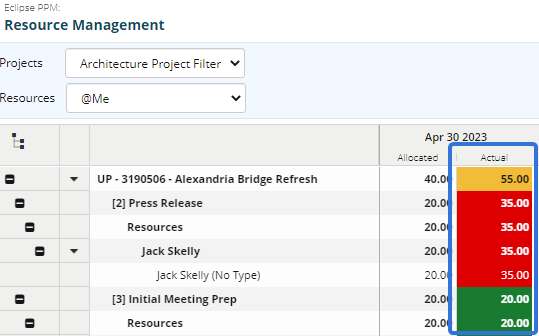
Benefit:
Prior to this upgrade, the idea of the "Timesheet Settings" spectrum was to allow users to highlight "Actual" Timesheet entries that were well beyond the allocated time. For example, a Timesheet approver who saw too many red or yellow cells on a user's Timesheet would easily be able to see that the user was spending too much time on certain Projects or Tasks. They could then reach out to them and give them advice on how to better spend their time. Seeing as though many users tend to use Resource Management to review Resource time, it only makes sense to extend this feature to this page as well. This helps ensure that Eclipse PPM users can take full advantage of the application components that they feel most comfortable using.
Templates
The following enhancements have been made to Eclipse PPM Templates. Select any of the upgrades to learn more about them:
What's Different:
The Activity Feed on a Project or Program's Home page will now display information related to templates. This includes both the template that was used to create the Project/Program as well as any Template Configurations that are applied.
Prior to this release, the Activity Feed would not contain any information about templates. For example, the first Activity Feed entry that contained information about the Project's creation would not mention anything about the Project Template that was used:
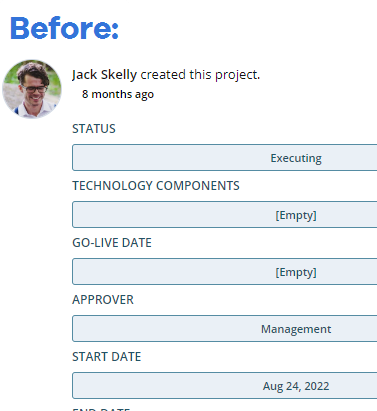
With this update, the first Activity Feed entry will now display the Project Template that was used to create the Project:
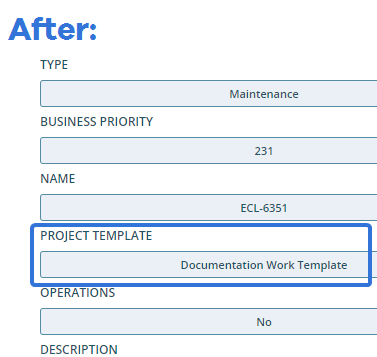
Note: This will only apply to Activity Feed entries made after this release. No previous entries will be retroactively affected.
Furthermore, the Activity Feed will also display the new template whenever a Template Configuration is applied to it. Previously, this Activity Feed entry would outline the configuration changes that were made, but it would not indicate which template was applied:
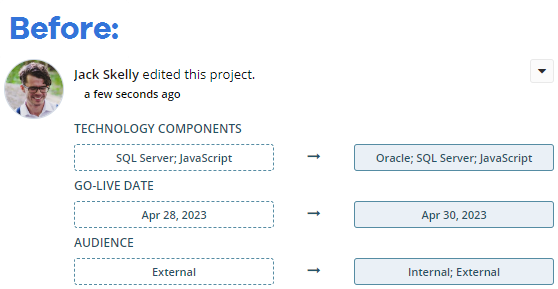
With this update, the new template will also be listed in this Activity Feed entry. Users will see both the previous template and the new one:
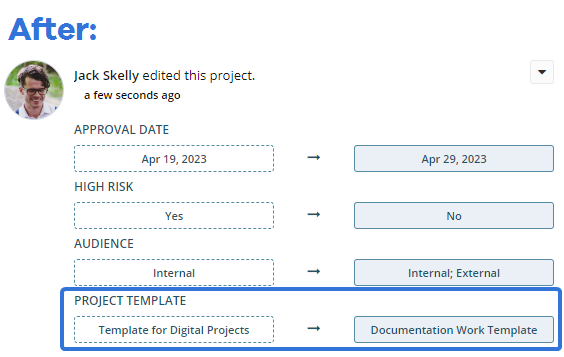
Note: This will only apply to Activity Feed entries made after this release. No previous entries will be retroactively affected.
Finally, users will have the option to filter the Activity Feed by template activity. Prior to this release, for example, a Project's Activity Feed could only be filtered by Project Activity, Status updates, or Project Status updates:
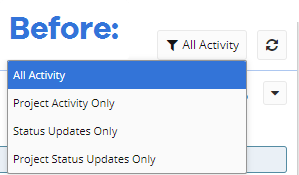
With this update, the Activity Feed can now be filtered by Project Template information:
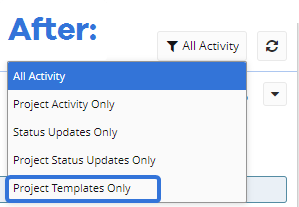
When this option is selected, the Activity Feed will only display entries pertaining to Template Configuration applications. Also, the original entry about Project/Program creation will be included.
Tip: This release also includes a way for administrators to view a list of times a template was applied to Projects/Programs. See "Template Application History for Project and Program Templates" below for more information.
Benefit:
Prior to this upgrade, there was no way for users to know which templates were applied to Projects/Programs. Users had no way of knowing which template was used to create the Project or Program, nor did they have any way of knowing which Template Configuration had been applied. This made it difficult for Eclipse PPM users who wished to copy the details of other Projects/Programs onto their own.
Example: Mirna is a Project Managers who needs to create a new Project in Eclipse PPM. She knows of another Project that she would like to replicate; this Project had all of the Project Properties, Health Indicators, and Evaluation Criteria that she would like on her new Project. Unfortunately, she had no way of knowing which Project Template was used to create this Project, so she had to request a new Project Template be created for her from scratch.
After the 2023R1 release, Mirna can simply view the Project's Activity Feed to see which Project Template was used to create it. If a Project Template Configuration was applied to it, she can see which one and use it to create her own Project.
What's Different:
Administrators can now see which Projects and Programs their templates have been applied to in Eclipse PPM, including through both Project/Program creation or template configuration application.
Prior to this release, there was no way to see this information. Project Template and Program Template menus did not contain any views that displayed which Projects or Programs made use of the template:
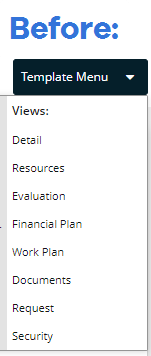
With this update, the template menu now contains an option to view the Template Application History:
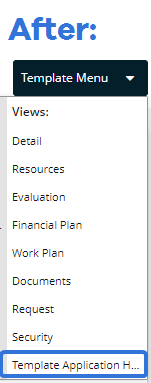
This page contains a table that displays a row for each Project or Program the template has been applied to:

The table contains the following columns:
-
Id: The ID number of the Project or Program that uses the template. Administrators can click directly on the ID number to navigate to the Project or Program. Also, the textbox in the column header can be used to filter rows by ID.
-
Name: The name of the Project or Program that uses the template. Administrators can click directly on the name to navigate to the Project or Program. Also, the textbox in the column header can be used to filter rows by name.
-
Event Type: Indicates whether the Project or Program was created using the template ("Created") or if the template configuration was applied to the Project or Program ("Edited"). The drop-down menu in the column header can be used to filter rows by either option.
-
Applied By: The name of the Eclipse PPM user who applied the template (either through creation or through template configuration application). The textbox in the column header can be used to filter rows by the user's name.
-
Applied Date: The date the template was applied to the Project or Program (either through creation or through template configuration application).
Benefit:
Prior to this upgrade, there was no way Eclipse PPM to see the Projects and Programs that templates were applied to. This data would be very difficult to track, especially within organizations with a great deal of Project Managers. With 2023R1, administrators can simply open the "Template Application History" page to view how often their templates have been used as well as additional information on each application.
Example: Lorna created a Project Template named "Template for Bridge Restoration Projects" because of the large number of bridge restorations undertaken by her organization. She does her best to inform Project Managers that they should use this Project Template if they ever need to create this type of Project. She also instructs them to apply this Project Template configuration to their existing bridge restoration Projects.
With this new feature, she can routinely check to see how often her template is being used. If it not being used as much as she would like, she will know that she needs to increase her communication efforts towards Project Managers.
Timesheets
The following enhancement has been made to Eclipse PPM Timesheets. Select the upgrade to learn more about it:
What's Different:
Prior to this release, Eclipse PPM users could filter their Timesheets using the "Show/Hide" and "Filters" checkboxes from the Options menu:

With this update, these groups have been replaced by two new filter groups: "Include these Projects" and "Include these Tasks":
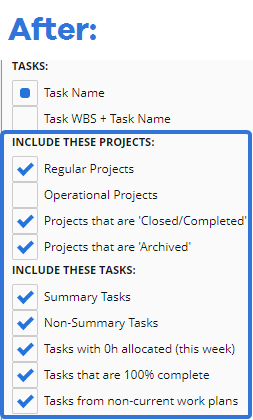
The "Include these Projects" group includes the following checkboxes:
Tip: User preferences from the Options menu are saved whenever users exit and reopen the Timesheet. These preferences will still be retained when Eclipse PPM 2023R1 is deployed. Check the notes under each new option below to see which selections the user will inherit by default based on their selections prior to 2023R1.
-
Regular Projects: Projects that are not Operations will be displayed in the Timesheet.
Note: This will automatically be selected for users who had Include Projects selected from the "Filters" group prior to this release.
-
Operational Projects: Projects that are Operations will be displayed in the Timesheet.
Note: This will automatically be selected for users who had Include Operations selected from the "Filters" group prior to this release.
-
Projects that are 'Closed/Completed': Projects with a "Closed/Completed" Status Type will be displayed in the Timesheet.
Note: Administrators can change the name of Eclipse PPM Status Types. However, this option will not reflect the new name.
Note: This filter works retroactively through the Timesheet. For example, if a Project has a "Completed" status, it will not appear anywhere in the Timesheet if this box is deselected, even in weeks when the Project was still in progress. Deselecting this box will totally remove "Closed/Completed" Projects from the entire Timesheet.
-
Projects that are 'Archived': Projects with an "Archived" Status Type will be displayed in the Timesheet.
Note: Administrators can change the name of Eclipse PPM Status Types. However, this option will not reflect the new name.
The "Include these Tasks" group included the following checkboxes:
-
Summary Tasks: Tasks that have been checked as "Is Summary" will be displayed in the Timesheet if they have not been filtered out by any of the other checkboxes.
Note: This will automatically be selected for users who had All Tasks or Summary Tasks Only selected from the "Show/Hide" group prior to this release.
-
Non-Summary Tasks: Tasks that have not been checked as "Is Summary" will be displayed in the Timesheet if they have not been filtered out by any of the other checkboxes.
Note: This will automatically be selected for users who had All Tasks or Non-Summary Tasks Onlyselected from the "Show/Hide" group prior to this release.
-
Tasks with 0h allocated (this week): Tasks without any allocated time to the Resource during the current week will be displayed in the Timesheet.
Note: De-selecting this checkbox will not cause the "Project Time" row to disappear even if it does not contain any allocated time.
-
Tasks that are 100% complete: Tasks that are 100% complete will be displayed in the Timesheet.
Note: This will automatically be selected for users who had Include Complete Tasks selected from the "Filters" group prior to this release.
Note: This filter works retroactively through the Timesheet. For example, if a Task has been marked 100% complete, it will not appear anywhere in the Timesheet if this box is deselected, even in weeks when the Task was still in progress. Deselecting this box will totally remove completed Tasks from the entire Timesheet.
Note: De-selecting this checkbox will not cause the "Project Time" row to disappear even if it is 100% complete.
-
Tasks from non-current work plans: Tasks from Work Plans aside from the current one will be displayed on the Timesheet.
Note: This will automatically be selected for users who had Include Non-Current Tasks selected from the "Filters" group prior to this release.
Note: The "Include these Projects" selections will take precedence over the "Include these Tasks" selections. Tasks that meet the "Include these Tasks" requirements will not be displayed on the Timesheet if the Project they belong to has been filtered out.
Benefit:
The previous filter groups were a bit confusing; users had a hard time distinguishing the difference between the "Show/Hide" group and the "Filters" group. Dividing the groups into Project filters and Task filters is a much clearer approach.
Also, additional functionality has been added to the Timesheet filters. Prior to this update, there was no way to filter out Projects with a "Closed/Completed" or "Archived" Status Type. There was also no way to filter out Tasks with no allocations to the current week or Tasks that were 100% complete. All of these filters allow Eclipse PPM users more freedom to customize their Timesheet display to their liking.
Upland Analytics
The following enhancements have been made to Upland Analytics in Eclipse PPM. Select any of the upgrades to learn more about them:
What's Different:
Eclipse PPM users will now be able to create reports using the new "NextGen" Upland Analytics interface.
Users can access "NextGen" Upland Analytics by selecting the the Try New Analytics button in the top right-hand side of the Upland Analytics screen:

Prior to this release, the "NextGen" interface was only focused on report viewers. After selecting the Try New Analytics button, users were only able to explore how to view, organize and download existing items in Upland Analytics. If they wanted to create anything in Upland Analytics, they would have to navigate back to the legacy version.
With this update, users now have the ability to create their own reports, dashboards, and drilldowns in "NextGen" Upland Analytics. This can now be done through the Create New drop-down menu that has been added to the "NextGen" interface:
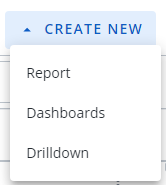
For more information, see Building Reports in "NextGen" Upland Analytics.
For more information on the differences between the "NextGen" interface and the legacy interface, see Navigating "NextGen" Upland Analytics.
Benefit:
Over the past year, Upland Software has made great strides in its efforts to redesign the look and feel of its products. Upland Analytics is no exception; it now features a refreshed, modern theme that matches the rest of our products, including Eclipse PPM. The "NextGen" Upland Analytics features a much cleaner, less cluttered interface that allows user to navigate to their reports much easier than before.
What's Different:
Each Resource- or User-related data view in Upland Analytics now contains new fields that can be used for displaying a Resource's name.
Note: Resource- and User-related views refer to any views that are used to provide information about an Eclipse PPM Resource. For example, "UA_Resource", "UA_Resource_ProjectOwner", "UA_User_ProjectCreatedBy" and many more.
The following fields have been added to Resource- and User-related views:
-
Full Name [First Last]: Displays the Resource or User's full name with the first name preceding the last name. A space will separate both names:

-
Full Name [Last First]: Displays the Resource or User's full name with the last name preceding the first name. A space will separate both names:

-
Name [First Last] (URL): Displays the Resource or User's full name with the first name preceding the last name. Users can select the name to navigate to the Resource or User's profile page:

Note: This new field has replaced the "Name (URL)" field.
-
Name [Last First] (URL): Displays the Resource or User's full name with the last name preceding the first name. Users can select the name to navigate to the Resource or User's profile page:

Benefit:
Prior to this release, there were not any fields that included the Resource or User's first and last name without including a URL. Instead, report builders would have to include both the "First Name" and "Last Name" field in their reports. Combining these fields into one allows report builders to create more concise reports that avoid containing too many columns.
Also, the new "[Last First]" columns can help organize Upland Analytics reports. For example, an Eclipse PPM user viewing a report can now sort the report alphabetically by Resource last name, something that could not be done prior to 2023R1 unless the report builder opted for the "Last Name" field instead of a field that contained a full name.
What's Different:
Upland Analytics report builders can now decide whether or not they would like their reports to display negative values in red text.
Note: This feature is only available using "NextGen" Upland Analytics.
Note: Eclipse users will require "Modify" Upland Analytics permissions from an Application Policy to edit Upland Analytics reports.
Prior to this release, negative values were always displayed in a red font color.

With this update, negative values will still appear in red by default. However, users can edit their reports to disable this feature. To do this, users will need to select the  Menu → Edit Report → Settings and Design:
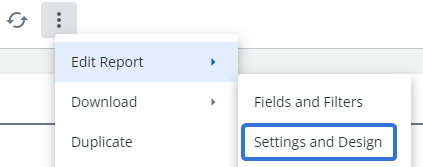
From here, they must open the Format menu as well as the column they would like to edit:
Click thumbnail to play.
Finally, the "Use Red Color in Negative numbers" checkbox can be unselected (or reselected):
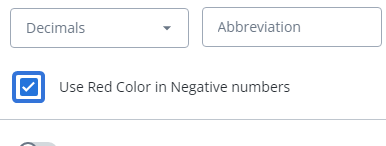
When unselected, the negative values in the column(s) will return to the automatic color, similar to other text on the report:

Tip: Keep in mind that negative financial numbers are displayed in parentheses () instead of with a "minus" symbol.
Benefit:
Although many users make use of red font color for negative numbers, many others prefer their negative values remain the same color as other values in the report. For example, a report builder might build a report that contains a great deal of negative values. However, these negative values occurred by design and are not indicative of any trouble. If all of the negative values on the report are displayed in red, the report viewers might understandably be alarmed. The ability to turn off red font color for negative numbers allows report builders to create more customizable reports that are suited to their data.
Work Planner
The following enhancement has been made to the Eclipse PPM Work Planner. Select the upgrade to learn more about it:
What's Different:
Eclipse PPM users will now see a new warning message when they substitute a Resource for another Resource on the same Work Plan.
Prior to this release, the message indicated that the new Resource would be replacing the old Resource and inheriting their allocations:

With this update, the message now states that the old Resources allocations will be appended (added) to the allocations of the new Resource:

Benefit:
Although the previous message was not incorrect, it was a bit misleading. Some users were understandable confused by the wording; it suggested that the replacement Resource might lose their own allocations on the Work Plan in the process. The new message makes it clear that they will keep their existing allocations while receiving the new ones.
What's Different:
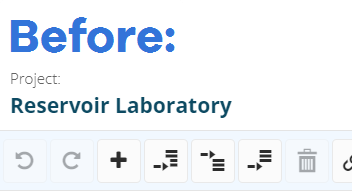
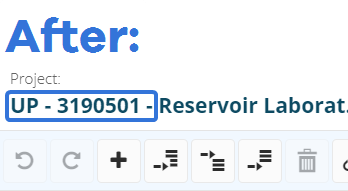
The Eclipse PPM Work Planner now displays the Project Number along with the Project name.
Prior to this release, only the Project name was visible in the header:
With this update, the Project Number will precede the Project Name in the Work Planner header:
Benefit:
Similar to Project names, Project Numbers are commonly used to organize and identify Eclipse PPM Projects. Now that they are included in the header, users will no longer have to navigate back to the Project Home page in order to find the Project Number.


