2024R1 Release Notes
The 2024R1 version of Eclipse PPM will be deployed to the production site on Saturday, June 1st, 2024. When this occurs, the features on this page will become available.
Administration
What's Different:
Administrators can now add users to User Groups, Application Policies, Project Policy Templates, and Program Policy Templates while creating new users in Eclipse PPM.
Prior to this release, users could not be added to these entities during the creation process. Administrators would have to add them to Groups and Policies after they were already created. With this update, the "New User" page now contains text boxes for each of these entities under "User Settings":

Tip: These new options are also available while creating new users from existing Resources.
Administrators can simply type the name of a Group or Policy into one of the text boxes and select it from the drop-down list to add the user to it.
Tip: Use the Select all button to add the user to every Group / Policy or use the Clear button to remove the user from every selected Group / Policy.
Once the new user is saved, it will belong to all of the selected Groups and Policies right away.
Benefit:
Prior to this update, adding new users to Groups and Policies would involve at least two separate processes: creating the new user and adding it to a Group or a Policy. Even more processes would be involved if the user had to be added to multiple Groups and Policies. This was especially tedious because Groups and Policies are a critical component in determining how users will interact with Eclipse PPM. User permissions, for example, should be established upon being invited to the application. If users are expected to work in Upland Analytics right away, they will need the "Upland Analytics" password from an Application Policy upon accessing Eclipse PPM for the first time. Now that Groups and Policies can be added while creating users, administrators no longer need to waste time and energy with these various processes.
API
What's Different:
With the 2024R2 release expected later this year, Eclipse PPM will longer support the "Legacy" API endpoints. This refers to the endpoints formatted in XML:

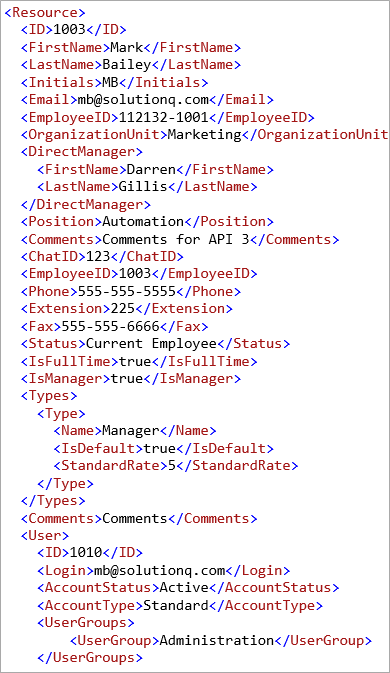
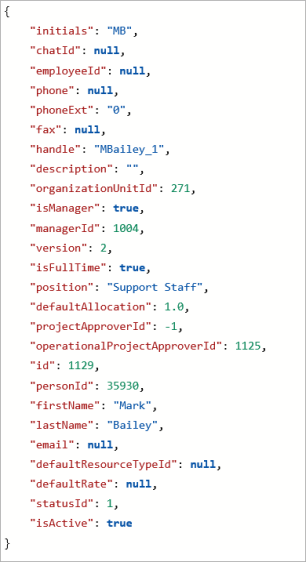
XML used to be the only choice for any kind of data interchange on the web. However, recent developments in open data sharing have introduced more options for developers, each with their own set of benefits. This is why Eclipse PPM has moved to JSON (JavaScript Object Notation) format instead of XML for the API:

Action Required:
Any existing API integrations should be migrated to the new JSON-based API endpoints before the 2024R2 release later this year. Integrations built using the XML-based endpoints will no longer function properly.
All of the JSON-based API endpoints can be found on the Eclipse PPM Swagger site. See Using Swagger and Calling APIs for more information.
Benefit:
The new JSON-based API offers multiple benefits for developers and users alike. Here are a few examples of the benefits of JSON:
-
Speed: Software programs can take a long time to process XML. Overall, JSON uses less data than XML (as we can see with the number of characters in the above examples), which means it can be processed and returned back in less time.
-
Readability: JSON data is organized in a clear, straightforward arrangement; each line represents a single point of data. XML, on the other hand, is much more busy and unclear. For instance, imagine stripping the color away from the text in each of the above examples; the JSON data would still be easy to understand while the XML data would be almost unreadable.
-
Efficiency: The busy structure and opening/closing tags of XML take up valuable space and processing time in an API request and response. The lightweight structure of JSON allows it to be processed quickly and easily.
Email Notifications
What's Different:
Each Eclipse PPM email notification will now include the Eclipse PPM environment name as well as a link to the Eclipse PPM environment that the email originated from.
Prior to this release, email notifications did not mention the environment name. Only a link to the environment would be provided at the bottom of the email.

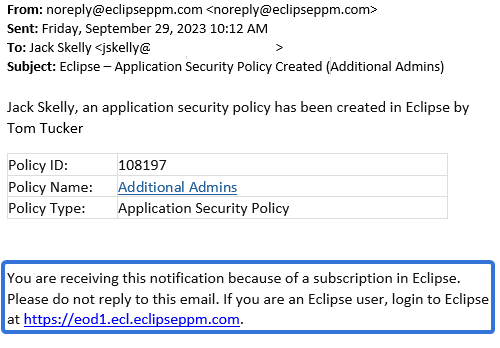
With this update, the environment name is now included at the bottom of the page as well.

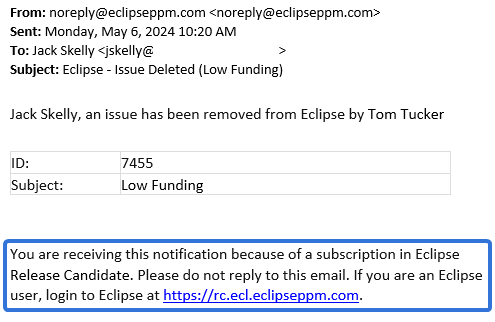
Tip: Eclipse PPM users with the "Organization Administration" permission from an Application Policy can change the environment name while managing organization details: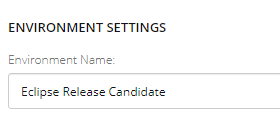
Benefit:
Eclipse PPM customers commonly make use of multiple environments. For example, Sandbox and Release Candidate sites allow users to experiment with unreleased features without impacting any important or sensitive data on their production sites. However, email notifications would often confuse users with multiple sites because it was not always clear which site was producing the notification. This was especially problematic for customers with multiple environments under the same URL (for example, all Release Candidate sites share the same URL, so users who belonged to more than one of them would not know which one was sending a notification). Environment names, however, can be unique to the environment. Including environment names in email notifications will ensure that users know exactly which site the notification is coming from.
Financial Plans
What's Different:
Negative Actual Expenditure values will now be taken into account while reconciling them against Committed Expenditures on Eclipse PPM Financial Plans.
Prior to this release, Actual Expenditure items with negative values would not affect the Committed Expenditure it was reconciled with; the Committed Expenditure value would simply ignore the negative value. With this update, negative Actual Expenditure values will actually change the Committed Expenditure value once reconciled against it.
Example: Lee has committed $1,000 on his Financial Plan for a new Backup Server. After the server is installed, he pays the vendor $1,000 and reconciles the new Actual Expenditure with the Committed Expenditure, which brings the Committed Expenditure amount to 0: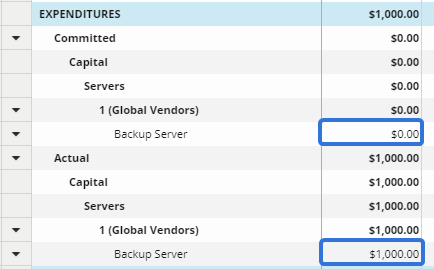
However, the vendor calls him the next day to tell him that Lee's company has qualified for a loyalty discount on this particular server. Instead of $1,000, the server was only supposed to cost $500. The vendor sends Lee a rebate of $500 to remedy this.
Lee prefers to keep all of his invoices separate on the Financial Plan, so he chooses to create a new Actual Expenditure line item for the rebate:
If he attempted to reconcile the negative "Backup Server Rebate" expenditure against the exiting "Backup Server" Committed Expenditure prior to this release, the Committed Expenditure would remain at zero: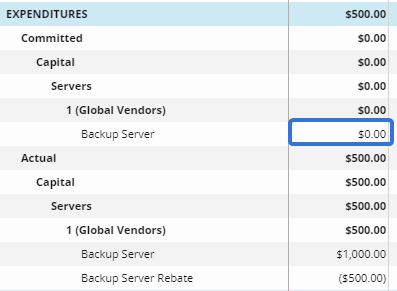
With this update, the negative value will no longer be ignored. If he reconciles the "Backup Server Rebate" with the "Backup Server" Committed Expenditure, $500 will return to the Committed Expenditure value: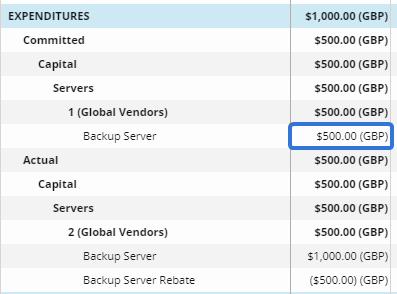
Once
Benefit:
Scenarios similar to the example above are all-too-common for Eclipse PPM users who are responsible for Financial Plans. Overpayments on expenditures occasionally happen, and Financial Plans should be able to accommodate them when they do. With this update, users in charge of Financial Plans can easily reconcile these excess amounts just like they would with any other Actual Expenditure.
Project Requests
What's Different:
Administrators can now determine which users will receive undelivered Project Requests during Project Request configuration.
Note: Users will require the "Manage Project Templates" Administration & Configuration permission from an Application Policy to configure Project Requests on Project Templates.
Prior to this release, Project Requests that were not successfully sent to the intended recipient would simply be rejected. The user submitting the request would receive an error message indicating that the request was undeliverable.
With this update, a new "Forward undeliverable requests to this person" field has been added to Project Request forms:
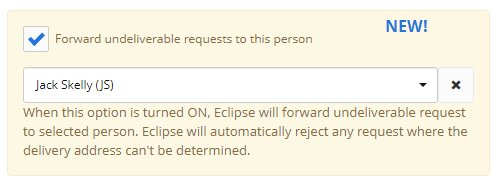
Selecting this checkbox will send any of the Project Template's undeliverable Project Requests to the user selected in the text box below.
Example: Celeste is configuring the Project Request form on her Project Template. When users submit Project Requests using this form, she wants the Manager of the requester to receive the request for approver. She selects the "Send all requests to specific approver" checkbox and enters "@DirectManager" into the text box: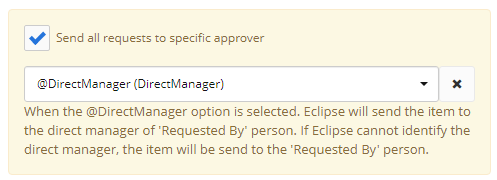
After she saves the form, Josh uses it to create a Project Request. However, Josh does not have a listed Manager on his profile, so there is no where for the request to be sent.
Prior to this release, submitting the form would cause an error. Josh would be notified that his request was undeliverable and therefore canceled.
With this update, Celeste can use the new "Forward undeliverable requests to this person" to send undeliverable requests to Jack, who manages a large number of Projects created using the template:
When Josh submits the request, he will be notified that his request was successfully sent to Jack for approval: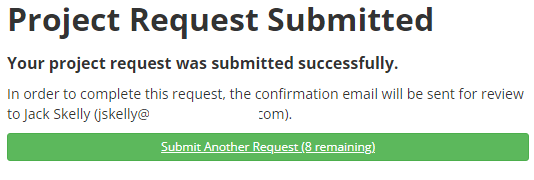
Benefit:
Prior to this release, Project Requests that could not reach the intended approver were canceled right away. This would cause users to reach out to Project Managers and administrators and ask them to adjust the request form for them so they could successfully send the request. It was especially difficult for users submitting requests outside of Eclipse PPM because they were not always certain who to contact to remedy the situation.
With this update, an actual Eclipse PPM user can be set as a backup receiver for Project Requests. This will allow more users to create Project Requests and result in much cancellations.
Reports
What's Different:
A new Eclipse Report titled "Program Policy Extract" is now available from the "Reports" page. This report contains the Program Policies, the permissions they enable, and the users/groups that belong to them.
Note: Eclipse Reports (as opposed to Custom Reports) are reports that are already pre-built into Eclipse PPM. They can be run at any time.
This new report can be found in the "Eclipse Report" table on the left-hand side of the "Reports" page:

Selecting Program Policy Extract will allow users to customize the title of their report:
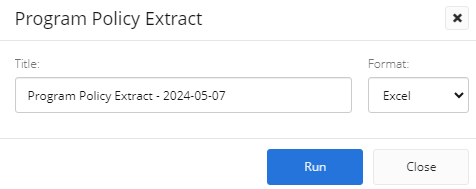
Note: "Excel" is the only formatting option available.
After selecting the Run button, the report will automatically download onto the user's device in a Microsoft Excel spreadsheet.
The Excel file will include two worksheets:

-
Policy Permissions: Each Program-related permission will be listed as a row and each Project Policy will be displayed as a column. The letter "X" will indicate if the policy includes the listed permission:

-
Policy Members: User groups and users will be listed alphabetically as rows (with user groups at the top) and Program Policies will be displayed as columns. The letter "X" will indicate if the user / user group belongs to the policy:

Benefit:
The 2023R1 release introduced the "Project Policy Extract" report, which indicated which permissions and users / user groups belonged to which Project Policies. With this update, this same initiative has been expanded to Program Policies as well.
Users can now quickly build a report on their organization's Program Policies. This will be helpful whenever administrators wish to review both the permissions and members of their Program Policies; they can see which permissions and which members belong to certain policies by simply viewing both worksheets.
What's Different:
A new Eclipse Report titled "Program Security Extract" is now available from the "Reports" page. This report will display the permissions that users have on specific Programs.
Note: Eclipse Reports (as opposed to Custom Reports) are reports that are already pre-built into Eclipse PPM. They can be run at any time.
This new report can be found in the "Eclipse Report" table on the left-hand side of the "Reports" page:
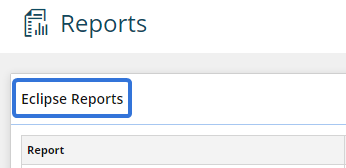

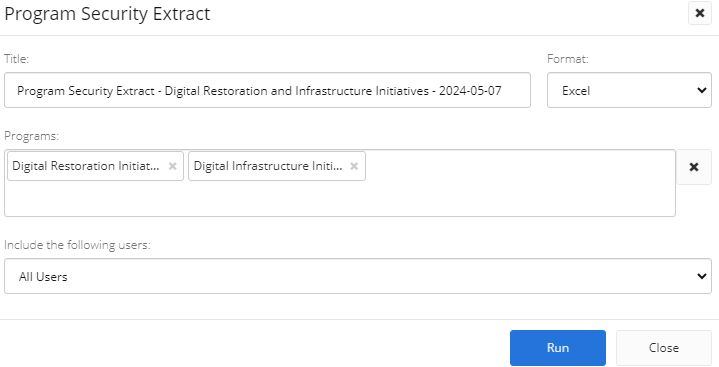
Selecting the Program Security Extract report title will open up a window that allows the user to customize the report:
-
Title: Enter a unique title for your report.
Tip: Keep in mind that you will likely run this report more than once and for a variety of different Programs each time. Including the date in the title as well as an indication of which Programs are included is recommended.
-
Format: Choose a format for the downloaded report.
Note: "Excel" is the only option for this report.
-
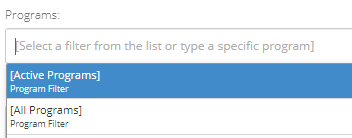
Programs: Determine which Programs will be included in the report. Program filters and specific Programs can be included:

Tip: Program filters (both pre-built and custom) can be found at the top of the list after selecting the field.
-
Include the following users: Determine which Eclipse PPM users will be listed on the report:

-
All Users: Every Eclipse PPM user in the environment will be included in the report.
-
Only users directly involved with the selected project: Only users who have a specified role on the Program will be included in the report.
Tip: If a Resource has a role on the Program but still does not appear on the report, make sure the Resource is also an Eclipse PPM user.
-
After selecting the Run button, the report will automatically download onto the user's device in a Microsoft Excel spreadsheet.
The Excel file will contain a worksheet for each Program included in the report:

Each Program Permission will be listed in the "Permission" column, ordered exactly as they appear when a Program Policy is opened. Each user included in the report will appear as a column to the right of the "Permissions" column. The Policies that the user belongs to will be displayed directly under the user's name:

The letter "X" will indicate if the user has the permission on the Program.
Benefit:
The 2023R1 release introduced the "Project Security Extract" report, which indicated which permissions users had on specific Projects. With this update, this same initiative has been expanded to Programs as well.
Prior to this release, there was no way to report on the permissions users had on certain Programs. Individuals who were interested in this would have to navigate to the Security pages of each Program. This would become extremely tedious if the individual was interested in the permission settings of multiple Programs. Furthermore, the Security pages themselves are not always straightforward. Individuals interested in the Program's permissions would have to check the "Members" tab of each Policy on the Program in order to see what each user was permitted to do. With this update, this data can be easily extracted and individuals can clearly see each user's permissions on any given group of Programs.
What's Different:
The labor costs on the "Financial Extract" report will now be broken down into Project Tasks.
Note: The "Financial Extract" report can be run as an Eclipse PPM Report (either on the Reports page or a Project's Home page), through the API, or through the Excel Add-In.
Prior to this release, labor-related data was already listed on the report. It was broken down by Resource costs, just like on the Financial Plan.
For example, take a look at the Work Plan below. Jack Skelly (JS) is assigned to two Tasks and Tim Stutzle (TS) is assigned to one Task:

On Jack's Timesheet, he has entered some time toward both of the Tasks he is assigned to. Tim has not entered any time at all. Therefore, the Project's current Financial Plan looks like this:

For simplicity, only one time period is displayed on this plan.
The labor efforts from both Jack and Tim are included in the Budget, and Jack's time entry has been included as an Expenditure.
Note: In order to display labor costs on the Financial Plan, select all three checkboxes under "Fulltime Resources:" while configuring the Project's "Financial Worksheet Settings":
To display Resource names on the Financial Plan, select Category and Item from the "Budget Details" drop-down menu: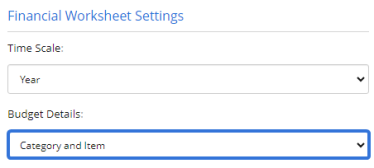
Prior to this release, the Financial Extract report would include a row for each of the labor amounts displayed on the Financial Plan. Keep in mind that these are totals based on all of the Tasks a Resource belongs to.


Irrelevant columns have been compressed for clarity.
With this update, the Financial Extract report breaks these totals down into Tasks. Instead of displaying the total labor cost of all the Resource's Tasks, the report displays the labor that is attributed to each Task.


Notice how there are now two "Budget Items" (column Q) for Jack. This is because he is assigned to two Tasks on the Work Plan. The $4,200.00 "Amount" (column AH) from the prior report has now been broken down into $1,400.00 for the "Press Release" Task and $2,800.00 for the "Communications Plan" Task. This applies to Expenditures as well; notice how there are two Expenditures (column W) for Jack. He has entered time toward both Tasks on his Timesheet, so the $2,240.00 total from the prior report has now been broken down into $840.00 for the "Press Release" Task and $1,400.00 for the "Communications Plan" Task.
Note: Please note that Financial Plans do not break down labor effort into Tasks; they will still only display labor costs by Resource. Therefore, the Financial Extract report will not necessarily duplicate the Financial Plan exactly.
The following columns have been added to the Financial Extract report to retrieve data about the Task:
-
Task ID
-
Task Name
-
Task Category
-
Task Code
-
Task Custom Properties
Benefit:
The Financial Extract's ability to automatically pull labor costs from Work Plans and time submissions gives report readers perspective into how much they are spending on Resources per Projects. However, labor costs listed by Resources only tell part of the story. By breaking this effort down into costs per Task, report readers can see how much labor is being spent on each Project Task. This allows them to make more informed decisions on which Tasks should move forward on current and future Projects.
Resource Management
What's Different:
Users now have the option to group the Resources in the Resource Management "Availability" window by their Organization Unit or their Manager.
After opening the "Options" drop-down menu, users will find a new "Group By" section:
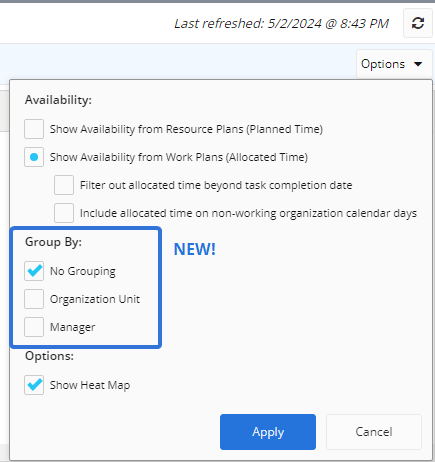
The listed Resources on the "Availability" window will be grouped by the selected entity. For example, selecting the "Manager" checkbox will group the Resources by their Direct Manager:
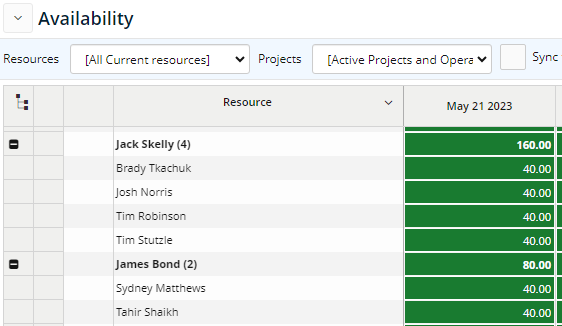
The Organization Unit / Manager row will display the total availability of all Resources under it.
Benefit:
Grouping Resources is not only a great way to organize the "Availability" window, but it also offers a high-level view of how much time is available for certain types of Resources. For example, many Eclipse PPM customers organize their Resources into Organization Units. When deciding which units to assign work to, Project Managers can group them together to see their overall availability and determine which ones can take on additional work.
What's Different:
Any columns added to the Resource Management page will appear in the "Availability" window as well as the "Resource Management" window.
Prior to this release, additional columns were only applied to the "Resource Management" window (the window above). When users added columns to the page through Resource Management configuration, they would not appear on the "Availability" window.

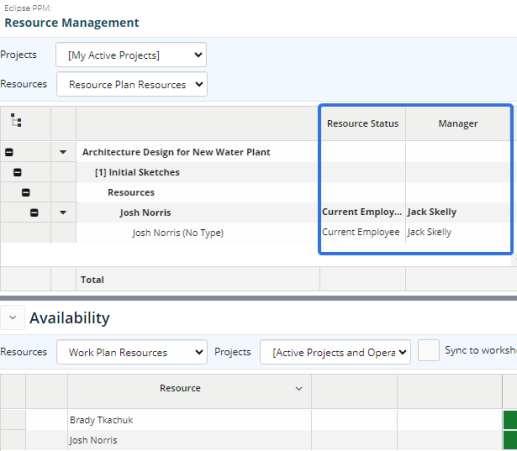
Notice how the "Resource Status" and "Manager" column are not included in the "Availability" table.
With this update, all added columns will be displayed in both windows.

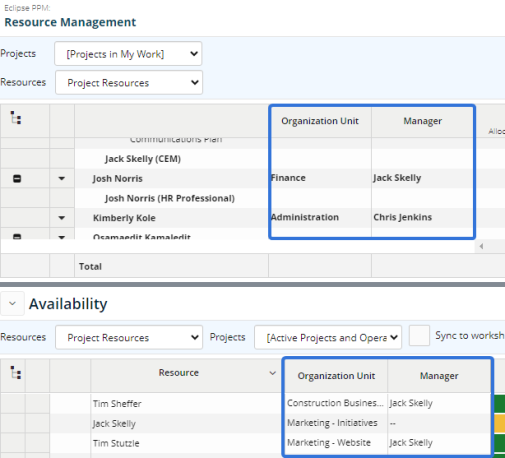
The "Organization Unit" and "Manager" columns have been added to the page and can be seen in both windows.
Benefit:
Adding columns to the Resource Management page provides valuable context about the listed Projects and Resources. In turn, this helps Project Managers make for informed decisions concerning planned and actual time. Now that these columns can be applied to the "Availability" window, Project Managers will have this context in mind while making decisions regarding Resource availability.
What's Different:
The Resource Management page now features a Select All button next to the "Resource Types" filter.

When this button is pressed, every Resource Type will be automatically selected from the filter:

Tip: After selecting / deselecting your desired Resource Types, remember to select the Refresh button so the changes are reflected on the page:
Benefit:
This new button offers users a simple way to display all Resource Types on the Resource Management page. It also makes it much easier to exclude specific Resource Types from the page; users can select the Select All button and deselect the Resource Types that should be excluded.
Search Page
What's Different:
Eclipse PPM users can now add custom Properties as columns on the Project, Program, and Task Search pages.
With this update, a new drop-down menu is available from the "Columns" tab:

Selecting Identification from the drop-down menu allows the user to add the same columns that were available prior to this release. Selecting Properties, however, will allow the user to select the checkboxes of any custom Project, Program, or Task's Properties:
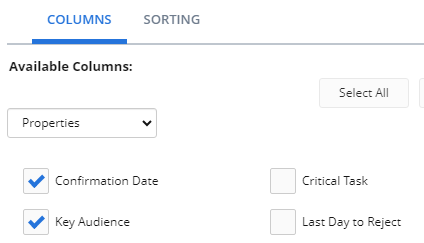
After selecting the Save button, the selected properties will appear as columns on the Search page:
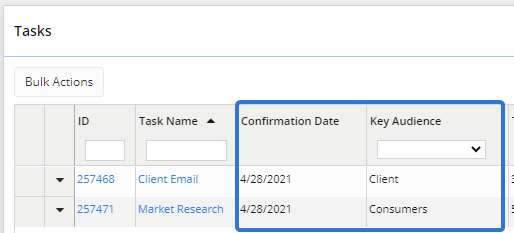
Tip: Users can sort and filter the results based on their custom Property values just like any other Search page column.
Benefit:
Prior to this update, the Search page offered a long list of available columns that could be used to identify, sort, and filter all of the results. However, Eclipse PPM users create their own Properties in order to capture custom information that is unique to their own business needs. Users should be able to find Projects, Programs, or Tasks on the Search page based on this unique information. With this upgrade, they can easily apply these Properties to the Search page and use them to return a set of results based on their values.
What's Different:
While updating Resources in bulk, default Resource rates will now populate each selected Resource Type.
Note: Users require the "Resource Administration" permission from an Application Policy to edit Resources in Eclipse PPM.
Users can update Resource Types for multiple Resources at once by performing Bulk Actions and selecting Types and Rates from the "Update Field" menu:
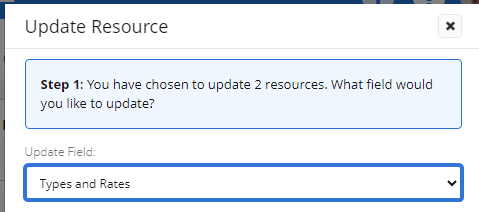
Prior to this release, Resource Types would always display a rate of 0 until the user populated the field.

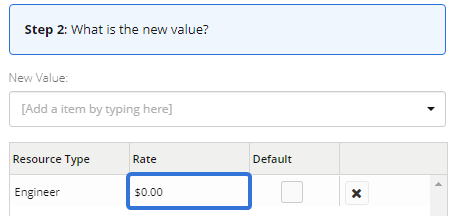
However, administrators can set default rates for Resource Types while managing the Eclipse PPM Structure:

Note: Users require the "Organization Administration" permission from an Application Policy to access and edit the "Structure" page in Eclipse PPM.
With this update, default rates will now auto-populate the "Rate" of each selected Resource Type while Resources are updated in bulk.

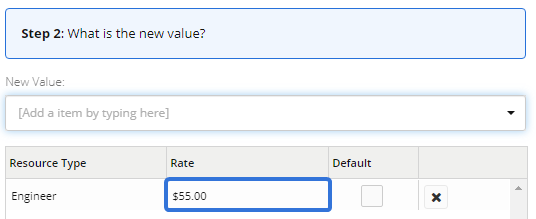
Benefit:
Eclipse PPM administrators set Resource Type default rates for many reasons. They increase consistency in Resource costs across Projects and ensure accurate cost estimation and budgeting. Prior to this upgrade, users would often have to open up the "Structure" page in a separate browser tab while bulk updating the Resource Types of multiple Resources to find out each default rate. Going forward, the default rates will already populate the "Rate" column, eliminating the need for any unnecessary navigation.
Timesheets
What's Different:
Eclipse PPM users can now configure Projects to restrict time entry for Tasks outside of each Task's date range.
While configuring a Project, users will see the new "Time Entries are only allowed for task dates" checkbox under the Project's "Time Entry Settings":
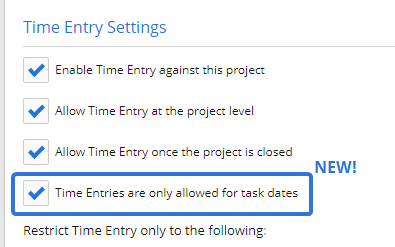
When this is selected, users will only be able to enter time towards Tasks between the Task's dates.
Example: Jack has been assigned to the "Convention Prep" Task on a Project. This short Task begins on April 8th and ends on April 10rd:
When he enters time for the Task, he can only add values to the dates between April 8th and April 10th on his Timesheet:
Notice that he cannot select and add time to the cell under April 11th. This is because it falls outside of the Task's date range.
Note: If this is selected, Projects that allow "Project Time" to be entered will only allow "Project Time" entries between the Project's Start Date and End Date.
Benefit:
Restricting users from entering time beyond Task dates serves several purposes. Most importantly, it ensures that Resources accurately track their work hours only during the duration of the Project's Task, which helps maintain accurate records for analyzing Project costs and assessing progress. It also encourages accountability among users by requiring them to adhere to the Project's deadlines. Users will be incentivized to complete their work within the designated project timeframe, which promotes efficiency and timely delivery of projects.
However, it is important to remember that every Project is different and situations might require work to be done either before or after a Task's duration. This is why the configuration is optional on every Project.
What's Different:
The days of the week will now appear on Timesheet column headers.
Prior to this release, each Timesheet column header only contained the month and the day.


With this update, the day of the week will be included along with the date in each column header.


Benefit:
Although dates provide specificity to each column header, individuals often think of time in days of the week instead. This is especially true when users enter time into their weekly Timesheet; they are less likely to make mistakes when they picture their week in days instead of dates.
Example: Erika had to spend all of Tuesday working on the "Alexandria Bridge Refresh" Project. When she entered her time at the end of the week, she remembered that her entire Tuesday was dedicated to it. However, she was in a rush to get home so she mistakenly entered the 8 hours under April 24th, which was Wednesday. This caused inaccurate time to be allotted toward the Project.
With this upgrade, Erika can easily see the days of the week directly on her Timesheet. She knows that Tuesday was the day she had to work on "Alexandria Bridge Refresh", so she enters her time right below "Tues Apr 23".
What's Different:
Users can now impersonate Resources while approving Timesheets when the filter is set to "All" on the Approvals page.
Prior to this release, other Resources could not be impersonated when the filter was set to "All". The "[Impersonate Resource]" field would be grayed out, preventing users from selecting it.


With this update, this is no longer the case. Users will be able to select a Resource from the field regardless of the filter settings.


Benefit:
When the Approvals page was originally developed, the "[Impersonate Resource]" field was disabled when "All" was selected due to concerns of unnecessary data overload. Over time, however, the performance of Eclipse PPM has enhanced and these concerns have proven to be futile. Users will no longer have to place a filter on the Approvals page in order to impersonate other Resources.
Upland Analytics
What's Different:
Upland Analytics report builders now have the ability to format large numbers on report axes and legends to make them clearer to readers.
Note: Users will require the "Modify" Upland Analytics permission from an Application Policy to add and edit Upland Analytics reports.
Prior to this release, values on axes and legends were always represented in whole numbers.

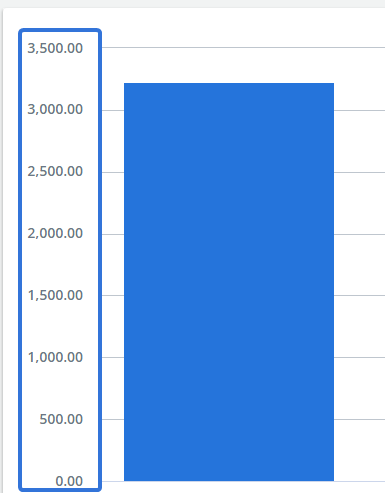
While editing the "Settings & Design" of a report, users can now open up a "Format" tab:
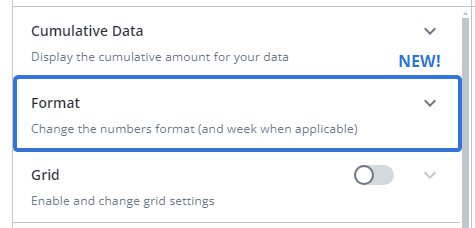
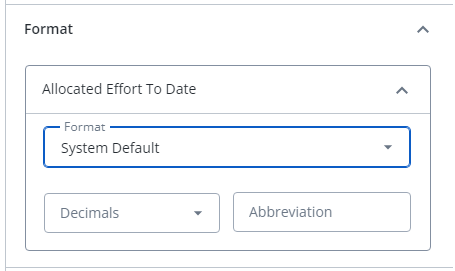
This tab allows report builders to apply custom formatting to values on the axes and legend:
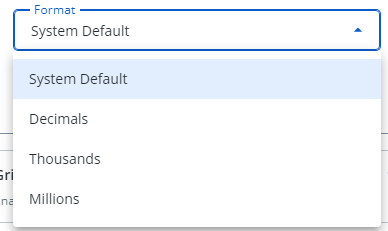
The "Format" drop-down menu can be used to display the values as whole numbers with decimal points, thousands, or millions:
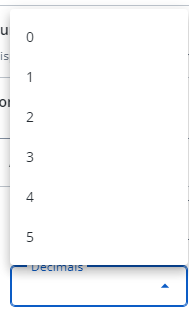
The "Decimals" drop-down menu can be used to determine how many decimal places will be displayed on the value:
Finally, report builders can enter a value in the "Abbreviation" field to accompany each number.
Example: If Thousands is selected from the "Format" menu, a report builder can enter "K" as the abbreviation so readers know that the values are formatted in thousands.
After saving, these custom formatting settings will be applied to the report.


Benefit:
Large numbers can be space-consuming on reports, especially when the scale of the numbers does not require readers to see every digit of the value. For instance, a bar chart with a Y-axis that is measured in millions does not necessarily need to display numbers in their entirety. Abbreviating numbers with decimal points and symbols will remove clutter from reports and increase their clarity and readability.
What's Different:
Upland Analytics report builders can now add values to their reports that measure the time between two separate dates.
While creating a Custom Field in Upland Analytics, report builders can implement the "DateDiff" function:
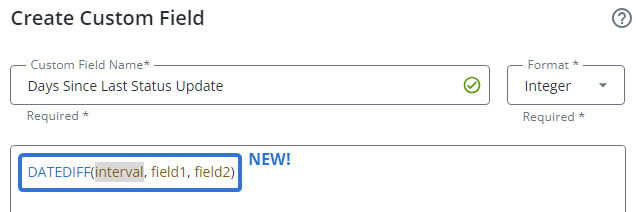
This new function will measure the difference between two specific dates.
Report builders can select the "interval" placeholder to determine which unit of time will be used to measure the difference:
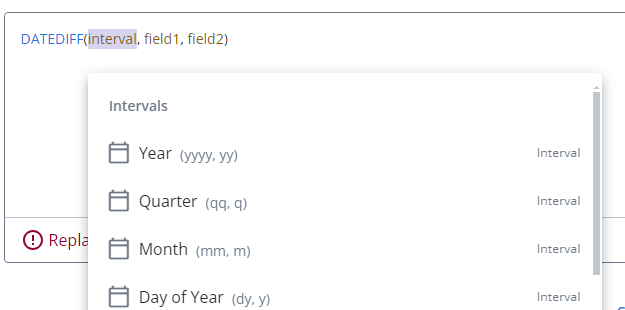
Next, they can select the "field1" and "field2" placeholders to determine which dates will be measured:

Example: This "DateDiff" function will calculate the number of days between a Program's last Status Update and the current date:
When added to a report, the value will be displayed as an amount of days:
Once the Custom Field is created, report builders can set colored thresholds. This means the field will change colors on the report based on its value.
While editing the "Settings & Design" of a report, users can now open up a "Format" tab:

After opening the drop-down menu of the new Custom Field, users can select the "Enable Conditional Formatting" lever to apply thresholds:

From here, the fields can be used to set a threshold that will cause the value to change colors on the report:
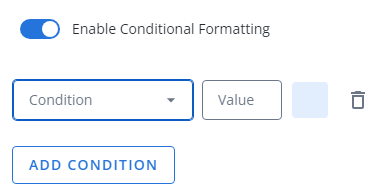
Example: Kate does not like when Programs go over 100 days without a Status Report, so she wants her report to point out when this occurs. She selects Greater Than from the "Conditions" menu and enters "100" into the "Value" field. She also selects the color red from the color picker: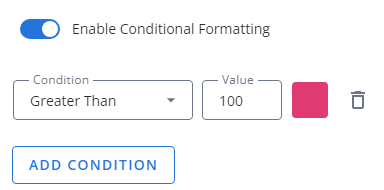
This causes the "Days Since Last Status Update" value to turn red if the Program has not had a Status Update for over 100 days:
Benefit:
Dates on Eclipse PPM reports already have the ability to change color based on certain thresholds. Prior to this upgrade, however, there was no way to configure this for users who prefer to use Upland Analytics for their reporting needs.
Measuring the distance between dates allows report readers to effectively monitor progress. Setting colored thresholds for date differences allows them to identify variances, analyze their causes, and take corrective actions to fix them.
User Interface
What's Different:
Eclipse PPM no longer features navigational breadcrumbs in the top left-hand corner of the page:
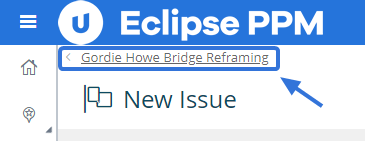
These breadcrumbs have been totally removed from the application.
Benefit:
Eclipse PPM breadcrumbs were not especially useful for navigating the application. Although they would allow users to return to the previous page, they would not always appear as expected. For example, if a user navigated from the Home page to a Project's home page, a breadcrumb for the "Home" page would appear. However, if the user navigated to that same Project's "Issues" page using the "Project Menu", the breadcrumb would not recognize this as a new page and it would still display the "Home" breadcrumb. This caused confusion for users attempting to navigate to different pages.
Additionally, the breadcrumbs are being deprecated because they are no longer required in the current Eclipse PPM interface. The Navigation Menu already contains the Recent Items button, which reveals a full list of pages the user recently visited:

Using this list is a much more effective and straightforward way to return to previously-visited pages in Eclipse PPM.
Work Planner
What's Different:
Users performing a Resource Substitution on a Work Plan will now have new options for handling the replaced Resource.
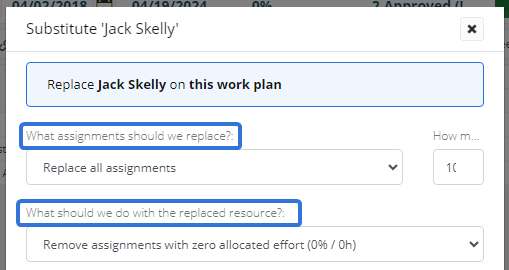
First of all, the labels on both of the "Substitute" window's drop-down menus have been changed for clarity. Prior to this release, they were labeled "What Assignments?" and "Assignments with Actual Time".

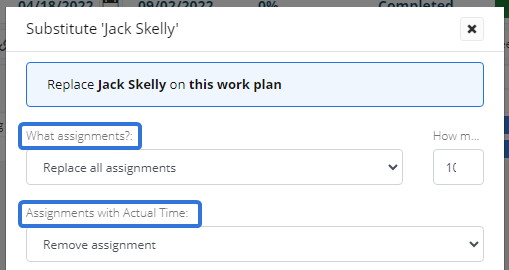
With this update, these labels have been changed to "What assignments should we replace?" and "What should we do with the replaced resource?".

The previous "Assignments with Actual Time" drop-down menu was solely focused on the Resource's assignments that had Actual Time (time entered toward them on a Resource's Timesheet).
Prior to this release, this menu had two options.


Both of these options only affected the assignments that the user submitted time toward. If the Resource did not submit any time toward a Task, the "Keep assignment (reduced to 0% / 0h)" option would not keep the Resource assigned to the Task.
With this update, there are now three options for determining what will happen to the replaced Resource.


-
Remove assignments with zero allocated effort (0% / 0h): The replaced Resource will be removed from Tasks if its allocation toward the Task is 0% (or 0 hours) after the substitution.
Note: If a replaced Resource was assigned to a Task but had a 0% allocation toward it prior to the substitution, that Resource will still be removed from the Task.
Note: When "Replace all assignments" is selected from the "What assignments should we replace?" drop-down menu, the new Resource will take all of the replaced Resource's allocations. This means that the replaced Resource's allocations will become 0% and it will be removed from each Work Plan Task. However, if "Replace assignments after a specific date" is selected and the chosen date falls within the date range of a Task that the replaced Resource is already assigned to, the new Resource will only take over the Task after the chosen date. This means the replaced Resource will still have allocations before the chosen date and will not be removed from the Task.
-
Keep assignments(reduced to 0% / 0h): The replaced Resources will still be assigned to the Tasks even when their allocation toward the Task is 0% (or 0 hours) after the substitution.
Note: Unlike the previous "Assignments with Actual Time" drop-down menu, this selection does not only apply to assignments with Actual Time. Resources will keep their assignments on the Tasks even if they have not submitted any time toward them.
-
Keep assignments on tasks with time entries (reduced to 0% / 0h): The replaced Resource will be removed from Tasks if its allocation toward the Task is 0% (or 0 hours) after the substitution unless that Resource has entered time toward the Task on their Timesheet.
Example: Jack Skelly (JS) is assigned to three Tasks on a Work Plan. His time has only been allocated to the "Convention Planning" Task; he has zero allocations on the other two Tasks:
Also, he has entered time toward the "Convention Guestlist" Task on his Timesheet even though he has no allocation toward the Task. On the "Convention Wrap Up" Task, he has no allocation nor does he have any time entries toward it.
The Project Manager decides to substitute Tim Stutzle for Jack on the Work Plan. Here is how Jack's assignment will be affected by each selection from the "What should we do with the replaced resource?" drop-down menu:
Remove assignments with zero allocated effort (0% / 0h)
Jack will be removed from Tasks if he has 0 allocation toward the Task after the substitution. In this case, "Replace all assignments" has been chosen from the first drop-down menu:
This means that Tim will take over all of Jack's allocations on the Work Plan, reducing them to zero. Jack is no longer assigned to any of the Tasks because his allocation is now zero on all of them:
Even though Jack's allocation on two of the Tasks was 0 before the substitution, he has still been removed from them.
Instead, imagine the first-drop down menu is set to "Replace assignments after a certain date" and the chosen date is May 1st:
The "Convention Planning" Task that Jack is allocated to runs from April 29th to May 3rd:
This means that Jack will still have time allocated to the Task after May 1st. His allocation will not be zero so he will remain assigned to the Task:
Keep assignments(reduced to 0% / 0h)
Jack will remain assigned to the Work Plan Tasks even when his allocation toward the Task is 0. If Tim replaces all of Jack's assignments as part of the substitution, Jack will still remain assigned to all of the Tasks at 0%:
This also applies to Tasks that Jack was assigned to at 0% allocation ("Convention Guestlist" and "Convention Wrap Up"). Jack will remain assigned to them after the substitution.
Keep assignments on tasks with time entries (reduced to 0% / 0h)
Jack will be removed from Tasks if he has 0 allocation toward the Task after the substitution. However, he will remain assigned to Tasks with 0 allocation if he has entered time toward the Task on his Timesheet.
In this case, he has already entered time toward the "Convention Guestlist" Task even though he has a 0% allocation toward it. If Tim replaces all of Jack's assignments as part of the substitution, Jack will only remain assigned to the "Convention Guestlist" Task:
Even though his allocation on all three Tasks is zero after the substitution, he is still assigned to the "Convention Guestlist" Task because he has already entered time toward it.
Benefit:
Prior to this upgrade, the second drop-down menu (previously named "Assignments with Actual Time") contained the "Keep assignment (reduced to 0% / 0h)" option. However, this would only apply to Resources with Actual Time (time entered on a Timesheet) toward the Task. There was no way to keep replaced Resources assigned to Tasks if they did not submit any time toward the Task. This made things difficult for Project Managers who use Work Planner substitutions to plan Resource takeovers ahead of time.
Example: Mark has created a new "Prepare Communications Package" Task that will last two weeks. He would like a new hire to be responsible for the Task, but the new hire is not ready so he assigns Jack (JS) to the Task in the interim:
Mark does not allocate any of Jack's time to the Task because Jack is temporarily helping out; he will contribute as much as he can during the week. Although none of Jack's time has been allocated to the Task, he still needs to enter time toward it on his Timesheet after he works on it.
Mark hears from Human Resources that the new hire, Tim, will be ready to take on the Task next week. To prepare for this, Mark decides to substitute Jack for Tim on the Task after this week. This way, Jack will be responsible for the Task this week and Tim will be responsible for it next week:
Even though "Keep assignment (reduced to 0% / 0h)" was selected, Jack was removed from the Task because his allocation was 0 before the substitution took place.
With this update, Mark can select "Keep assignment (reduced to 0% / 0h)" from the "What should we do with the replaced resource?" drop-down menu:
This will add Tim to the Task without removing Jack, despite his 0% allocation:
Mark can now use the "Detailed Time" window to allocate Tim's time to the Task next week.
What's Different:
The "Apply Calendar Changes" window has been removed from the Work Planner.
Prior to this release, the "Apply Calendar Changes" window would appear when a user first opened a Work Plan that was auto-synced to a Calendar with changes. This user would be given the option to apply the Calendar changes to the Work Plan or discard them.


Selecting Yes would apply the new Calendar changes to the Project / Project Template's Work Plan. Selecting No would temporarily ignore these changes, and the window would continue to appear whenever the Work Plan was opened until a user finally selected Yes.
With this update, users will no longer be given the choice to apply Calendar changes when they open up a Work Plan. Instead, changes made to Calendars will automatically be applied to the Work Plans they are auto-synced to. Users will not see any notification windows after opening a Work Plan that has received auto-synced Calendar changes.

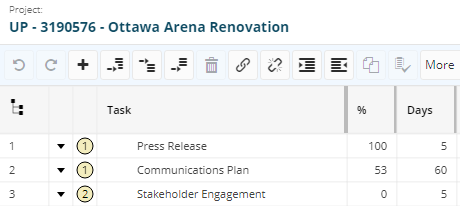
The Work Plan will open up without any notification windows.
Note: Administrators still have the option to notify users when Calendar changes are pushed to auto-synced Work Plans by forcing the changes through (see Add and Manage Calendars for more information). A notification window will appear informing the user that the applied changes were pushed:
Benefit:
Prior to this upgrade, users who opened auto-synced Work Plans after Calendar changes were able to choose whether or not those changes were applied. Although administrators had the option to push those changes through (see Add and Manage Calendars for more information), the "Apply Calendar Changes" window essentially defeated the purpose of auto-sync in the first place.
Auto-synced Work Plans are expected to adhere to all Calendar changes. The ability to temporarily ignore them created unnecessary confusion and allowed Work Plan editors to schedule work on days that should have been avoided. By removing this window, administrators can be sure that Work Plans will always reflect the Calendars they are synced to.
What's Different:
When users open up a "Detailed Time" window in the Work Planner (either for the entire Work Plan or for a specific Resource or Task), the "Periods" preference will no longer automatically change based on the number of periods.
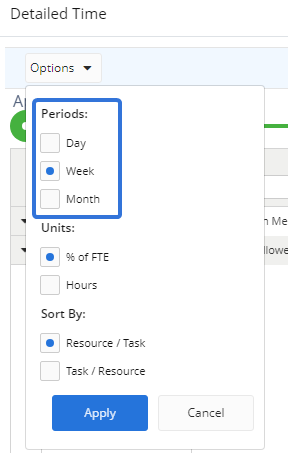
Prior to this release, a user's "Periods" preference would automatically change based on the number of periods displayed in the window. If a user set the preference to "Day", it would automatically switch to "Week" if the user opened a window that displayed more than 15 days. If a user set the preference to "Day" or "Week", it would automatically switch to "Month" if the user opened a window that displayed more than 100 days.
With this update, this automatic switch has been removed from the "Detailed Time" window. A user's "Periods" selection will remain the same whenever a "Detailed Time" window is opened until the user decides to change it.
Benefit:
Automatic preference switching was originally introduced to simplify how users would see data in the "Detailed Time" window. For example, it was assumed that users would not want to view a time span of over 100 days in daily or weekly periods. However, users would often expect their "Periods" preference to remain active regardless of time span displayed. This caused confusion as users assumed something was wrong with the application when the "Periods" selection would automatically switch. With this upgrade, users now have full control over their "Detailed Time" preferences.