Upland Qvidian Interface
If you are new to Upland Qvidian, you may want to familiarize yourself with the Upland Qvidian interface and commonly used workspaces, such as the library and projects pages. With the exception of the library, the Upland Qvidian interface will always include a header at the top and side navigation menu on the left.
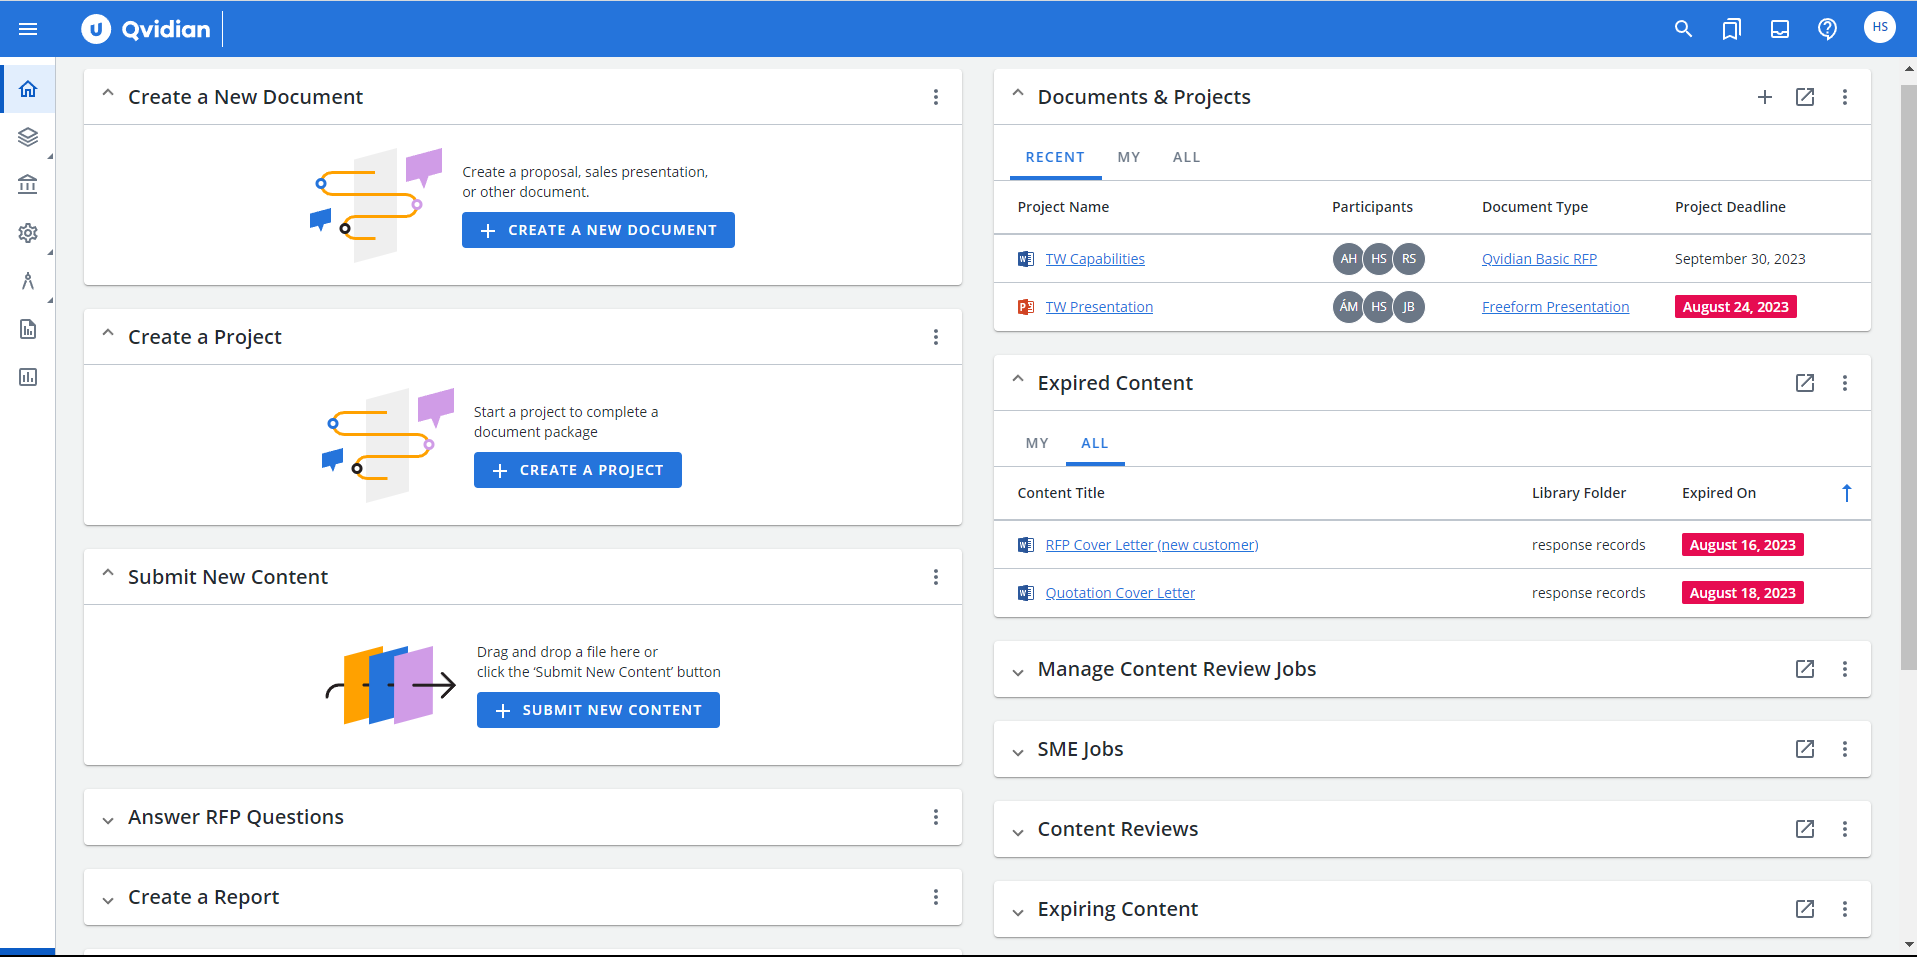
Example of the Home page with the header and side navigation menu.
The Header
The header is visible at the top of the all pages, except for the project or content review. The organizational logo is in the top left corner of the header. You can replace or remove the default by visiting Administration > Application Data > Branding. Quick links to the search, Bookmarks, Email, Profile menu, and the Log-out button are located along the top of the header.
Profile menu
The Profile menu is the right-most icon in the header. Each user's Profile menu  icon is displayed as their first and last initial in a white circle. From the Profile menu, you can:
- manage your Upland Qvidian credentials.
- view your roles and permissions.
- set your Qvidian preferences.
- reset your Upland Qvidian preferences.
- customize your Home page.
- learn about the version of your Qvidian instance, such as: version, portal website, subscriber name, subscriber ID, user ID, licensed products, and if applicable, the language model being used.
- log out of your Qvidian instance.
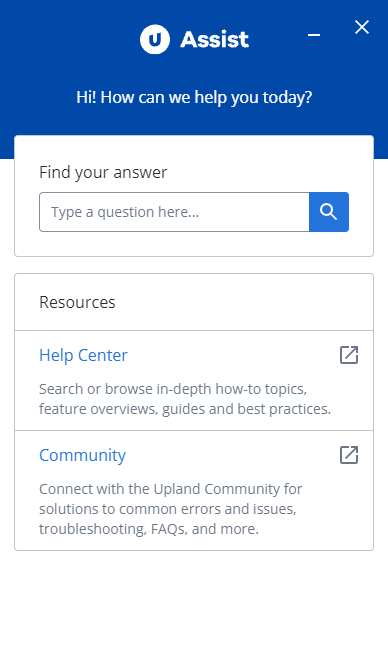
Upland Assist
Upland Assist is a single point of access for self-service and customer support directly within Upland Qvidian. It provides enhanced support by allowing you to submit support tickets as well as search and browse both the Upland Qvidian Help Center and the Support Knowledge content.
Caution: Upland Assist is not available in IE11 as Upland Qvidian no longer supports IE11 (as of August 2021).
- Click the Help
 icon, found in the top right of the Qvidian header, to open the Upland Assist panel.
 - To open the Help Center or Community in a new browser tab, elect the Help Center or Community links within the Resources section.
- To search directly in the Upland Assist panel, enter your question or desired topic directly into the Find your answer search bar and click the Search
 icon. Search results will populate directly below in the Find your answer section.
 - Click the desired answer to learn more. Help Center topics will be identified with a Help Center topic
 icon. Community topics will be identified with a Community topic
  icon. PDF downloads will be identified with a PDF download
  icon.
icon. - Click View More Results to see more answers.
- Click the Contact Support link if you need more help.
- Click the desired answer to learn more. Help Center topics will be identified with a Help Center topic
- Click X to close the Upland Assist panel. Click the minimize icon to hide Upland Assist in the bottom right corner of your browser.
Search
The header also includes a search bar, which searches the library. To perform a search, click the Search ![]() icon and then start entering the character string (word, numbers, phrase) on which to search. As soon as you enter the first two characters, suggested terms that match these characters will display. You can select the term and click the magnifying glass to find the content records in the library, or you can continue entering the string narrowing the suggested terms and then select the term and perform the search. The library opens and the found content records display on the list or grid. These searches are pulled from previous searches, keywords, and content titles that you have previously applied. The suggested search terms will consist of the values that start with the text that you have entered. The list will be sorted alphabetically, with duplicates removed, and will not be grouped by their source. When a piece of Word or PowerPoint content is uploaded, bulkloaded, or submitted from an RFP, Qvidian will automatically add the content’s title as the first search term in the associated record’s Learned Terms. There is no limit number of displayed results.
icon and then start entering the character string (word, numbers, phrase) on which to search. As soon as you enter the first two characters, suggested terms that match these characters will display. You can select the term and click the magnifying glass to find the content records in the library, or you can continue entering the string narrowing the suggested terms and then select the term and perform the search. The library opens and the found content records display on the list or grid. These searches are pulled from previous searches, keywords, and content titles that you have previously applied. The suggested search terms will consist of the values that start with the text that you have entered. The list will be sorted alphabetically, with duplicates removed, and will not be grouped by their source. When a piece of Word or PowerPoint content is uploaded, bulkloaded, or submitted from an RFP, Qvidian will automatically add the content’s title as the first search term in the associated record’s Learned Terms. There is no limit number of displayed results.
Note: The “Search for Content” panel displays a list of up to 5 links to your favorite saved Library searches. Clicking one of the links will open the Library and execute the search.
Bookmarks
Click the Bookmarks![]() icon to add the Upland Qvidian application website to your Favorite's list for easier access.
icon to add the Upland Qvidian application website to your Favorite's list for easier access.
Email Notifications
Click the Email Notifications![]() icon to view your list of email notification messages.
icon to view your list of email notification messages.
The side navigation menu
The side navigation menu has up to seven menu icons, depending on your user and role permissions. When clicked, the icons either open a landing pages that contain related functions and links, or a sub-menu. The menu icons include:
Home
Click the Home  icon to return to the Home page.
My Work
Click the My Work  icon to open the My Work menu. Use the Search My Work search field to quickly locate your work.
- Documents & Projects: Click a document or project title to open it, or click View All Documents & Projects to go to the Documents & Projects page.
- Content Reviews:Click a review job title to open it, or click View All Review Jobs to go to the Content Reviews page.
- Manage Content Review Jobs:Click a document or project title to open it, or click View All Review Jobs to go to the Manage Content Review Jobs page.
- Feedback:Click to go to the Feedback page.
- SME Jobs: Click to open the SME Jobs page and manage your SME jobs.
- Assigned Questions: Click to open the Assigned Questions dashboard and answer questions assigned to you in created documents.
Library
Click the Library  icon to open the library.
Administration
 icon to open the Administration menu, which includes create and manage users and roles, and configure you Qvidian instance. Select one of the following options:
 - Default Home Page: This is where you go to manage the panels and their controls and how you want them to display on the default Home page.
- News & Announcements: This is where you post news and announcements to display in the News Feed item on the Home page.
- Users & Roles: Upland Qvidian users, roles and teams are added and managed here.
- Users: Add and manage your Upland Qvidian users and permissions here.
- Roles: Add and manage your Upland Qvidian roles and permissions here.
- Teams: Add and manage your Upland Qvidian roles and permissions here.
- Application Settings: These functions and settings are used to configuration options for your company’s instance of Upland Qvidian.
- Global Settings: This is where you manage the behavior of predefined functions in Upland Qvidian.
- Event Auditing: This is where you record when certain tasks and functions, known as events, are performed within Upland Qvidian
- Login Security: This is where you configure password enforcement to set restrictions on the passwords users can create, the length of time they can use it, and the number of attempts that can be made.
- IP Filters: This is where you manage the IP addresses for systems that you want to access Upland Qvidian.
- Clear Content URLs: This is where you can clear all URLs generated for content records in the library or that have been bookmarked.
- Integration Connections: This is where you manage Extensions Web Services that are used to integrate with Upland Qvidian.
- Timeouts: This is where you can manage some of specific timeout settings that were previously controlled by global settings.
- Single Sign-On: This is where you manage your single sign-on settings.
- Submit Content Settings: This is where you manage the fields that are displayed to users in different Roles when submitting new content to the Library from the Home page panel or from RFP Projects.
- Application Data: These functions and settings are used to configuration options for your company’s instance of Upland Qvidian.
- Custom Metadata: This is where you capture information that is unique to your organization.
- Custom User Information: This is additional information that can be used to further define a user or distinguish users from other users.
- Merge Codes: These are placeholders for text, data, or images in a file that are either entered manually, selected, or brought in automatically from a Customer Relationship Management (CRM) application.
- Email Notification Triggers: This is where you manage your email notification triggers.
- Event Auditing: This is where you record when certain tasks and functions, known as events, are performed within Upland Qvidian.
- SME Email Body: This is where you can modify the default message in the email template used when sending jobs to Subject Matter Experts (SMEs).
- Dropdown Lists: This is where you create custom values for select drop-down menus, organize them in the in the order you would like them to display to users, and choose one to be the default value if the user does not make a selection.
- Keywords: These are descriptive words or phrases that can be added to a content record to help users find it in the library.
- Report Views: This is a Structured Query Language (SQL) query which queries tables within your Upland Qvidian database each time a report is run.
- Branding: This is where you brand your instance of Upland Qvidian, by adding your company's logo to the upper left corner of the header.
- Salesforce: Upland Qvidian integrates with Salesforce.com, a customer relationship management product that customers can use to administer sales information.
- Document Types: This is where you map an object in Salesforce.com to the same object in Upland Qvidian
- Merge Codes: This is where you specify a Upland Qvidian merge code for a Salesforce.com object and Salesforce.com field.
- Connection Information: This is how changes to created documents and projects data to Salesforce.com are synchronized without the operation being initiated from Salesforce.com.
Architecture
 icon to go to the Architecture menu, which includes options to create and mange document types, merge codes, drop-down lists and more.
- Templates: Style Templates are Microsoft Word and PowerPoint template files (.dot, .dotx , .pot, or .potx) containing a collection of text styles that control the format in the text areas of the document, such as headings, body text, bullet points, captions, and section numbering.
- Merge Codes: These are placeholders for text, data, or images that are either entered or selected manually in the Data Entry screen or brought in automatically from a Customer Relationship Management (CRM) application when you build a document.
- Document Types: These define the content and selections available to the end users to include in a specific document.
- Document Type Categories: These can help users easily locate a document type when creating a document.
- Dropdown Lists: This is where you can create custom values for select drop-down menus, organize them in the in the order you would like them to display to users, and choose one to be the default value if the user does not make a selection.
Reports
Click the Reports  icon to go to the Reports page where you can view and manage reports.
Upland Analytics
Click the Analytics  icon to go to Upland Analytics.