2024R1.0 - New Features
Below is a summary of the new additions to PowerSteering in the 2024R1.0 release. PowerSteering 2024R1.0 is set to be deployed to the staging site on April 3rd, 2024 and deployed to the production site on April 21st, 2024. When this happens, the listed features will become available.
Note: This page will be updated as new functionality becomes available.
The following areas of PowerSteering have been upgraded as part of the 2024R1.0 release:
Agents
The following improvements have been made to PowerSteering Agents. Click on any of the upgrades below to learn more about them:
What's Different:
A new Start Projects agent is now available in PowerSteering.
Note: Only PowerSteering administrators can work with agents.
When enabled, this agent will automatically start work items based on their Scheduled Start Dates. Work items with Scheduled Start Dates that match the current date (or a set number of days before the current date, see "Parameters" below) will automatically be given an "On Track" status. Also, the Actual Start Dates of the work items will automatically be updated to the current date.
Note: Administrators have the ability to change Work Status Names in PowerSteering. The "On Track" status might be called something else in your PowerSteering environment.
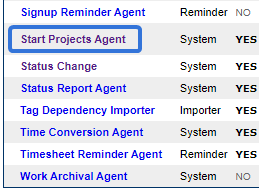
The new Start Projects agent can be configured and enabled through the Agents page in PowerSteering:
Administrators can select the Starts projects automatically task to view the agent's settings as well as a log of past runs:
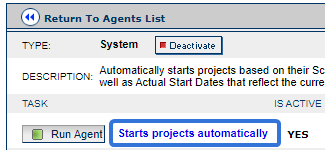
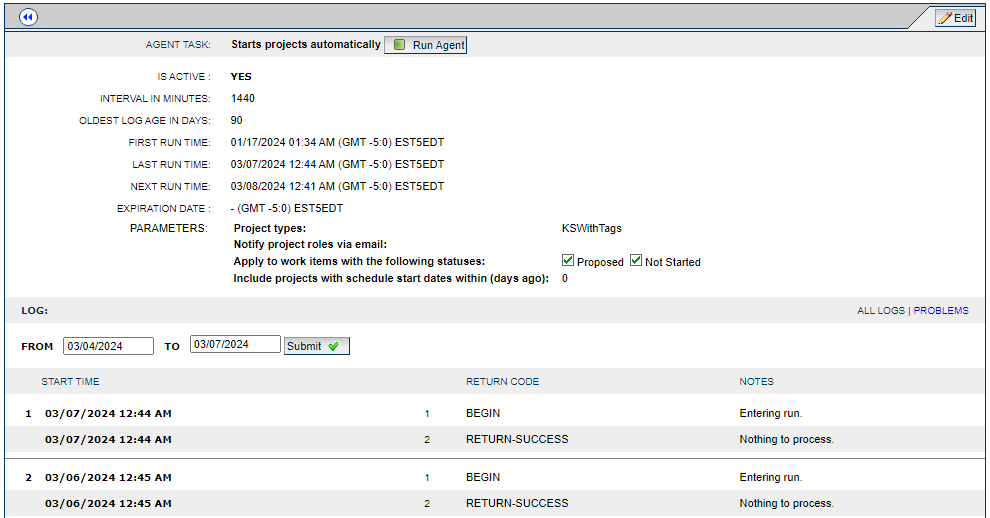
Tip: Selecting the Run Agent button on either page will force the agent to run immediately, regardless of the agent's schedule.
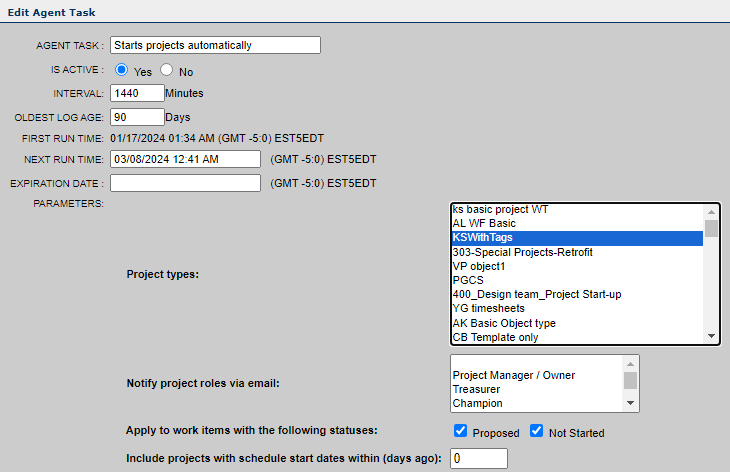
Selecting the Edit button in the top right-hand corner allows administrators to configure the agent's settings:

-
Agent Task: Rename the agent task.
-
Is Active: Determine whether the task is currently running or not.
-
Interval: Determine how often the task will run in minutes. For example, entering "1440" will cause the task to search for work to start every 1440 minutes (24 hours).
-
Oldest Log Age: Determine how long log entries will be retained for.
Tip: Log entries can be seen on the main task page (after Starts projects automatically is selected).
-
First Run Time (uneditable): Displays the first time the task ran.
-
Next Run Time: Displays the next time the task will run. Enter in a custom time if you would like to change it.
Note: Be sure to follow the same format when entering a custom time (mm/dd/yyy 00:00 AM/PM).
-
Expiration Date: Enter in a date for the task to discontinue.
Note: Be sure to follow the same format as other dates (mm/dd/yyy 00:00 AM/PM).
-
Parameters: Use the following parameters to determine how the task will function.
-
Project types: Select the Object Types that the agent will automatically start. Work items created from those Object Types will be checked by the agent.
Tip: To select multiple Object Types from the list, hold down the CTRL key while clicking on them:

Click thumbnail to play. -
Notify project roles via email: Select which Roles should be notified when the work item is automatically started by the agent. Resources assigned to the selected Roles on the work item will receive email notifications as soon as the agent starts it.
Tip: To select multiple Roles from the list, hold down the CTRL key while clicking on them:

Click thumbnail to play. -
Apply to work items with the following statuses: The agent will search for and start work items with the selected inactive statuses.
Note: Administrators have the ability to change Work Status Names in PowerSteering. The available statuses might be called something else in your PowerSteering environment.
-
Include projects with schedule start dates within (days ago): When the agent runs, it will search for and start work items with Scheduled Start Dates that have occurred within the indicated number of days.
Example: If "2" has been entered into this field, the agent will search for and start work items with Scheduled Start Dates that have occurred within the last two days (assuming the other parameters have been satisfied). If work item has not been started yet and has a Scheduled Start Date that was three days ago, it will not be started by the agent.
-
Benefit:
Actual Dates are captured on PowerSteering work items when a non-active status (like "Proposed" and "Not Started") is changed to an active one (like "On Track"). Prior to this release, however, there was no way to automatically start work items when their Scheduled Start dates approached. Users would often set Scheduled Start dates with the intent of starting the project when they approached, but many Scheduled Dates would come and go without the project starting. This new agent gives administrators the ability to start these projects even when users forget.
Looking Ahead:
In a later release, this agent will be able to capture Baselines for the work items it automatically starts.
What's Different:
PowerSteering administrators can now determine whether or not the Work Status Change Agent Task will search for due dates based on current gate end dates or Gated Project end dates.
Note: Only PowerSteering administrators can work with agents.
Note: Administrators have the ability to change agent task names. The name of this agent task may be different in your PowerSteering environment.
Prior to this release, the Work Status Change Agent would always consider the current gate while checking for the due date of Gated Projects. It would always change the status of the Gated Project based on the current gate's end date, not the Gated Project's.
With this update, administrators can now configure the "Allow changing the status based on gated project dates" parameter while editing the agent task:

-
Enabled: The agent will consider the Gated Project's end date as the due date.
-
Disabled: The agent will consider the current gate's end date as the due date.
Note: This parameter will not have any effect on non-gated work.
Note: The "Due date is based on" parameter will determine which end date (Planned, Scheduled, or Baseline) will be considered the due date.
Example: Imagine the Work Status Change Agent Task is set to check for Scheduled End Dates and the current date is February 5th, 2024. A Gated Project has a Scheduled End Date of May 31st, 2024, which means the current date has not passed the agent's due date: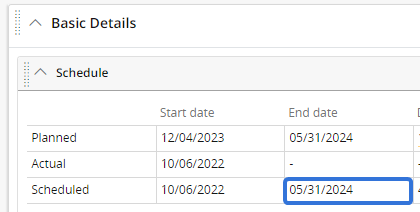
However, the "Define" gate is currently active. This gate has a Scheduled End Date of January 31st, 2024:
If "Allow changing the status based on gated project dates" is enabled, the Gated Project's Scheduled End Date will be considered the due date (05/31/2024). The current date has not passed this date, so the status will not be changed.
If "Allow changing the status based on gated project dates" is disabled, the "Define" gate's Scheduled End Date will be considered the due date (01/31/2024). The current date has passed this date, so the status will be changed.
Benefit:
Prior to this update, this agent would always consider one of the current gate's end dates as the due date on Gated Projects. This is based off the assumption that a Gated Project should not be considered "On Track" if the current gate's end date has passed. However, many users prefer the agent to take a macro-level approach to changing statuses. If a gate has not been advanced before its end date, the entire Gated Project should not necessarily be considered "Off Track". With this new parameter, administrators can decide which end date should cause the status to change.
API
The following improvements have been made to the PowerSteering REST API. Click on any of the upgrades below to learn more about them:
What's Different:
A new "Status Report" service has been added to the PowerSteering REST API. This service allows API users to return data on Status Reports.
Note: PowerSteering users require the "REST API - Read" Context permission to hit "GET" endpoints.
Caution: Please be aware that API permissions are not restricted by other PowerSteering permissions. For example, a user with the "REST API - Read" permission will be able to successfully hit these endpoints even if they do not have the "View Status Reports" Project permission.
Two new GET endpoints have been introduced to return this data:
-
GET <http://<host>/<context>/rest/statusreportservice/v1/statusreports
This endpoint will return a list of Status Reports from PowerSteering. The following parameters can be used to filter the Status Reports that get returned:
Parameters Required Description from No The start date used to filter Status Reports. Only Status Reports created on or after this date will be included. The date must be formatted mm/dd/yyyy. If this parameter is not specified, the default "from" date will be 01/01/2000. to No The end date used to filter Status Reports. Only Status Reports created on or before this date will be included. The date must be formatted mm/dd/yyyy. If this parameter is not specified, the default "from" date will be the current date. objectType No Only Status Reports of specified Object Types will be included in the results. Separate the Object Type names with commas (use double commas ",," to separate if any Object Type names include commas). If this parameter is not specified, no filter will be applied. mostRecent No A Boolean flag used to only include a work item's most recent Status Update. If "true" is entered as the value, Status Reports will only be included in the response if they are the work item's most recent one. If this parameter is not specified, no filter will be applied (as if "false" was entered). includeArchived No A Boolean flag used to include Status Reports from Archived work items. If "true" is entered, Status Reports from Archived work items will be included. If "false" is entered, Status Reports from Archived work items will not be included. If this parameter is not specified, "false" will be the default. start No Specify which listed result you would like the response to start with. For example, entering the number "3" will cause the list to begin with the third Status Report that would have been listed from the top if the "start" parameter was not defined. The first two Status Reports that were skipped over will not be included in the response. count No Specify how many Status Reports you would like to return. For example, entering the number "2" will only return two Status Reports.
-
GET <http://<host>/<context>/rest/statusreportservice/v1/statusreports/project/{project ID}
This endpoint will return Status Reports for a specific work item. The API user can specify the work item by replacing {project ID} in the endpoint with the work item's ID number.
Tip: The work item's ID number can be found at the end of the URL after the "U" when the user is viewing the work item's Summary Page:

The following parameters can be used to filter the Status Reports that get returned:
Parameters Required Description from No The start date used to filter Status Reports. Only Status Reports created on or after this date will be included. The date must be formatted mm/dd/yyyy. If this parameter is not specified, the default "from" date will be 01/01/2000. to No The end date used to filter Status Reports. Only Status Reports created on or before this date will be included. The date must be formatted mm/dd/yyyy. If this parameter is not specified, the default "from" date will be the current date. start No Specify which listed result you would like the response to start with. For example, entering the number "3" will cause the list to begin with the third Status Report that would have been listed from the top if the "start" parameter was not defined. The first two Status Reports that were skipped over will not be included in the response. count No Specify how many Status Reports you would like to return. For example, entering the number "2" will only return two Status Reports.
The API response for both of these endpoints will include information on each Status Report, as well as information on the work item it belongs to and the user who submitted it:
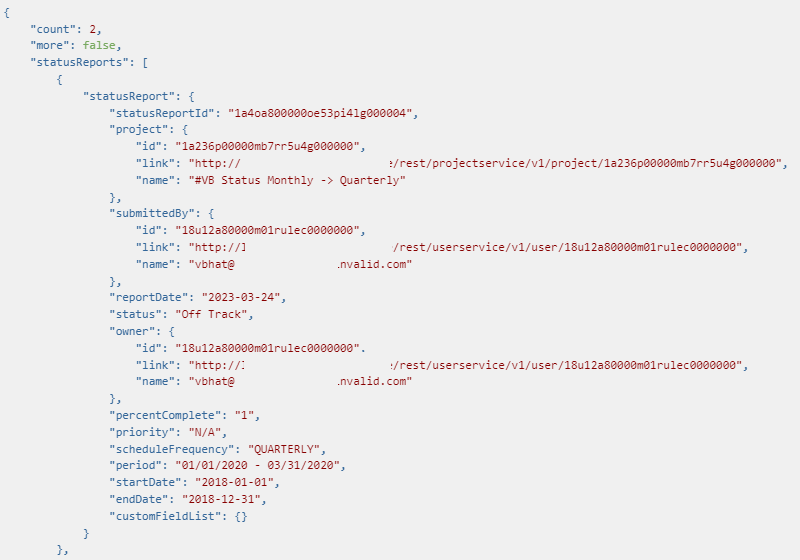
Tip: For more information on the "Status Report" service, see the "Services" page through the RESTful API Help.
Benefit:
Retrieving Status Report data through the API enhances efficiency, collaboration, and adaptability within a project management environment. By using the API to integrate with other applications and systems, users can pull Project status data into various tools, dashboards, or reporting systems, eliminating the need for tedious manual data entry. This new service aligns with modern software development and integration practices by offering a robust solution for accessing and utilizing Status Report information outside of PowerSteering.
What's Different:
A new "Measure" service has been added to the PowerSteering REST API. This service allows API users to retrieve data on PowerSteering Measures.
This new service currently consists of three endpoints:
-
GET <http://<host>/<context>/rest/measureservice/v1/measure/{measureID}/measurevalues
This endpoint will retrieve values of a specific Measure instance on a work item, as well as some information on the Measure itself and the work item it is attached to:
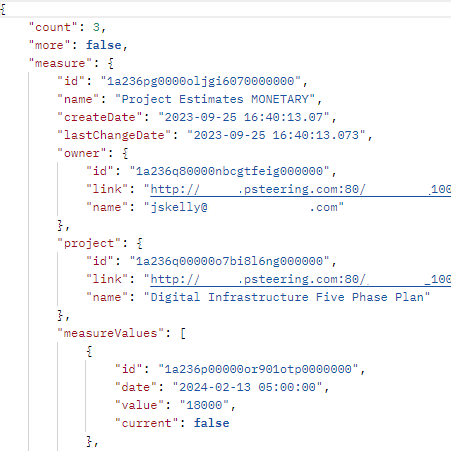
Note: The listed Measure values will be ordered by most recent date.
The API user can specify the Measure instance by replacing {measureID} in the endpoint URL with the Measure instance's ID number.
Tip: The Measure instance's ID number can be found in the URL after the first capital "U" when the user navigates to the Measure on a work item:

Make sure not to enter the ID number at the end of the URL; that is the work item's ID number.Based on the parameters, this endpoint can be used to either retrieve a list of values for the Measure or retrieve the current value of a Measure. If both the start date (startDate) and end date (endDate) parameters are set, the response will include all values that fall between those dates:
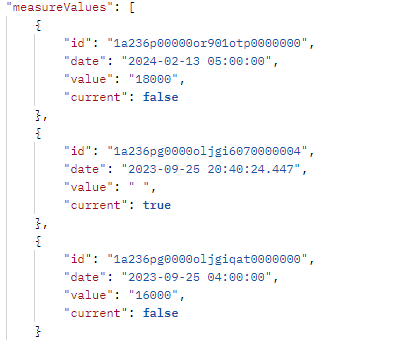
If one or both of these parameters are not set, only the current value will be included in the response:
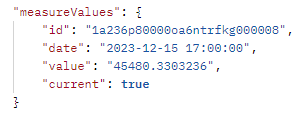
The following parameters can be used to filter the Measure values that get retrieved:
Parameters Required Description measureID Yes The ID number of the Measure instance that you would like to retrieve values for. It must replace {measureID} in the endpoint URL. Tip: The Measure instance's ID number can be found in the URL after the first capital "U" when the user navigates to the Measure on a work item:

Make sure not to enter the ID number at the end of the URL; that is the work item's ID number.startDate No The start date used to filter Measure values. Only values from on or after this date will be included. The date must be formatted yyyy-mm-dd. If this parameter (along with "endDate") is not specified, only the current Measure value will be included in the response. endDate No The start date used to filter Measure values. Only values from on or before this date will be included. The date must be formatted yyyy-mm-dd. If this parameter (along with "startDate") is not specified, only the current Measure value will be included in the response. start No Specify which listed result you would like the response to start with. For example, entering the number "3" will cause the list to begin with the third Measure value that would have been listed from the top if the "start" parameter was not defined. The first two Measure values that were skipped over will not be included in the response. count No Specify how many Measure values you would like to return. For example, entering the number "2" will only return the two Measure values from the top of the listed values in the response.
-
GET <http://<host>/<context>/rest/measureservice/v1/measuretemplate/{templateId}/measures
This endpoint will retrieve information about each instance of a specific Measure, including the Measure's current value:
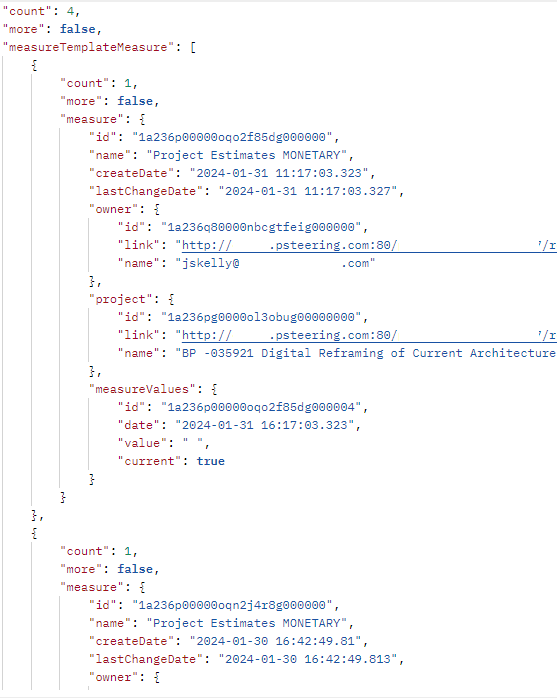
The API user can specify the Measure template by replacing {templateId} in the endpoint URL with the Measure's ID number.
Note: Only one Owner can be entered.
Tip: The Measure's ID number can be found in the URL after the capital "U" when the user edits the Measure in PowerSteering:

The following parameters can be used to filter the Measures that get retrieved:
Parameters Required Description templateId Yes The ID number of the Measure template that you would like to retrieve Measure instances for. It must replace {templateId} in the endpoint URL. Tip: The Measure template's ID number can be found in the URL after the capital "U" when the user edits the Measure template in PowerSteering:

start No Specify which listed result you would like the response to start with. For example, entering the number "3" will cause the list to begin with the third Measure that would have been listed from the top if the "start" parameter was not defined. The first two Measures that were skipped over will not be included in the response. count No Specify how many Measures you would like to return. For example, entering the number "2" will only return the two Measures from the top of the list in the reponse.
workStatus No Filter the Measures by the Status of the work item they are attached to. For example, entering "On Track" will only return Measure instances attached to work items with an "On Track" Status. Note: Only one Status can be entered.
workOwner No Filter the Measures by the Owner of the work item they are attached to. For example, entering "Jack Skelly" will only return Measure instances attached to work items with Jack Skelly as the Owner.
Note: Only one Owner can be entered.
-
GET <http://<host>/<context>/rest/measureservice/v1/measuretemplates
This endpoint will retrieve information about Measure templates in PowerSteering:
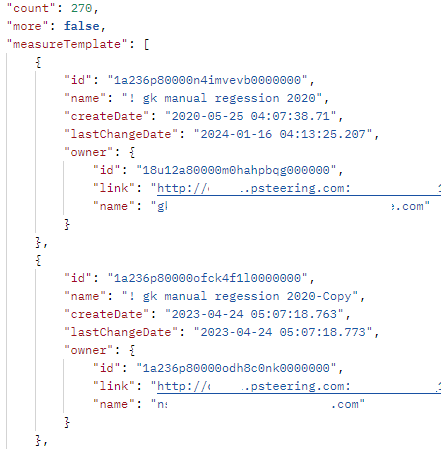
Note: The Measure templates will be listed alphabetically, just like they appear on the Measures Library page.
The following parameters can be used to retrieve specific Metric templates:
Note: If no parameters are used, the endpoint will retrieve a list of every Measure template in PowerSteering.
Parameters Required Description templateId No The ID number of the Measure template that you would like to retrieve data for. Tip: The Measure template's ID number can be found in the URL when the user edits the Measure template in PowerSteering:

Note: Only one ID number can be entered.
templateName No The name of the Measure template that you would like to retrieve data for. Note: Only one name can be entered.
Benefit:
Retrieving Measure data through the API enhances efficiency, collaboration, and adaptability within a project management environment. By using the API to integrate with other applications and systems, users can pull Measure data into various tools, dashboards, or reporting systems, eliminating the need for tedious manual data entry. This new service aligns with modern software development and integration practices by offering a robust solution for accessing and utilizing Measure information outside of PowerSteering.
What's Different:
A new endpoint has been added to the "Portfolio" service of PowerSteering REST API. This POST endpoint can be used to create new Portfolios in PowerSteering.
Note: PowerSteering users require the "REST API - Write" Context permission to hit POST endpoints.
The endpoint is as follows:
POST <http://<host>/<context>/rest/portfolioservice/v1/portfolio/>
API users can enter fields from the "Portfolio" object into the body to create a new Portfolio:
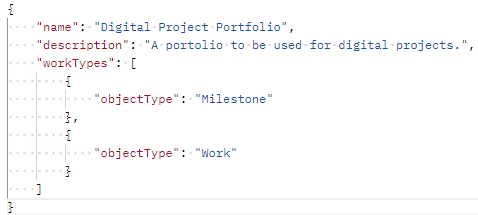
Tip: For more information, visit the "Objects" page through the RESTful API Help.
-
name (required): The name of the new Portfolio.
-
description: A description of the new Portfolio.
-
workTypes: A list of Object Types that will be automatically included in the Portfolio. Each listed Object Type must include the Object Type's ID (not the name of the Object Type):
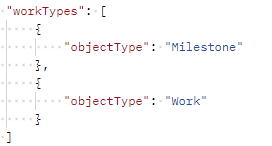
Tip: An Object Type's ID can be found at the end of the URL after the "S" when a user navigates to the Object Type in PowerSteering:

Alternatively, API users can retrieve a Portfolio's Object Type names and IDs by hitting the "Get portfolio" endpoint. See "Portfolio service" in the RESTful API Help for more information.
A successful response will include the ID number of the new Portfolio as well as a "true" value in the "success" field:

The new Portfolio will be listed on the "Portfolios" page in PowerSteering:

Note: The listed Object Types will become the Portfolio's work types: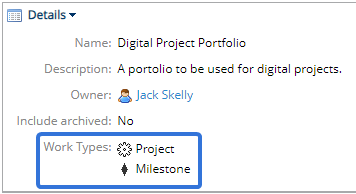
Benefit:
POST endpoints allow users to submit data to PowerSteering outside of the application itself. This new endpoint provides a versatile mechanism to create new Portfolios and securely transmit their data to PowerSteering.
What's Different:
A new endpoint has been added to the "Portfolio" service of PowerSteering's REST API. This DELETE endpoint can be used to delete Portfolios from PowerSteering.
Note: PowerSteering users require the "REST API - Delete" Context permission to hit DELETE endpoints.
The endpoint is as follows:
DELETE <http://<host>/<context>/rest/portfolioservice/v1/portfolio/{portfolio id}>
Replacing {portfolio id} with the Portfolio's ID number will delete the Portfolio from the application.
Tip: The Portfolio's ID number can be found at the end of the URL after the "S" when the user navigates to the Portfolio in PowerSteering:
Successfully running the endpoint will result in the Portfolio being deleted from PowerSteering.
Benefit:
This new endpoint offers users more control over their PowerSteering data by allowing them to delete Portfolios from outside the application. Once a Portfolio becomes obsolete, the endpoint can be used to remove it from PowerSteering. This helps maintain data integrity by ensuring that only accurate and relevant information can be found in your PowerSteering environment.
What's Different:
A new endpoint has been added to the "Project" service of PowerSteering REST API. This GET endpoint can be used to retrieve information on a work item's References.
Note: PowerSteering users require the "REST API - Read" Context permission to hit GET endpoints.
The endpoint is as follows:
GET <http://<host>/<context>/rest/projectservice/v1/project/{id}/references>
Replacing {id} with a work item's ID number will retrieve two lists:
-
Work that the work item references ("references")
-
Work that the work item is referenced by ("referencedBy")
Tip: The work item's ID number can be found at the end of the URL after the "U" when the user is viewing the work item's Summary Page:
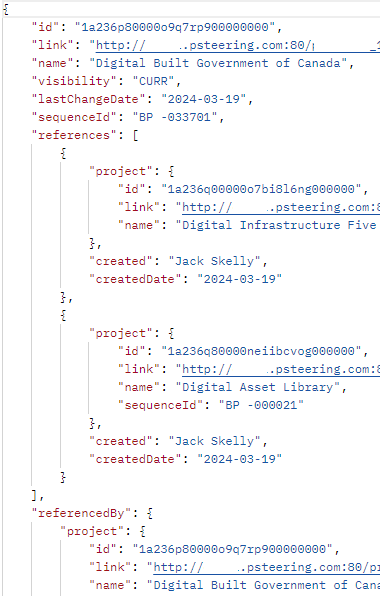
Note: The "created" and "createdDate" fields refer to the creation of the Reference, not the creation of the work item itself.
Tip: See the "Services" page in the RESTful API Help for more information on the endpoints that make up the "Project" service.
Benefit:
Retrieving Reference data through the API enhances efficiency, collaboration, and adaptability within a project management environment. By using the API to integrate with other applications and systems, users can pull Reference data into various tools, dashboards, or reporting systems, eliminating the need for tedious manual data entry. This new service aligns with modern software development and integration practices by offering a robust solution for accessing and utilizing Reference information outside of PowerSteering.
What's Different:
New data fields have been added to the "Project" object in the PowerSteering REST API. These fields will be included in the response when the following "Project" service API endpoints are hit:
GET <http://<host>/<context>/rest/projectservice/v1/statusreports/projects/{project ID}
GET <http://<host>/<context>/rest/projectservice/v1/statusreports/projects
GET <http://<host>/<context>/rest/projectservice/v1/statusreports/downloadAllWorks
GET <http://<host>/<context>/rest/projectservice/v1/statusreports/download
Tip: See the "Services" page in the RESTful API Help for more information on the endpoints that make up the "Project" service.
The fields are as follows:
-
programs: A list of the work item's Programs. The Program ID number, Program name, and endpoint URL to retrieve (GET) information on the Program will be returned:

-
statusChangeDate: The date the work item's Status was most recently changed, formatted yyyy-mm-dd:

Note: If the work item's Status has never been changed, the creation date will be displayed.
-
cancelDate: The date the work item's Status was set to "Canceled", formatted yyyy-mm-dd:

Note: This field will only be displayed in the response if the work item is currently cancelled.
Note: If the "Canceled" work status name was changed in your PowerSteering environment, another term may be used. See Manage Work Status Names for more information.
Benefit:
These new fields give users more control over the PowerSteering data that is available outside the application. Integrations can be set up that allow individuals to identify work item's Programs, most recent Status change date, and cancel date without having to navigate through PowerSteering. This expands the user's ability to interact with PowerSteering servers, retrieve data, and integrate information into separate applications.
Dashboards
The following improvements have been made to PowerSteering Dashboards. Click on any of the upgrades below to learn more about them:
What's Different:
PowerSteering administrators can now add a "Parent" column while creating or editing Dashboard Layouts.
Note: PowerSteering users must either belong to the Admin Group or have the "Dashboard Layout Administration" Context permission to create or edit Dashboard Layouts. If you would like to add the "Parent" column to a Dashboard but you do not have permission, reach out to an administrator.
While adding columns to a Dashboard Layout, administrators can now select the "Parent" column from the list of available columns:
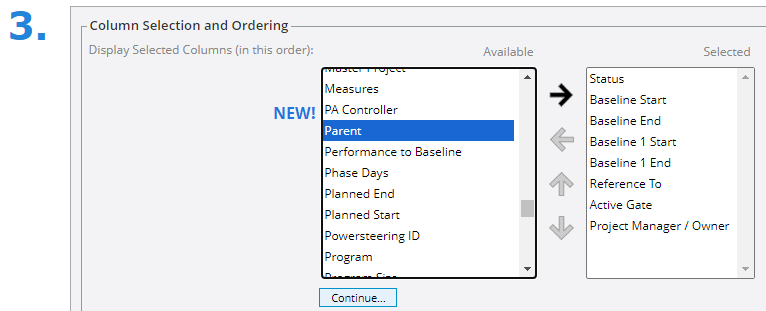
When added, this column will list the direct parent of each listed work item on the Dashboard:
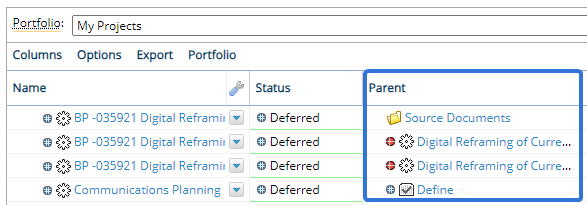
Note: "Parent work" refers to the work item directly above another work item in the Work Tree. For example, the "Communications Planning" project in the Dashboard above has the "Define" gate listed as its parent. This is because the project is a direct Descendant of the "Define" gate, just like "Ice Breaker Meeting" and "Hand-off":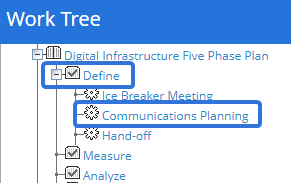
Tip: Selecting the listed parent work will navigate the user directly to the parent work's Summary page.
Benefit:
Prior to this release, the "Location" column was already available to add to Dashboard Layouts. However, this column displays all of the parent work, not just the direct parent. In many cases, users might only be interested in viewing the direct parent of a work item; every other work item clutters up the Dashboard and contributes to information overload. The new "Parent" column allows Dashboards to be more customizable and concise.
What's Different:
PowerSteering administrators can now add an "Is Archived" column while creating or editing Dashboard Layouts.
Note: PowerSteering users must either belong to the Admin Group or have the "Dashboard Layout Administration" Context permission to create or edit Dashboard Layouts. If you would like to add the "Is Archived" column to a Dashboard but you do not have permission, reach out to an administrator.
While adding columns to a Dashboard Layout, administrators can now select the "Is Archived" column:

This column will indicate whether each work item on the Dashboard is archived or not. A value or "true" indicates that the work item is archived and a value of "false" indicates that it is not:

Tip: To make sure archived works are not filtered out of your Portfolio, be sure to select the "Include archived projects" checkbox while editing the Portfolio:
If archived work items are still not appearing in the Dashboard, your PowerSteering environment configuration might be filtering them out. Reach out to your PowerSteering representative to fix this.
Benefit:
Knowing which work items have been archived is important in a project management context. Archiving is often used to mark the completion of work in PowerSteering; being aware of whether certain work has been archived allows Project Managers to accurately track progress and helps users understand the status of their initiatives.
What's Different:
PowerSteering administrators can now add a column for document templates while creating or editing Dashboard Layouts. This column will display a link to the version of the document template that has been attached to the listed work item.
Note: PowerSteering users must either belong to the Admin Group or have the "Dashboard Layout Administration" Context permission to create or edit Dashboard Layouts. If you would like to add this column to a Dashboard but you do not have permission, reach out to an administrator.
While adding special columns to a Dashboard Layout, administrators will now see a "Document" section:
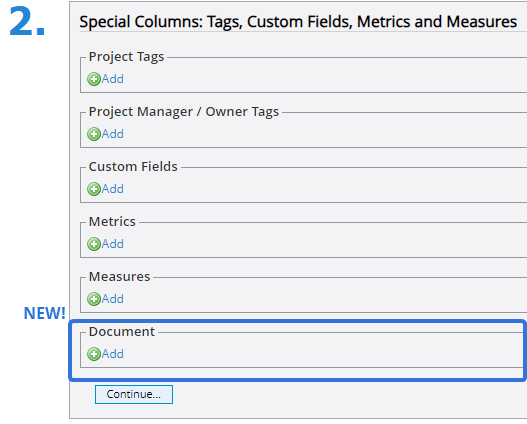
Selecting Add will open up the "Add Document Column" window, which administrators can use to select which document template should be used:
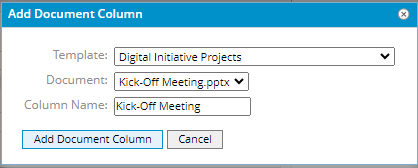
-
Template: Select a work template from the drop-down menu.
-
Document: Select a document that has been added to the work template. If the work template does not have any documents associated with it, the drop-down menu will simply state "no document".
Note: If the work template only contains a placeholder for the selected document, existing work created from that template will not display anything for the document in the Dashboard.
-
Column Name: Enter a name that will displayed in the column header on the Dashboard.
For work items that were created using the selected work template, the column will display a link to the document template when the layout is implemented on a Dashboard:
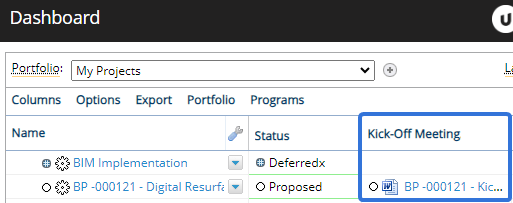
Dashboard viewers can click directly on the document to download it onto their device.
Note: Please remember that the file downloaded onto your device will be the most recent version of the document that was added to the work item.
Additionally, each value will display an icon that indicates the status of the document. Dashboard viewers can scroll their cursor over the icon to read the status:

Benefit:
This new special column allows Dashboard viewers to open up and review document versions. When administrators add this column to a Dashboard Layout, viewers can download and view the documents of a specific Portfolio's work items instead of tediously navigating to numerous work items.
What's Different:
Metric columns on Dashboards can now calculate totals based on "Next Year" or "Next Fiscal Year" periods. While creating or editing Dashboard Layouts, administrators can now select "Next Year" or "Next Fiscal Year" as the period:


Note: PowerSteering users must either belong to the Admin Group or have the "Dashboard Layout Administration" Context permission to create or edit Dashboard Layouts. If you would like a Metric column to be adjusted on a Dashboard Layout but you do not have permission to edit it, reach out to an administrator.
The "Period" selection determines how the value in the Metric column is calculated. For example, selecting "Next Fiscal Year" will add up all of a Metric line item's values for the next fiscal year and display the total in the Dashboard column.
Example: Take the following Metric column that has been configured for a Dashboard Layout:
When this layout is applied to a Dashboard, this column will display the sum of values entered in the next fiscal year on the "Software" line item from the "Projected" view of the "Expenses" Metric for each listed work item in the Dashboard.
Imagine it is the year 2024 and your organization's next fiscal year is January 2025 to December 2025. The "Digital Infrastructure Five Phase Plan" project has the "Expenses" Metric attached to it, and there are already three entries on the "Software" line item from the "Projected" view for the year 2025: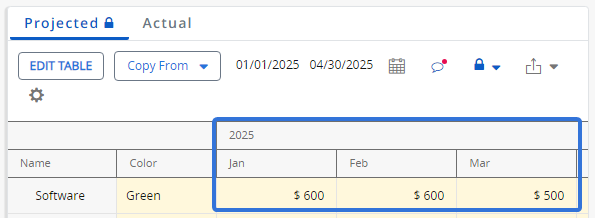
On the Dashboard, the column will display the sum of these entries for the "Digital Infrastructure Five Phase Plan":
Note: Administrators can configure the Fiscal Year through the Resource Calendar.
Tip: Metric column names on Dashboards should be as informative as possible so viewers know what the value is reflecting. However, users can see the column details by scrolling their cursor over the column header: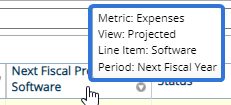
Benefit:
The ability to display next year's Metric data is valuable for several reasons because it provides organizations with strategic insight. For example, having an idea of how much money will be spent on certain entities in the coming year allows managers to proactively plan ahead. This helps them create realistic budgets, identify potential risks and uncertainties, and understand where they can increase funding or cut costs. Users can always be aware of this information when it is only a glance away on the Dashboard.
What's Different:
While filtering the "Active Gate" column on a Dashboard, users will find that the name of each gate is now indented under the Process names.
Prior to this release, there was no organization on the "Filter" menu. Every the list simply consisted of every gate from every Process in PowerSteering.

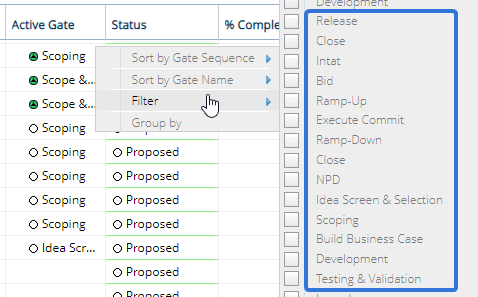
With this update, Process names have been added to the menu. Each gate will be indented under the Process it belongs to.

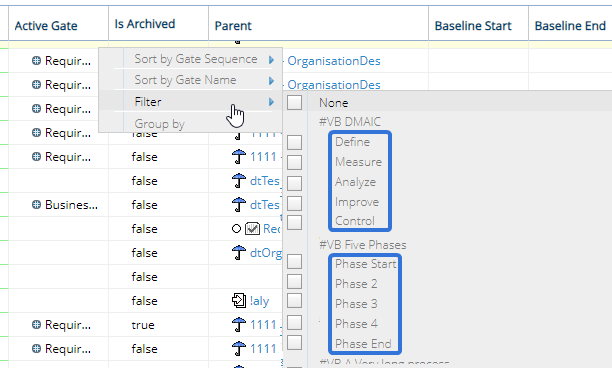
Benefit:
Prior to this upgrade, the "Filter" menu was extremely unorganized. Dashboard viewers would have to scroll through the entire menu to find the active gate(s) that they wanted to filter the results through. This was especially tedious for users working for enterprise-level organizations, which can have numerous amounts of Processes and gates. Now that each gate is organized under the Process it belongs to, users will have a much easier time navigating to their desired gates and applying their Dashboard filters.
Executive Review
The following improvement has been made to the PowerSteering Executive Review. Click on the upgrade below to learn more about it:
What's Different:
Metric axes on the Executive Review page can now calculate totals based on "Next Year" or "Next Fiscal Year" periods. While creating or editing Executive Review Layouts, administrators can now select "Next Year" or "Next Fiscal Year" as the "Track for Period" selection for Metric axes:


Note: PowerSteering users must either belong to the Admin Group or have the "Executive Review Administration" Context permission to create or edit Executive Review Layouts. If you would like the Metric settings to be adjusted on an Executive Review Layout but you do not have permission to edit it, reach out to an administrator.
The "Track for Period" selection determines how the Metric Axis value is calculated on the Executive Review page. For example, selecting "Next Fiscal Year" will add up all of a Metric line item's values for the next fiscal year and display the total.
Example: Take the following Metric Y Axis that has been configured for an Executive Review Layout: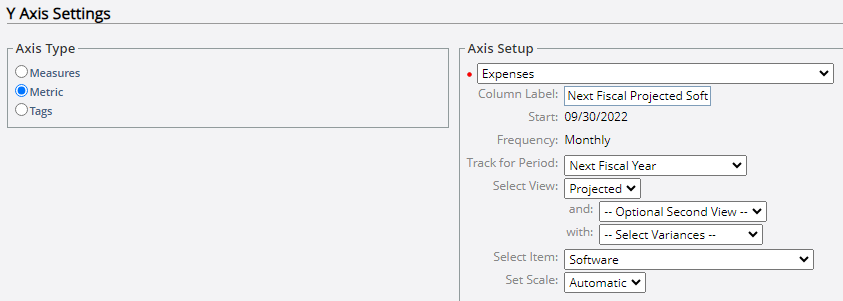
When this layout is applied to the Executive Review page, a work item's Y Axis value will be the sum of Metric data entered in the next fiscal year on the "Software" line item from the "Projected" view of the "Expenses" Metric.
Imagine it is the year 2024 and your organization's next fiscal year is January 2025 to December 2025. The "Digital Reframing of Current Architecture" project has the "Expenses" Metric attached to it, and there are already three entries on the "Software" line item from the "Projected" view for the year 2025 that add up to $1,450:
On the Executive Review page, "Digital Reframing of Current Architecture" will display the sum of these entries for its Y Axis value: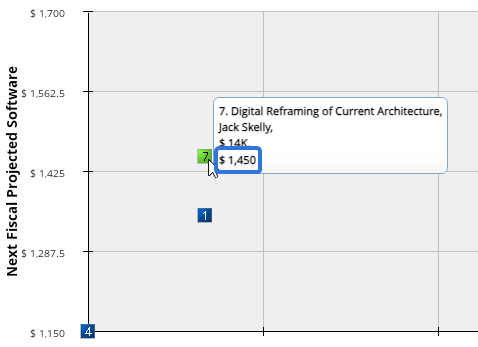
Note: Administrators can configure the Fiscal Year through the Resource Calendar.
Tip: Metric Axis column labels should be as informative as possible so viewers know what the value is reflecting.
Benefit:
The ability to display next year's Metric data is valuable for several reasons because it provides organizations with strategic insight. For example, having an idea of how much money will be spent on certain entities in the coming year allows managers to proactively plan ahead. This helps them create realistic budgets, identify potential risks and uncertainties, and understand where they can increase funding or cut costs. Users can always be aware of this information when it is only a glance away on the Executive Review page.
Financial Review
The following improvements have been made to the PowerSteering Financial Review. Click on any of the upgrades below to learn more about them:
What's Different:
The Financial Review page can now be configured to display "Next Year" or "Next Fiscal Year" periods of a Metric. While creating or editing Financial Review Layouts, administrators can now select "Next Year" or "Next Fiscal Year" as the "Track Period":
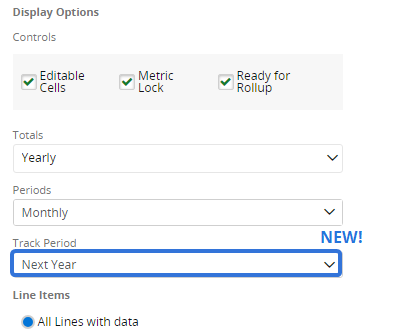
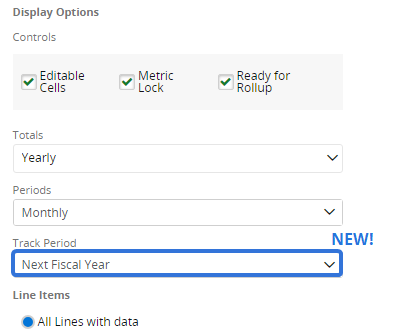
Note: PowerSteering users must either belong to the Admin Group or have the "Financial Review Administration" Context permission to create or edit Financial Review Layouts. If you would like the "Track Period" settings to be adjusted on a Financial Review Layout but you do not have permission to edit it, reach out to an administrator.
The "Track Period" selection determines the displayed date range on the Financial Review page. For example, selecting "Next Fiscal Year" will display the next fiscal year in its entirety on the page.
Example: Take the following Metric Details that have been configured for a Financial Review Layout: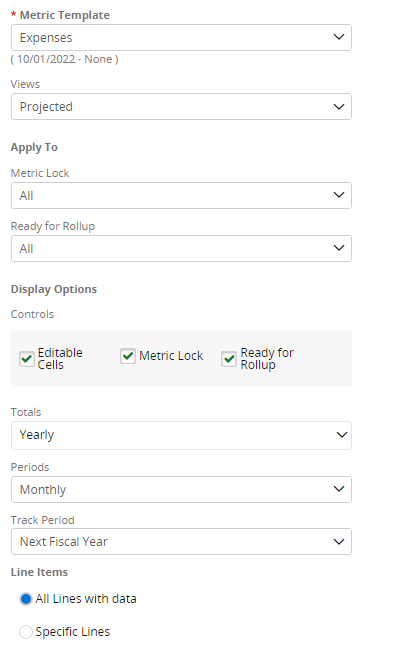
When this layout is applied to the Financial Review page, the next fiscal year will be displayed when each work item is opened. Any line items from the "Projected" view of the "Expenses" Metric that contain data in the next fiscal year will be displayed.
Imagine it is the year 2024 and your organization's next fiscal year is January 2025 to December 2025. The "Communications Planning" project has the "Expenses" Metric attached to it, and there are already two entries on the "Software" line item from the "Projected" view for the year 2025: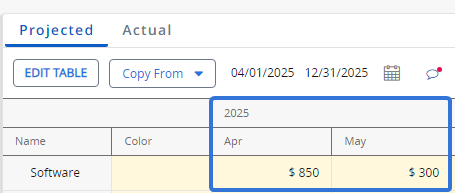
On the Financial Review page, "Communications Planning" will display the entire fiscal year when opened. Both entries can be seen:
Note: Administrators can configure the Fiscal Year through the Resource Calendar.
Benefit:
The ability to display next year's Metric data is valuable for several reasons because it provides organizations with strategic insight. For example, having an idea of how much money will be spent on certain entities in the coming year allows managers to proactively plan ahead. This helps them create realistic budgets, identify potential risks and uncertainties, and understand where they can increase funding or cut costs. Users can always be aware of this information when it is only a glance away on the Financial Review page.
What's Different:
Administrators can now add a "Metric Lock" column while creating or editing Financial Review Layouts:
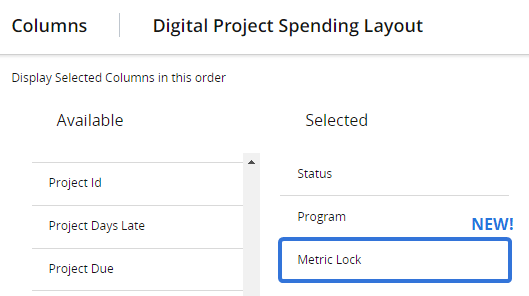
Note: Only PowerSteering administrators and users with the "Financial Review Administration" Context permission can add end edit Financial Review Layouts.
This column will display the current lock status of the listed Metric instance:

-
Locked: The entire Metric view has been locked.
-
Unlocked: The entire Metric view is unlocked.
-
Partially locked: Only part of the Metric view has been locked. The date indicates when the Metric view is locked up to.
Note: This refers to the latest date the Metric view is fully locked. For example, take the following Metric:

Although some cells in 2023 are locked, every line item (row) is locked up until the end of December 2022. Therefore, the Metric is only fully locked until the end of December, which will be displayed in the column: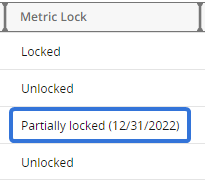
Benefit:
Prior to this release, there was no way for Financial Review readers to know if locks had been applied to Metric views. Even if they expanded one of the rows, they cannot tell how much of the Metric has been locked because the dates rarely display the entire Metric view. With this new column, readers can easily see whether or not their Metrics have been appropriately locked, allowing them to make any adjustments.
Gated Work
The following improvements have been made to Gated Work in PowerSteering. Click on any of the upgrades below to learn more about them:
What's Different:
PowerSteering administrators can now set a new Metric Rule on Pre-Advance Conditions that requires numeric Metric entries that only exist within the Project dates.
Note: Only administrators can create and edit Conditions.
While adding Metric Rules to a Pre-Advance Condition, administrators will find a new "Between Project Dates ONLY" selection under the "Must Have Manual Entries" column:

A Gated Project's Metric view (established by the "Metric Template" and "View" selections) must only contain numeric values within the Project dates to satisfy the Condition when this is selected. If there are no values within the Project dates, the Condition will not be satisfied. Also, if there are values between the Project dates but there are also values outside of the Project dates, the Condition will not be satisfied.
Note: If the "Include 0 values" checkbox is selected for the Metric Rule, "0" will be treated as a legitimate value. This means that no zeros can exist outside of the Project dates if "Between Project Dates ONLY" is selected. It also means that zeros within the Project dates will be accepted as values. If the checkbox is not selected, zeros will be seen as empty cells.
Note: This is not to be confused with the "Between Project Dates" selection, which only requires values within the Project dates and does not check for values outside of them. Unlike the "Between Project Dates" selection, "Between Project Dates ONLY" requires values within the Project dates as well as no values outside of them.
Note: By default, PowerSteering will search for values up to 10 years after the Project end date. If you would like to change this limit, reach out to your PowerSteering representative.
Tip: The Project dates can always be seen on the Metric instance:
They reflect the Scheduled Start and End dates of the Gated Project.
Example: Amber has created a new Pre-Advance Condition with a "Between Project Dates ONLY" Metric rule for the "Expenses" Metric Template. She associates the Condition with the "Define" gate on one of her company's Gated Work Templates.
John is the Project Manager for a Gated Project that was created using this template. He notices that the "Define" gate has a "Between Project Dates ONLY" Metric Rule for the "Projected" view of the "Expenses" Metric:
In order to advance the gate, this Metric view must contain at least one value within the Project dates, which are January 1st, 2024 to April 24th, 2024:
John enters values for January 2024 to May 2024 on the Metric view:
However, the Condition is not satisfied because the month of May is outside of the Project dates:
John removes the value from the month of May:
Once he saves the Metric, the Condition is satisfied:
Benefit:
Prior to this upgrade, administrators could use the "Between Project Dates" Metric Rule option to ensure that Metrics contained values within relevant periods before a gate was advanced. However, there was no option to ensure that values did not exist outside of these dates. This can be extremely useful in many scenarios, especially when Project dates are moved after Metric data has already been entered.
Example: On Jennifer's Gated Project, the "Define" gate is used for establishing Project information. This includes Project duration as well as associated costs. The Project is set to last from January 1st to April 24th, so she enters the projected associated costs for this time period into her "Expenses" Metric. However, the Project gets pushed back until the summer, which means the new Project dates are now June 1st to September 24th. She changes the scheduled dates of the Project and enters the associated costs into those Metric periods, but she forgets to remove the costs from the original periods. This is a problem because these original values can end up skewing the totals if they are not removed.
Thankfully, an administrator has added a "Between Project Dates ONLY" Metric Rule to the "Define" gate. When Jennifer looks to advance to the next gate, she sees that the Condition is not satisfied. Once she navigates to the Metric and removes the original values, she can see that the Condition is satisfied.
What's Different:
When a gate is advanced, any Post-Advance Actions that have been associated to the gate will now execute in alphabetical order based on the Post-Advance Action name.
Prior to this release, Post-Advance Actions were applied in random order; there was no way for users to determine which actions occurred first. With this update, the actions will now occur alphabetically by their names.
Tip: PowerSteering administrators should take this into account while creating Post-Advance Actions that will be associated to the same gate. For example, adding letters to the start of each action's names is an easy way to determine which actions will occur first:
In this example, the actions have been named in a way that guarantees their order of execution.
Note: Only PowerSteering administrators can create and edit the names of Post-Advance Actions.
Benefit:
The order of the Post-Advance Actions is important because certain actions can prevent other actions from occurring.
Example: Lucy has associated two Post-Advance Actions to a gate: one to copy Metric values from the "Projected" view to the "Actuals" view, and another to lock the "Actuals" view. Prior to this release, there was no way for her to control which action occurred first. This was a problem because if the "Actuals" view was locked, the values from the "Projected" view could not be copied onto it:
To prevent this from happening, Lucy creates a quick sorting system for her Post-Advance Actions; she places the name of the associated gate at the beginning of the name as well as a letter:
This ensures that the values will be copied onto the "Actuals" view before the view is locked.
Metrics
The following improvements have been made to PowerSteering Metrics. Click on any of the upgrades below to learn more about them:
What's Different:
PowerSteering Metrics can now contain pinned columns with Metric line item totals that remain in place as a user scrolls horizontally through a Metric:

Notice how the "Display Total" column remains on the right-hand side of the Metric as the user moves the scrollbar.
PowerSteering administrators can add pinned totals while creating or editing Metric Templates. On the Display Tab, a new "Pinned Total" drop-down menu is now available:
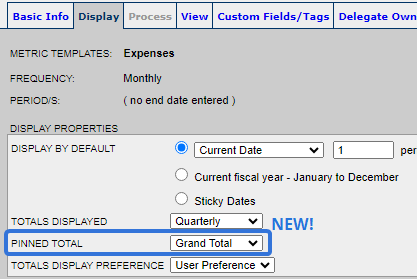
Note: Only PowerSteering administrators and users with the "Metric Template Administration" Context permission can create new Metric Templates and edit Metric Templates that they created themselves. Users with the "Edit" Metric Template permission can edit other Metric Templates if they have been added as one of the template's administrators on the Basic Info tab.
Note: Changes to the "Pinned Total" settings will be implemented to all existing Metric instances created using the template as well as future ones.
The "Pinned Total" menu contains three options for configuring pinned columns:

-
Never: Metrics created from the Metric Template will not contain pinned totals.
-
Grand Total: Metrics created from the Metric Template will contain a pinned "[Project] Total" column that adds up totals for every value in a given Metric line item (row).
Click thumbnail to play.
Notice that the values in each line item do not add up to equal the values in the pinned "[Project] Total" column. This is because the "[Project] Total" column is adding up values from the entire line item, which may include columns that are not currently displayed on the Metric.
Note: This option will not be available if DisplayRange is selected from the "Totals Displayed" drop-down menu.
-
DisplayRange: Metrics created from the Metric Template will contain a pinned "Display Total" column that adds up totals for every displayed value in a given Metric line item (row). Values that are not currently displayed on the Metric will not be added to the pinned "Display Total" column.
Click thumbnail to play.
Notice that the values in each line item add up to equal the values in the pinned "Display Total" column. This is because the "Display Total" column is only adding up line item values from displayed columns, not from the entire Metric. If there are values that exist outside of the display period, they will not be added to the totals.
Note: A Metric's display period can be changed at any time by selecting the Calendar icon
 and setting a date range:
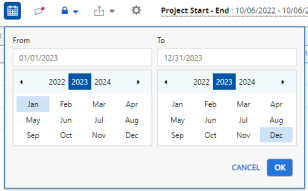
When DisplayRange is selected, only values within this date range will be included while calculating totals.Note: This option will not be available if Grand Total is selected from the "Totals Displayed" drop-down menu.
Tip: Selections from the "Totals Displayed" and "Pinned Total" menus can work in conjunction with one another. For example, selecting Quarterly from the "Totals Displayed" menu and Grand Total from the "Pinned Total" menu will result in quarterly totals that the user can see while scrolling through the Metric as well as a pinned column for the grand total:
Click thumbnail to play.
However, if the same selection is made for both drop-down menus (either Grand Total or DisplayRange), only one pinned column for the totals will be displayed on the Metric.
Note: Pinned columns will obey the selection from the "Totals Display Preference" drop-down menu directly below the "Pinned Total" drop-down menu. For example, selecting Left from the menu will pin the totals column to the left-hand side of the Metric grid:
Click thumbnail to play.
Note: If Never has been chosen from the "Totals Displayed" drop-down menu, the "Pinned Total" drop-down menu will be disabled.
Benefit:
Fixed columns contribute to a more user-friendly and efficient experience by improving data visibility, navigation, and context retention. As users scroll horizontally to explore the Metric data, columns containing line item totals remain visible, providing a reference point and context for the information being viewed.
Example: Prior to this release, a "[Project] Total" column might have been on the right-hand side of the Metric grid. Users would have to horizontally scroll all the way to the right of the grid in order to see the totals. If they wanted to view the values on the left-hand side of the grid, they would have to scroll back to the left side and memorize which totals belongs to the line item in order to prevent themselves from having to scroll to the right again.
With this update, the totals can be displayed at all time. This provides a reference point for users and prevents them from having to rely on memory and excessive scrolling.
What's Different:
Administrators can now add Tag Dependencies to Metrics in PowerSteering.
While creating or editing Tag Dependencies, administrators can now associate them with Metrics:
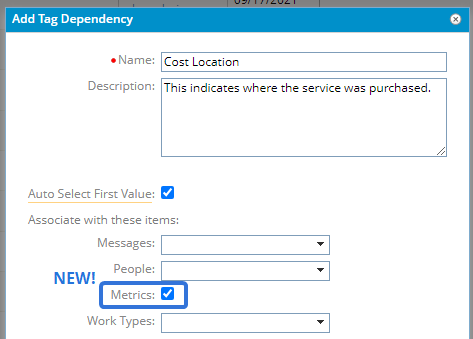
Note: Only PowerSteering administrators and users with the "Tag Administration" Context permission can create and edit Tag Dependencies.
Note: Tags that are added to theses Tag Dependency must also be associated with Metrics.
Tag Dependencies that have been associated with Metrics can be added while creating or editing Metric Templates. The Custom Fields / Tags Metric Tab now includes an additional section for attaching Tag Dependencies to the Metric:
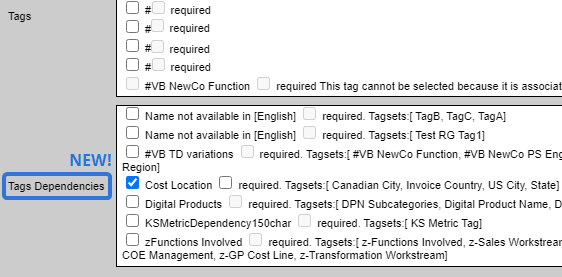
Note: Only PowerSteering administrators and users with the "Metric Template Administration" Context permission can create new Metric Templates and edit Metric Templates that they created themselves. Users with the "Edit" Metric Template permission can edit other Metric Templates if they have been added as one of the template's administrators on the Basic Info tab.
When the Tag Dependency is attached, each of the Tags that make up the Tag Dependency will be represented by Tag columns on the Metric instance:

While editing the Metric, however, only the "Top" Tag can be directly selected at first:

Note: The "Top" Tag is the first Tag of a Tag Dependency that a user interacts with.
This will open up window that allows the user to interact with the Tag Dependency:
Click thumbnail to play.
Note: PowerSteering users require the "Update Metric Tags" Project permission to update Tags on a Metric.
Benefit:
Administrators create Tag Dependencies to define a set of contextual relationships between specific PowerSteering Tags. With this update, they can now apply these relationships to Metrics so users can add context to Metric line items.
What's Different:
PowerSteering administrators can now require users to enter values for Metric Tags and Custom Fields only when numeric data is entered into a Metric line item.
Prior to this release, administrators could make Tags or Custom Fields mandatory on Metrics. While creating or editing Metric Templates, administrators could select the "required" checkbox next to a Tag or Custom Field on the Custom Fields / Tags Metric Tab.

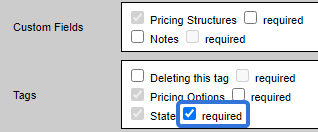
Note: Only PowerSteering administrators and users with the "Metric Template Administration" Context permission can create new Metric Templates and edit Metric Templates that they created themselves. Users with the "Edit" Metric Template permission can edit other Metric Templates if they have been added as one of the template's administrators on the Basic Info tab.
When any of the "required" checkboxes were selected, the Metric view could not be saved until every corresponding Tag / Custom Field contained a value:
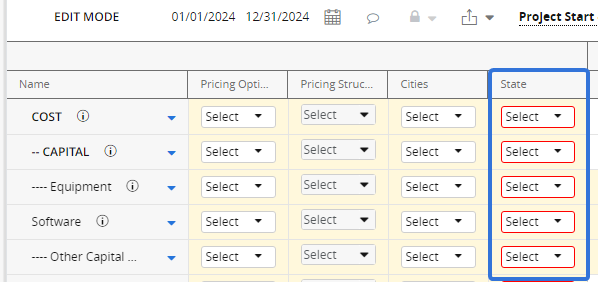
The red outlines indicate that "State" values must be entered before the Metric view can be saved.
Note: Required Tags and Custom Fields must contain values on a Metric view to be saved, not on the entire Metric instance. In other words, if all of the required Tags and Custom Fields on "View A" contain values but not all of the required Tags and Custom Fields on "View B" contain values, "View A" can still be saved.
With this update, administrators can now select the "Required only when there is data on the line" checkbox on the Custom Fields / Tags Metric Tab.

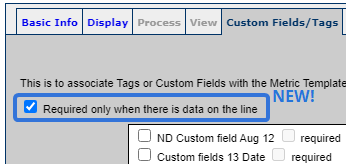
When this is selected, all "required" Tags and Custom Fields will only require values when numeric data has been entered into the line item:
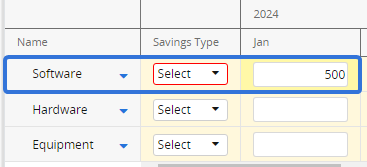
Notice that the "Savings Type" Tag is only outlined in red within the "Software" line item. This is because only the "Software" line item contains numeric data, so it requires a value for the Tag.
Benefit:
Prior to this update, every "required" Tag and Custom Field on a Metric view had to contain a value before the view could be saved. This would cause problems because Metrics often contain a numerous amount of line items that are not always used. This caused Metric users to tediously enter values for Tags and Custom Fields on line items that were not even in use, which could both waste time and seed confusion.
Example: Mina attached a "Notes" Custom Field to her "Costs" Metric because she wants users to enter a quick description of the costs entered into each line item. However, her Metric contains over 10 line items, which means users could not save the Metric view unless every line item contained a note. This caused problems because not all line items contained numeric data, especially at the start of a Project when most costs had not been established yet. Users would have to enter meaningless placeholder notes into every line item in order to save the Metric view.
With this update, Mina can simply select the "Required only when there is data on the line" checkbox. Now, users will only be required to enter a note for line items that contain numeric values, which saves valuable time and reduces confusing placeholder notes.
Permissions
The following improvement has been made to PowerSteering Permissions. Click on the upgrade below to learn more about it:
What's Different:
The "Edit Name" Project permission has been added to PowerSteering. This permission allows the user to edit the name of a work item:

Tip: Work names can also be edited in Project Central:
Users must add the additional "Name" column to change the name of a work item in Project Central. The "Name" column on the left-hand side of the table cannot be used to change the name.
Prior to this release, users could edit work item names with the "Edit" Project permission. With this update, the ability to edit work names has been removed from this permission; users will also require the "Edit Name" permission to edit work item names.
Note: This permission applies to work template names as well.
Benefit:
Prior to this update, users with the "Edit" permission on a Project had the ability to change the Project's name. This caused problems because users who were able to make changes to work item details were also able to change the name of the work item itself. Unprompted changes to work names can cause confusion and disorganization, so many PowerSteering administrators prefer to restrict this ability to a selected few individuals. With the new "Edit Name" permission, administrators can allow certain individuals to change the work item name without taking away the "Edit" permission from those who need it.
Project Central
The following improvement has been made to the Project Central. Click on the upgrade below to learn more about it:
What's Different:
PowerSteering users can now remove all of a work item's assignments at once through Project Central.
Note: PowerSteering users will require the "View Project Central" Project permission to access the Project Central page.
Prior to this release, users would have to use the "Remove resource assignment" icon next to each listed assignment in order to remove them from the work item.

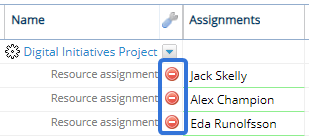
With this update, users can select the new Remove assignments option from the work item's drop-down menu.

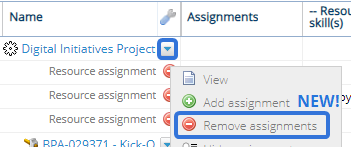
This will clear all of the assignments from the work item.
Benefit:
Prior to this upgrade, there was no way for users to remove multiple assignments from a work item at once. Assigned Resources could only be removed one-by-one by selecting the "Remove resource assignment" icons, which could become tedious and time-consuming for work items with a large number of assignments. The Remove assignments option allows users to remove all assignments with a single click, saving valuable time and effort.
Resource Review
The following improvement has been made to the Resource Review. Click on the upgrade below to learn more about it:
What's Different:
Two new options are now available while users are filtering the Allocation section of the Resource Review page by Roles.
Prior to this release, there were only three options for determining how the section would be filtered by selected Role(s).


-
On profile: Resources with the selected Role(s) on their profile will be displayed.
-
On work: Resources with the selected Role(s) on the work they are assigned to will be displayed.
-
Either role or work: Resources with the selected Role(s) on either their profile or the work they are assigned to will be displayed.
When any of these options are selected, all of the work a Resource is assigned to will appear in the Allocation section of the Resource Review page. The Resource's full effort and availability is displayed.
With this update, however, two new options have been added to the "Role" drop-down menu.

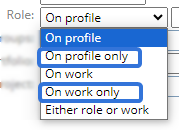
-
On profile only : Resources with the selected Role(s) on their profile will be displayed. Only work that they are assigned to under the specified Role(s) will appear.
-
On work only: Resources assigned to work under the selected Role(s) will be displayed. Only work that they are assigned to under the specified Role(s) will appear.
When either of these new options are selected, only work items that the user is assigned to under the specific Role will be displayed.
Example: Jack has the "Human Resources Supervisor" Role on his profile:
He is only assigned to the "BP -000121 - Digital Reserve for Other work" project as a "Human Resources Supervisor".
A user viewing the Resource Review page adds an "On profile" Role filter for the "Human Resources Supervisor" Role:
Jack is displayed in the Allocation section because he has the Role on his profile. All of the work he is assigned to is included as well:
Even though he is only assigned as a "Human Resources Supervisor" on one project, all projects he is assigned to will appear.
After this, the user changes the option to "On profile only":
Now, only work that Jack is assigned to as "Human Resources Supervisor" will appear:
If the "Human Resources Supervisor" Role is removed from Jack's profile, he will no longer be displayed on the page.
Note: Work items must have "Plan Resources" set to "Yes" in order to be displayed on the Resource Review page. See Edit Work Details for more information.
Benefit:
The three "Roles" filter options that already existed prior to this release display Resource work that does not correspond to the selected Role(s). This gives the viewer a full grasp of the Resource's effort and availability for the selected period. However, many users assumed (and would prefer) to use the "Roles" filter to only display work attributed to specific Roles. With this update, users can choose to only view Resource assignments toward certain Roles, eliminating any work items that do not match the Role they are interested in viewing.
Security
The following improvements have been made to PowerSteering Security. Click on any of the upgrades below to learn more about them:
What's Different:
PowerSteering customers now have the option to apply new rules for creating user passwords.
Note: This is an optional feature that must be enabled by the PowerSteering team. If you are interested, please contact your PowerSteering representative for more information.
Note: This only applies to non-SSO passwords. Customers using SSO may set their own password criteria outside of PowerSteering.
The new password acceptance criteria is as follows:
-
A minimum of 10 characters
-
At least one uppercase letter and one lowercase letter
-
At least one numerical character
-
At least one non-alphanumeric character (#,$,!,&, etc.)
Note: These criteria will only apply to users while they are creating new passwords. No existing passwords will be affected if they do not currently match these criteria.
Benefit:
Implementing a strong password policy goes a long way in enhancing the security of digital accounts, especially when those digital accounts may contain highly-sensitive information (like many PowerSteering environments). They are much harder to guess or crack, which protects users and organizations from malicious attackers and automated bots. Strong passwords are a vital aspect of cybersecurity, and they will protect your PowerSteering accounts from threats and unauthorized access.
What's Different:
PowerSteering's session timeout behavior has changed with this release. The following will now apply:
-
Session time has been set to 10 hours. This means when a user logs in to PowerSteering, the session will originally be set to expire 10 hours later.
-
If the user interacts with PowerSteering, the session will reset.
-
A notification will appear 5 minutes before the session is set to expire:

Selecting Extend Session will reset the timer to another 10 hours.
Benefit:
Session timeouts enhance PowerSteering security by reducing the risk of unauthorized access. If a user forgets to log out or if their session is left unattended, the system automatically terminates the session, preventing unauthorized individuals from gaining access. It also mitigates the risk of stolen devices; if a user's computer is stolen, thieves will have a limited time period to exploit an active session before it times out. Timeouts play a crucial role in mitigating various security risks and are considered a best practice in web application security.
What's Different:
PowerSteering customers now have the option to enforce a password history policy. When enabled, this will prevent users from reusing one of their six previous passwords when changing their password.
Note: This is an optional feature that must be enabled by the PowerSteering team. If you are interested, please contact your PowerSteering representative for more information.
Note: This only applies to non-SSO passwords.
Benefit:
When users regularly create new, unique combinations of passwords, the likelihood of attackers gaining access to PowerSteering through previously compromised credentials is significantly reduced. This is a valuable component of strong password management and user authentication security.
Statuses
The following improvement has been made to PowerSteering Statuses. Click on the upgrade below to learn more about it:
What's Different:
Comments can now be mandatory after a user changes a work item's Status (on either non-Gated or Gated work).
Note: This feature cannot be enabled by users or administrators; it must be enabled by the PowerSteering team. Reach out to your PowerSteering representative if this is something you would like.
PowerSteering customers can reach out to a representative to request that comments become mandatory when work items are changed to certain Statuses. When users change a work item's Status to one of the specified statuses, a "Comments" window will appear. The window will contain a red-outlined text box, indicating that text must be entered to activate the Add Comment button:
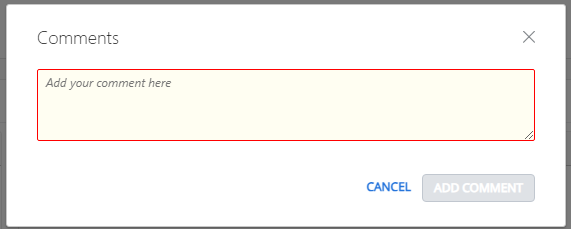
Once the user enters a comment and selects the Add Comment button, both the comment and the Status change will be saved. If the user selects Cancel instead, the Status change will not be saved.
The comment will appear when a user hovers the cursor over the "Status" label on a work item's Summary Page:

Benefit:
Leaving comments on Status changes is important for several reasons in a collaborative working environment. It provides context for colleagues who might not be involved in the day-to-day operations of certain work items but still need to be informed.
Example: Lucy would like to see an explanation whenever a Project becomes either canceled or deferred. She reaches out to her PowerSteering representative to request mandatory comments whenever a work item receives a Status change to either "Canceled" or "Deferred".
Jack, a Project Manager, has recently heard that one of his Projects will not receive funding this year, so it will need to be canceled. When he changes the Project Status from "On Track" to "Canceled", he is prompted to leave a mandatory comment: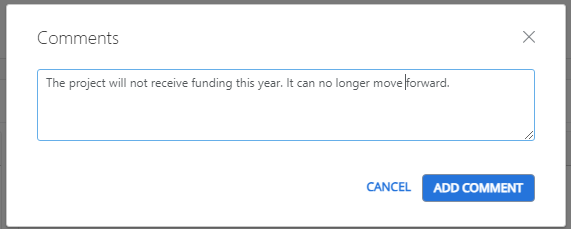
Lucy can see that the Project has been canceled. Instead of reaching out to Jack, she can simply visit the Project's Summary Page and scroll her cursor over the "Status" label to see why the Project was canceled:
Tags
The following improvements have been made to PowerSteering Tags. Click on any of the upgrades below to learn more about them:
What's Different:
The maximum number of character for Tag values has been increased from 50 characters to 150 characters. While adding or editing Tag values, each value name can contain up to 150 characters:
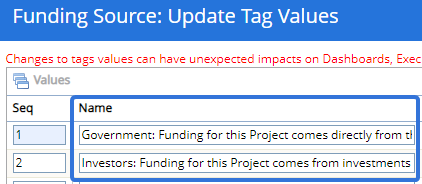
Note: PowerSteering users must belong to the Admin Group or they must have the "Tag Administration" Context permission to create or edit Tags.
Benefit:
Tags are entirely customizable entities that can fulfill a variety of business needs. Many organizations prefer to have Tag values that are more descriptive instead of values that simply serve as labels. Prior to this release, longer values would have to be truncated in order to fit into the character limit. Increasing this limit from 50 characters to 150 characters gives administrators the freedom to create more detailed Tag values that provide more information to their users.
What's Different:
While filtering new Data Grids by Hierarchical Tag values, "child" value checkboxes will now be indented under their corresponding "parent" values.
Note: A Hierarchical Tag contains Tag values with "parent" / "child" relationships. For example, imagine a Tag with values that are a mix of managers and employees. A Hierarchical Tag allows the employee values to be organized as "child" values of the managers: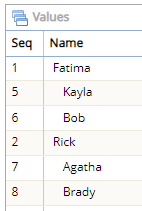
Fatima and Rick are managers ("parent" values) and their employees ("child" values) are indented directly below them.
Note: PowerSteering administrators and users with the "Tag Administration" Context permission can create new Hierarchical Tags.
Prior to this release, Hierarchical Tag values were not indented very clearly while filtering a new Data Grid. Only the values themselves were slightly indented, not the checkboxes themselves.

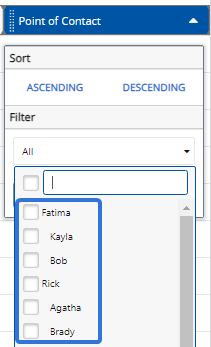
With this update, each "parent" value will serve as a drop-down menu. When the menu is opened, the "child" values will be displayed. Each "child" value (along with its checkbox) will be indented.

Click thumbnail to play.
Note: This difference can only be seen on new Data Grids in PowerSteering. The legacy Data Grids (such as the Dashboard) already display "child" values with an indent: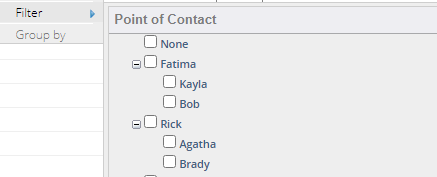
Benefit:
The new Data Grid design introduced a fresh, easy-to-use interface that matches the rest of PowerSteering updated UI. However, the original design for Hierarchical Tag values lacked clarity; users would have a much easier time filtering these values on legacy Data Grids. With this upgrade, the "Filter" window is much more organized, allowing users to easily navigate and understand the "parent" / "child" relationship between each Tag value.
Timesheets
The following improvements have been made to PowerSteering Timesheets. Click on any of the upgrades below to learn more about them:
Note: With this release, the legacy Timesheet page will be deprecated from PowerSteering. This means that all users will have to use the new Manage Time page going forward. See 2024R1.0 Deprecated Features for more information.
What's Different:
Users now have the ability to filter the Manage Time page by the status of each Timesheet.
Prior to this release, each timesheet status had its own tab on the new Manage Time page.


Users could select one of the tabs to see the Timesheets with the displayed status for the time period.
With this update, the tabs have been replaced by a "Timesheet Status" drop-down menu.


The menu allows users to determine which Timesheets should be displayed for the period:
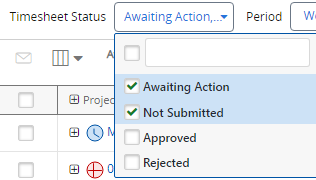
In this example, only Timesheets with a status of "Awaiting Action" or "Not Submitted" will be displayed for the time period.
Note: Selecting the top checkbox or none of the checkboxes will result in Timesheets of all statuses being displayed.
Tip: A Timesheet will have a "Not Submitted" status when it is saved by a user but not yet submitted. Once the user submits it, the Timesheet will move to "Awaiting Action".
Also, a count of Timesheets per status for the time period has been placed directly below the "Timesheet Status" drop-down menu:

Benefit:
Prior to this upgrade, users would have to select one of the status tabs to view Timesheets with the indicated status. While this was an effective way to organize the Manage Time page, the new design allows user to customize which Timesheets appear in the table.
Example: Amira is reviewing the Timesheets of her employees for the week. She is interested in viewing Timesheets that have not been approved or rejected yet. Prior to this release, she would have to switch back and forth between the "Awaiting Action" tab and the "Not Submitted" tab to view these Timesheets. With this update, she can simply select both statuses from the "Timesheet Status" drop-down menu and view all of these Timesheets at once.
What's Different:
Users can now decide whether to group time submissions by Projects or by Users on the new Manage Time page.
With this update, a new "Display" drop-down menu is available on the page:

The drop-down menu offers two display options:

-
By User: The Timesheets will be grouped by the user who submitted or saved them:
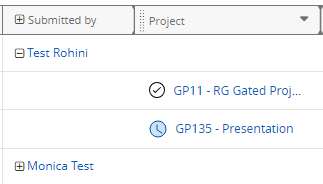
The "Submitted By" column (containing PowerSteering users) will be placed at the left-hand side of the table.
Note: When this option is selected, the row containing the user's name will display the user's total time for the period:

The rows containing work item names will only display the user's time toward the work item itself:
-
By Project (default): The Timesheets will be grouped by the work items they were submitted or saved against:
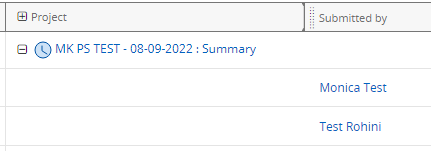
The "Project" column (containing PowerSteering work items) will be placed at the left-hand side of the table.
Note: When this option is selected, the row containing the work item's name will display the total time against the work item for the period:

The rows containing user names will only display the individual user's time toward the work item:
The "Display" setting will only apply to the individual user's Manage Time page; it will not be applied to any other PowerSteering users.
Benefit:
Prior to this upgrade, the legacy Manage Time page featured the same "Display" drop-down menu. This allowed users to group time submissions either by work item or by user:

The legacy Manage Time page will no longer be available after this release, so this behavior must be migrated to the new page. Users can now implement this functionality while also taking advantage of the cleaner, easier-to-use interface of the new Manage Time page.
What's Different:
A "Groups" column can now be added to the Manage Time page. This column will display all of the Groups that the listed user belongs to:
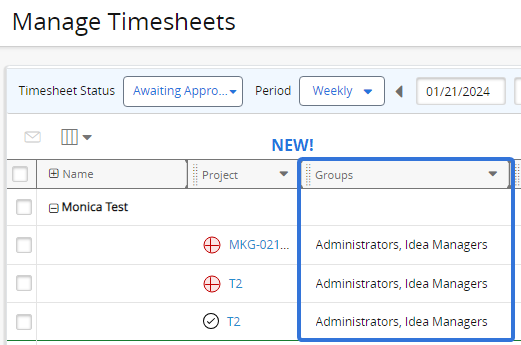
Note: This new feature is only available on the new Manage Time page, not the legacy page. Please also be aware that the legacy Manage Time will no longer be available after a future release.
Users who wish to display this column on the Manage Time page can add it by opening the "Select columns" drop-down menu ( ) and selecting the "Groups" checkbox:
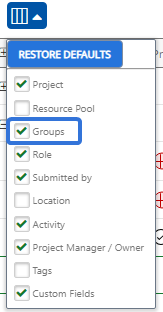
Also, users can select the triangle icon ( ) in the "Groups" column header to filter the listed users by the Groups they belong to:
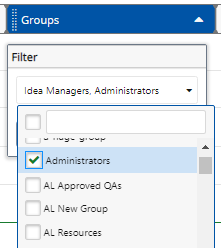
When this happens, only users who belong to the selected Groups will be displayed on the Manage Time page.
Note: Changes to the Manage Time page only apply to the user who makes them. If you decide to add the "Groups" column to your Manage Time page, other users will not automatically see the column when they open the Manage Time page themselves.
Benefit:
The legacy Manage Time page featured a way to filter the list of users by the Group they belong to:

This function was not immediately introduced along with the new Manage Time page, which means there was no way to filter the users by Group unless without switching back to the legacy page. However, the new "Groups" column offers even more functionality than the legacy page because users can now be filtered by more than one Group. The legacy page only allowed users to be filtered by a single Group, but the "Groups" column on the new Manage Time page allows them to be filtered by multiple Groups.
Example: The legacy page filter in the image above will filter out all Users that do not belong to the "Idea Managers" Group. With the new "Groups" column, however, users can select more than one Group. They can filter out users who do not belong to the "Idea Managers" Group or the "Administrators" Group: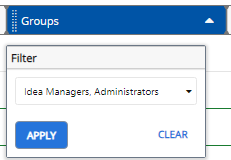
What's Different:
Users can now convert the currency displayed on the new Manage Time page to another currency.
With this update, a new "Currency" drop-down menu is available on the page:

This menu can be used to determine which currency the costs will be displayed as on the page:
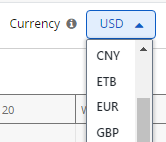
Note: The currencies in the drop-down menu are based on the Exchange Rates entered in PowerSteering.
When a currency is selected, all of the costs displayed on the Manage Time page will be converted to it.
Benefit:
Prior to this upgrade, the legacy Manage Time page featured the same "Currency" drop-down menu. This allowed users to covert the costs on the Manage Time page to the selected currency:

The legacy Manage Time page will no longer be available after this release, so this behavior must be migrated to the new page. Users can now implement this functionality while also taking advantage of the cleaner, easier-to-use interface of the new Manage Time page.
What's Different:
A "Tags" column can now be added to the Manage Time page. This column will display all of the user-associated Tags that the listed user has values for:
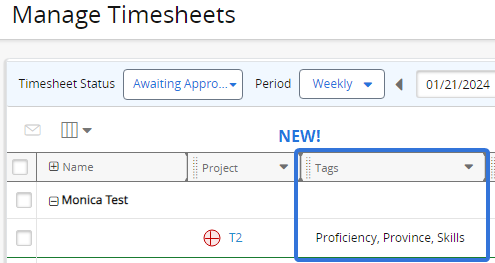
Note: This new feature is only available on the new Manage Time page, not the legacy page. Please also be aware that the legacy Manage Time will no longer be available after this release.
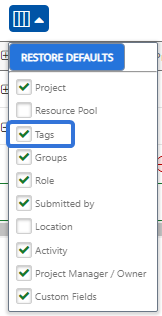
Users who wish to display this column on the Manage Time page can add it by opening the "Select columns" drop-down menu ( ) and selecting the "Tags" checkbox:
Also, users can select the triangle icon ( ) in the "Tags" column header to filter the listed users by the Tags they have values entered for:
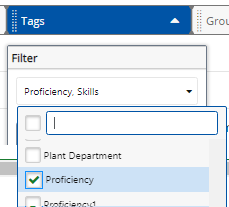
When this happens, only Resources who have values selected for the selected Tags will be displayed on the Manage Time page.
Note: Only Tags that have been associated with "Users" will appear in the "Filter" window: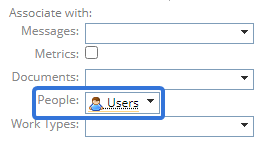
Administrators can associate Tags to users while creating or editing Tags.
Note: Changes to the Manage Time page only apply to the user who makes them. If you decide to add the "Tags" column to your Manage Time page, other users will not automatically see the column when they open the Manage Time page themselves.
Benefit:
The legacy Manage Time page featured a way to filter the list of users by the Tags that were associated with them:
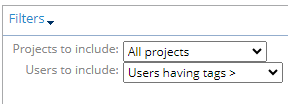
This function was not immediately introduced along with the new Manage Time page, which means there was no way to filter users by Tags without switching back to the legacy page. With this update, users can now organize the page by specific Tag values.
What's Different:
A "Custom Fields" column can now be added to the Manage Time page. This column will display all of the user-associated Custom Fields that the listed user has values for:
Note: This new feature is only available on the new Manage Time page, not the legacy page. Please also be aware that the legacy Manage Time will no longer be available after a future release.
Users who wish to display this column on the Manage Time page can add it by opening the "Select columns" drop-down menu ( ) and selecting the "Custom Fields" checkbox:
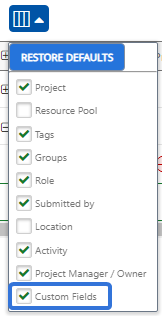
Also, users can select the triangle icon ( ) in the "Custom Fields" column header to filter the listed users by the Custom Fields they have values entered for:
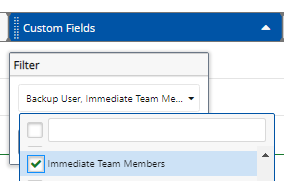
When this happens, only users who have values selected for the selected Custom Fields will be displayed on the Manage Time page.
Note: Only Custom Fields that have been associated with "Users" will appear in the "Filter" window:
Administrators can associate Tags to users while creating or editing Custom Fields.
Note: Changes to the Manage Time page only apply to the user who makes them. If you decide to add the "Custom Fields" column to your Manage Time page, other users will not automatically see the column when they open the Manage Time page themselves.
Benefit:
Prior to this release, there was no way to filter users by Custom Fields. This could not be done on the legacy Manage Time page either; listed users could only be filtered by Tags, not Custom Fields. Custom Fields (like the name suggests) are totally customizable and used in various ways across PowerSteering. Filtering the Manage Time page by specific Custom Fields allows managers to only view the users they wish to view, reducing unnecessary clutter on the page.
Upland Analytics
The following improvement has been made to Upland Analytics in PowerSteering. Click on the upgrade below to learn more about it:
What's Different:
PowerSteering users can now subscribe to Dashboards in Upland Analytics.
Prior to this release, there was no way to subscribe to Upland Analytics Dashboards. Users could only subscribe to specific reports. With this update, users can select a Dashboard's  icon and select Subscriptions → Create:
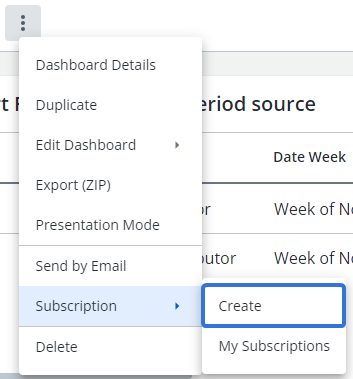
From here, the user can create a new Subscription for the Dashboard.
Tip: Users can also reach this screen through the "My Reports and Dashboards" widget on the "My Analytics" page by selecting a Dashboard's  icon and selecting Subscribe:
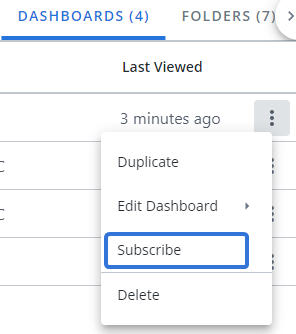
Benefit:
Subscriptions allow users to receive Upland Analytics report updates on a scheduled basis. Extending this functionality to Upland Analytics Dashboards allows users to automatically receive data from Dashboards as well as specific reports.
Work Generation
The following improvement has been made to Work Generation in PowerSteering. Click on the upgrade below to learn more about it:
What's Different:
PowerSteering users now have the option to carry Resource data in Project Central over from the source work to the target work during Work Generation.
While creating or editing Work Generation Templates, administrators will find the new "Plan Resources" drop-down menu under the "New Work" section of the "New Work Basics" tab:
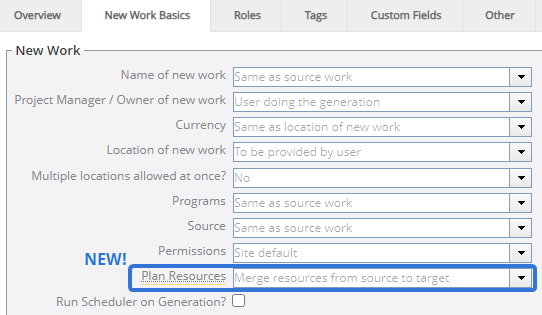
Note: Only PowerSteering administrators can create and edit Work Generation Templates.
The "Plan Resources" drop-down menu offers three options for carrying planned Resource data from the source work to the target work:

-
Copy and Replace all resources from source to target: Any Resources that have been planned through Project Central on the source work will appear on the target work. The source work's Resources will replace any Resources that have been planned on the work template of the target work.
Example: Imagine that Josiane has been assigned as a Developer for the source work:

Also, Jack has been assigned as a Contributor on the template of the target work:
After Work Generation, the Resource plans from the source work will totally replace the plans from the template. This means Jack will not be assigned as a Contributor on the target work, but Josiane will be assigned as a Developer:
-
Merge resources from source to target: Any Resources that have been planned through Project Central on the source work will appear on the target work. Any Resources that have been planned on the work template of the target work will be included as well.
Example: Imagine that Josiane has been assigned as a Developer for the source work:

Also, Jack has been assigned as a Contributor on the template of the target work:
After Work Generation, the Resource plans from the source work will merge with the plans from the template. This means both Jack and Josiane will be assigned to the new work in their respective Roles:
-
Ignore: None of the Resource plans from the source work will be copied onto the new work. Only Resource plans from the template of the target work will be included.
Note: To assign Resources to a work item, the work item must have "Plan Resources" set to "Yes" while editing work details:
Benefit:
Prior to this release, only Resource plans from the template of the target work were included on the new work (just like if "Ignore" from the menu above was chosen). There was no way to bring Resource assignments from the source work over to the new work after Work Generation. This was a problem because many users preferred to plan Resources during the source work stage; once the source work was ready for Work Generation, these Resources would have to be reassigned all over again. With this upgrade, users can plan their Resources on the source work, generate new work when the time is right, and then pick up where they left of once the new work is created.


