2024R2 Release Notes
The 2024R2 version of Eclipse PPM will be deployed to the production site on Saturday, December 8th, 2024. When this occurs, the features on this page will become available.
Note: This page will be updated as new functionality becomes available.
The following key features will be made available with the 2024R2 Eclipse PPM release:
What's Different:
Administrators now have the ability to import Time Entries in bulk by uploading a comma-separated values (CSV) file into Eclipse PPM.
Note: Users will need the new "Bulk Update - Time Entries" permission from an Application Policy in order to use this feature.
On the "Administration" page, administrators can now select Bulk Update - Time Entries from the "Other" menu.

From here, they can upload a CSV file with time entry data into Eclipse PPM by selecting the Choose file button and using their computer's file manager to navigate to the file.
Importing Time Entries consists of three components:
Creating the import file
Users must prepare a CSV file that contains all of the time entry information that they wish to import.
Tip: A CSV (comma-separated values) file is any text file that allows data to be saved in a table-structured format. The most common way to create a Bulk Update file is by using Microsoft Excel. However, the file must be saved as a ".csv" file before it can be uploaded into Eclipse PPM.
Each row of the import file represents a Resource's time entered toward a Project Task on a single day. The following columns must be included on the file.
Tip: Click here to download a sample Excel file that contains each column header.

-
Project: Identify the Project that the Resource is entering time against. While configuring process options, use the "Project Identifier" field to determine which values should be entered under this column (Project Names, Project Numbers, Project Property values, etc.).
-
Task: Identify the Task that the Resource is entering time against. While configuring process options, use the "Task Identifier" field to determine which values should be entered under this column (Task Names, Task Numbers, Task Property values, etc.).
Note: If no "Task" value is entered for the Time Entry column, the hours will be applied to the "Project Time".
-
Resource: Identify the Resource that is entering time. While configuring process options, use the "Resource Identifier" field to determine which value should be entered under this column (First Name + Last Name, Resource ID, Resource email, etc.).
-
Date: Identify which day the Resource is entering time for. The date should be formatted dd/mm/yyyy.
-
Hours: Enter the number of hours that the Resource is entering against the Project Task for the day.
-
Notes: Enter a Daily Task Note for the time entry.
Note: See Add and View Timesheet Notes for more information on Daily Task Notes.
Once you have finished preparing your update file, save it to your computer as a ".csv" file.

Once it is saved, select the Choose File button to open up your computer's file manager and navigate to the file.

The name of the selected file will replace the "No file chosen" text, indicating that the update file is ready for upload.

Before uploading the file into Eclipse PPM, be sure to review all of the processing options.
Processing Options
Administrators can configure the following options to determine how the file will be imported into Eclipse PPM.

-
Approvals: Determine how the submission status of the Time Entries once they are imported into Eclipse PPM.

-
Do not submit: The Time Entries will be saved to each Resource's Timesheet, but they will not be submitted.
-
Submit: The Time Entries will be saved to each Resource's Timesheet and submitted. They can be approved by the configured time approver on the Approvals page.
-
Submit & Approve: The Time Entries will be saved to each Resource's Timesheet and submitted. They will be automatically approved upon import.
-
-
Import Mode: Determine how the Time Entries will be imported into Eclipse PPM.

-
Insert/Overwrite: The Time Entry values on the import file will replace any existing entries on the same days/Project Tasks.
-
Insert/Sum: The Time Entry values on the import file will be added to the existing entries on the same days/Project Tasks.
-
-
Project Identifier: Determine how Projects will be identified under the "Project" column of the import file.

-
Project Id: Project IDs must be entered under the "Project" column to identify Projects.
-
Project Name: Project names must be entered under the "Project" column to identify Projects.
Note: Project names do not have to be unique. If another Project shares the same name as the identified Project, the row will fail to be imported.
-
Project Number: Project Numbers must be entered under the "Project" column to identify Projects.
Note: Project Numbers do not have to be unique. If another Project shares the same Project Number as the intended Project, the row will fail to be imported.
-
Project Property: Select one of the listed Project Properties to identify Projects by the property's values.
Note: Multiple Projects can have the same Project Property values. If another Project has the same value as the intended Project, the row will fail to be imported.
-
-
Task Identifier: Determine how Tasks will be identified under the "Task" column of the import file.

-
Task Id: Task ID numbers must be entered under the "Task" column to identify Tasks.
-
Task Name: Task names must be entered under the "Task" column to identify Tasks.
Note: Task names do not have to be unique. If another Task on the same Project has the same name on the current Work Plan, the row will fail to be imported.
-
Task Number: Task Numbers must be entered under the "Task" column to identify Tasks.
-
Task Property: Select one of the listed Task Properties to identify Tasks by the property's values.
Note: Multiple Tasks can have the same Task Property values. If another Task on the Project has the same value on the current Work Plan, the row will fail to be imported.
-
-
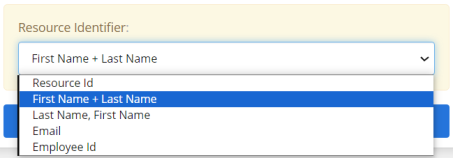
Resource Identifier: Determine how Resources will be identified under the "Resource" column.
-
Resource Id: Resource ID numbers must be entered under the "Resource" column to identify Resources.
-
First Name + Last Name: The Resource's first and last name (in that order) must be entered under the "Resource" column to identify the Resource (i.e. Tim Stutzle).
Note: If more than one Resource shares the same first and last name, the row will fail to be imported.
-
Last Name, First Name: The Resource's last and first name (in that order, separated by a comma) must be entered under the "Resource" column to identify the Resource (i.e. Stutzle, Tim).
Note: If more than one Resource shares the same first and last name, the row will fail to be imported.
-
Email: The Resource's email address must be entered under the "Resource" column to identify the Resource.
-
Employee Id: The Resource's Employee ID must be entered under the "Resource" column to identify the Resource.
Note: If more than one Resource shares the same Employee ID, the row will fail to be imported.
-
Uploading the file
Once all of the Processing Options have been reviewed, the file can be uploaded into Eclipse PPM. Select the Upload button at the bottom of the page to import the Time Entries.

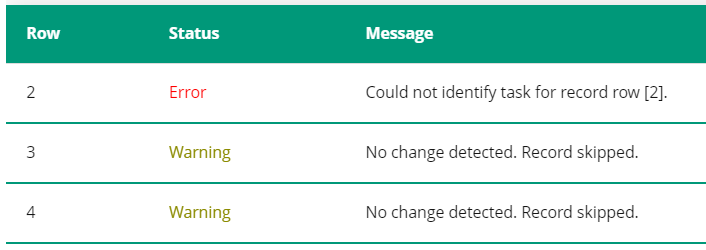
After uploading, a window will appear to indicate how many Time Entries were successfully imported in total, how many failed to import, and how many were imported with warning messages.

Note: The "Success" result displays a total of all the Time Entries that were successfully uploaded, including those that uploaded as "Success With Warnings". This is why the sum of these numbers may not add up to the number of Time Entries in your upload file.
Directly below the results, a table will list all of the warnings and failures as well as a description of the issues.
Benefit:
Prior to this release, Bulk Import could be used to create Resources and create or update a large number of Projects simultaneously. It is especially helpful for organizations that wish to integrate data from another application into Eclipse PPM as they can export their data into a spreadsheet and quickly upload it.
With this update, this ability has been extended to Time Entries as well. If Resources track their time using another application, an administrator can export the time data into a spreadsheet and upload it into Eclipse PPM. This prevents users from having to manually add their time to multiple applications at once. Additionally, the time can be automatically approved upon submission. If another application is used to approve time, this prevents time approvers from having to review time submissions more than once.
What's Different:
Administrators can now push Resource Type Rate updates directly to Resources in Eclipse PPM. Administrators can select which Resource Type updates to apply, as well as which Resources will receive them.
Tip: This feature can be used in conjunction with the new Rate Card feature to streamline the process of updating Resource Type Rates. See below for more information.
Note: Resources will not receive any Resource Types that are not already on their profiles. This feature simply updates the Rates of Resource Types that already exist on Resource profiles.
Note: Eclipse PPM users require the "Organization Administration" permission from an Application Policy to access and edit the Organization Structure.
On the Organization Structure page, administrators can select the new Bulk Action button.

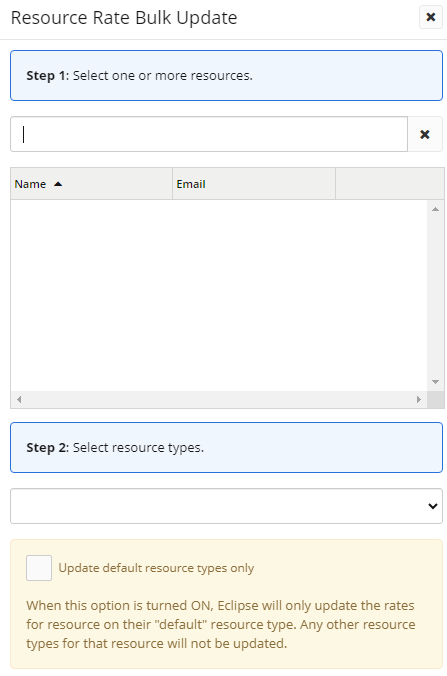
This will open up the "Resource Rate Bulk Update" window.
-
Step 1: Click on the textbox to select the Resources that will receive Resource Type Rate updates. Each selected Resource will appear in the table below.
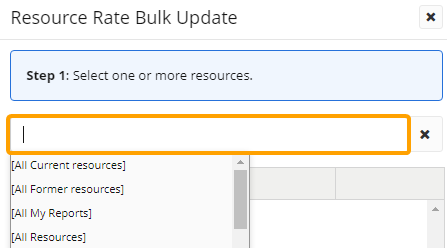
Note: The Resource filters from the Resource Search page will be displayed at the top of the suggestions list in brackets.
Tip: Start typing in the name of an individual Resource to make it appear in the suggestions list.
-
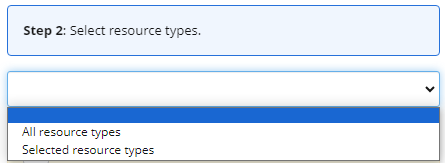
Step 2: Use the drop-down menu to determine which Resource Types will be updated on the Resource profiles.
Note: The selected Resource Types will not be added to the selected Resources' profiles. Instead, the selected Resources that already have the selected Resource Types on their profiles will receive updates to their Resource Type Rates.
-
All resource types: Updated Rates from all Resource Types will be applied to the selected Resources.
-
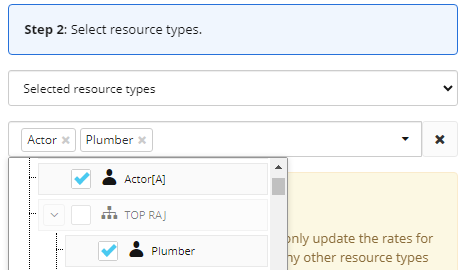
Selected resource types: Select the "Resource Types" field that appears to determine which Resource Type Rate updates will be applied to the selected Resources. Select the checkboxes of Resource Types to include them.
-
-
Update default resource types only: If selected, only the default Resource Type on each Resource's profile will receive an updated Rate. Other Resource Types on a Resource's profile will not receive an updated Rate.
Once these options are configured, the administrator can select the Save button to apply the Resource Type Rate updates to the selected Resources.

If all Resources were updated successfully, a green banner will appear at the top of the Organization Structure page.

If not, the banner will explain if the bulk update partially or totally failed.


In either case, the administrator can select More info to see a list of errors that occurred.

Note: The "Record" number refers to the ID number of the Resource that could not be updated.
Benefit:
Prior to this upgrade, administrators could edit the Default Rate of each Resource Type on the Organization Structure page. However, these updated Default Rates would only be applied to Resource profiles when the Resource Type was applied to them after the update. There was no way to update the Default Rate of existing Resource Types on Resource profiles. Because of this, updating Default Rates on Resource profiles became an extremely time-consuming manual undertaking for Eclipse PPM administrators.
Now, administrators no longer need to visit each Resource's profile one-by-one in order to update their Resource Type Default Rates. They can simply edit them all in bulk from the Organization Structure page.
Example: Derek's organization needs to increase the Rates of certain Resource Types in order to be competitive in the job market. He accesses the Organization Structure page to edit the Default Rates for some of his more in-demand positions. However, he is also concerned that his current employees with those Resource Types will seek out other jobs, so he decides he will increase their Rates to match the new Default Rates.
Prior to this release, Derek would have had to visit every Resource profile with those Resource Types in order to update their Default Rates. This could have taken him several hours depending on how many Resources contained one of the Resource Types on their profiles. With this update, however, he can simply select the Bulk Action button, select the "[All Current resources]" filter in Step 1, and the Resource Types he would like to update in Step 2. This way, every Resource with one of the updated Resource Types on their profile will receive the updated Default Rates simultaneously.
What's Different:
Administrators can now create Rate Cards and apply them to multiple Resource Types in Eclipse PPM. When the Rate of a Rate Card is changed, it will automatically update the Default Rate of every Resource Type that the Rate Card is associated with.
Tip: This feature can be used in conjunction with the new Resource Type Rate update feature to streamline the process of updating Resource Type Rates. See above for more information.
Note: Eclipse PPM users require the "Configuration Administration" permission from an Application Policy to create and edit Rate Cards. Also, users require the "Organization Administration" permission from an Application Policy to apply them to Resource Types while editing the Organization Structure.
With this update, a new Rate Cards selection can be found under the "Resource" menu on the Administration page.
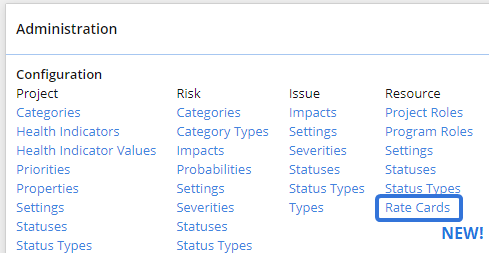
This page can be used to create and edit Rate Cards.
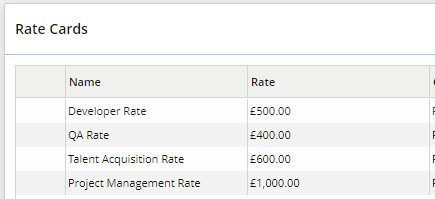
Once a Rate Card has been created, it can be applied to multiple Resource Types on the Organization Structure page. Administrators will notice the new "Rate Card" drop-down menu while creating or editing Resource Types.

The drop-down menu contains every Rate Card from the "Rate Cards" page as well as a "Custom" option.
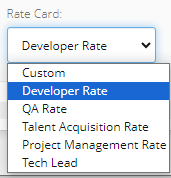
If a Rate Card is selected from the menu, the configured Rate will be automatically applied as the Resource Type's Default Rate. The "Default Rate" field will not be editable.

If "Custom" is selected from the menu, the "Default Rate" field can be edited just like it could before this release.

When an administrator edits the Rate of a Rate Card, that Rate will be automatically applied as the Default Rate for every Resource Type associated with the Rate Card.


Benefit:
Prior to this upgrade, changes in Resource Type Rates required administrators to manually update the Default Rates one-by-one. This became unnecessarily tedious and time consuming when multiple Resource Types were expected to share the same Rate; administrators had to update the Default Rate of each Resource Type to the exact same Rate. With this update, administrators can simply assign a Rate Card to Resource Types that share the same Rate in order to update their Rates simultaneously.
Example: Aly's agency pays architects at a Rate of £300. However, there many different kinds of architects that work for her, each with a different Resource Type ("BIM Model Architect", "Surveyor Architect", etc.). Market trends have forced her agency to increase this Rate to £320, so she will need to update the Default Rate of each architect Resource Type.
Prior to this release, she would have had to edit every Resource Type on the "Organization Structure" page to reflect this change. This would have taken up a great deal of time as well as leave room for human error. With this update, however, she can simply edit the "Architect Rate" Rate Card.
Once she saves this change, all of the architect Resource Types with the "Architect Rate" applied to them will automatically reflect the new Default Rate.
What's Different:
A new "Project Request" Data Source has been exposed in Upland Analytics. This Data Source allows Eclipse PPM users to create detailed reports and charts on Project Requests.
Note: Only Project Requests and Projects that were created from Project Requests will be included. Projects that were created traditionally through Eclipse PPM will not be reported on.
This new Data Source contains two Data Views: the "Project" view and the new "Project Request" view.

Note: If any fields from the "Project" view are included, only converted Projects will be included in the report. Project Requests that have not been converted yet will not be included.
The new "Project Request" Data View contains the following fields:
-
Is Converted to Project (A): Indicates whether the Project Request has been converted into a Project or not.
-
Project Id (A): The ID number of the Project.
Note: Requested Projects that have not been converted to Projects yet will not have ID numbers.
-
Project Template Id (A): The ID number of the Project Template used to request the Project.
-
Project Template Name (A): The name of the Project Template used to request the Project.
-
Request Id (A): The ID number of the Project Request.
Note: This will still be displayed for Projects that have been converted from a Project Request.
-
Name (Text) (A): The name of the Project / Project Request.
-
Name (URL) (A): The name of the Project / Project Request. Selecting the name will navigate the report viewer to the Project Home page.
Note: Only Project Requests that have been converted to Projects will contain links in this field. Project Requests do not have Home pages.
-
Resolved By Full Name [First Last] (A): The first and last name (in that order) of the Eclipse PPM user who approved the Project Request and converted it into a Project.
-
Resolved By Full Name [First Last] (URL) (A): The first and last name (in that order) of the Eclipse PPM user who approved the Project Request and converted it into a Project. Selecting the name will navigate the report viewer to the user's profile.
-
Resolved By Full Name [Last First ] (A): The last and first name (in that order) of the Eclipse PPM user who approved the Project Request and converted it into a Project.
-
Resolved By Full Name [Last First ] (URL) (A): The last and first name (in that order) of the Eclipse PPM user who approved the Project Request and converted it into a Project. Selecting the name will navigate the report viewer to the user's profile.
-
Resolved Date (
 ): The date (mm/dd/yyyy) and the time the Project Request was approved and converted into a Project.
 -
Resolved Date Month (
 ): The month the Project Request was approved and converted into a Project.
 -
Resolved Date Month Year (
 ): The month and the year that the Project Request was approved and converted into a Project.
 -
Resolved Date Quarter (
 ): The fiscal quarter that the Project Request was approved and converted into a Project.
 -
Resolved Date Quarter Year (
 ): The fiscal quarter and the year that the Project Request was approved and converted into a Project.
 -
Resolved Date Year (
 ): The year the Project Request was approved and converted into a Project.
 -
Status (A): The approval status of the Project Request.
-
Submitted By Full Name [First Last] (A): The first and last name (in that order) of the Eclipse PPM user who submitted the Project Request.
-
Submitted By Full Name [First Last] (URL) (A): The first and last name (in that order) of the Eclipse PPM user who submitted the Project Request. Selecting the name will navigate the report viewer to the user's profile.
-
Submitted By Full Name [Last First ] (A): The last and first name (in that order) of the Eclipse PPM user who submitted the Project Request.
-
Submitted By Full Name [Last First ] (URL) (A): The last and first name (in that order) of the Eclipse PPM user who submitted the Project Request. Selecting the name will navigate the report viewer to the user's profile.
-
Submitted Date (
 ): The date (mm/dd/yyyy) and the time the Project Request was submitted.
 - Submitted Date Month (
 ): The month the Project Request was submitted.
 -
Submitted Date Month Year (
 ): The month and the year that the Project Request was submitted.
 -
Submitted Date Quarter (
 ): The fiscal quarter that the Project Request was submitted.
 -
Submitted Date Quarter Year (
 ): The fiscal quarter and the year that the Project Request was submitted.
 -
Submitted Date Year (
 ): The year the Project Request was submitted.
Additionally, new Request-related standard reports and report components have been added to Upland Analytics for any users to run. The new reports can be found by selecting Dashboards → Dashboard Components → Requests from the Analytics menu.

The following new reports are available:
-
All Requests: A tabular report containing all Project Requests.

-
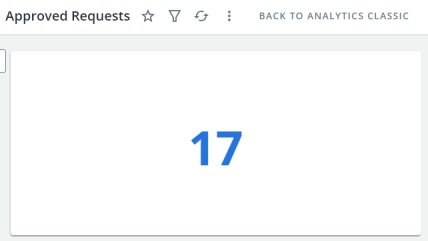
Approved Requests: A KPI that counts the total Project Requests that were approved over the last 12 months.
-
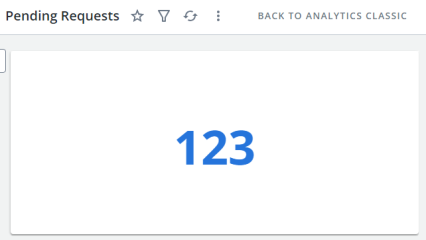
Pending Requests: A KPI that counts the total number of unaddressed Project Requests.
-
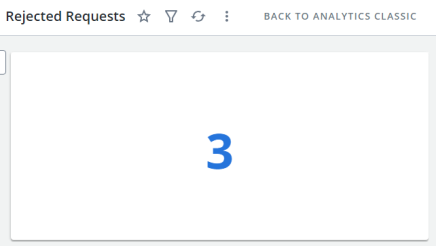
Rejected Requests: A KPI that counts the total Project Requests that were rejected over the last 12 months.
-
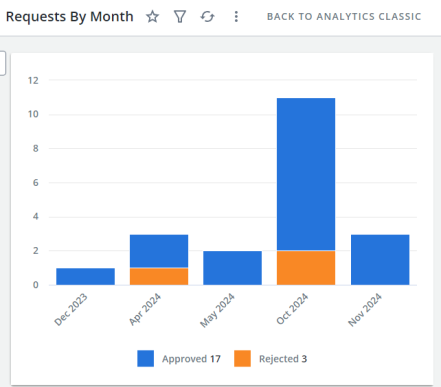
Requests by Month: A stacked bar chart that displays the monthly trend of approved/rejected Project Requests that were submitted over the last 12 months.
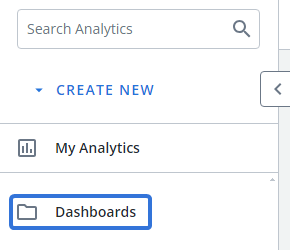
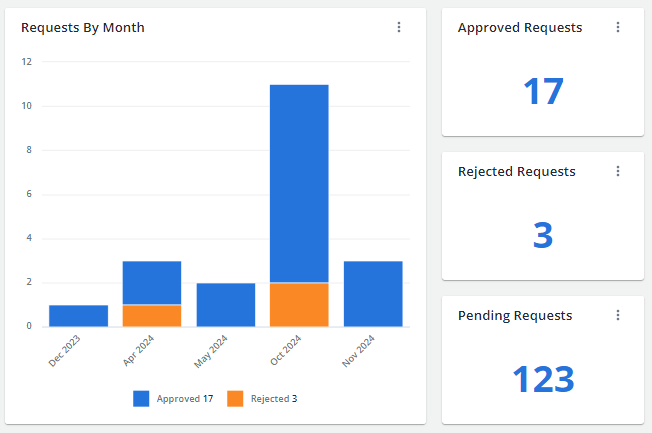
Also, a new "Request Analysis (Rolling 12 Months)" dashboard can be found by selecting the "Dashboards" folder from the Analytics menu.
This dashboard displays the new "Requests by Month" stacked bar chart as well as the new "Approved Requests", "Rejected Requests", and "Pending Requests" KPIs.
Benefit:
Prior to this release, there was no way for Upland Analytics report builders to create reports on Project Request data. This missing component was a problem because many Eclipse PPM users create Projects using Project Requests. In fact, several use Project Requests as their primary source of creating new Projects. Now that Upland Analytics can be used to report on them, users can easily gain insight into their organization's requests.
Report viewers can use this Data Source to identify trends and patterns of the Projects that are being requested, including the type of Projects, the users that are requesting them, and them amount of requests that are being approved/rejected.
What's Different:
Custom Task Properties have been added as fields to the "Task" Data View in Upland Analytics. When users create a report with a Data Source that includes the "Task" Data View, they will be able to expose Task Property values for each Task.

Benefit:
Prior to this release, Task Properties could not be included in Upland Analytics reports. This was an issue for many organizations because Task Properties allow users to capture information about their Tasks that other Eclipse PPM fields cannot. Properties are part of what makes Eclipse PPM a customizable application that can be tailored to each individual organization. The ability to include Task Properties in Upland Analytics allows report builders to create more informative reports that contain data that is relevant to their unique report readers.
Example: Tony is creating an Upland Analytics report for recent Tasks on Digital Initiatives Projects. For every Task created in her organization's Eclipse PPM environment, Project Managers are expected to schedule a review meeting during the Task where the assignees share their progress and concerns. This prompted an administrator to create two custom Task Properties: "Review Date" and "Review Notes".
Prior to this release, Tony could not include this information in her Upland Analytics report. With this update, however, she can expose this information for each included Task. She can ensure that her report readers will know when each Task's review meeting happened as well as how it went.
What's Different:
Administrators can now determine how Project/Program Numbers and "Classification" fields will be applied to Projects and Programs while applying templates.
With this update, administrators will see two new "Apply Options" while applying templates.
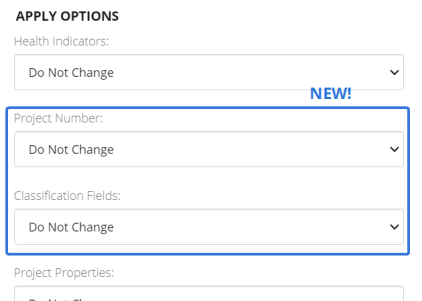
-
Project/Program Number: Determine how the template's auto-numbering settings will be applied to the Project/Program. Templates with a defined "Auto-Number Prefix" will apply a number with the prefix to the Project/Program. Templates without an "Auto-Number Prefix" will just assign a number.
Note: If auto-numbering is not enabled on the template that is being applied, this field will be inactive.
Note: To enable auto-numbering or an "Auto-Number Prefix", edit the settings of the Project or Program Template.

-
Do Not Change: The Project/Program Numbers of the Projects/Programs will not be changed.
-
Update: The auto-number settings of the template will be applied to the Projects/Programs. Even Projects/Programs that already have numbers will have new numbers applied to them.
-
Update, if empty: The auto-number settings of the template will be applied to Projects/Programs that do not currently have Project/Program numbers. Those that have numbers will not be affected.
-
-
Classification Fields: Determine how the template's "Classification" fields will be applied to the Projects/Programs.
Note: "Classification" fields can bee seen on a Project/Program's Home page when the "Profile" tab is selected.
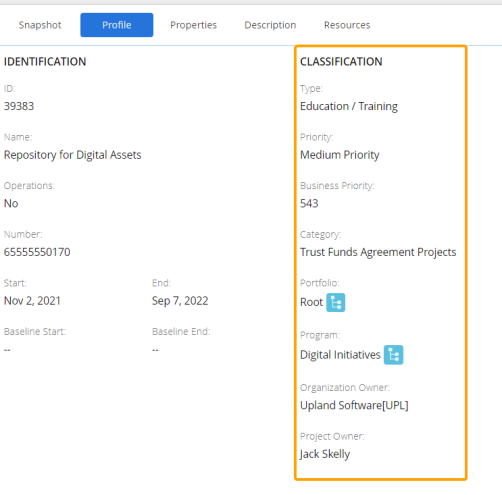

-
Do Not Change: The "Classification" settings of the Projects/Programs will not be changed.
-
Replace project data with template data: All of the template's "Classification" values will be applied to the Projects/Programs.
-
Note: Prior to this release, the process of applying template information to Projects and Programs was known as applying Project/Program Template Configuration.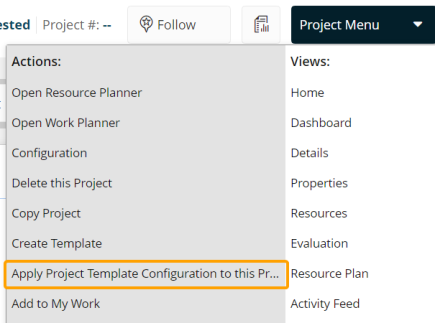
With this update, the process is now simply known as applying templates.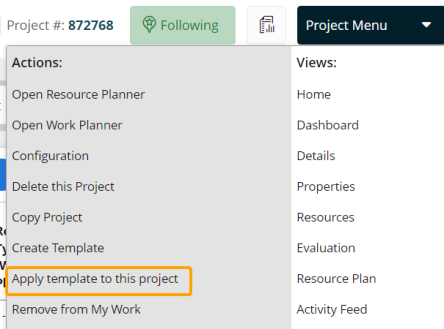
Benefit:
Administrators could apply many template entities to their Projects/Programs prior to this release, but there was no way to apply numbers or "Classification" settings. Now that this is an option, these fields can be standardized across a number of Projects/Programs. This ensures that all Projects/Programs adhere to a common format and are organized consistently across the organization. Additionally, it saves users from having to apply these settings to Projects/Programs one-by-one if standardization is changed. If Project Number prefix conventions are changed, for instance, and administrator can simultaneously apply the new prefix to as many Projects as required.
The following enhancements will also be available with the 2024R2 release:
Alerts and Notifications
What's Different:
Users can now receive notifications when the Description, Start/End Dates, or duration of a Task they follow is changed.
The Alerts and Notifications page can be used to enable "Following Notifications" for Tasks. This means the user will receive a notifications when Tasks they follow have been changed.
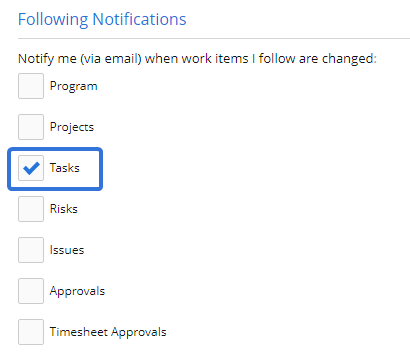
Prior to this release, however, notifications were only sent out if a Task's percent complete was changed or if the Task received a new comment. With this update, notifications will also be sent when the Description, Start/End Dates, or duration of followed Tasks is changed.
Benefit:
When users decide to follow certain Tasks, many are presumably interested in more than just comments and percent complete changes. Task Descriptions, Start/End Dates, and durations are also important components that users should be aware of. For instance, a Task follower would likely want to know if the Task's End Date had been moved up by a week. The updates to this notification will keep users aware of each significant event that occurs to the Tasks they follow.
API
What's Different:
The legacy XML-based API endpoints will be deprecated as part of the 2024R2 release. When this release is deployed, these endpoints will no longer be functional.
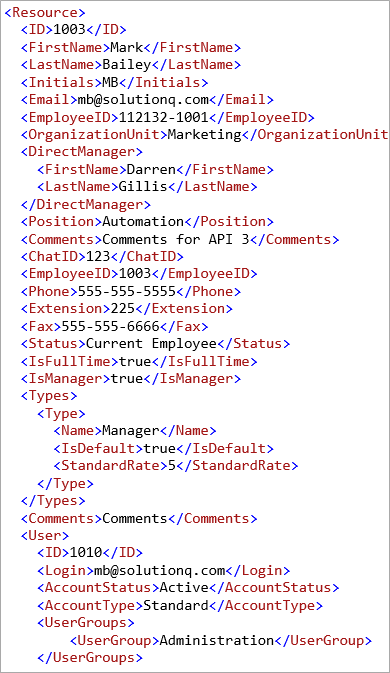
Prior to the 2020R3 release, API requests and responses would always be formatted in XML (Extensible Markup Language).
Beginning with the 2020R3 release, a new set of JSON-based endpoints were made available.
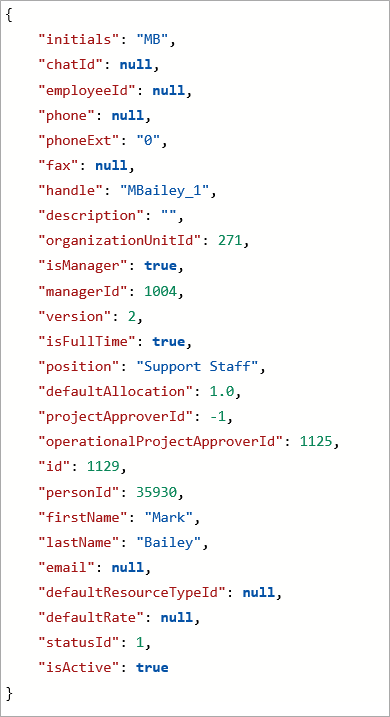
Both the legacy XML-based endpoints and the new JSON-based endpoints have been functional since then. With this release, however, the XML-based endpoints will no longer be supported. All integrations will need to be built with these new endpoints.
Tip: There is an easy way to differentiate between the old and new API endpoints. The old endpoints contain "services" in the URL:
None of the new endpoints contain the word "services":
Tip: Eclipse PPM uses Swagger for API documentation. To access Swagger, type in "help/index.html" at the end of the Eclipse PPM URL.
See Using Swagger and Calling APIs for more information.
Action Required:
Eclipse PPM users have been consistently notified over the past four years to update their API integrations from the XML-based endpoints to the new JSON-based endpoints. Any users who rely on the Eclipse PPM API but have not yet updated their integrations will not be able to make any calls. Please reach out to your Eclipse PPM representative to help you reshape your integrations to work with the new JSON endpoints.
Benefit:
XML used to be the only choice for any kind of data interchange on the web. However, recent developments in open data sharing have introduced more options for developers, each with their own set of benefits. This is why Eclipse PPM has moved to JSON (JavaScript Object Notation) format instead of XML for the API.
A JSON-based API comes with many advantages, included:
-
Speed: Software programs can take a long time to process XML. Overall, JSON uses less data than XML (as we can see with the number of characters in the above examples), which means it can be processed and returned back in less time.
-
Readability: JSON data is organized in a clear, straightforward arrangement; each line represents a single point of data. XML, on the other hand, is much more busy and unclear. For instance, imagine stripping the color away from the text in each of the above examples; the JSON data would still be easy to understand while the XML data would be almost unreadable.
-
Efficiency: The busy structure and opening/closing tags of XML take up valuable space and processing time in an API request and response. The lightweight structure of JSON allows it to be processed quickly and easily.
See What's New with the API for more information on this transition.
What's Different:
New response fields have been added to the Financial Extract Report GET API endpoints.
Note: The Financial Extract Report endpoints can be found under "Reports" on Swagger.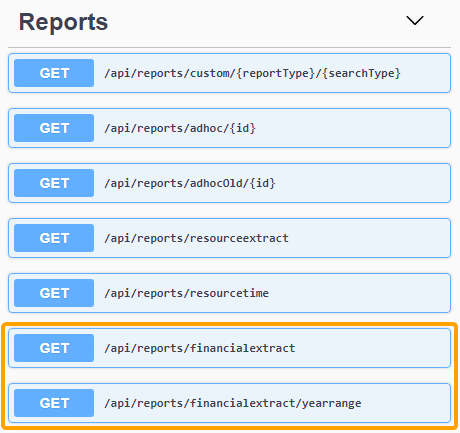
Note: These fields have also been added to the Project Financial Extract Eclipse PPM Report itself. See below for more information.
Project Properties
Project Property values will now be displayed in the Financial Extract Report API response.

The Project Properties will be identified by their ID numbers. For instance, "ProjectProperty6259" in the example above refers to the Project Property with an ID number of 6259, which is the "Approval Date" Property.
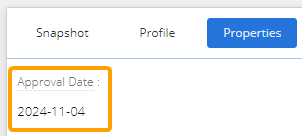
Tip: Use the "Get Properties" GET endpoint to identify Project Properties by their ID numbers.
The response will include data about each Project Property in your Eclipse PPM environment, including the name.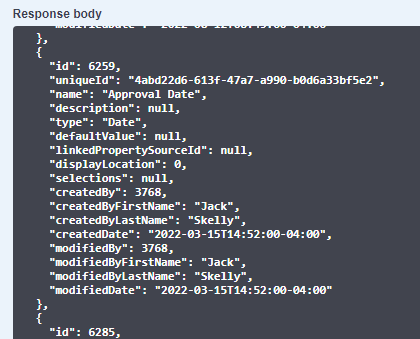
Group
A new "Group" field will now be displayed in the Financial Extract Report API response. This field indicates what type of value the Financial Extract report line item is displaying: "Budget", "Expenditure", "Benefits", or "Funding".

Benefit:
Prior to this release, the Financial Extract Report endpoint response included data on each Project it returned ("ProjectNumber", "IsOperational", "ProjectStatus", etc.). However, there was no way to capture any of the Project's Property values. These fields are crucial for many users because they can contain important information that is unique to their organizational needs. With this update, these fields can be included when the Financial Extract report is run through the API.
Additionally, there was no single response field that indicated the type of value that the Financial Extract report line item was displaying. With this update, report readers can be certain that they are looking at "Budget", "Expenditure", "Benefits", or "Funding" values while viewing the report through the API.
What's Different:
A new "defaultAllocation" field can now be included in the response body after hitting the Resource Advanced Search REST API endpoint.

Note: This endpoint returns data on Eclipse PPM Resources based on the values entered into the request parameters. For more information on using Advanced Search endpoints, see the Advanced Search API Reference Sheet.
This field will display the Default Allocation of each Resource included in the response.
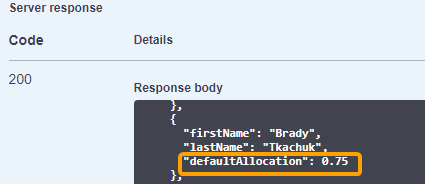
Note: The "Default Allocation" value is represented as a decimal of the Resource's Default Allocation percentage. For example, a value of "0.75" reflects a Default Allocation percentage of 75%. A value of "1" reflects a Default Allocation of 100%.
Users can add this field to the response while determining the Selected Fields. Entering "defaultAllocation" into the "Selected Fields" parameter will cause it to appear in the response.

Note: If this field is left empty, all of the available fields will appear in the response.
Benefit:
Default Allocation represents the standard or expected percentage of time a Resource should be allocated to specific Tasks or Projects. Including it in the Resource Advanced Search response body helps Project Mangers understand the baseline workload for each Resource. This gives them an idea of how available each Resource is before adding them to Projects.
Documents
What's Different:
Eclipse PPM users can now upload multiple external documents to a Project simultaneously.
Note: Eclipse PPM users require the "External Documents - Modify" permission on a Project's Policy in order to add external documents.
Users can still upload external documents to Projects by navigating to a Project's Documents page and selecting the Upload Document button.

Prior to this release, selecting this button would open up a "New File" window containing a Choose File button.


Selecting Choose File allowed users to select a document from their device's file explorer. After a file was selected, no more files could be added before pressing the Save button.
With this update, the Choose File button has been replaced by a drag-and-drop box.

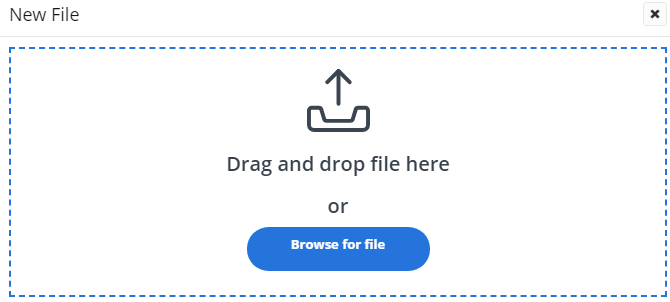
Users can add files by dragging them into the box and dropping them.
Alternatively, they can use their device's file explorer to navigate to a document by selecting the Browse for file button.
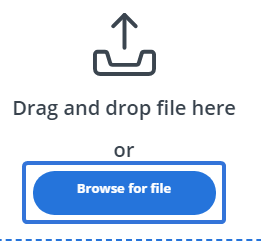
Note: This button functions the same as the Choose File button did prior to this release.
Regardless of how the file is uploaded, it will be listed directly under the box.
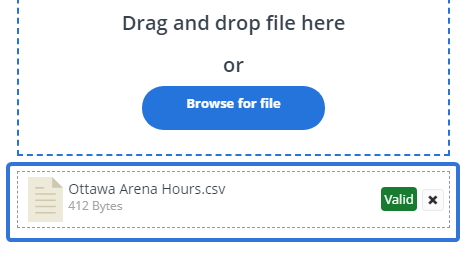
Note: The file will display a green "Valid" label if it is acceptable to be uploaded into Eclipse PPM.
Users can upload multiple files before selecting the Save button to add them all to the Project at once.

Benefit:
Prior to this release, users could only upload one document to their Eclipse PPM Projects at a time. They would have to select the Upload Document button, select the Choose File button, navigate to a file, and select the Save button in order to upload a single file. The process was extremely tedious and time-consuming for users who wanted to upload a large number of documents to the Project at once; they would have to continuously open the "New File" window over and over again to upload all of their files.
With this update, the "New File" window can be used to upload multiple documents before saving. In particular, users can highlight multiple files and drag them into the box to upload all of them simultaneously.
General
What's Different:
Upland Analytics can now be set as the start page for Eclipse PPM users. This means that when users open the application, the Upland Analytics page can be their immediate landing page.
Note: Users require the "Upland Analytics - View" permission from an Application Policy to access the Upland Analytics page. If this new option is set as a user's start page and the user does not have the permission, an error will occur upon logging in.
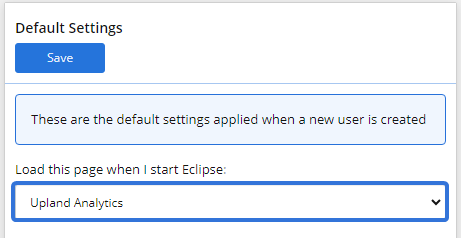
When users visit the General Settings page and open the "Load this page when I start Eclipse" drop-down menu, "Upland Analytics" will now be one of the selections.
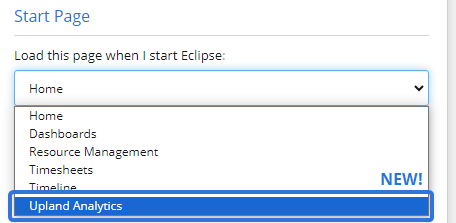
Users who select this option will automatically see the Upland Analytics landing page when they log into Eclipse PPM.
Additionally, administrators can set this as the default start page for other users while applying User Preferences. They can use the "Apply User Preferences" fields to select specific users and User Groups that will receive the Upland Analytics page as their start page.
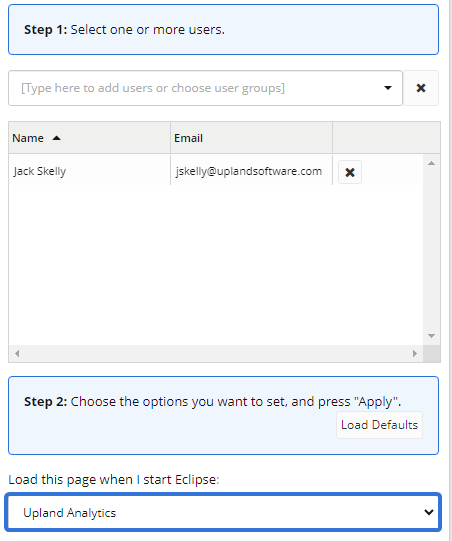
Administrators can also use the "Default Settings" box to configure the Upland Analytics page as the default start page for new users.
Benefit:
Generally, the start page options are pages that users are most likely to visit when they log into the application. The Upland Analytics page is now one of these pages because of its growing popularity in Eclipse PPM. In fact, many users only log into Eclipse PPM to view the dynamic reports and dashboards in Upland Analytics. These users, as well as others who spend most of their Eclipse PPM time on the Upland Analytics page, will no longer need to waste time navigating to it in order to see their data.
Organization
What's Different:
Administrators can now use up to 256 characters to name their Organization Units. Prior to this release, Organizational Unit names had a character limit of 64. With this update, much longer names can be accommodated.
Benefit:
Although long Organization Unit names may be uncommon, but they are not unheard of. Many organizations that use Eclipse PPM utilize long department names that should be reflected in their Organization Units. Also, administrators now have the option of adding descriptions and other additional information about Organization Units directly in the name.
Reporting
What's Different:
User can now add a new "Baseline Effort" column to the Resource Time Eclipse PPM report.
Note: Users will need the "Resource Reports" permission from an Application Policy to run the Resource Time report. Also, users will require the "Profile Details - View" permission on at least one of the included Project's Policies in order to view the Project's data in the report.
While adding columns to the report with the "Columns" field, users will notice a new "Baseline Effort" column when they scroll to the bottom of the list.

The column will display the Resource's "Allocation (%)" for the Task when the current Baseline was taken.

Note: "Allocation (%)" is the percentage of the Resource's total time that has been allocated toward the Task for the indicated time period. In the line item above, the "Press Release" Task took up 38.10% of Jack's total time in the month of November when the Baseline was taken (the "Baseline Effort"). Now, 47.62% of his total time in November is allocated toward the Task (the "Allocation (%)").
Benefit:
Including a Baseline Effort for each Resource in the Resource Time report offers several key benefits that were not available prior to this release. The "Baseline Effort" column can be used as a reference to easily compare the original planned effort with the new planned effort allocated to each Resource. When report readers identify discrepancies between the "Baseline Effort" and the "Allocation (%)", they can analyze possible root causes (scope changes, unexpected complexities, or productivity issues, etc.) and adjust their Work Plans accordingly.
What's Different:
Users can now include columns for Project Properties as well as a new "Group" column while running the Project Financial Extract Eclipse PPM Report. None of these new columns require any configuration; they will automatically appear on the report whenever it is run.
Note: Projects and their data will only be included in the report if the user running the report has the "Project Details - View" permission on at least one of the Project's Policies. Consider this before tasking an Eclipse PPM user with running this report.
Note: These fields have also been added to the Project Financial Extract Report GET API endpoint. See above for more information.
Project Properties
Project Property values will now be displayed in the Financial Extract report. When readers scroll horizontally to the right of the report, they will see a column for each Project Property in their Eclipse PPM environment.

If the Project contains a value for the Property, it will be displayed under the Property's column. If it does not, the cell will be empty.
Group
A new "Group" column will now be displayed in the Financial Extract report. This column indicates what type of value the line item is displaying: "Budget", "Expenditure", "Benefits", or "Funding".

Benefit:
Prior to this release, the Financial Extract report included data on each Project it returned ("Project Priority", "Project Status", "Project Type", etc.). However, the report did not expose any of the Project's Property values. These fields are crucial for many users because they can contain important information that is unique to their organizational needs. With this update, these fields can be included when the Financial Extract report is run.
Additionally, there was no single field that indicated the type of value that the Financial Extract report line item was displaying. With this update, report readers can be certain that they are looking at "Budget", "Expenditure", "Benefits", or "Funding" values while viewing the report.
What's Different:
A new "`@StatusUpdateLastModifiedBy" Single Item Marker can be inserted into Project and Program Report Templates. When a Custom Report is run using a template with this marker, the marker will be replaced by the name of the user who most recently updated the Project/Program's Status or Status Update.
Note: Changing the status of a Project or Program's Health Indicator(s) will not affect this field.
Note: Users require the "Portfolio / Approval View" permission on a Project's Policy to include it in a Project Custom Report. They require the "Profile Details" permission on a Program's Policy to include it in a Program Custom Report.
Example: Harrison is creating a new Project Report Template in Microsoft Excel. He decides to create a "Status Update" section that will contain information about each included Project's Status Update.
Prior to this release, his Report Template could only include markers for the Status Update's content and the date the Status Update (or Status) was last edited.
With this upgrade, he can now include the "`@StatusUpdateLastModifiedBy" Single Item Marker as well.
When he creates a new Custom Project Report using the template and runs the report, the marker will be replaced by the name of the user who most recently modified the Status Update of the included Project.
Benefit:
Reporting on who most recently updated a Project or Program's Status can improve both accountability and collaboration. Knowing who updated the Status allows team members and stakeholders to direct questions or follow-ups to the appropriate person, saving time and reducing miscommunication. Additionally, knowing the most recent updater helps team members coordinate efforts. For instance, if a Project receives a "Delayed" Status, the responsible person can be approached for further context or support.
What's Different:
A new "Default Allocation" column is now available for Resource AdHoc reports. This column will display the Default Allocation of each Resource listed in the table.
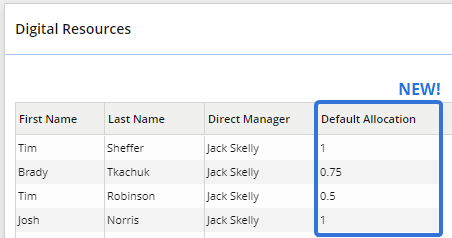
Note: The "Default Allocation" value is represented as a decimal of the Resource's Default Allocation percentage. For example, a value of "0.75" reflects a Default Allocation percentage of 75%. A value of "1" reflects a Default Allocation of 100%.
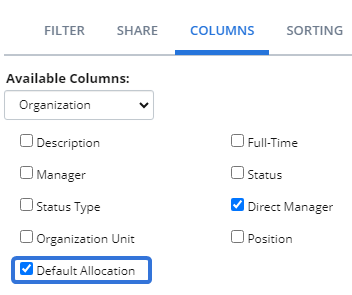
Users can add this column to the page while adding or editing an AdHoc report for Resources. Selecting the "Columns" tab as well as "Organization" from the "Available Columns" menu will reveal the new "Default Allocation" column option.
Note: AdHoc reports cannot be sorted or filtered by report viewers. These rules need to be applied while creating or editing the report. See Create and Manage AdHoc Reports for more information.
Benefit:
Default Allocation represents the standard or expected percentage of time a Resource should be allocated to specific Tasks or Projects. Including it as a column on Resources AdHoc reports helps Project Mangers understand the baseline workload for each Resource. This gives them an idea of how available each Resource is before adding them to Projects.
Resources
What's Different:
A new "Default Allocation" column is now available on the Resource Advanced Search page. This column will display the Default Allocation of each Resource listed in the table.
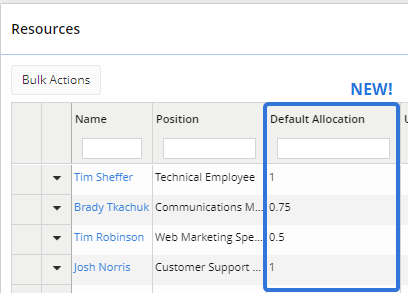
Note: The "Default Allocation" value is represented as a decimal of the Resource's Default Allocation percentage. For example, a value of "0.75" reflects a Default Allocation percentage of 75%. A value of "1" reflects a Default Allocation of 100%.
Users can add this column to the page while configuring the table.
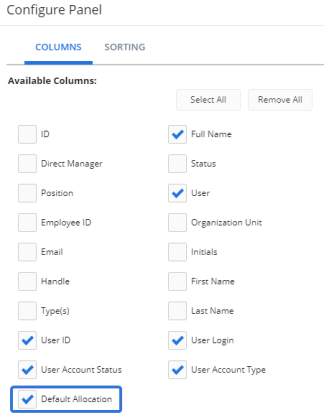
Like other columns, users can select the "Default Allocation" column header to sort the Resources in numeric or reverse numeric order based on their Default Allocations. Additionally, the textbox in the column header can be used to filter the Resources by their Default Allocations.
Benefit:
Default Allocation represents the standard or expected percentage of time a Resource should be allocated to specific Tasks or Projects. Including it as a column on the Resources Advanced Search page helps Project Mangers understand the baseline workload for each Resource. This gives them an idea of how available each Resource is before adding them to Projects.
Tasks
What's Different:
Users can now update Task durations while taking Bulk Actions from the Advanced Search page.
Note: Users require the "Project Schedule - Modify" permission on a Project's Policy to update the duration of the Project's Tasks.
Prior to this release, users could only update the percent complete, Task Category, or Task Property values of their selected Tasks while taking Bulk Actions. With this update, a new "Task Duration" selection has been added to the "Update Field" drop-down menu.
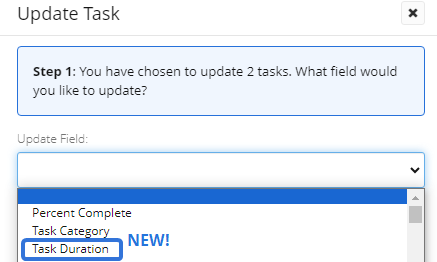
When this is selected, the user can enter the new duration (in days) of each selected Task into the "New Value" field.
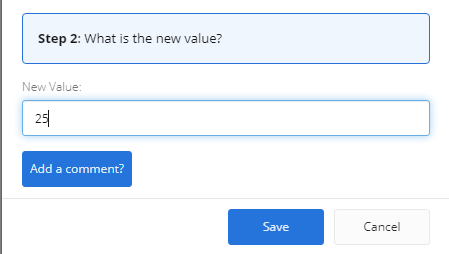
After selecting the Save button, each selected Task will receive the new duration.
Note: This does NOT add the number of days entered into the "New Value" field to the existing durations. The number of days entered into the field will replace the current duration of each selected Task.
Note: Changes in duration will affect a Task's Planned Start and End Dates based on the Task's "Constraint".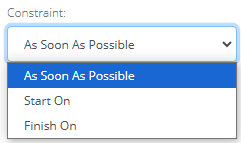
If As Soon As Possible or Start On are selected, the Task's Planned End Date will be changed to accommodate the new Planned Duration. For example, imagine a Task with a Planned Start Date of December 4th and a Planned End Date of December 6th. The Planned Duration is currently 3 days. When the Planned Duration is changed to 4 days, the Planned Start Date stays the same and the Planned End Date gets pushed back to December 7th to accommodate it.
If Finish On is selected, the Task's Planned Start Date will be changed to accommodate the new Planned Duration. For example, imagine a Task with a Planned Start Date of December 4th and a Planned End Date of December 6th. The Planned Duration is currently 3 days. When the Planned Duration is changed to 4 days, the Planned End Date stays the same and the Planned Start Date gets pushed forward to December 3rd to accommodate it.
Benefit:
Updating Task durations in bulk provides significant benefits for project management efficiency, accuracy, and adaptability. Bulk updates eliminate repetitive manual work, allowing Project Managers to adjust the durations of multiple Tasks in a fraction of the time it would take to update them individually. They can quickly adapt to any changes in Project scope, deadlines, or Resource availability. Additionally, bulk updates ensure that Task durations are adjusted consistently, reducing the risk of errors or inconsistencies that can arise from manual, Task-by-Task updates.
Upland Analytics
What's Different:
The "Resource - Project Owner" Data View had been added to the "Project Objective List" Data Source.

The fields from this view can be added to reports created with the Data Source.
Benefit:
While running reports on Project Objectives prior to this release, there was no way to include any information about the Project Owner. With this update, Owner-related fields can now be included in order to create more dynamic Project Objective reports.
Work Planner
What's Different:
A new "Resources[h]" column is available for Project Work Plans.
Note: Users require the "Project Schedule - View" permission on a Project's Policy to view the Project's Work Plan.

Note: This column has been added to the "[Default View]".
The column will display the initials of each Resource assigned to the Task. Next to each set of initials is the total number of hours allocated to the Resource for the Task.
Additionally with this release, the "Resources" column has been renamed to "Resources[%]".
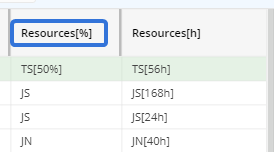
It will behave the same as it did prior to this release; the percentage of each Resource's time allocated to the Task will be displayed in brackets. If the allocation is 100%, no percentage will be displayed.
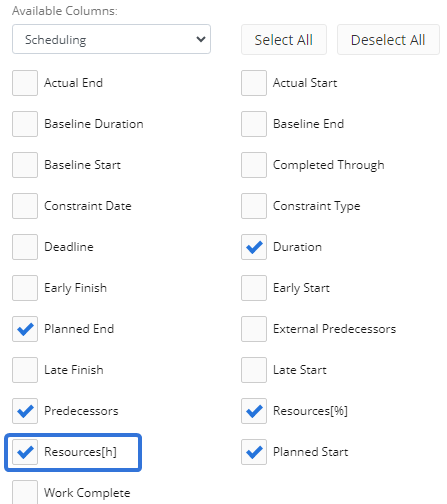
Users can select the new "Resources[h]" column while creating or editing Work Plan Views.

The column can be selected for the View while adding "Scheduling" columns.
Benefit:
Viewing Resource allocations in hours instead of percentage of total time can offer a more practical way of effectively managing the Work Plan. Hours provide a concrete measure of the time allocated to specific Tasks, which is often easier to understand and act upon than percentages. For example, knowing that a Resource is allocated 20 hours to a Task is more actionable than knowing they are allocated 50%, as percentages don’t clarify the total available time. Additionally, hours offer a clear, universal metric for dividing time when multiple teams or Project Managers share a Resource. Percentages might create confusion, especially if different Project Managers interpret them differently.
Both hours and percentages offer benefits while managing the Work Plan. With this upgrade, Project Managers can now customize their Work Plans with either (or both) of these options.
What's Different:
An "Organization Unit" column has been added to the Resource Sheet on the Project Work Plan. The column will display the Organization Unit that each Work Plan Resource belongs to.
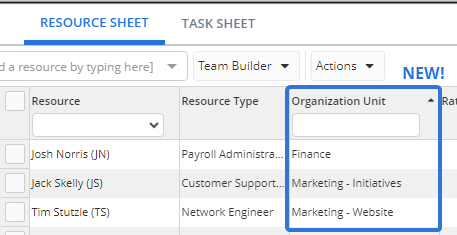
Note: The column displays the Organization Unit from the Resource's Profile, not the Organization Unit of the selected Resource Type on the Work Plan.
Users can sort the Resources by their Organization Units in alphabetical or reverse alphabetical order by selecting the column header.
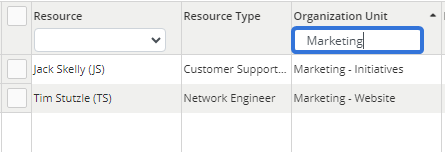
Additionally, users can filter Resources by their Organization Units by typing the Organization Unit (or part of it) into the textbox.
Benefit:
Organization Units are used to organize and manage Resources based on their Roles, departments, locations, or other organizational structures. They provide a framework for aligning Resources with the organization’s operational and strategic goals. Including an "Organization Unit" column on the Resource Sheet enables Project Managers to allocate Resources to Work Plan Tasks based on their organizational designation, ensuring the right team members are assigned to the right work in Eclipse PPM.
What's Different:
Users can now place a filter on a Project's Activity Feed that only lists Work Plan-related activities.
Note: Users require the "Project Details - View" on a Project's Policy to view the Activity Feed. Also, they require the "Project Schedule - View" permission on a Project's Policy to view Work Plan-related activities.
When users select the filter button on the Activity Feed page, they will notice a new "Project Workplan Only" option.
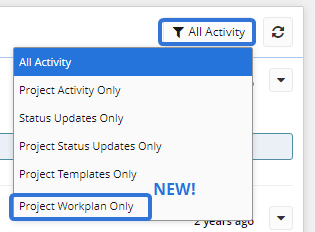
When this is selected, only activities that are related to the Project's Work Plan will be displayed.
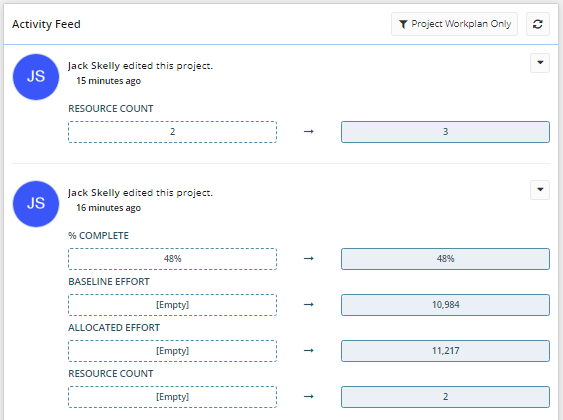
Additionally, the Activity Feed will now capture more Work Plan-related than before. Prior to this release, only changes to the Project's percent complete were recorded on the page. With this update, the following Work Plan changes will be displayed:
-
% Complete: Changes to the Project's overall percent complete.
-
Resource Count: Changes to the number of Resources on the Work Plan.
-
Allocated Effort: Changes to the Work Plan's total allocated effort.
-
Baseline Effort: Changes to the current Baseline's total effort.
Benefit:
A Project's Activity Feed allows users to see who made certain changes to the Project. It is useful for tracking decisions, reviewing past actions, and providing accountability for tasks completed or changes made. Additionally, it provides centralized updates and makes it easy for team members to stay informed about the Project's progress and recent developments. Many Eclipse PPM users are primarily interested in Work Plans, so this new filter option allows them to focus on these updates.


