2023R2 Release Notes
The 2023R2 version of Eclipse PPM will be deployed to the production site on Saturday, December 9th, 2023. When this occurs, the features on this page will become available.
The following areas of Eclipse PPM have been updated as part of this release:
API
The following enhancement has been made to the Eclipse PPM API. Select the upgrade below to learn more:
What's Different:
The REST API has been updated to return more information for Eclipse PPM Project Schedules. In particular, more values will be returned when running the Project Schedule GET endpoints: /api/schedules/projectschedules/{projectId} or /api/projects/{id}/schedules/current.
Prior to this release, limited data points were returned in the response body when either of these endpoints were run:

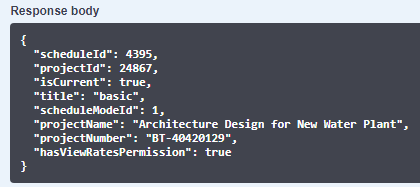
With this update, the response body has been upgraded to return many more data points after running either of the Project Schedule endpoints:

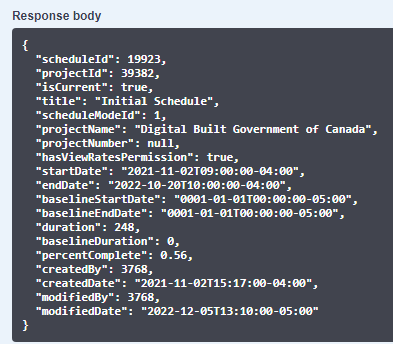
The following values have been added to the response body:
-
Start Date: The start date and time of the Project Schedule.
-
End Date: The end date and time of the Project Schedule.
-
Baseline Start Date: The start date of the Project Schedule's current Baseline.
-
Baseline End Date: The end date of the Project Schedule's current Baseline.
-
Duration: The total duration of the Project Schedule in days.
-
Baseline Duration: The total duration of the Project Schedule's current Baseline in days.
-
Percent Complete: The current percent complete of the Project Schedule, displayed as a decimal number ("0.56" means 56%).
-
Created By: The user ID of the user who created the Project Schedule.
-
Created Date: The date and time the Project Schedule was created.
-
Modified By: The user ID of the user who most recently modified the Project Schedule.
-
Modified Date: The date and time the Project Schedule was most recently modified.
Benefit:
The Eclipse PPM 2020R3 release introduced a new set of JSON-based API endpoints to replace the legacy XML endpoints. Although JSON comes with many advantages over XML (faster processing times, better readability, etc.), the XML-based Project Schedule endpoints returned more data points than the original JSON endpoints:
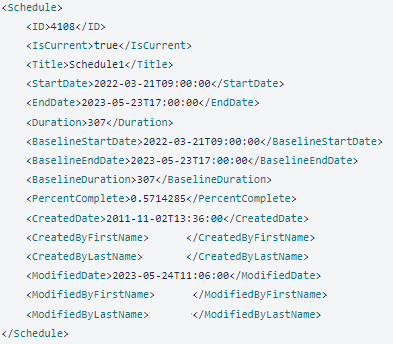
These same Project Schedule data points can once again be retrieved through REST API, but this time with the advanced efficiency and readability of JSON.
What's Different:
A new GET endpoint is now available for "Assignments" Advanced Searches via the Eclipse PPMREST API. Users can access and test the new endpoint via the Swagger API documentation.

Note: The "Assignments" Advanced Search page is new to this release. For more information, see New Advanced Search page for "Assignments" below.
Note: An "Assignment" occurs whenever a Resource (either Named or Generic) is assigned to a Task in Eclipse PPM.
The endpoint can be used to search for a set of Eclipse PPM Assignments based on an Assignments filter ID number. Also, they can use the selected fields and expanded fields to return a custom set of information for each retrieved Assignment.
Example: Users can test the endpoint by entering a filter ID into the "id" field in Swagger: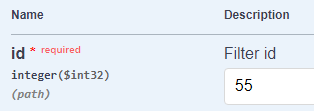
Also, they can enter "Selected fields" ($select) and "Expanded fields" ($expand) values to customize the information that is returned for each Assignment: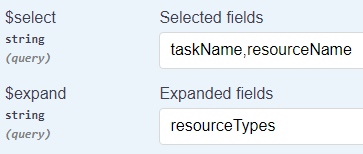
These will automatically be placed into the request URL when using Swagger:
If the API call is successful, the response will return the requested information for each assignment that meets the filter criteria: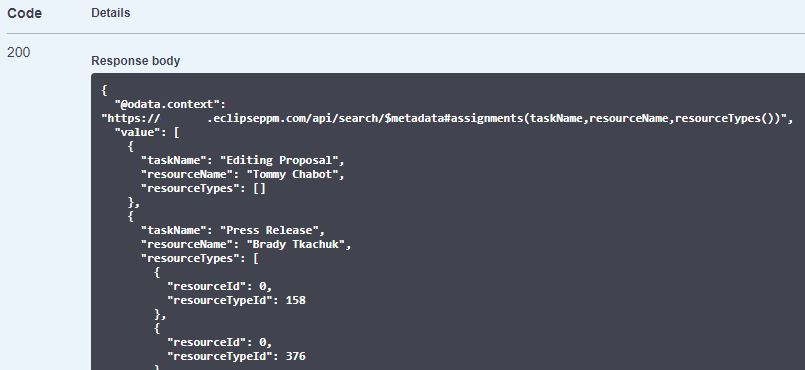
Tip: For a complete guide on calling Advanced Search API endpoints, including the acceptable field values for the "Assignments" endpoint, see the Advanced Search API Reference Sheet.
Benefit:
Project Work Plans are one of the most crucial components of Eclipse PPM. They allow Project Managers to organize all the work that needs to be done for a Project and then assign Resources to that work. Prior to this release, there was no way to retrieve information on individual assignments using the Eclipse PPM API. With this update, each assignment can be filtered through and reviewed using the API, allowing users to access the information through their Eclipse PPM integrations.
What's Different:
Additional selected fields are now available for the "Project" and "Risk" Advanced Search GET endpoints in the Eclipse PPM REST API.
The selected fields can be used to return a custom set of information about the entities (Projects or Risks in this case) that match the filter criteria. Eclipse PPM users can test these endpoints using the Swagger API documentation.
Example: Users can enter "Selected fields" ($select) values into Swagger to customize the information that is returned for each Project or Risk:
This will automatically enter the selected fields into the request URL:
If the API call is successful, the response will return the requested information for each entity that meets the filter criteria: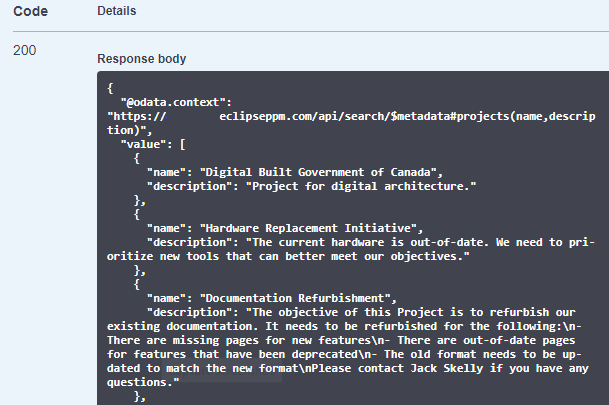
The following selected fields are now available:
-
Project
-
baselineDuration: The total duration of the Project's current Baseline in days.
-
createdBy: The User ID of the user who created the Project.
-
description: The Project's Description.
-
isOperational: Indicates whether the Project has been marked as "Operations".
-
modifiedBy: The User ID of the user who most recently modified the Project.
-
projectExpectedPercentComplete: The expected Percent Complete of the Project as of the current date (this will appear as a decimal number. For example, if the Project should be 25% complete at the current date, it will appear as "0.25").
-
-
Risk
-
categoryType: The Category Type of the Risk.
-
createdDate: The date the Risk was created.
-
Tip: For a complete guide on calling Advanced Search API endpoints, including the acceptable field values for the "Assignments" endpoint, see the Advanced Search API Reference Sheet.
Benefit:
Advanced Searches allow Eclipse PPM users to search for a specific set of entities (indicated by a chosen filter) as well as a custom set of data for each of those returned entities. The REST API allows users to conduct these searches through Eclipse PPM integrations. With additional selected fields, API users can access more information about their search results while working outside of Eclipse PPM.
Bulk Update
The Bulk Update - Projects enhancement is new to this version ofEclipse PPM. Select the upgrade below to learn more about it:
What's Different:
Administrators now have the ability to update Projects in bulk by uploading a comma-separated values (CSV) file into Eclipse PPM.
Note: Users will need the "Bulk Update - Projects" permission from an Application Policy in order to use this feature.
Administrators can now select Bulk Update - Projects under the "Other" menu on the Administration page:
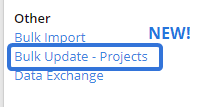
From here, they can upload their CSV file into Eclipse PPM by selecting the Choose file button and using their computer's file manager to navigate to the file:
Note: Users can only use Bulk Update to edit information that they have permission to edit. If that attempt to change information that they are not permitted to edit, the Project will fail to update.
Updating Projects in bulk consists of three components:
Creating an update file
Users must prepare a CSV file that contains all of the Project information that they wish to update.
Tip: A CSV (comma-separated values) file is any text file that allows data to be saved in a table-structured format. The most common way to create a Bulk Update file is by using Microsoft Excel. However, the file must be saved as a ".csv" file before it can be uploaded into Eclipse PPM.
The rows of the CSV update file will contain the listed Projects that will be editing in bulk. Each column will represent Project information that can be edited once the file is uploaded:

The CSV file must contain the "ProjectID" column and each listed Project must have a Project ID number entered. Project IDs cannot be edited through the Bulk Update; they are used to identify the Projects that are being updated. The rest of the columns are optional and do not need to be included in the update file.
The update file may consist of the following columns. Make sure that each column header is spelled EXACTLY as it appears below.
Tip: Click here to download a sample Excel file that contains each column header.
-
ProjectID (required): The ID number of the Project you would like to edit. If it cannot be matched to an existing Project, an error will occur. This value cannot be updated through a Bulk Update; it is only used to identify the Project that will be updated.

Note: When "Validate 'ID' against 'Name'" is turned ON, an error will occur if a Project's "ProjectID" value does not match its "ProjectName" value. See the Processing Options below for more information.
-
ProjectName: The name of the Project.

Note: When "Validate 'ID' against 'Name'" is turned ON, an error will occur if a Project's "ProjectID" value does not match its "ProjectName" value. This means that a "ProjectName" value will be required if the option is turned ON. It also means that users cannot update Project names when it is turned ON because the "ProjectName" value will need to correspond to the "ProjectID" value. See the Processing Options below for more information.
Note: Administrators can enforce Projects to have unique names while configuring Project settings. If this has been enforced, a listed Project will fail to update if another Project already uses the entered name.
-
ProjectNumber: The Project number. The maximum length of a Project Number is 64 characters.

Note: The upload will fail if the number already belongs to another Project. Project numbers must be unique.
-
ProjectDescription: A description of the Project. The maximum length of a Project description is 2048 characters.

-
ProjectIsOperations: Indicates whether or not the Project is considered "Operations". One of two values can be entered into this field:

-
True: The Project is "Operations".
-
False: The Project is not "Operations".
Note: Microsoft Excel will often automatically convert "True" or "False" values to all caps. This is OK; the value is not case sensitive.
-
-
ProjectType: The Project Type. The value entered must match an existing Project Type.

Note: Administrators have the ability to add and manage Project Types in Eclipse PPM.
-
ProjectPriority: The current Priority of the Project. The value entered must exactly match an existing Project Priority.

Note: Administrators have the ability to add and manage Project Priorities in Eclipse PPM.
-
ProjectBusinessPriority: The Project's Business Priority Number. Business Priority Numbers must be between 1-999.

-
ProjectCategory: The Project's Category. The value entered must exactly match an existing Project Category.

Note: Administrators have the ability to add and manage Project Categories in Eclipse PPM.
-
ProjectPortfolioProgram: The name of the Program or Portfolio that the Project belongs to. The value entered must exactly match an existing Program or Portfolio.

Note: It is possible for Programs and Portfolios to have duplicate names in Eclipse PPM. In the case of a Program and a Portfolio sharing the same name, the Project will always be added to the Program. If multiple Programs or Portfolios share the same name, the Project will be added to the most recent one.
In any of these cases, a warning message will appear after the upload indicating that the name is a duplicate as well as the ID number of the Program or Portfolio that the Project was added to:
-
ProjectOrganizationOwner: The Project's Organization Unit. The value entered must exactly match an existing Organization Unit without the abbreviation.

Note: Administrators have the ability to add and manage Organization Units in Eclipse PPM.
Note: It is possible for Organization Units to have duplicate names in Eclipse PPM. In the case of multiple Organization Units sharing the same name, the newer Organization Unit will always be chosen. A warning message will appear after the upload indicating that the name is a duplicate:

-
ProjectOwner: The Owner of the Project. The name must be formatted "LastName, FirstName" with a space after the comma and it must exactly match an existing Resource name in Eclipse PPM:

Note: It is possible for Resources to have duplicate names in Eclipse PPM. In the case of multiple Resources sharing the same name, the newer Resource will always be chosen. A warning message will appear after the upload indicating that the name is a duplicate:

-
ProjectHealthIndicator(<IndicatorName>): The current status of a Health Indicator on the Project. "<IndicatorName>" must be replaced by the exact name of a Health Indicator in the column header. Also, the values in the column must be one of the four Health Indicator statuses: "Green", "Yellow", "Red", or "Not Set":

Note: Update files can contain multiple "ProjectHealthIndicator" columns to update multiple Health Indicators on the Project.
Note: If the "Add missing Health Indicators to project?" option below is selected, the Health Indicators on the CSV file will automatically be added to any Projects that do not currently have them. See the Processing Options below for more information.
-
ProjectProperty(<PropertyName>): The value of a Project Property on the Project. "<PropertyName>" must be replaced by the exact name of a Project Property in the column header. Depending on the Property Type, the expected value will vary.
Note: Update files can contain multiple "ProjectProperty" columns to update multiple Properties on the Project.
-
Date: The date must be formatted "MM/DD/YYYY".

-
Flag: Either "True" or "False" can be entered as a value. "True" = Yes and "False" = No.

Note: Microsoft Excel will often automatically convert "True" or "False" values to all caps. This is OK; the value is not case sensitive.
-
Multiple Select: The names of the values must exactly match the names of available values for the Property. Also, multiple values must be separated by a vertical line symbol (|).

Note: The Multiple Select values will either merge with the existing values on the Project or totally replace them based on the selection from "Multiple Select Project Property Values". See the Processing Options below for more information.
-
Single Select: The name of the value must exactly match the name of an available value for the Property.

-
Number: The value must be numeric.

-
Text: The value must be a string of text less than 4000 characters.

-
-
ProjectResource(<ProjectRoleName>): The name of the Resource(s) that will be added to the Project under the indicated Role. "<ProjectRoleName>" must be replaced by the exact name of an existing Role in the column header. Also, the values in the column must be Resource names formatted "LastName, FirstName" with a space after the comma and they must exactly match an existing Resource name in Eclipse PPM. If more than one Resource will be added to the Project in the Role, each name must be separated by a vertical line symbol (|).

Note: Update files can contain multiple "ProjectResource" columns to update multiple Resources and Roles on the Project.
Note: The Project Resources will either merge with the existing Resources on the Project or totally replace them based on the selection from "Project Resources". See the Processing Options below for more information.
-
ProjectStatus: The current Status of the Project. The values in the column must exactly match existing Project Statuses in Eclipse PPM.

Note: Depending on the selection from "Pending Project Status Workflows", Projects with pending workflows will either skip this field or have their workflows canceled so the Status can be changed to the value. See the Processing Options below for more information.
-
ProjectStatusUpdate: The current Status Update of the Project.

Note: Depending on the selection from "Project Status Update", the values in this column might totally replace the existing Project Status Updates, prepend the text to the existing Status Update, or append the text to the existing Status Update. See the Processing Options below for more information.
Once you have finished preparing your update file, save it to your computer as a ".csv" file:

Once it is saved, select the Choose File button to open up your computer's file manager and navigate to the file:
The name of the selected file will replace the "No file chosen" text, indicating that the update file is ready for upload:

Before uploading the file into Eclipse PPM, be sure to review all of the Processing Options.
Processing Options
Users can configure the following options to determine how the Project data will behave once imported into Eclipse PPM:
-
Update blank/empty fields: When this checkbox is selected, blank values in the update file will erase any values on the Project. When it is not selected, empty values will be ignored and the corresponding values on the Project will not be changed.

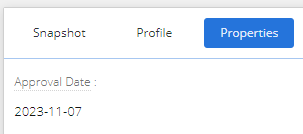
Example: The "Reservoir Library" Project currently has a value set for the "Approval Date" Property:
In the update file, the "Reservoir Library" line does not have a value listed for "ProjectProperty(Approval Date)":
If the "Update blank/empty fields" checkbox is selected, the Project's "Approval Date" will be wiped clean. If the checkbox is not selected, the "Approval Date" will not be affected.Tip: If you decide to select this checkbox, make sure that all current values have been entered into the update file if you do not want them to change. In the example above, you would have to insert the current "Approval Date" in the "ProjectProperty(Approval Date)" cell to prevent it from being erased.
-
Validate 'ID' against 'Name': When this checkbox is selected, Eclipse PPM will check to see if the "ProjectID" values correspond to the "ProjectName" values.

If they do not match, the Project will fail to update:

Tip: If you would like to update Project names with your upload, make sure this checkbox is not selected. If it is selected, Project names that do not match the existing Project names will cause a failure.
Note: The validation is case sensitive. If capital letters in the "ProjectName" value do not match those in the existing name, the validation will fail and the Project will not be updated.
-
Add missing Health Indicators to project?: When this checkbox is selected, the Health Indicators that are included in the update file will be added to the Project if they do not already exist on the Project. If it is not selected, the Health Indicator will not be added to the Project even if there is a value entered on the update file.

-
Add missing Properties to project?: When this checkbox is selected, the Properties that are included in the update file will be added to the Project if they do not already exist on the Project. If it is not selected, the Property will not be added to the Project even if there is a value entered on the update file.

-
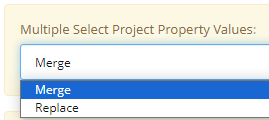
Multiple Select Project Property Values: Determine how the values on Multiple Select Property Types will be imported into Eclipse PPM.
-
Merge: The specified values on the update file will be merged with the existing values on the Project Property.
Example: The "Reservoir Library" Project currently has "Public" and "Government" selected for the "Stakeholders" Multiple Select Property:
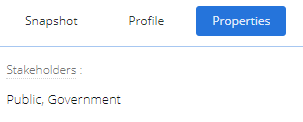
In the update file, the "Reservoir Library" line has different values set for the "Stakeholders" Property:
If "Merge" is selected, the values identified in the update file will be merged with the values that currently exist on the Project: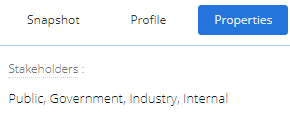
-
Replace: The existing values on the Project Property will be erased and replaced by the values specified on the update file.
Example: The "Reservoir Library" Project currently has "Public" and "Government" selected for the "Stakeholders" Multiple Select Property:

In the update file, the "Reservoir Library" line has different values set for the "Stakeholders" Property:
If "Replace" is selected, the existing values will be erased and replaced by the values identified in the update file: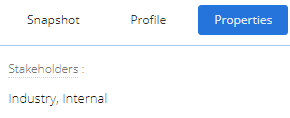
-
-
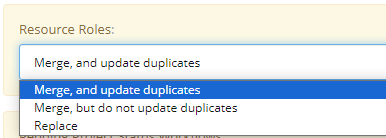
Resource Roles: Determine how Resources in the "ProjectResource(<ProjectRoleName>)" will be imported into Eclipse PPM with respect to the identified Roles.
-
Merge, and update duplicates: The Resources will be added to the Project in the specified Role. If any of the Resources were already attached to the Project in a different Role, their Role will be updated to the Role specified on the update file.
Example: Brady is already the "IT Lead" on the "Reservoir Library" Project:
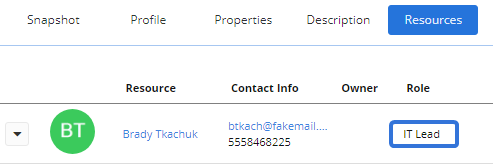
In the update file, he has been included under the "ProjectResource(QA Analyst)" column for the "Reservoir Library" line along with his coworker, Tim, who is not already on the Project:
If "Merge, and update duplicates" is selected, Tim will be added to the Project as a QA Analyst and Brady will have his Role switched to QA Analyst: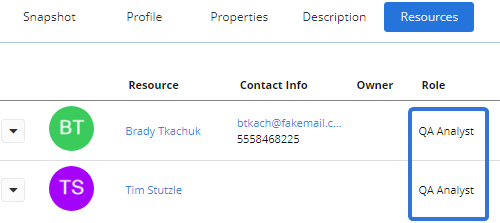
-
Merge, but do not update duplicates: The Resources will be added to the Project in the specified Role only if they do not already exist on the Project. If any of the Resources already exist on the Project in a different Role, their Role will not be updated to the new one.
Example: Brady is already the "IT Lead" on the "Reservoir Library" Project:

In the update file, he has been included under the "ProjectResource(QA Analyst)" column for the "Reservoir Library" line along with his coworker, Tim, who is not already on the Project:
If "Merge, but do not update duplicates" is selected, Tim will be added to the Project as a QA Analyst but Brady's Role will not be changed: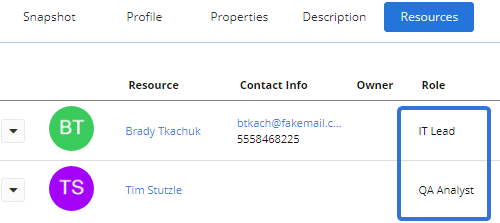
-
Replace: The Resources will be added to the Project in the specified Role. Any Resources that existed in the specified Role on the Project will be removed.
Example: Brady is the "IT Lead" on the "Reservoir Library" Project:

In the update file, both Tommy and Tim have been included under the "ProjectResource(IT Lead)" column for the "Reservoir Library" line:
If "Replace" is selected, both Tommy and Tim will become IT Leads for the Project and Brady will be removed as a Project Resource: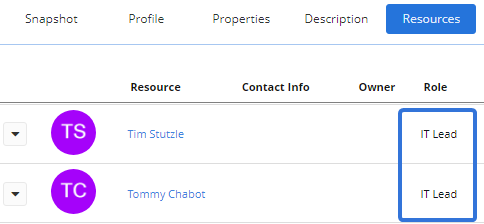
Tip: If "Replace" is selected, be sure to include the names of any existing Resources on Project Roles that you do not want to remove.
-
-
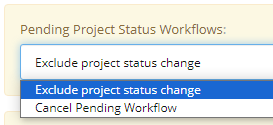
Pending Project Status Workflows: Determine how values in the "ProjectStatus" column will affect Projects with pending Workflows.
-
Exclude project status change: Projects with a "Change Project Status" Workflow configured for the new Status will not have their Status changed, regardless of what is entered under the "ProjectStatus" column on the update file. If this occurs, a "Failed" message will indicate that approval is required for Project Status changes:

Note: If an Advanced Workflow has been used to exclude the new Status from requiring approval, the Status will be successfully changed.
Example: Will wants to update the status of his "Reservoir Library" Project to "Executing":

Unfortunately for him, an Approval Template has been attached to the "Change Project Status" Workflow for the Project: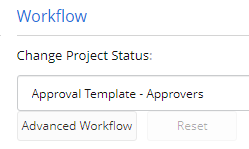
This means the Project's Status cannot be changed without approval, so it will not be changed as a result of the Bulk Import.
However, the Advanced Workflow button (pictured above) can be used to attach different Approval Templates to specific Statuses. Alternatively, certain Statuses can be configured NOT to have an Approval Template attached: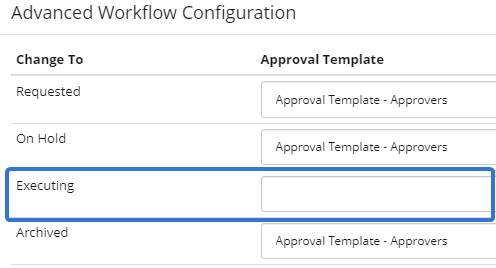
Statuses without Approval Templates attached to them can become new the new Project Status without approval. If the "Executing" Status does not have an Approval Template attached to it (pictured above), Will can successfully change the Project's Status to "Executing" when "Exclude project status change" is selected. -
Cancel Pending Workflow: Projects with a "Change Project Status" Workflow configured for the new Status will have their Status changed. The values under the "ProjectStatus" columns will change the Statuses of all listed Projects without approval.
Example: Will wants to update the status of his "Reservoir Library" Project to "Executing":

An Approval Template has been attached to the "Change Project Status" Workflow for the Project:
Also, a template has been specifically attached to the "Executing" Status through Advanced Workflow: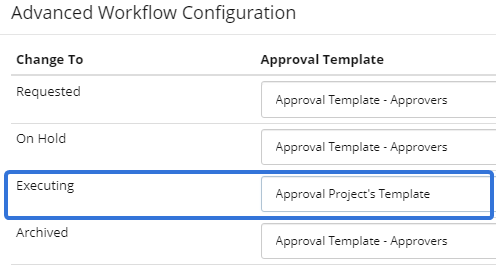
Despite this, the Bulk Update will override the Workflow and the Project's Status will be changed to "Executing".
-
-
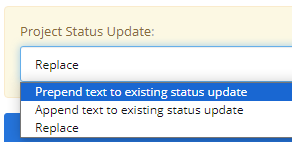
Project Status Update: Determine how values in the "ProjectStatusUpdate" will be imported into Eclipse PPM.
-
Prepend text to existing status update: The text entered for a Project under the "ProjectStatusUpdate" column will be added to the beginning of the existing Status Update.
-
Append text to existing status update: The text entered for a Project under the "ProjectStatusUpdate" column will be added to the end of the existing Status Update.
-
Replace: The text entered for a Project under the "ProjectStatusUpdate" column will totally replace the existing Status Update.
-
Uploading the File
Once all of the Processing Options have been reviewed, the file can be uploaded into Eclipse PPM. Select the Upload button at the bottom of the page to update your Projects:

After uploading, a window will appear to indicate how many Projects were successfully updated in total, how many failed to update, and how many were updated with warning messages:

Note: The "Success" result displays a total of all the Projects that successfully uploaded, including those that uploaded as "Success With Warnings". This is why the sum of these numbers may not add up to the number of Projects in your upload file.
Directly below the results, a table will list all of the warnings and failures as well as a description of the issues:

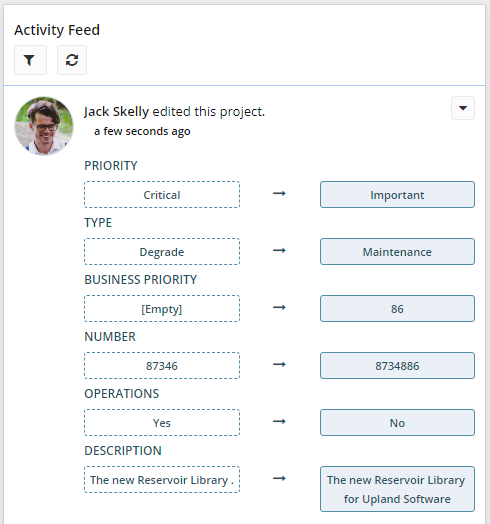
Users can easily review any of the individual Projects by viewing a Project's Activity Feed. Every update made to the Project will be listed:
Benefit:
Prior to this release, Bulk Import could be used to create a large number of Projects or Resources simultaneously. This saves Project creators from having to repeatedly go through the process of adding new entities to the application. As useful as this is, however, Eclipse PPM users often face the same struggles while editing their Projects. Many users found themselves spending a great deal of time tediously opening and editing Projects in order to edit certain details in each one. With this update, they no longer need to waste time and energy on this; they can edit their Projects all at once by importing a Bulk Update - Projects file into Eclipse PPM. This is especially helpful for Project Managers who oversee large Portfolios of Projects; they can manage their Project updates on a spreadsheet and simply upload it into the application.
This upgrade is also especially useful for organizations that would like to integrate their Eclipse PPM Project data with another system. The data can be exported into a spreadsheet and then imported into Eclipse PPM, ensuring that data in both systems is always synchronized.
Dashboards
The following enhancement has been made to Dashboards in Eclipse PPM. Select the upgrade below to learn more:
What's Different:
New columns are now available for each of the four "List" Dashboard panels. User can add them to their Dashboards while configuring Dashboard panels.
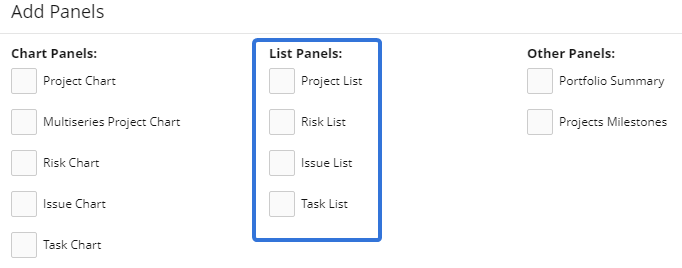
These are the four Dashboard "List" panels. They list out a set of entities (either Projects, Risks, Issues, or Tasks) as well as a custom set of descriptive values in a table.
Note: All of the new columns can be used on Eclipse PPM Dashboards and Project Dashboards with the exception of those under the "Project List" panel. The "Project List" panel is not available for Project Dashboards.
The following columns can now be added to their respective "List" panel:
-
Project List
-
Operations: Indicates whether or not the Project is considered "Operations".
-
Description: The Project's Description.

-
-
Risk List
-
Description: The Risk's Description.
-
Impact Magnitude: The severity, size, and / or extent of the Risk's impact.
-
Impact Description: A Description of the impact that the Risk could potentially have.
-
Strategy: The plan for mitigating the Risk.
-
Category Type: The Category Type of the Risk's Category. Administrators can add and manage Risk Category Types.
-
Status Type: The Status Type of the Risk's current Status. Administrators can manage Risk Status Types.

-
-
Issue List
-
Impact Description: A Description of Issue's impact (or its potential impact).
-
Description: A Description of the Issue.
-
Action Required: The action(s) that need to be taken in order to mitigate the impact of the Issue.
-
Status Type: The Status Type of the Issue's current Status. Administrators can manage Issue Status Types.

-
-
Task List:
-
Task Description: A Description of the Task.
-
Task Is Critical: Indicates whether or not the Task has been marked as "Critical".
-
Task Is Summary: Indicates whether or not the Task has been marked as "Summary".
-
Task Actual Start Date: The Actual Start Date entered for the Task.
-
Task Actual End Date: The Actual End Date entered for the Task.

-
Additionally, users can now read long text values directly from the Dashboard page. If a value is cut off with an ellipsis (...), users can simply hover their cursors over the value to open up a tooltip that contains the value in full:

Benefit:
Dashboards allow users to monitor, measure, and analyze key Eclipse PPM data all in once place. They are meant to be customized in ways that reflect unique business objectives for organizations and users. These additional data fields allow for greater customization, which reduces the need for users to navigate around the application to find the data they are looking for.
Project Requests
The following enhancement has been made to Project Requests in Eclipse PPM. Select the upgrade below to learn more:
What's Different:
Eclipse PPM administrators can now use the Project Request Configuration page to determine which users will receive email notifications when a Project request is resolved (approved or rejected).
Note: Only users with the "Manage Project Templates" Administration & Configuration permission from an Application Policy can configure Project Requests on Project Templates.
While configuring a Project Template's Project Request form, an administrator can now use the "Submitting Request" section to determine whether users will be notified when a Project request from the template is resolved:
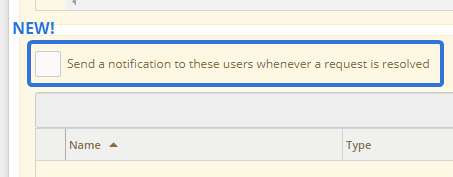
After selecting one of the checkboxes, the administrator can select the text field to enter the name of a user or a User Group that will receive the notification:
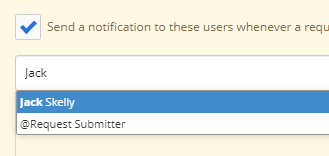
Note: Selecting "@Request Submitter" from the drop-down menu will send an email notification to the user who requested the Project.
Once a user or User Group is selected from the drop-down menu, it will be added to the list:
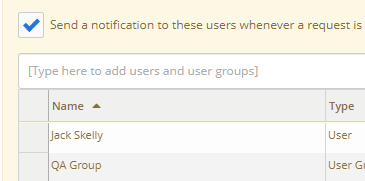
Any user or User Group can be removed from either list by selecting the  button:

After selecting the Save button in the "Submitting Requests" section, both email notification lists will be saved. The listed users will receive an email notification whenever a Project Request is resolved:

Benefit:
Prior to this release, notifications could only be sent to users or User Groups whenever a Project Request was submitted using the Project Template. This informs relevant stakeholders that a Project they might be interested in has been requested.
Example: Imagine a User Group named "Digital Infrastructure Projects Team" that consists of Resources that are assigned to every digital architecture Project. Whenever Projects are requested using the "Digital Architecture" Project Template, an administrator can make sure that the members of this User Group are notified.
Naturally, it makes sense for relevant stakeholders to also receive notifications whenever a Project Request is approved or rejected. This will allow the tagged users to appropriately prepare for the new Project if it is eventually approved.
Project Template Configuration
The following enhancement has been made to Project Template Configuration in Eclipse PPM. Select the upgrade below to learn more:
What's Different:
Eclipse PPM users can now apply the "Time Entry Settings" from a Project Template to Projects that have already been created while applying Project Template Configuration.
Prior to this release, users were already able to manually update a Project's Time Entry Settings by accessing the Project Configuration page:
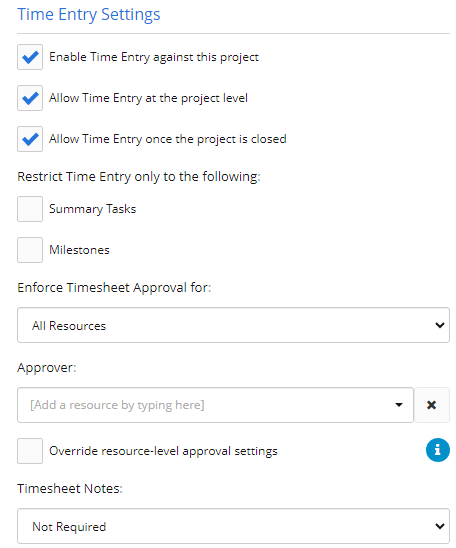
Also, administrators could edit the exact same settings while configuring a Project Template. These settings would then be passed on to any Projects created using the template.
Also prior to this release, however, these settings were not available while applying Project Template Configuration to Projects. With this update, "Time Entry Settings" has been added as an "Apply Option" on the "Apply Project Template Configuration" window:
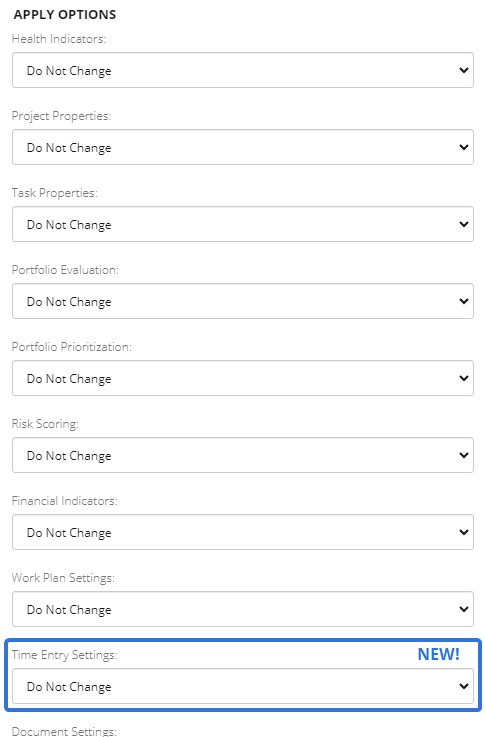
The "Time Entry Settings" drop-down menu gives users two options while applying a Project Template Configuration:

-
Do Not Change: None of the Project Template's "Time Entry Settings" will be applied to any of the Projects.
-
Replace project settings with template settings: The Project Template's "Time Entry Settings" will overwrite the settings of the Projects.
Benefit:
Applying Project Template Configuration to Projects allows Eclipse PPM users to apply characteristics of a Project Template to Projects after creation. Users can totally customize which Project Template settings are applied to their Projects and how they will be applied. Including "Time Entry Settings" in the "Apply Project Template Configuration" window allows users to further customize their Projects' settings and prevents them from having to manually update the "Time Entry Settings" of their Projects after applying a Project Template Configuration.
Reports
The following enhancements have been made to Reports in Eclipse PPM. Select any of the upgrades below to learn more about them:
What's Different:
"Resource Roles" is now an available column group for the "Project Portfolio Gantt" Eclipse Report.
Note: The "Project Portfolio Gantt" report presents a graphical view of the timelines for a selected set of Projects:
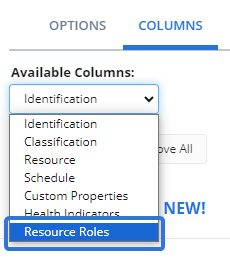
With this update, users can now add columns for the Resource Roles on the listed Projects. While configuring the columns of the "Project Portfolio Gantt" report, a new "Resource Roles" column group is now available from the "Available Columns" drop-down menu:
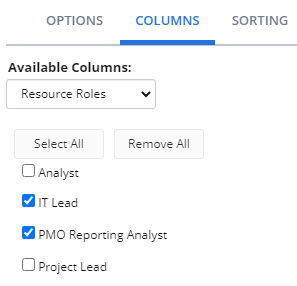
From here, any of the Resource Roles can be added to the report as columns:
Tip: Administrators can add Resource Roles to Eclipse PPM. See Add and Manage Project Roles for more information.
Each column will display the name of the Resource that currently assumes that Role on the listed Project:

Tip: See Manage Project Resources for information on assigning Roles to Resources on Eclipse PPM Projects.
Benefit:
Report readers have needs that are unique to their organizational objectives, so the ability to customize the information on Eclipse Reports is very important.
Example: Every month, a Director runs a "Project Portfolio Gantt" report to review the progress of the various Eclipse PPM Projects. If she is not satisfied with the progress of any listed Projects, she contacts the Project Manager to inquire about any issues that might be slowing them down. Prior to this release, she would have had to manually navigate to each Project in Eclipse PPM in order to find out who the Project Manager was. With this update, however, she can simply include a "Project Manager" column in the report itself, which will prevent her from having to tediously search for each Project Manager.
What's Different:
"Tag" is now an available column for "Note" Adhoc Reports in Eclipse PPM.
While creating a "Note" Adhoc Report, users can now add a "Tag" column:
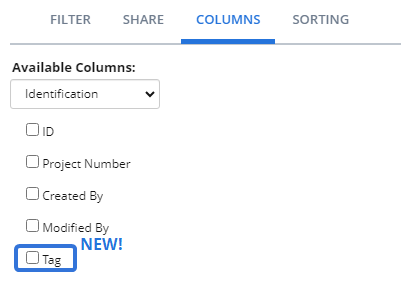
This column will display all Tags that have been attached to the listed Note:

Note: If a listed Note has multiple Tags, each Tag will be separated by a comma.
Tip: Administrators have the ability to create Tags that can be attached to Notes. See Manage Tags for more information.
Benefit:
The objective of Tags is to indicate that a Note pertains to a specific topic or category. Prior to this release, however, the "Notes" Adhoc Report would not display any Tags attached to Notes, which means there was no way for users to see the topics of each listed Note. With this upgrade, the report can now indicate what each Note is about. This can be extremely helpful when users are only looking for notes on specific categories.
Example: Nadine instructs her Project Teams to write Project Notes about future considerations whenever they think of anything that could be useful for future Projects. She has created a Tag named "Future Considerations" and instructs the teams to attach it to each of these Notes.
Once a month, Nadine reviews all of the "Future Consideration" Notes for ideas. She has created a "Note" Adhoc Report that includes the new "Tag" column. She then exports the report to a CSV file, which opens up in Microsoft Excel. From here, she can add a text filter to the "Tag" column so it only includes results with "Future Considerations" in the title: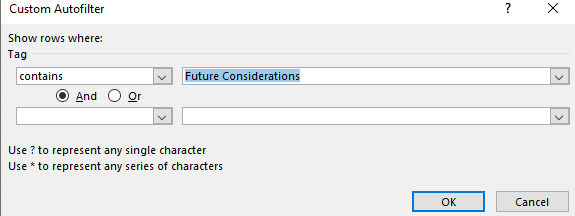
Now, she can read all of the Notes that have been tagged with "Future Considerations":
Now,
Search
The following enhancements have been made to the Search pages in Eclipse PPM. Select any of the upgrades below to learn more:
What's Different:
A new Advanced Search page for "Assignments" has been added to Eclipse PPM. Users can now select Search → Assignments from the Navigation menu to view a table of all Resource Assignments:
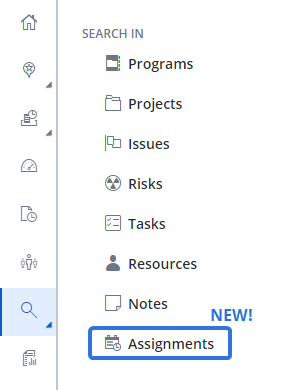
Similar to other Advanced Search pages, this page will list out all of the Work Plan assignments in Eclipse PPM:
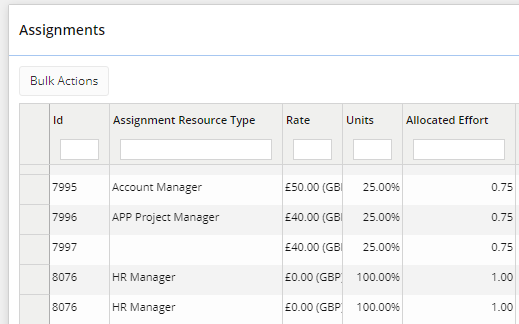
Whenever a Resource is assigned to a Task on a Work Plan, the assignment will appear on the "Assignments" page.
Note: Keep in mind that both "Named Resources" and "Generic Resources" can be assigned to work on a Work Plan.
A Named Resource is an actual Resource that has been created in Eclipse PPM. This represents an individual who has been assigned to work on a Task: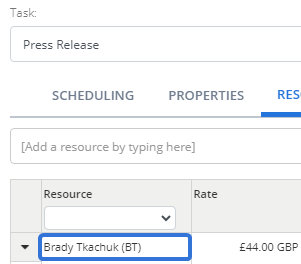
"Brady Tkachuk" is a Named Resource. This Resource represents a real person who has been assigned to work on the Task.
A Generic Resource is a Resource Type that has been assigned to the Task: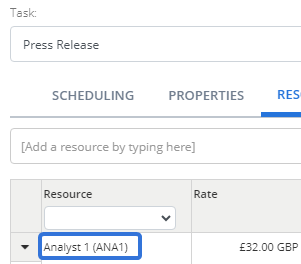
"Analyst 1" is a Generic Resource. The "Analyst" Resource Type has been added to the Work Plan and assigned to the Task. Each Generic Resource will be numbered as they are added to the Work Plan (for example, if another Analyst is required, the Project Manager can add it again and it will automatically display the name "Analyst 2"). These are sometimes referred to as "demand" because a Project Manager might not have yet decided on an actual Named Resource to assign to the Task. Once a Named Resource is decided on, the Project Manager can perform a substitution.
Similar to other Advanced Search pages, users have the option to include a large number of columns on the page to display different types of data. Information about the assignment ("Allocated Effort", "Actual Effort", "Rate", etc.), the assigned Resource ("Resource Name", "Resource Email", "Resource Type(s)", etc.), the Task ("Task Name", "Task Start / End Date", "Task % Complete", etc.), and the Project ("Project Name", "Project Portfolio", "Project Status", etc.). These columns can all be added / removed to the table (as well as sorted) by selecting the Columns button:
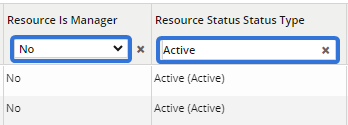
Once a column is added to the page, users can select the column header to sort the table by the column's values. They use the text box / drop-down menu in the column header to filter the table by the column's values:
Users can also apply pre-built or custom filters to the "Assignments" page. The filter menu will display all of the existing filters that can be applied to the listed assignments:
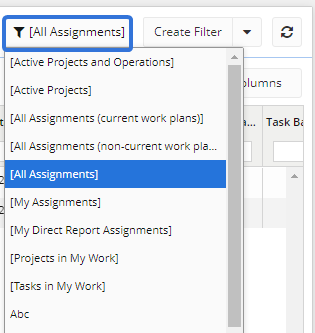
Note: Filters in brackets are pre-built filters created by Eclipse PPM.
Users can select the Create Filter button to create their own custom Assignments filter that they can use to filter results:

Alternatively, they can open the button's drop-down menu and select Copy Filter to create a current filter starting with the rules and groups of the filter currently in use:

Tip: For help creating custom filters, see Advanced Search (Apply a Filter).
A filter can also be created for specifically chosen assignments by selecting the Bulk Actions button:
After selecting the checkboxes of specific assignments, the user can select the Create Filter button to create a custom filter that will only include the selected assignments:
Finally, users can select the Export button to download a CSV file of the assignments table:
Note: Similar to other Advanced Search entities, users can make "Assignments" Advanced Search calls using the Eclipse PPM REST API. See New Advanced Search endpoint for the "Assignments" filter above for more info on the new endpoint and see Advanced Search API Reference Sheet for information on calling Advanced Searches through the API.
Benefit:
Project Work Plans are one of the most crucial components of Eclipse PPM. They allow Project Managers to organize all of the work that needs to be done for a Project and then assign Resources to that work. Prior to this release, there was no way for users to get a high-level view of all the assignments in Eclipse PPM. With this update, every assignment can be filtered through and reviewed, allowing Project Managers greater visibility into the work being done on their Projects.
What's Different:
Eclipse PPM users can now use the Bulk Actions button on the Search pages to add Programs, Projects, Issues, Risks, and Tasks to their "My Work" panel:
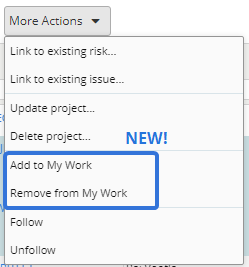
Once a user selects the Bulk Actions button, the More Actions drop-down menu appears. This menu now has two new options: Add to My Work and Remove from My Work:
-
Add to My Work: The selected entities will be added to the user's "My Work" panel. If any selected items already belong to the user's "My Work" panel, they will remain there.
-
Remove from My Work: The selected entities will be removed from the user's "My Work" panel. If any selected items already do not belong to the user's "My Work" panel, they will remain off of the panel.
Example: Miranda wants to add multiple Projects to her "My Work" panel at once. She can now navigate to the Project List page and select the Bulk Actions button. After this, she selects the checkboxes of the Projects that she would like to add to her "My Work" panel: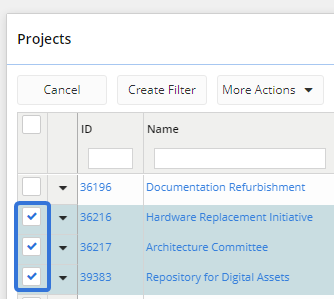
After selecting Add to My Work from the More Actions drop-down menu, all of these Projects will be added to the "My Work" panel on her Home page: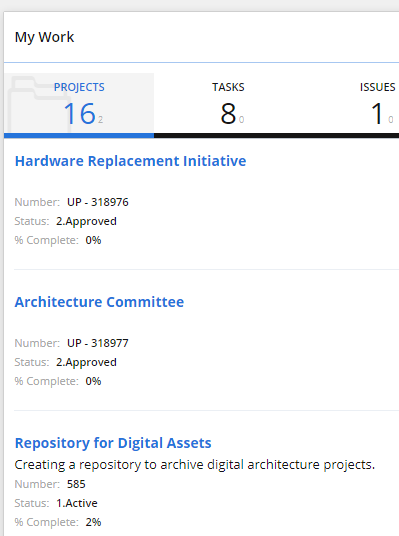
Benefit:
Prior to this release, Eclipse PPM users would have to navigate to the entity they wanted to add to their "My Work" panel and use the menu to add it. For example, a user would have to navigate to an Issue, open the Issue Menu and select Add to My Work:
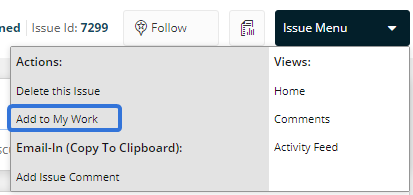
This only allowed users to add one entity at a time; in order to add multiple Issues to the "My Work" panel, for example, a user would have to navigate to each separate Issue and add it individually. This upgrade enables users to efficiently add entities to their "My Work" panel in bulk, saving them from having to tediously add them one-by-one.
Status Updates
The following enhancement has been made to Status Updates in Eclipse PPM. Select the upgrade below to learn more:
What's Different:
Text property options are now available for Status Update comments in Eclipse PPM.
Note: Eclipse PPM users can add Status Updates to Projects, Programs, Tasks, Issues, and Risks.
Note: Eclipse PPM users require the "Edit Project Status" permission from a Project Policy to edit a Project's Status or the "Edit Program Status" from a Program Policy to edit a Program's Status.
Prior to this release, Status Update text boxes did not contain any properties. Users could only add a signature/timestamp while leaving a comment on a Status Update:
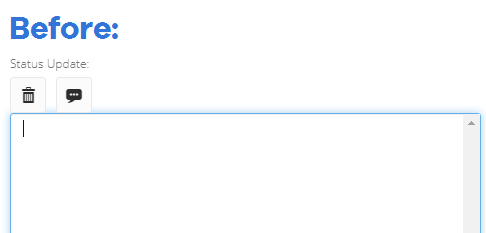
With this upgrade, the following properties can now be added to Status Update comments:
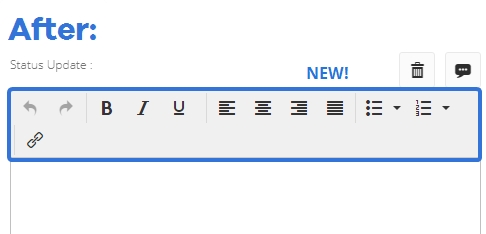
-
Undo
 : Erase the last change made to your comment.
 -
Redo
 : Erase the last Undo you made to your comment.
 -
Bold
 : Apply a bold font to your text.
 -
Italicize:
 : Apply an italic font to your text.
 -
Underline
 : Apply an underline to your text.
 -
Align left
 : Align your text with the left side of the text box.
 -
Align center
 : Center your text in the middle of the text box.
 -
Align right
 : Align your text with the left side of the text box.
 -
Justify
 : Distribute your text evenly between the left and right side of the text box.
 -
Bullet list
 : Create a bullet point list. Select the arrow to choose the style of the bullet points.
 -
Numbered list
 : Create a numbered list. Select the arrow to choose the numbering style.
 -
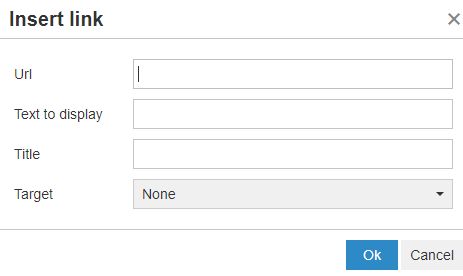
Insert/edit link
 : Insert a link into the comment. You will have multiple options to customize your link:
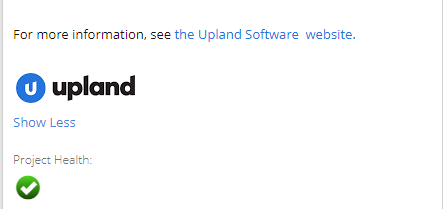
Additionally, users can now attach images to Status Reports. The new rich text format allows images to be copied and pasted into the text box and displayed within the Status Update:
Benefit:
Many Eclipse PPM users leave lengthy, detailed comments on their Status Reports. When this is the case, readability becomes extremely important. These new properties give Eclipse PPM user the ability to emphasize certain words and phrases, structure written content, and link to other webpages, which all serve to increase readability and maintain a reader's attention.
Example: Here is an example of a Status Update that might have been left on a Project prior to this release: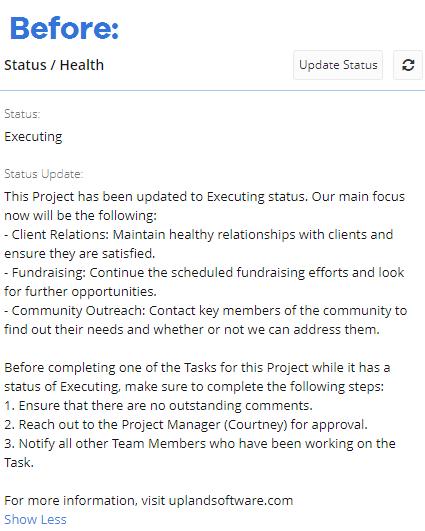
Here is the same Status Update after this upgrade: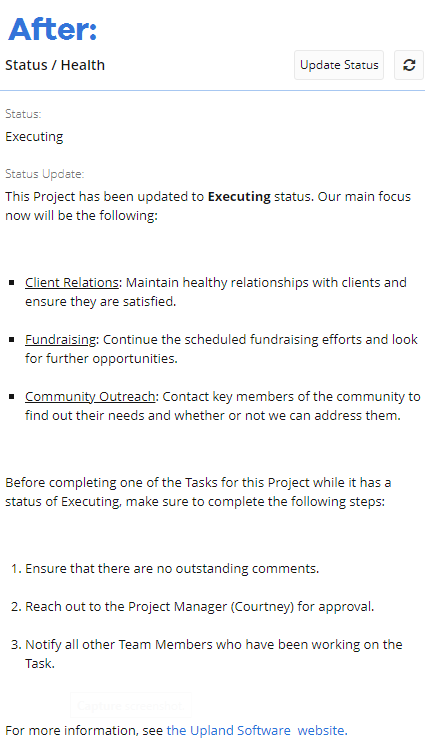
Notice how much more readable this Status Update is after the new formatting properties have been applied.
Upland Analytics
The following enhancements have been made to Upland Analytics in Eclipse PPM. Select any of the upgrades below to learn more:
What's Different:
A new Data Source named "Financial" has been exposed in Upland Analytics. This Data Source allows Eclipse PPM users to create detailed reports and charts about financial data.
The most notable Data View in this new Data Source is the new "Financial" Data View:
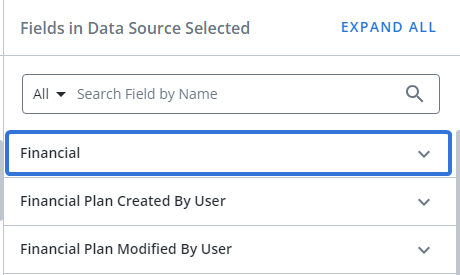
This Data View contains the following columns that can expose granular data about Eclipse PPM Financial Plans:
-
Amount (#): The amount of the Financial Plan row, whether the value belongs to "Funding", "Budget", "Expenditure", or "Benefits".
-
Calendar Month (
 ): The month of the financial data (amount).
 -
Calendar Month Year (
 ): The month and year of the financial data (amount).
 -
Calendar Quarter (
 ): The financial quarter of the financial data (amount).
 -
Calendar Quarter Year (
 ): The financial quarter and year of the financial data (amount).
 -
Calendar Year (
 ): The year of the financial data (amount).
 -
Calendar Week (
 ): The week of the financial data (amount).
 -
Category (A): The Funding, Budget, or Benefit Category that the amount belongs to.
-
Document Number (A): The Document Number of the Expenditure amount (for Expenditures only).
-
Expenditure Date (
 ): The date of the Expenditure (formatted mm/dd/yyyy). For Projects configured to calculate labor costs using the "Calculate actuals using time entries" checkbox, the time entries for a specific month are rolled up to the first of the month or first of the year.
 -
Expenditure Document Number (A): The Expenditure Document Number of the Expenditure amount.
Note: For manual Expenditures, this can be different than the "Document Number".
-
Expenditure Group (A): Indicates whether the Expenditure is a "Committed" or "Actual" Expenditure.
-
Expenditure Memo (A): The memo that was entered along with the Expenditure.
-
Expenditure Name (A): The name of the Expenditure item. Expenditures calculated from time entries will display the Resource's name.
-
Expenditure Paid (A): Indicates whether or not the Expenditure has been paid.
-
Expenditure Type (A): The "Expenditure Type" selected for the Expenditure.
-
Expenditure Vendor (A): The Vendor entered for the Expenditure.
-
GLAccount (A): The GL Account associated with the Budget Category used for the Budget or Expenditure line.
-
Group (A): Indicates whether the amount belongs to "Funding", "Budget", "Expenditure", or "Benefits".
-
Item (A): The name of the listed financial item.
-
Sub Group (A): This value will differ based on the "Group" of the financial item.
-
Funding: The Funding Category of the item.
-
Budget: The Category Type of the Budget item.
-
Expenditures: The Category Type of the Expenditure item's Budget Category.
-
Benefits: Whether the item is an "Expected" or "Realized" Benefit.
-
This Data Source also includes views that can be used to identify information about the creator and last editor of the Financial Plan, as well as the Project, Portfolio, Program, and Organizational Unit that the Financial Plan belongs to.
Benefit:
Prior to this release, report builders could include Financial Plan information in their Upland Analytics reports by using the "Project Financials" Data View from the "Project List" Data Source. However, the fields in this view only expose high-level financial information, such as current totals or totals to date. There was no way to create that displayed financial data for specific time periods. With this release, Upland Analytics reports can now be used to view financial data over several periods of time instead of only providing a snapshot of the current finances.
What's Different:
Six new Standalone Reports are now available for use in Upland Analytics.
Note: Standalone Reports are pre-built reports that are automatically included with Upland Analytics. They can be accessed through the "Standalone Reports" folder on the "My Analytics" menu: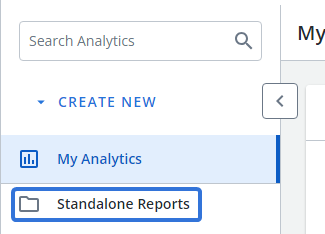
They can also be accessed through the "Folders" tab on the "My Reports and Dashboards" panel: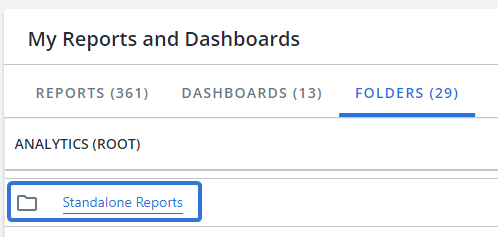
The following Standalone Reports have been added:
-
Program Issues: A table of Issues organized by the Programs they belong to:
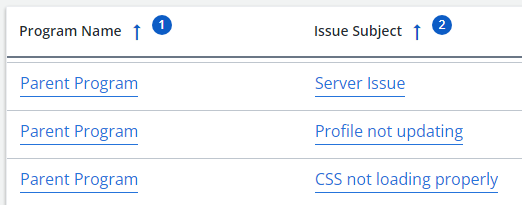
Other exposed fields include "Reported By", "Date Reported", "Status Type", "Status", "Planned Resolution Date", and "Actual Resolution Date".
Report viewers can navigate to this report by selecting Standalone Reports → Risks and Issues.
-
Project Issues: A table of Issues organized by the Projects they belong to:

Other exposed fields include "Reported By", "Date Reported", "Status Type", "Status", "Planned Resolution Date", and "Actual Resolution Date".
Report viewers can navigate to this report by selecting Standalone Reports → Risks and Issues.
-
Program Risks: A table of Risks organized by the Programs they belong to:

Other exposed fields include "Reported By", "Date Reported", "Score", "Status", "Planned Mitigation Date", and "Actual Mitigation Date".
Report viewers can navigate to this report by selecting Standalone Reports → Risks and Issues.
-
Project Risks: A table of Risks organized by the Projects they belong to:

Other exposed fields include "Reported By", "Score", "Status", "Date Reported", "Actual Mitigation Date", and "Planned Mitigation Date".
Report viewers can navigate to this report by selecting Standalone Reports → Risks and Issues.
-
Prioritization Scores by Project: A table of Projects and their Portfolio Prioritization scores:

The exposed fields include "Project Number", "Project Name", "Prioritization Total Score", "Prioritization Weighted Score", and "Prioritization Weighted Ratio".
Report viewers can navigate to this report by selecting Standalone Reports → Projects.
-
Risk Scores By Project: A table of Projects and their Risk Scoring scores:

The exposed fields include "Project Number", "Project Name", "Risk Total Score", "Risk Weighted Score", and "Risk Weighted Ratio".
Report viewers can navigate to this report by selecting Standalone Reports → Projects.
Benefit:
The key component of Upland Analytics is the ability to create custom reports that are unique to the business needs of organizations and individuals. However, some reports that are basic in nature can be helpful to a great number of users. A table that lists Issues by Project, for instance, might be extremely basic, but it can be used by virtually every Eclipse PPM organization that makes use of Issues. Standalone Reports save report builders time and energy by preventing them from having to create these near-universal reports themselves.
What's Different:
Eclipse PPM users can now subscribe to Upland Analytics Dashboards. After navigating to a Dashboard and selecting the Menu button ( ), users now have the option to select Subscription from the drop-down menu:
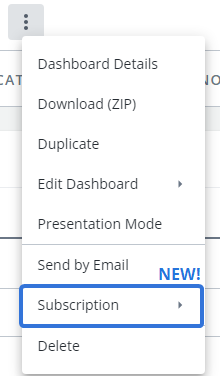
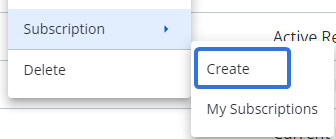
From here, users can select Create to put together a new Dashboard Subscription:
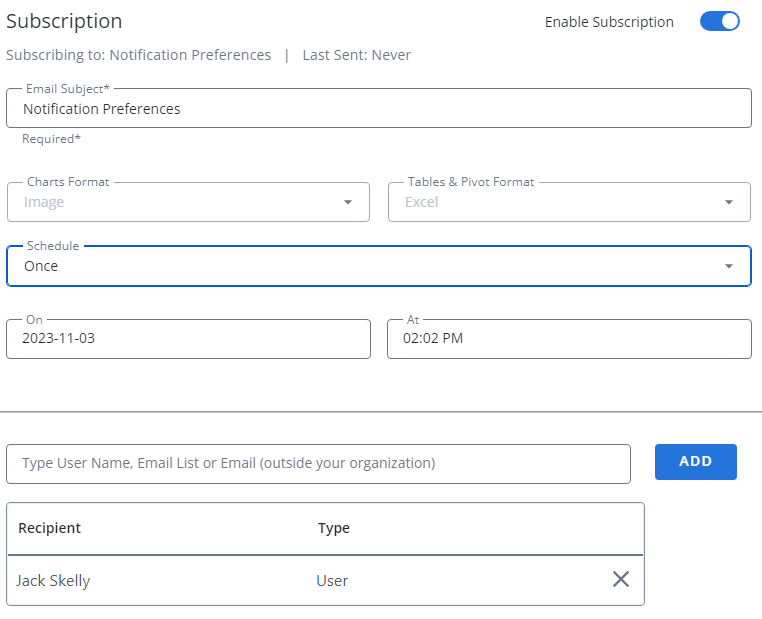
The "Subscription" window will appear, allowing the user to customize the Subscription:
-
Enable Subscription: Use this switch to toggle the Subscription between active and inactive. Only active Subscriptions will be sent out. The Subscription will be active when the switch is blue:

-
Email Subject: Enter in a name for the Dashboard Subscription. This name will occupy the subject field when the email is sent to subscribers.
-
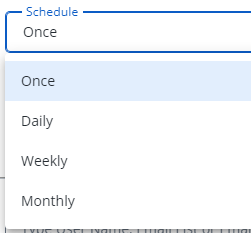
Schedule: Decide how often the Subscription will be sent out:
-
Once: The Dashboard will only be emailed once. Use the fields that appear to determine the date and time the Dashboard will be sent:

-
Daily: The Dashboard will be emailed on a daily basis. Use the fields that appear to determine the daily interval as well as the time the Dashboard will be sent:

-
Weekly: The Dashboard will be emailed on a weekly basis. Use the fields that appear to determine the weekly interval, the time the Dashboard will be sent, and the days of the week it will be sent:

-
Monthly: The Dashboard will be emailed on a monthly basis. Use the fields that appear to determine which days of the month the Dashboard will be sent:

-
-
Recipients: Use the text field to add any Eclipse PPM users, email lists, or email addresses that will receive the Dashboard via email. Select the checkbox of the user and then select the Add button. The recipients will be displayed in the table under the field.
Recipients will receive an email that allows them to download a zip folder that contains all of the Dashboard information:

Tip: See Subscribe to a Dashboard in the Upland Analytics help site for more information.
Benefit:
Users can visit Upland Analytics and view a Dashboard whenever they like. However, subscriptions ensure that a user will not forget to review a Dashboard at a specific point in time. Also, recipients do not always have access to Eclipse PPM even if they are users. Subscribing to a Dashboard is the best way to make sure that all relevant stakeholders can receive Upland Analytics Dashboards and remain informed.
What's Different:
Fields with duplicate names will now specify which data view they belong to once added to a report.
Note: This feature is only available through "NextGen" Upland Analytics.
Prior to this release, fields from different data views with duplicate names would appear identical on a report. For example, a report using the "User List" data source could include a "Account Type" field from the "User" data view and the "User Created By" data view.

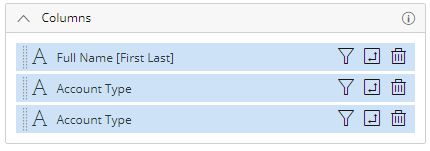
These fields would have identical column headers in the report.


With this update, any duplicate field names will also display the name of the data view:

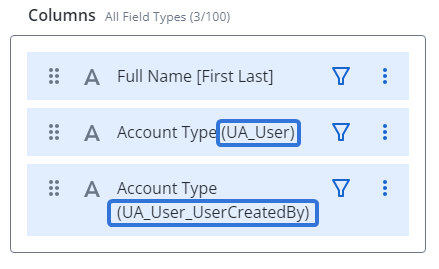
This will be reflected in the report's column headers.


Benefit:
Duplicate field names have the capacity to cause confusion amongst report viewers. Even when report builders practice caution (placing the "Account Type" column next to the user it refers to, for example), report columns should not share the same name if they report on totally different data. Adding the data view to duplicate column labels ensures that readers will not confuse different data types and will consume the information accurately.
What's Different:
Two new fields related to Program Status Updates have been added to the "Program" data view in Upland Analytics:
-
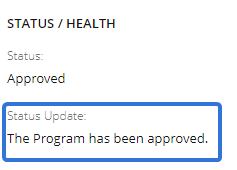
Program Status Update: A text string of the Program's current Status Update.
Note: Be sure not to confuse the Status Update with the actual Status of the Program:
-
Program Last Status Update: A date and timestamp of the last time the Program's Status Update was modified.
Note: This date will only reflect changes made to the Program's Status Update. It will not count any changes made to the Program's Status or Health Indicators.

Benefit:
Prior to this release, report builders could include information about a Program's current Status ("Status", "Status Type", and "Status Type ID"). However, there was no way to report on the Status Update that accompanied it. Status Updates can provide vital information to describe the Program's current Status and keep people informed of the Program's current progress, challenges, and future plans. Including these new fields in Upland Analytics reports will give report readers additional perspective into the current state of Eclipse PPM Programs.
What's Different:
Upland Analytics report builders can now add custom strings of text into their concatenated functions while creating new Custom Fields.
Note: The "Concatenate" function joins values from different fields into a new combined field. Report builders can use it by selecting "CONCAT" when they click on the function builder while creating a Custom Field: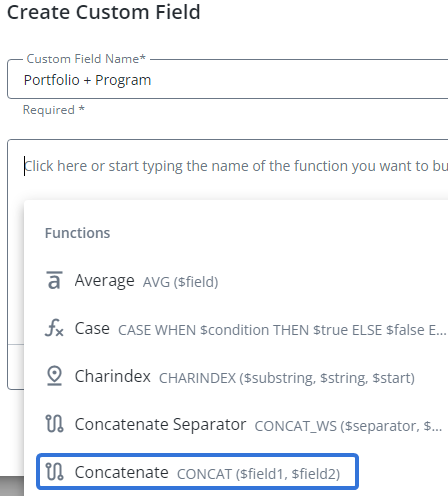
With this upgrade, report builders can now enter custom strings into their "Concatenate" functions. This can be done by placing single quotation marks (') into the formula and typing custom text in between them:

Similar to the other fields in the equation, the custom string will need to be separated from everything else with a comma.
Note: Upon hitting the single quotation mark key on your keyboard, two single quotation marks will appear with the cursor placed between them:
Your custom text string should be placed between them, so you can begin typing right away. Be sure not to mistake them for a double quotation mark.
The custom string may contain text, numbers, and even special characters (&, ~, %, etc.).
Tip: For more information on Custom Field formulas, see Custom Fields Expression Editor.
Benefit:
Prior to this feature, the "Concatenate" function would simply bring multiple fields together and place the values next to one another. Although this was useful in many cases, there was no way for report builders to format their concatenated fields or add extra context to them so they would be easier for report viewers to read.
Example: Celeste wants to create a Custom Field that includes both the Portfolio name and the Program name of a Project. She uses the "Concatenate" function to bring both of these fields together:
However, she wants to add some contextual information to the new field to make it easier to read. She decides to use single quotation marks in order to add labels to each separate field:
This makes the values clearer on her report:
What's Different:
Upland Analytics report builders can now include date fields that indicate the week of the date.
Prior to this release, report builders were already able to express their dates in different ways on reports. The available date fields included Date (mm/dd/yyyy with a timestamp), Date Date (mm/dd/yyyy), Date Month Year, Date Quarter Year, and Date Year. With this update, Date Week is now an available option as well:
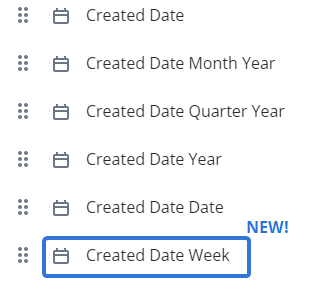
When these fields are added to reports, they will express the date as a week:
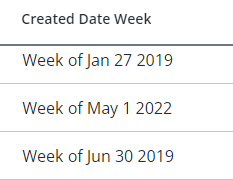
Note: The indicated date is the Sunday that the week begins with.
Two new fields are now available for the "Project", "Program", "Resource", and "User" data views:
-
Created Date Week: The week the entity was created.
-
Modified Date Week: The week the entity was last modified.
Benefit:
Upland Analytics Date fields can be expressed in multiple ways to accommodate the unique business needs of each organization. Different organizations will make use of different date formats based on the structure of their schedules. For example, imagine a Project Team that organizes their work in weekly sprints. It might make sense for this team to express Project end dates as weeks so the team members know which sprint the Project will end in. This is another example of Upland Analytics' commitment to being as customizable as possible.