In PSA, each user is uniquely identified with a username, password, and a profile. Together with other settings, such as the user security profile determines which tasks a user can perform, what data the user can see, and what the user can do with the data.
This article covers the creation of a user's profile.
- From the Icon Bar click Setup
 .
. - From the Navigation Menu click Organization.
- From the available options select Users.
- Upon the Users List page displaying, click Create User.
- Note that upon the Create User page displaying, you will see the Settings Details navigation with the General, Personal, Security and any associated User Defined Fields tabs.
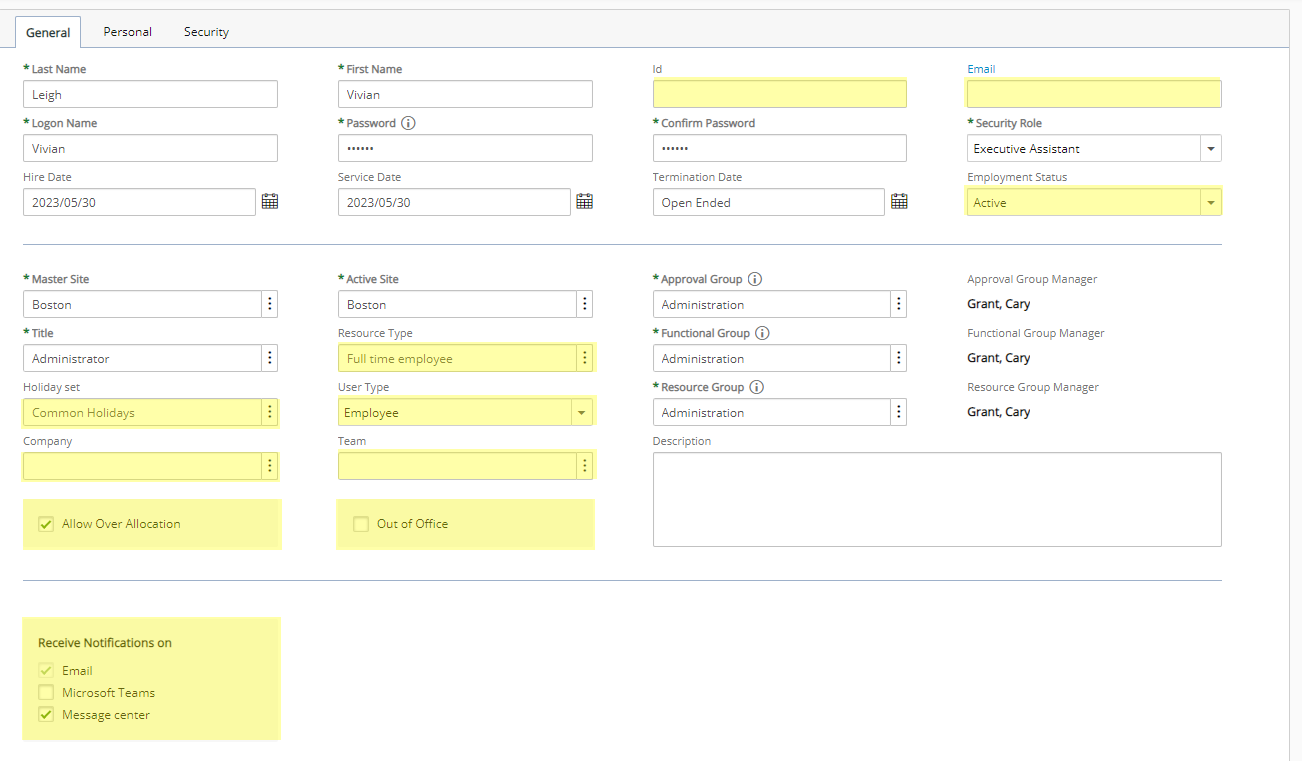
- Within the General tab, enter or select the mandatory information which are marked by an asterisk(*):
- Last Name*: Enter the user’s last name.
- First Name*: Enter the user’s first name.
- Enter the logon information:
- Logon Name*: Enter the logon name with which the user will log into the application.
Note: Depending on your System Setup configuration (Setup > Organization > System), the Logon Name may be populated automatically based on the selection made for Default Logon Name . For further details refer to Setting Logon Preferences.
- Password*: Enter the password with which the user will log into the application.
- Confirm Password*: In the Confirm password field enter the password that was entered in the Password box.
- Logon Name*: Enter the logon name with which the user will log into the application.
- Select a Security Profile: Click Security Profile* and choose from the available options.
The Security Profile determines the components the user has access to in PSA. For more information on security profiles and how to create them, refer to “Configuring a Security Profile”.

- If the default selection for any of the required information must be changed, click the respective ellipsis button, the corresponding List page displays from where you can make another selection:
- Master Site*: The Master Site is the primary location of the user and is used to define the user's default holiday set and languages, which can both be overridden on a per-user basis.
- Active Site*: Active Site define where a user is currently located. The user can change the Active Site. The user’s Active Site determines Regional Settings for the user.
- Title*: Select the user’s title. For further details refer to Associating a Title to a User.
- Approval Group*: An Approval Group is the group in which the user’s work is approved. A user can be a manager or member of one functional group, such as Marketing, with or without subordinate users for whom he may approve or reject entries, while simultaneously being a subordinate user of a totally different group (his approval group). The Manager box beside the Approval Group displays the nApproval Groupame of the manager in charge of the selected group.
- Functional Group*: A user's functional group is where all entries (timesheet, expenses, purchase orders, charges, workflows, etc.) are 'reported', meaning report totals, for example, are based upon this group. The Manager box beside the Functional Group displays the name of the manager in charge of the selected group.
- Resource Group*: The resource group manages the user’s work allocation and availability. The Manager box beside the resource group displays the name of the manager in charge of the selected group.

Note: Suspended Groups are hidden by default on the Groups List page. To display them, check the Show Suspended Groups box. However, you cannot select a suspended group as a User's Approval, Functional or Resource Group.
- Upon selecting/entering all mandatory fields, you can click Save any time and proceed to step 15.
- Where required, modify the Hire Date, Service Date and Termination Date date(s):
- Click the corresponding Calendar
 button
 - Select the appropriate date.

- Click the corresponding Calendar
- Enter or select the following optional settings:
- Id: If there is an ID for the user, enter it in the ID box.
- Email: If the user has an email address, enter it in the Email box.
- Employment Status: Select the employment status of the user. Available options are: Active, Suspended or Decommissioned.
- Resource Type: Click browse to access the Resource Type List page and select a resource type. This type could be Full time employee etc.
- Holiday Set: Click browse, to access the Holiday List page and associate a holiday set to the user.
- User Type: Click browse to access the User Type List page and select a resource type. This type could be Employee, Consultant etc.
- Company: Click browse to access the Company List page and select the company for which the payroll and payable batches are processed.
- Team: Click browse beside the Team box and select the team to which the user belongs to.
- Select Allow Over Allocation: Select to allow over allocation for the user.
- Select Out of Office to set the User Out of Office in PSA.
- From the Receive Notifications on section, select the required options:
- Email: This option is selected and rendered un-editable by default for all Users. As a result, all Users will receive Email Notifications.
- Microsoft Teams: Selecting this option will trigger notifications in Microsoft Teams, provided that the necessary settings are in place.
Caution: When creating a new User, the system verifies if Microsoft Teams is enabled on your environment. If the setup is complete, the Microsoft Teams notification option is automatically set by default. Clear this box, if you do not want a specific user to receive these notifications.
- Message center: Un-selecting this setting will disable Notifications, therefore, the User will only receive Email notifications.

Note: When you check or uncheck the Message center box and then click Save, the Notifications
 button in the header bar will turn on or off accordingly.
- In the Description box, enter a description for the User.
- Navigate to the Personal tab and enter/select the following infmration:
- Language: From the Language list, select a language for the user.
- SSN: Enter the user’s Social Security Number.
- Profile URL: Enter the user’s web page URL.
- Phone Number: Enter the user’s phone number.
- Mobile Number: Enter the user’s mobile telephone number.
- Alternate Phone Number: Enter the user’s alternate phone number.
- Enter the appropriate address information in Address line 1, Address line 2, City, Country, State/Provinceand Zip/Postal Code fields.
- Where required, modify the Last Evaluation and Next Evaluation date(s):
- Click the corresponding Calendar
 button
 - Select the appropriate date.
- Click the corresponding Calendar

- Navigate to the Security tab and enter/select the following information:
From the Override licensing defined by Security Profile option and select features the user can access: Logon, Invoicing, Cost Tracking, Expense, Billing, Timesheet and Business Intelligence.
- From the Can report on any section, select the reporting capabilities of the user:
- Client: Allows the manager to generate reports on all clients.
- Project: If a user, such as a manager, has access to project reporting, they have access only to those projects where they are the manager. To generate reports on all projects, this option should be selected.
- Group: Allows the manager to generate reports on all users.
- User: If a user, such as a manager has access to user time reporting, they have access only to those users in his group. To generate reports on all users, this option should be selected.
- From the Access section, choose:
- Can bypass Single Sign-On: Allows the user to bypass Single Sign-On. For more information, see Allowing Users to Bypass SSO Login.
- Password never expires: when selected, users password will never expire.

- Click Save.
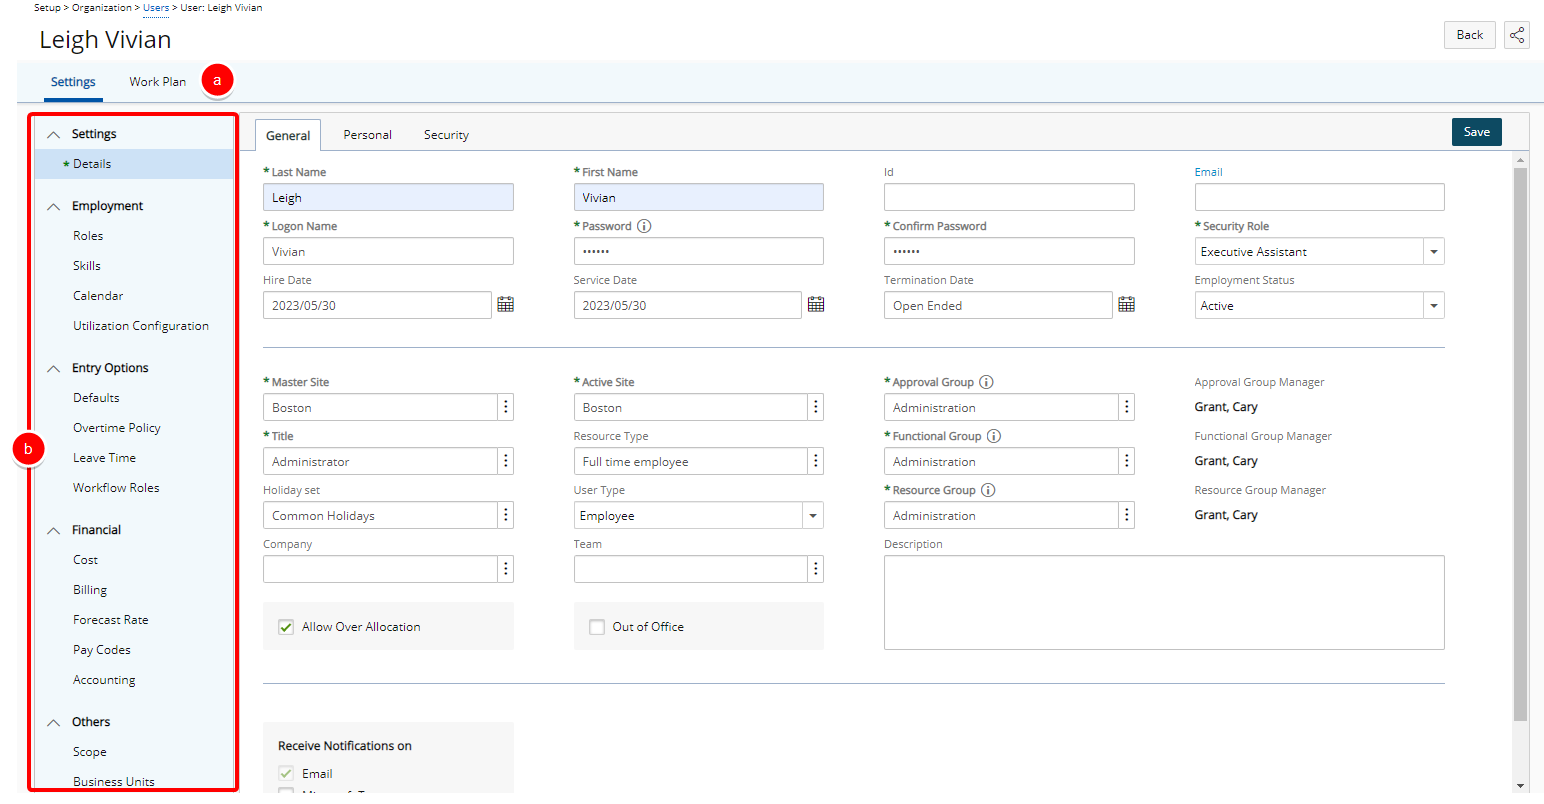
- View the created user profile and note that:
- The Work Plan can now be accessed though the tab navigation.
- Other user profile properties can now be set through the User Edit side navigation such as: Employment, Entry Options, Financial and Others.
