The Users List page presents a searchable list of all the users in your organization. From the Users list page, you can search for, browse for, view, and edit user information. Through the context menu you can Assign Tasks, access user's, Timesheet, Work Plan, Skills, Statistics and Settings.
This article covers the available options from the Users list page.
The Users list page
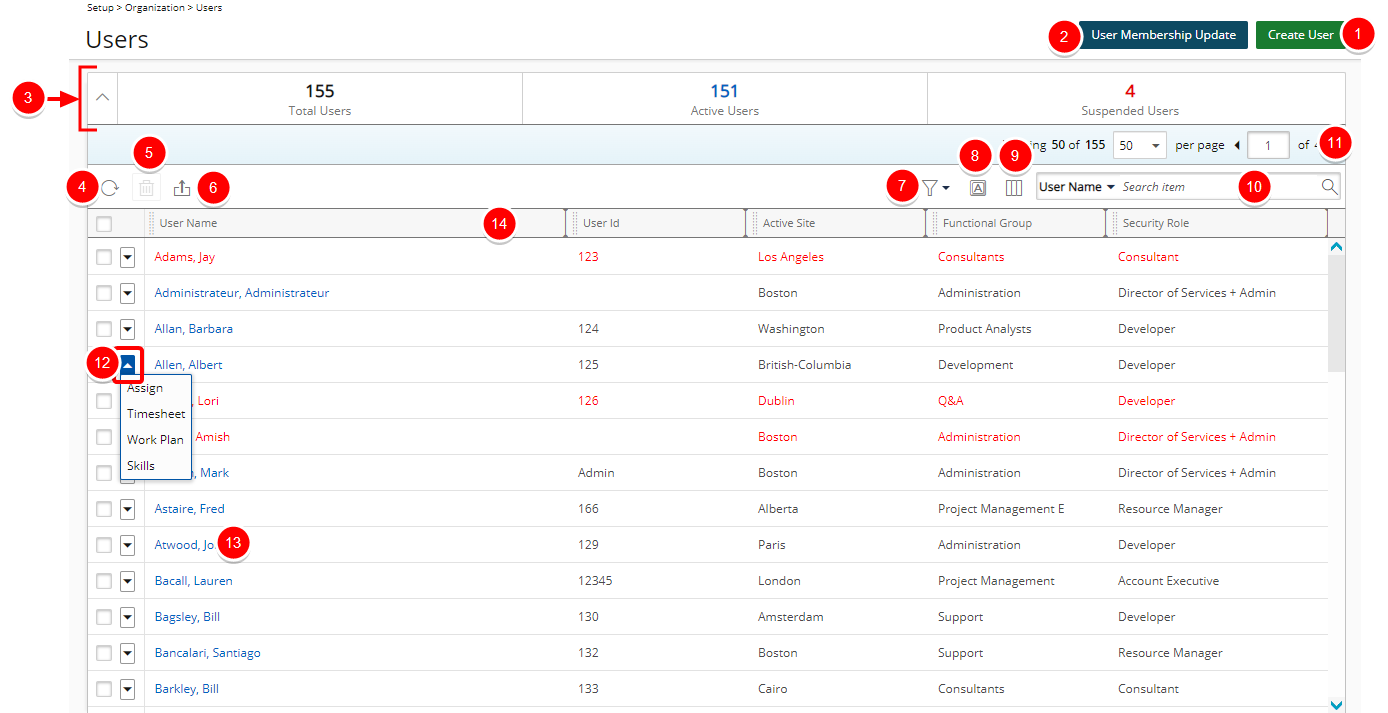
You can do a variety of things from the Users list page.
- Click the Create User to perform a one-off addition of a basic User.

- Click the User Membership Update button to quickly assign users to a Functional Group or set Timesheet Views for a group of users. Rather than associating users to Groups, and assigning Timesheet Views for users individually, use this mass update feature to simplify this task.
- The Summary section displays the number of Total Users, Active Users and Suspended Users. You can easily collapse or expand it by clicking on the corresponding arrow button.
- Click Refresh
 to refresh the page.
 - Click Delete
 to delete the selected User(s).
 - Click Export to Excel
 to export all the Users listed, and as displayed, to Excel.
 - Click Filter
 to access the on-page Filters context menu where you can filter the User list by Active, Suspended or Decommissioned criteria.
 - Click Column Terminology
 to modify the Display Name of the Selected columns.
 - Click Column Selection
 to customize the column layout.
From Column Selection you can add or remove columns to display on the Users list and customize the Users list layout based on criteria that is most important to you. For further details refer to Out-Of-The-Box Column Selection options | Users list.
By default the following columns are displayed: User Name, User Id, Active Site, Functional Group and Security Profile.Note: In addition to these Out-Of-The-Box Column Selection options any associated User Defined Fields (UDFs) at the User level are also available through the Users list Column Selection.
- Select a search criterion from the available anchored criteria filters; User Name, User Id, Functional Group, Approval Group, Resource Group, Resource Type and User Login Name. Enter the corresponding search value, then click the Search button.
Furthermore, you can choose to include the following options as search criteria from the Column Selection: Active, Active Site, Approval Group Manager, Business Phone, Email, Functional Group Manager, Hire Date, Holiday Set, Language, Last Evaluation Date, Master Site, Mobile, Next Evaluation Date, Primary Role, Resource Group Manager, Security Role, Service Date, SSN, Team, Termination Date, Title and User Type. - The Pagination facilitates moving to a new User list page and to view the number of pages.
- User Context menu: Provides shortcuts to easily:
- Assign Tasks
- Access user's Timesheet
- Access user's Work Plan
- Access user's Skills
- Click the User Name, to access the User Edit page and view a user's information.
Note:
- Suspend Users are displayed in red font.
- Decommissioned Users are displayed in gray font.
- From the table header:
- You can easily sort the columns by ascending or descending order simply by clicking a column header. Note that an arrow indicates the descending (
 ) or ascending (
 ) order applied to the column.
 - You can dynamically resize column(s), to your preferred width. Simply move your cursor to the column boundary
 you want to resize. When the cursor becomes a resize
  cursor, click and drag the column accordingly.
 - Click
 and drag a column to the desired position.
- You can easily sort the columns by ascending or descending order simply by clicking a column header. Note that an arrow indicates the descending (