PSA 2024 R3.0 is set to be deployed to your staging sites on October 23, 2024. While production sites are set to be upgraded on November 17, 2024. The listed enhancements will become available to you upon upgrading to 2024 R3.0.
Below is a summary of new/improved features in PSA2024 R3.0.
2024.08.29.2024R3.0.V1.EB
Removal Notice
Please be advised that support for the 1366x768 screen resolution will be discontinued starting with the 2025R1 release. This change aligns with our ongoing efforts to optimize the application experience for modern screen resolutions.
We encourage you to transition to higher resolutions to ensure optimal functionality and usability.
In the upcoming 2025R2 release, there will be changes with static hourly Forecast Cost/Billing rates located in the following four areas of the application:
- Project List (
 Project List)
 - Project Status Report (Project List > Project Edit)
- Program List (
 Program List)
 - Role edit page (Setup > Organization > Roles)
In 2025R2 we will introduce the:
- Dynamic Forecast Rate for Projects in both the Project List and Project Status Report.
This rate will reflect the sum of hours allocated to the project multiplied by the corresponding rate, providing a more precise financial forecast. - At the same time the static hourly Forecast Cost/Billing rates will be deprecated from the Program List and Role edit pages.
Customers who have data stored in these hourly Forecast Cost/Billing fields and wish to keep the data, should create User Defined Fields to capture this information before it disappears.
Note: These changes will be applied in the upcoming 2025R2 release.
API/SDK
Description: You can now GET, POST, PUT, PATCH, and DELETE Forecasted Rule associations in the Project Team through the API.
Caution: It is highly encouraged to use a Security Profile with Administrative privileges when working with the API. However, if you need to use a less privileged Security Profile, please ensure that all required permissions are granted.
Benefit: This enables technical clients to build tools for their user base to edit the Forecasted Rule associations in the Project Team and automate processes that currently require manual intervention. Moreover, the API will enable the development of seamless integrations to 3rd party systems by connecting endpoints together for data exchange.
Click here for more information on how to access the REST API documentation.
Description: You can now GET, GET ById, POST, PUT and PATCH User Defined Fields associations with Roles via the API.
Caution: It is highly encouraged to use a Security Profile with Administrative privileges when working with the API. However, if you need to use a less privileged Security Profile, please ensure that all required permissions are granted.
Benefit: This enables technical clients to build tools for their user base to create, modify and retrieve the User Defined Fields associated with Roles and automate processes that currently require manual intervention. Moreover, the API will enable the development of seamless integrations to 3rd party systems by connecting endpoints together for data exchange.
Click here for more information on how to access the REST API documentation.
Audit Trail

Description: To enhance the transparency and accuracy of Audit Trails, for all time entry deletion events, the Task Name will now automatically be captured and displayed in the Comment field of the Event Details of Delete Time Entry log. This information will be formatted as follows: “Task Name: [NAME_OF_TASK]”
Benefit: By including the Task name in the Audit log, administrators will be able to track and understand deletions with greater clarity, ensuring that the Audit Trail contains sufficient context for effective monitoring and troubleshooting. This improvement strengthens the overall audit functionality by providing more granular details for Time Entry management.
For further details refer to Auditing Changes Made to Time Entries: Tracking Insert, Update, and Delete Actions.

Description: A new Excel Import Audit Trail option, is now available in the Tools menu on the Audit Setup page (Setup > Organization > System > Security > Audit Trail). When enabled, this option allows you to audit Excel imports.
Note: By default, auditing of Excel Import is turned off.

When the Excel Import Audit Trail option is enabled, the details of each Excel Import can be viewed in the Audit Trail by navigating to Tools > Audit Trail. The captured information includes the following:
- Excel Import performed by: This indicates the user who executed the import, displayed as {Lastname, Firstname}.
- Using the file: The specific file used for the import will be listed as {filename.xlsx}.
- Processed objects: A line-separated list of all objects that were processed during the import will be provided, allowing for easy identification of changes made.
Note: Each import operation creates a single Audit Trail Event entry. If you import or update multiple objects using one Excel file, only one Audit Event entry will be available for the import.

Furthermore, you can now also Filter ![]() the Audit Trail list page based on Excel Import Event Type.
the Audit Trail list page based on Excel Import Event Type.
Action Required: Upon upgrading to 2024 R3.0 you must first enable the auditing of Excel Import to gain full advantage of this improvement. To do so, navigate to the Audit Setup page (Setup > Organization > System > Security > Audit Trail). From the left navigation click Tools then select the Insert option for Excel Import Event Type.
Use case: Thomas, the system administrator, is tasked with monitoring the usage of Excel Imports in the Audit Trail. He needs to track who performed each import and when it occurred. By selecting the Insert option for Excel Import Event Type, he can enable auditing of Excel imports. After enabling the feature, each time an employee imports data using Excel, he can review the details of the Excel Import Event, including information on who performed the import and the time stamp. This enables Thomas to ensure accountability and aid in the tracking and troubleshooting of any issues that may arise.
Benefit: The new Excel Import Audit Trail option allows detailed monitoring of all Excel import operations, ensuring data integrity and accountability.
For further details refer to:
Excel Import
Description: In this release, we have made the following improvements to the Excel Import file:
- Excel Import Template Format Changed from .xls to .xlsx: The Excel Import Template format has been updated to use the more modern and efficient .xlsx format, replacing the older .xls format.
The switch to the .xlsx format enhances data accessibility and compatibility, as it uses a structured XML format, unlike the binary .xls files. This ensures better integration with various versions of Excel and other spreadsheet applications.Note: The maximum allowed records per Excel sheet (per object) is 15,000. If you need to import 15,000 records for multiple objects (across different tabs), you must create separate files for each object and import them one by one. Exceeding 15,000 records in one tab will result in an error during the import process.
- Column Names Renamed for Consistency Across All Sheets: Some of the column names in the Excel Import Template have been renamed to ensure consistency across all sheets.
Renaming columns for consistency across sheets simplifies data management and reduces errors during imports. - New Columns Added and Some Others Removed Across Multiple Sheets: Several new columns have been added to the Excel Import Template to support additional fields across the sheets, while some columns have been removed to reflect recent changes made to various objects in the application.
These modifications ensure the template remains aligned with the latest system updates.
Action Required: You must download and use the new Excel Import Template that includes the format change, renamed columns, and newly added fields. The previous .xls template is no longer supported and cannot be used for future imports.
Please refer to the table below for a detailed list of the changes and make the necessary adjustments in your workflows accordingly.
| Sheet | Prior to 2024 R3.0 | 2024 R3.0 |
|---|---|---|
| Sites | ||
| Time_Zone_IN_Secondes | Renamed to Timezone_In_Seconds | |
| Is_PlaceHolder | Renamed to Is_Placeholder | |
| IsSuspended | Renamed to Is_Suspended | |
| New Is_Override_Regional_Settings | ||
| New Thousands_Separator | ||
| New Decimal_Separator | ||
| New Date_Separator | ||
| New Date_Format | ||
| Business_Units | ||
| Manger_Last_Name | Renamed to Manager_Last_Name | |
| Manger_First_Name | Renamed to Manager_First_Name | |
| Is_PlaceHolder | Renamed to Is_Placeholder | |
| IsSuspended | Renamed to Is_Suspended | |
| Groups | ||
| Manger_Last_Name | Renamed to Manager_Last_Name | |
| Manger_First_Name | Renamed to Manager_First_Name | |
| Alternate_Manger_Last_Name | Renamed to Alternate_Manager_Last_Name | |
| Alternate_Manger_First_Name | Renamed to Alternate_Manager_First_Name | |
| Is_PlaceHolder | Renamed to Is_Placeholder | |
| Teams | ||
| Is_PlaceHolder | Renamed to Is_Placeholder | |
| IsSuspended | Renamed to Is_Suspended | |
| Users | ||
| Willing_To_Travel | Removed | |
| Willing_To_Travel_If_Interest | Removed | |
| Willing_To_Relocate | Removed | |
| Willing_To_Relocate_If_Interest | Removed | |
| Gender_Code | Removed | |
| Override_Ts_Access | Removed | |
| ETC_Override_Global | Removed | |
| Purchase_Workflow_Name | Removed | |
| Timesheet_Workflow_Name | Removed | |
| Forecast_Cost | Removed | |
| Forecast_Bill | Removed | |
| ProjectServer_Status | Removed | |
| New Resource_Group_Name | ||
| New Can_Report_On_Any_Client | ||
| New Password_Never_Expires | ||
| New Can_Bypass_Single_Sign_On | ||
| New Send_MsTeam_Notification | ||
| New Allow_Over_Allocation | ||
| New Out_Of_Office | ||
| Titles | ||
| Is_PlaceHolder | Renamed to Is_Placeholder | |
| Clients | ||
| Is_PlaceHolder | Renamed to Is_Placeholder | |
| New Client_Type | ||
| New Booking_Type | ||
| New Invoice_Report_Template_Name | ||
| New Invoice_Accounts_Receivable_Name | ||
| New Invoice_Payment_Term_Account_Name | ||
| Portfolios | ||
| Is_PlaceHolder | Renamed to Is_Placeholder | |
| New Is_Suspended | ||
| Projects | ||
| Alternative_Manager_Last_Name | Renamed to Alternate_Manager_Last_Name | |
| Alternative_Manager_First_Name | Renamed to Alternate_Manager_First_Name | |
| Is_PlaceHolder | Renamed to Is_Placeholder | |
| IsSuspended | Renamed to Is_Suspended | |
| ProjectServer_Status | Removed | |
| New Booking_Type | ||
| New Disable_Financial_Planner | ||
| New Time_Entry_Notes_Option | ||
| New Project_Health | ||
| New Manager_Auto_Approved | ||
| New Can_Be_Invoiced | ||
| New Allow_User_To_Edit_ETC | ||
| OverridePlan | Removed | |
| New Program_Name | ||
| New Used_By_Time | ||
| New Used_By_Expense | ||
| New Used_By_Charge | ||
| New Used_By_Product | ||
| New Used_By_Resource_Planning | ||
| New Override_Payable | ||
| Phases | ||
| Is_PlaceHolder | Renamed to Is_Placeholder | |
| Work_Types | ||
| EnableETC | Renamed to Enable_ETC | |
| Is_PlaceHolder | Renamed to Is_Placeholder | |
| IsEligible | Removed | |
| Accumulate | Removed | |
| ActionType | Removed | |
| ChargeType | Removed | |
| Increase | Removed | |
| New Color | ||
| Tasks | ||
| IsSuspended | Renamed to Is_Suspended | |
| ProjectServer_Status | Removed | |
| New Time_Entry_Notes_Option | ||
| New Is_Decommissioned | ||
| New Used_By_Time | ||
| New Used_By_Expense | ||
| New Used_By_Charge | ||
| New Used_By_Product | ||
| New Used_By_Resource_Planning | ||
| Skills | ||
| Is_PlaceHolder | Renamed to Is_Placeholder | |
| IsSuspended | Renamed to Is_Suspended | |
| ProjectServer_Status | Removed | |
| Skill_Associations | ||
| ExpiryDate | Renamed to Expiry_Date |
Benefit: These improvements streamline the import process, reduce troubleshooting, and boost your overall productivity.
for further details refer to Importing items/objects using Excel.
Description: Improvement have been made to the Excel Import functionality wherein you can now also import User Defined Fields(UDF) associated with the following objects in PSA: Clients, Groups, Portfolios, Projects, Tasks, Users and Work Types.
Administrators can download the Excel Import Template, add each UDF as a new column, by following the naming convention: each UDF column should be prefixed with “UDF_” followed by the UDF Field Name. For example, "UDF_ProjectCode" for a User Defined Field where the Field Name is ProjectCode.
Technical Details:
The Excel Import process for UDFs follows the same method used in APIs, utilizing the CustomProperties property, which is of type Dictionary<string, object> to handle UDF data.
UDF columns in the Excel Import must be prefixed with "UDF_" in uppercase, followed by the UDF's Field Name (e.g., "UDF_BugBrowser", "UDF_LeaveStartDate").
Note: The Excel column name for UDFs should reflect the UDF's actual Field Name value, not the Display Name value, ensuring accurate mapping during the import process.
Error handling for Excel Import mirrors the REST API behavior. Any error scenarios that occur in the API will also trigger similar failures in the Excel import process, maintaining consistency.
For UDFs that accept multiple values, these values must be provided as a comma-separated list without spaces (e.g., "Value1,Value2,Value3") in the respective UDF column.
If a UDF column is added to the Excel Import Template, the value provided must adhere to the correct data type.
Note: If no value is supplied, a data type error is displayed.
If a UDF column is included in the Excel Import Template but no value is provided, any existing value in the UDF will be cleared without triggering an error message, ensuring a smooth update process.
To leave the value of a UDF unchanged in PSA, simply remove the corresponding UDF column from the Excel Import Template. If the UDF already contains a value, this approach will prevent any modifications to it during the import process.
If a required UDF is missing in the Excel template, an error message will display stating, "The required property UDF [Text 1] is missing," ensuring that all mandatory fields are included.
For UDFs that store time or timespan data, the values must be provided in milliseconds to maintain consistency with the system's time format.
When History tracking is enabled for a UDF (e.g., Project, User, Client), any update made via Excel Import will create a History record, including the User Name of the User who performed the import.
The value for Health UDFs is case-sensitive and must be provided in uppercase (e.g., "RED"). Any value provided in a different case, such as "Red" or "rED," will be considered invalid.
For System Table UDFs, the value provided should be the Key of the respective object, not its Description, ensuring proper reference to system-defined objects.
If a UDF has been disassociated from an object but the Excel Import Template still includes the UDF column, no error will be displayed, and the column will simply be ignored.
If the logged-in user lacks the necessary Create or Modify permissions for a particular object in PSA, upon attempting to perform these actions, an error message will appear: "The current user does not have rights to perform this action."
Calculated and Advanced User Defined Fields are not supported in the Excel Import functionality.
Note: For Browse Type UDFs, you can now provide the object Name instead of its unique ID value, simplifying the import process compared to the previous version behavior.
To import User Defined Field values:
In our example here, we are going to import values for a User Defined Field associated to Projects.
- Login as an Administrator and download the Excel Import Template from the Excel Import (Tools > Import > Excel) page.
- Prepare the Excel File:
- Navigate to the required Sheet in the downloaded Excel file. In our example we are going to create a new Project.
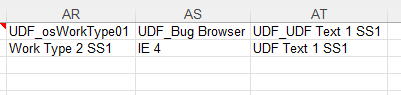
- Add new columns in Projects Sheets. In our example the Project object has the following UDF associations. The Field Name of these UDFs are: osWorkType01, Browser and UDF Text 1 SS1
We are going to add the following UDF columns following the naming conventions outlined above:- UDF_osWorkType01
- UDF_Bug Browser
- UDF_UDF Text 1 SS1

- Enter values for each of the UDF's along with values required to create the New Project.
- Save the Excel file.
- Import Process: After preparing the file, upload the Excel sheet through the Excel Import (Tools > Import > Excel).
- The system will verify any missing required fields, data types, and mandatory UDFs. Any error messages are displayed on screen.
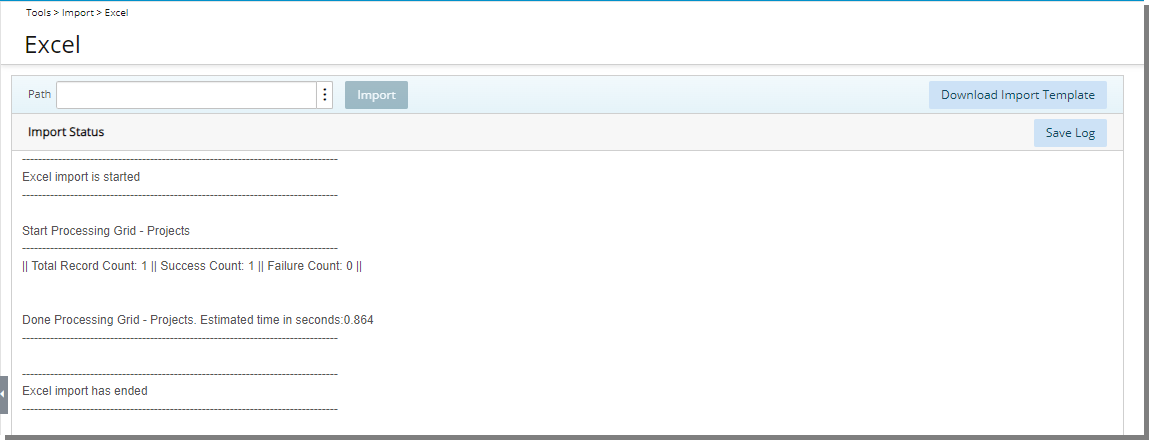
- Once all requirements are met, the import completes successfully. You can navigate to the imported Project and verify the associated UDF values.
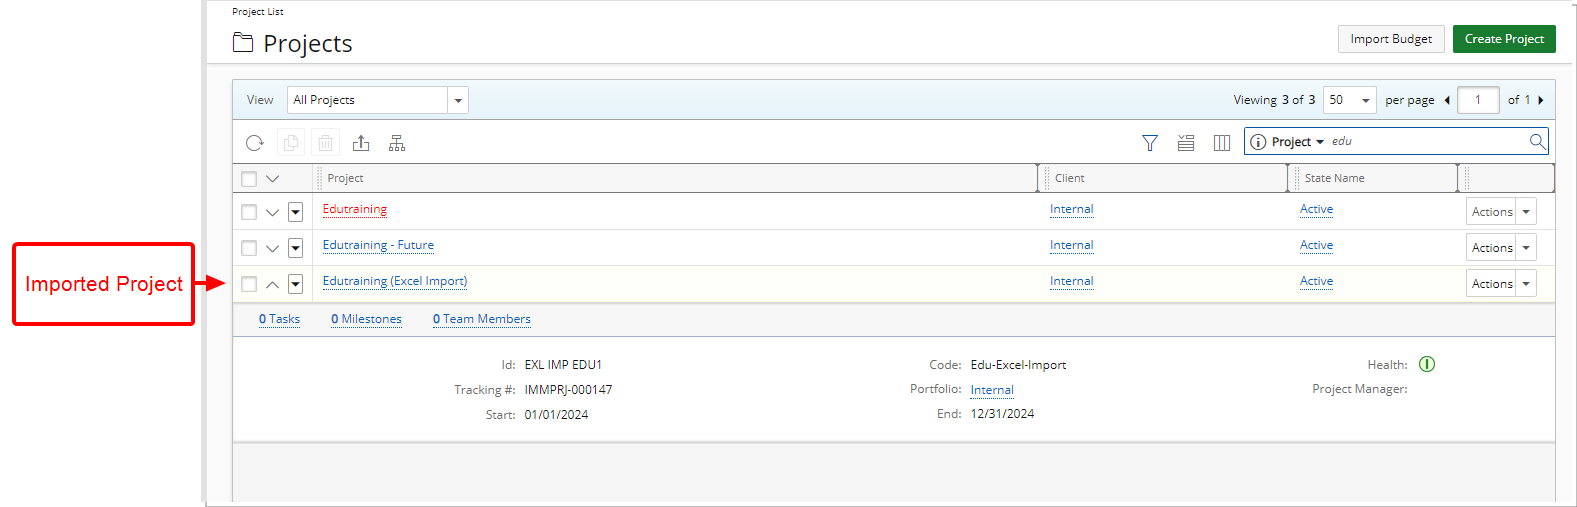
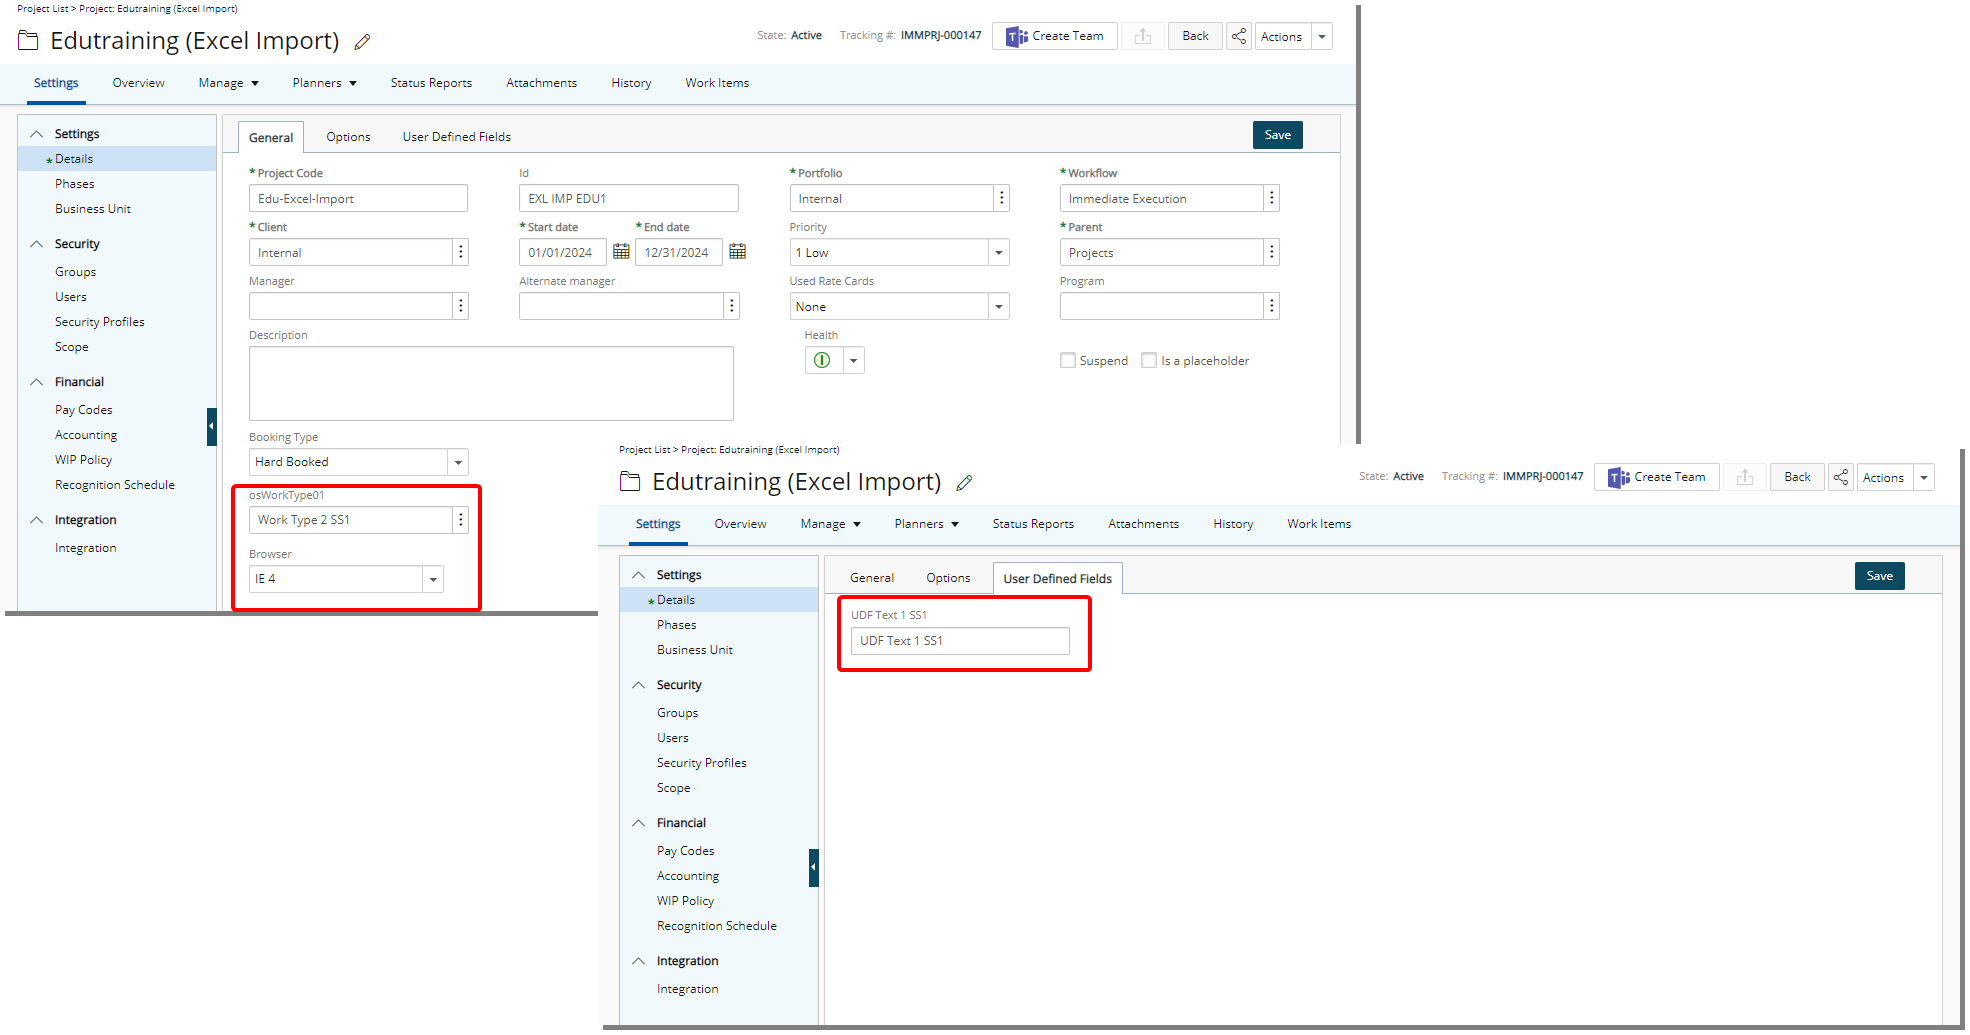
- In our example the Import process created the new Edutraining (Excel Import) Project with the following UDF values:
- UDF_osWorkType01: Work Type 2 SS1
- UDF_Bug Browser: IE 4
- UDF_UDF Text 1 SS1: UDF Text 1 SS1
Benefit: This enhancement streamlines data management by enabling bulk UDF updates, reducing the risk of human error, ensuring greater accuracy and consistency in the data.
For further details refer to:
Expense

Description: In this release we are introducing an improvement to the Expense Reporting module: the ability to Close/Reopen Expense Report periods based on selected dates and workflows.
This enhancement gives users with the newly added Can close/reopen Expense Report period security permission control over Expense periods, ensuring the accuracy of financial reporting and preventing unauthorized modifications to expense data after the reporting period has closed.
Action Required: By default, the ability to close or reopen an Expense Report period is enabled for the Administrator security profile. If this responsibility needs to be assigned to a different security profile, you must manually enable the permission for that profile first. For further details refer to New Security Permission: Can Close/Reopen Expense Report Period.
Upon clicking the Close/Open Period button a dialog box will appear, allowing you to define the closing conditions:
- You can now select specific Start and End dates to automatically Close/Reopen all Expense Reports that fall within or spans across the selected dates.
- In addition you can also Close/Reopen a Period by Workflow.
Note: If no Workflow is selected, the period will be Closed/Reopened for all Workflows.
If both dates and a specific Workflow are selected, any Expense Reports that fall within or span across the selected dates and are part of the chosen Workflow will be locked. This is particularly beneficial for organizations that manage multiple workflows or departments, offering precise control over which reports can no longer be edited.
Note: You can still create an Expense Report for the same dates using a different Workflow, as long as the Period is open for that Workflow.
Example: Let's assume that the Expense Period between June 1st and June 30 is closed.
- ExpenseReport1 having a Start Date and End Date of May 1 to May 15 will remain unlocked.
- ExpenseReport2 having a Start Date and End Date of May 15 to June 15 will be locked.
- ExpenseReport3 having a Start Date and End Date of June 15 to June 18 will be locked.
- ExpenseReport4 having a Start Date and End Date of June 15 to July 15 will be locked.

Once a period is closed, the system will restrict any of the following actions:
- Modifications or new Entries to the locked Expense Reports. ensuring that no changes can be made to reports from the closed period, maintaining financial integrity for reconciliation.
- Creation of new Expense Reports that fall within the locked period, preventing any new or copied Expense Reports that fall within the closed period and Workflow.
Note: You can still Copy the Expense Report and Share it, however all other fields remain locked.
Caution: Any updates or creation of new Expense Reports that fall within a Closed Period will fail, regardless of how they are initiated—whether from the user interface, through integrations, via a one-time script, or through any customizations.
A new information icon is also displayed against a locked Expense Report Name. Hovering over this icon informs you that the Period is Closed.

The Expense Reports that fall within a Closed Period are identified as such from the Expense Manager. Note that Period Closed is displayed within the Actions column.
Furthermore, the new Period Closed on-page Filter is now also available, allowing you to filter the page based on this criteria.
Benefit: This new feature is designed to streamline the close process and improve overall financial management, allowing for more reliable and accurate expense reporting. It allows for:
- Greater Flexibility: Administrators can now customize which expense reports are locked based on both dates and workflows, allowing for more nuanced control of the close process.
- Enhanced Data Integrity: Preventing any changes to past expense reports after a period is closed ensures that financial records remain accurate and consistent.
- Streamlined Financial Reconciliation: By locking reports tied to both date ranges and workflows, finance teams can more efficiently reconcile reports without the risk of unexpected changes post-closure.
For further details refer to:

Description: A new selection box has been added to the Expense Payable Setup page (Setup > Expense > System > Payable) under the newly added Post Options section. This setting, labeled Do not allow Payable Batch to be posted if there are open Expense Reports in the batch interval, provides you with greater control over the posting process.
Action Required: By default, the Do not allow Payable Batch to be posted if there are open Expense Reports in the batch interval setting is unchecked to maintain the existing behavior of the system. If you wish to utilize this functionality you must turn it on from the Expense Payable Setup page (Setup > Expense > System > Payable).

When this option is enabled, the system will automatically check for any open Expense Reports within the Expense Payable Batch interval during the posting process. If any Expense Reports remain unclosed, an error message will appear, stating: The Payable Batch cannot be posted until all periods within the Batch interval are marked as closed.
Note: The Expense Payable Batch picks up all the Expense Reports that follow the existing logic:
- The Expense Report must be in a State that has the Include entries in Payable Batch option checked (Setup > Expense > Workflows > Workflow edit > States tab > Details)
- All Expense Reports that follow the selected Batch Options (Financial > Expense Payable Manager > Payable Batch)
Benefit: This improvement ensures that all Expense Reports are closed before posting an Expense Payable Batch, reducing the risk of errors and ensuring financial records remain accurate and complete.
For further details refer to Invoice Setup.

Description: When reviewing all receipts via the Tools context menu in an Expense Report, you can now download all attachments as a single .zip file by clicking the newly added Download Attachments link.
When you click the link, the .zip file download begins automatically. You can find the downloaded file in your Downloads folder. To make it easy to identify, each .zip file is named after the Expense Report's Tracking number, ensuring quick access to the corresponding report.
Benefit: This improvement streamlines the process, saving you time by allowing you to quickly obtain all necessary documents in one step, rather than downloading each attachment individually.
For further details refer to Viewing and printing all receipts for an Expense Report.

Description: In previous releases, when exporting the list of Expense Reports from Assigned Reports, My Reports or All Reports tab, the base currency symbol for all amount-based columns did not consistently display. This caused confusion for users, as they could not easily distinguish between amounts in different currencies, leading to potential misinterpretations of financial data. Additionally, inconsistent column names like User’s Id and Amount due created formatting discrepancies, further complicating report readability and accuracy.
In this release we have made the following improvements:
- In the “Assigned Reports,” “My Reports,” and “All Reports” tabs, when exporting to Excel, the base currency symbol is now appended to all amount-based columns. This update ensures consistency in how currency values are represented across the following fields:
- Total Amount
- Amount to Approve
- Amount Due
- Cash Advance
- Total Payable
- Total Billable
- Total R&D
- Total Funded
- Total Amount Reimbursed
- Total Capitalized
- Total Reimbursable
- Additionally, the following column name changes have been made for improved clarity and formatting in the exported Excel file:
- User’s Id” has been renamed to User Id
- Amount due has been renamed to Amount Due
Benefit: The updated export functionality ensures that all amount-based columns now consistently display the base currency symbol, improving clarity and preventing misinterpretation of financial data. Additionally, the standardized column names enhance report readability and provide a more professional and streamlined appearance, making it easier for you to analyze and share accurate information.
For further details refer to Export to Excel.
Financial

Description: In previous releases when Do not post if there are open periods in the Invoice interval selection box was checked, the system verified if there were any Timesheets included in the Invoice Interval that were not closed and displayed a warning message.
With this release, we have introduced the functionality to Close/Reopen Expense Periods. To accommodate this new feature, the Do not post if there are open periods in the Invoice interval selection box has been renamed to Do not post if there are open Timesheet periods in the Invoice interval.
Note: Upon upgrading, to preserve your existing settings, if the Do not post if there are open periods in the Invoice interval selection box was enabled in your environment, the upgrade script will automatically enable the Do not post if there are open Timesheet periods in the Invoice interval option.
Furthermore a new selection box has been added to the Invoice tab of Financial Settings page (Setup > Financial > System > Invoice) under the Invoice Post Options section. This setting, labeled Do not post if there are open Expense periods in the Invoice interval, provides you with greater control over the posting process.
Action Required: By default, the Do not post if there are open Expense periods in the Invoice interval setting is unchecked to maintain the existing behavior of the system. If you wish to utilize this functionality you must turn it on from the Financial Settings page (Setup > Financial > System > Invoice).
Scenarios:
- When only Do not post if there are open Timesheet periods in the Invoice interval is enabled: The system will check for any open Timesheet periods within the Invoice interval during the posting process. If any Timesheet periods remain unclosed, a warning message will appear stating: The invoice cannot be posted. Some or all of the time entries to be invoiced are part of open periods. You cannot post the invoice until all of the periods in the invoice interval have been marked as closed.
- When only Do not post if there are open Expense periods in the Invoice interval is enabled: The system will check for any open Expense Reports within the Invoice interval during the posting process. If any Expense Reports remain unclosed, a warning message will appear stating: The invoice cannot be posted until all the Expense Reports in the Invoice interval are marked as closed.
- When both options are enabled and there are open Timesheet Period(s) and open Expense Report Periods:
- The Timesheet validation takes precedence. A warning message will appear stating: The invoice cannot be posted. Some or all of the time entries to be invoiced are part of open periods. You cannot post the invoice until all of the periods in the invoice interval have been marked as closed.
- Upon closing the Timesheets and reposting the Invoice, if any Expense Reports remain unclosed, a warning message will appear stating: The invoice cannot be posted until all the Expense Reports in the Invoice interval are marked as closed.
- When both options are enabled and there are closed Timesheet Periods and open Expense periods: You will receive the following warning message: The invoice cannot be posted until all the Expense Reports in the Invoice interval are marked as closed.
Benefit: This improvement ensures that all Expense Reports are closed before posting an Invoice, reducing the risk of errors and ensuring financial records remain accurate and complete.
For further details refer to:

Description: In a past release we introduced the mandatory Invoice File Name selection box which is defaulted to Organization - Invoice Number option, on the Invoices tab of Financial Settings (Financial > System) which allows you to customize the naming conventions when emailing a PDF copy of the invoice.
Improvements have now been made so that when you download an Invoice from the following areas of the application either in Excel, PDF or Word format, the downloaded file name now also follows the same Invoice File Name naming convention:
- Previewing an Invoice from Invoice Edit page (Financial> Invoice Manager> Invoices> Invoice Edit> Preview)
- Previewing an Invoice from Invoices tab of Invoice Manager (Financial> Invoice Manager> Invoices> Preview )
- Previewing when Posting/Unposting an Invoice (Financial> Invoice Manager> Invoices> Invoice Edit > Post/Unpost)
- Previewing an Invoice from the Invoices expanded row of Batches tab (Financial> Invoice Manager> Batches> Expand Drawer)
- Previewing an Invoice from the Invoices tab if an Invoice Batch (Financial> Invoice Manager> Batches> Invoice Batch Edit > Invoices tab )
- Previewing an Invoice from Client Edit Invoices tab (Setup> Work> Clients >Client Edit > Invoices tab)
Benefit: This improvement ensures a unified naming format between previewed/downloaded and emailed invoices, making it easier to track, retrieve, and categorize invoices by client or organization. By maintaining this consistency, it streamlines the process, reduces errors, and enhances overall efficiency in managing invoice records.
For further details refer to:
Description: In previous releases, when attempting to post a Payroll Batch that included time entries from open periods, the system displayed the following message: "The Payroll Batch cannot be posted. Some or all of the Time Entries to be posted are part of open periods. You cannot post the Batch until all of the periods in the batch interval have been marked as closed."
This message has now been streamlined to: "The Payroll cannot be posted until all periods within the Batch interval are marked as closed."
Benefit: The updated message offers clearer, more concise guidance, reducing confusion for you by focusing on the core issue. This enhancement improves your experience by minimizing the time spent interpreting the error message, allowing you to quickly understand the issue and take corrective action. This update aligns with our commitment to improving efficiency and ease of use in payroll management.
For further details refer to Posting a Payroll Batch.
Description: You can now choose to include the newly available Total Included Hours column through:
- The Columns Selection
 of a Client's Invoices tab (Setup > Work > Clients > Client Edit > Invoices)

- Invoice drawer of Batches tab (Financial > Invoice Manager > Batches Tab)

- Invoice tab of Batch Edit page (Financial > Invoice Manager > Batch Edit)

Moreover, the Services column has been renamed to Time.
Benefit: The Total Included Hours column displayed in the Invoices table provides a quick, consistent overview of total Timesheet hours, enabling project managers to easily verify the accuracy of invoices and make informed decisions.
For further details refer to Working with Invoice Manager.
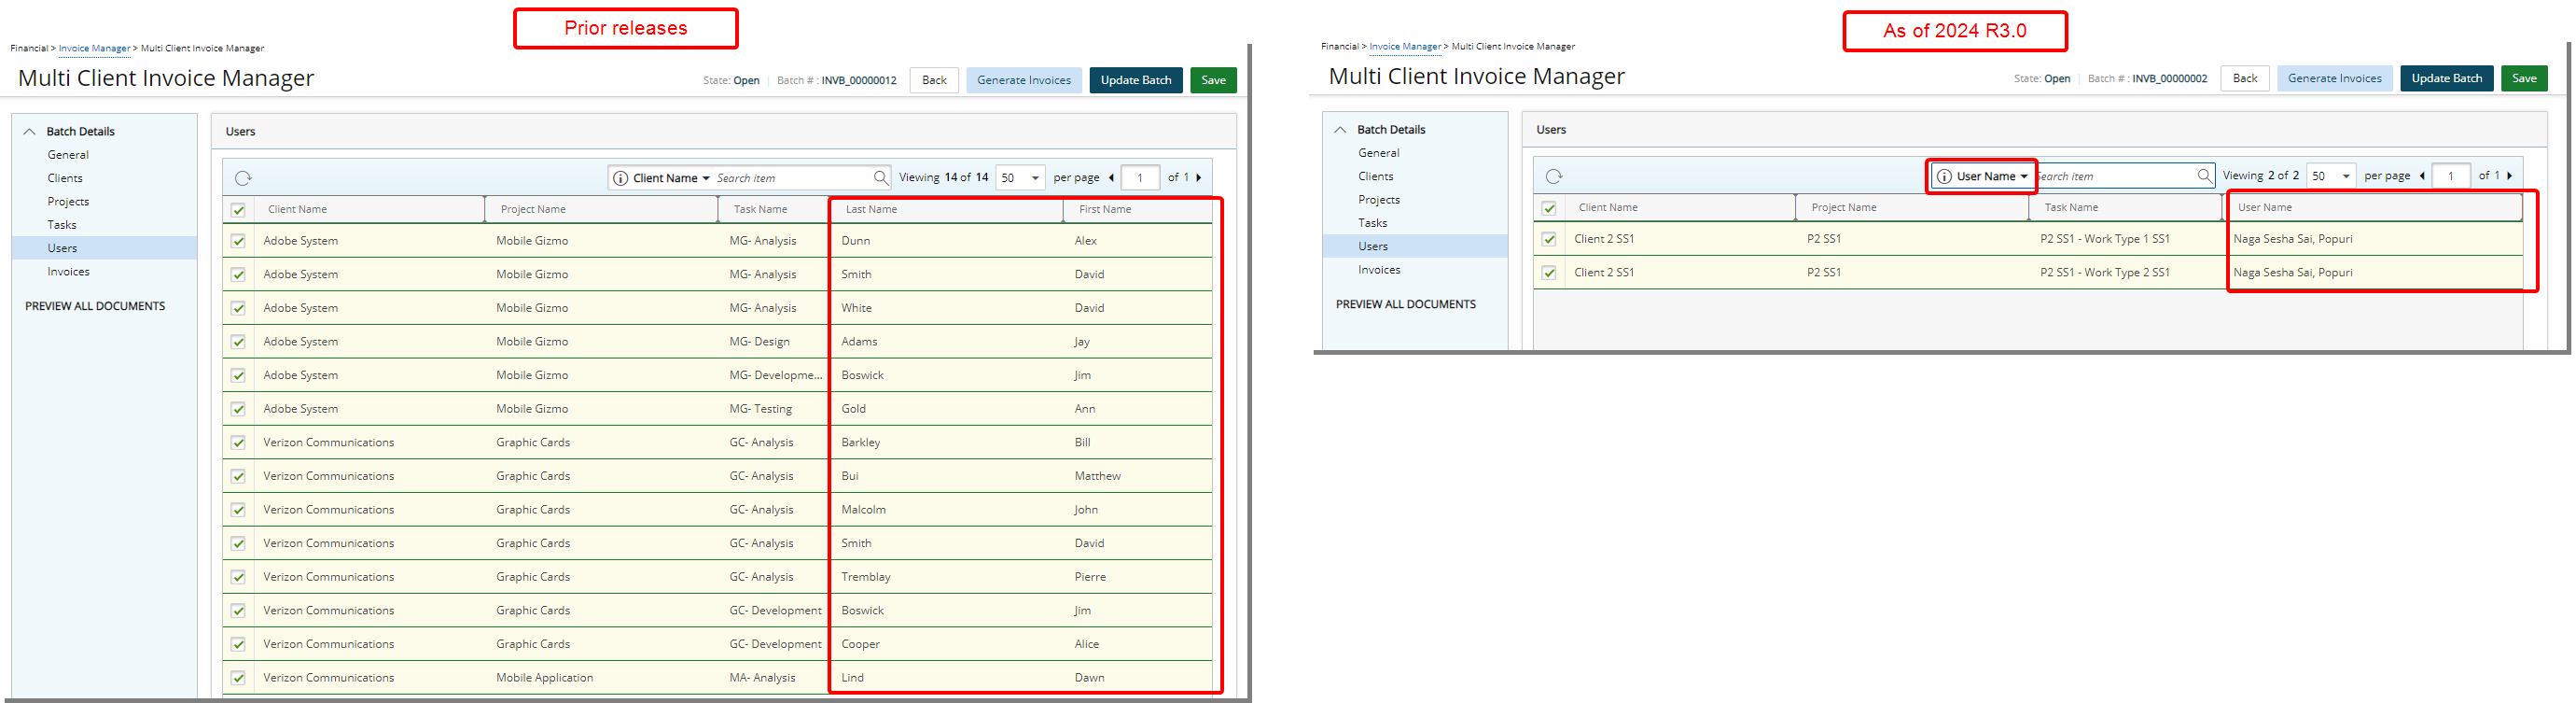
Description: In the Users tab of the Multi Client Invoice Manager, the search criteria for Last Name and First Name have been merged into a single criterion labeled User Name. Now, when you enter characters in the search box using the User Name criterion, the results will include matches from both the First and Last Name fields.
Benefit: This improvement enhances user experience, especially in environments with large user lists, and promotes consistency in data management, ultimately improving the effectiveness of the Multi Client Invoice Manager.
For further details refer to:
Financial Planner

Description: In previous releases, refreshing the Financial Planner did not automatically update the Budget and Financial Summary sections, leading to potential discrepancies in displayed data. With the latest improvements, these sections will now refresh automatically to reflect any changes. Specifically:
- Budget Summary Updates: When the Display Budget option is selected, the Budget Summary section will now refresh to display the most current budget information, ensuring that any recent updates are accurately reflected.
- Financial Summary Updates: Similarly, when the Display Financial Summary option is selected, the Financial Summary section will refresh to show the latest financial data, providing a more accurate overview of the project's financial status.
Benefit: This enhancement ensures that the Budget Summary and Financial Summary sections are always in sync with the latest data when the Financial Planner is refreshed, improving the accuracy and reliability of financial planning. You can now confidently rely on the refreshed views to reflect real-time financial information, reducing the risk of outdated data impacting budget decisions and financial assessments.
For further details refer to Accessing Financial Planner.
Integration
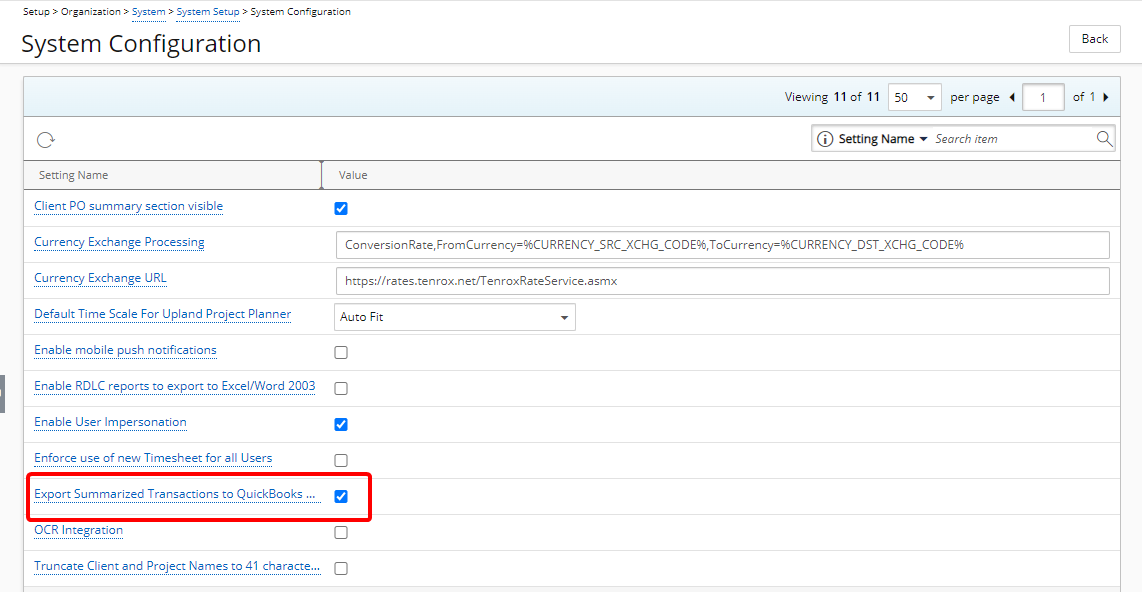
Description: In 2024 R2.0 release, we introduced a powerful framework designed to optimize the JSON files sent to QuickBooks Online. This enhancement consolidates transactions linked to the same account, resulting in a more manageable number of summarized records. By streamlining the data, the framework effectively prevents errors commonly encountered when sending large invoices with over 1000 transactions. However, the functionality had to be enabled by the PSA Technical Services Team, which added dependency on external support for a critical process.
In this release, a new Export Summarized Transactions to QuickBooks Online selection box is now available from the System Configuration page (Setup > Organization > System > System Setup) accessible only by the Master Administrator User Profile.
Note: By default, Export Summarized Transactions to QuickBooks Online is unchecked.
When Export Summarized Transactions to QuickBooks Online is turned on, transactions will be exported in a summarized format. This means that records will be consolidated based on unique references, and the sums of amounts will be calculated for transactions sharing the same reference.
Additionally, during the export process, actual transaction dates will be disregarded, and the Transaction Date in QuickBooks Online is set with the PSA Invoice Document Date. It is crucial to ensure that the amounts between the Invoice Total amount in QuickBooks Online and PSA (Financial > Invoice Manager > Invoice Edit > Summary tab) match.
Benefit: This enhancement improves the efficiency of Invoice data transmission to QuickBooks Online by consolidating transactions for easier management and successful processing. Furthermore, with the new ability for the Master Administrator to directly enable summarized exports, there's no longer a need to involve the PSA Technical Services Team, reducing delays and streamlining your workflow.
For further details refer to:
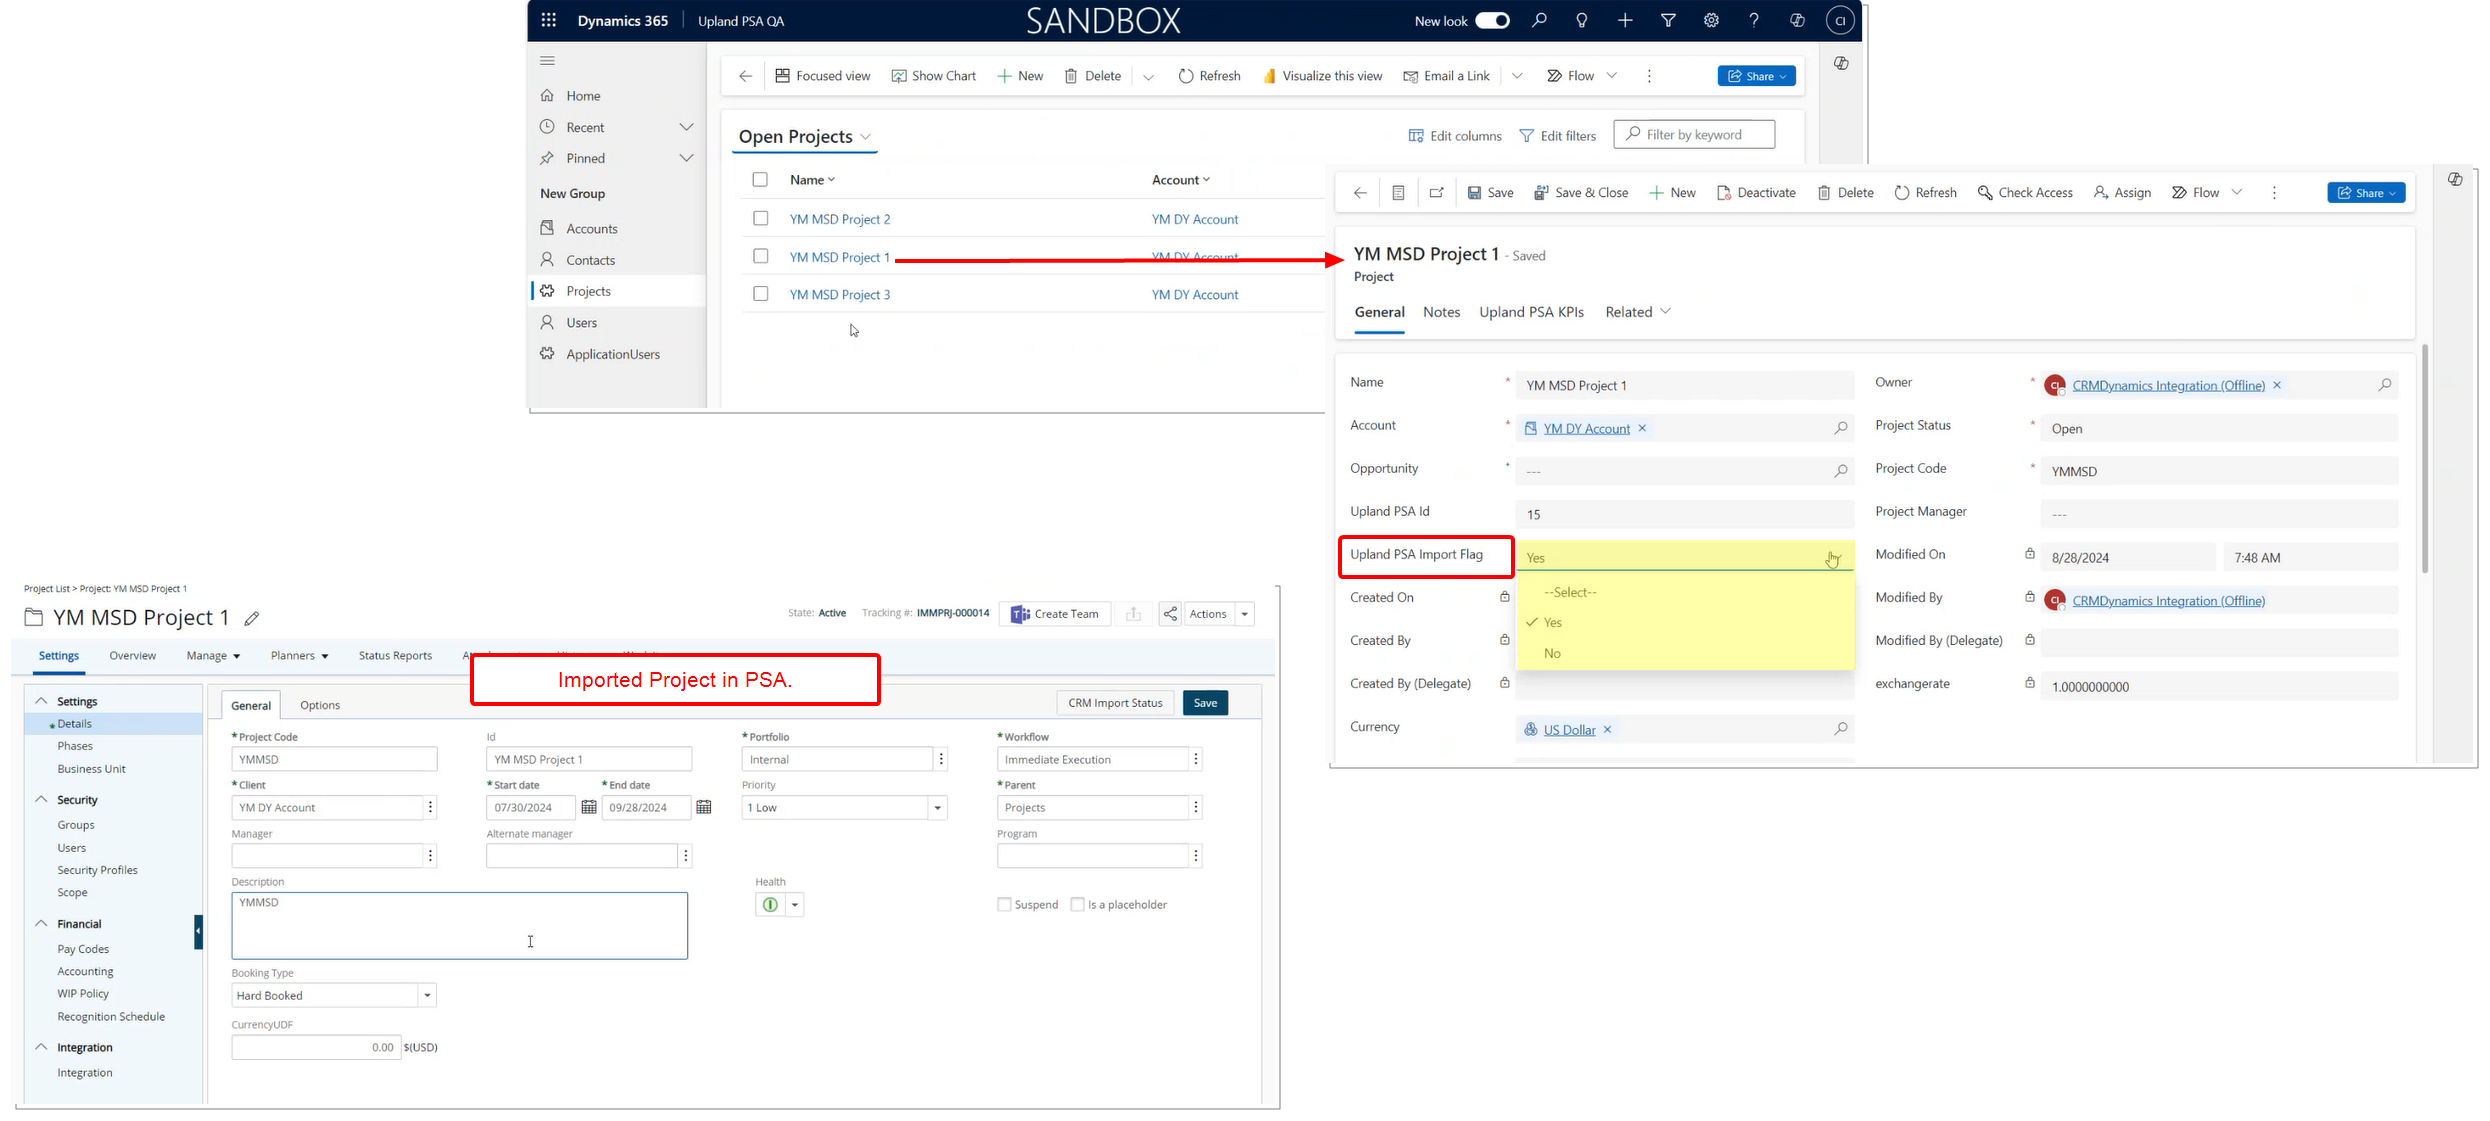
Description: The new Upland PSA Import Flag with Yes/No options is now available when modifying a Project in Microsoft Dynamics 365.
By default, the Upland PSA Import Flag is set to Yes for all Projects created after upgrading, ensuring that newly created projects in Microsoft Dynamics 365 will be automatically imported into PSA either when published from Microsoft Dynamics 365 or through the CRM Data Exchange Automation Process from PSA.
For Projects created in Microsoft Dynamics 365 before the upgrade, the Upland PSA Import Flag will have no set value (will be blank), and additional steps will be required to modify it:
- In Microsoft Dynamics 365 filter your Projects view by the new Upland PSA Import Flag having no value (blank).
- Select the required Projects in this filtered result set.
- Click Edit.
- Modify the value of Upland PSA Import Flag to Yes.
- Click Save.
Note: An error message is displayed upon attempting to publish a Project from Microsoft Dynamics CRM using the Push to Upland option where the Upland PSA Import Flag is set to No informing you that the Project could not be published to Upland PSA.
Benefit: This enhancement simplifies the integration process by ensuring that only projects with the correct settings are published. By preventing the publication of projects not intended for import, it helps maintain accuracy and reduces the risk of errors in project management.
For further details refer to PSA and Microsoft Dynamics CRM Integration.

Description: To ensure consistency and accuracy across PSA and Concur, a new Remove project from Concur when PSA Project is suspended selection box is added to the Concur Export Options (Integrations > Concur).
When selected, suspended projects in PSA are removed from Concur when Export Projects to Concur Automation Service is run.
Benefit: This improvement automatically removes suspended projects from Concur during the Export Projects to Concur Automation Service process. By doing so, it keeps Concur free from outdated or inactive projects, ensuring that project data remains accurate and consistent across both systems.
for further details refer to:
Description: The API now supports searching for Expense Items using either the Concur Integration ID or Expense Item Name, streamlining the process of managing expenses. If the Concur Integration ID is not found, the API will search by Expense Item Name and associate the correct Concur ID if matched in PSA. In cases where neither is found, a new Expense Item will be automatically created.
Benefit: This improvement enhances efficiency by simplifying Expense Item searches and reducing manual data entry, ensuring that users can quickly find or create the necessary Expense Items.
For further details refer to What occurs when the connection from PSA to Concur is set up?
Leave Request
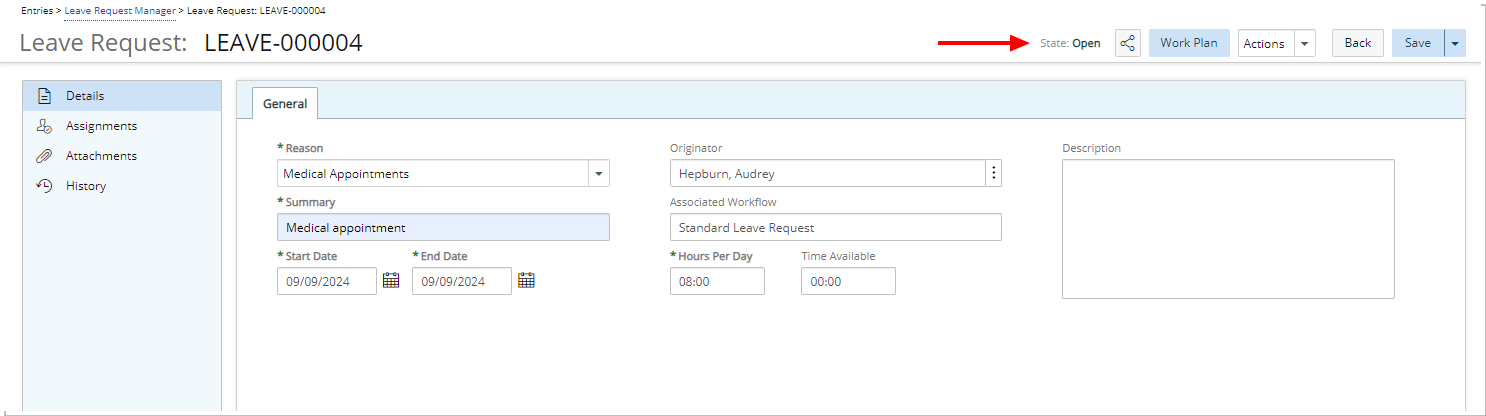
Description: You will now be able to view the current State of your Leave Request immediately after saving. The Workflow State of the Leave Request will automatically be displayed upon saving, similar to how Workflow States appear in Project creation. Typically, this will reflect the initial State of the Workflow.
Moreover, when a Leave Request is opened via the Share functionality, the Workflow State is also displayed, providing managers with immediate insight into the current State of the request.
Note: The Workflow State is read-only.
Benefit: You will now see the Workflow State of your Leave Request immediately after saving, providing instant clarity on its status. This update also benefits managers by displaying the Workflow State when a request is shared with them, enabling quicker assessment of its approval status and more efficient leave management.
For further details refer to Creating a Leave Request.
Mobile

Description: A new Adjustments tab is now available from the Add Time Entry screen of the Mobile application allowing you to enter Time Adjustments.
Note: The availability of this new tab is managed by the following: The Can create adjustments security permission which specifically governs the user's ability to create Adjustments, but only when both Show Adjustments and Can Enter Adjustments options are enabled at their Timesheet Template level. For more information and specific cases please refer to the table below.
The table below illustrates the specifics of various cases.
| Can Create Adjustments (Security Profile) | Can Enter Adjustments (Timesheet Template) | Show Adjustments (Timesheet Template) | Can enter Adjustments on My Timesheet |
|---|---|---|---|
| Turned on | Turned on | Turned on | Yes |
| Turned on | Turned on | Turned off | No |
| Turned on | Turned off | Turned on | No |
| Turned on | Turned off | Turned off | No |
| Turned off | Turned on | Turned on | No |
| Turned off | Turned on | Turned off | No |
| Turned off | Turned off | Turned on | No |
| Turned off | Turned off | Turned off | No |
Additionally, the Leave Time tab has been renamed to Non-Working to align with terminology in the web application and consistency.
Benefit: The ability to input both positive and negative values directly in the mobile app significantly enhances the flexibility of timesheet management. Whether you are correcting an overreported time or adjusting for under-reported hours, you can now do so quickly and accurately from your mobile device. This eliminates the need to switch to a desktop or web application to make these adjustments, streamlining your workflow and allowing you to manage your timesheets seamlessly, no matter where you are. This added flexibility ensures that your time tracking remains precise and up-to-date, even when you are on the move.
For further details refer to PSA Mobile - Entering Adjustments
New Timesheet
Description: Previously, when the Timesheet State changed (e.g., from 'Submitted' to 'Approved'), the position of action buttons would shift, potentially causing confusion and slowing down the approval process. The following modifications were made:

For the Compact Vertical Density view:
- The State link has been repositioned to the end of the header line, following the “< >” period navigation icons, for better accessibility.
- The font size for the word Summary and the User's name which is displayed at the beginning of the first line has been set to 15 for improved readability.
- A static width of 120 has been added to the beginning of the first line, ensuring a consistent layout.
- For the Compact Vertical Density view, where applicable, the following two icons will be displayed after the State link:
- A yellow triangle indicating warnings or issues.
- A
 Review icon (only Hourly Timesheet).
For all other densities: The State link has been repositioned to the end of the header line, following the “< >” navigation icons, for better accessibility.
Benefit: With these improvement, the position of buttons remain fixed, regardless of the State changes, allowing Timesheet approvers to navigate the interface more efficiently. This improvement simplifies the approval workflow, making it quicker and easier to approve large volumes of Timesheet without the need to reorient after each change.
For further details refer to Available options through My Timesheet.
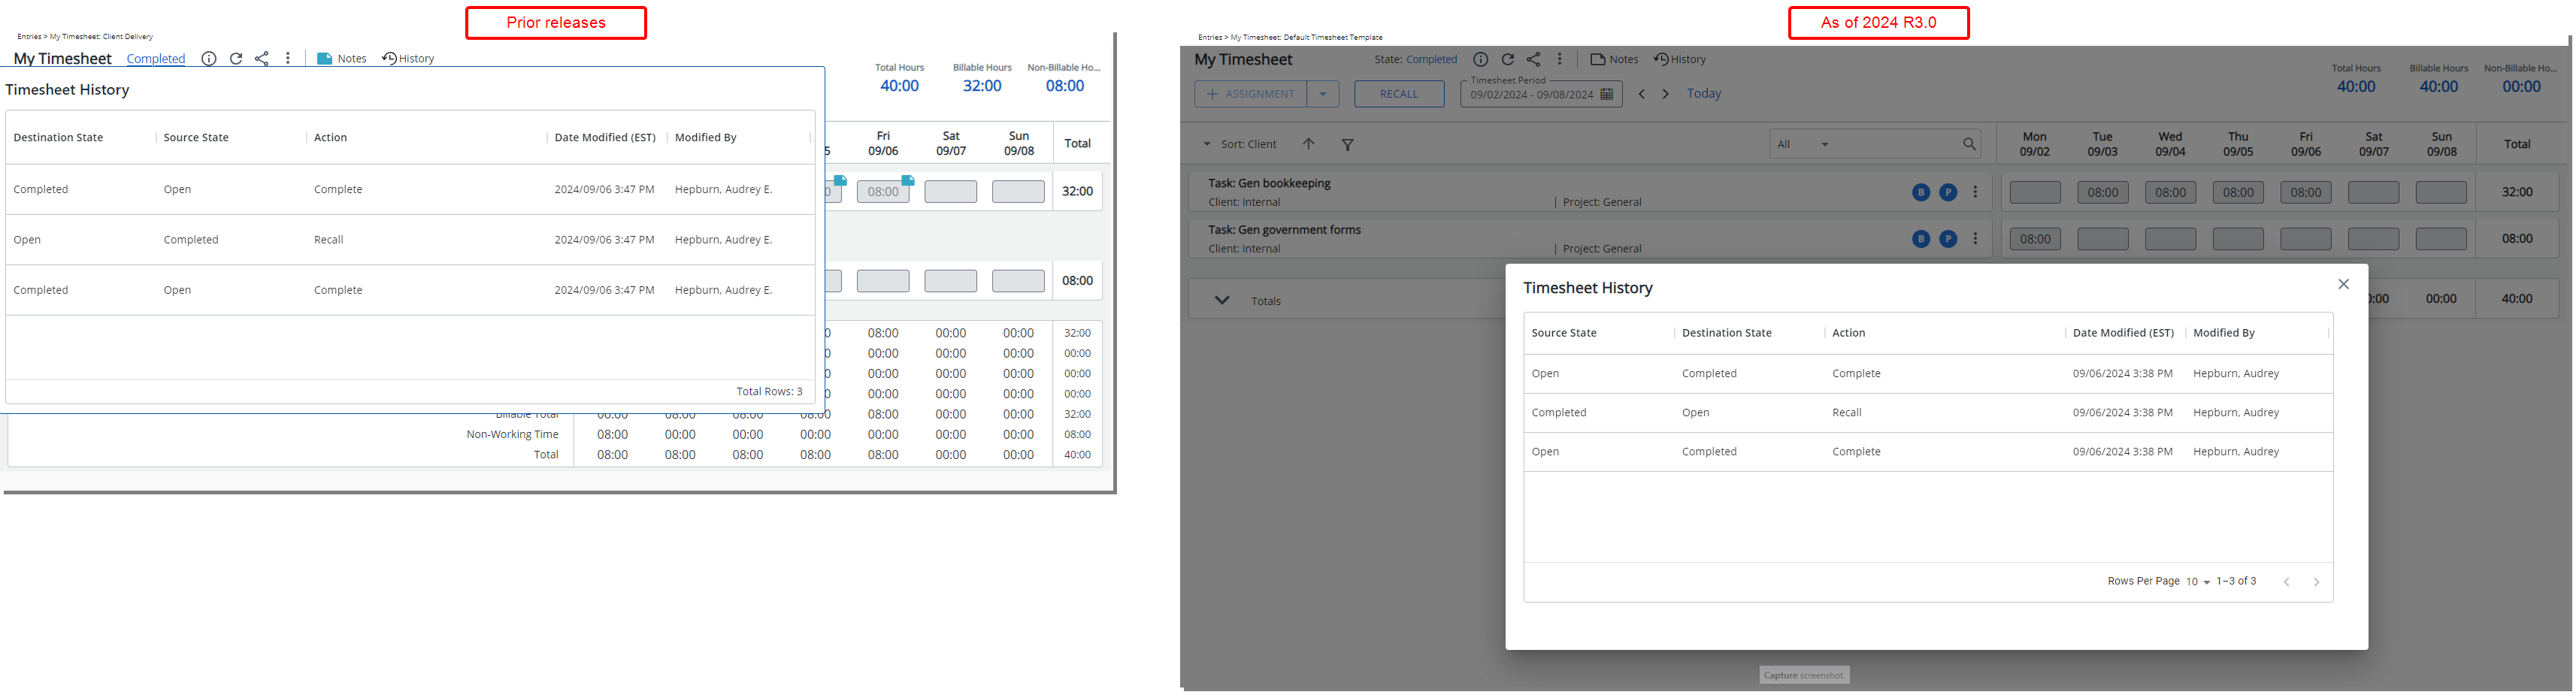
Description: In a previous release, we introduced a ![]() History button in the header section of New Timesheet page. Hovering over this button displayed a tooltip with detailed information about the State changes made to the Timesheet, including Source State, Destination State, Action, Date Modified, and Modified By. However, this tooltip obscured most of the Timesheet, making it difficult to view other Timesheet data while reviewing the History.
History button in the header section of New Timesheet page. Hovering over this button displayed a tooltip with detailed information about the State changes made to the Timesheet, including Source State, Destination State, Action, Date Modified, and Modified By. However, this tooltip obscured most of the Timesheet, making it difficult to view other Timesheet data while reviewing the History.
With this release, we have improved the feature by making the ![]() History clickable, allowing you to easily open the History dialog box for quicker access to detailed information. This dialog box provides the same detailed history information in a familiar interface, similar to the one accessed through the Timesheet Context menu
History clickable, allowing you to easily open the History dialog box for quicker access to detailed information. This dialog box provides the same detailed history information in a familiar interface, similar to the one accessed through the Timesheet Context menu ![]() . Additionally, the dialog box can now be re-positioned, allowing you to move it to a convenient location on the page.
. Additionally, the dialog box can now be re-positioned, allowing you to move it to a convenient location on the page.
Benefit: This enhancement provides a more efficient and user-friendly experience, allowing you to access the History details without losing visibility over the Timesheet. By making the History dialog movable, you can now seamlessly review past changes while simultaneously viewing Time Entries, improving workflow and decision-making.
For further details refer to Timesheet History.
Description: Enhancements have been made to the monthly view of New Timesheet to improve the user experience when entering time. In previous releases, under certain conditions outlined below, Time Entry cells were hidden and out of view. This release introduces the following improvements:
- Compact Horizontal Density View Stability: When using the Compact Horizontal Density layout, the Timesheet view now remains stable and does not shift past the selected day when opening the right panel such as the Notes panel. This keeps the day you are working on in view, making it easier to enter or edit Notes without losing track of your selected date.
- Automatic Display of Hidden Time Entry Cells: When attempting to enter Time for a day that is currently hidden from view, the timesheet will now automatically bring that cell into viewpoint. This improvement ensures that you can seamlessly enter Time for any day, even if it was initially off-screen.
- Period View Starting from the First Day: If today’s date is not part of the current Timesheet Period, the timesheet will now automatically start from the first day of the Period. This allows you to easily access and review the entire Period without needing to scroll or search for the beginning of the timeframe.
- Viewpoint Adjustment for Today’s Date: If today’s date falls within the current Timesheet Period, then today’s date is immediately visible in the viewpoint upon initial load. This makes it more convenient for you to enter Time for the current day without needing to navigate manually.
Benefit: These improvements streamline the Time Entry process by keeping the focus on the selected day, especially in the monthly view, ensuring that the entry cell remains visible.
For further details refer to My Timesheet Display Settings.

Description: Improvements have been made to New Timesheet when in read-only mode to allow you to use the tab key to navigate between entry cells. Furthermore, as you navigate between cells, the right panel is also refreshed to show the relevant data based on the currently selected cell.
Benefit: This improvement enables the right panel to automatically update as you navigate between cells in a Timesheet using the Tab key, even in read-only mode. This ensures that relevant content is consistently displayed alongside the data you're reviewing, simplifying the verification process. By aligning with standard keyboard navigation, this feature saves time, reduces the chance of overlooking important details, and enhances your overall experience when working with read-only Timesheets.
For further details refer to:
Notifications

Description: In past releases, when a Reminder to approve completed timesheets (Escalation 1) was generated, it provided only basic details such as the originator's Username, Timesheet dates, and a link to the Timesheet. While this information was helpful, it lacked the critical level of detail needed in more complex scenarios, particularly for project managers handling Timesheets that required approval from multiple parties. One of the main business challenges occurred when Timesheets were split among different approvers, creating confusion about which approver had not yet taken action.
Furthermore, a more pressing challenge lay in notifying the approvers' managers when approvals were overdue. The existing Reminder to approve completed timesheets (Escalation 1) fell short of providing the necessary details, as it only indicated that certain Timesheets were pending approval without identifying which specific approvers were responsible for the delay. This gap significantly hampered the ability to resolve escalations quickly and ensure timely approvals.
To resolve this, the new parameter, %TIMESHEETS_BY_ASSIGNEE%, is now available for the Reminder to approve completed timesheets (Escalation 1) Notification. When used, this parameter displays timesheets grouped by the assignees who have yet to approve them. Each assignee's Username is linked to their Email address, and the listed Timesheet Periods provide Direct Links to the pending Timesheets, allowing for quicker follow-up and resolution.
Benefit: This enhancement provides a clearer view of who is holding up the approval process, significantly improving accountability and streamlining compliance management.
For further details refer to System Notification Parameters.
Description: The following two new options are now available when adding Recipients to Announcement Notifications:
- Site (User's Active Site): The system identifies users who are associated to the chosen Site on the selected Scheduled Send Date. The Announcement Notification is then sent to those users.
- Timesheet Template: The system identifies users who are assigned to the selected Timesheet Template on the selected Scheduled Send Date. The Announcement Notification is then sent to those users.
These options provide enhanced flexibility in targeting specific groups of users based on their associated Active Site or assigned Timesheet Template.
The delivery of Announcement Notifications is determined by the Scheduled Send Date. This means that when setting up notifications, the system will check the user's status and assignments as of the specific send date. Only those users who meet the criteria on that date will receive the notification.
Note: Users on the Exempt List will be excluded from receiving Announcement Notifications.
Example: Let's assume that:
- User1 is assigned to TimesheetTemplate1 from Jan 1 to Mar 31 and TimesheetTemplate2 from June 1 to July 31.
- User2 is assigned to TimesheetTemplate1 from Jan 1 to July 31.
- The Administrator has setup the Announcement Notification for all users belonging to TimesheetTemplate 1 on Feb 1. The Notification Send date is set to July 1.
In this scenario User1 will not receive the notification as the User1 is assigned to Template 2 on the Scheduled Send Date (July 1). However, User2 will receive the notification.
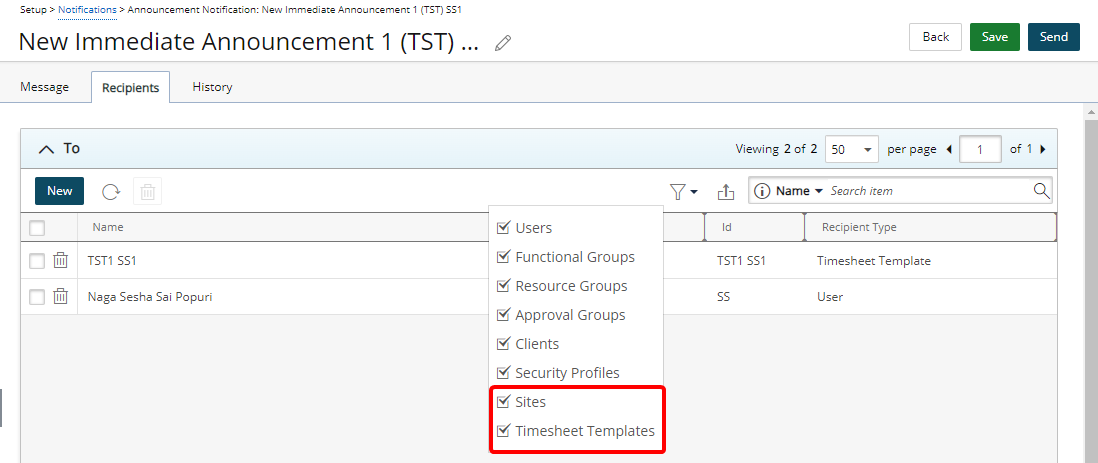
In addition, Site and Timesheet Template options are now available as on-page Filters within the Recipients tab. This allows for quicker and more precise filtering when managing your Announcement Notifications.
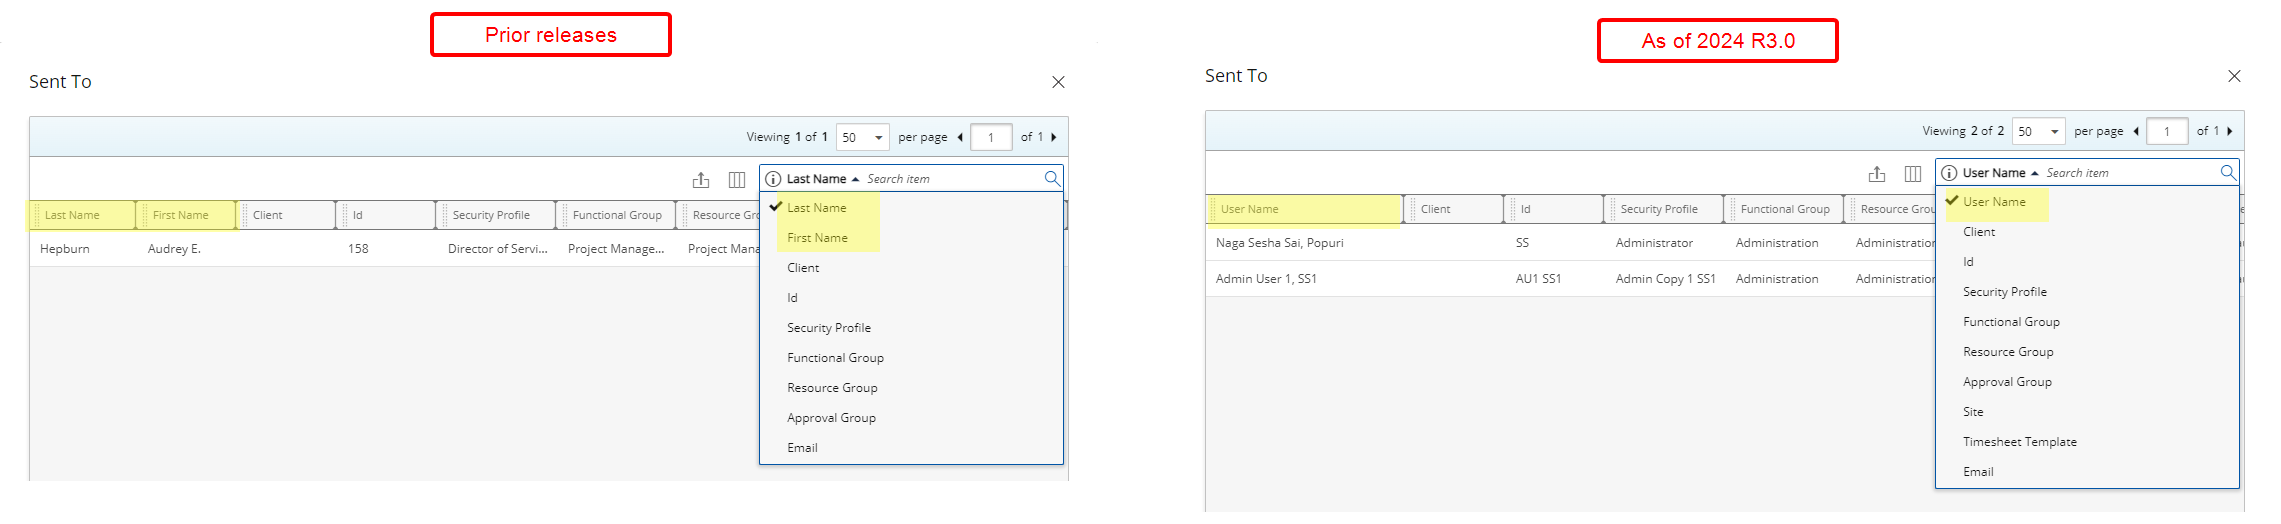
To streamline the user experience further, the Last Name and First Name columns as well as search criteria have been replaced with User Name field within the Sent To dialog box accessed through the History tab.
Benefit: These improvements not only enhance the precision with which you can manage and target announcement recipients but also streamline the process, saving time and reducing complexity. Furthermore, by using familiar fields and simplifying the interface, you can manage notifications more efficiently and with greater confidence.
For further details refer to Creating an Announcement Notification.
Organization Breakdown Structure (OBS)

Description: In previous releases, administrators were unable to Suspend a Role associated with Decommissioned or Suspended Users. This limitation prevented them from marking roles that were no longer in use, allowing new associations to be made, which compromised data integrity and led to potential inconsistencies within the system.
In this release we have made improvements to allow the suspension of a Role assigned as a Primary Role to a Decommissioned or Suspended User. This new functionality empowers administrators to effectively mark and manage Roles that are no longer in use.
When suspending a Role, the system will verify if there are any users with Primary Role associations:
- A success message is displayed, and the Role is successfully suspended if all associated Users are either Suspended or Decommissioned.
- If at least one associated User is active, an error message is shown: "This Role cannot be suspended as it is the Primary Role of active Users," and no further action is taken.

Suspended Alternate Roles are visible within the Roles page when modifying a User (Setup > Organization > Users) as long as they are still associated with a User, allowing administrators to easily identify and manage them.
Additionally, you can unassociate these suspended Roles, enabling their removal or reassignment when necessary. However, suspended Roles that have no associations, are hidden from view, streamlining the interface by displaying only relevant Roles.
Benefit: This enhancement allows for effective management of Roles that are no longer in use, ensuring that only Roles with inactive users are suspended. By preventing new associations and maintaining accurate role assignments, this functionality helps uphold data integrity and streamlines role management within the system.
For further details refer to:
Description: A new Business Units button has been added to the Title Edit page, providing direct access to the newly introduced Associated Business Units page. From this page, you can now seamlessly associate a Title with one or more Business Units for specific periods.
Note: With this release, associating Business Units to Titles does not affect the Business Units Precedence Rule. However, please note that this may be subject to change in a future release.
To associate a Business Unit with a Title:
- From the Title Edit page, click Business Units.
- On the Associated Business Units page, click New.
Note: A new line item will be added with inline editing enabled.
- Click the Browse button next to the Business Unit field to access the Business Units List page. By default, all active Business Units are listed. To view suspended Business Units, select Show Suspended Business Units.
Note: Your selection will be remembered the next time you access this dialog box.
- To refine the list, Search for a Business Unit by Name or ID.
- Select the required Business Unit.
Note: You will automatically return to the Associated Business Units page.
- Set the Start Date and End Date to define the association period.
- Click Save.
Benefit: This feature helps ensure accurate and dynamic business structure management, making it easier to reflect organizational changes and ensure the Titles remain relevant across different Business Units over time.
for further details refer to:
Description: In a previous release we introduced the functionality to bulk assign Users to Projects. Improvements have been made to this functionality to now hide suspended Projects by default from the Assigned Projects dialog box.
If you want to view both non-suspended and suspended Projects, select the Show all Projects option. Once selected, all ongoing Projects will appear within the list.
Note: Your selection for showing or hiding suspended Projects is remembered, ensuring your preferred view is consistently applied each time you log in.
Benefit: Hiding suspended projects when checking assigned projects by default reduces clutter, making it easier to focus on active ones. This enhancement helps streamline your workflow and ensures you can quickly identify the projects that require your attention.
For further details refer to:
Description: Improvements have been made to the Alternate Role management, allowing you to bulk add/remove users from a specific Alternate Role in one action.
Benefit: This improvement eliminates the need to individually update the Role for each User, making it faster and more efficient to suspend or decommission a Role by removing all associated Users at once.
For further details refer to Associating Users to Alternate Role(s).
Project Status Reporting
Description: The new Current Cost Charge Budget In Project Cost Curr. Field is now available within the Project KPI's tab when creating a Project Status Report Template. When included in a Template this field allows users to access more detailed and accurate budget information directly within the Project Status Reports, providing a clearer understanding of project financials.
Benefit: This enhancement allows you to obtain a more comprehensive view of project costs directly within the Project Status Report, streamlining the process of budget analysis and decision-making. By reducing the time required to access detailed financial data, it helps improve efficiency and ensures that users can make informed decisions more quickly.
For further details refer to Available Fields from the Project KPIs tab.
Project Team
Description: In past releases, when a resource was added to the Project Team, the Onboarding Date was automatically set to the Project Start Date, and the Offboarding Date was set to the Project End Date. This logic caused issues in cases where the Hire and/or Termination dates of Resources fell outside of the Onboarding/Offboarding dates
In this release, enhancements have been made to this logic to improve the accuracy of Onboarding and Offboarding dates when adding a new Resource to the Project Team:
- When a new User Resource Type is added to the Project Team, the system automatically sets the Onboarding and Offboarding dates based on these key criteria:
- The Onboarding Date is automatically set to the most recent of either the Project Start date or the Resource’s Hire date. This ensures that the resource is not scheduled to start before they are officially hired or before the project begins.
- The Offboarding Date is automatically set to the earliest of either the Project End date or the Resource’s Termination date. This prevents scheduling a resource beyond when they are available or after the project has concluded.
- For Role based Resource Types, the Onboarding and Offboarding dates remain empty, allowing for flexibility when defining Roles without specific dates tied to individuals.
Benefit: This approach automatically aligns the Onboarding and Offboarding dates with both the project timeline and the resource’s Hite/Termination dates, reducing the risk of scheduling conflicts and ensuring accurate project planning.
Description: In 2024 R2.0 release we introduced an information icon within the Project Teams page, when a Resources' On/Offboarding Dates conflicted with their Hire/Termination Dates.
In this release improvements have been made to remove the information icon related to conflicts with On/Offboarding and Hire/Termination Dates from the Project Team page.
The existing validations will still trigger, displaying a warning message, and you will be able to save your changes.
Benefit: This update simplifies the user interface by reducing clutter on the Project Team page, making it cleaner and easier to navigate while existing validations still provide clear alerts, ensuring that Project Managers are informed of any date conflicts without hindering their ability to make necessary changes. Overall, the cleaner interface and uninterrupted workflow contribute to a better user experience.
For further details refer to the On/Offboarding section of the help center.
Description: This release introduces enhancements to validations and warnings when modifying On/Offboarding Dates that conflict with a resource's hard Booking Dates. Key scenarios include:
- Conflicting Dates with Hard Bookings
If both Onboarding and Offboarding dates conflict and there are Hard Bookings outside the selected interval, the following message is displayed: "There are bookings outside of the selected On/Offboarding Dates. The earliest Onboarding Date is {date of first booking} and the latest Offboarding Date is {date of last booking}. Do you want to continue with these dates?"
Clicking "NO" prevents saving the dates, while clicking "YES" updates them to the first and last booking dates.
-
Conflicting Dates with Entries
If only Time/Expense/Charge/Product Entries conflict, the following message is displayed: "There are entries outside of the selected On/Offboarding Dates. The earliest Onboarding Date is {date of first entry} and the latest Offboarding Date is {date of last entry}. Do you want to continue with these dates?"
Clicking "NO" prevents saving, while clicking "YES" updates to the earliest and latest entry dates.
- No Conflicts
If there are no conflicts, the new Onboarding and Offboarding dates are updated successfully, and a success message is displayed.
- Onboarding Conflicts
If only the Onboarding date conflicts, the following message is displayed: "The selected On/Offboarding dates cannot be set for some Resources. The earliest Onboarding Date can be set as seen below. Do you want to continue with these dates?"
Clicking "NO" prevents saving, while clicking "YES" updates dates to the earliest available for those with entries and retains the initial choice for others.
-
Offboarding Conflicts
If only the Offboarding date conflicts, the following message is displayed: "The selected On/Offboarding dates cannot be set for some Resources. The latest Offboarding Date can be set as seen below. Do you want to continue with these dates?"
Clicking "NO" prevents saving, while clicking "YES" updates dates accordingly.
- Combined Conflicts
When both dates conflict, , the following message is displayed: "The selected On/Offboarding dates cannot be set for some Resources. The earliest Onboarding Date and the latest Offboarding Date can be set as seen below. Do you want to continue with these dates?"
Clicking "NO" prevents saving, while clicking "YES" updates the dates based on the earliest and latest entries for resources with conflicts.
Benefit: Project Managers are immediately alerted to conflicts, allowing for quick corrections. This enhances resource management efficiency and accuracy, reduces booking conflicts, and improves overall user satisfaction with the resource allocation process.
Description: When modifying On/Offboarding dates for a Resource with Assignments, the associated Task Assignment Start and End Dates automatically adjust to reflect these changes. Key scenarios include:
When the Onboarding Date is modified
The new Task Assignment Start Date will be set to the latest date among the Task Start Date, the old Task Assignment Start Date, and the new Onboarding Date.
Any Task Assignment without Entries that ends before the new Onboarding Date will be deleted.
When the Offboarding Date is modified
The new Task Assignment End Date will be set to the earliest date among the Task End Date, the old Task Assignment End Date, and the new Offboarding Date.
Any Task Assignment without Entries that ends after the new Offboarding Date will be deleted.
Benefit: This improvement enables project managers to seamlessly adjust On/Offboarding dates, automatically updating Task Assignment dates. This automation saves time, enhances accuracy by reducing manual errors, and ensures resource schedules align with project timelines.

Description: In a previous release, we introduced a warning icon which displayed after a Resource Name, when there was a Rate Card Association or Bookings outside of the Hire or Termination Dates. This sometimes caused confusion for users, as the warning could be overlooked.
In this release we have made improvements to display this warning message before the Resource Name. This improvement ensures that you are more easily alerted to potential issues, including:
- When Bookings don't match On/Offboarding
- When Hire/Termination don't match On/Offboarding
- When the Resource doesn't have an associated Rate Card
Benefit: These enhancements help you quickly identify and address discrepancies, improving your overall experience in managing resources effectively.
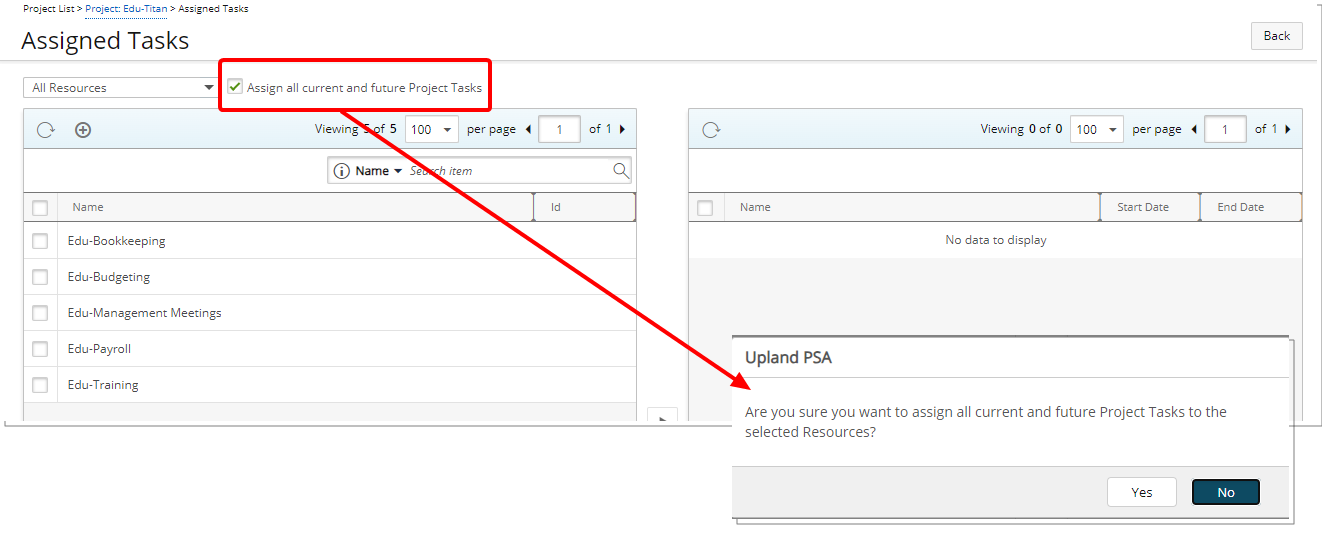
Description: In a previous release, we introduced the option to automatically Assign all current and future Project Tasks to either All or Selected Resources, simplifying Task allocation.
Building on this improvement, we have now added a confirmation message that allows you to either proceed with or cancel the process.
Benefit: This added step ensures that your task assignments are accurate and aligned with your needs.
for further details refer to Assigning Tasks through the Project Team page.
Rate Cards

Description: In an earlier release, we introduced the ability to define Rate Cards at both the Financial and Project levels. With this release, you can now also define Rate Cards at the Client level.
Users with the newly added Can Modify Client Rate Cards security permission, can access the Client Rate Cards by clicking the new Rate Cards menu option available from the Client edit side navigation. Upon accessing the Client Rate Cards page you can:
- Assign an already existing Rate Card to your Client.
- Create a new Rate Card.
- Click the Refresh
 button to refresh the list.
 - Click the Copy
 button to copy an existing Rate Card.
 - Click the Delete
 button to delete selected Rate Card(s).
 - Click the Export
 button to export the list to Excel.
 - Click the Import button to import Rate Cards from Excel.
- Manage Columns from Column Selection .
- By default Search
 for Rate Cards based on Name, Id and Effective Date. You can manage the Search criteria from Column Selection .
 - Pagination is available at the top right corner to facilitate easy navigation across pages.
- From the table header:
- Sort the columns by ascending or descending order simply by clicking a column header. Note that an arrow indicates the descending (
 ) or ascending (
 ) order applied to the column.
 - Click
 and move a column to the desired position.
 - Dynamically resize column(s), to your preferred width. Simply move your cursor to the column boundary (
 ) you want to resize. When the cursor becomes a resize cursor, click and drag the column accordingly
- Sort the columns by ascending or descending order simply by clicking a column header. Note that an arrow indicates the descending (

Clicking New Rate Card will add a new line item to the list where inline editing is enabled allowing you to create the new Rate Card:
- Enter a Name and Id.
- Select the required Currency.
- Choose an Effective Date.
- When the Rate Card is saved, you can then access the Rate Card drawer and continue the setup process by adding Items.

Clicking Assign Rate Card will add a new line item to the list where inline editing is enabled allowing you to choose an already existing Rate Card defined at the Financial level:
- Choose an Effective Date.
- Click Save.
- You can then access the Rate Card drawer and continue the setup process by adding Items or modifying existing ones that were defined at the financial level.

Additionally, the existing Security permission Can Modify Project Rate Cards now governs the newly added Used Rate Cards selection list available from the Settings tab of the Project Edit page.
Note: For users without this permission, the Used Rate Cards selection box will be read-only, and the Rate Cards tab will be hidden, ensuring appropriate access control.
This selection list allows users to specify which Rate Card will be applied to the Project. The available options are:
- None: Default selection.
- Client: When selected, the active Rate Card defined at the Client level will automatically apply to the hourly billing rates of the Project.
Note: Rate Cards defined at the Client level will be visible from Project Edit, however, you can not modify them. The active Rate Card will be displayed in bold to distinguish it from the non-active ones and are applied as Actual and Forecast Rates in the Financial Planner.
- Project: When selected, the active Rate Card defined at the Project level will automatically apply to the hourly billing rates of the Project.
Note: Upon upgrading to 2024 R3.0, the Project option will be automatically selected if you were already using Rate Cards for your projects. Otherwise, the default value for this selection box is None.
If your project has been utilizing Project Rate Cards and you decide to switch to a different rate card type (Client or None), all the existing project-specific Rate Cards will be deleted. A validation message will appear to confirm the change, ensuring you are aware of the impact and preventing unintended loss of important Project Rate Card data.
Benefit: By defining a Rate Card at the Client level, you can ensure consistent and accurate billing across multiple Projects for the same Client, simplifying financial management and enhancing pricing transparency for your Clients.
For further details refer to the following sections in the help center:
Resource Management
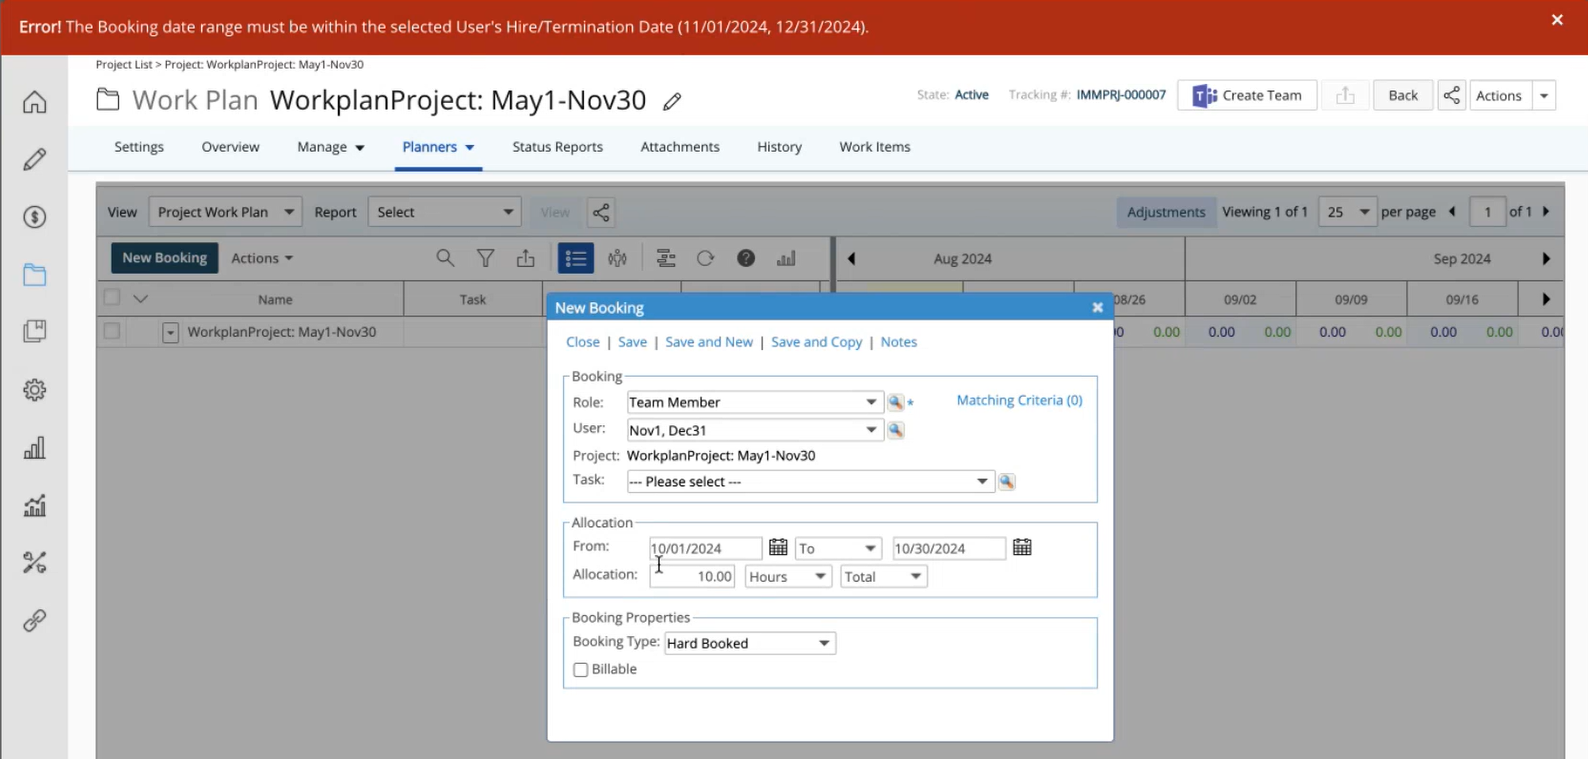
Description: In this release, we are introducing error notifications to prevent Hard Bookings of resources outside their designated On/Off-boarding and Hire/Termination dates. When attempting to Shift, Split, Update Effort, or Copy Bookings, the system will trigger error messages if these actions would cause Hard Bookings to extend beyond the resource's On/Off-boarding and Hire/Termination dates.
Benefit: This improvement ensures that Project and Resource Managers are alerted immediately if they attempt to schedule a user only within their specified On/Offboarding and Hire/Termination dates, aligning with their actual availability and contractual commitments, thereby maintaining accurate and efficient resource allocation.
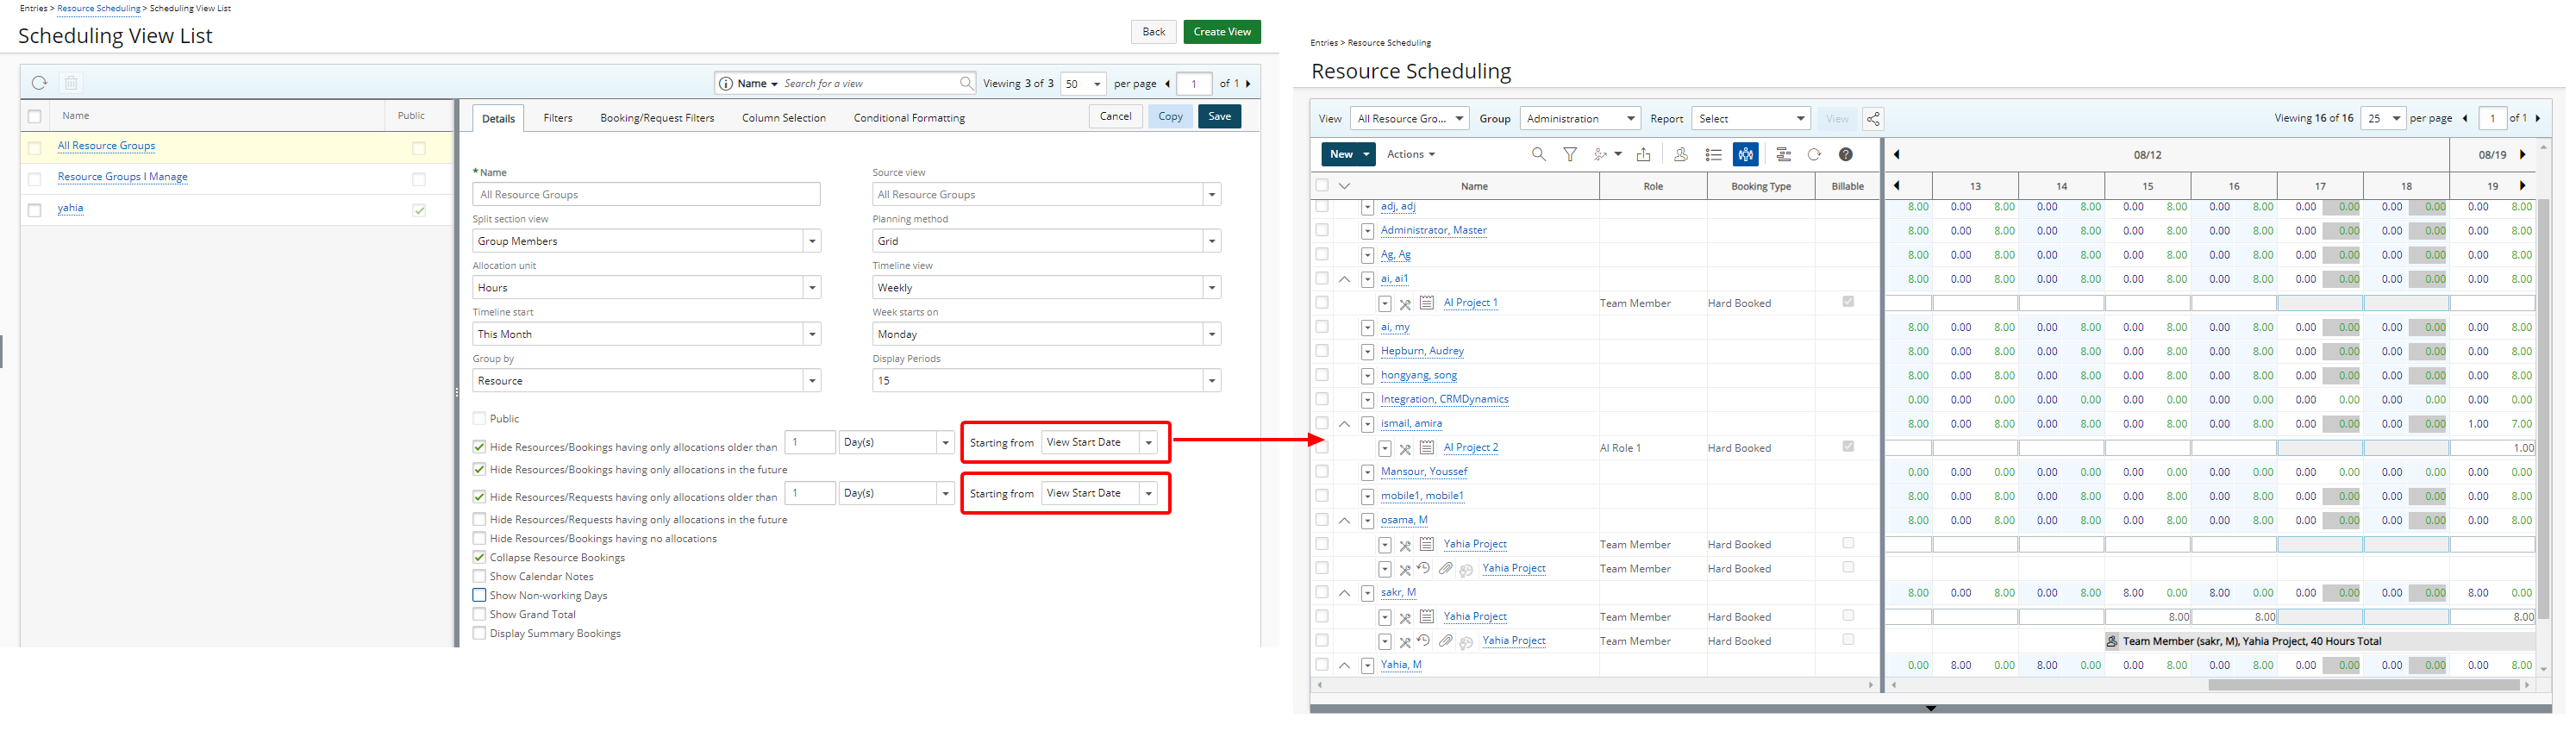
Description: In previous releases when selecting the following options on the Details tab of the Scheduling View edit page:
- Hide Resources/Bookings having only allocations older than x [Month(s), Week(s) or Day(s)]
- Hide Resources/Requests having only allocations older than x [Month(s), Week(s) or Day(s)]
The system would hide these outdated Resources/Bookings or Resources/Requests starting from the current date (Today).
Now, Resource Managers can choose to show or Hide Resources/Bookings and/or Resources/Requests starting from either Today’s Date or View Start Date. This enhancement allows for a more streamlined view by hiding past or unnecessary bookings, making it easier to focus on current and future resource allocations from all Work Plans:
- Group Work Plan (Setup > Organization > Groups > Group Edit)
- User Work Plan (Setup > Organization > Users > User Edit)
- Role Work Plan (Setup > Organization > Roles > Role Edit)
- Project Work Plan (Project List > Project Edit > Planners) Or (Project List > Context Menu)
- Resource Scheduling Work Plan (Entries > Resource Scheduling)
- Project Scheduling Work Plan (Entries > Project Scheduling)
- My Work Plan (Entries > My Work Plan)
Benefit: By tailoring the display of Bookings and Requests, the Work Plan becomes less cluttered and more focused, enhancing decision-making and efficiency in resource management.
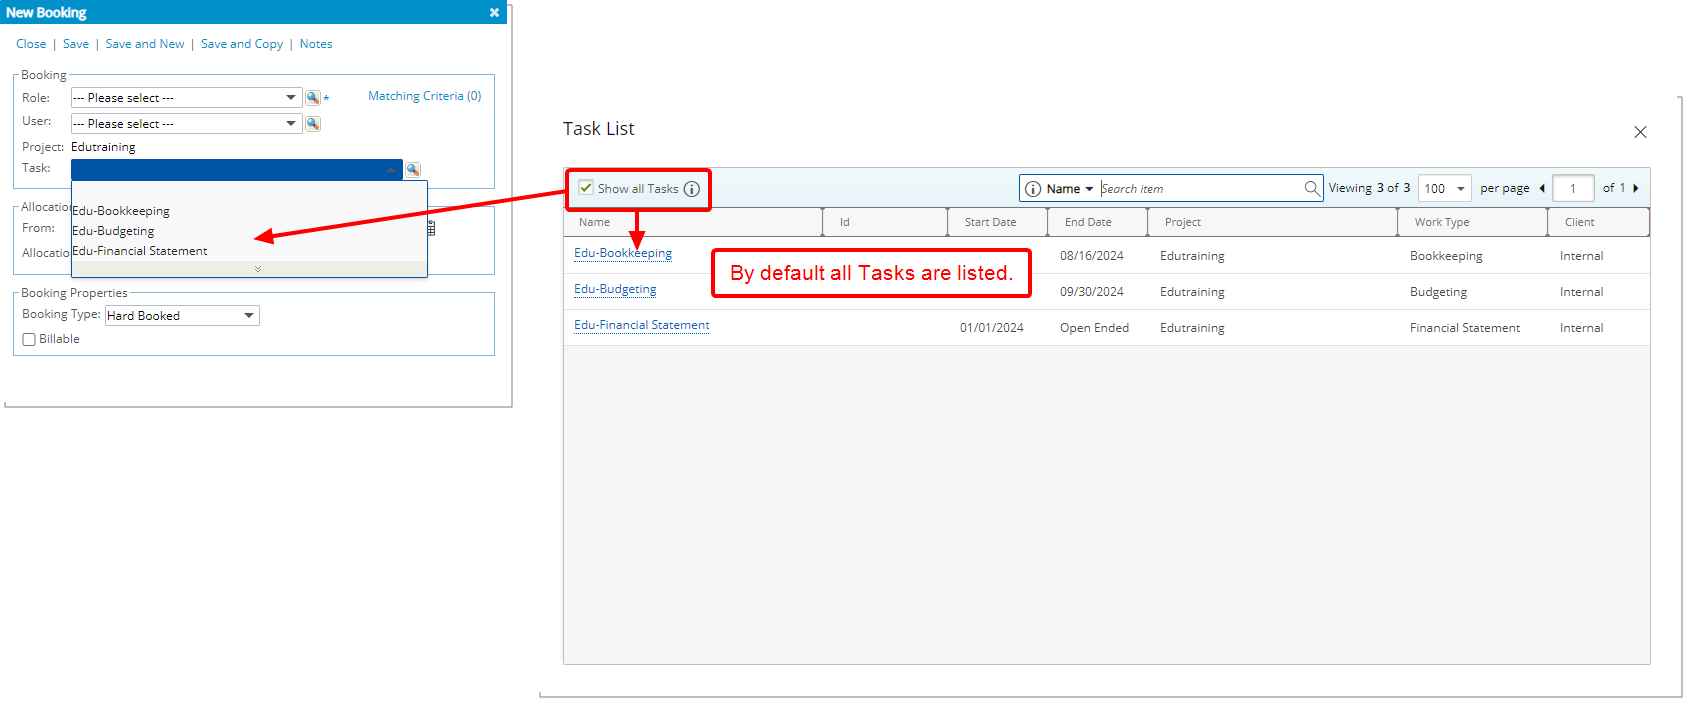
Description: You now have the option to display only current Tasks (with an End date of today or in the future) when creating or modifying a Booking or Booking Request across all Work Plans.
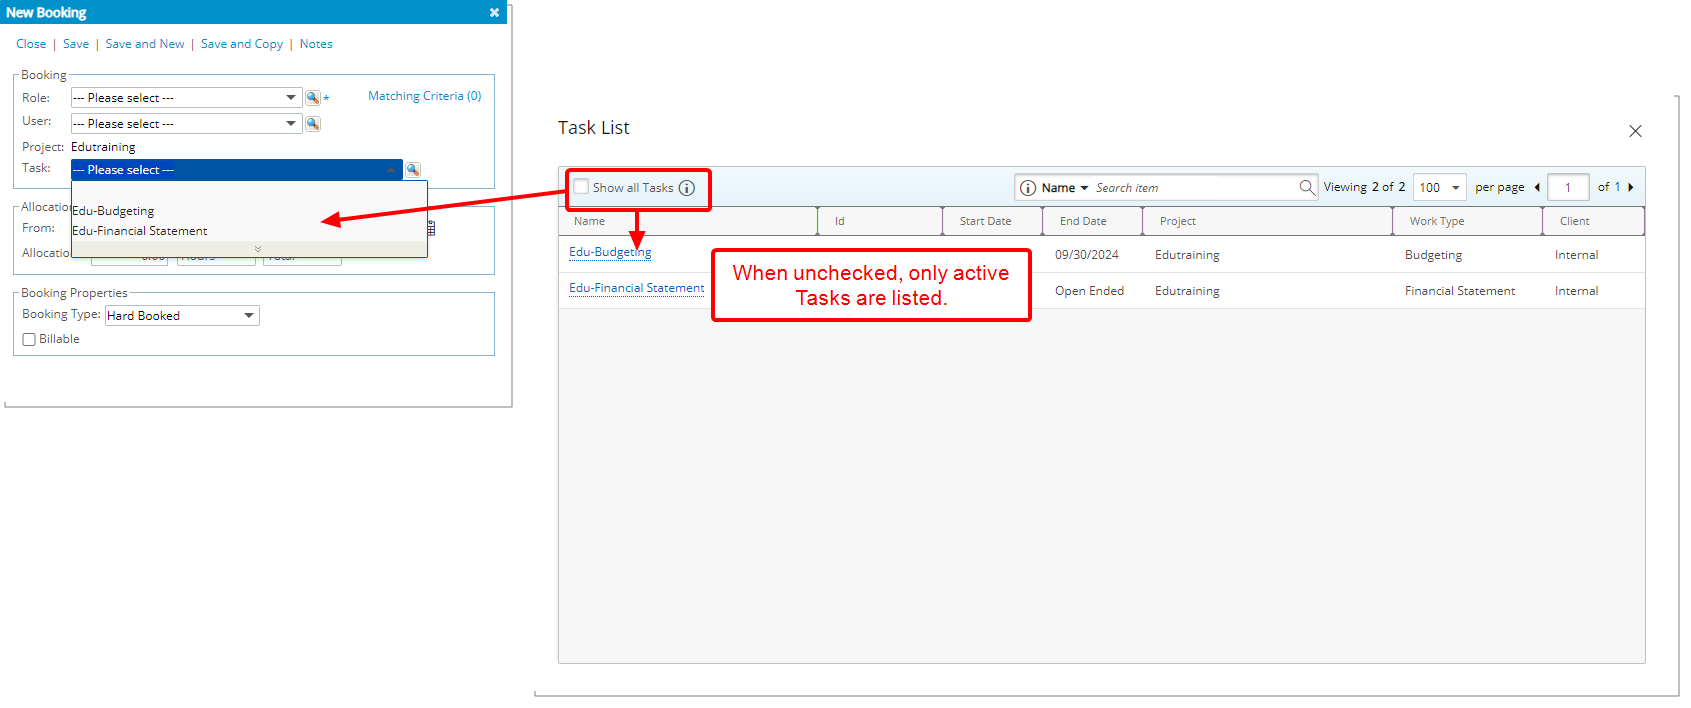
By default, the Task selection box within the New/Modify Booking or New/Modify Booking Request and Task List dialog boxes displays only current tasks (with an End date of today or in the future). If you want to view all Tasks, excluding suspended ones, you can check the Show All Tasks option in the Task List dialog box while browsing for a Task. Once selected, all non-suspended tasks will appear in both the Task selection box and the Task List dialog box.
Note: Your selection will be remembered across all Work Plans and Views for the same browser, so you won’t need to adjust it repeatedly.
Benefit: This default setting helps you focus on relevant, current Tasks without the distraction of past ones.
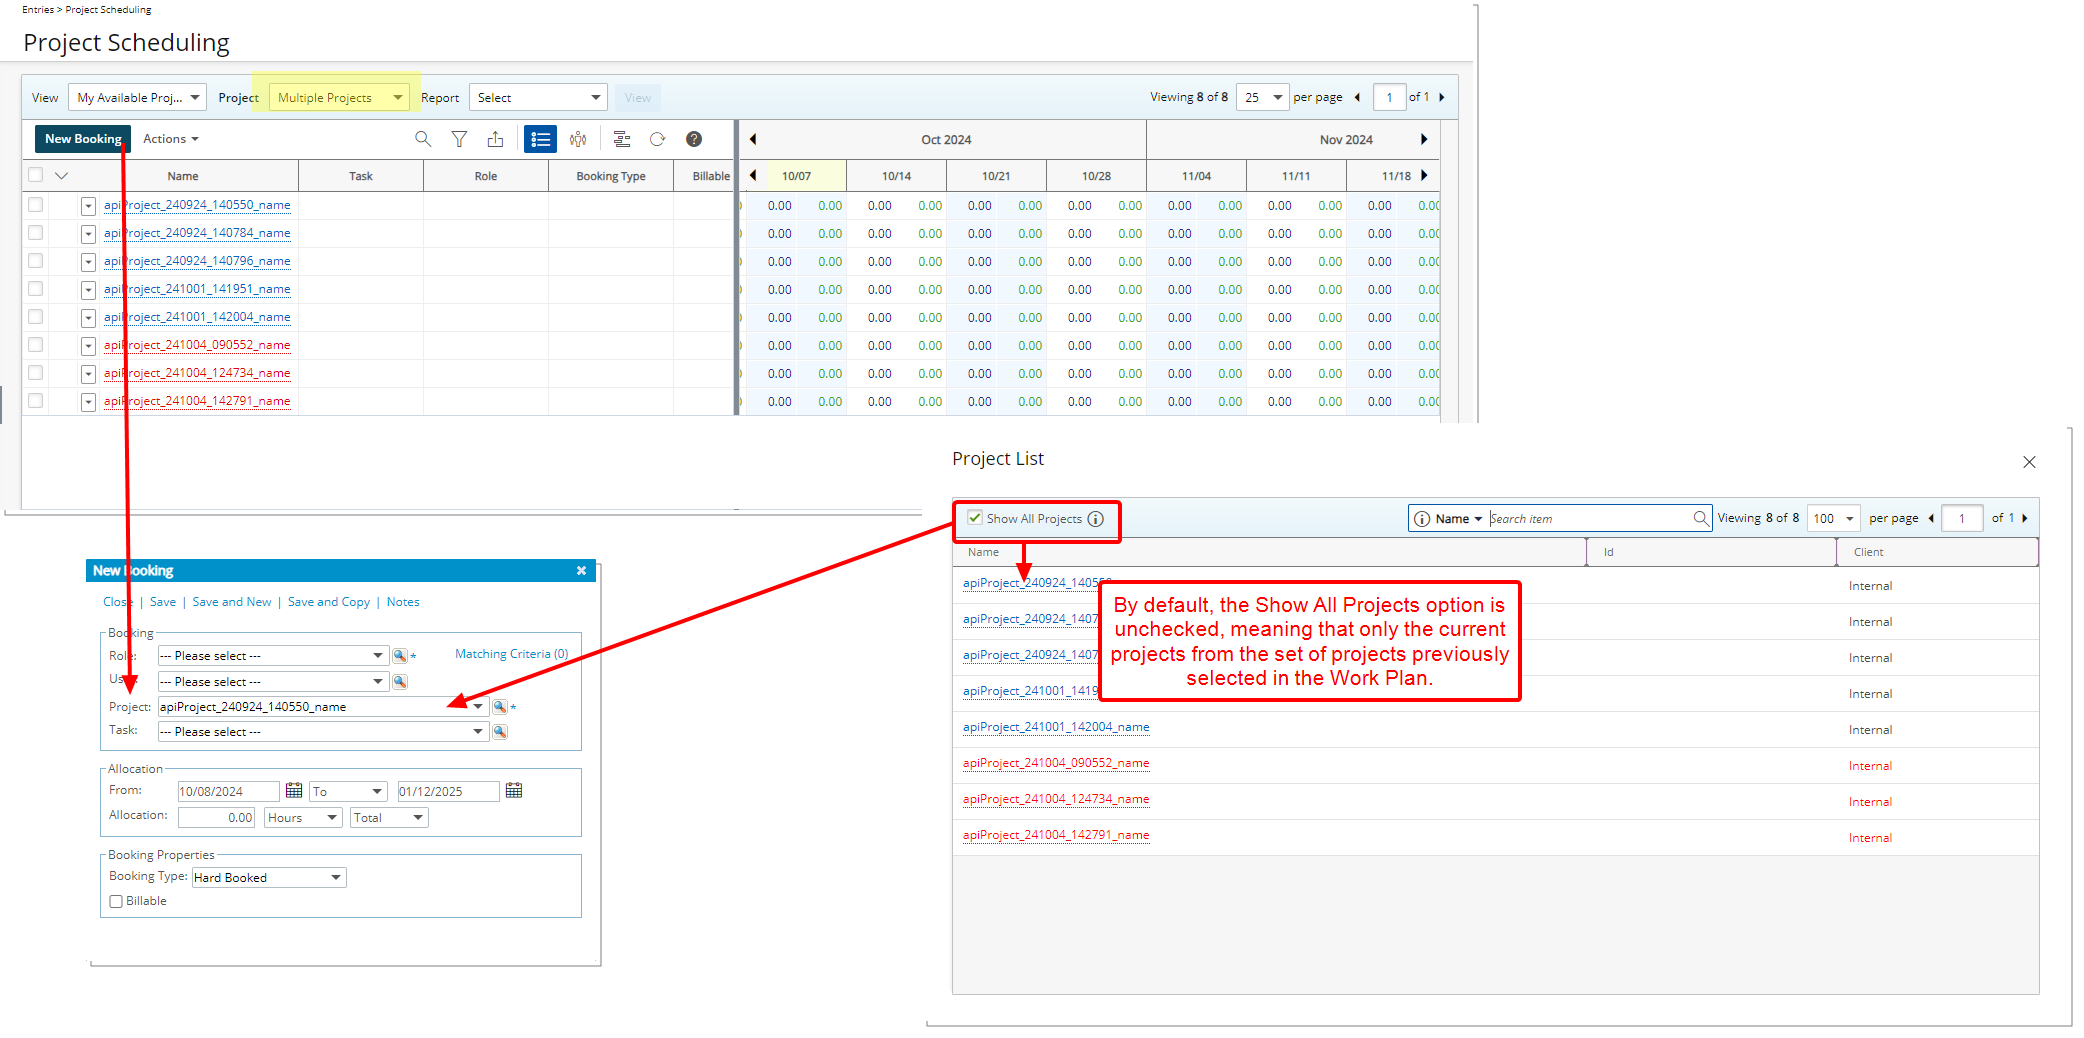
Description: You now have the option to display only current Projects (with an End date of today or in the future) when creating/modifying a Booking or a Booking Request from the following Work Plans:
- Resource Scheduling Work Plan (Entries > Resource Scheduling)
- Project Scheduling Work Plan (Entries > Project Scheduling)
- My Work Plan (Entries > My Work Plan)
By default, the Show All Projects option is unchecked, meaning that only the current projects from the set of projects previously selected in the Work Plan displayed in the Project selection box within the New/Modify Booking or New/Modify Booking Request and Project List dialog boxes. If you want to view all projects, you can check this option in the Project List dialog box. Once selected, all projects will appear in the Project selection box as well as in the Project List dialog box.
Note: Your selection will be remembered across the above-mentioned Work Plans and Views for the same browser, so you won’t need to adjust it repeatedly.
Benefit: This default setting helps you focus on relevant, current Projects and Tasks without the distraction of past Projects.
Security

Description: A new security permission, Can Modify Client Rate Cards, is now available to provide more granular control over who can access and modify Client Rate Cards (Setup > Work > Clients > Client Edit).
Note: This security permission is granted by default for the Administrator Security Profile.
This permission can be accessed and configured from Setup > Organization > System > Security > Security Profile > Setup > Work. Administrators can grant or restrict this permission using Yes/No permissions, giving specific users the ability to access and modify Client Rate Cards.
To enable this permission for a Security Profile:
- Navigate to Setup > Organization > System > Security > Security Profile.
- Select the security profile for the user or group that needs access.
- Go to Setup > Work.
- Locate the permission labeled Can Modify Client Rate Cards.
- Set the permission to Yes to grant access.
- Save the changes to apply the updated permissions.
Note: The Rate Cards option in the Client side menu will be hidden for users who do not have this permission
Benefit: This enables more precise management of sensitive data, ensuring that only authorized users can make changes to Client Rate Cards.
For further details refer to Client Rate Cards Security permission.
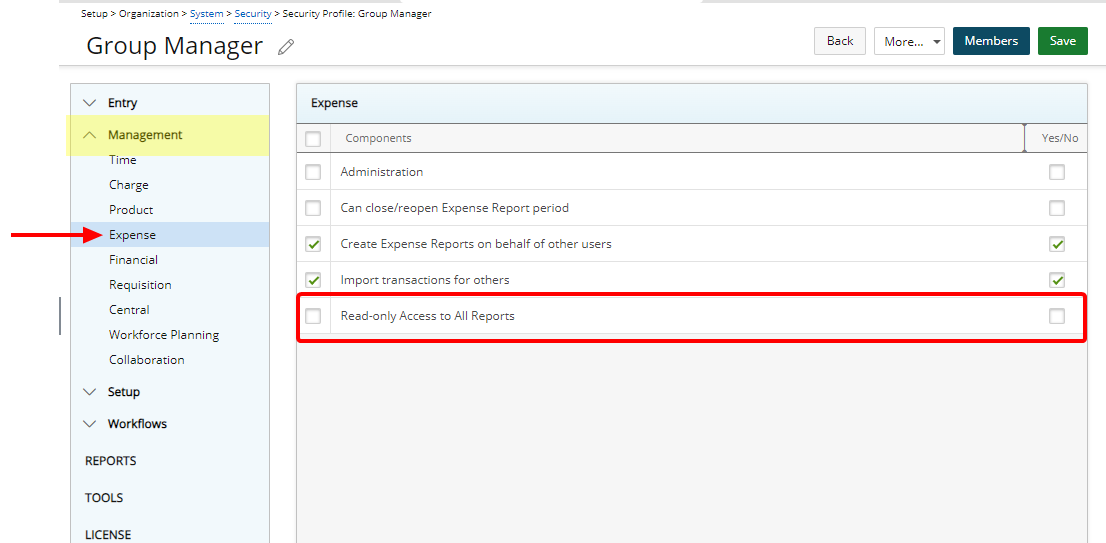
Description: A new security permission, Read-only Access to All Reports, is now available to provide more granular control over who can View the All Reports tab located within the Expense Manager.
This permission can be accessed and configured from Setup > Organization > System > Security > Security Profile > Management > Expense. Administrators can grant or restrict this permission using Yes/No access rights, giving specific users the ability to view All Reports tab.
Caution: The Read-only Access to All Reports permission is dependent on the Administration permission.

When the security permission is enabled, Users belonging to the Security Profile, will have read-only access to the All Reports tab, allowing them to view and analyze Expense Reports without the risk of making accidental changes.
To enable this permission for a Security Profile:
- Navigate to Setup > Organization > System > Security > Security Profile.
- Select the security profile for the user or group that needs access.
- Go to Management > Expense.
- Locate the permission labeled Read-only Access to All Reports.
- Set the permission to Yes to grant access.
- Save the changes to apply the updated permissions.
Benefit: This Security Permissions allows users to review financial data and track report statuses, ensuring the integrity of the information is maintained. By limiting access to read-only, it allows for thorough analysis while safeguarding the reports from unintended edits or modifications.
For further details refer to Granting the Read-Only Access to All Reports tab in Expense Manager.
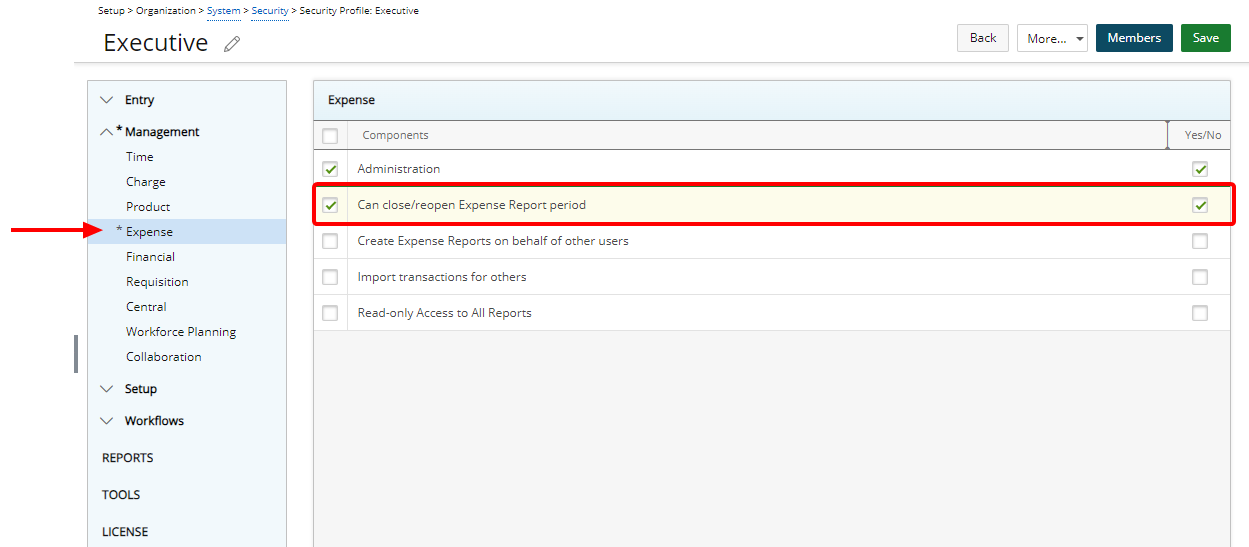
Description: A new security permission, Can close/reopen Expense Report period, is now available to provide more granular control over who can manage the closing and reopening of expense report periods.
This permission can be accessed and configured from Setup > Organization > System > Security > Security Profile > Management > Expense. Administrators can grant or restrict this permission using Yes/No access rights, giving specific users the ability to manage expense report periods based on their security profile.
By default, this permission is enabled for the Administrator security profile, ensuring that system administrators have full control over closing and reopening periods. However, if the task of managing expense report periods needs to be delegated to other roles or departments, you must manually enable this permission for those users by adjusting their security profile settings.
To enable this permission for a Security Profile:
- Navigate to Setup > Organization > System > Security > Security Profile.
- Select the security profile for the user or group that needs access.
- Go to Management > Expense.
- Locate the permission labeled Can close/reopen Expense Report period.
- Set the permission to Yes to grant access.
- Save the changes to apply the updated permissions.
Benefit: This Security permission allows you to ensure that only authorized users can control the closure and reopening of Expense Report Periods, safeguarding the integrity of financial data.
For further details refer to Granting the right to close/reopen Expense Report periods.
Description: In previous releases, the following two Security Permissions were located under Setup > Financial within the Security Profile settings:
- Can associate Billing Rules to non-project Team members
- Can associate Cost Rules to non-project Team members
In this release, to streamline access, these Security Permissions have been relocated under Management > Financial, where other related Cost and Billing permissions are already managed.
Benefit: This improvement ensures that all permissions concerning Cost and Billing rules are now grouped together, streamlining the process of configuring security settings. Administrators can now access and manage these permissions more efficiently from a single, cohesive location within PSA.
For further details refer to Granting the right to associate Billing and/or Cost Rules to non-project Team members.
UI/UX Enhancements
Description: The Role edit page is now structured in the same familiar format already in use in other areas of the application. Although most of the features remain the same, the appearance and usability have been significantly improved to enhance your overall experience.
Upon creating a new Role, you can now enter/select the General Settings. You can then access the Skills, Work Plan, Forecast Rate and Attachments through the tab navigation.
Upon saving the Role, the Members sub-tab is then available to you, where you can associate Primary and Alternate Roles.
Furthermore, within the Members tab, a new Show Inactive Users selection box has been introduced to enhance user management. This option is unchecked by default, ensuring that all Suspended Users are hidden from view initially, which helps maintain a streamlined interface. You can easily reveal Suspended Users by selecting Show Inactive Users option. However, even when displayed, these Suspended Users cannot be selected or associated with any Roles, preventing accidental associations.
Further improvements have been made to the Alternate Role management, allowing you to now associate or disassociate multiple Alternate Roles at once. This enhancement streamlines the process, giving you greater flexibility and efficiency when managing Role associations, especially in scenarios where multiple changes are needed. For further details refer to Improved Alternate Role Management.
Benefit: The UI/UX improvements aim to modernize the look and feel of the application, fostering uniformity and elevating user experience.
For further details refer to the Configuring Roles (OBS) section of the help center.
Description: The user interface including spacing, colors, positioning, buttons, icons and fonts of the Workforce Planning Notification Page (Setup > Notifications > Workforce Planning Notifications > Notification Edit has been improved for better user experience and consistency with the other updates that have been made thus far.
When creating a new Workforce Planning Notification, you can:
- Enter the Name and Subject. Then choose the Language.
- Select the Associated Projects.
- Then enter the Message body and click Save.
- Upon saving, the Recipients and Criteria tabs are then available to you.

Although the Criteria tab has a new look, its functionality remains unchanged from previous releases. You can continue to use this tab with the same processes and outcomes that you are familiar with, ensuring a smooth transition without any need to relearn or adjust to new features.

The functionality of adding Recipients also remains the same as in previous release, however the following improvements have also been made:
- The New and Delete links were converted to buttons.
- Addition of the ability to Refresh the list.
- Addition of the ability to Export the list to Excel.
- Addition of the ability to Search the list based on Recipient Type and Message Type.
- Pagination is available at the top right corner to facilitate easy navigation across pages.
Benefit: The UI/UX improvements aim to modernize the look and feel of the application, fostering uniformity and elevating user experience.
For further details refer to:
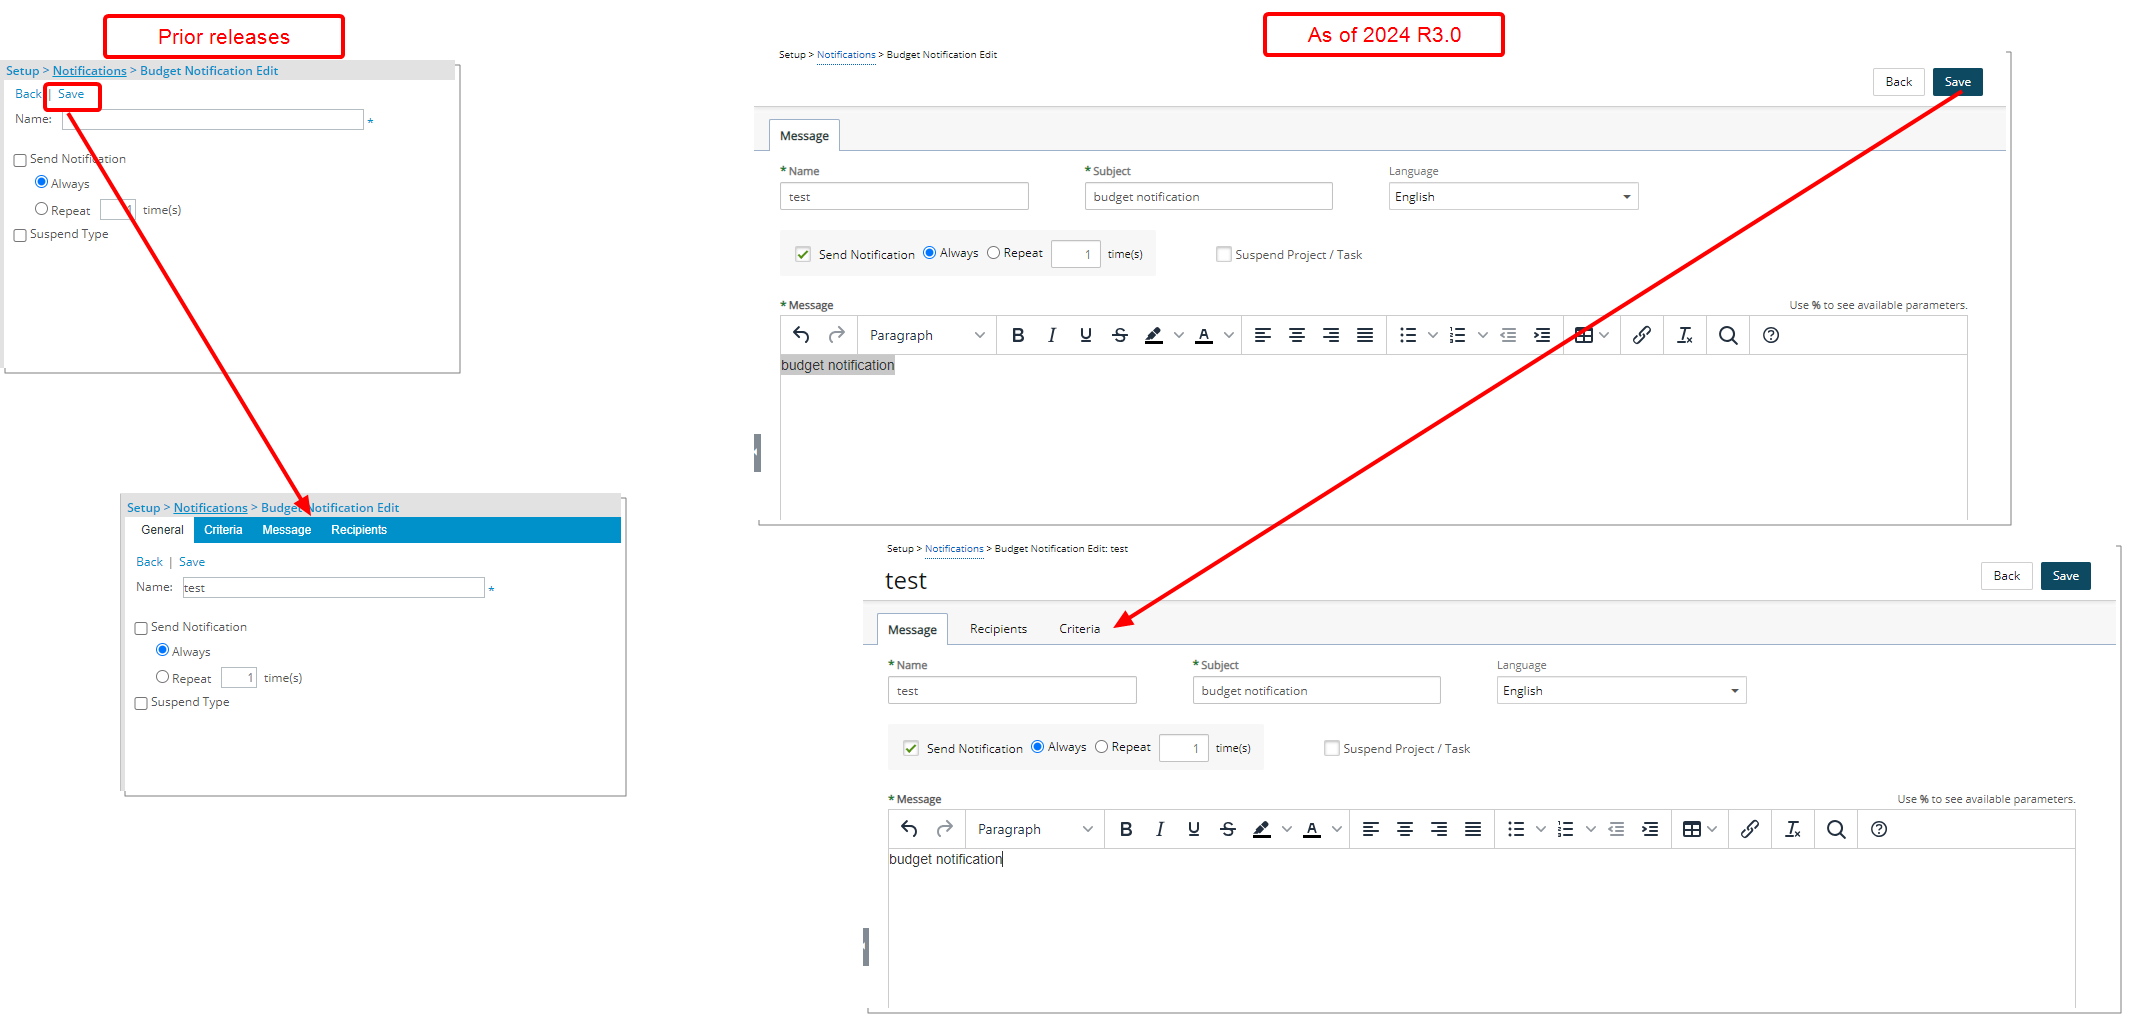
Description: The user interface including spacing, colors, positioning, buttons, icons and fonts of the Budget Notification pages (Setup > Notifications > Budget Notifications > Notification Edit, Project List > Project Edit> Budget Notifications > Notification Edit and Setup > Work > Tasks > Task Edit > Budget > Budget Notifications > Budget Notification Edit) have been improved for better user experience and consistency with the other updates that have been made thus far.
When creating a new Budget Notification, you can:
- Enter the Name and Subject. Then choose the Language.
- Select the frequency.
- Enter the Message body and click Save.
- Upon saving, the Recipients and Criteria tabs are then available to you.
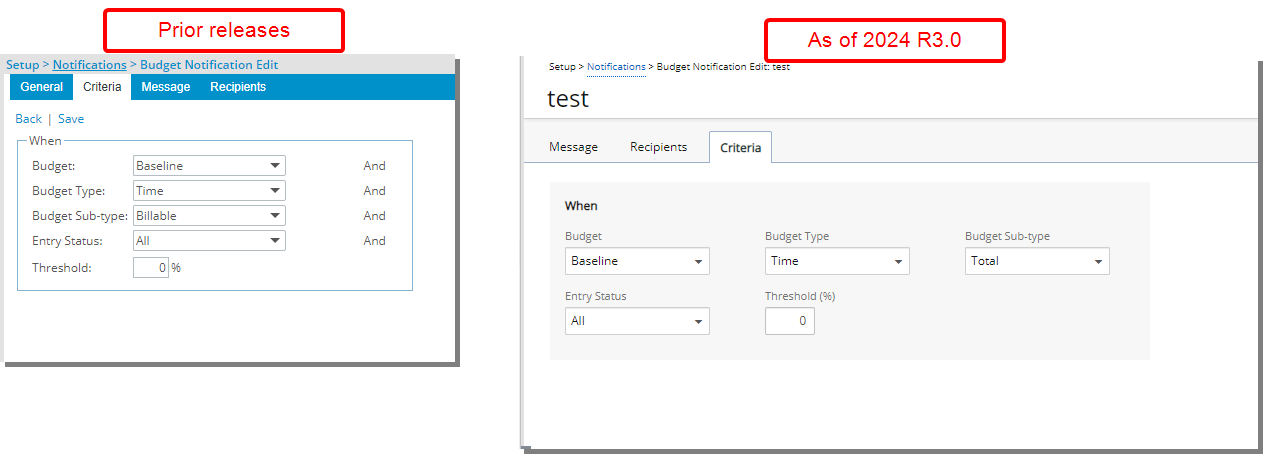
Although the Criteria tab has a new look, its functionality remains unchanged from previous releases. You can continue to use this tab with the same processes and outcomes that you are familiar with, ensuring a smooth transition without any need to relearn or adjust to new features.
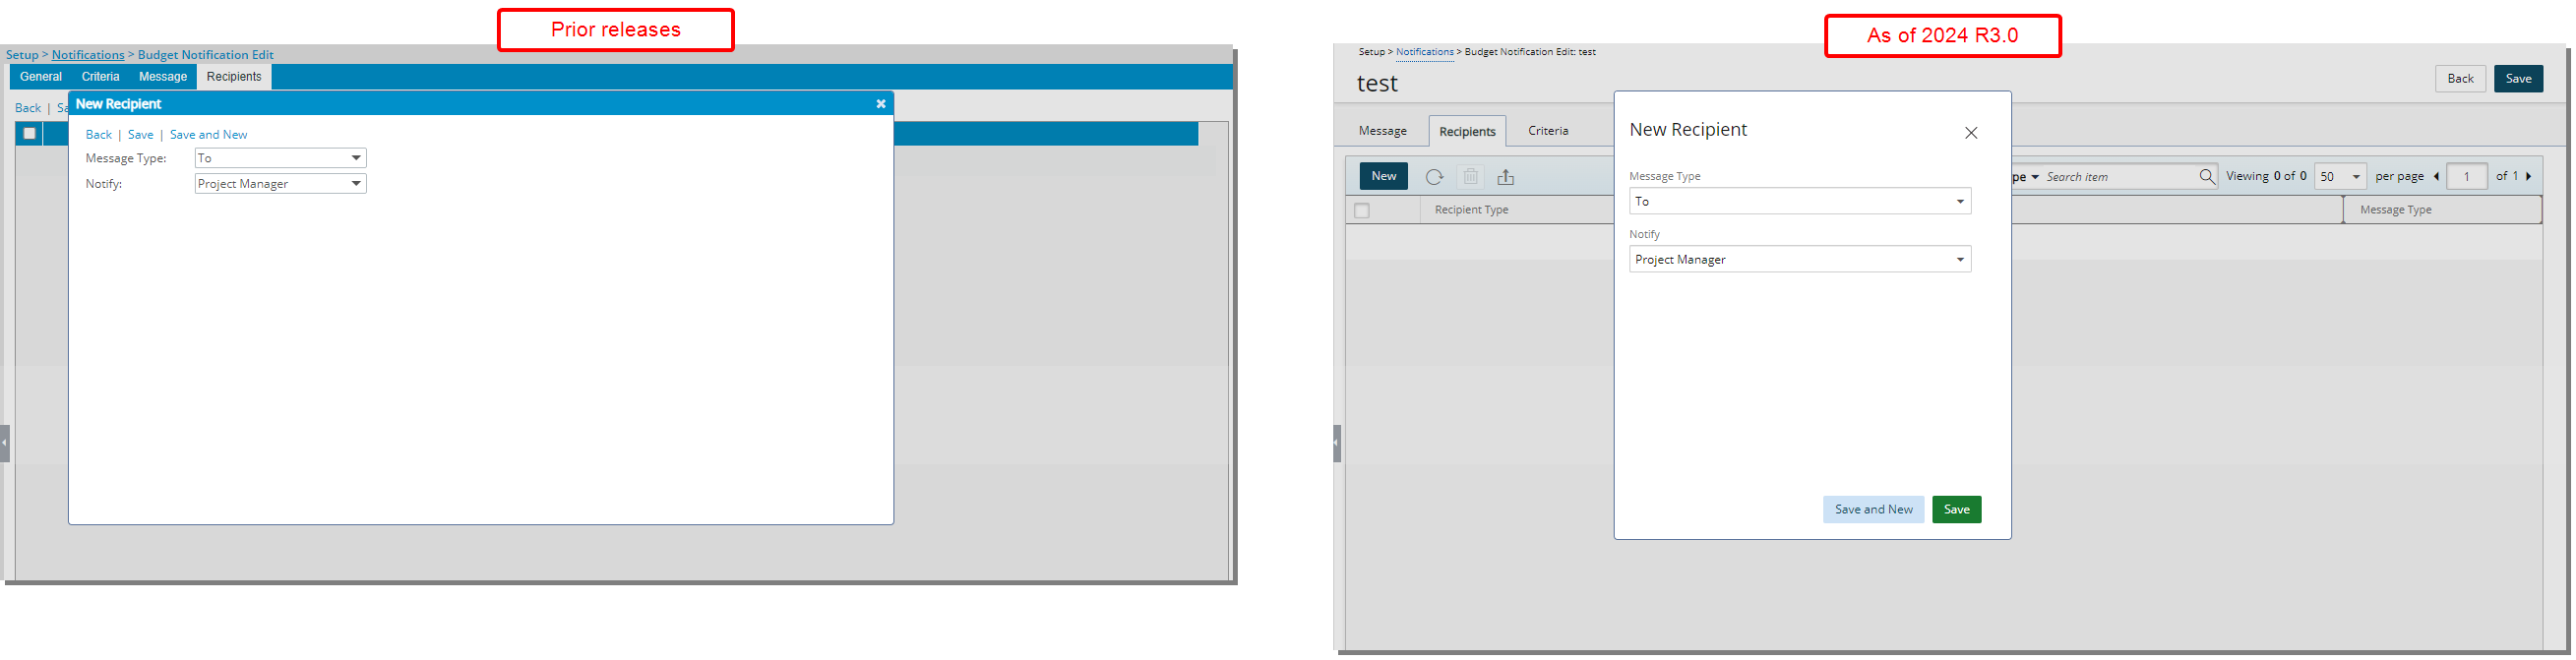
The functionality of adding Recipients remains the same as in previous release, however the following improvements have also been made:
- The New and Delete links were converted to buttons.
- Addition of the ability to Refresh the list.
- Addition of the ability to Export the list to Excel.
- Addition of the ability to Search the list based on Recipient Type and Message Type.
- Pagination is available at the top right corner to facilitate easy navigation across pages.
Benefit: The UI/UX improvements aim to modernize the look and feel of the application, fostering uniformity and elevating user experience.
For further details refer to:
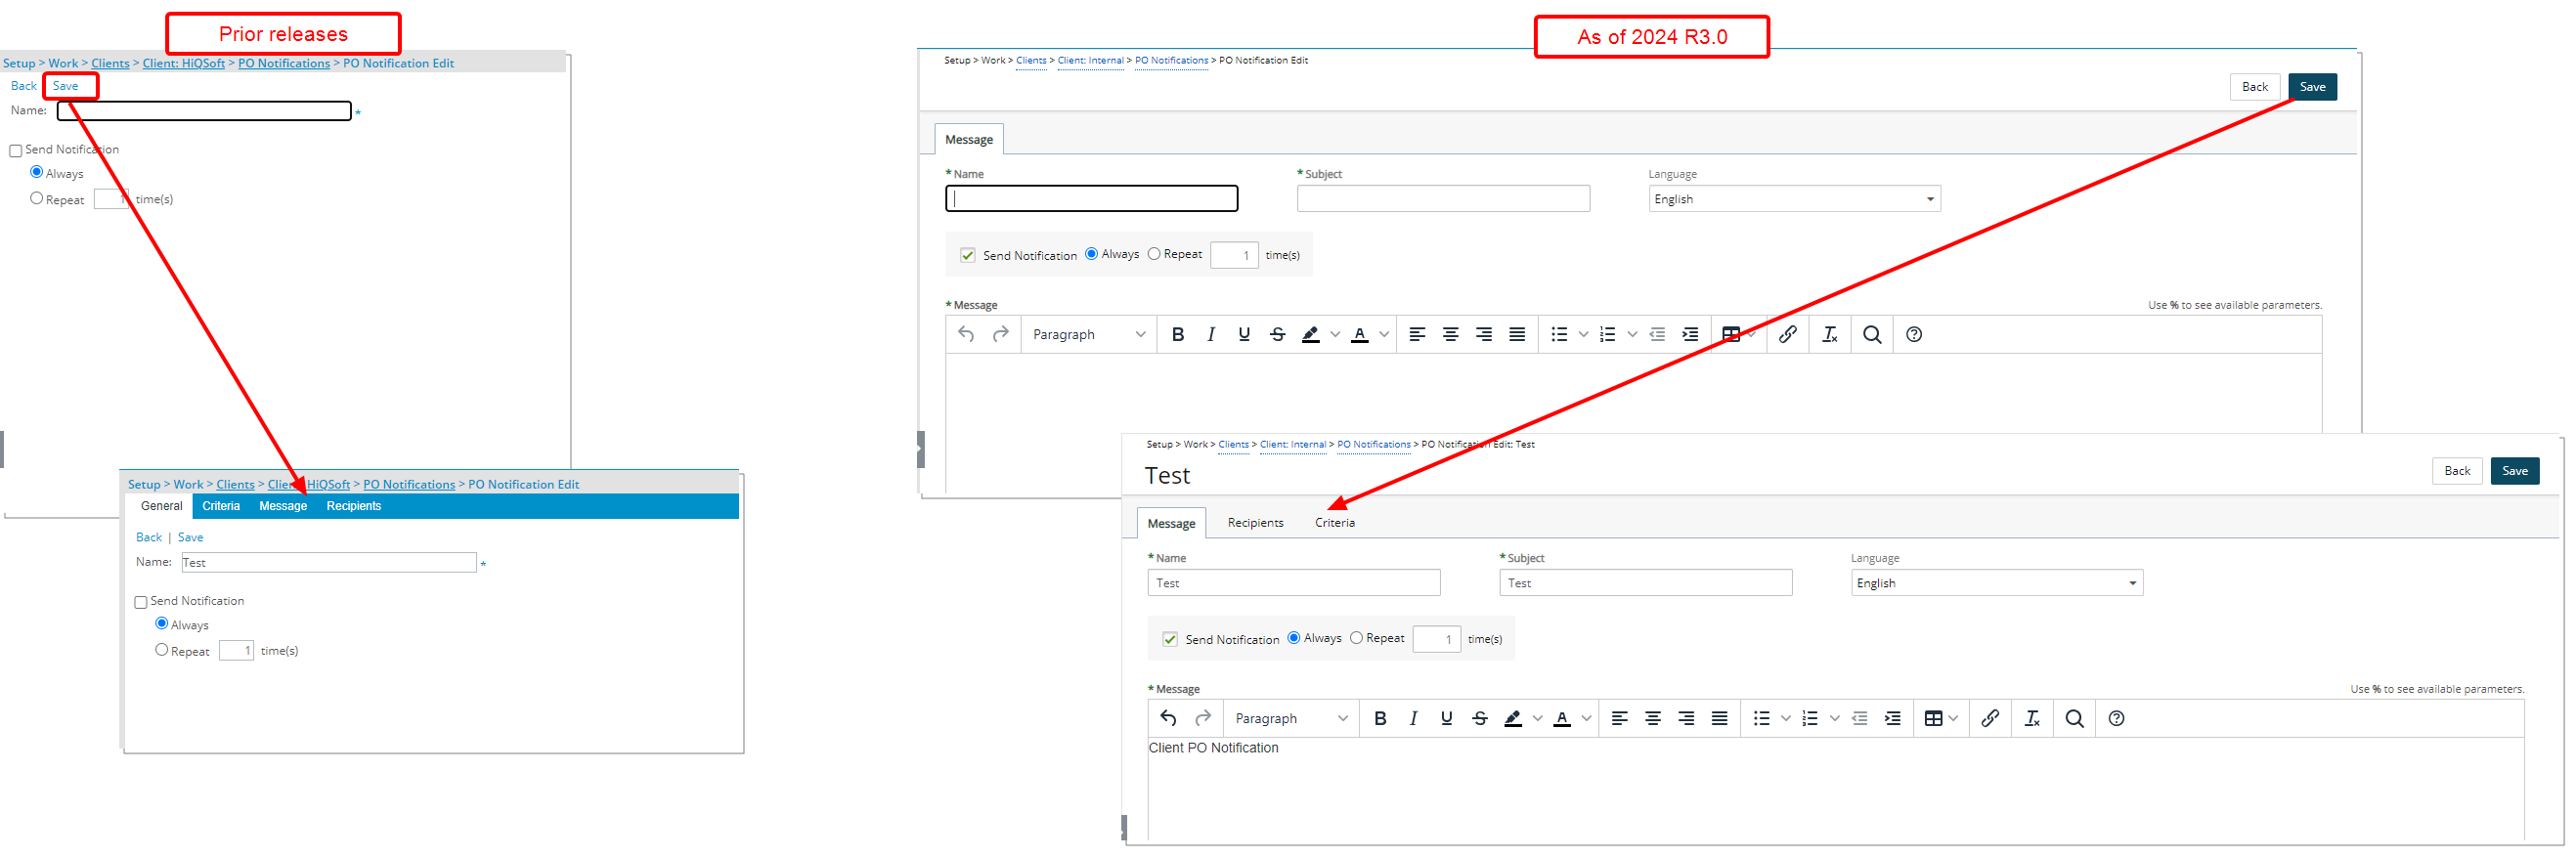
Description: The user interface including spacing, colors, positioning, buttons, icons and fonts of the PO Notification pages (Setup > Work > Clients > Client Edit > PO List > Notifications > Notification Edit and Setup > Notifications > Client PO Notifications > Notification Edit) have been improved for better user experience and consistency with the other updates that have been made thus far.
When creating a new PO Notification, you can:
- Enter the Name and Subject. Then choose the Language.
- Select the frequency.
- Enter the Message body and click Save.
- Upon saving, the Recipients and Criteria tabs are then available to you.

Although the Criteria tab has a new look, its functionality remains unchanged from previous releases. You can continue to use this tab with the same processes and outcomes that you are familiar with, ensuring a smooth transition without any need to relearn or adjust to new features.
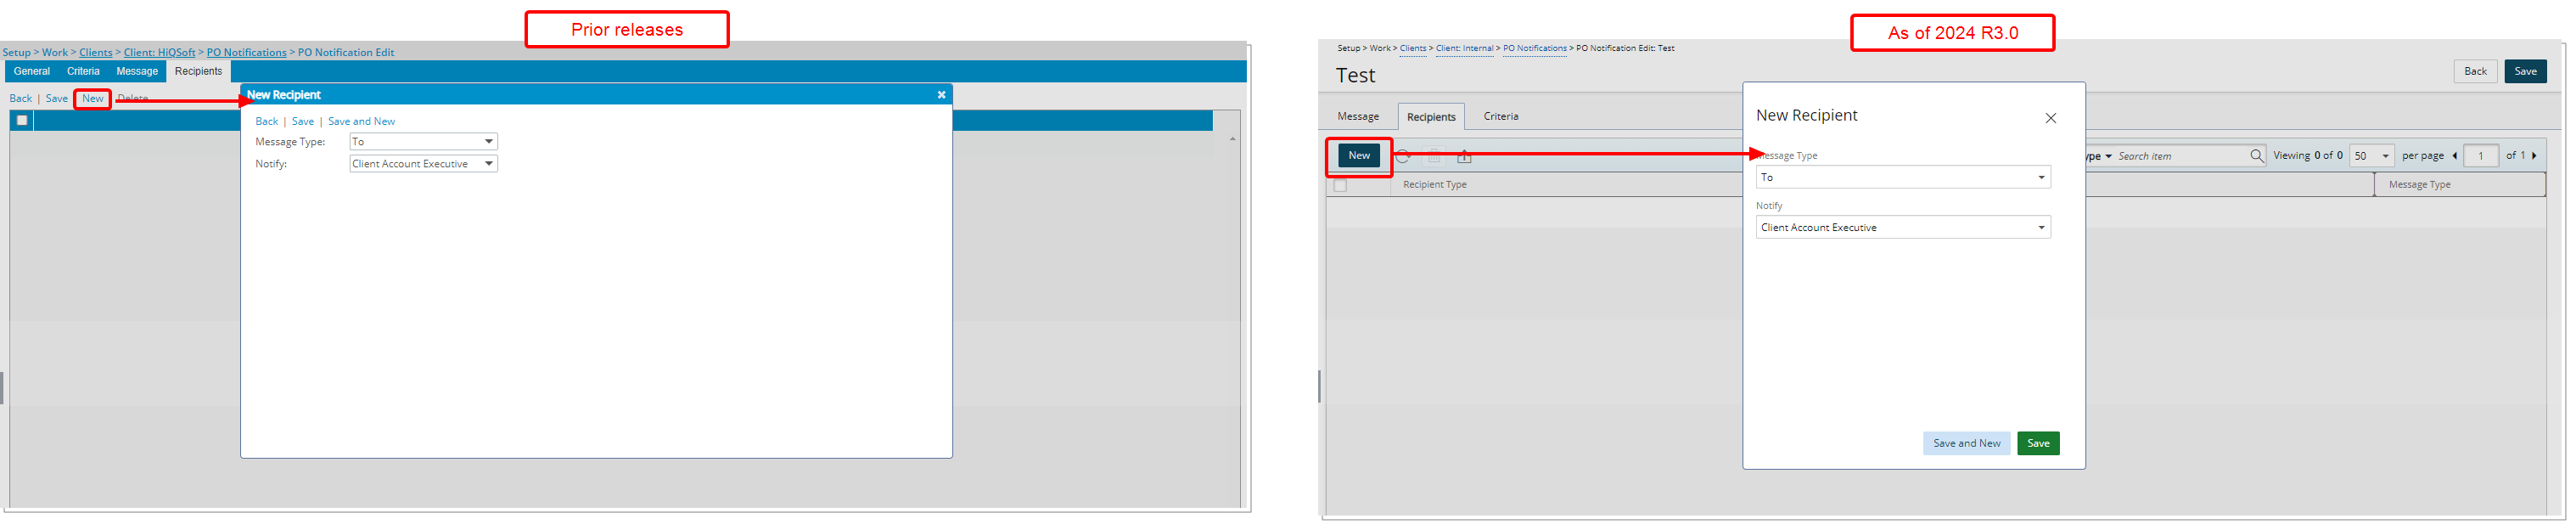
The functionality of adding Recipients remains the same as in previous release, however the following improvements have also been made:
- The New and Delete links were converted to buttons.
- Addition of the ability to Refresh the list.
- Addition of the ability to Export the list to Excel.
- Addition of the ability to Search the list based on Recipient Type and Message Type.
- Pagination is available at the top right corner to facilitate easy navigation across pages.
Benefit: The UI/UX improvements aim to modernize the look and feel of the application, fostering uniformity and elevating user experience.
For further details refer to:
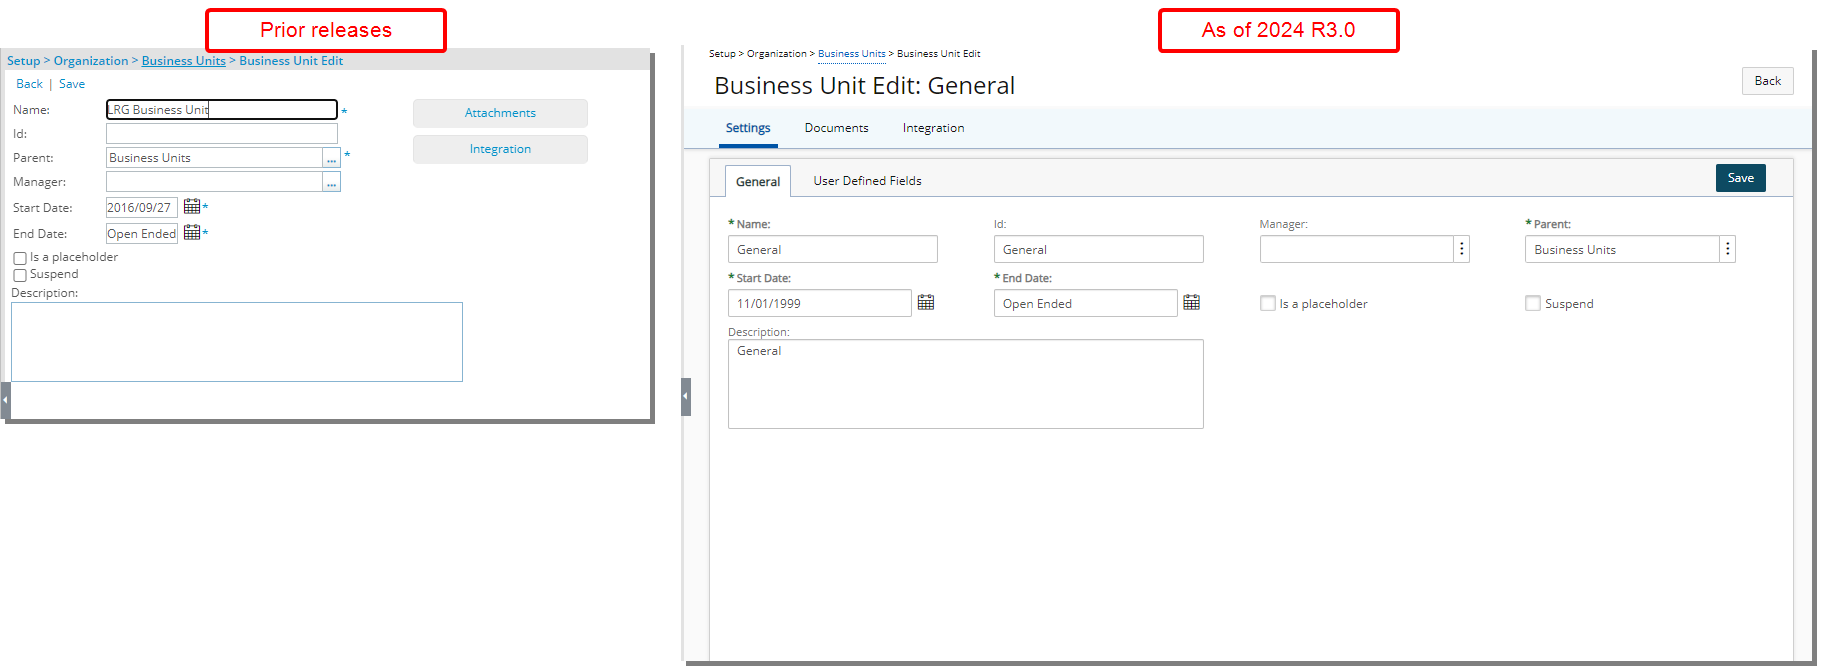
Description: The user interface including spacing, colors, positioning, buttons, icons and fonts of the Business Unit Edit page (Setup > Organization > Business Units) has been improved for better user experience and consistency with the other updates that have been made thus far.
The Integration and Documents (former Attachments) buttons have been converted into tabs.
Moreover, in this release, User Defined Fields (UDFs) have been newly introduced for Business Units and are now presented in a familiar tab format, consistent with other objects in the application. This addition not only expands customization options for Business Units but also ensures a seamless user experience by aligning with the standard tabbed layout used throughout the platform, making it easier for you to adopt and navigate this new capability. For further details refer to Associate User Defined Fields (UDFs) with Business Units.
Benefit: The UI/UX improvements aim to modernize the look and feel of the application, fostering uniformity and elevating user experience.
For further details refer to Configuring Business Units (OBS).
Upland Analytics
The following improvements have been made to Upland Analytics.
Description: When removing a User Defined Field associated with a Timesheet Template in PSA, the corresponding Field will be removed from the Time Entry Basic View and from any report(s) built with this Field prior to the removal.
Note: Upon running a report containing this Field, you will get the following error message: One of the fields in this report is not configured properly or is no longer available for reporting. (UA_DT_TIMEENTRYBASIC_{UDF NAME}).
This is the expected behavior in Upland Analytics. You must Edit the report and click Save (no changes in report designer are required).
Benefit: This improvement ensures data integrity by automatically removing obsolete fields, preventing errors in reports and streamlining report management.
For further details refer to:
Description: As part of our ongoing efforts to improve transparency and efficiency in Timesheet management, we have introduced a new Data Source in Upland Analytics that enables you to report on pending Timesheet Approvals. This enhancement allows you to identify which approvers have not completed their approval, helping to pinpoint where delays are occurring and enabling timely resolution.
The following Views are available from in this Data Source:
- New Timesheet Assignment View with the following Fields:
- Timesheet Assignment Assigned User: User name of the User who should act upon the entries in this Timesheet. If the Timesheet is assigned to more than one User, each user name is displayed on a separate line in the report.
- Timesheet Assignment Assigned User Email Link: Email address of the User who should act upon the entries in this Timesheet.
- Timesheet Assignment Type: Displays the Assign to in the Workflow Assignment Rule.
- Timesheet Summary View (Existing View) with the addition of the following three Fields:
- Timesheet Is Final: Displays Yes/No to indicate if Timesheet Is Final or not.
- Timesheet Is Read-only: Displays Yes/No to indicate if Timesheet Is Read-only or not.
- Timesheet Workflow Version: Displays a number indicating the version of the workflow.
- Timesheet Workflow History View (This is an existing View).
- Timesheet Workflow History Modified by User View (This is an existing View) .
- User View (This is an existing View).
Note: In cases where the Timesheet Workflow has a PM approval State, if a Project does not have a designated Project Manager or Alternate Project Manager, and the Originator lacks an Approval Group Manager, no record will appear in the Timesheet Assignment Data Source.
Benefit: By improving transparency and offering clearer oversight of the approval process, this feature ensures that users can efficiently manage and track Timesheet approvals. The ability to swiftly identify where approvals are stalled leads to more effective process management and helps facilitate the timely posting of Timesheets.
For further details refer to Timesheet Assignment Data Source and related Views.
Description: Identifying the Project Budget Unique ID is crucial when Budget creation or integration fails, as it helps quickly resolve inconsistencies or errors. While this information is available in the Task Budget Summary View, the Project Budget Summary View is more commonly used.
To enhance efficiency, the Project Budget Unique ID has been added to the Project Budget Summary View.
Benefit: You can now troubleshoot budget issues faster by directly accessing the Project Budget Unique ID in the Project Budget Summary View, saving time and aligning functionality with the Task Budget Summary for a consistent user experience.
For further details refer to Project Budget Data Source and related Views.
Description: In the Expense Report Summary View, the Field previously labeled Expense Report Receipt Count has been updated to Expense Report Receipt Count Link, and a new Field, Expense Report Receipt Count, has been added to capture the total number of Receipts attached to each Expense Report as a numeric value.
Similarly, in the Expense Entry Basic View, the Expense Entry Receipt Count field has been renamed to Expense Entry Receipt Count Link, with a new Expense Entry Receipt Count Field introduced to indicate the number of Receipts attached to each Expense Entry, also represented as a numeric value.
Benefit: This enhancement improves clarity and functionality by allowing you to filter on receipt counts, which was not possible in the previous release since the counts were treated as strings. Now, as numeric fields, they support number-based filtering, enabling better tracking and management of receipts for both expense reports and entries.
Description: In organizations where billing rate names are crucial, contracts often depend on specific billing rule names that indicate different levels of work experience, education, or tasks performed. Each client and contract may have unique billing rule names that must be used for invoicing.
To support this need, four new fields are now available in the Time Entry Basic View within the Timesheet Data Source:
- Billing Rule Id: This is the Id of the Billing Rule associated with Billable Time Entries.
- Billing Rule Name: This is the Name of the Billing Rule associated with the Billable Time Entries & used for calculation of total Billable Amount.
- Cost Rule Id: This is the Id of the Cost Rule associated with Payable Time Entries.
- Cost Rule Name: This is the Name of the Cost Rule associated with the Payable Time Entries & used for calculation of total Payable Amount.
Benefit: These Fields ensure accurate billing and cost management by clearly identifying billing and cost rules in reports. Including billing rule names and respective rates in reports allows Project Managers to verify the correct billing rule for each Time Entry, ensuring the title matches the user's responsibilities and qualifications. Additionally, grouping billable time data by billing rule rather than by user enables more effective reporting on spending by labor category. This helps Project Managers analyze costs and billing more accurately, ensuring compliance with client contracts and improving overall financial management.
For further details refer to Timesheet Data Source and related Views.
Project Planner

Description: In past releases, all UPP Tasks were automatically synchronized in PSA, where they were treated as time-tracking tasks. This made it difficult to distinguish between planning activities and time-tracking tasks, causing inefficiencies in Task management in PSA.
As of this release, the newly added Synchronize in PSA selection box is now available within the Summary tab of Tasks in UPP.
Note: To maintain existing functionality, Synchronize in PSA selection box is checked by default.
To prevent a Task from being created in PSA, simply uncheck the Synchronize in PSA selection box. Upon saving your Project in UPP, the Task will not be added to PSA, and if the Task already exists in PSA, it will be removed, provided there are no Entries already made against it.
For such planning activities note that some fields/settings/tabs are unavailable. Such as:
- Allocated Work and Total Actual Work located within the Summary tab.
- From the Resources table: Booking Type, Units and Allocated hours or any other Resource Management Booking Attributes.
Unsynched Tasks (planning activities) will not have a Budget and will not be included in the Project overall Budget in PSA. You can assign a User to planning activities, however these tasks will not appear in Timesheets, Project Work Plan or anywhere else in PSA.
You can check/uncheck the Synchronize in PSA selection box at any time. Upon saving, any Tasks for which the Synchronize with PSA selection box is checked, will be created/udated in PSA as in previous releases.
Note: The Synchronize in PSA selection box is unavailable for Milestone and Summary Tasks.

Additionally, the Synchronize with PSA column is now available through the UPP Column Selection. When included in the view, you can easily see and modify the value (Yes or No) using inline editing to indicate whether synchronization will occur.

Let's assume we have the following Tasks:
| Synchronize with PSA | When UPP is Saved | |
|---|---|---|
| Task 1 | Checked | Task is Synched |
| Task 2 | Unchecked | Task s only available in UPP |
| Task 3 (Milestone Task) | Checkbox is unavailable | Existing Behavior (Milestone Tasks are Synched) |
| Task 4 (Summary Task) | Checkbox is unavailable | Existing Behavior (Summary Tasks are not published in PSA) |
| Task 1 | Checked | Task is Synched |
To summarize:
- Unchecking the Synchronize in PSA box prevents the Task from being added to PSA or removes it (if no Entries exist) when the Project is saved in UPP.
- Checking (default behavior) the Synchronize in PSA box ensures the Task is created or updated in PSA when the Project is saved in UPP.
Copying a project: When copying a Project in PSA, your selection for the Synchronize in PSA box is retained. Consequently, unsynched Tasks (planning activities) in the copied Project will only be available in UPP.
UPP Synchronization with Resource Planning: When the Project Planner Synchronize with Resource Planning selection box is checked, Tasks that remain unsynched (i.e., planning activities) can still be assigned within the Project Planner. However, these Tasks will not appear or be reflected in Resource Planning. Since the Task does not exist in PSA, no synchronization between Project Planner and Resource Planning is possible for these specific Tasks.
Exporting from UPP: When exporting to Excel, the "Synchronize in PSA" column is now included, displaying a value of 0 (for Tasks not synchronized) or 1 (for Tasks that are synchronized).
Benefit: This improvement allows teams to effectively manage Tasks that don’t require time tracking, ensuring clear separation between project planning and delivery tasks and the time-tracking system. This added flexibility enhances workflow efficiency and project organization.
for further details refer to Synchronization of Project Planner Task in PSA.
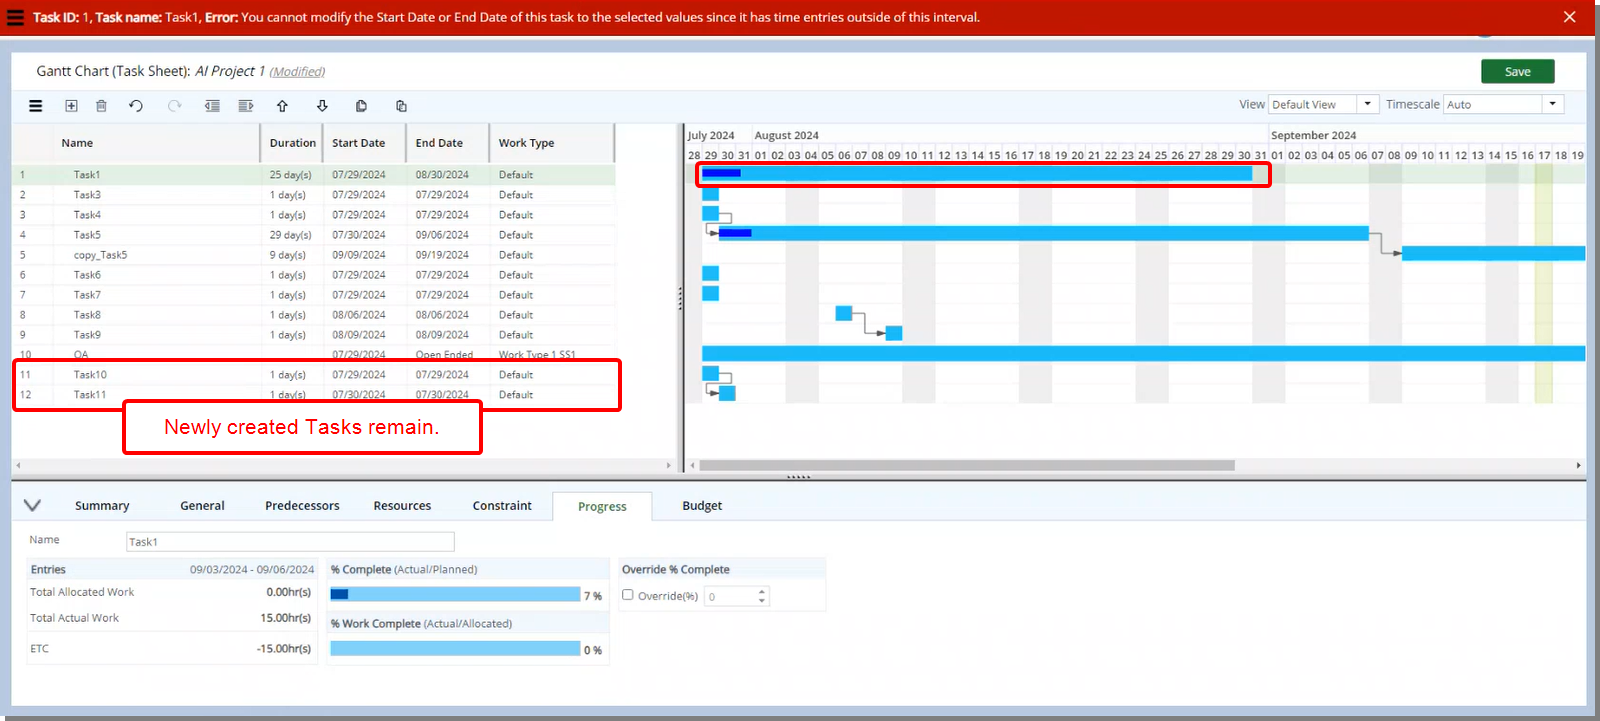
Description: In previous releases, when an error occurred during the saving process in Upland Project Planner, the system would refresh the page, causing you to lose all unsaved changes. The page refresh not only caused downtime but also increased the likelihood of errors, as you had to correct issues without the benefit of seeing your recent modifications.
In this release, improvements have been made to ensure that when an error occurs during the saving process, the system will not refresh the page. Instead, you will receive an error message while your unsaved changes are retained. This allows you to correct the issue without losing any modifications made before the error occurred.
Benefit: This enhancement ensures your recent changes are preserved, reducing frustration and safeguarding valuable updates when a save operation encounters an error. It also streamlines your workflow by allowing you to continue working with minimal disruption.
User Defined Fields
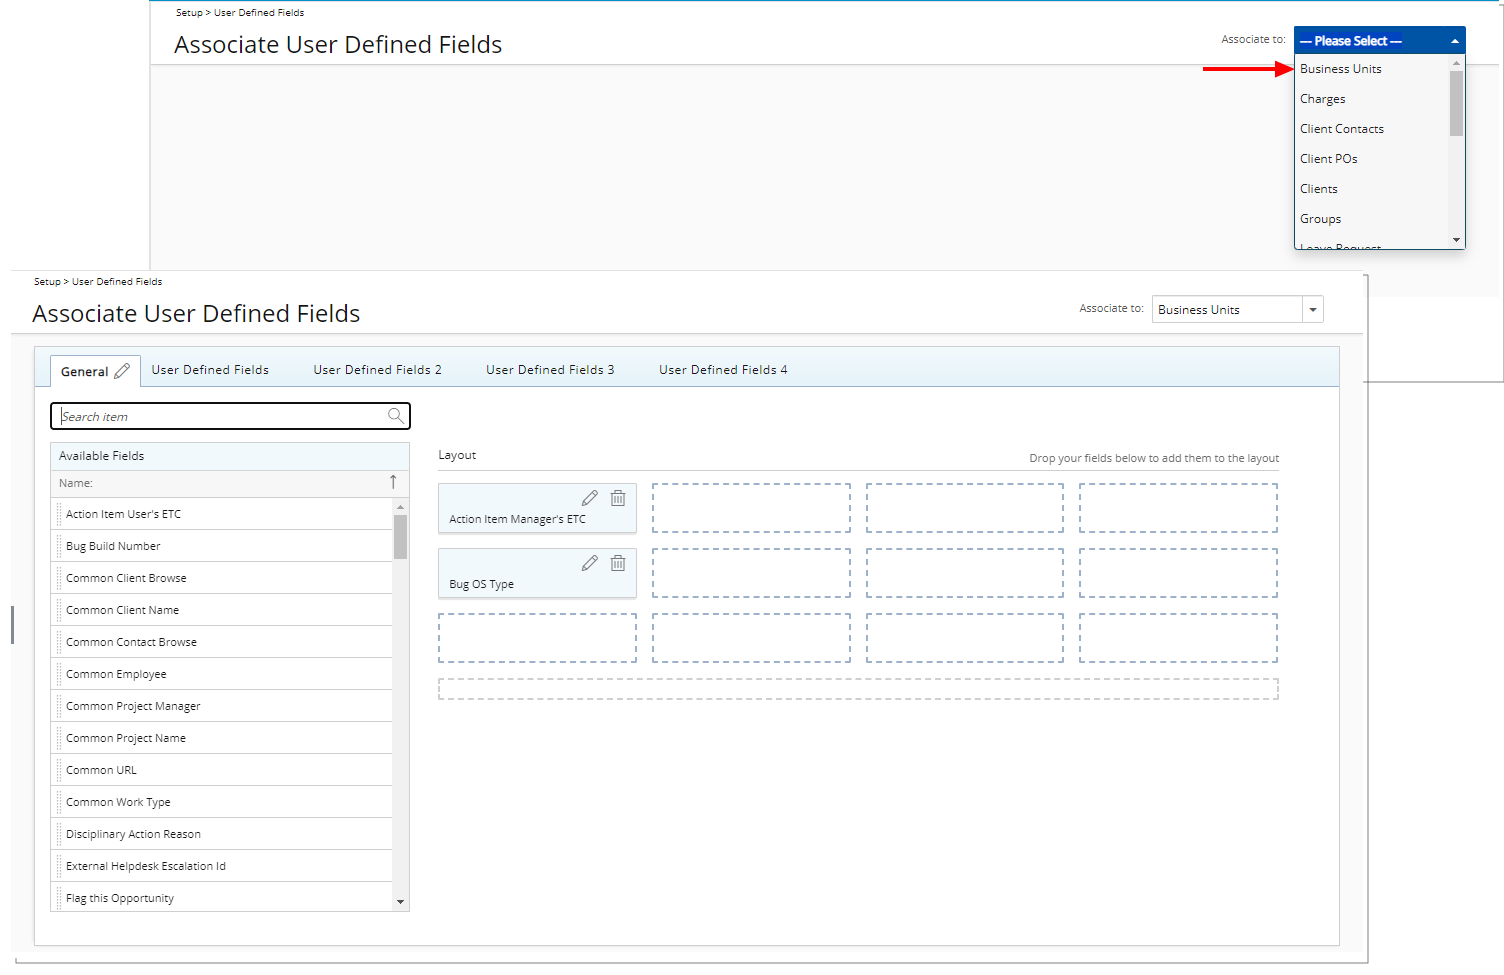
Description: You can now associate User Defined Fields (UDFs) directly to Business Units via the Associate User Defined Fields page (Setup). This is achieved by selecting the new Business Units option from the Associate to selection list.
The association of UDFs to Business Units is performed in the same familiar manner as with other objects in PSA. This ensures a consistent and intuitive experience, allowing administrators to easily associate UDFs without needing to learn new processes or navigate unfamiliar steps.
Furthermore, the user interface including spacing, colors, positioning, buttons, icons and fonts of the Business Unit edit page (Setup > Organization > Business Units) has been improved for better user experience and consistency with the other updates that have been made thus far. For further details refer to Improved Business Unit Edit Page.
Benefit: By associating User Defined Fields (UDFs) with Business Units, you can customize data collection to fit your organization’s specific operational needs and processes.
For further details refer to:
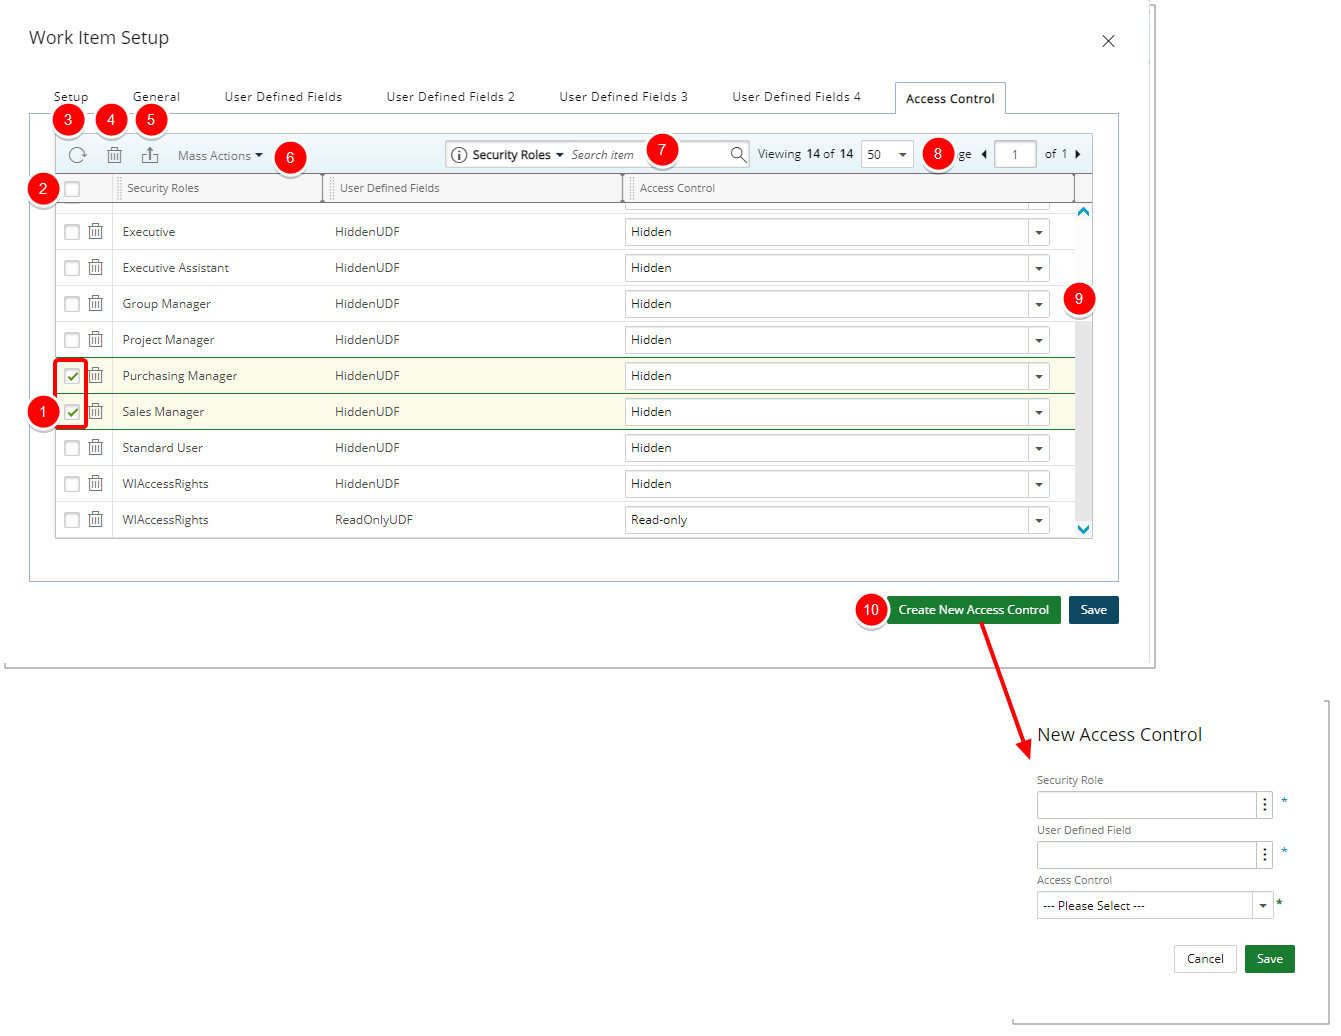
Description: It is now possible to define access limitations to User Defined Fields associated with Work Items based on Security Roles. Within the new Access Control tab, you can now choose to either hide or bar users from editing/updating the associated User Defined Field(s).
From the Access Control tab, you can:
- Multi or single select rule(s).
- Select all rules.
- Click Refresh to refresh the page.
- Delete selected rules: When one or more rules are selected, the multi-delete button becomes available.
- Click to Export the list to Excel.
- Mass Action on selected items: Change the visibility to Hidden or Read-only for multiple UDFs concurrently.
- Use the contains-in logic search to search for items. The available criteria are: Security Roles and User Defined Fields. For further details refer to Searching for an item.
- Pagination: The Pagination facilitates moving to a new list page and to view the number of list items and pages.
- Change the visibility to Hidden or Read-only for a single User Defined Field.
- Create a New Access Control.
Benefit: With this improvement, you gain better control over the visibility and usage of User Defined Fields associated with Work Items.
For further details refer to Limiting user access to the User Defined Field associated with Work Items.
Workflows
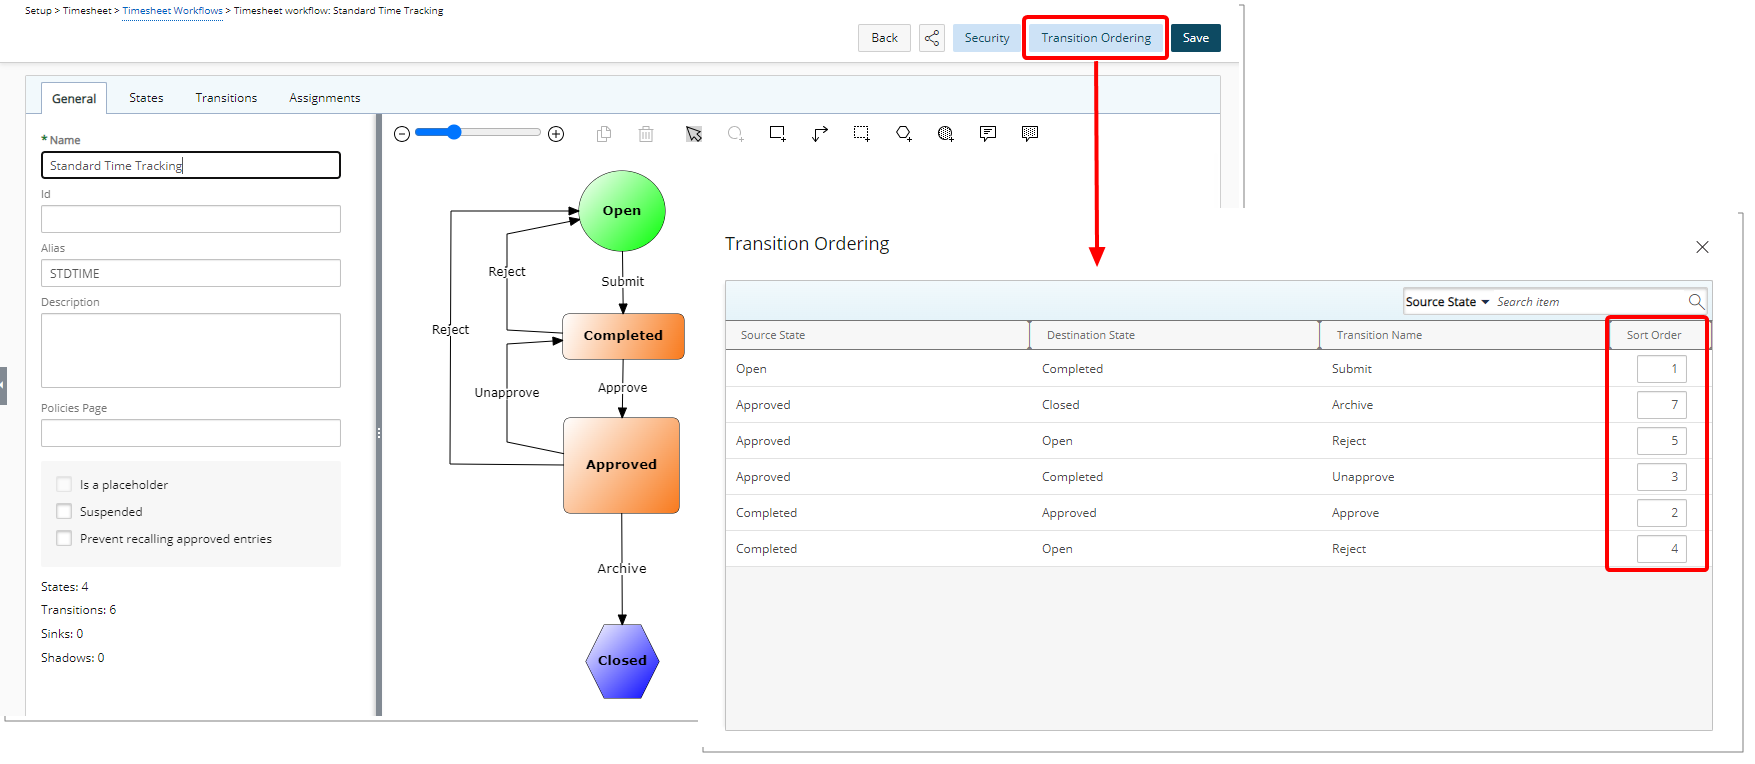
Description: Previously, when multiple State Transitions were available, they were displayed alphabetically in the Actions selection list within the New Timesheet or Timesheet Manager pages. This made it challenging for users to quickly access the correct action, sometimes resulting in an incorrect transition to a Final State.
In this release, we introduce a new Sort Order capability for these transitions.
From a Timesheet Workflow, users with the Modify right to Timesheet Workflows can now click the newly added Transition Ordering button, which opens a dialog box displaying read-only columns for Source State, Destination State, and Transition Name. You can assign a numerical order (1 to 50) to each transition to control its position in the above-mentioned Actions selection lists.
Changes to the Sort Order are saved automatically, so there is no need to Save the Workflow separately. Furthermore, modifying only the Sort Order of existing Transitions does not create a new Workflow version. However, adding a new State or Transition does.
Note: If two or more transitions share the same Source State and Sort Order, they will be sorted alphabetically.
In the Transition Ordering dialog box, you can:
- Search by Source State, Destination State, or Transition Name.
- Sort all columns except the Sort Order column.
Note: By default, the table is sorted by Source State in ascending order.
Action Required: By default, all transitions are sorted alphabetically (sort order value = 1 for all Transitions). However, administrators can assign specific sort orders to ensure that the most commonly used actions appear first within the Actions selection lists.
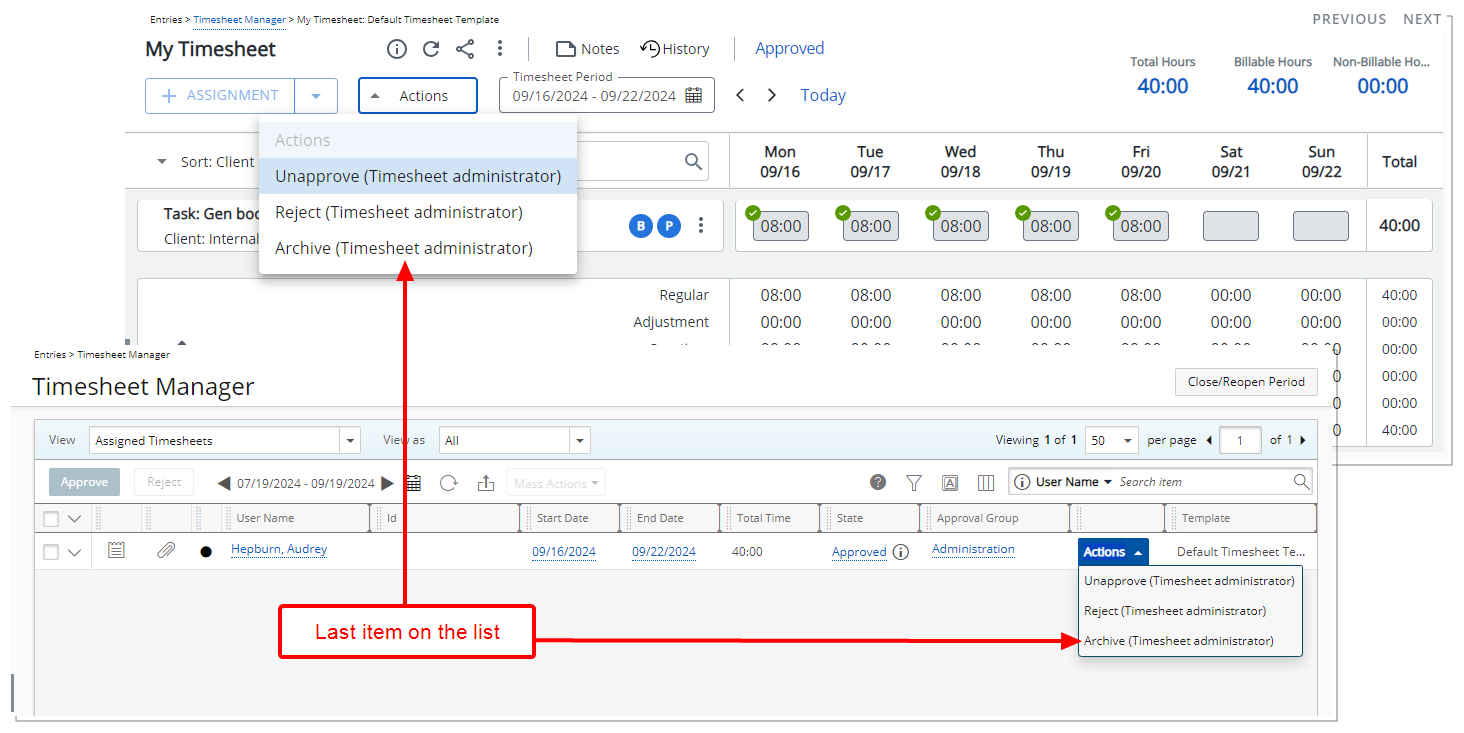
In our example above we chose to display the Archive Transition as last item on the list.
Note: This feature applies only to the New Timesheet and does not affect the API or PSA Mobile.
Benefit: By allowing administrators to prioritize frequently used actions, this improvement enhances user efficiency, reduces errors, and creates a more intuitive Timesheet process that better aligns with actual usage patterns.
For further details refer to Customizing the Timesheet State Transition Order.

Description: In previous releases, when adding recipients to Workflow Notifications, administrators had to manually Save each Recipient while managing Notifications for either the State or Transition of a Workflow. After saving, they had to Close the dialog and click New again to add another recipient. This process involved extra steps and increased the number of clicks, making it time-consuming, especially when adding multiple Recipients in succession.
With the addition of the new Save & New button within the New Recipient dialog box, administrators can now quickly save a newly added recipient and immediately start adding another, without needing to close the dialog and click New again.
You can find this improvement when creating or managing Notifications for either the State or Transition of the following Workflows.
- Expense Workflows (Setup > Expense > Workflows)
- Invoice Workflows (Setup > Financial > Workflows)
- Leave Request Workflows (Setup > Timesheet > Leave Request Workflows)
- Project Workflows (Setup > Work > Project Workflows)
- Resource Request workflows (Setup > Workforce Planning > Resource Request Workflows)
- Timesheet Workflows (Setup > Timesheet > Timesheet Workflows)
- Work Item Workflows (Setup > Work > Work Item Workflows)
Benefit: This enhancement reduces repetitive actions, saves time, and streamlines the workflow, making it easier and more efficient to add multiple recipients when creating or managing Notifications for either the State or Transition of a Workflow.
For further details refer to Setting Up Notifications for the Workflows.