PSA2025 R2.0 is set to be deployed to your staging sites on April 16, 2025. While production sites are set to be upgraded on May 11, 2025. The listed changes, including new features, enhancements, bug fixes, or deprecations, will become available to you upon upgrading to 2025 R2.0.
2025.03.11.2025R20.V1.EB
Note: This page may be updated as new information becomes available. Visit this page regularly for the latest updates.
Removal Notices
Since the 2022R2.0 release, Upland Analytics has been available in two versions: Classic and New Analytics. This dual-version approach was introduced to provide flexibility, allowing you to explore the innovative features of New Analytics while retaining access to the familiar Classic interface.
New Analytics offers a host of powerful enhancements designed to elevate functionality and improve the overall user experience. Key improvements include:
- More intuitive navigation for faster access to essential features.
- Streamlined workflows to optimize efficiency.
- Advanced analytical capabilities for deeper, actionable insights.
Significant resources have been dedicated to ensuring a smooth transition to New Analytics, enabling you to adapt seamlessly to this upgraded platform.
During 2025, Classic Analytics will be removed, marking the full transition to New Analytics. This shift reflects our commitment to providing a robust, modern platform that addresses evolving analytical business needs.
Note: No action is required to transition to the new UA—your reports will be migrated automatically.
For detailed guidance on using New Analytics and exploring its latest features, please visit the New Analytics Help Center.
API/SDK
Description: This release introduces a new BudgetBaselines API that supports both single and multiple baselines. It provides full CRUD (create, read, update, delete) operations for managing baselines as part of the Budget API.
- The GET call (GetAll, GetById, GetByFilter, Count) now return data related to baselines.
- The POST, PUT, and PATCH calls are used to create and update baselines.
Caution: The BaselineValue property in the BudgetEntries API is now read-only. It will be automatically populated when an active baseline is created using the new BudgetBaselines API, and can no longer be modified directly.
Additionally, adding or editing baselines through the BudgetEntries API is no longer supported.
In past releases, baseline values were created one at a time using the BudgetEntries API. With this release, the new BudgetBaselines API streamlines the process by automatically generating baseline entries. A single POST request to the BudgetBaselines endpoint will copy all current values into a new baseline, reducing manual effort and improving consistency.
Endpoints Overview
Response Sample:
[
{
"UniqueId": 55,
"BudgetId": 45,
"Name": "January2024Budget",
"IsActive": 0,
"Description": "",
"Reason": "REASON1",
"CreatedOn": "2025-03-15T11:48:49.77",
"CreatorUserId": 1
},
{
"UniqueId": 17,
"BudgetId": 3,
"Name": "January2025Budget",
"IsActive": 1,
"Description": "",
"Reason": "REASON1",
"CreatedOn": "2025-03-15T10:58:24.96",
"CreatorUserId": 1
}]Response Sample:
{
"UniqueId": 17,
"BudgetId": 3,
"Name": "Baseline",
"IsActive": 1,
"Description": "",
"Reason": "REASON1",
"CreatedOn": "2025-03-15T10:58:24.96",
"CreatorUserId": 1
}Create a new Baseline.
Request Sample:
{
"BudgetId": 44,
"Name": "Demo Baseline",
"IsActive": 1,
"Description": "Demo Baseline Description",
"Reason": "REASON1"
}Updates the Baseline with provided data.
Request Sample:
{
"Name": "Demo Baseline Active",
"IsActive": 1,
"Description": "Demo Baseline Description",
"Reason": "REASON1"
}Partially updates the Baselines with provided data.
Request Sample:
{
"Name": "Updated Demo Budget"
}Benefit: This enhancement introduces support for single or multiple baseline(s) within the BudgetBaselines API, allowing you to create, manage, and update single or multiple baseline(s) programmatically.
Click here for more information on how to access the REST API documentation.
Description: A new POST API endpoint has been introduced to handle data retrieval, designed specifically to support POST requests from the Power BI data connector. The new endpoint allows you to send data requests and retrieve information efficiently.
Example:
[post] http://localhost/tenterprise/api/v2/Query/Postreq?name=abc
[Post Payload]
let
CallApiWithPost = (sp as text, requestBody as text) =>
let
psaUrl = Text.Combine({#"Upland PSA Url", "/tenterprise/api/v2/Query/postreq?name=",sp}),
headers = [
Authorization= fnGetToken(),
#"Content-Type" = "application/json"
],
response = Web.Contents(psaUrl, [
Headers = headers,
Content = Text.ToBinary(requestBody)
]),
// Parse the response
parsedResponse = Text.FromBinary(response)
in
parsedResponse
in
CallApiWithPostBenefit: This endpoint allows you to send data in the POST request and retrieve the necessary data for integration with Power BI.
Click here for more information on how to access the REST API documentation.
Excel Import
Description: Previously, PSA’s Excel Import feature allowed importing key objects such as Sites, Business Units, Groups, Teams, Users, Titles, Clients, Portfolios, Projects, Phases, Work Types, Tasks, Skills and Skill Associations.
Now, we’ve enhanced the Excel Import feature to support importing Programs and their associated User Defined Fields. The Programs tab, now available in the Excel Import Template, lets you specify these details:
| Programs Property Import Fields | Definitions |
|---|---|
| Tenrox_Excel_Process_Status | Import status (populated by the system after the Programs import is processed). |
| UniqueId | - Upon Creation: The Unique ID of a new Program is automatically populated by the system once the creation process is completed. - Upon Update: The Unique ID of Program being updated must be entered by you, ensuring it matches the one initially generated by the system during the initial import. For further details on how to extract this Unique ID refer to Create a Report to View Unique Ids. Note: Do not edit this column if you are creating a new Program using Excel Import. |
| Name * | Defines the Name of the Program (required field). |
| Id | Defines the Program's ID. |
| Currency* | Currency of the Program. |
| Manager_Logon_Name | Logon Name of the Manager associated to the Program. |
| Manager_Last_Name | Last name of the Manager associated to the Program. |
| Manager_First_Name | First name of the Manager associated to the Program. |
| Alternate_Manager_Logon_Name | Logon Name of the Alternate Project Manager associated to the Program. |
| Alternate_Manager_Last_Name | Last name of the Alternate Project Manager associated to the Program. |
| Alternate_Manager_First_Name | First name of the Alternate Project Manager associated to the Program. |
| Program_Health | Defines the Program Health. Note: Enter GREEN, YELLOW or RED. |
| Planned_Start_Date | Planned Start Date of the Program. Note: Set column format to Date ( MM/DD/YYYY). |
| Planned_End_Date | Planned End Date of the Program. Note: Set column format to Date ( MM/DD/YYYY). |
| Is_Completed | Defines whether or not the Program is Completed. Note: Enter 1/0 for Yes/No. |
Each User Defined Field can be added as a new column by following the same naming convention as before: prefix each User Defined Field column with "UDF_" followed by the User Defined Field Field Name.
Example: "UDF_ProgramCode" for a User Defined Field with the Field Name "ProgramCode."
The technical details remain the same as in the previous release. For further details refer to: Importing User Defined Field values using Excel and Importing User Defined Field values : Technical Details articles.
Benefit: This enhancement simplifies data management by enabling the import of Programs and their associated User Defined Fields, making the process more efficient, consistent, and reducing manual data entry.
For further details refer to Programs Property Import Fields.
Description: The Excel Import functionality has been enhanced to include the Logon Name for some objects. This improvement helps you easily distinguish between individuals with identical names when working with data imports.
The following table outlines where the Logon Name has been added.
| Sheet | New Field(s) |
|---|---|
| Sites | - Site_Administrator_Logon_Name
- Site_Alternate_Contact_Logon_Name |
| Business_Units | - Manager_Logon_Name |
| Groups | - Manager_Logon_Name
- Alternate_Manager_Logon_Name |
| Teams | - Leader_Logon_Name |
| Clients | - Account_Executive_Logon_Name
- Invoice_Issuer_Logon_Name |
| Portfolios | - Manager_Logon_Name |
| Projects | -
Manager_Logon_Name
- Alternate_Manager_Logon_Name |
| Skills Associations | - Logon_Name (required) |
| Programs | - Manager_Logon_Name
- Alternate_Manager_Logon_Name |
Note:
- In the Skills_Associations sheet First_Name and Last_Name are removed.
- In the Users sheet LogonId is renamed to Logon_Name.
- If the Logon_Name field exists in a sheet, it will take priority over the Name field ensuring that the Logon Name is used for identification purposes when both fields are present.
Action Required: You must download and use the new Excel Import Template.
Benefit: Including the Logon name improves accuracy and clarity by providing a unique identifier for users, particularly when multiple individuals share the same name. This enhancement simplifies data management and ensures that the correct user is selected during the Excel Import process.
For further details refer to:
- Excel Import
- Importing items/objects using Excel
- Clients Property Import Fields
- Groups Property Import Fields
- Portfolios Property Import Fields
- Project Property Import Fields
- Programs Property Import Fields
- Sites Property Import Fields
- Skill Associations Property Import Fields
- Teams Property Import Fields
Export to Excel - General
Description: In previous releases, some numeric columns were exported to Excel as strings. As a result it was not possible to perform any calculations on these columns in Excel.
As of this release, numeric columns are formatted as number or currency in the exported Excel files, allowing you to perform calculations directly on the data.
The areas where the Export to Excel improvement was implemented are:
- Project Team (Project list > Project Edit > Manage)
- Project Fixed Cost (Project list > Project Edit > Manage > Cost > Fixed Time)
- Project Fixed Billing (Project list > Project Edit > Manage > Billing > Fixed Time)
- Project List
- Program List
- Projects (Programs list > Program Edit > Projects)
Benefit: With this update, you no longer need to manually adjust formatting for financial data in Excel. This saves time, enhances accuracy, and improves efficiency when analyzing and reporting on exported data.
For further details refer to Export to Excel.
Expense Manager

Description: In this release, the user interface of the Expense Manager page has been revamped to match that of the Timesheet Manager. You can now easily approve or reject Expense Reports, or view Expense Reports awaiting approval, based on the newly introduced Views. This change enhances consistency across the application, making it more intuitive for users familiar with the layout and options in Timesheet Manager.
The concept of Views is now introduced in Expense Manager, replacing the previous tab navigation. The old tabs have been converted into Views accessible through the Views context menu, which includes the following out-of-the-box Views:
- My Expense Reports: (previously Expense Reports tab): This View provides a list of your Users Expense Reports.
- Assigned Expense Reports: (previously Assigned Reports tab): This View provides a list of all Expense Reports that are assigned to and are awaiting for action from you.
- All Expense Reports: (previously All Reports tab): This View provides a list of all Expense Reports for all the Users.
These out-of-the-box system Views may not be deleted. However you can:
-
Create/Edit Details/Manage/Delete your own Private Views.
-
Create/Edit Details/Manage/Delete Public Views provided you are granted the respective Public Expense Manager View right(s) located within Setup > Organization > System > Security > Security Profile> Management > Time.
Note: The Overview tab is deprecated and no longer available.
The introduction of the Views in Expense Manager aligns with similar functionality across other areas of the application. This update enables you to not only switch between different Views but also Create, Manage, Delete, or Edit Details of Views directly from the context menu.

From the familiar Views dialog box, you can make necessary changes to the View from the Details and Columns tabs.
Security Permissions Tied to Expense Manager Views:
- The Administration Security Permission under Management > Expense determines access to the All Expense Reports View.
- The Assigned Reports Security Permission under Entry > Expense determines access to the Assigned Expense Reports View.
- The Expense Reports List with My Expense Reports View Security Permission under Management > Central determines access to the My Expense Reports View.
- The Public Expense Manager View Security Permission under Management > Central determines a User's ability to Modify, Create, or Delete Public Expense Manager Views.
-
The Read-Only Access to All Expense Reports Security Permission under Management > Expense determines a User's ability to view all Expense Reports View without making any modifications.
Note: This permission allows administrators to grant visibility into all Expense Reports View while preventing unauthorized changes. The Read-only Access to All Reports permission is dependent on the Administration permission which must be granted as well.
Benefit: This update aligns the Expense Manager interface with that of Timesheet Manager, streamlining the approval and review process for Expense Reports. By adopting a familiar layout and functionality, you can apply your existing knowledge and practices across both areas, resulting in a more intuitive and efficient experience.
For further details refer to the following sections of the help center:
Integrations
Description: This release enhances the Microsoft Teams Workflow Notification Bot for Leave Request and Work Item Workflow Notifications, providing greater flexibility, improved authentication, and actionable notifications. Users can now approve or reject requests directly within Microsoft Teams, improving efficiency, speeding up decision-making, and ensuring compliance. Real-time updates enhance collaboration, while Power Automate integration streamlines workflows by automating tasks.
Granular Control Over Notifications

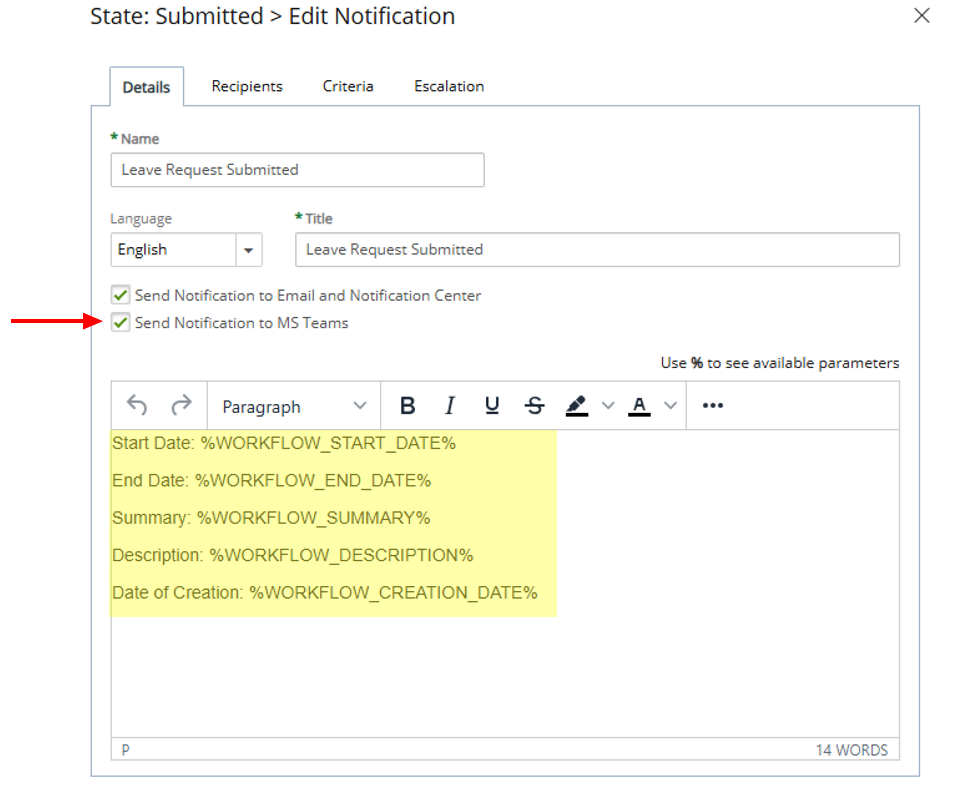
The previously available Send Notification option has been split into two configurable settings across all Workflow Notifications.
- Send Notification to Email and Notification Center
- Send Notification to MS Teams
This enhancement gives administrators greater flexibility and control over how Notifications are delivered.
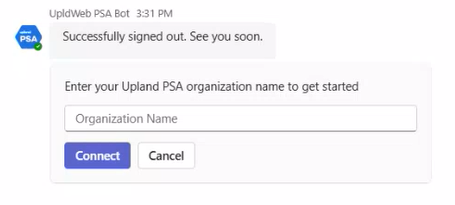
SSO Login Compatibility
The bot now fully supports Single Sign-On (SSO), allowing for seamless authentication without requiring separate login credentials.
Upon successfully connecting to your Organization, you will be prompted to sign in to Upland PSA using your SSO credentials
Note: SSO login is required to use actionable links in Notifications.
Actionable Links in Notifications
For users logged in using Single Sign-On (SSO), Leave Request or Work Item Workflow Notifications in MS Teams will include direct links, allowing them to take immediate action within PSA without manually navigating through the system.
Example:
Let's assume we have setup the Leave Request Workflow to send an Microsoft Teams Notification upon submission of a Leave Request.
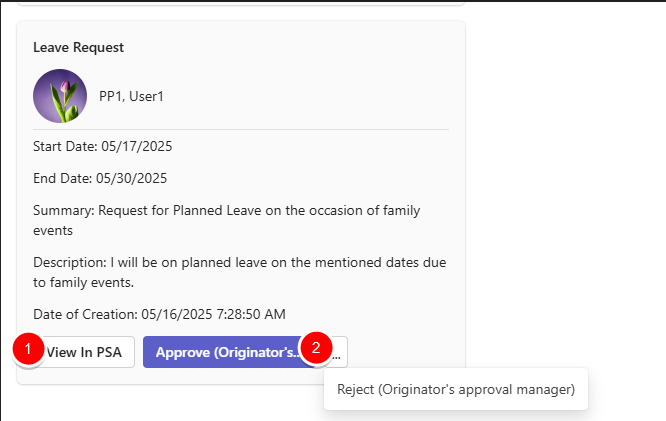
When a User Submits the Leave Request, their manager will receive an actionable card in Microsoft Teams. They can either:
- Navigate to PSA and view the request.
- Approve or Reject the Leave Request directly from Microsoft Teams.
Note: Rejecting the Leave Request will trigger a rejection note dialog box.
- Improved Efficiency & Productivity
- Users can take action directly within Teams without switching to other applications.
- Reduces delays in approvals, responses, or task completion.
- Faster Decision-Making
- Actionable notifications provide real-time updates with direct options (e.g., Approve/Reject).
- Enables quicker responses from project managers, reducing bottlenecks.
- Enhanced Compliance & Accountability
- Ensures users are reminded of pending approvals or tasks within their workflow.
- Tracks actions taken within Teams for better auditability.
- Seamless Collaboration
- Notifies relevant stakeholders instantly, allowing them to discuss and act on approvals or escalations in one place.
- Reduces miscommunication and missed deadlines.
- Increased Engagement
- Users are more likely to respond to notifications in a familiar platform like Teams rather than email.
- Actionable cards make interactions more interactive and engaging.
- Automation & Workflow Optimization
- Integrates with Power Automate and other Microsoft services to trigger automated actions.
- Reduces manual follow-ups and streamlines processes.
For further details refer to:
Description: The new PSA Jira integration app is now available on the Atlassian Marketplace, connecting your PSA application with Jira. This one-way integration ensures that time tracking information recorded in Jira is accurately reflected in PSA, maintaining consistency and eliminating the need for manual updates.
Connecting PSA to Jira
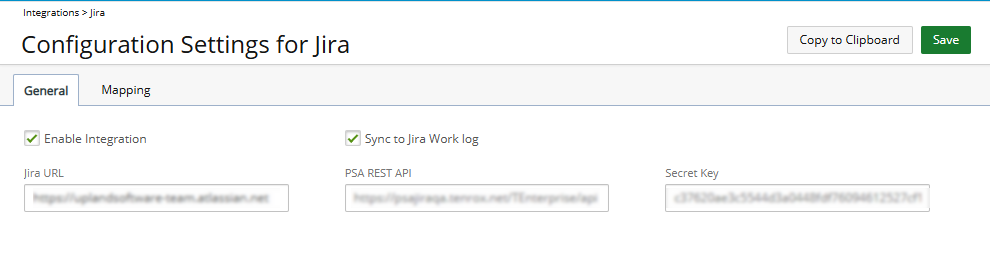
A new Configuration Settings for Jira page (Integrations > Jira) is available from the Integrations menu.
Note: This page is accessible only if the Jira integration License is enabled and the logged-in user has the necessary Jira Integration security permission (Setup > Organization > System > Security > Security Profile > Tools) to configure the integration.
The Jira integration must be configured by a Jira Administrator. To set up the integration, follow these steps:
- From the General tab, select Enable Integration to activate the integration between PSA and Jira.
- When Sync to Jira Work Log is enabled, a single time entry is created per day in the Jira Work Log, with all associated notes combined.
- Enter your Jira URL where the data will be synchronized.
- Click Copy to Clipboard to copy the PSA configuration data.
- Navigate to your Jira URL and click Apps.
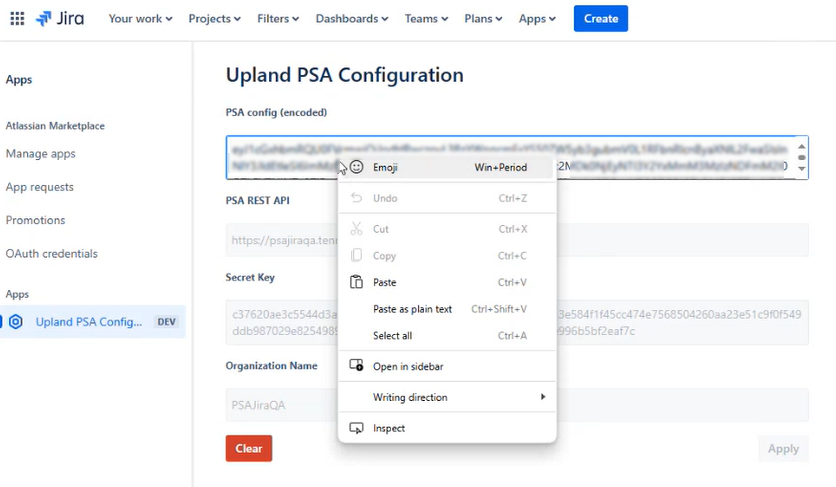
- Select Manage your apps.
- In the Upland PSA Configuration page, paste the previously copied PSA configuration data.
- Click Apply to establish the connection.
Logging Time in Jira After Integration Setup
Once the integration is successfully set up, follow these steps to log time in Jira:
- Open your web browser and sign into Jira with your credentials.
Note: User mapping between Jira and PSA is based on the email address. The user's email in Jira must match their email in PSA to ensure proper synchronization of Time Entries.
- Locate and open the Jira ticket where you want to log time.
- Within the Jira ticket, look for the Upland PSA Time Tracking section located on the right panel of the page and click the down arrow to expand it.
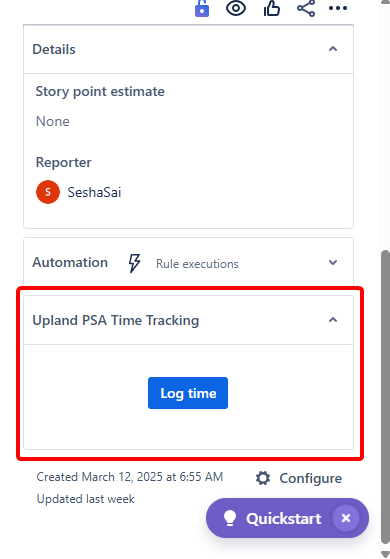
Note: This section becomes available only when the integration is enabled.
- You will see a Log Time button. When you click this Log Time button, a time entry form will appear.
Note: The Log Time button is displayed only once per Jira session. After clicking it, the button will no longer be visible for the duration of the session. A new session begins only when you log out of Jira and log back in.
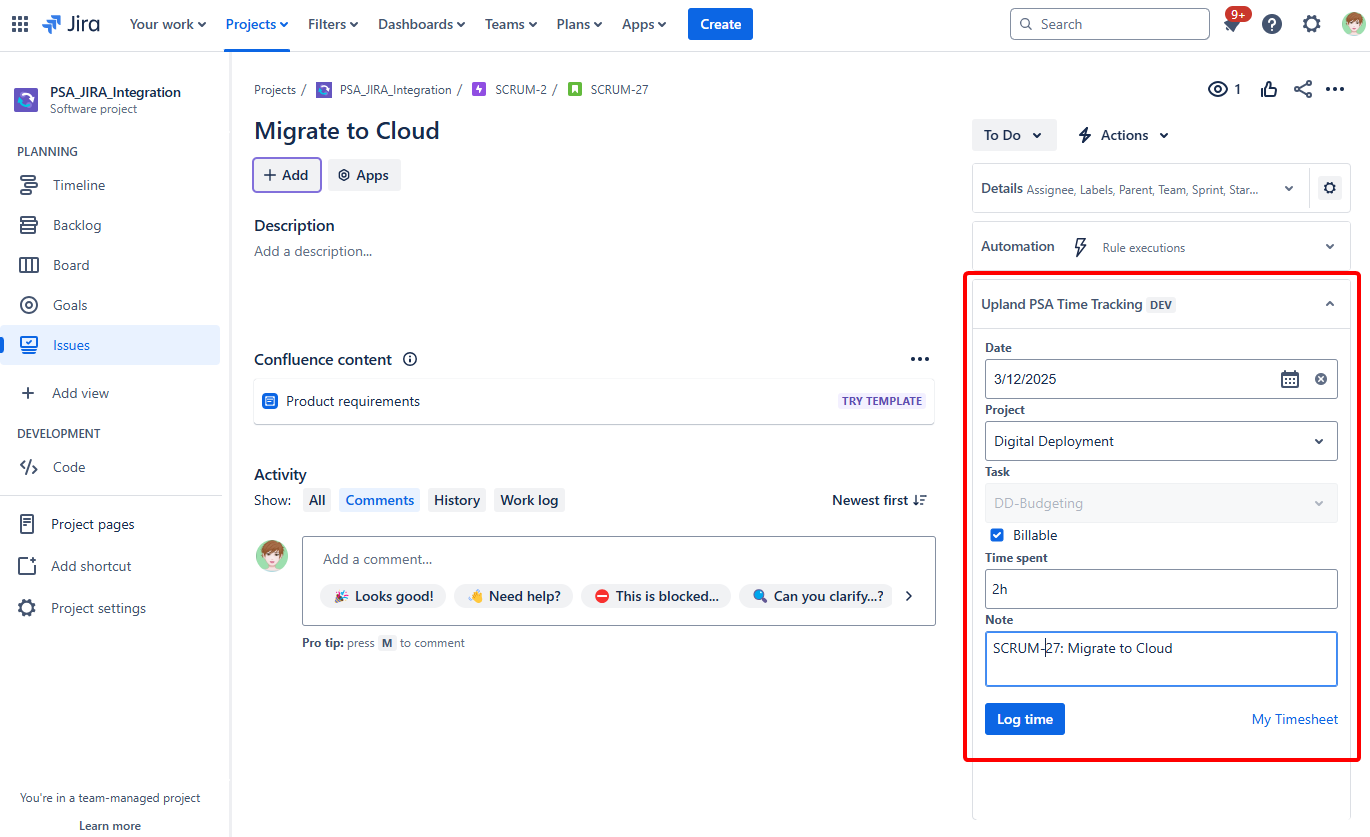
The following fields will be available to you:
- Date: The date of the Time Entry
- Project: Select the relevant project.
- Task: Choose a Task associated with the selected Project for the Time Entry.
Note: When you log time for a Task, it will stay selected when you go back to the Jira ticket, but only if you still have access to the Task.
- Billable: Indicates whether the Time Entry is Billable in PSA.
- Time Spent: Enter the total time spent on the task. Both positive and negative values are allowed.
- Note: A Note is automatically generated with the Jira ticket ID and Jira Summary.
- You can navigate to PSA by clicking My Timesheet.
- Click the Log Time to log the time spent on the task.
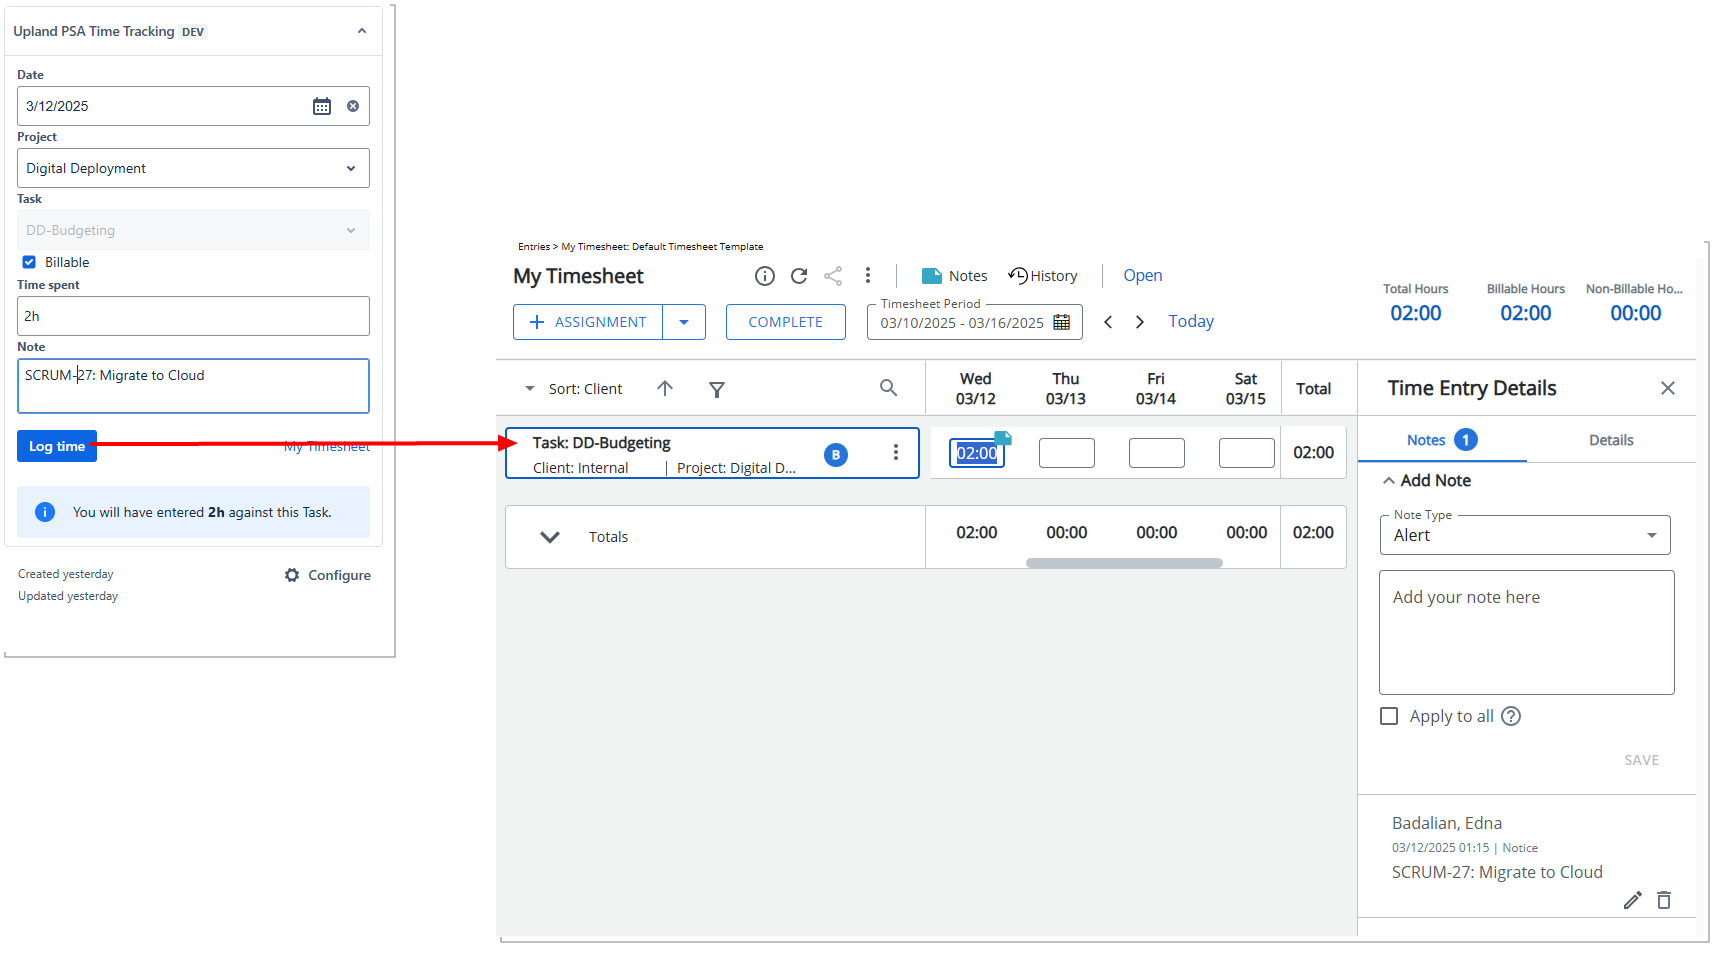
Upon clicking the Log Time button in the Jira ticket, status messages will indicate whether the action was successful or if it failed. If the action is successful: The Time Entry, including both positive and negative values, will be logged directly into PSA against the selected Date, Project, Task, and Billable flag in My Timesheet.
Caution: Any additional fields configured through the Timesheet Template will be set to their default values in My Timesheet.
How Logged Time Is Removed and Adjusted in Jira and PSA
When you remove logged time, the system first checks if the amount you are removing is equal to or less than the time that needs to be corrected.
Example:
- If you remove 2 hours, and the correction allows for 2 hours or more, it will be removed normally.
- If you enter 5 hours, but only 3 hours need to be corrected, the system will adjust it to 0 and notify you that 3 hours were removed so you can manually adjust the remaining 2 hours elsewhere.
How the system validates time before reducing:
- Jira side: The system checks if the total logged time for the selected date is enough. If not, an error appears.
- PSA side: The system checks if your timesheet has enough time logged for the selected Task, User, and Billable status. If not, an error appears.
How time is reduced:
- On PSA: The system removes time from the largest entry first. If one entry doesn’t have enough time, it removes it completely and continues with the next one. This means some entries may be removed while others are adjusted.
- On Jira: Entries are reduced in the order Jira provides them. If the first entry doesn’t have enough time, it is removed, and the system moves to the next one. Again, some entries may be removed while others are adjusted.
Note: In this release, any Notes associated with negative values entered in Jira will not be saved in PSA. This behavior is specific to negative values and does not apply to positive Time Entries.
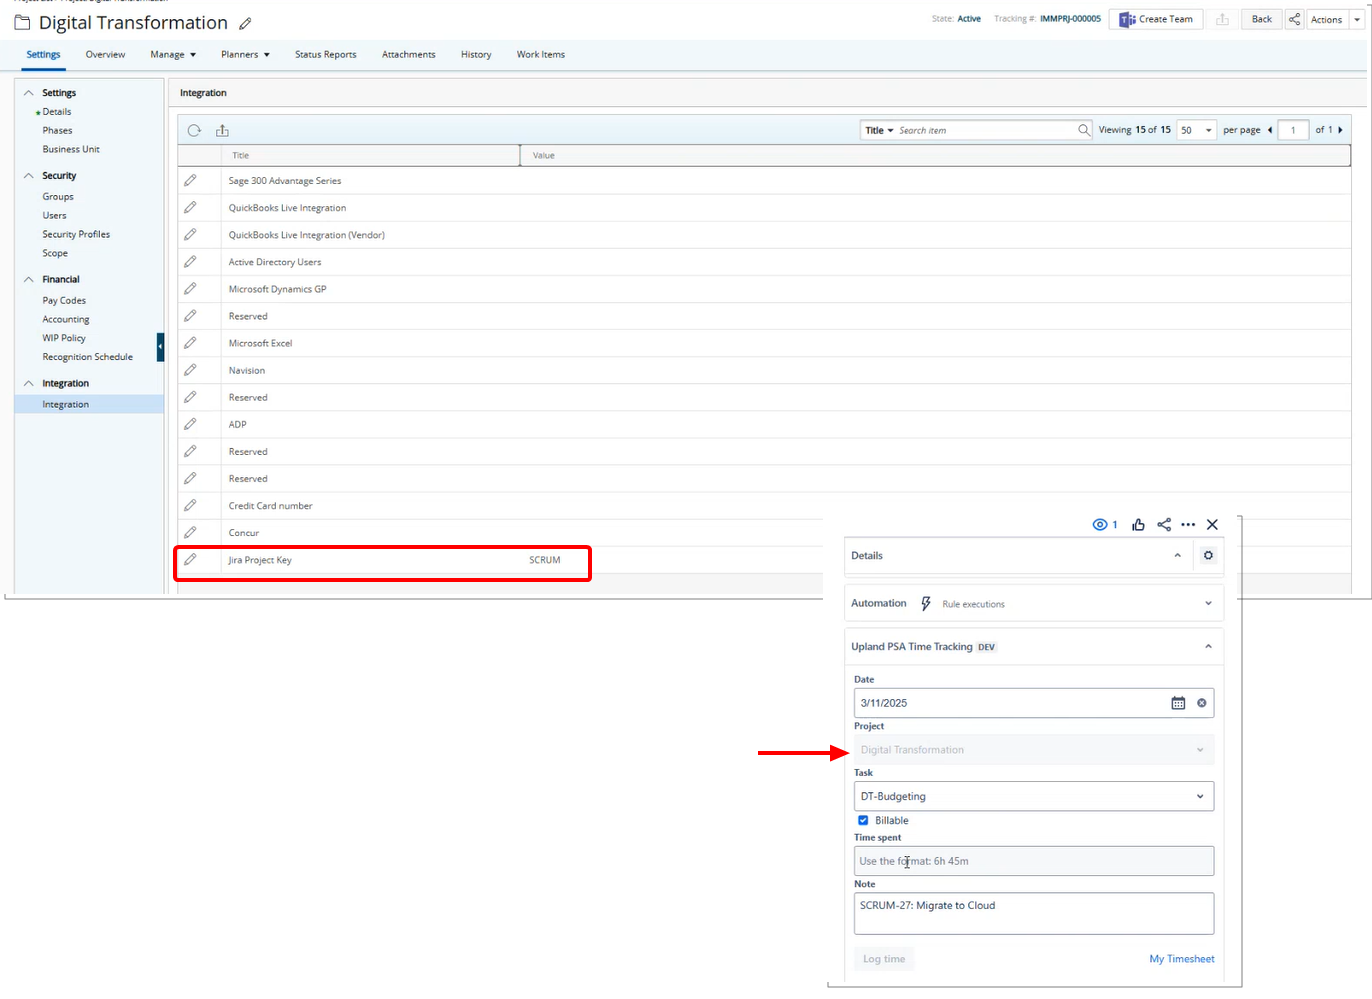
A new Jira Project Key setting is now available on the Integration page when modifying a Project. This setting enables you to enter the Jira Project Key. Once the mapping is configured, the Project field in Jira will be automatically populated with the mapped Projects that the user has access to (dependent on User permissions in Upland PSA.

This mapping can also be configured from the Mapping tab within the Configuration Settings for Jira page (Integrations > Jira), where you can manage and create mappings as needed.
Benefit: With the one-way integration between PSA and Jira, users can effortlessly track time by syncing entries directly from Jira to PSA. This automation eliminates manual data entry, minimizes errors, and ensures accurate logging of billable hours and project work—saving time and improving efficiency.
For further details refer to PSA - Jira Integration Guide
Description: To ensure compatibility with Quick Book Online's latest requirements:
- The API version has been upgraded to meet the minimum supported version of 74.
- The SDK has been updated to version 14.*.
- Outdated OAuth 1.0 support has been removed as it is no longer in use.
Additionally, required dependencies have been updated to align with the latest SDK standards.
For details on how to set up the connect, refer to PSA – QuickBooks Online Integration.
New Timesheet
Description: Improvements have been made to the way Time Entry Notes are entered and edited by introducing automatic saving and in-place editing. See the breakdown of specific improvements below for more details.
Creating a First Note
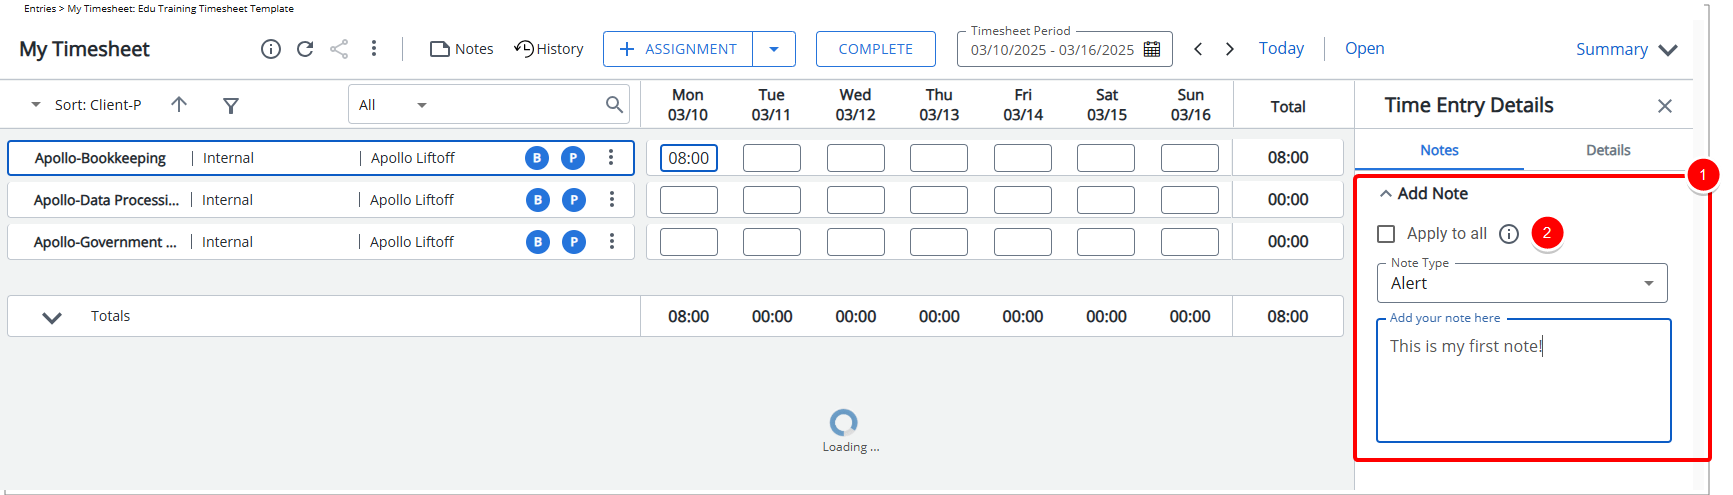
- When creating a note for the first time, the Add Note section now expands automatically for easier access.
- The Apply to All option has been repositioned to the top, accompanied by an info icon for further guidance.
Auto-Save Notes

Notes are now automatically saved when the Note text area loses focus, eliminating the need for manual saving and streamlining the process. Consequently, the Save button has been removed.

- Once the note is saved, the Add Note section automatically collapses for a cleaner view.
- The saved note is then displayed directly below the Add Note section for easy reference.
- The Apply to All option is also hidden, ensuring a more streamlined interface.
Inline Editing for Time Entry Notes

You can now edit your Time Entry Notes directly within the right panel using the Edit ![]() button.
button.
- Upon clicking the Edit
 button the text transforms into an editable text area with Cancel
  and Save
  buttons.
 - The Note remains in place while being edited, without moving to the top of the section.
- The height of the text area dynamically adjusts based on the Note size, expanding up to a maximum of four lines as needed.
- The Delete
 button is hidden during editing to prevent accidental deletions.
 - When editing a Note, you can now also modify the Note Type.
Note: The timestamp of the Note is hidden during editing
Benefit: You can now enter and modify Time Entry Notes with fewer clicks, ensuring a smoother and more efficient experience without disruptions.
For further details refer to Time Entry Notes.

Description: The Timesheet Notes dialog box has been optimized to display more rows by reducing white space and making the table more compact. This enhancement minimizes vertical scrolling and improves readability, allowing you to review Notes more efficiently.
Benefit: With a clearer and more space-efficient layout, timesheet approvers can quickly scan and review multiple notes without excessive scrolling. This improvement enhances usability, saves time, and provides a more seamless experience.
For further details refer to Timesheet Notes.
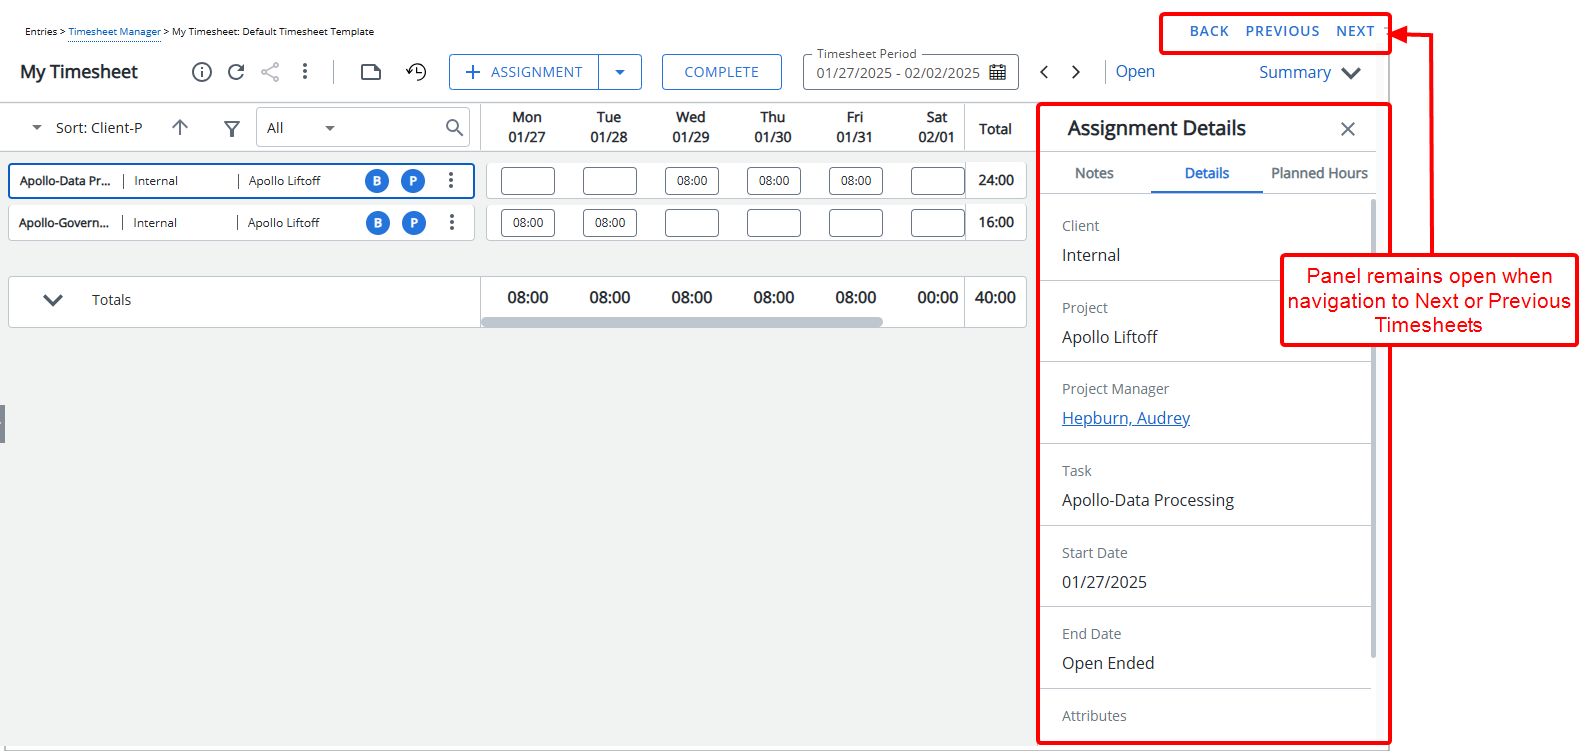
Description: In the previous release, when reviewing User Timesheets, the right panel would automatically close upon navigating between Timesheets using the Next and Previous buttons. As a result, Timesheet approvers had to manually reopen the panel each time they moved to a different User Timesheet. This added unnecessary clicks, disrupted workflow efficiency, and made it cumbersome to quickly reference related details while reviewing multiple Timesheets in succession.
As of this release, the right panel now remains open during the current session and retains the selected tab when navigating between Timesheets using the Next and Previous buttons.
Example: If a Timesheet approver opens the panel and views the Notes tab, the system will remember this selection within the current session and keep the panel open on the same tab when moving to the Next or Previous Timesheet.
Note: The Pin Right Panel On setting in the Timesheet Template assigned to the logged-in User takes precedence. To enable session-based panel behavior, this setting must be turned off.
A Back button has also been added to the New Timesheet page, allowing you to quickly return to the Timesheet Manager without needing to manually navigate back.
Furthermore, when accessing Timesheet Manager through the Home page, a Back button is now available, allowing you to return to the Home page.
Benefit: This enhancement streamlines the Timesheet approval process by reducing repetitive actions and improving efficiency. Approvers no longer need to manually reopen the right panel or reselect their preferred tab when navigating between timesheets. By remembering the panel’s state and selected tab, the system allows for a faster, more seamless review experience, enabling users to focus on validation and decision-making rather than UI interactions. This improvement helps minimize disruptions, saving time and enhancing overall workflow efficiency.
For further details refer to
Notifications
Description: Administrators can now automatically apply Budget Notifications to multiple projects and tasks using customizable Filters, extending the template’s functionality to support mass notifications.
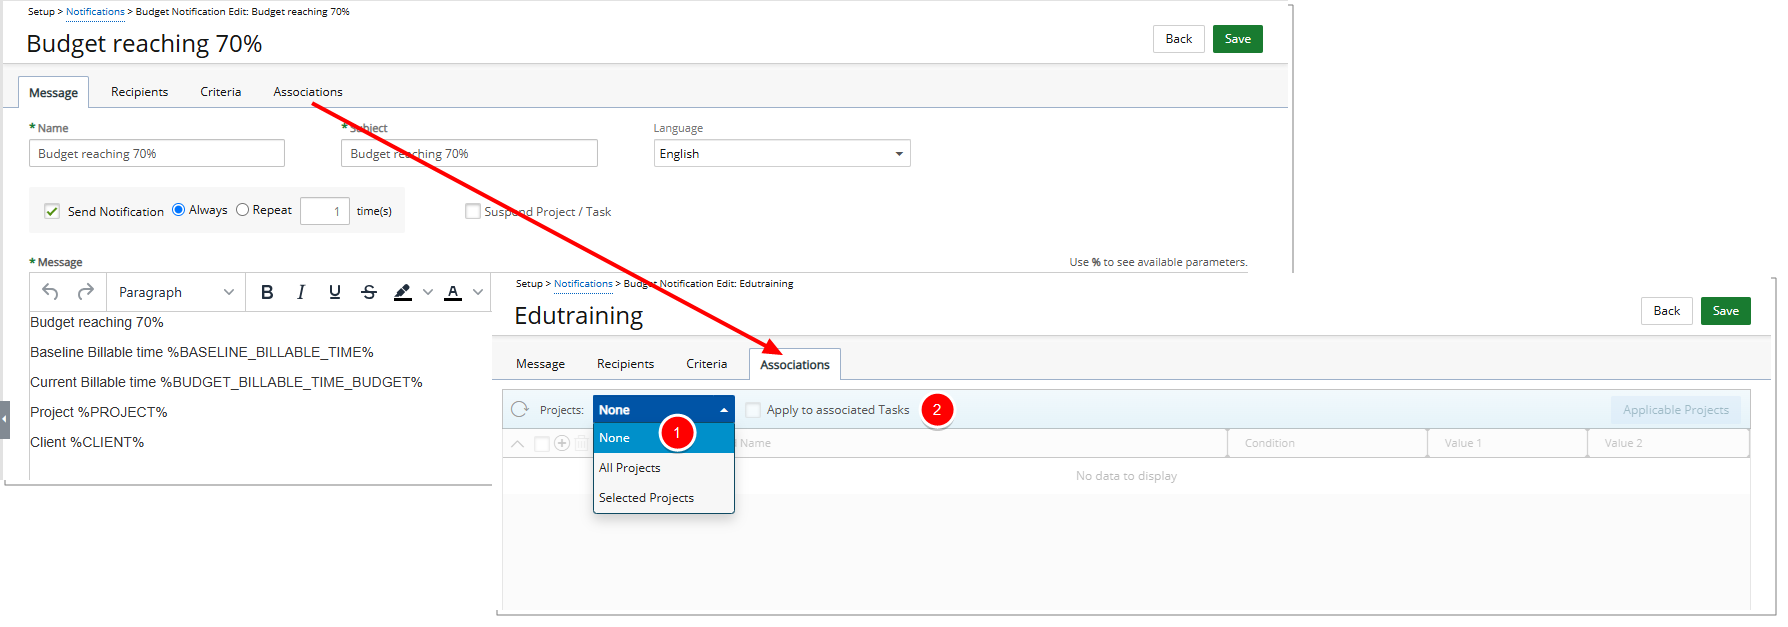
A new Associations tab has been introduced to the Budget Notification Templates where a set of Filter criteria can be configured.
- The Projects selection list allows you to select:
- None: When None is selected, the Budget Notification Template functions as it did in previous releases. The Associations tab becomes read-only, and only the criteria specified in the Criteria tab will trigger notifications for Projects where the template is manually associated.
Note: None is selected by default.
- Selected Projects: When selected, you can then define a set of Filters. The Budget Notification Template will then automatically appear in read-only form within the Notifications tab of Project Budget Notifications for projects that meet these defined Filters.
Notifications are created based on the schedule in the Budget Notifications Automation Processing Service when the criteria in the Criteria tab are met for Project Budgets, and sent according to the schedule in the Notifications Delivery Automation Service. - All Projects: When selected, the Associations tab becomes read-only. The Budget Notification Template will automatically appear in read-only form within the Notifications tab of Project Budget Notifications for all Projects in the system.
Notifications are created based on the schedule in the Budget Notifications Automation Processing Service when the criteria in the Criteria tab are met for Project Budgets, and sent according to the schedule in the Notifications Delivery Automation Service.Note: It is recommended to avoid using the All Projects option for large organizations due to potential performance issues.
- None: When None is selected, the Budget Notification Template functions as it did in previous releases. The Associations tab becomes read-only, and only the criteria specified in the Criteria tab will trigger notifications for Projects where the template is manually associated.
- Apply to associated Tasks: When selected, the Budget Notification Template will automatically appear in read-only form within the Notifications tab of Task Budgets for the Projects that meet the Filter criteria.
Note:
- For multiple project budgets, notifications are created at the Summary level. For a single project budget, notifications are created at the Project level.
- Role-based budgets do not support this type of notification.
When Selected Projects is chosen you can then configure the Filter using the familiar Filter interface:
- In addition to User Defined Fields associated to the Project object you can choose the following Fields to create your filter: Alternate Manager, Client, Code, End, Health, Id, Is Active, Portfolio, Program, Project, Portfolio Manager, Program Manager, Project Manager, Start, State Name, Workflow and Tracking number.
- Depending on your chosen Field in step 1, the Conditions may vary and will have one of the following options:
- In, Not In
- =, <>, Like, Not Like
- =, <>, >=, <=, <, >, Between, Not Between, Today, This Week, Last Week, This Month, Last Month, This Quarter, Last Quarter, This Year, Last Year, Year to Date, This Fiscal Month, Last Fiscal Month, This Fiscal Quarter, Last Fiscal Quarter, This Fiscal Year, Last Fiscal Year, Fiscal Year to Date
- The Value 1 and Value 2 options are dependent on the chosen Field and Conditions. You may have to either:
- Click the ellipsis button and select the Value from a list
- Select one or multiple values from a selection list
- Enter a value for Value 1
Example
In our example, we are going to create a filter for Projects that have a Project Code Like Edu-.
- In the Associations tab of the required Budget Notification Template, select Selected Projects. Note that we are leaving the Apply to associated Tasks check box unchecked.
- Choose Code as the Field Name.
- Set the Condition to Like.
- Enter Edu- as the value to filter for projects with a Project Code starting with "Edu-".
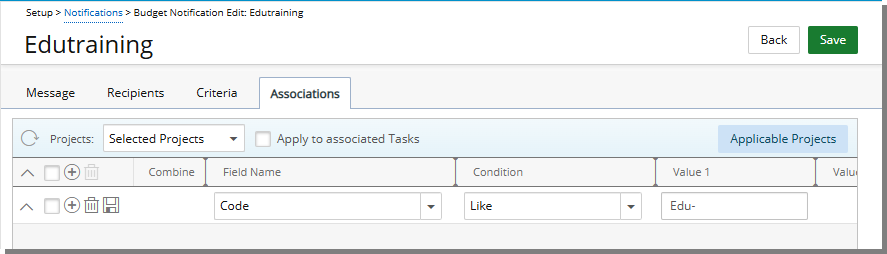
- Save the Filter.
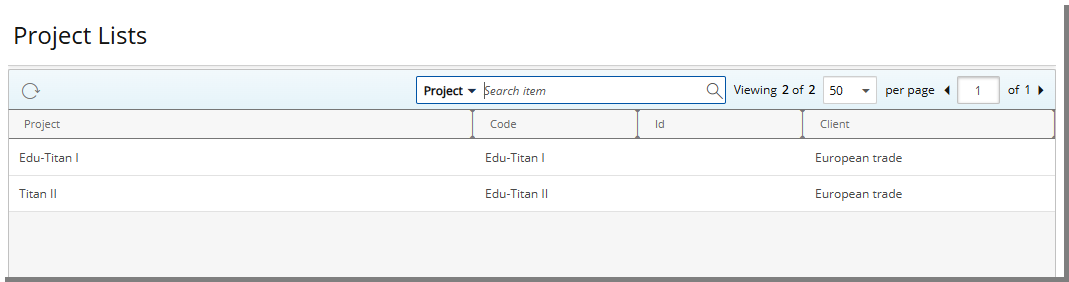
Once the filter is configured, click the Applicable Projects button. The listed Projects are the ones that match our defined Filter criteria. These projects will have the Budget Notification Template automatically applied.
The Notifications will be created according to the schedule defined in the Budget Notifications Automation Processing Service, triggered when the criteria set in the Criteria tab are met for Project Budgets, and sent according to the schedule defined for the Notifications Delivery Automation Service.
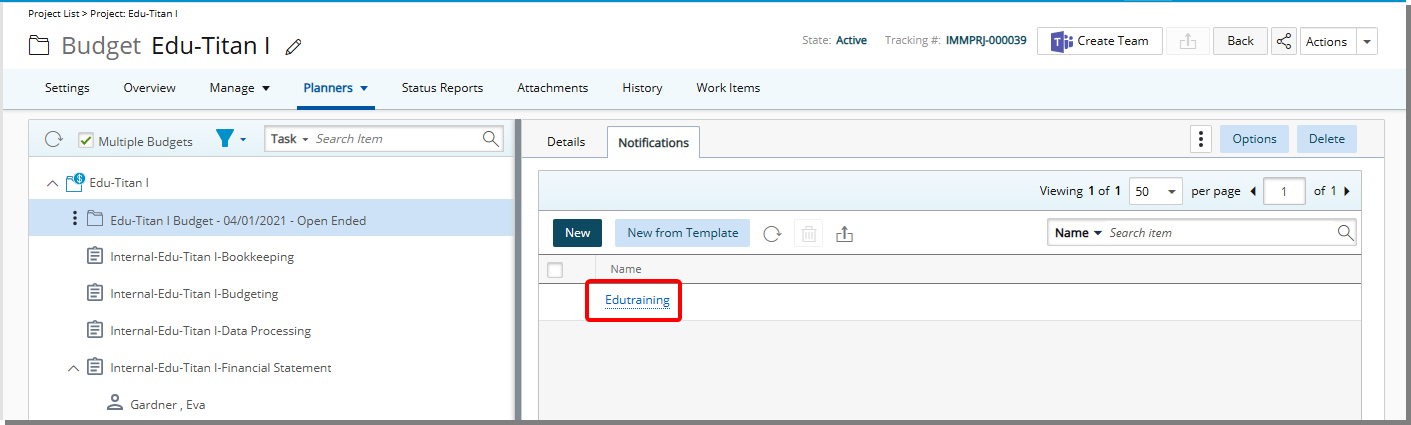
Navigating to the Project Budgets Notifications tab note that the association is automatically applied. However this Budget Notification is in read-only mode.
Benefit: This enhancement simplifies the management of budget notifications, ensuring that relevant stakeholders receive timely and targeted updates. By leveraging customizable filters and automatic application, administrators can improve notification efficiency and ensure better budget tracking and communication across projects and tasks.
For further details refer to:
Organization Breakdown Structure (OBS)

Description: The option Enable Mentioning in Comments & Notes is now available from the System Configuration page (Setup > Organization > System > System Setup) accessible only by the Master Administrator User Profile.
When the Enable Mentioning in Comments & Notes setting is turned on, you can tag specific Users in Comments and Notes using the "@" symbol, allowing for direct notifications and improved collaboration. Mentioned Users receive Email Notifications, provided an Email is saved in their user profile, ensuring they are promptly informed of relevant discussions.
Note: By default, Enable Mentioning in Comments & Notes is checked.
Benefit: This feature enhances communication by making it easier to involve the right stakeholders in ongoing conversations.
For further details refer to:

Description: The breadcrumb trail now displays the Username when assigning a Task from the Users list context menu (Setup > Organization > Users > Assign).
Benefit: This enhancement provides clarity by showing key information—such as the Username—directly within the breadcrumb trail. This reduces the risk of errors caused by misidentification, as administrators can quickly confirm the intended User without needing to cross-reference or navigate to other pages. This improvement ensures contextual awareness, enabling administrators to confidently and efficiently complete Task assignments while maintaining accuracy.
For further details refer to Assign Tasks from Users List.
Project Budget
In this release, the Project Budget page has been updated with a modernized interface that enhances readability and usability. The improved design offers better navigation, a more structured layout, and clearer presentation of key budget details, making it easier to track and manage project financials efficiently.
Additionally, several enhancements and modifications have been introduced to align with evolving user needs, ensuring greater accuracy and control over project budgets.
Below is a detailed breakdown of the improvements and changes made in this release:
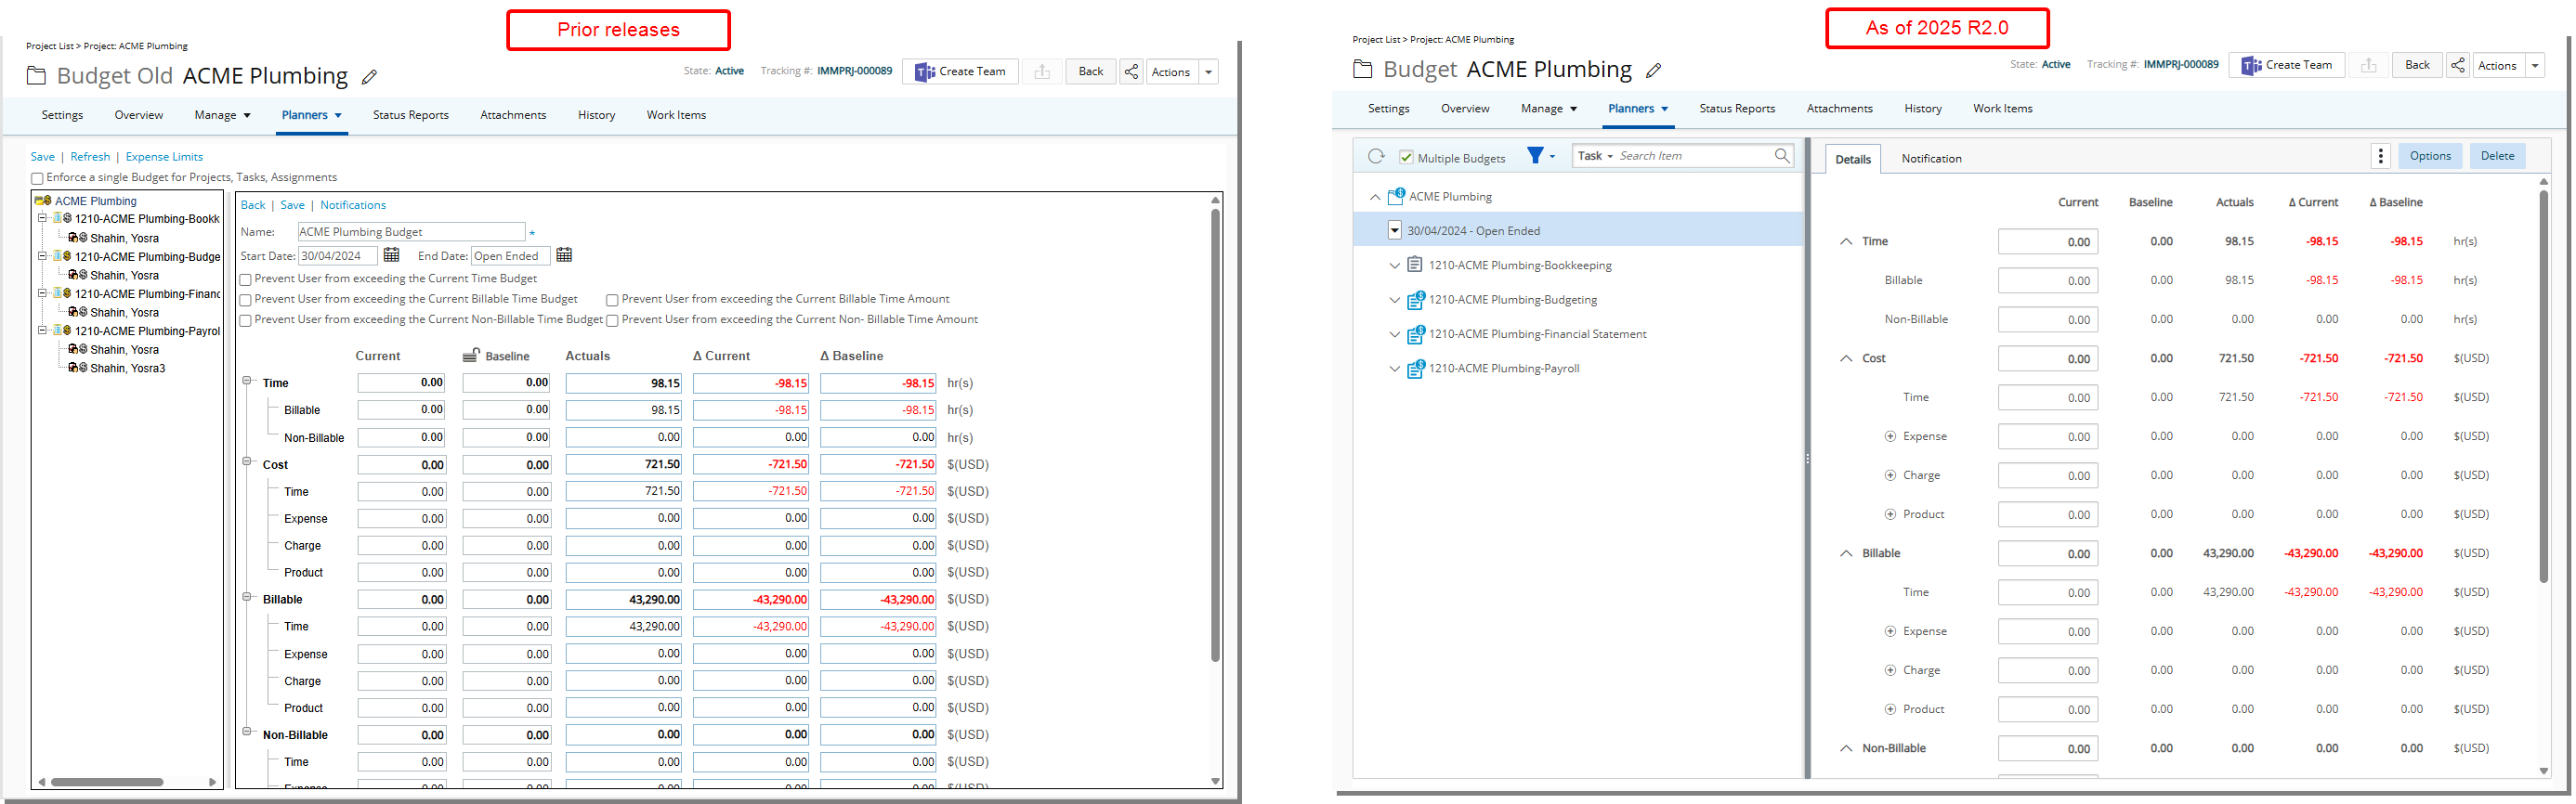
Description: The Project Budget page has been enhanced with a modernized interface designed to improve readability, navigation, and overall usability. The updated layout provides a more structured and intuitive experience, allowing you to access key budget details more efficiently. Clearer visual organization ensures that budget data, allocations, and financial insights are presented in a way that enhances comprehension and decision-making. These improvements make it easier to track expenses, compare budget allocations, and manage project financials with greater accuracy and ease.
Below is a detailed breakdown of the specific interface changes and enhancements introduced to further streamline budget management.
Single Budget
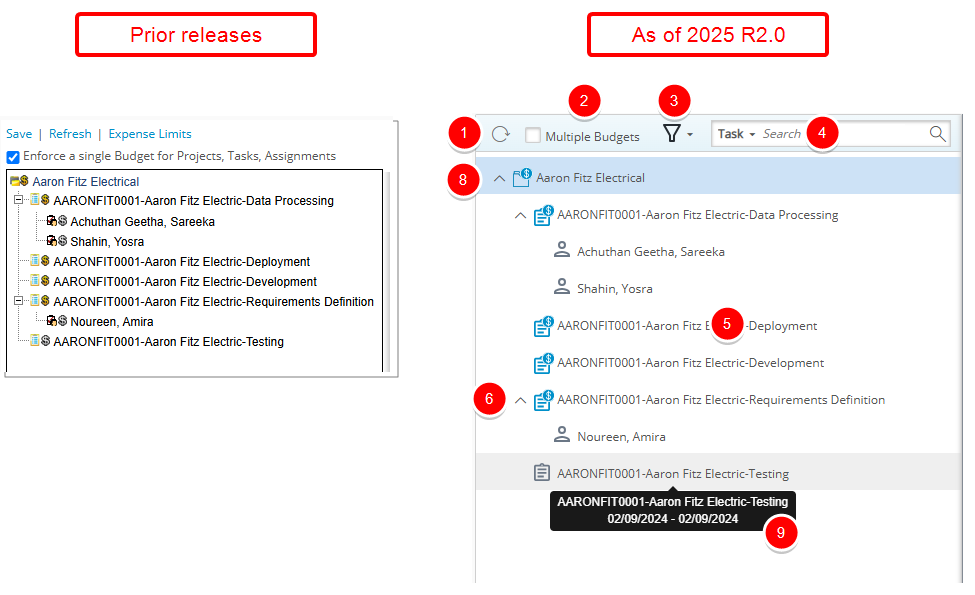
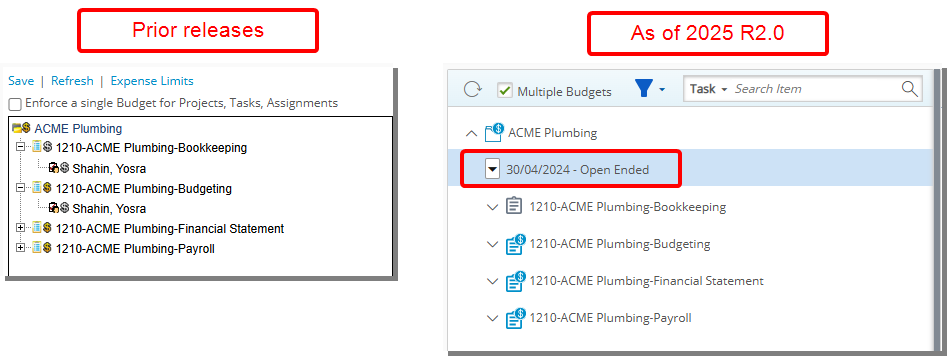
The user interface of the left panel, including spacing, colors, positioning, buttons, icons, and fonts, has been updated for consistency and improved usability.
- The Refresh
 button is now positioned on the far left side of the page.
 - The Enforce a single Budget for Projects, Tasks, Assignments is replaced by the Multiple Budgets selection box.
- By default the tree is Filtered
 to display only Active Tasks or Assignments when suspended or decommissioned ones are present (
 /).
/).- When the Decommissioned checkbox is checked, Decommissioned Tasks and Assignees are displayed in gray.
- When the Suspended checkbox is checked, Suspended Tasks and Assignees are displayed in red.
- If none of the three options are checked, only the Project Budget is shown.
Note: The selected Filter is saved per browser per user, ensuring preferences persist across sessions.
- Search by Task or User.
- The icons representing Projects, Tasks, and Assignments in the tree structure have been redesigned. When a Budget is defined, the icons appear blue; otherwise, they are gray.
- Project (
 /
/ )
) - Task (
 /
/ )
) - Assignment (
 /
/ )
)
- Project (
- The Expand
 and Collapse
  buttons now match the familiar ones used throughout the application.
 - Clicking on an item that has a Budget will display the related budget on the right panel.
- When multiple child items are open, you can now collapse them all at once using the collapse button at the Project level. Expanding the Project again will keep all child items collapsed by default.
- Hovering over an item displays a tooltip with relevant details such as Start Date, End Date and, if available, a Description.
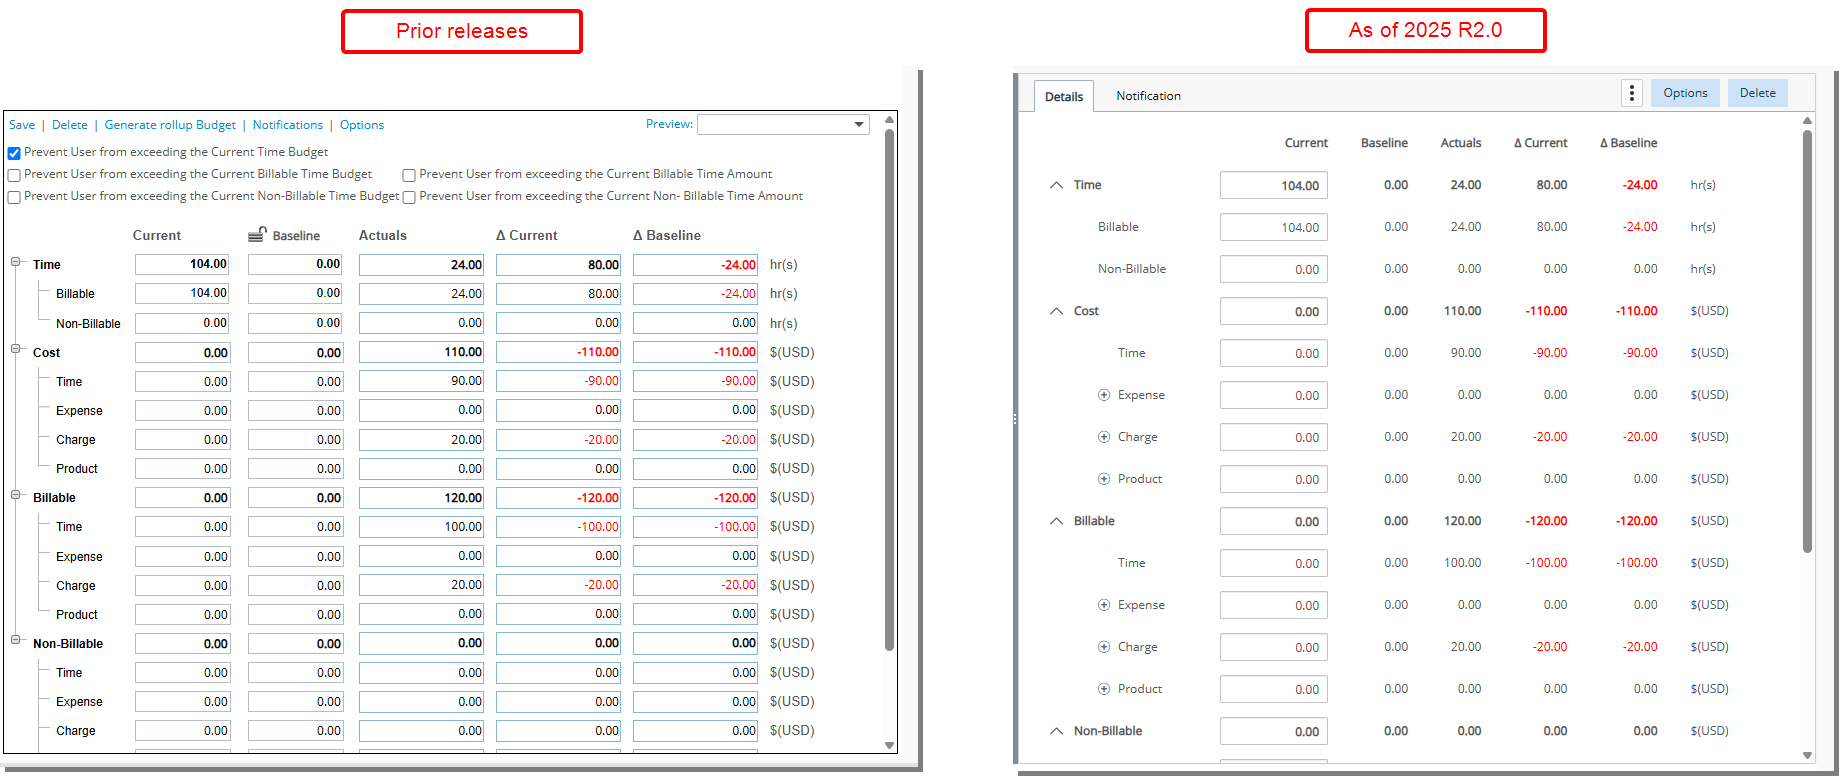
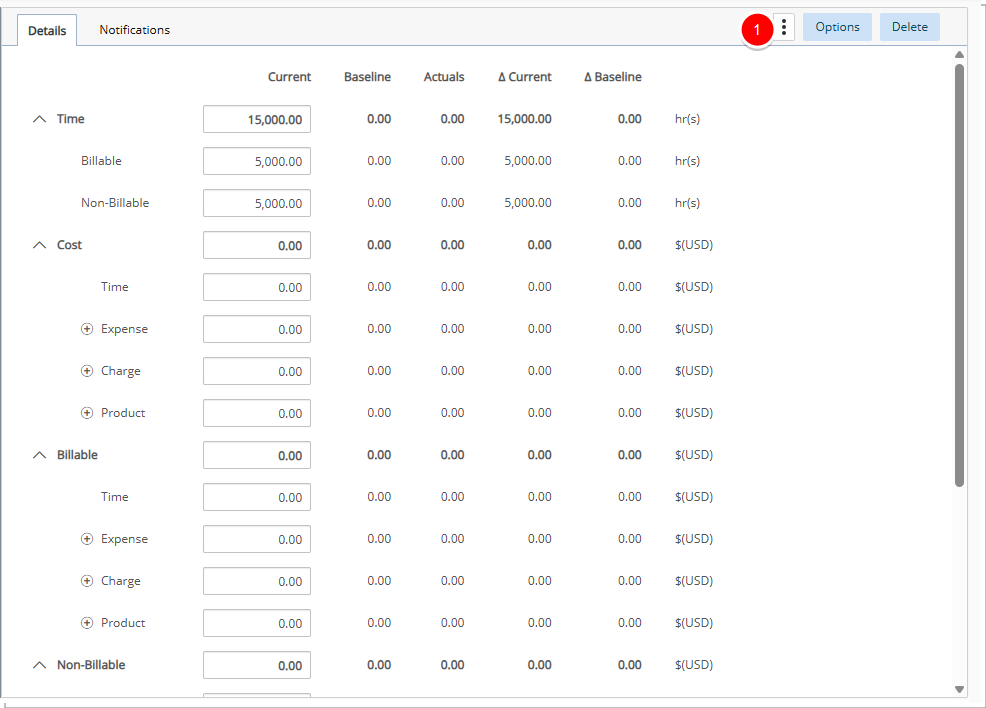
The right panel has also undergone a user interface update, including spacing, colors, positioning, and fonts, to ensure consistency and improved usability. There are now two tabs available:
The Details tab where you will find all the details of your Budget such as:
- The four main expandable/collapsible sections: Time, Cost, Billable and Non-Billable
Note:
- The Time category has two subcategories: Billable and Non-Billable.
- The Cost, Billable, and Non-Billable categories each have four subcategories: Time, Expense, Charge, and Product. For the Expense, Charge, and Product subcategories, you can click the Add
 button to add items. When an item exists, you can use the Delete
  button located next to it to remove it.
-
There are five columns for each row:
- Current
- Baseline
Note: The Baseline column can no longer be modified directly from the Budget table. Instead, you can manage Baselines using the Baselines link in the Context menu
 (refer to Budget Baselines).
 - Actuals
- Delta Current
- Delta Baseline
The legacy Notifications link is converted to a tab. For further details on improvements made to Budget Notifications, refer to Baseline Parameters in Budget Notifications.
Furthermore, note the following updates:
- The Save link has been removed. Changes made to the Budget are now automatically saved.
- The Delete and Options links have been converted into buttons and relocated to the far right of the tab header area.
- A new Context menu is now available, providing access to:
- Reports: Includes Project, Task, and Assignment Budget-type RDLC reports, displayed as a dialog box.
- Baseline management: Refer to Budget Baselines).
- Generate Rollup Budget: The functionality for generating a Rollup Budget at the Task and Project levels remains the same as in previous releases and can now be accessed through the context menu in the same familiar way.
Note: The Generate Roll-Up Budget option is deprecated at the Assignment level and is no longer available.
- The following options, previously located above the table, have been renamed and are now accessible through the Options button:
- Prevent User from exceeding the Current Time Budget
- Prevent User from exceeding the Current Billable Time Budget
- Prevent User from exceeding the Current Billable Time Amount
- Prevent User from exceeding the Current Non-Billable Time Budget
- Prevent User from exceeding the Current Non- Billable Time Amount
Note: For more details on improvements made to the Options page refer to Budget Options.
Multi Budgets

When accessing the Multi-Budget Project Budget page, you will now notice a Summary tab.
The Budget Summary provides a read-only overview of all budgets associated with a project, displaying key financial details in an organized table format. This summary is divided into four rows, each representing the aggregated values for Time, Cost, Billable, and Non-billable budgets.
Each row is divided into five columns, reflecting different budget categories: Current, Baseline, Actuals, and Delta (Current and Baseline).
- Current: This column shows the total of all current budgets, including Time, Total Cost, Total Billable, and Total Non-billable budgets.
- Baseline: This column displays the aggregate baseline values for Time, Total Cost, Total Billable, and Total Non-billable budgets.
- Actuals: Here, the total actuals are shown, calculated based on the project, task, or assignment dates.
- Delta Current: This column indicates the difference (delta) for current budgets across Time, Total Cost, Total Billable, and Total Non-billable budgets.
- Delta Baseline: This column represents the difference (delta) for baseline budgets in the same categories.
Additionally, you will find the option to Create Budget, allowing you to easily generate new budgets directly from this page. This enhancement streamlines the budget management process, providing a more efficient way to manage multiple budgets within a project.
Note: When the Multiple Budgets checkbox is checked, multiple budgets can be created at the Project level. However, creating multiple budgets at the Task and Assignment levels has been deprecated, as these features were not widely utilized. Role-based budgets, introduced in this release, do not support multiple budgets. You can still create a single budget for each of these items.
The Budgets can be accessed by simply clicking on their respective dates in the left panel. This allows for quick navigation to the relevant budget details, making it easier to manage and view budgets based on their specific timeframes.
Note: A new setting has been added that allows administrators to select Multiple Budgets as the default project budget at the Work System level (Setup > Work > System) . Administrators can also choose to Display Budgets by name, enabling you to assign custom names to your Project Budgets. If this setting is not enabled, Project Budget names will be defined as "Project Budget Start Date - Project Budget End Date." Additionally, when you hover over the budget name, the Project Budget Description (if defined) will appear, providing additional context without the need for further clicks. For further details refer to Enhanced Work System Setup Page with Improved UI/UX and New Budget Settings.
From the Budget Context menu ![]() you can choose to Edit or Copy an existing Budget.
you can choose to Edit or Copy an existing Budget.
Additionally, the user interface has been aligned with the design of Single Budget page, maintaining consistency in layout, navigation, and functionality for a more intuitive experience.
All other features for Multi-Project Budgets remain unchanged from the previous release, ensuring a seamless transition for users.
Expense Limits
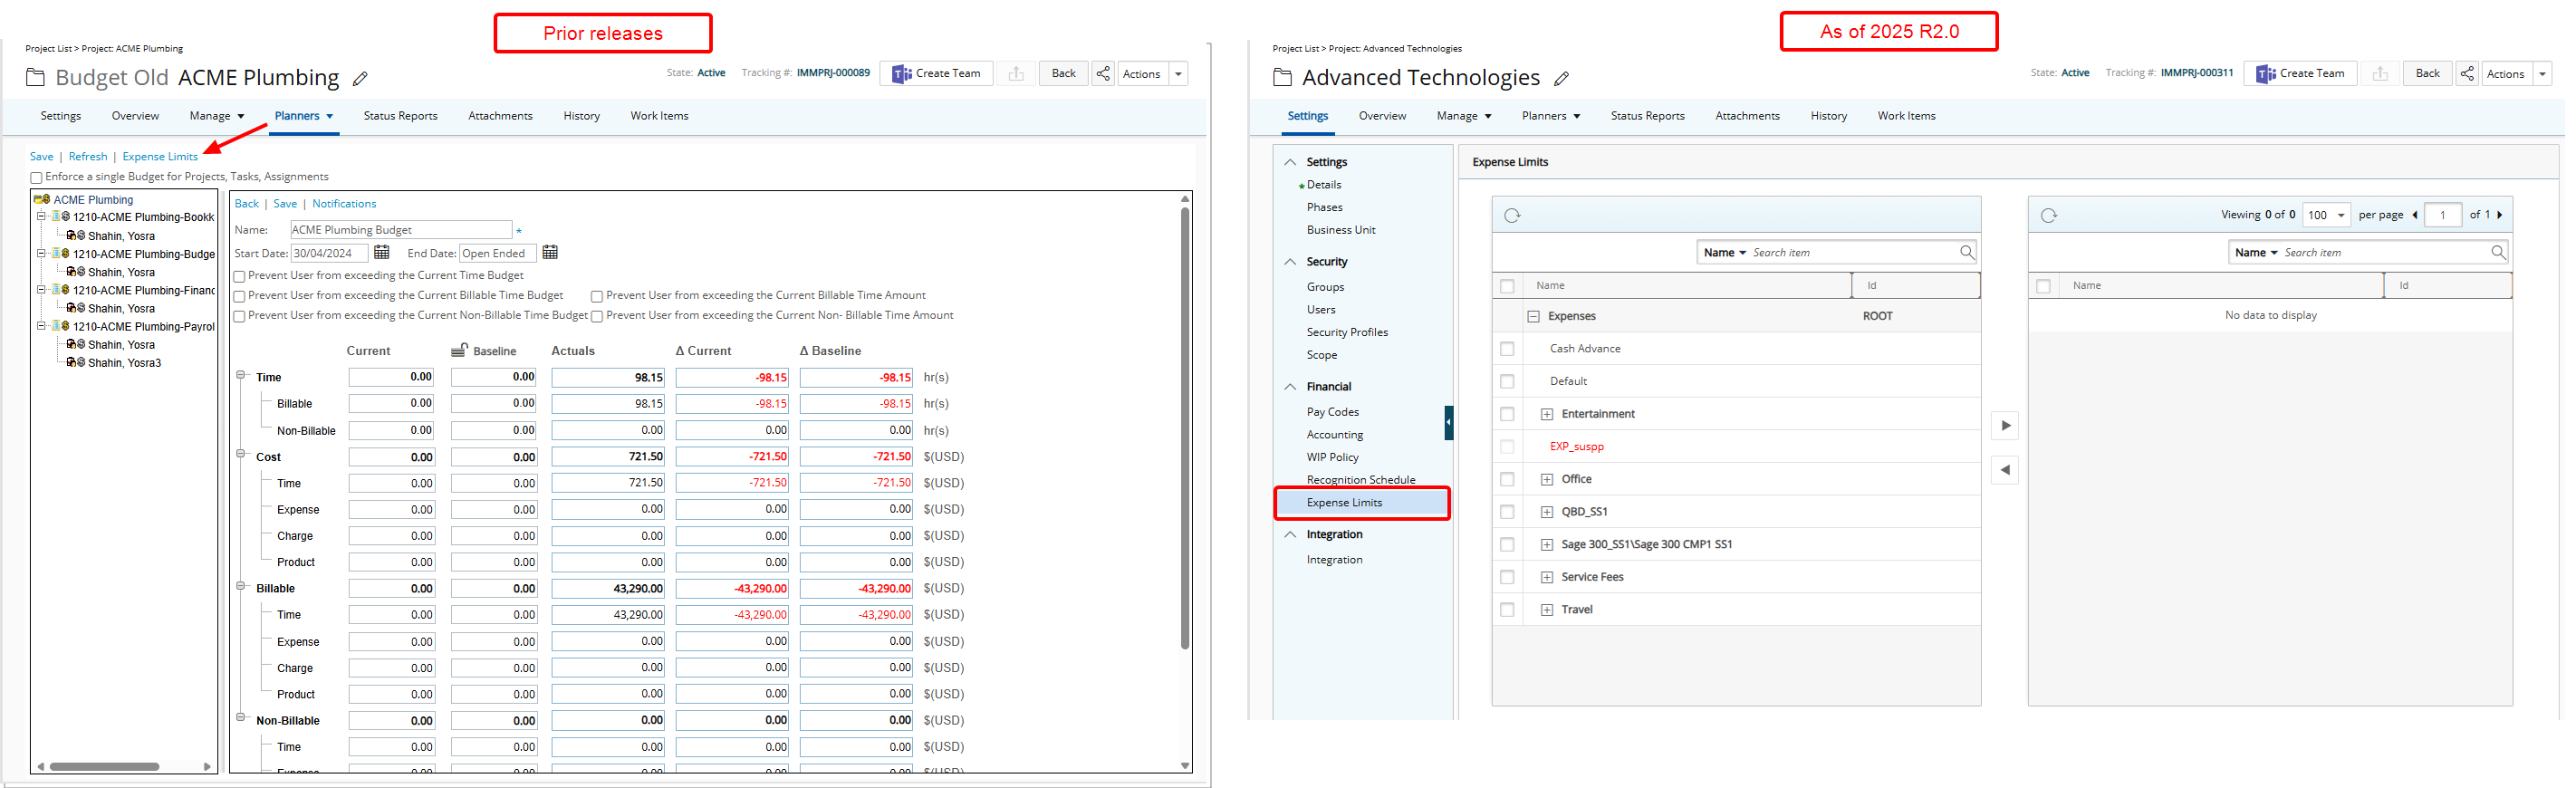
The Expense Limits functionality, which you were previously able to access directly from the Project Budget page, is now available through a new access point. It has been relocated to the Project Edit page under the Financial menu located within the project left navigation panel. While the functionality remains the same, the updated location offers easier access within the overall project management workflow.
For further details refer to the Project Budget section of the help center.

Description: This release introduces the ability to save and manage multiple Baselines for a Project Budget, offering you the flexibility to maintain various snapshots of your Budget at different stages. You can now capture changes such as contract updates or adjustments made during the course of the project. Each baseline can be saved with a specific timestamp and can serve as a reference point for Project progress, giving you a comprehensive view of Budget changes over time.
Note: Deleting a Budget will also delete all associated baselines.
When hovering over a Baseline Name, a detailed dialog box will appear, displaying the following information:
- Name: The Name assigned to the baseline.
- Creation date: The date when the baseline was created.
- Created by: The name of the user who created the baseline.
- Reason: The reason or purpose defined for the baseline
Example:
Audrey, the project manager, is overseeing a web development project. During the project, there are significant scope changes, adjustments in timelines, and alterations to the budget. To track these changes effectively, Audrey decides to save multiple baselines at different points in the project to have a reference of the original plan and the various revisions made throughout the project lifecycle.
Initial Contract: At the start of the project, Audrey creates the first baseline as the “Original Plan.” This baseline includes the initial project time and monetary budget. It serves as the reference for the original project goals. The budget values entered in the Current column are saved as the entries for the newly created baseline.
Baseline After Mid-Project Scope Changes : Halfway through the project, the client requests additional features, which require adjustments to the project time and monetary budget. She Modifies the Current column and then creates a new baseline called “Mid-Project Revision” to reflect these changes. This baseline captures the updated scope and budget.
Baseline After Final Adjustments: Towards the end of the project, there are minor adjustments to the timeline and budget to account for unforeseen delays and additional costs. Audrey creates a third baseline called “Final Adjustments.” This baseline represents the final version of the project time and monetary budget before the project completion.
She can choose any of these baselines as the Active Baseline, the Active baseline's name is displayed at the top of the Baseline column. The budget entries associated with this baseline are loaded into the Baseline column, and the Delta Baseline values are recalculated to reflect any changes.
Note: Performing a rollup will remove all budgets and their Baselines. When creating a new budget after a rollup, a new baseline must be created.

To manage baselines, click Baselines, and then chooses Manage Baselines from the Context menu ![]() . The Manage Baselines dialog box will be displayed. Click the Baseline Name to edit the Name, Description, and Reason. Additionally, you can Delete
. The Manage Baselines dialog box will be displayed. Click the Baseline Name to edit the Name, Description, and Reason. Additionally, you can Delete ![]() a baseline or change the Active baseline directly from the table.
a baseline or change the Active baseline directly from the table.

To support this new feature, a System Table (Setup > Organization > System) called Budget Baseline Reason has been added to the System Tables list page allowing administrators to manage the predefined list of Reasons.
The out-of-the-box reasons are:
- Initial Contract
- Scope Creep
- Unforeseen Costs
- Changes in Timeline
Copying a Project
When copying a Project that has multiple Baseline if:
- The Budgets check box is checked and Using Project dates is selected then only the Active baseline is copied. Note that the copied baseline is renamed to Baseline.
- The Budgets check box is checked and Based on existing schedule is selected then all Baselines are copied. Note that the copied baselines retain their original names.
API Support
A new End Point called BudgetBaselines is now also available to support multiple baselines you can POST, PUT, PATCH, GET and DELETE. For more information refer to the REST API documentation.
Caution: Adding or editing baselines through the existing BudgetEntries API is no longer supported.
Budget Import Support
This release does not support importing multiple baselines through the Budget Import functionality. If your Budget Import Template includes Baseline values, they will overwrite any existing Baselines and be set as the Active Baseline.
Caution: This means that upon importing, all previously stored Baselines will be deleted, and the newly imported Baseline will be set as the Active Baseline by default.
Benefit: You can now track and compare Budgets more effectively. This feature improves project transparency by enabling the retention of historical data for auditing and decision-making. Whether it is for contract modifications, project scope changes, or financial tracking, you can easily document and review budget variations. This enhances overall project control and ensures that you have accurate, up-to-date financial information readily available at any given stage of the project.
For further details refer to Project Budget Baselines.
Description: In this release, we are introducing the ability to create budgets based on Roles rather than just Tasks. This enhancement allows you to define budgets at the Role level, aligning financial planning with resource allocation rather than individual Task Assignments. Role-based budgets are particularly useful to organizations that plan and track budgets by Role rather than by specific Task breakdowns.
Note: This release does not support multiple Budgets for a single Role. However, multiple Project Budgets are supported.
A new Budget Type option is now available at the Project level. This allows you to override the system default and choose between Task-Based or Role-Based budgeting.
Prerequisites:
- The Budget Type must be set to Role for the Project. To do so, navigate to the Options tab when modifying a Project and select Role as the Budget Type.
- Ensure that Roles are added to the Project Team.
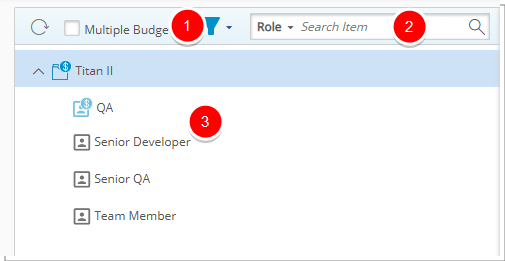
When creating a new Role-Based Budget, the Roles are displayed in the left navigation panel. Most functionalities remain consistent with Task-Based Budgets, except for the following key differences:
- By default the tree displays Active and Suspended Roles (/).
- When the Active checkbox is checked, Active Roles are displayed in gray.
- When the Suspended checkbox is checked, Suspended Roles are displayed in red.
- If none of the two options are checked, only the Project Budget is shown.
Note: The selected Filter is saved per browser per user, ensuring preferences persist across sessions.
- Search by Role.
- When a Budget is defined, the icons appear blue; otherwise, they are gray.
- Project (/)
- Role (
 /
/ )
)
Note: The Start and End Dates of a Role Budget align with the Project dates. If the Project dates are updated, the Role Budget dates will automatically adjust accordingly.
- Project (
The right panel includes the same options as the ones for Task-Based Budgets with the following exceptions:
- From the Context menu you can:
- Access Reports
- Baseline management: Refer to Budget Baselines).
Note: Generate Rollup Budget is not available for Role-Based Budgets.
Project Planner
When a Project uses Role-Based Budgets, the following options are hidden in UPP:
- The Budget tab located witih the bottom panel
- The Project Budget option in the top-left menu
However, you can still update the Active Baseline from UPP.
Budget Import Support
This release does not support importing Role Based Budgets.
Benefit: This enhancement provides greater flexibility in budget planning by aligning financial tracking with resource roles rather than specific tasks, improving resource allocation and financial oversight.
For further details refer to Creating Role Based Budgets.
Description: The Notifications page is now available as a tab within the Project Budget, providing a more streamlined and integrated experience.
New Baseline parameters are now available when creating or managing Budget Email Notifications, providing greater visibility into Baseline details, including name, reason, description, creator, creation date, time, cost, and billable vs. non-billable breakdowns. The new Parameters are:
- %BASELINE_NAME – The name of the Baseline.
- %BASELINE_REASON – The Reason defined for this Baseline.
- %BASELINE_DESCRIPTION – The Description defined for this Baseline.
- %BASELINE_CREATOR% – The name of the user who created the Baseline.
- %BASELINE_CREATION_DATE% – The date when the Baseline was created.
- %BASELINE_TOTAL_TIME% – Total hours of the Baseline.
- %BASELINE_BILLABLE_TIME% – Billable hours of the Baseline.
- %BASELINE_NON_BILLABLE_TIME% – Non-Billable hours of the Baseline.
- %BASELINE_TOTAL_COST% – Total Cost Amount of the Baseline.
- %BASELINE_TIME_COST% – Cost associated with Time in the Baseline.
- %BASELINE_EXPENSE_COST% – Cost associated with Expenses in the Baseline.
- %BASELINE_CHARGE_COST% – Cost associated with Charges in the Baseline.
- %BASELINE_PRODUCT_COST% – Cost associated with Products in the Baseline.
- %BASELINE_TOTAL_BILLABLE% – Total Billable amount of the Baseline.
- %BASELINE_TIME_BILLABLE% – Billable Time amount of the Baseline.
- %BASELINE_EXPENSE_BILLABLE% – Billable Expense amount of the Baseline.
- %BASELINE_CHARGE_BILLABLE% – Billable Charge amount of the Baseline.
- %BASELINE_PRODUCT_BILLABLE% – Billable Product amount of the Baseline.
- %BASELINE_TOTAL_NON_BILLABLE% – Total Non-Billable amount of the Baseline.
- %BASELINE_TIME_NON_BILLABLE% – Non-Billable Time amount of the Baseline.
- %BASELINE_EXPENSE_NON_BILLABLE% – Non-Billable Expense amount of the Baseline.
- %BASELINE_CHARGE_NON_BILLABLE% – Non-Billable Charge amount of the Baseline.
- %BASELINE_PRODUCT_NON_BILLABLE% – Non-Billable Product amount of the Baseline.
Furthermore, the following Parameters are also available to support Role based Budgets:
- %ROLE% – This is the Name of the Role if Role type budget is created.
- %ROLE_GROUP% – This is the Group to which the Role is associated to if Role type budget is created.
- %ROLE_GROUP_MANAGER% – This is the Name of the Group manager of the Role if Role type budget is created.
Note that for the Project Summary Budget, when Multiple Budget is enforced, the following parameters are hidden as they are not applicable:
- %BUDGET_START%
- %BUDGET_END%
- %BUDGET_NAME%
- %TASK%
- %BASELINE_CREATION_DATE%
- %BASELINE_CREATOR%
- %BASELINE_DESCRIPTION%
- %BASELINE_NAME%
- %BASELINE_REASON%
- %ROLE%
- %ROLE_GROUP%
- %ROLE_GROUP_MANAGER%
Benefit: This enhancement empowers users with deeper insights and more relevant information in budget notifications, enabling better decision-making, clearer communication, and improved accountability. By tailoring content to include key Baseline and Role-based details—while hiding what's not applicable—notifications become more actionable, focused, and aligned with the specific needs of each project.
For further details refer to:
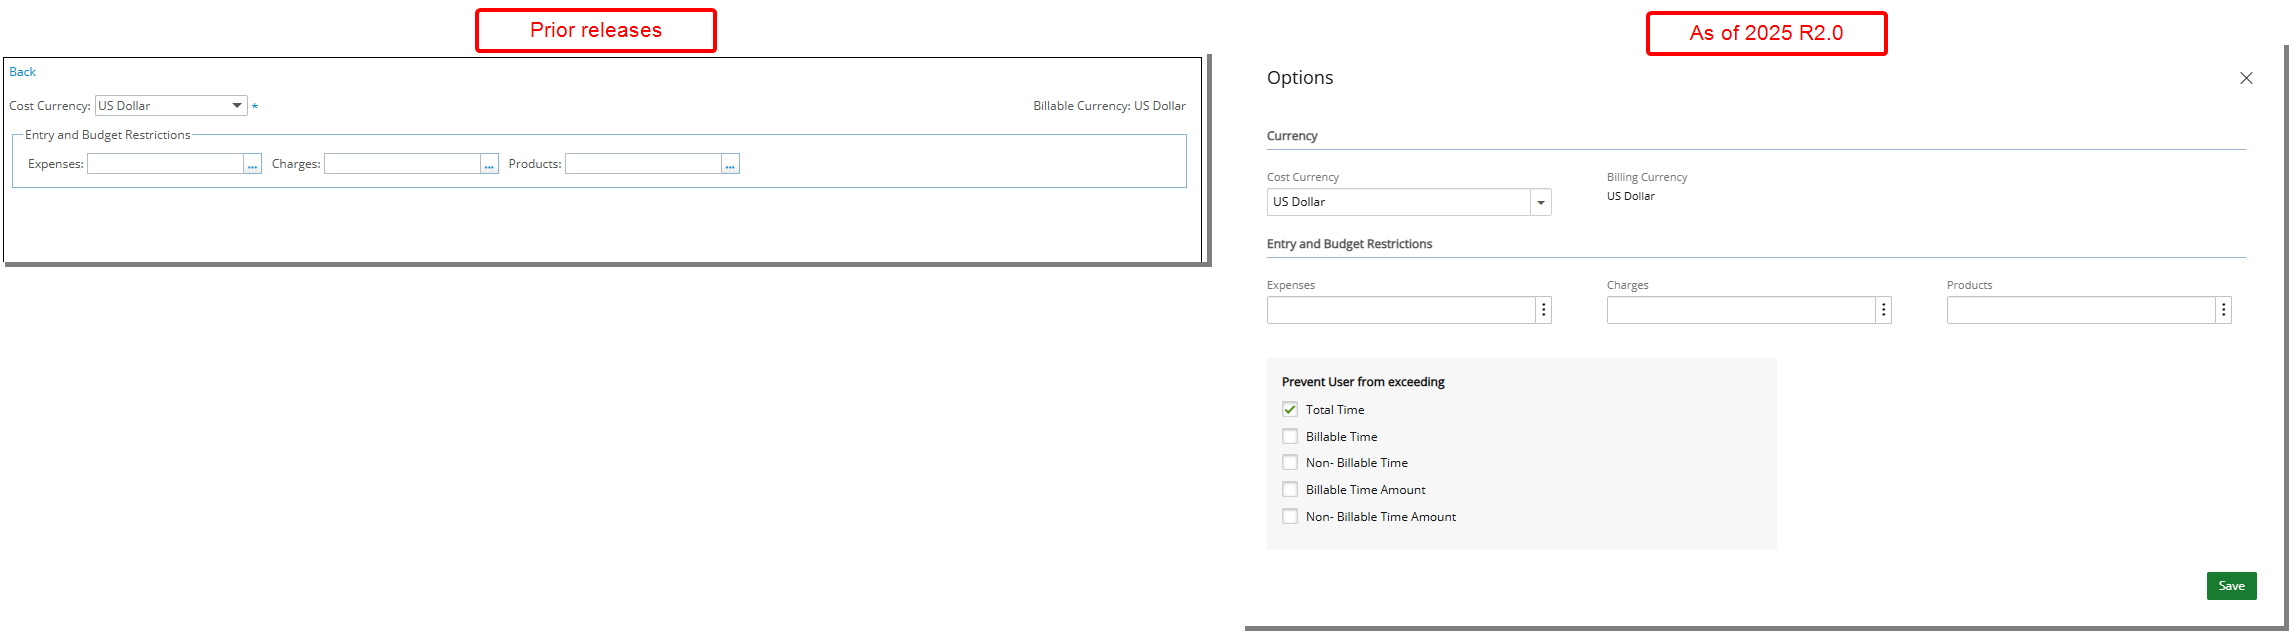
Description: The Budget Options page, which was previously accessed via the Options link, is now available through the Options button. The page has been redesigned as a dialog box with a user interface update, including improvements to spacing, colors, positioning, and fonts, ensuring a more consistent and user-friendly experience.
The functionality of the settings and options remains unchanged from the previous release, with the only addition being a new Prevent User from Exceeding section that groups the following existing settings:
- Total Time
- Billable Time
- Non-Billable Time
- Billable Time Amount
- Non-Billable Time Amount
Additionally, enhanced budget validation has been implemented based on the Billable and Non-Billable Time Attributes, further improving how budget limits are enforced. For more information, please refer to Enhanced Budget Validation Based on Billable and Non-Billable Time Attributes.
You can continue using the page as before, with no changes to the process or outcomes, ensuring a smooth transition without the need for relearning.
For further details refer to Budget Options.
Description: In 2022 R1.1.1 we introduced the following options to prevent users from entering time that exceeds the defined budget for a specified date range. These options restrict entries based on:
- Total Time
- Billable Time
- Non-Billable Time
- Billable Time Amount
- Non-Billable Time Amount
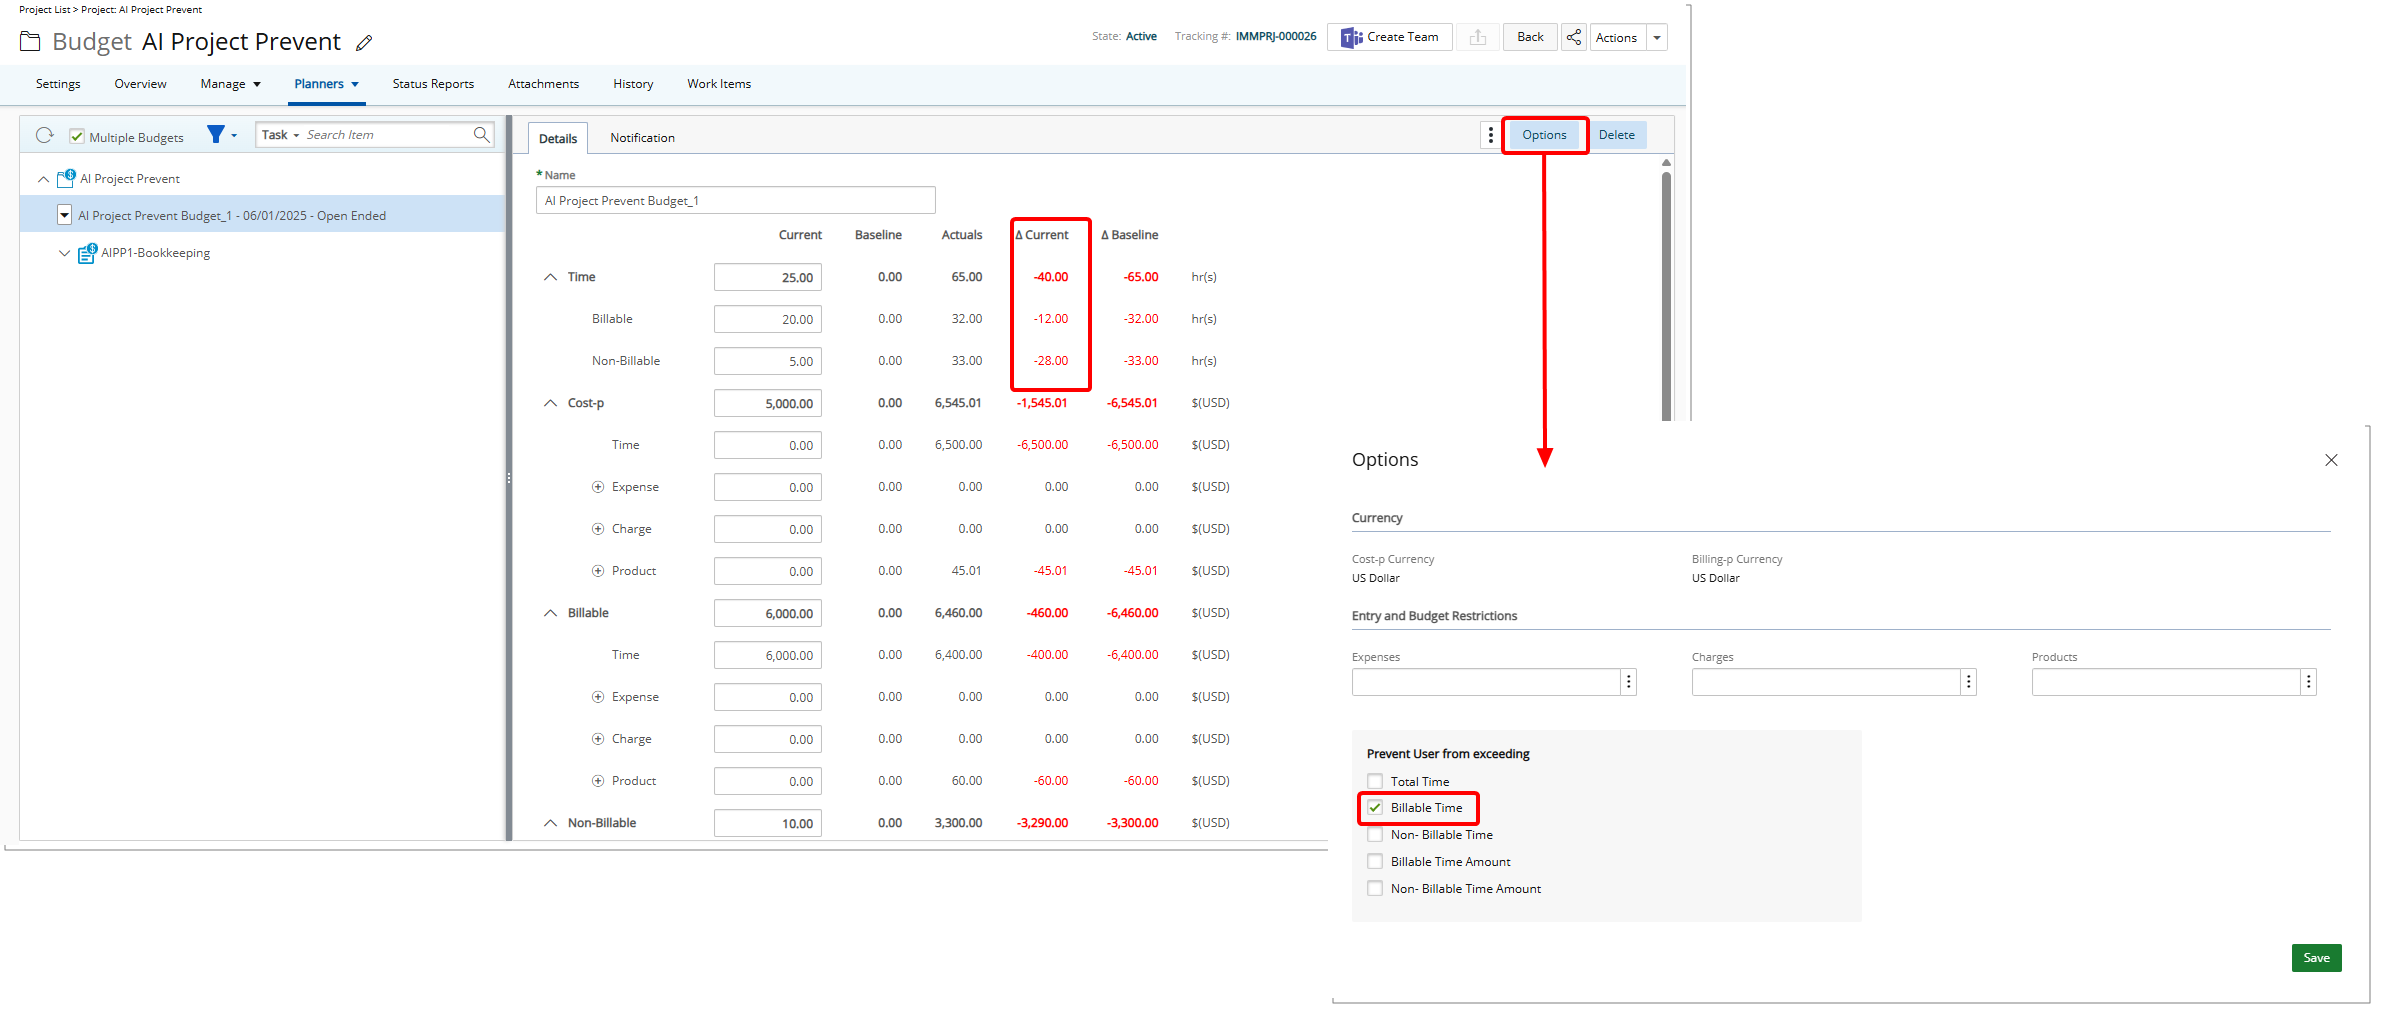
As an example, the Prevent User from exceeding the Current Non-Billable Time Budget rule triggered errors even for Billable Time Entries, particularly when the Non-billable Budget had a negative value.
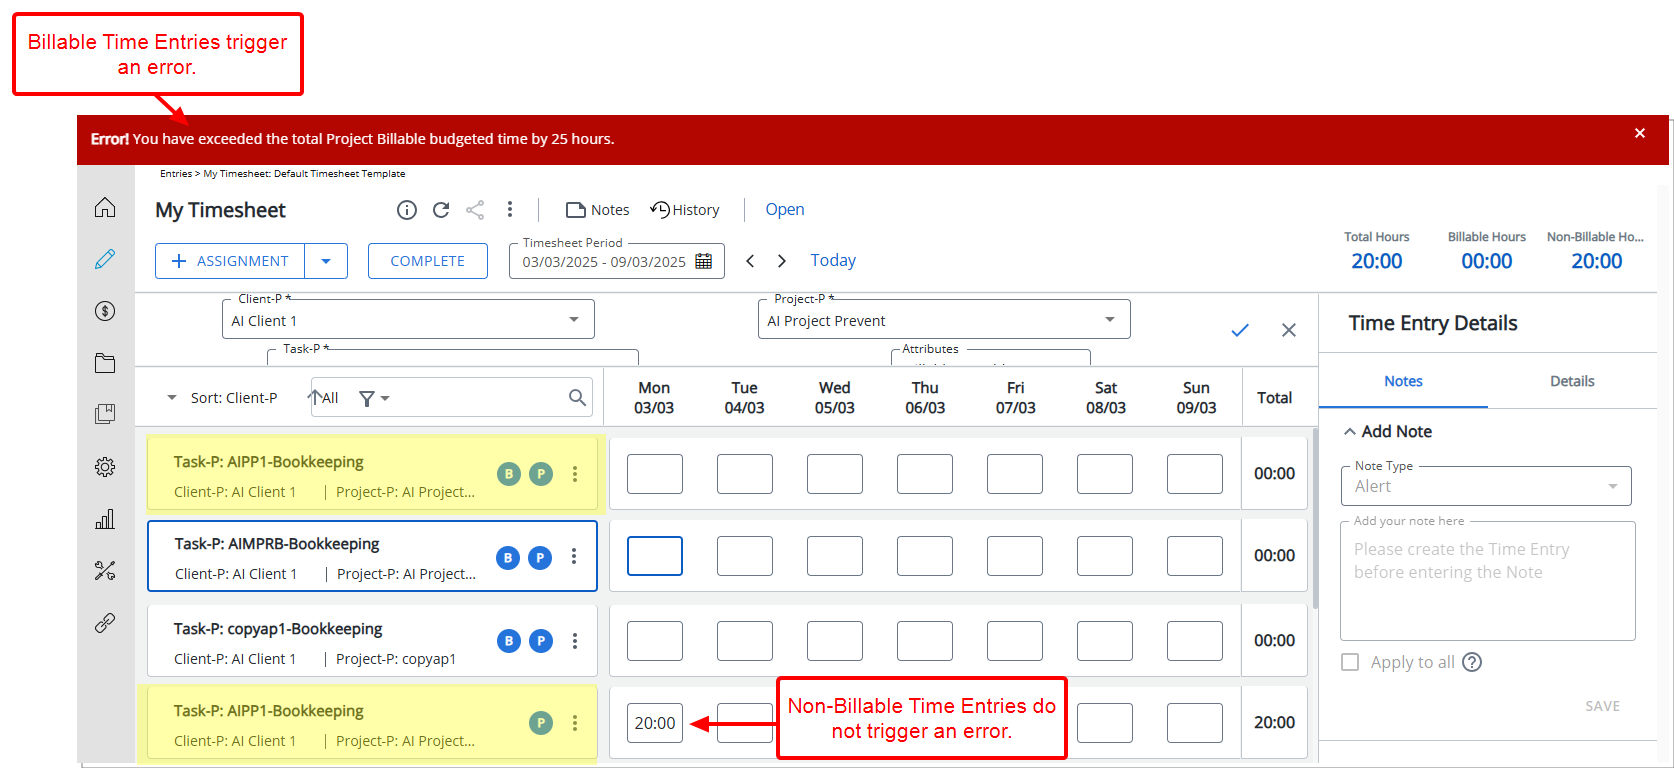
To improve accuracy, the validation for exceeding time budgets now consider the Billable Attribute of Time Entries. This ensures that validation is triggered only when an Entry explicitly violates a prevention rule based on its Billable or Non-billable Attribute when either the Billable or Non-Billable Budget has a negative value.
Validation Behavior in My Timesheet
General Time Budget Prevention:
Where Prevent User from exceeding the Current Time Budget is checked, validation is triggered after exiting the Time Entry cell for any Entry.
Billable Time Budget Prevention:
Where Prevent User from exceeding the Current Billable Time Budget and/or Prevent User from exceeding the Current Billable Time Amount is checked, validation is triggered only after exiting the Time Entry cell for Billable Time Entries.
Non-Billable Time Budget Prevention:
Where Prevent User from exceeding the Current Non-Billable Time Budget and/or Prevent User from exceeding the Current Non-Billable Time Amount is checked, validation is triggered only after exiting the Time Entry cell for Non-Billable Time Entries.
Role-Based Budget
The validation behavior for Time Budget Prevention has been extended to include the newly added Role-Based Budget. Similar to how budget validations are applied to General, Billable, and Non-Billable Time Budgets, Role-Based Budget validations will now trigger based on the Billable attribute of the Time Entry. When a user exceeds the allocated budget for a specific Role, the system will display an error message, replacing the Task reference with the corresponding Role and explicitly including the [Role Name].
Benefit: This improvement ensures that Budget validations align correctly with the Billable and Non-Billable Attributes of Time Entries. Refining when and how the validation is triggered, helps prevent unnecessary errors and interruptions, improving efficiency while maintaining compliance with budget restrictions.
For further details refer to Preventing Users from Exceeding Budget.
Description: In previous releases, when the Project Start or End Dates were extended or shortened, the Budget Dates did not update automatically. This required manual adjustments to align the Budget with the revised Project timeline. If users forgot to update the Budget dates, actuals and delta calculations could become inaccurate, leading to misaligned financial data and potential reporting errors.
In this release improvements have been made so that when a project’s Start or End date is extended or shortened, the Budget Start and End dates automatically adjust to match the new project timeline. This ensures consistency between project scheduling and budget tracking.
If multiple budgets exist, a message warns that changing project dates may require budget updates or lead to budget deletions. You can choose to proceed or cancel the action.
- Selecting No will cancel the process.
- Selecting Yes will result in the Project dates to update, and:
- Budgets outside the new project timeline are deleted.
- Budgets overlapping the new dates are adjusted accordingly.
Use cases:
- Starting the Project earlier: The Budget that starts the earliest will be adjusted to match the new Project Start Date.
- Extending the Project to finish later: The Budget that ends the latest will be adjusted to match the new Project End Date.
- Starting the Project earlier and finishing later: The earliest Budget Start Date will be updated to match the new Project Start Date, and the latest Budget End Date will be updated to match the new Project End Date.
- Starting the Project later, but the earliest Budget End Date is still within the new timeline: The earliest Budget Start Date will be updated to match the new Project Start Date.
- Starting the Project later, but some Budgets end before the new Project Start Date: Any Budgets that end before the new Project Start Date will be deleted.
- Ending the Project earlier, but some Budgets start after the new Project End Date: Any Budgets that start after the new Project End Date will be deleted.
- Ending the Project earlier, but the latest Budget Start Date is still within the new timeline: The latest Budget End Date will be updated to match the new Project End Date.
When a Project has only one Budget, it automatically follows any changes made to the Project’s Start and End Dates. Unlike multiple budgets, there is no risk of deletion, and the system ensures the Budget aligns with the updated Project timeline.
How It Works:
If the project follows a single Budget model, the Budget dates will automatically update to match the modified Project Start and End Dates. In this case no warning messages will appear.
Note: If actuals (recorded work or costs) exist in the Budget, you cannot modify the Project dates. The system will block the change and display an error message. (This is an existing behavior.)
Task and Assignment budgets always function as single Budgets. Changing Task or Assignment dates will not trigger any messages or warnings.
Benefit: This automation eliminates the need for manual Budget date updates, reducing administrative effort and ensuring accurate financial calculations.
For further details refer to:
Project Management
Description: User-Defined Fields associated to Milestone can now be added to the Billing Milestone table through Column Selection ![]() from the following areas of the application:
from the following areas of the application:
- Project List > Project Edit > Manage > Milestone

- Project List > Project Edit > Manage > Milestones > Expanded row > Billing tab

- Project List > Project Edit > Manage > Billing > Milestone tab

Benefit: This improvement ensures that User Defined Fields associated with Milestones are available for selection in Milestone Billing tables, offering greater flexibility in viewing relevant data and allowing you to focus on the information most important to you.
For further details refer to:

Description: In previous releases, changing a project's Portfolio automatically updated its Project Workflow, often causing confusion and errors. Users could encounter an unexpected error preventing the save or unknowingly assign the Project to the wrong Workflow, impacting processes like project activation and revenue recognition.
As of this release, the Portfolio field is now completely independent of the Project Workflow. A Portfolio can now contain Projects assigned to different Workflows without any automatic changes.
When modifying the Portfolio field in Project Edit, a confirmation prompt now appears if the new Portfolio’s Project Workflow differs from the current one, asking: Do you want to update this Project's current Workflow to the selected Portfolio's Project Workflow?
- If Yes is selected, both the Portfolio and Workflow fields are updated.
- If No is selected, only the Portfolio is updated, and the Workflow remains unchanged.
- If the new Portfolio’s Project Workflow matches the Project’s current workflow, the Portfolio is saved without any additional prompts.
Benefit: This enhancement provides greater flexibility in project management by allowing Portfolios to include a mix of Projects with different Workflows. It ensures that modifying the Portfolio field does not unintentionally alter the Project Workflow, maintaining consistency across project configurations.
For further details refer to:

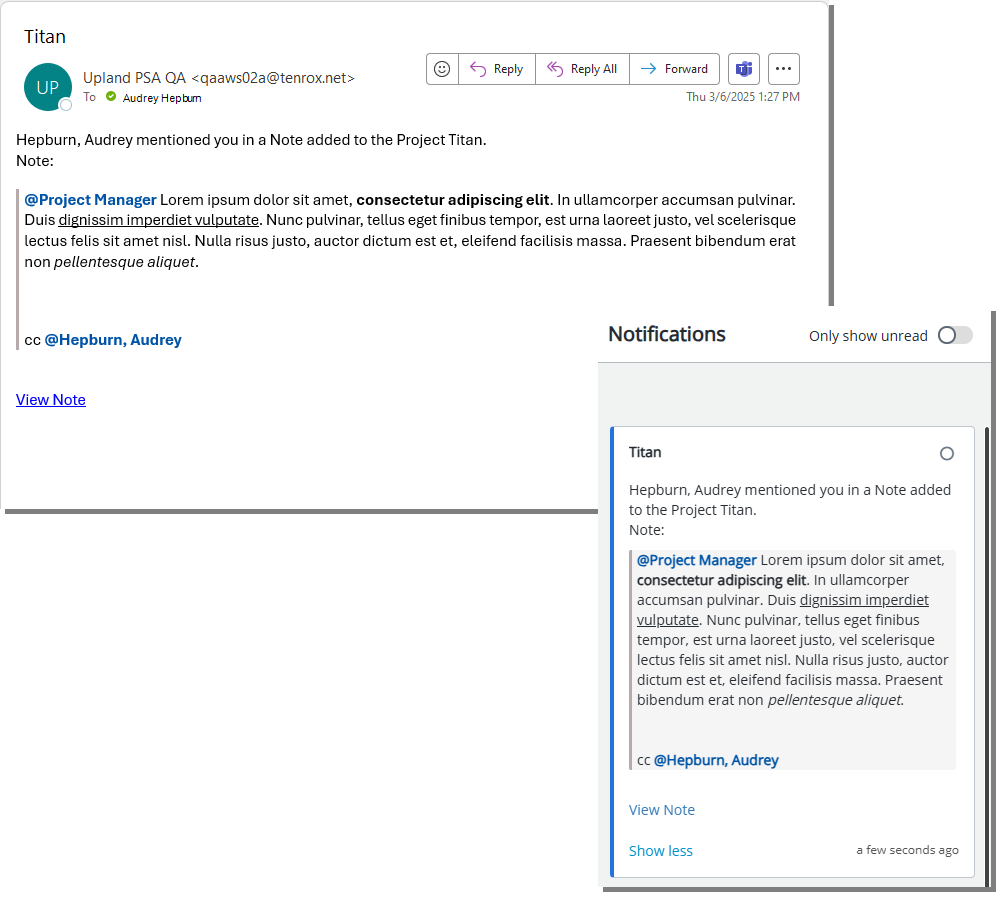
Description: When the Enable Mentioning in Comments & Notes setting located within the System Configuration page is turned on, you can mention others in the Project Notes using @ notation.
When adding a new Note, a placeholder message—“Type @ to mention and to notify someone”—now appears next to the cursor, guiding you on how to tag others.
Mentioned users will receive a notification, ensuring they are aware of relevant updates or required actions. To support this functionality a new System Notification titled Project Notes Mention Notification is now available from System Notifications page (Setup > Notifications). For further details refer to Project Notes Mention Notification.
Typing “@” triggers a dropdown list of user suggestions (maximum of 15), which dynamically updates as you type more characters, refining the suggestions in real time.
How Mentions Work:
The suggestion list will display :
- Active Users - if they have a valid Email (suspended and decommissioned users are excluded)
- Project Manager or Alternate Manager - if they are associated with the Project and have a valid email
- Project Team - if there are more than 1 active and onboarded User with a valid Email.
Mentioned Users will receive email notifications, ensuring they are promptly informed and can take necessary action.
Note: You can mention multiple Users in a single Note, including the same user more than once. However, each User will receive only one notification, regardless of how many times they are mentioned.
Tooltips and visual indicators for Mentioned Users

- Decommissioned or Suspended Users: The mention appears in red, with tooltips indicating their status: Decommissioned User, or Suspended User.
- Removed or Out-of-Scope Users: The mention appears in red, with a tooltip displaying Unknown User.
- Removed Project Manager or Alternate Manager: Tooltips display: No Manager Defined.
- Undefined Project Team: Tooltips display: No Team Member Defined.
- Removed Email Address: The mention appears in grey, with tooltips displaying: Invalid Email.

Notes displayed within the Notes tab will appear as plain text without any formatting, ensuring consistency across all listed entries. This also applies to the tooltip that appears when you hover over a note, where the content remains unformatted.
Benefit: Mentioning Users in Project Notes keeps them informed with timely notifications, enhancing collaboration, accountability, and project communication.
For further details refer to Adding Note(s) & Note Attachment(s) to Project(s).
Project Planner
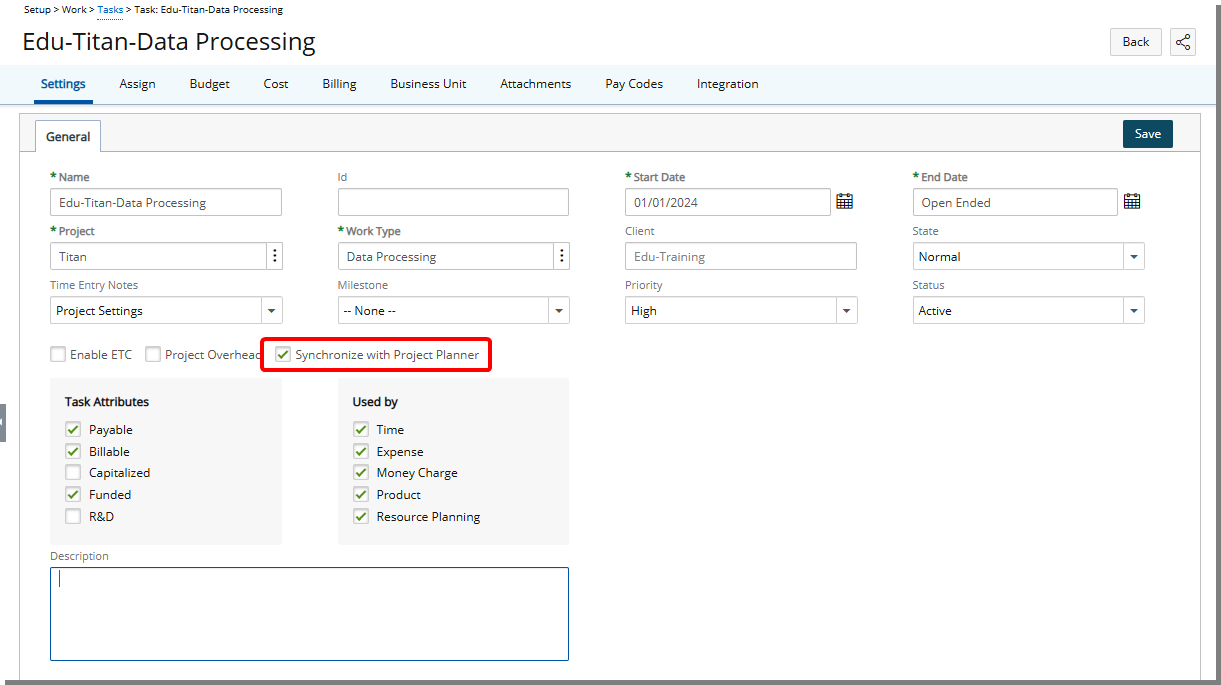
Description: In an earlier release we introduced the Synchronized with PSA flag in Project Planner. Removing this flag would completely remove the Task from PSA, which was not ideal for scenarios where Tasks needed to remain in PSA for billing and Time recording but be hidden from the Project Planner.
To address this, a new Synchronize with Project Planner selection box is now available when creating/modifying a Task from the following areas of the application:
- Project Tasks list page (Project List > Project List > Manage > Tasks)
- Task edit pages (Setup > Work > Tasks >Task edit or Project List > Project List > Manage > Tasks >Task edit).
This provides greater flexibility in managing Task visibility between Project Planner and PSA.
Note: The Synchronize with Project Planner option is selected by default.
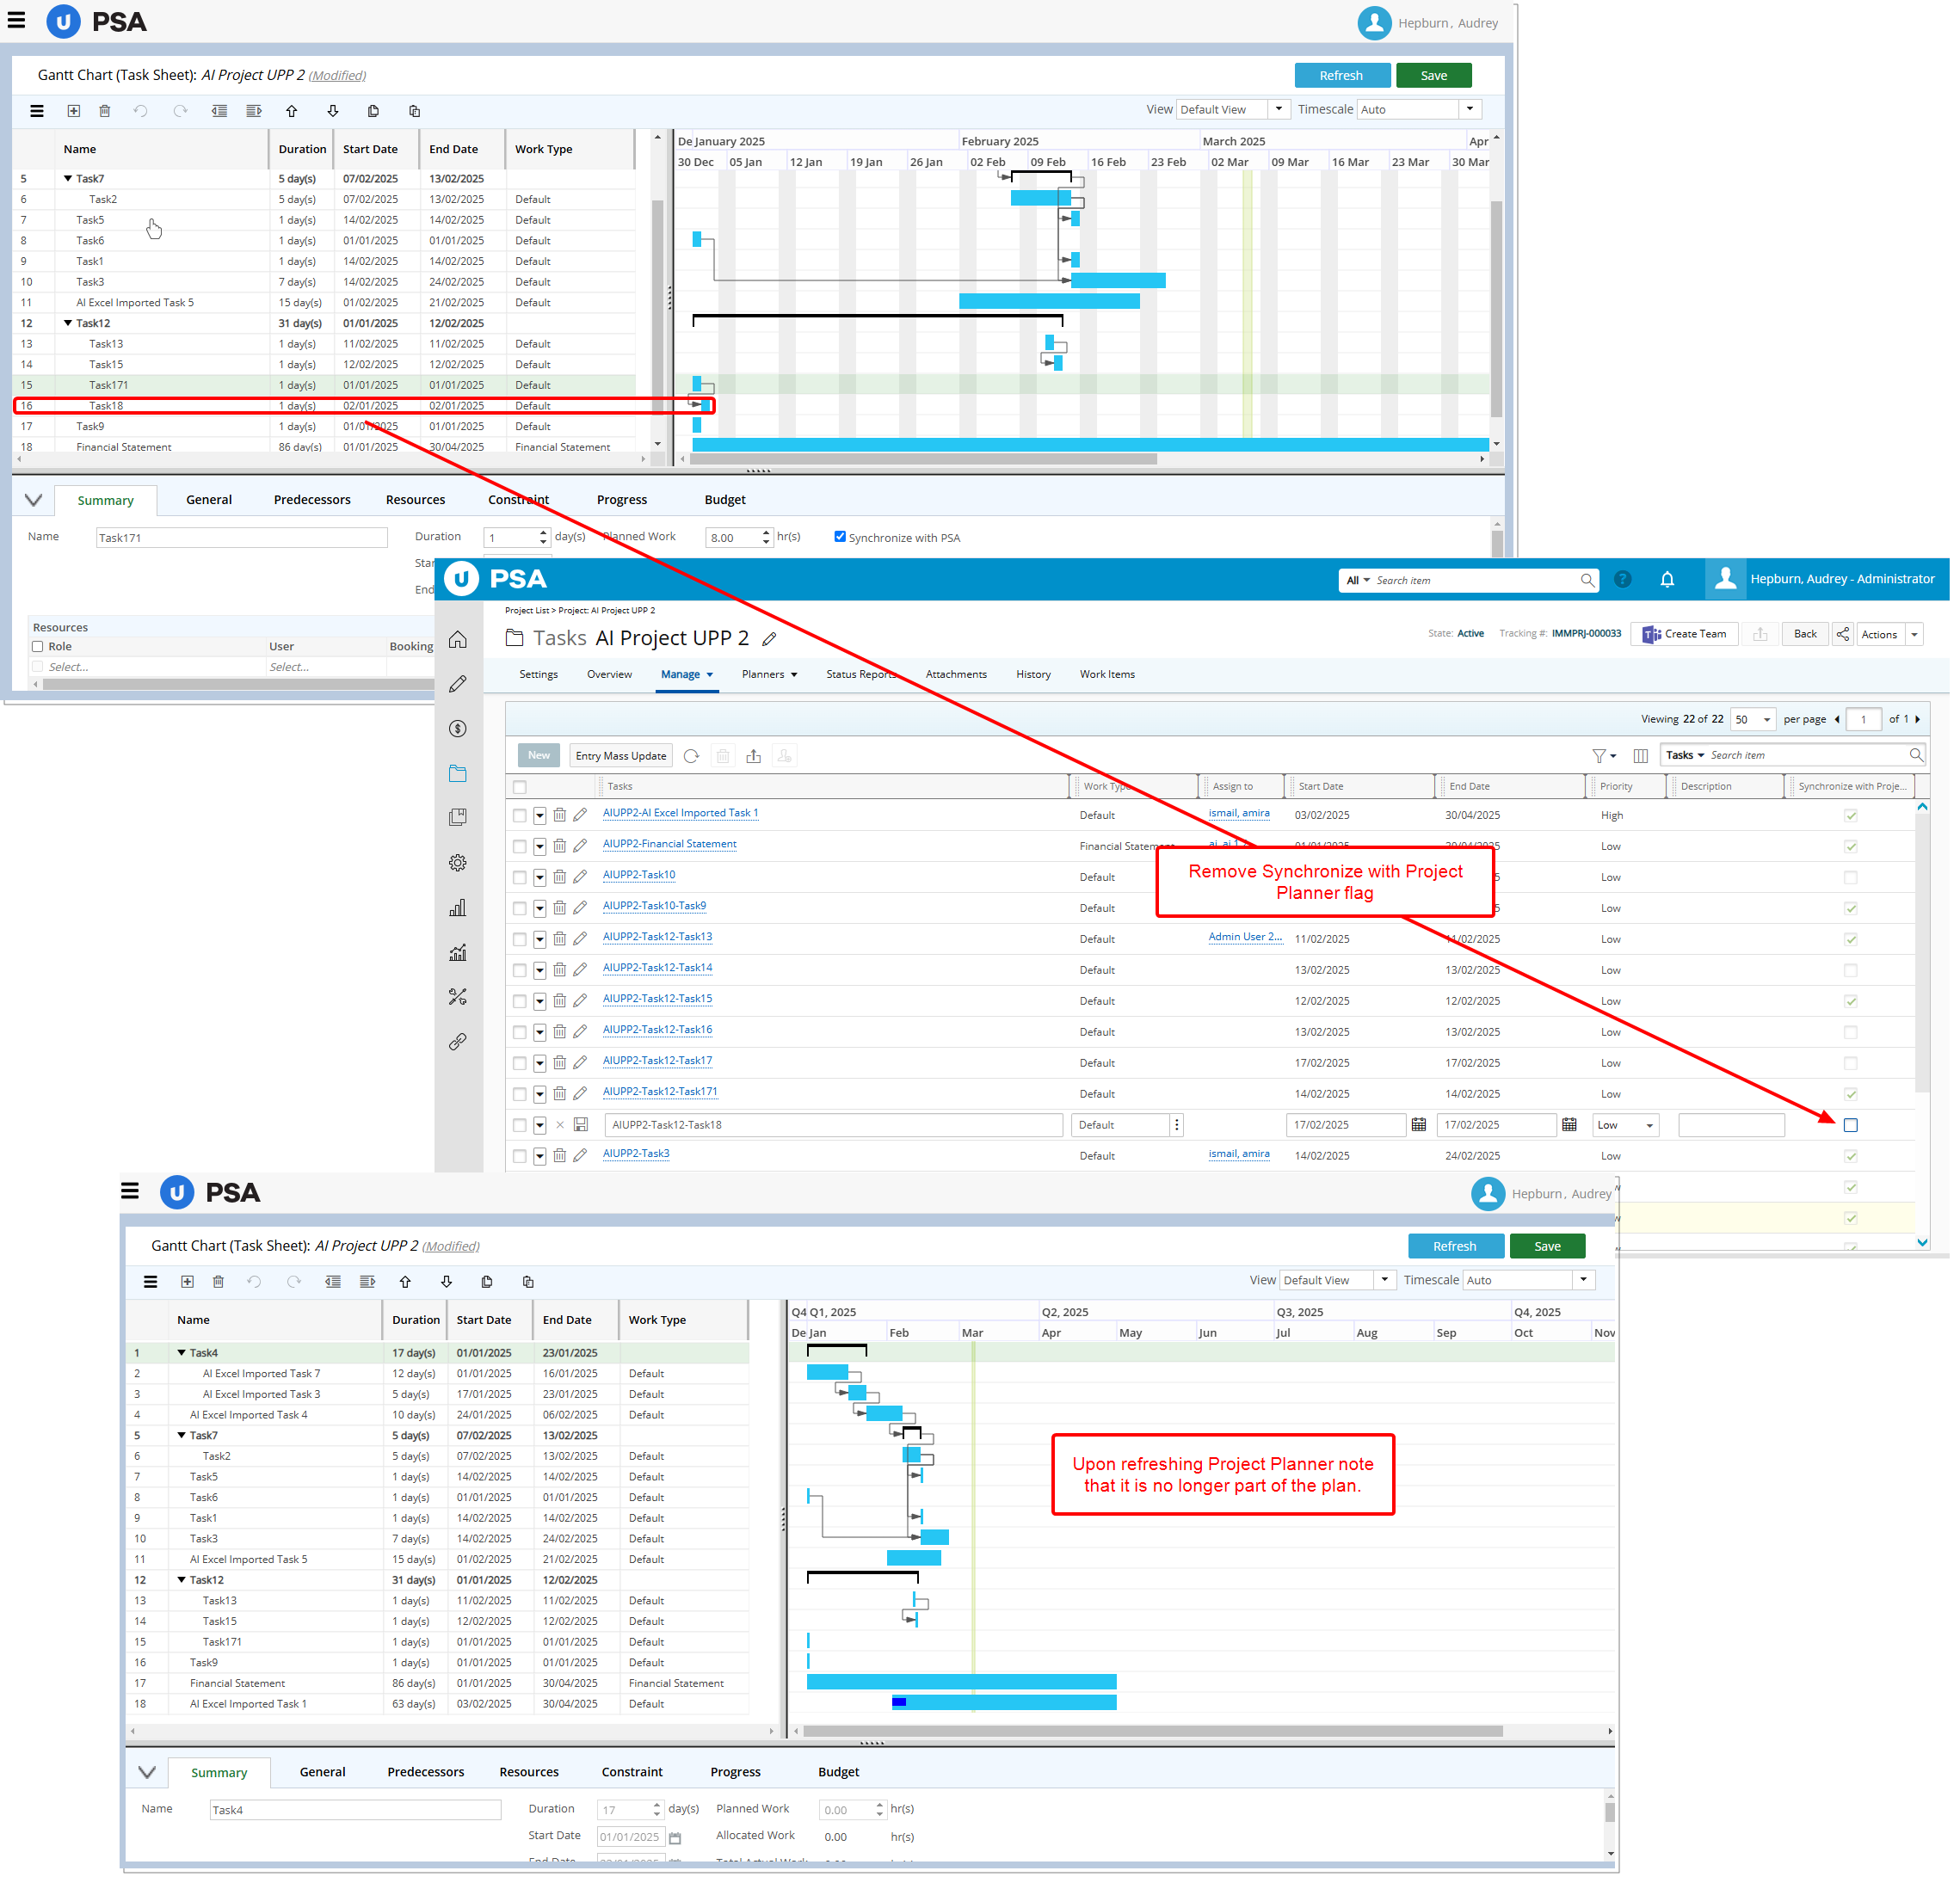
If the selection box is unchecked for a Task, it will no longer appear in the Project Planner. Furthermore, if a Task that was previously integrated is removed, the system will realign dependencies to maintain continuity.
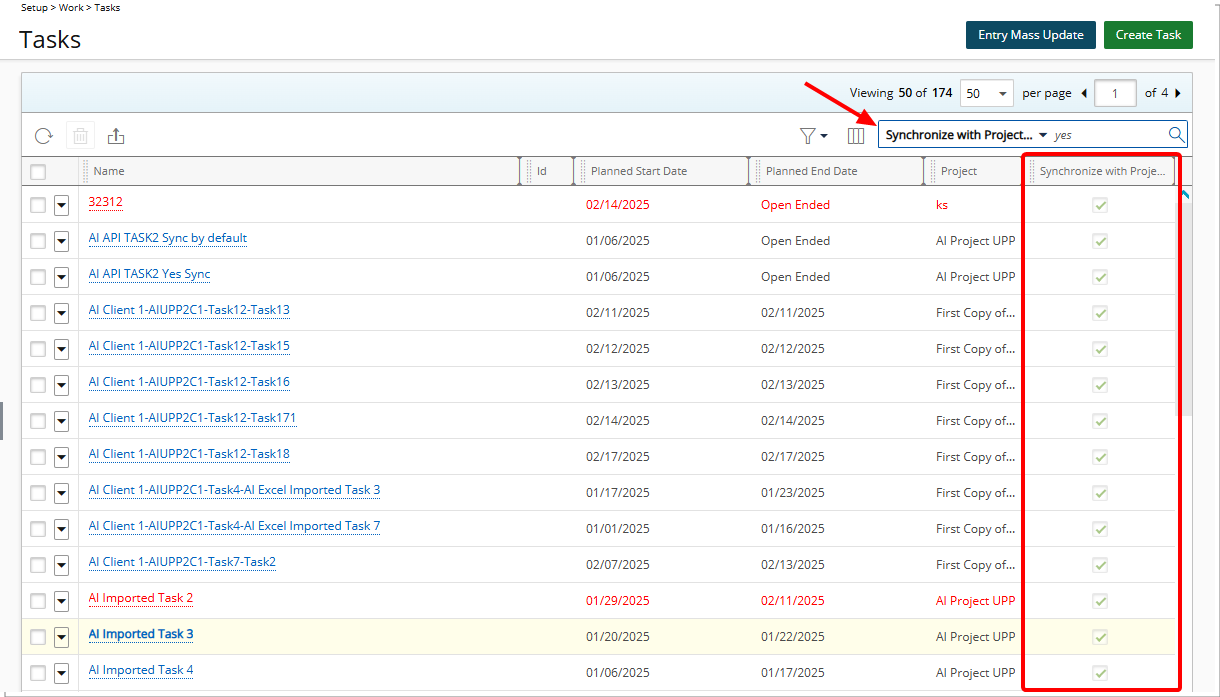
You can also Search ![]() the Tasks list based on whether they are Synchronized with Project Planner and you can also choose to include this new column from Column Selection
the Tasks list based on whether they are Synchronized with Project Planner and you can also choose to include this new column from Column Selection ![]() .
.
Note: If an active Project Planner license does not exist, this selection box will be hidden from view.
Additionally:
- The new Synchronize with Project Planner setting is now supported via the API, allowing integrations and automation workflows to programmatically control Task visibility in Project Planner. This ensures that external systems can manage Task synchronization efficiently without requiring manual intervention.
- A new column for Synchronize with Project Planner (Synchronize_With_Project_Planner) has been added to the Excel Import template. When importing Tasks via Excel, you can now define whether a Task should appear in Project Planner, streamlining bulk updates and data imports.
- A Refresh button is now available in Project Planner to improve usability, allowing you to update Task data instantly without navigating away.
Benefit: This improvement provides greater flexibility in managing Task visibility between Project Planner and PSA. You can now retain Tasks in PSA for billing and time recording while excluding them from Project Planner as needed.
For further details refer to
Description: In previous releases, when updating Task dates in UPP, users would receive misleading messages stating that a budget would be deleted or its dates would change. Since PSA does not support multiple Task Budgets and any existing Budget for a Task automatically follows the new Task dates, these alerts were unnecessary.
As of this release, these messages have been removed to prevent confusion. Additionally, a Refresh button has been added to update the page with the latest data.
Note: If there are unsaved changes, you will receive a prompt before proceeding.
Benefit: This improvement eliminates unnecessary alerts, improving clarity and ensuring a smoother user experience when modifying Task dates.
Project Team
Description: The system now automatically updates Offboarding Dates when a User’s Termination Date is modified. This enhancement ensures that Offboarding Dates are recalculated based on the new Termination Date, aligning with Project timelines and preventing disruptions in user access.
A confirmation message is displayed providing the option to apply changes across all related Projects or leave them unchanged.
How it works
Upon editing the Termination Date, the system checks the Offboarding Dates for all Projects the User is associated with.
If there are no Project Entries beyond the updated Termination Date, a confirmation message will appear displaying a list of affected projects. The dialog box message explains that new Offboarding Dates have been generated based on the earlier of the Project End Date or the updated Termination Date.
You can either:
- Choose Yes to update all projects with the suggested Offboarding Dates.
- Choose No to leave the existing Offboarding Dates unchanged while still applying the Termination Date update.
Example:
Jake Thompson was originally set to leave the company on May 31, 2024, but his Termination Date has been extended to August 15, 2024. Lisa, the HR Administrator, needs to update this in Upland PSA.
Since Jake has no Timesheet Entries beyond August 15, 2024, a dialog box appears displaying a list of his Projects along with their current Offboarding Dates and suggested updates. The message reads: Based on the selected Termination Date, new Offboarding Dates have been generated for all assigned projects. Would you like to update these dates?
| Project Name | Current Offboarding Date | Suggested Offboarding Date |
|---|---|---|
| Project A - Client Implementation | May 31, 2024 | August 15, 2024 |
| Project B - Internal Research | May 31, 2024 | August 15, 2024 |
Lisa selects Yes, and the system automatically updates Jake’s Offboarding Dates for both projects to August 15, 2024.
If there are Project Entries extending beyond the updated Termination Date, another dialog box appears, informing you that future entries must be deleted before proceeding.
You can either:
- Delete the future entries, allowing the system to proceed with recalculating the Offboarding Dates based on the new Termination Date. If you choose to delete the future entries, the system removes them permanently. It then generates new Offboarding Dates using the earlier of the Project End Date or the updated Termination Date.
- Keep the future entries, in which case the Termination Date remains unchanged.
Example:
Lisa the HR Administrator updates Mark Evans, whose termination date is being moved from April 30, 2024, to July 31, 2024. However, Mark has time entries logged in August 2024 for Project C – System Upgrade.
A dialog box appears, informing Lisa that future time entries exist beyond the updated Termination Date. She is given two options:
- Delete the future entries and proceed with updating the Termination Date and Offboarding Dates.
- Keep the future entries, in which case the Termination Date remains unchanged at April 30, 2024.
Lisa chooses to delete the entries. The system removes them and then recalculates the Offboarding Date for Mark's projects, setting them to July 31, 2024.
Benefit: This automated process reduces manual effort and ensures that the user’s termination details are properly synchronized across all relevant projects
For further details refer to Updating a user's Hire or Termination Date.
Resource Management
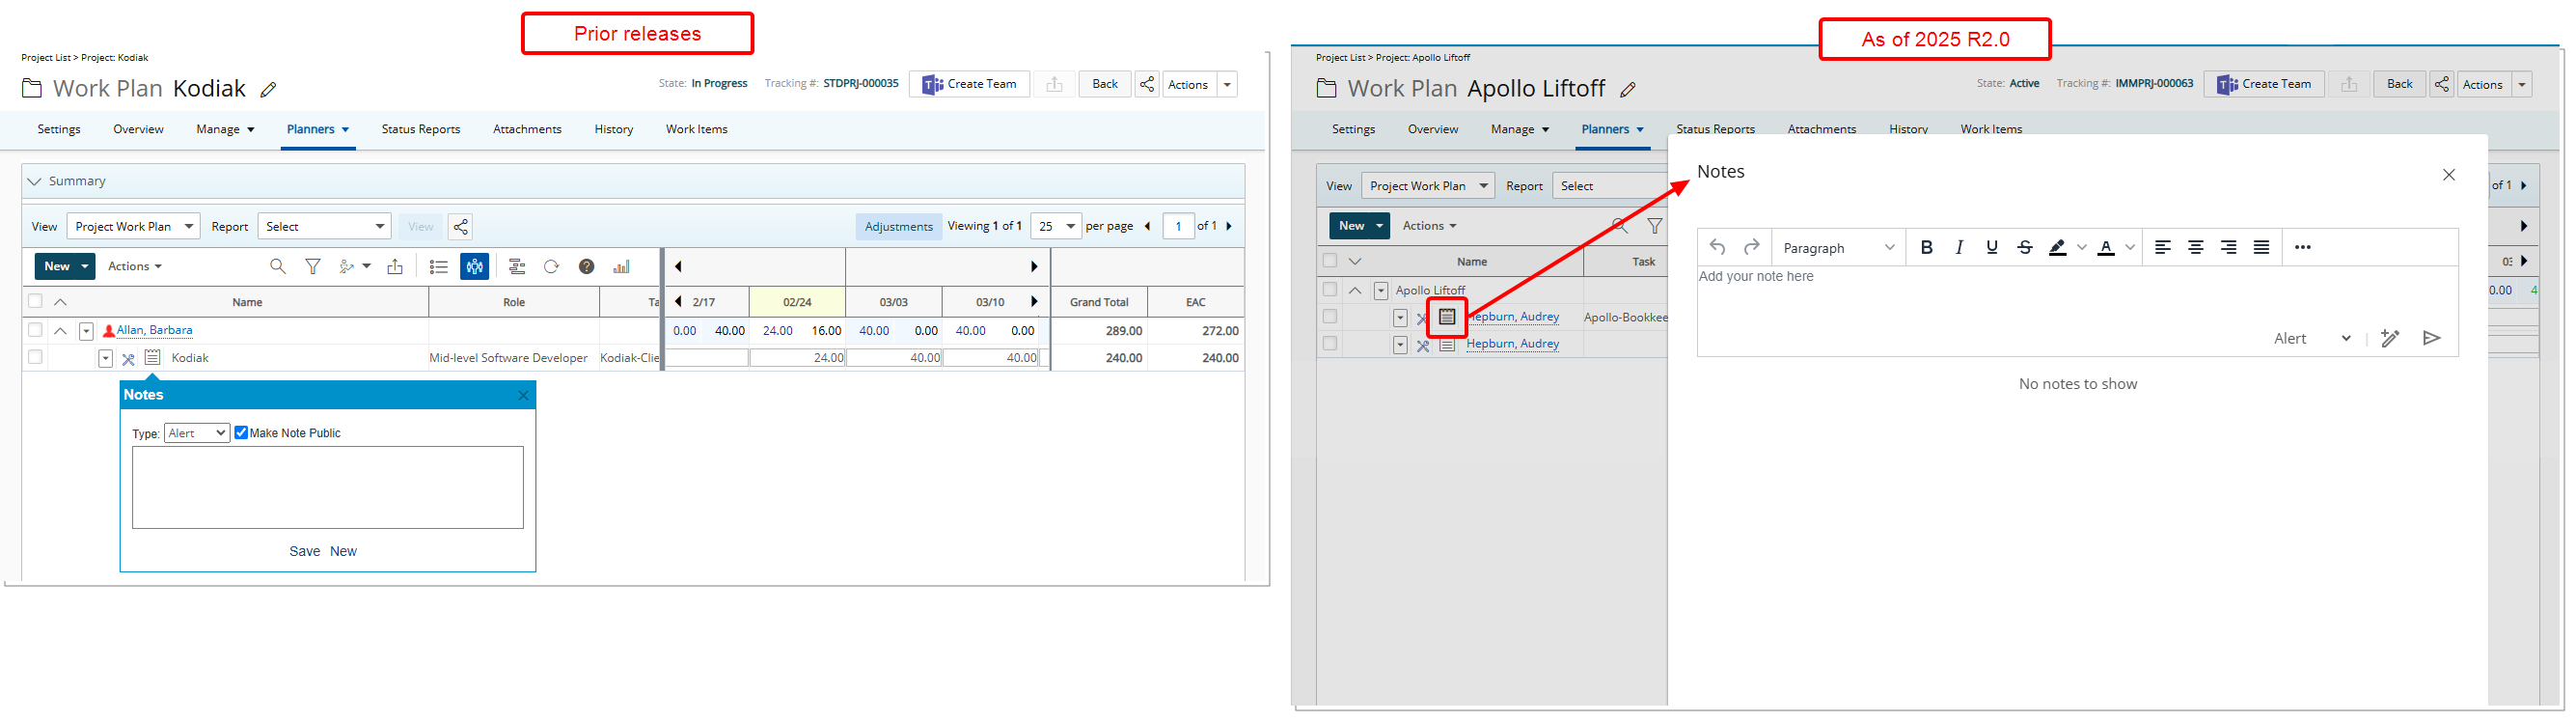
Description: The layout of the Booking Notes dialog box, has been improved for better user experience and consistency with the other updates that have been made thus far.
In addition to the improvements made to the spacing, colors, positioning, buttons, icons and fonts you can now use a WYSIWYG editor to format your Notes. Some of the available format options are:
- Bold, italic, underline, and strike-through
- Text color and highlight color
- Font type and size
- Numbered lists and bulleted lists
- Hyperlinks
- Tables
Note: You can modify or delete your own Notes if you have the necessary permissions. This right can be granted under Setup > Organization > System > Security > Security Profile > Other > Notes.
The rich text editor also allows copying of rich text, such as from a web browser or Word, to be pasted into the Notes area.
Note: Pasting text into the rich-text editor should preserve most formatting, but some types of unsupported formatting, such as colored text, may need to be added manually in the editor after pasting.
Furthermore, you can also Mention Users and Trigger Notifications in Work Plan Notes.
Benefit: This improvement enhances team communication, and collaboration. Its versatility and user-friendly interface make it a valuable tool for conveying information more effectively.
For further details refer to:
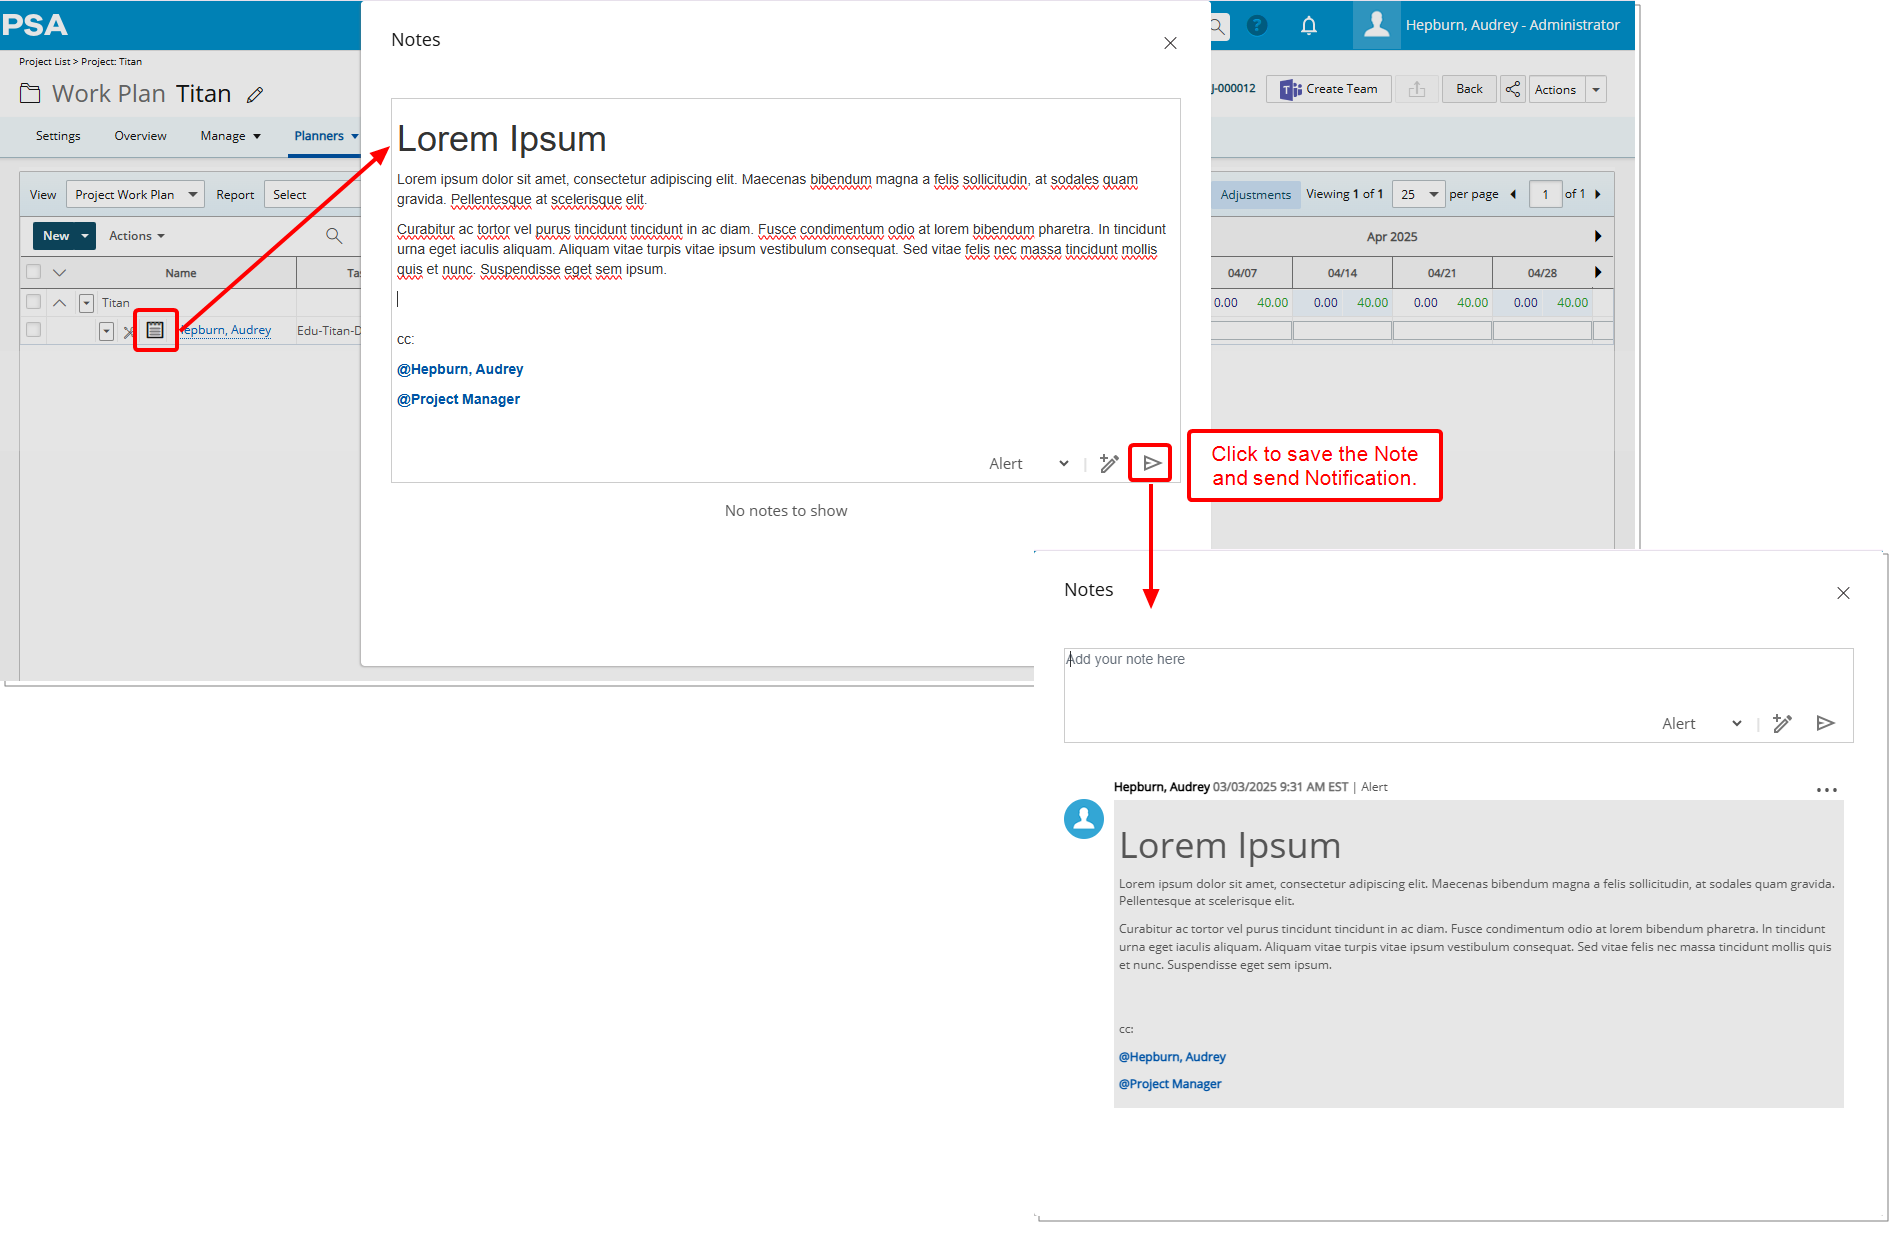
Description: When the Enable Mentioning in Comments & Notes setting located within the System Configuration page is turned on, you can mention others in the Work Plan Notes using @ notation.
When adding a new Note, a placeholder message—“Type @ to mention and to notify someone”—now appears next to the cursor, guiding you on how to tag others.

Click the Save ![]() button to save and send the Notification. Mentioned users will receive a notification, ensuring they are aware of relevant updates or required actions.
button to save and send the Notification. Mentioned users will receive a notification, ensuring they are aware of relevant updates or required actions.
Typing “@” triggers a dropdown list of user suggestions (maximum of 15), which dynamically updates as you type more characters, refining the suggestions in real time.
How Mentions Work:
The suggestion list will display :
- Active Users - if they have a valid Email (suspended and decommissioned users are excluded)
- Project Manager or Alternate Manager - if they are associated with the Project and have a valid email
- Project Team - if there are more than 1 active and onboarded User with a valid Email.
Tooltips and visual indicators for Mentioned Users
- Decommissioned or Suspended Users: The mention appears in red, with tooltips indicating their status: Decommissioned User, or Suspended User.
- Removed or Out-of-Scope Users: The mention appears in red, with a tooltip displaying Unknown User.
- Removed Project Manager or Alternate Manager: Tooltips display "No Manager Defined".
- Undefined Project Team: Tooltips display: No Team Member Defined.
- Removed Email Address: The mention appears in grey, with tooltips displaying: Invalid Email.
Note: You can mention multiple Users in a single Note, including the same user more than once. However, each User will receive only one notification, regardless of how many times they are mentioned.
When a user is mentioned using @ notation, the system triggers a Booking Notes Mention Notification, which includes relevant details about the mention.
Benefit: Mentioning Users in Work Plan Notes keeps them informed with timely notifications, enhancing collaboration, accountability, and project communication.
For further details refer to Booking Notes Mention Notification.
Description: In previous releases, when a Resource was replaced in the Work Plan, the Role field would default to the Primary Role of the newly matched Resource, regardless of the original Booking Role assigned to the replaced resource. This created confusion for Resource Managers, as it was difficult to track the exact Role that had been selected for the Resource before the substitution. This discrepancy led to inconsistencies in the Work Plan, making it harder to maintain accurate records of the roles assigned to resources, particularly when multiple roles were involved in the matching criteria.
As of this release when a Resource is replaced in the Work Plan, the Booking Role will now be retained in the Role field for the new Resource. This ensures that when a Resource is substituted in the Work Plan, the selected Booking Role (instead of the Primary Role) is displayed, providing greater clarity on which Role was originally chosen across all Work Plans::
- Group Work Plan: Setup > Organization > Groups > Group Edit
- User Work Plan: Setup > Organization > Users > User Edit
- Role Work Plan: Setup > Organization > Roles > Role Edit
- Project Work Plan: Project List > Project Edit > Planners Or Project List > Context Menu
- Resource Scheduling Work Plan: Entries > Resource Scheduling
- Project Scheduling Work Plan: Entries > Project Scheduling
- My Work Plan: Entries > My Work Plan
Example:
User A: Resource in the Work Plan | Booking Role: Team Member User B: Matched Resource | Primary Role: QA | Alternate Role: Team Member
Matching Criteria: Primary Role & Alternate Role (or) Primary Role & Alternate Role with Skills
When User A is replaced with User B, User B will have the Booking Role as Team Member, since User B was matched based on this Role.
Benefit: This improvement ensures that the Work Plan more accurately reflects the original Role assigned to a Resource, enhancing visibility and accuracy in resource tracking. By retaining the Booking Role, resource managers can better monitor and manage Role assignments throughout the Project.
For further details refer to Replace a Booked Resource.
System Notifications

Description: A newly introduced System Notification titled Work Item Mention Notification is now available from System Notifications page (Setup > Notifications).
The email Notification will be sent to the mentioned Users in a Work Item entry Comment, ensuring they are promptly informed and can take necessary action.
This email includes relevant details about the mention such as:
- Notification Name: Work Item Mention Notification
- Recipient: %USER_NAME% (Mentioned User)
- Email Subject: (%WORK_ITEM_TRACKING_NUMBER%) %WORK_ITEM_TITLE%
The email message details the following:
- %USER_NAME% (Sender) mentioned you in a comment on (%WORK_ITEM_TRACKING_NUMBER%) %WORK_ITEM_TITLE%.
- %WORK_ITEM_COMMENT%
- %WORK_ITEM_COMMENT_LINK%
Field Descriptions:
- %WORK_ITEM_TRACKING_NUMBER% – The Work Item's tracking number.
- %WORK_ITEM_TITLE% – The title of the Work Item.
- %WORK_ITEM_COMMENT% – The content of the comment where the user was mentioned.
- %WORK_ITEM_COMMENT_LINK% – A direct link to the comment.
- %WORK_ITEM_COMMENT_LINK_NOSSO% – A direct link to the comment for users without SSO access.
In addition to email notifications, mentioned users will also receive an alert in the Notification Center ![]() , keeping them informed within the application.
, keeping them informed within the application.
Benefit: The Work Item Mention Notification enhances communication and collaboration by ensuring you are promptly alerted when mentioned in a comment. This feature helps streamline discussions and keep all relevant parties informed in real time.
- Enables users to tag relevant stakeholders (e.g., project managers, finance teams) for quick clarifications.
- Reduces the need for separate email chains, keeping all discussions within the system.
- Saves time spent searching for the right contact person or following up manually.
For further details refer to Work Item Mention Notification.

Description: A newly introduced System Notification titled Booking Notes Mention Notification is now available from System Notifications page (Setup > Notifications).
The email Notification will be sent to the mentioned Users in a Booking Note, ensuring they are promptly informed and can take necessary action.
This email includes relevant details about the mention such as:
- Notification name: Booking Notes Mention Notification
- To: %USER_NAME% (Recipient)
- Title: %USER_NAME% (Note creator) added a note to the Workplan Booking
The email message details the following:
- %USER_NAME% – User who created the Mention
- %BOOKING_PROJECT% – The project associated with the booking, using the system’s terminology for "Project."
- %BOOKING_ROLE% – The role assigned within the project, following the system’s terminology for "Role."
- %BOOKING_RESOURCE% – The individual assigned to the booking, using the system’s terminology for "User" or "Resource."
- %BOOKING_ALLOCATION_DATES% – The start and end dates of the booking. Hidden if Total Allocated Hours is 0.
- %BOOKING_HOURS% hr(s) – The total number of hours allocated.
- %BOOKING_TYPE% – The Type of booking, following the system’s terminology for "Booking Type."
- %BOOKING_ATTRIBUTES% – Additional booking details from Workforce Planning > System > Booking Attributes, displayed if enabled. These attributes appear as <Attribute Name>: <Attribute Value> in the email.
- %BOOKING_NOTE% – The comment or message added to the booking, where the recipient was mentioned.
In addition to email notifications, mentioned users will also receive an alert in the Notification Center ![]() , keeping them informed within the application.
, keeping them informed within the application.
Benefit: The Booking Notes Mention Notification enhances communication and collaboration by ensuring you are promptly alerted when mentioned in a Note. This feature helps streamline discussions and keep all relevant parties informed in real time.
- Enables users to tag relevant stakeholders (e.g., project managers, finance teams) for quick clarifications.
- Reduces the need for separate email chains, keeping all discussions within the system.
- Saves time spent searching for the right contact person or following up manually.
For further details refer to Booking Notes Mention Notification.

Description: A newly introduced System Notification titled Project Notes Mention Notification is now available from System Notifications page (Setup > Notifications).
The email Notification will be sent to the mentioned Users in a Project Note, ensuring they are promptly informed and can take necessary action.
This email includes relevant details about the mention such as:
- Notification name: Project Notes Mention Notification
- To: %USER_NAME% (Recipient)
- Title: %PROJECT_NAME%
The email message details the following:
- %USER_NAME% mentioned you in a Note added to the Project %PROJECT_NAME%.
- Note: %PROJECT_NOTE%
- %PROJECT_NOTE_LINK%
Field definitions:
%USER_NAME% – User who created the Mention
%PROJECT_NAME% – Name of the Project where user was mentioned
%PROJECT_NOTE% – The content of the note where the user was mentioned.
%PROJECT_NOTE_LINK% - A direct link to the comment.
In addition to email notifications, mentioned users will also receive an alert in the Notification Center ![]() , keeping them informed within the application.
, keeping them informed within the application.
Benefit: The Project Notes Mention Notification enhances communication and collaboration by ensuring you are promptly alerted when mentioned in a Note. This feature helps streamline discussions and keep all relevant parties informed in real time.
- Enables users to tag relevant stakeholders (e.g., project managers, finance teams) for quick clarifications.
- Reduces the need for separate email chains, keeping all discussions within the system.
- Saves time spent searching for the right contact person or following up manually.
For further details refer to Project Notes Mention Notification.
Timesheet Templates

Description: The new Enforce Public Note when Timesheet is submitted after end of period selection box is now available from the Rules tab of Timesheet Template edit page.

When selected, upon submitting a Timesheet after the due date, the system will now display a prompt requiring the User to select a reason from a predefined list. Additionally, an optional text area is available for further justification. Upon saving, the Note can be accessed through the Timesheet tab of Timesheet Notes dialog box.
Note: This prompt dialog box appears only during the initial late submission of a Timesheet and does not trigger again if the Timesheet is later recalled or returned for resubmission.

Additionally, upon attempting to submit a Timesheet after the due date directly from the Timesheet Manager page, the system will display an error message: Error! This Timesheet's period has ended, and a note is required. Please open the Timesheet and provide a reason before submitting.

To support this new feature, a System Table (Setup > Organization > System) called Timesheet Late Submission Reason Note Types has been added to the System Tables list page allowing administrators to manage the predefined list of reasons users must select from when submitting a late timesheet.
The out-of-the-box reasons are:
- Forgetfulness
- Overwhelmed with Workload
- Technical Issues (default selection)
Benefit: This feature ensures that users provide a clear and standardized justification when submitting a Timesheet after the due date, helping organizations track and understand late submissions. Additionally, the ability to configure the Reasons enhances flexibility, ensuring the system aligns with company policies and expectations.
For further details refer to:
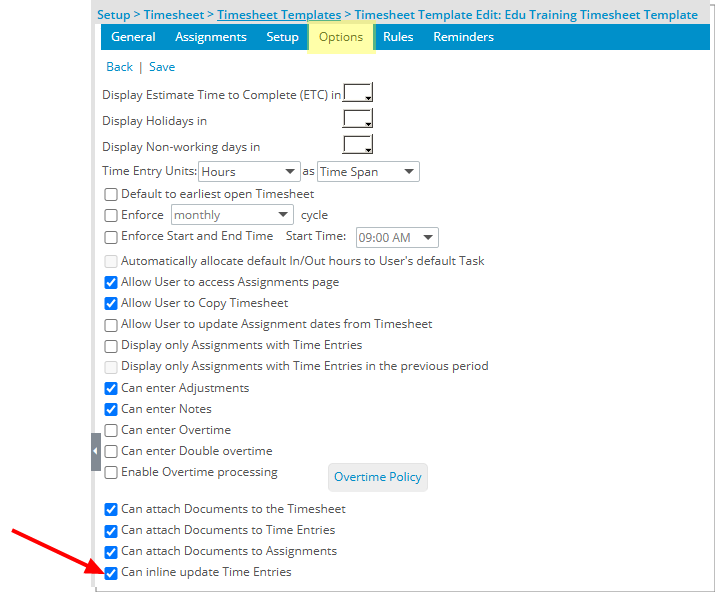
Description: In the legacy Timesheet, it was possible to add time to an existing Assignment, and the system would automatically sum the Entries. However, in the New Timesheet, duplicate Assignment lines were not allowed, forcing users to manually calculate and update total time, increasing the risk of errors and adding unnecessary effort.
As of this release, a new Can inline update time entries selection box is now available within the Options tab of Timesheet Templates.

When enabled, users assigned to the Timesheet Template can adjust existing Time Entries by adding or subtracting time:
- Clicking the new + button located within the Time Entry context menu.
- A + icon will appear against the time entry indicating that the system will automatically sum the Time Entries instead of requiring manual calculation.
Note: By default, Can inline update time entries is unchecked.
Benefit: This enhancement improves efficiency by eliminating the need for manual time calculations. You can now add or remove time to an existing Assignment without extra steps, reducing errors and making timesheet entry faster and more intuitive.
For further details refer to:

Description: You can now add the following KPIs to the Show Summary section of a Timesheet Template located in the Setup tab (Setup > Timesheet > Timesheet Templates):
- Future Planned Hours: The Total Hard Booked Hours for future periods until the end of the Project, excluding the current period.
- Future Planned Billable Hours: The Total Billable Hard Booked Hours for future periods until the end of the Project, excluding the current period.
- Future Planned Non-Billable Hours: The Total Non-Billable Hard Booked Hours for future periods until the end of the Project, excluding the current period.
Once added to a Template, these KPIs will be visible in the Summary section of the Timesheet for Users assigned to that Template.

These KPIs are also available from the Column Selection ![]() of Planned Hours dialog box accessed by clicking the KPIs in the Summary section of your Timesheet.
of Planned Hours dialog box accessed by clicking the KPIs in the Summary section of your Timesheet.
Note: By default, these KPIs are not displayed in the table but can be added using the Show column functionality.
Benefit: This enhancement provides you with a more detailed and structured view of your future planned work directly from your Timesheet, improving workload management and project tracking.
For further details refer to:
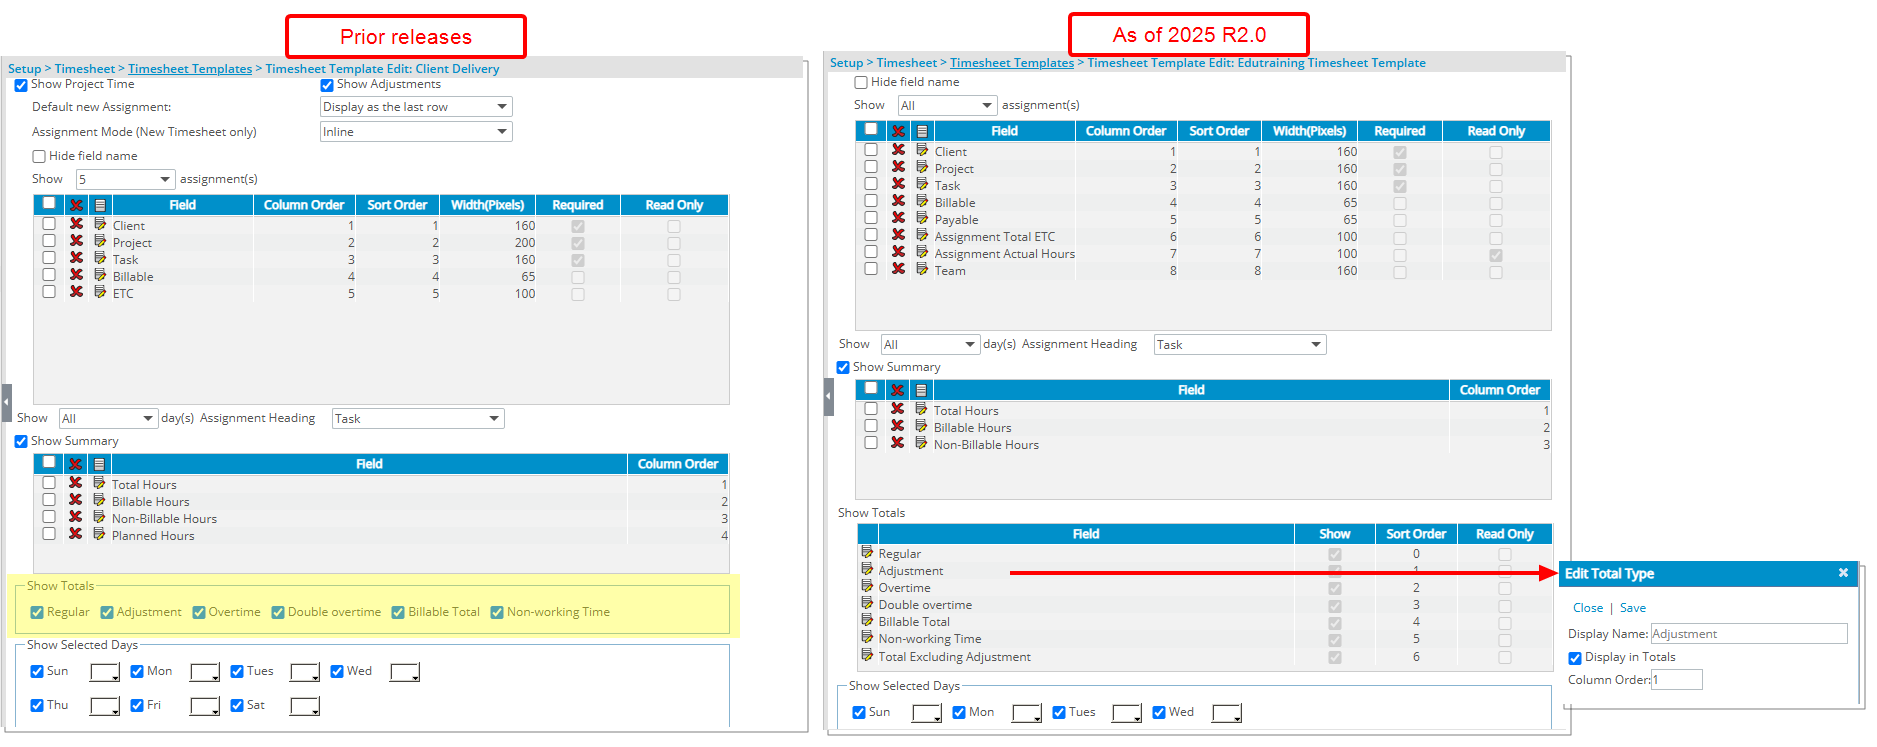
Description: You can now configure the order of items displayed in the Show Totals section within Timesheet Templates. The default order is:
- Regular
- Adjustments
- Overtime
- Double Overtime
- Billable Total
- Non-working Time
- Total Excluding Adjustment - (New option. For further details refer to Include Total Excluding Adjustment in the Totals Section of New Timesheet).
Clicking the Edit button next to an available field allows you to modify the Display Name, choose whether to Display in Totals, and adjust the field's position using Column Order.
Benefit: This enhancement provides greater flexibility in configuring the Totals section for New Timesheet Users, allowing administrators to customize the display order, rename fields, and choose which totals to include.
For further details refer to Managing the Totals Section in a Timesheet Template.
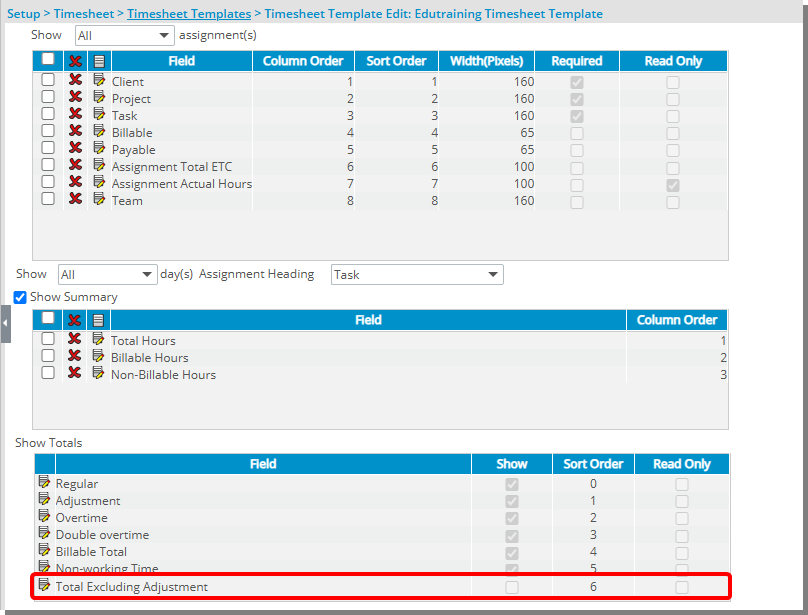
Description: In previous releases, there was no option to include Total Excluding Adjustment in the Show Totals section. This made it difficult to view a breakdown of total worked hours that excluded Adjustments when needed.
You can now include the Total Excluding Adjustment field in the Show Totals section of a Timesheet Template. This value, calculated as Regular + Non-Working Time + Overtime + Double Overtime, provides a clearer breakdown of total worked hours before adjustments.
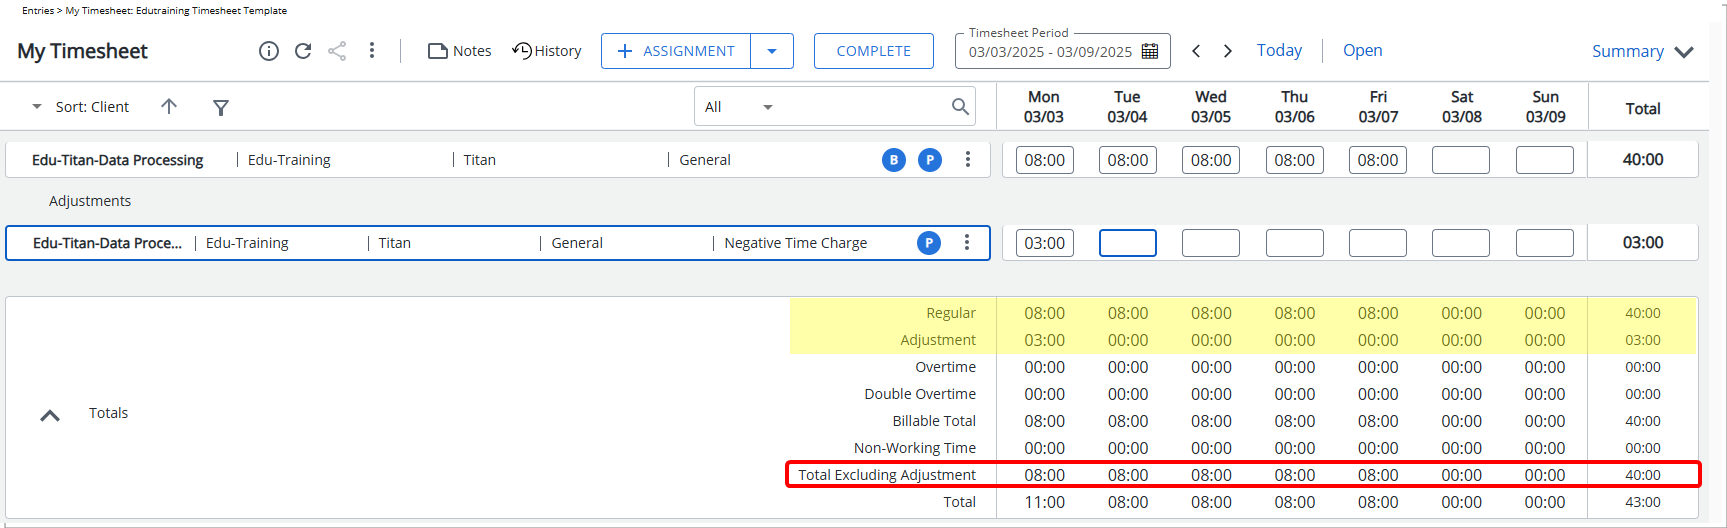
Note:
- The Total Excluding Adjustment field is unchecked by default.
- This option is only available for users of New Timesheet and does not apply to the legacy Timesheet.
Benefit: This enhancement improves visibility into total worked hours for users of New Timesheet by providing a clear breakdown without Adjustments, allowing for better analysis of work hours and more accurate payroll and resource planning.
For further details refer to Managing the Totals Section in a Timesheet Template.
UI/UX Enhancements
The UI/UX improvements described in this section aim to modernize the look and feel of the application, fostering uniformity and elevating user experience.

Description: The Notes capability has been improved across multiple pages, replacing plain text entry with a rich text editor. This enhancement allows you to format your notes using bold, italics, bullet points, headings, and more, improving organization and readability.
The rich text editor is now available by default on the following pages where Notes can be entered:
- Project List > Project Edit > Attachments > Notes
- Project List > Project Edit > Status Reports > Attachments > Notes
- Project List > Project Edit > Planners > Work Plan > Resource Request row > Attachment > Notes > New
- Project List > Project Edit > Planners > Work Plan > Resource Request row context menu > Attachments > Notes > New
- Setup > Organization > Users > User Edit > Attachments > Notes
- Setup > Work > Clients> Client Edit > Attachments > Notes
- Setup > Work > Clients > Client Edit > Contacts > Contact Edit > Attachments > Notes
- Setup > Work > Clients > Client Edit > Invoices > Invoice Edit > Attachments > Notes
- Setup > Work > Portfolios > Portfolio Edit > Attachments > Notes
- Setup > Work > Portfolios > Portfolio Edit > Projects > Project Edit > Attachments > Notes
- Setup > Work > Work Types > Work Type Edit > Attachments > Notes
- Setup > Work > Tasks > Task Edit > Attachments > Notes
- Entries > Leave Request Manager > Leave Request Edit > Attachment > Notes
- Entries > Work Item Manager > Work Item Edit > Attachment > Notes
- Entries > Charges > My Entries/Approval > Charge Entry Edit > Attachments > Notes
- Entries > Products > My Entries/Approval > Product Entry Edit > Attachments > Notes
- Entries > Timesheet Manager > Notes > Attachments > Notes
- Setup > Work > Clients > PO Edit > Client POs Prepayment Charge > Notes
- Program List > Program Edit > Attachments > Notes
- Financial > Invoice Manager > Invoices > Invoice Edit > Attachments > Notes
- Financial > Invoice Manager > Batches> Invoices> Invoice Edit > Attachments > Notes
You can also copy and paste formatted text from external sources, such as web browsers or Word documents, with most formatting retained. However, certain styles, like specific text colors, may need manual adjustments after pasting.
Benefit: With the rich text editor, you can create well-structured and visually clear notes, making information easier to read and act upon. Formatting options like bold text, bullet points, and hyperlinks help you organize content effectively and highlight key details, reducing misinterpretation and improving collaboration.
For further details refer to Rich Text Editor.
Description: To enhance the user experience and ensure a consistent UI across the application, several updates have been made. These improvements focus on standardizing layouts, aligning button placements, refining labels, and ensuring uniform formatting for a more cohesive and intuitive interface.
For details on specific changes, please expand each section below.

- The New button was renamed to Create Cost Rule, and its color was changed to dark green. It is now located in the upper right corner of the page.
- The Pagination is now located above the table header.
- The Filter
 and Search
  are now located in the upper right corner of the table header.

- The New button was renamed to Create Billing Rule, and its color was changed to dark green to align with UI standards. It is now located in the upper right corner of the page.
- The Pagination is now located above the table header.
- The Filter and Search are now located in the upper right corner of the table header.

- The Associations and Save buttons are now located in the header of the Details section.

- The Associations and Save buttons are now located in the header of the Details section.

- The New button was renamed to Create Rate Card and its color was changed to dark green to align with UI standards. It is now located in the upper right corner of the page.

The following elements are now located within the table header area:
- Refresh
- Delete selected items
- Export
 to Excel
 - Column Selection

- Search

- The Regenerate button was renamed to Update Batch, and its color was changed to dark green to align with UI standards.
- The Save button is now located within the Details table header, and its color was changed to navy blue.

- The Regenerate button was renamed to Update Batch, and its color was changed to dark green to align with UI standards.
- The Save button is now located within the Details table header, and its color was changed to navy blue.
- The Amount (USD) column has been renamed to Amount $(USD) in the Payroll Batch Manager list page and the following tabs when modifying a Payroll Batch: Time, Overview, and Pay Codes. Additionally, when exporting a table, this field now displays the currency in the exported Excel file.
- In the Overview tab, the Money Charges (USD) column has been renamed to Money Charges $(USD).
 column has been renamed to Money Charges $(USD)")
- Furthermore, in the Users, Timesheets, and Time tabs:
- You can now move table columns to the desired location using drag and drop.
- The Pagination is now always located on the blue bar.
- The Refresh button is now positioned on the left side of the table header.
- The Filter , Column Selection , and Search options are now located on the right side of the table header.
- The Include all Users/Timesheets/Time Entries selection box is located on the left corner of the blue bar.

- Pagination is now available upon performing a Search within the Milestone tab.

- Pagination and Column Selection are now available upon performing a search within the Recurring tab.

-
Column Selection
is now available within the Split Tab.
You can now drag and drop columns to reposition them while managing Project Cost/Billing Rules from the following tabs:
- Manage > Cost > Fixed Time tab
- Manage > Cost > Hourly tab
- Manage > Billing > Fixed Time tab
- Manage > Billing > Split tab
- Manage > Billing > Hourly tab
- Manage > Invoices

Column Selection ![]() functionality has been added to the Project Invoices pages (Manage > Invoices) for better customization.
functionality has been added to the Project Invoices pages (Manage > Invoices) for better customization.
By default, the following columns are displayed: Invoice #, From, To, State, Assigned To and Amount. You can manage these through Column Selection ![]() .
.
By default, you can Search ![]() for an Invoice based on Invoice #, From, To, State and Assigned To. These search criteria can also be managed through Column Selection
for an Invoice based on Invoice #, From, To, State and Assigned To. These search criteria can also be managed through Column Selection ![]() .
.

In previous releases, the Name field was located in the top-left corner when creating or modifying a Holiday Set. Furthermore, the Suspend and Placeholder selection boxes were stacked vertically on the Holiday Set edit page. As of this release:
- Create Holiday Set now appears in the title area, which updates to the Holiday Set’s Name once saved.
- The Name field has been moved to the General tab on the Holiday Set edit page.
- The Suspend and Placeholder selection boxes are now displayed side by side.

- The Save button is now dark green, aligning with UI standards.
- The Export button is now positioned next to the Refresh button in the table header.

- The Save button is now located within the header area of the Details tab.

- The Save button is now dark green, aligning with UI standards.
-
The Save button located in the Recipients tab, is now dark green, aligning with UI standards.

- Improvements to the Sent To dialog box:
- Addition of a Refresh button located in the table header.
- The Export button has been moved to the left, placing it next to Refresh .

- Addition of a Refresh

- Renamed Please Select to Reports for clarity.
- The Save button is now dark green.

- The Save button is now located on the General tab and appears in dark blue.
- The Update Batch button is now dark green.

- The Cancel button located within a Leave Request expanded row (Assigned Requests and All Requests tabs) is renamed to Close.

The order of the buttons has been updated as follows (from left to right): Share, Back, Action, Save & Copy and Save.
Additionally:
- The Save button is now dark green.
- The Save & Copy button is now light blue.

The order of the Column Selection ![]() and Filter
and Filter ![]() buttons has been switched. The new order is: Filter
buttons has been switched. The new order is: Filter ![]() then Column Selection
then Column Selection ![]() .
.

The buttons on the left side of the page are ordered as follows: New, Refresh ![]() , Copy
, Copy ![]() , Delete
, Delete ![]() , and Export
, and Export ![]() .
.

- The Export button has been moved next to Delete .
- The Search functionality has been moved to the white header area and is positioned on the right side of the page.

- The Search functionality has been moved to the white header area and is positioned on the right side of the page.
- The Column Selection button has been moved to the white header area and is positioned on the left side of the Search bar.

- A View selection list has been moved to the blue header.
- The order of buttons is now: Refresh , Copy
 , Delete , Export , Approve, Unapprove.
Benefit: These enhancements provide a more intuitive and seamless user experience by ensuring consistency across the application. Standardized layouts and aligned button placements improve navigation and usability, while refined labels and uniform formatting enhance clarity and readability. By reducing inconsistencies, these updates help you work more efficiently and confidently across different pages throughout the application.

Description: The user interface including spacing, colors, positioning, buttons, icons and fonts of the System Notifications edit page (Setup > Notifications) has been improved for better user experience and consistency with the other updates that have been made thus far.
Furthermore, the Title field has been renamed to Subject, and this change is also reflected on the System Notifications list page.
Although the page has a new look, its functionality remains unchanged from previous releases. You can continue to use this page with the same processes and outcomes that you are familiar with, ensuring a smooth transition without any need to relearn or adjust to new features.

Description: The user interface including spacing, colors, positioning, buttons, icons and fonts of the Title edit page (Setup > Organization > Titles) has been improved for better user experience and consistency with the other updates that have been made thus far.
The Skills and Business Units options are now presented as tabs, becoming accessible immediately after saving a Title.
Although the General tab has a new look, its functionality remains unchanged from previous releases. You can continue to use this page with the same processes and outcomes that you are familiar with, ensuring a smooth transition without any need to relearn or adjust to new features.

Description: The user interface including spacing, colors, positioning, buttons, icons and fonts of the Task Edit page (Setup > Work > Tasks) has been improved for better user experience and consistency with the other updates that have been made thus far.
The Budget, Cost, Billing, Business Unit, Attachments, Assign, Pay Codes, and Integration options are now presented as tabs, becoming accessible immediately after saving a Task.
Note: The Project Overhead option has been removed from the Task Edit page, as it was no longer in use. This change streamlines the interface and eliminates an unnecessary field that no longer served a functional purpose.
Furthermore, the Status selection list now replaces the previous selection boxes used for suspending or decommissioning a Task. Instead of using separate selection boxes, you can now manage Task Status from a single list with the following options:
- Active
- Suspended
- Decommissioned
Although the page has a new look, its functionality remains unchanged from previous releases. You can continue to use this page with the same processes and outcomes that you are familiar with, ensuring a smooth transition without any need to relearn or adjust to new features.

Description: The user interface including spacing, colors, positioning, buttons, icons and fonts of the Phase edit page (Setup > Work> Phases) has been improved for better user experience and consistency with the other updates that have been made thus far.
Although the page has a new look, its functionality remains unchanged from previous releases. You can continue to use this page with the same processes and outcomes that you are familiar with, ensuring a smooth transition without any need to relearn or adjust to new features.

Description: A fourth Layout column has been added to the User Defined Fields layout for Roles.
The General and User Defined Field tabs now have a four-column layout. The spacing of various elements on these tabs have been further improved to accommodate for the additional column.
Benefit: This improvement enhances data accessibility by ensuring that User Defined Fields associated to Roles are clearly displayed, improving usability and efficiency in role management.
Description: In addition to the improvements made to align the UI of the error and warning dialog boxes with other UI updates across the application—ensuring a consistent and streamlined experience—further enhancements have been implemented to improve clarity and usability when modifying Bookings.
The error and warning dialog boxes now provide clearer messaging when performing the following actions:
- Modifying a Booking
- Shifting a Booking
- Splitting a Booking
Additionally, the Excel Export has been updated to enhance error tracking. The Type column in exported reports now displays either the error or warning, depending on the nature of the modification.
Benefit: These improvements provide clearer feedback when making booking changes, improve error tracking in exported reports, and create a more consistent, user-friendly experience across the application.

Description: The user interface including spacing, colors, positioning, buttons, icons and fonts of the Entry Mass Update page (Setup > Work > Tasks) has been improved for better user experience and consistency with the other updates that have been made thus far.
Although the General tab has a new look, its functionality remains unchanged from previous releases. You can continue to use this page with the same processes and outcomes that you are familiar with, ensuring a smooth transition without any need to relearn or adjust to new features.

Description: The user interface including spacing, colors, positioning, buttons, icons and fonts of the Work Type edit page (Setup > Work > Work Types) has been improved for better user experience and consistency with the other updates that have been made thus far.
Although the page has a new look, its functionality remains unchanged from previous releases. You can continue to use this page with the same processes and outcomes that you are familiar with, ensuring a smooth transition without any need to relearn or adjust to new features.

Description: The user interface including spacing, colors, positioning, buttons, icons and fonts of the Component edit page (Setup > Work > Components ) has been improved for better user experience and consistency with the other updates that have been made thus far.
Although the page has a new look, its functionality remains unchanged from previous releases. You can continue to use this page with the same processes and outcomes that you are familiar with, ensuring a smooth transition without any need to relearn or adjust to new features.

Description: The user interface including spacing, colors, positioning, buttons, icons and fonts of the Portfolio edit page (Setup > Work> Portfolios) has been improved for better user experience and consistency with the other updates that have been made thus far.
Although the page has a new look, its functionality remains unchanged from previous releases. You can continue to use this page with the same processes and outcomes that you are familiar with, ensuring a smooth transition without any need to relearn or adjust to new features.

Description: The user interface including spacing, colors, positioning, buttons, icons and fonts of the Failed Notifications page (Tools ) has been improved for better user experience and consistency with the other updates that have been made thus far.
Although the page has a new look, its functionality remains unchanged from previous releases. You can continue to use this page with the same processes and outcomes that you are familiar with, ensuring a smooth transition without any need to relearn or adjust to new features.

Description: The user interface including spacing, colors, positioning, buttons, icons and fonts of the Charge Entry page has been improved for better user experience and consistency with the other updates that have been made thus far.
The Charge Entry page can be accessed through the following entry points:
- Entries > Charges > My Entries
- Entries > Charges > Approval
- Financial > Invoice Manager > Invoice Edit > Settings > General
In addition, the following improvements have also been made:
-
The Client and Project mandatory fields are added.
Note:Higher level options are auto-selected and the next lower level selection box is filtered.
As an example:
- When you select a Task, the Project and Client boxes will automatically populate based on the association to the selected Task.
- When you select a Project, the Client box will automatically populate based on the association to the selected Project, and the Task selection box is filtered accordingly to only show Tasks belonging to the chosen Project.
- When you select a Client, the Project selection box is filtered accordingly to only show Projects belonging to the chosen Client.
- Budget restrictions are taken into account when selecting a Charge.
- With Budget Restrictions: The dropdown will show a flat list of Charges associated with the selected Task's budget. When using the browse functionality, all Charges will be displayed in a hierarchy, but only the Budget-associated Charges can be selected. Other Charges will not be selectable.
- Without Budget Restrictions: The selection list and browse dialog box will display all available Charges without any restrictions.
Note: When using the Charge field, only the top two levels of the hierarchy are visible and selectable. To select a lower-level child item, click the Browse button next to the field to open the Charge List page for selection.
- The Attachments link is converted to a tab and becomes available upon saving the Charge Entry.
- If User Defined Fields are associated, they will now be displayed in a 4-column format, following the updated UI layout.
Note: The Recognition Schedule link has been deprecated and no longer available from the Charge edit page.
Benefit: The updated Charge Entry page offers a more intuitive and user-friendly experience, ensuring consistency with other system updates. Enhanced field functionality streamlines data entry and selection, while improved interface design simplifies navigation and organization. These changes collectively optimize workflows, reduce errors, and improve your efficiency.

Description: The user interface including spacing, colors, positioning, buttons, icons and fonts of the Product Entry page has been improved for better user experience and consistency with the other updates that have been made thus far.
The Product Entry page can be accessed through the following entry points:
- Entries > Products > My Entries
- Entries > Products > Approval
- Financial > Invoice Manager > Invoice Edit > Settings > General
In addition, the following improvements have also been made:
-
The Client and Project mandatory fields are added.
Note:Higher level options are auto-selected and the next lower level selection box is filtered.
As an example:
- When you select a Task, the Project and Client boxes will automatically populate based on the association to the selected Task.
- When you select a Project, the Client box will automatically populate based on the association to the selected Project, and the Task selection box is filtered accordingly to only show Tasks belonging to the chosen Project.
- When you select a Client, the Project selection box is filtered accordingly to only show Projects belonging to the chosen Client.
- Budget restrictions are taken into account when selecting a Product.
- With Budget Restrictions: The dropdown will show a flat list of Products associated with the selected Task's budget. When using the browse functionality, all Products will be displayed in a hierarchy, but only the Budget-associated Products can be selected. Other Products will not be selectable.
- Without Budget Restrictions: The selection list and browse dialog box will display all available Products without any restrictions.
Note: When using the Product field, only the top two levels of the hierarchy are visible and selectable. To select a lower-level child item, click the Browse button next to the field to open the Product List page for selection.
- The Attachments link is converted to a tab and becomes available upon saving the Product Entry.
- If User Defined Fields are associated, they will now be displayed in a 4-column format, following the updated UI layout.
Note: The Recognition Schedule link has been deprecated and no longer available from the Product edit page.
Benefit: The updated Product Entry page offers a more intuitive and user-friendly experience, ensuring consistency with other system updates. Enhanced field functionality streamlines data entry and selection, while improved interface design simplifies navigation and organization. These changes collectively optimize workflows, reduce errors, and improve your efficiency.

Description: A title has been added to the Associated Cost/Billing Rules of Leave Time edit page for better clarity and organization.
Furthermore, the Back button has been redesigned and moved to the upper top right corner of these pages.
Benefit: This improvement enhances readability and ensures you can easily identify the page when managing Cost and Billing rules for Leave Time.
Upland Analytics
The following improvements have been made to Upland Analytics.
Description: Previously, reporting in Upland Analytics on Financial Planner was limited to higher-level categories, preventing you from analyzing financial data at the Item and Sub-Item levels. Without this granularity, project managers lacked detailed insights into revenue breakdowns, cost allocations, and resource-specific financial contributions, making it difficult to track financial performance accurately.
As of this release a new Financial Planner Category Data Source is now available allowing you to report on Items and Sub-Items within the Financial Planner, providing a more detailed breakdown of financial data, offering deeper insights into cost distribution and revenue tracking. This enhancement enables visibility into specific financial components, such as:
- Revenue → Charges → Bonus at the Item level
- Time → Roles → Team Member → Users at the Sub-Item level
In addition to all existing views from the Financial Planner Data Source, the new Financial Planner Category Data Source includes the Financial Planner Category View, which provides the following Fields:
- Section: This is the name of the Section which might be renamed from the Financial Planner template. It has one of the following values: Time, Revenue & Cost.
- Section Type: This is the type of the Section. It has one of the following values: Time, Revenue & Cost.
- Category: This is the name of the Category which might be renamed from the Financial Planner template.. For Time section, its value is Roles. For Revenue and Cost sections, it can be one of the following values “Roles, Charges, Products, Expenses, Functional Groups, Master Sites, Resource Types, Work Types, Tasks“
- Category Type: This is the type of the Category. For Time section, its value is Roles. For Revenue and Cost sections, it can be one of the following values “Roles, Charges, Products, Expenses, Functional Groups, Master Sites, Resource Types, Work Types, Tasks“
- Subcategory: This is the name of the Subcategory. It has different values based on the selected Category.
- Item: This is the name of the Item. For Role Category and Team Member Category its values is the name of the User. Otherwise it is Null.
- Item Type: This is the type of the Item. For Role Category and Team Member Category its values is User. Otherwise it is Null.
- Subcategory Total Actual Amount in Base Curr: Sum of the Actual amounts in Base Currency calculated per Period for the Subcategory.
- Subcategory Total Actual Amount in Client Curr: Sum of the Actual amounts in Client Currency per Period for the Subcategory.
- Subcategory Total Actual Amount in Project Curr: Sum of the Actual amounts in Project Currency per Period for the Subcategory.
- Subcategory Total Actual Billable Time: Sum of the Actual Billable Time calculated per Period for the Subcategory.
- Subcategory Total Actual Non Billable Time: Sum of the Actual Non Billable Time calculated per Period for the Subcategory.
- Subcategory Total Actual Non Payable Time: Sum of the Actual Non Payable Time calculated per Period for the Subcategory.
- Subcategory Total Actual Payable Time: Sum of the Actual Payable Time calculated per Period for the Subcategory.
- Subcategory Total Actual Time: Sum of the Actual Time calculated per Period for the Subcategory.
- Subcategory Total Combined Amount in Base Curr: Sum of the Combined amounts in Base Currency calculated per Period for the Subcategory.
- Subcategory Total Combined Amount in Client Curr: Sum of the Combined amounts in Client Currency per Period for the Subcategory.
- Subcategory Total Combined Amount in Project Curr: Sum of the Combined amounts in Project Currency per Period for the Subcategory.
- Subcategory Total Combined Billable Time: Sum of the Combined Billable Time calculated per Period for the Subcategory.
- Subcategory Total Combined Non Billable Time: Sum of the Combined Non Billable Time calculated per Period for the Subcategory.
- Subcategory Total Combined Non Payable Time: Sum of the Combined Non Payable Time calculated per Period for the Subcategory.
- Subcategory Total Combined Payable Time: Sum of the Combined Payable Time calculated per Period for the Subcategory.
- Subcategory Total Combined Time: Sum of the Combined Time calculated per Period for the Subcategory.
- Subcategory Total Forecast Amount in Base Curr: Sum of the Forecast amounts in Base Currency calculated per Period for the Subcategory.
- Subcategory Total Forecast Amount in Client Curr: Sum of the Forecast amounts in Client Currency per Period for the Subcategory.
- Subcategory Total Forecast Amount in Project Curr: Sum of the Forecast amounts in Project Currency per Period for the Subcategory.
- Subcategory Total Forecast Billable Time: Sum of the Forecast Billable Time calculated per Period for the Subcategory.
- Subcategory Total Forecast Non Billable Time: Sum of the Forecast Non Billable Time calculated per Period for the Subcategory.
- Subcategory Total Forecast Non Payable Time: Sum of the Forecast Non Payable Time calculated per Period for the Subcategory.
- Subcategory Total Forecast Payable Time: Sum of the Forecast Payable Time calculated per Period for the Subcategory.
- Subcategory Total Forecast Time: Sum of the Forecast Time calculated per Period for the Subcategory.
- Item Total Actual Amount in Base Curr: Sum of the Actual amounts in Base Currency calculated per Period for the Item.
- Item Total Actual Amount in Client Curr: Sum of the Actual amounts in Client Currency per Period for the Item.
- Item Total Actual Amount in Project Curr: Sum of the Actual amounts in Project Currency per Period for the Item.
- Item Total Actual Billable Time: Sum of the Actual Billable Time calculated per Period for the Item.
- Item Total Actual Non Billable Time: Sum of the Actual Non Billable Time calculated per Period for the Item.
- Item Total Actual Non Payable Time: Sum of the Actual Non Payable Time calculated per Period for the Item.
- Item Total Actual Payable Time: Sum of the Actual Payable Time calculated per Period for the Item.
- Item Total Actual Time: Sum of the Actual Time calculated per Period for the Item.
- Item Total Combined Amount in Base Curr: Sum of the Combined amounts in Base Currency calculated per Period for the Item.
- Item Total Combined Amount in Client Curr: Sum of the Combined amounts in Client Currency per Period for the Item.
- Item Total Combined Amount in Project Curr: Sum of the Combined amounts in Project Currency per Period for the Item.
- Item Total Combined Billable Time: Sum of the Combined Billable Time calculated per Period for the Item.
- Item Total Combined Non Billable Time: Sum of the Combined Non Billable Time calculated per Period for the Item.
- Item Total Combined Non Payable Time: Sum of the Combined Non Payable Time calculated per Period for the Item.
- Item Total Combined Payable Time: Sum of the Combined Payable Time calculated per Period for the Item.
- Item Total Combined Time: Sum of the Combined Time calculated per Period for the Item.
- Item Total Forecast Amount in Base Curr: Sum of the Forecast amounts in Base Currency calculated per Period for the Item.
- Item Total Forecast Amount in Client Curr: Sum of the Forecast amounts in Client Currency per Period for the Item.
- Item Total Forecast Amount in Project Curr: Sum of the Forecast amounts in Project Currency per Period for the Item.
- Item Total Forecast Billable Time: Sum of the Forecast Billable Time calculated per Period for the Item.
- Item Total Forecast Non Billable Time: Sum of the Forecast Non Billable Time calculated per Period for the Item.
- Item Total Forecast Non Payable Time: Sum of the Forecast Non Payable Time calculated per Period for the Item.
- Item Total Forecast Payable Time: Sum of the Forecast Payable Time calculated per Period for the Item.
- Item Total Forecast Time: Sum of the Forecast Time calculated per Period for the Item.
- Period End: Period End Date displayed on the Financial Planner.
- Period End Month: Period End Date displayed on the Financial Planner (Aggregate Date - Month).
- Period End Month Year: Period End Date displayed on the Financial Planner (Aggregate Date - Month Year).
- Period End Quarter: Period End Date displayed on the Financial Planner (Aggregate Date - Quarter).
- Period End Quarter Year: Period End Date displayed on the Financial Planner (Aggregate Date - Quarter Year).
- Period End Year: Period End Date displayed on the Financial Planner (Aggregate Date - Year).
- Period End Week: Period End Date displayed on the Financial Planner (Aggregate Date - Week).
- Period Start: Period Start Date displayed on the Financial Planner.
- Period Start Month: Period Start Date displayed on the Financial Planner (Aggregate Date - Month).
- Period Start Month: Year Period Start Date displayed on the Financial Planner (Aggregate Date - Month Year).
- Period Start Quarter: Period Start Date displayed on the Financial Planner (Aggregate Date - Quarter).
- Period Start Quarter Year: Period Start Date displayed on the Financial Planner (Aggregate Date - Quarter Year).
- Period Start Year: Period Start Date displayed on the Financial Planner (Aggregate Date - Year).
- Period Start Week: Period Start Date displayed on the Financial Planner (Aggregate Date - Week).
- Period Type: This defines the Period which can be “Current, Forecast, Actual”
Note: When the Subcategory is Role, the Item field will contain data. Otherwise, the Item field will remain blank.
Benefit: With this expanded reporting capability, you gain greater financial transparency, allowing for more precise budget tracking, cost analysis, and revenue forecasting. By drilling down into Items and Sub-Items, project managers can make data-driven decisions that improve financial planning, resource allocation, and overall project profitability.
For further details refer to Financial Planner Category Data Source and related views.
Description: In previous releases, inconsistencies existed between the Forecast Rate Fields in Upland Analytics and the rates defined in key areas such as the Project Team, Financial Planner, User edit, and Project settings. These discrepancies were especially evident in the following Fields:
- Task Allocation Summary View in the Task Scheduling Data Source:
- Project Allocation Hard Booked Forecast Billing Base Curr
- Project Allocation Hard Booked Forecast Cost Base Curr
- Project Allocation Soft Booked Forecast Billing Base Curr
- Project Allocation Soft Booked Forecast Cost Base Curr
- Task Allocation Hard Booked Forecast Billing Base Curr
- Task Allocation Hard Booked Forecast Cost Base Curr
- Task Allocation Soft Booked Forecast Billing Base Curr
- Task Allocation Soft Booked Forecast Cost Base Curr
- Resource Utilization Summary View in the Skill Associations Data Source:
- Resource Hard Booked Forecast Billing Base Curr
- Resource Hard Booked Forecast Cost Base Curr
- Resource Soft Booked Forecast Billing Base Curr
- Resource Soft Booked Forecast Cost Base Curr
- Project KPIs View in the Project Management Data Source:
- Project Forecasted Billing In Client Curr
- Project Forecasted Billing In Base Curr
- Project Forecasted Cost In Base Curr
- Project Forecasted Cost In Client Curr
- Resource Utilization Summary View in the User Scheduling Data Source:
- Resource Hard Booked Forecast Billing Base Curr
- Resource Hard Booked Forecast Cost Base Curr
- Resource Soft Booked Forecast Billing Base Curr
- Resource Soft Booked Forecast Cost Base Curr
- Program KPIs View in the Program Management Data Source:
- Program Forecasted Billing In Base Curr
- Program Forecasted Billing In Program Curr
- Program Forecasted Cost In Base Curr
- Program Forecasted Cost In Program Curr
These discrepancies caused confusion and increased the risk of errors in forecasting, making it difficult for users to trust the accuracy of the forecast data.
This release addresses the issue by ensuring that these fields in Upland Analytics now consistently reflect the rates defined across all relevant areas of PSA.
Furthermore, the following Fields/Views have been renamed for improved clarity:
- Project KPIs View (previously Project KPIS View) under the Project Management Data Source.
- In the Project Status Report Entry KPIs View under the Project Status Report Entry Data Source, the following Fields have been renamed:
- KPI Forecasted Billing (previously Kpi Forecasted Billing)
- KPI Forecasted Cost (previously Kpi Forecasted Cost)
Benefit: The improvement ensures that the Forecast Rates presented in Upland Analytics align with the rates set in the Project Team, Financial Planner, and Project settings, providing users with a unified and reliable view of forecast data for more accurate financial planning and decision-making.
For further details refer to:
User Defined Fields

Description: Improvements have been implemented to display an info icon against associated User Defined Fields throughout the application when a Description has been configured for them at the System level (Setup > Organization > System). Hovering over the info icon reveals the Description, providing you with additional context or guidance about the User Defined Field.
Note:
- The Info Icon will not appear for User Defined Fields associated with different objects if the Description is blank, including those that are empty or contain only spaces.
- All leading and trailing spaces in the Description are removed when displayed in the tooltip.
- This enhancement applies to all User Defined Field types except those associated with Timesheets.
Benefit: This enhancement improves user experience and data clarity by offering immediate access to contextual information about User Defined Fields. You can now quickly understand the purpose or usage of an associated User Defined Field.
For further details refer to:

Description: Conditional Formatting has been introduced for User Defined Fields associated with Projects, enhancing customization and data clarity.

From the Conditional Formatting dialog box, accessible when modifying a User Defined Field associated to Projects, you can define conditional expressions, select Fields to evaluate, and specify the desired formatting. In addition to User Defined Fields associated with Projects, you can leverage the following Fields to define conditional formatting: Actual End, Actual Start, Alternate Manager, Client, Code, End, Health, Id, Is a placeholder, Is Active, Parent, Portfolio, Priority, Project Manager, Start, State Attribute, State Name, Tracking # and Unique Id.
Based on the selected Field, you can then chose the required logical operations from the Conditions and select/enter Values to create or modify an existing Conditional Format.
These defined conditional color indicator are visible from the Project Edit page and located against the associated User Defined Field.
Note: For Advanced and Calculated User Defined Fields, the Conditional Formatting color overwrites the color defined by the Apply color feature.
Let's assume you want to highlight projects where the Actual Go Live Date is in the future:
- Open the Conditional Formatting dialog for the desired User Defined Field.
- Select the Actual Go Live Date field as the condition basis.
- Choose the Condition > Today.
- Set the indicator color to red.
Now, when modifying a Project and choosing a future date for the Actual Go Live Date field you will see a red color indicator against it, drawing attention to potential delays.
Benefit: This feature enhances the visibility and organization of Project data by enabling dynamic color-coded indicators. You can quickly identify important statuses or criteria, improving efficiency and decision-making. The ability to use a broad range of Fields ensures flexibility and adaptability for your diverse business needs.
For further details refer to

Description: A colored indicator (dot) now appears next to the Conditional Formatting button (for User Defined Fields associated with Projects) and the Calculation Criteria button (for Advanced User Defined Fields associated with Projects and PSRs). This visual indicator helps you quickly see when Conditional Formatting and/or Calculation Criteria have been configured. Hovering over the dot displays a tooltip confirming their presence.
Benefit: This enhancement improves usability by providing a quick visual cue, eliminating the need to check for existing records. You can instantly identify when Conditional Formatting or Calculation Criteria has been defined, streamlining data review and configuration.
For further details refer to
Work Breakdown Structure (WBS)

Description: The Work System setup page has been revamped to improve the user experience and streamline budget management.
Budget-related settings are now organized in a dedicated Budget section, and new options have been introduced to support the latest enhancements in the Project Budget feature. These include:
- Budget type which allows you to select Task-based or Role-Based Budgets at the system level. For further details refer to Role Based Budgets.
Note: Task is selected by default. You can override this setting at the Project level under the Options tab.
- The Enforce a single Budget for Projects, Tasks, Assignments setting was replaced with Multiple Budgets selection box. When selected the default Project Budgets support multiple Budgets.
- When Multiple Budgets is selected you can then choose to Display Budgets by Name rather than Dates.
The following project related settings are now located under the Options section:
- Grant Alternate Manager visibility as Manager in Project List
- Enable Work Type uniqueness
- Remove Resources from the Project Team when no work is planned
- Enable Project Currency override
Benefit: The improved Work System setup page enhances usability by organizing related settings more effectively and streamlining configuration.
For further details refer to the Configuring Work System defaults (WBS) section of the help center.

Description: The breadcrumb trail now displays the Task Name when assigning a Task to a User from the Tasks list context menu (Setup > Organization > Users > Assign).
Benefit: This enhancement provides clarity by showing key information—such as the Task name—directly within the breadcrumb trail. This reduces the risk of errors caused by misidentification, as administrators can quickly confirm the intended User without needing to cross-reference or navigate to other pages. This improvement ensures contextual awareness, enabling administrators to confidently and efficiently complete Task assignments while maintaining accuracy.
For further details refer to Assign Tasks from Tasks List.

Description: The Client Edit page now includes a Projects tab, providing you direct access to all Projects associated with the specific Client. This enhancement centralizes project-related information, making it more convenient to manage and review Projects from within the Client Edit page.

From the Projects tab you can:
- Create New Project.
Note: By default, the Client field is pre-filled with the Client being modified and remains editable.
- Refresh the list.
- Copy selected Project.
Note: When copying a Project, the Client field in the copied Project automatically defaults to the Client being modified and remains editable.
- Delete selected Project.
- Export the list of Projects to Excel.
- The following columns are displayed by default: Project and State Name. You can manage the columns from Column Selection .
- Search for Projects based on Project, State Name, Code, Portfolio, Project Manager, Tracking # and Programs. You can choose to include the Alternate Manager, Parent, Unique Id and Workflow search criteria from Column Selection .
- Pagination is available at the top right corner to facilitate easy navigation across multiple pages.
- Click Project name to access the respective Project edit page.
- Click the State Name to view the State information such as Workflow and Assignments.
Note: New and Copy buttons are disabled for Suspended Clients.
Benefit: This improvement eliminates the need to navigate across multiple pages to access Project details, offering a clear overview of all Projects associated to the Client.
For further details refer to:
Workflow Setup
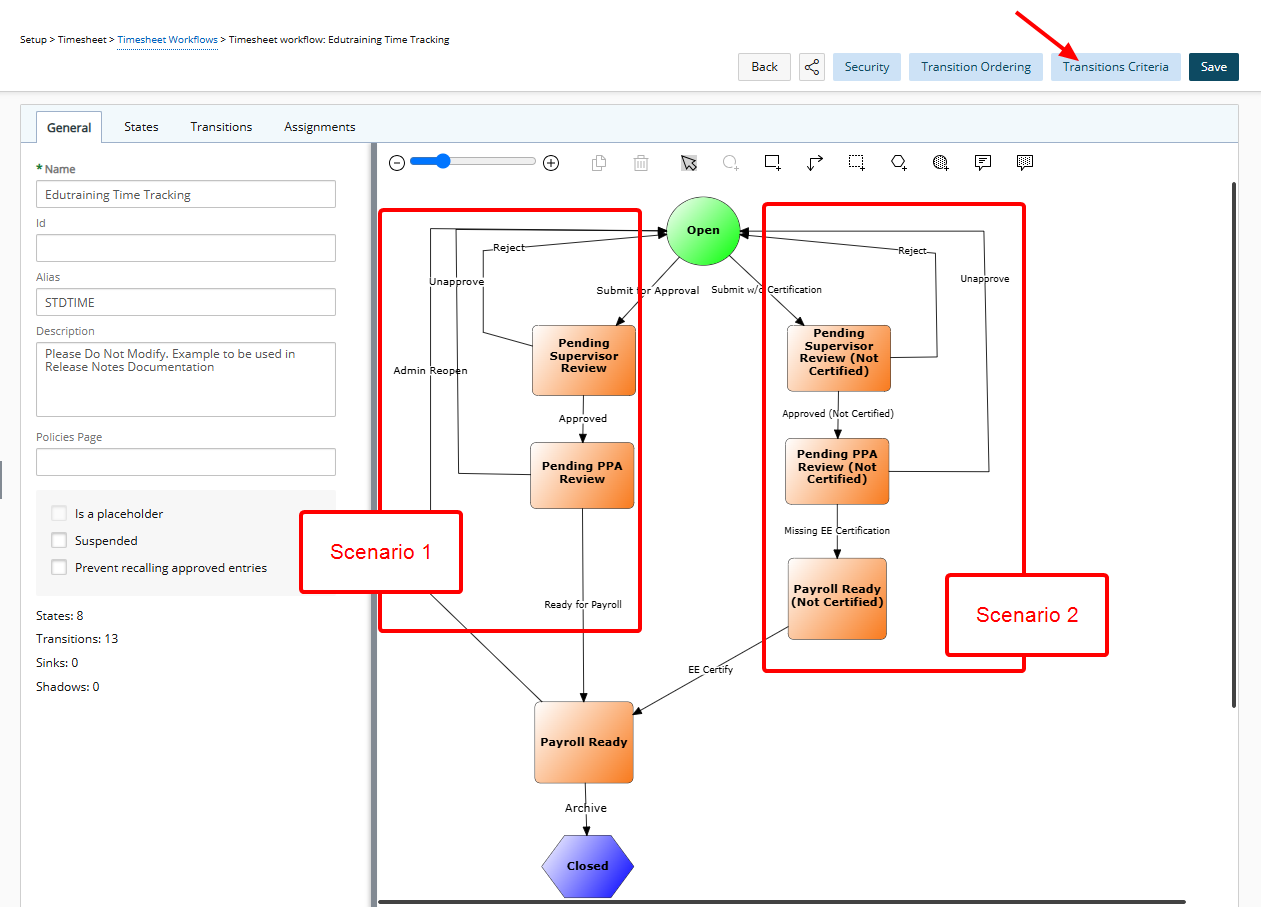
Description: Previously, the Timesheet workflow did not differentiate between self-submitted and proxy-submitted timesheets. This meant:
- Timesheets submitted by someone else could move forward without the owner's verification, increasing the risk of errors.
- The same transition rules applied regardless of who submitted the timesheet, limiting control over approvals.
- Users had no way to track whether a timesheet was submitted by the owner or a proxy, making audits and corrections difficult.
To address this, a Transition Criteria button has been added in Timesheet Workflow edit page, enabling administrators to configure Transition rules based on whether the Logged-In User is the Timesheet Owner.
Transitions can now differ based on who is submitting the Timesheet. If a user submits their own Timesheet, it follows the standard approval process. However, if someone else submits a Timesheet on behalf of the owner, an additional step is introduced, requiring the timesheet owner to review and certify it before final approval.
Examples:
Scenario 1: User Submits Their Own Timesheet. In which case the timesheet follows the regular process as defined on the left side of our example workflow.
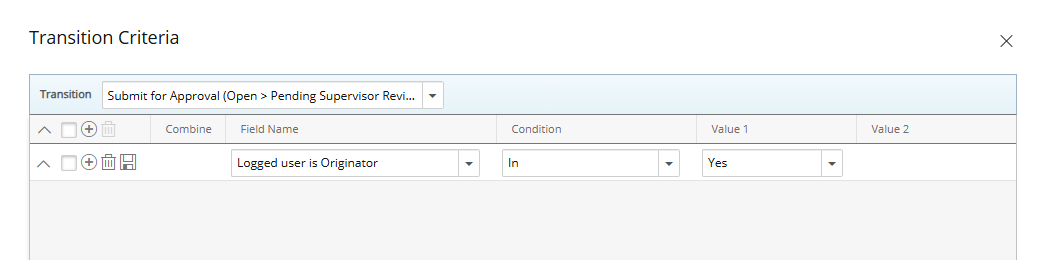
- The logged-in user and the timesheet owner are the same.
- The timesheet follows the standard approval path: Open → Pending Supervisor Review → Pending PPA Review → Payroll Ready
Scenario 2: Someone Else Submits a Timesheet on Behalf of the Owner. In which case the timesheet owner must certify the submission before it moves forward.

- The logged-in user is different from the timesheet owner.
- The workflow introduces an extra step at the Payroll Ready stage:
- Open → Pending Supervisor Review (Not Certified) → Pending PPA Review (Not Certified) → Payroll Ready (Not Certified) → EE Certify (Timesheet Owner Review) → Payroll Ready
Benefit: This enhancement provides greater control over timesheet approvals by allowing administrators to configure different transition rules based on whether a timesheet is self-submitted or submitted by a proxy. Proxy-submitted timesheets can be set up to require additional verification from the owner before final approval, improving accuracy, accountability, and compliance with approval policies.
For further details refer to Conditional Timesheet Transitions Based on Submitter.
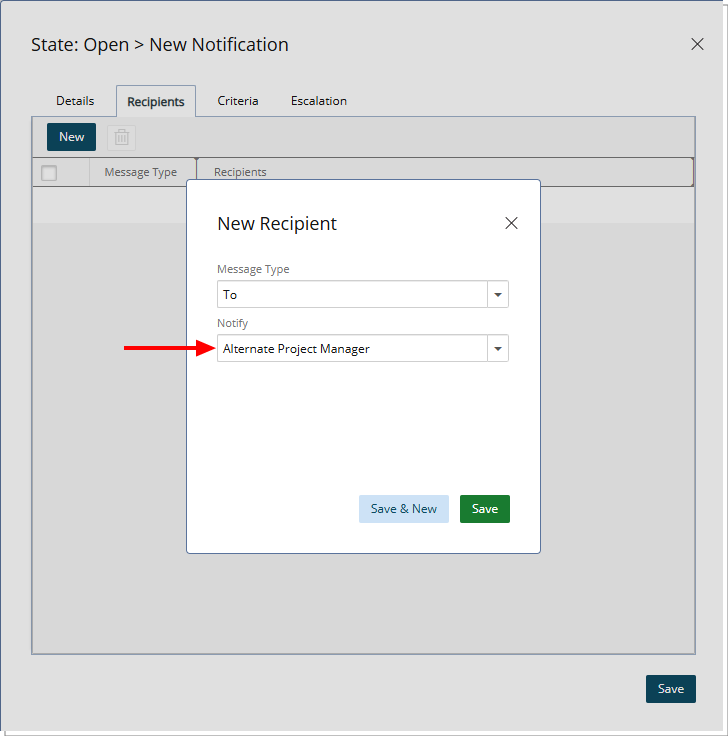
Description: Workflow Notifications can now be sent to Alternate Project Managers wherever the Project Manager is an option in the Notify selection box within Workflow setup ensuring that Alternate Project Managers receive important workflow notifications just like Project Managers.
The Alternate Project Manager option can now be selected from the Notify selection box located under the Recipients tab of States and Transitions Notifications in the following Workflow Setup pages:
- Project Workflows (Setup > Work)
- Work Item Workflows (Setup > Work)
- Resource Request Workflows (Setup > Workforce Planning)
- Timesheet Workflows (Setup > Timesheet)
- Expense Workflows (Setup > Expense)
- Invoice Workflow (Setup > Financial)
Benefit: By allowing Notifications to be sent to Alternate Project Managers, this improvement enhances communication and project oversight, ensuring critical updates reach the right stakeholders even when the primary Project Manager is unavailable.
For further details refer to Notify List Recipient Options by Workflow Type.
Work Items

Description: When the Enable Mentioning in Comments & Notes setting located within the System Configuration page is turned on, you can mention others in the Work Item Comments section using @ notation.
When adding a new Comment, a placeholder message—“Type @ to mention and to notify someone”—now appears next to the cursor, guiding you on how to tag others.
Mentioned users will receive a notification, ensuring they are aware of relevant updates or required actions.
Typing “@” triggers a dropdown list of user suggestions (maximum of 15), which dynamically updates as you type more characters, refining the suggestions in real time.
How Mentions Work:
If a Project is selected for the Work Item, you can mention:
- Project Manager / Alternate Manager – Displays assigned manager’s name
- Project Team – Displays team size and includes only active, onboarded users
- Specific Users – @Last Name, First Name (with Logon Name as a tooltip)
If no Project is selected for the Work Item, you can mention:
- Specific Users – @Last Name, First Name (with Logon Name as a tooltip)
Tooltips and visual indicators for Mentioned Users
- Decommissioned or Suspended Users: The mention appears in red, with tooltips indicating their status: Decommissioned User, or Suspended User.
- Removed or Out-of-Scope Users: The mention appears in red, with a tooltip displaying Unknown User.
- Removed Project Manager or Alternate Manager: Tooltips display: No Manager Defined.
- Undefined Project Team: Tooltips display: No Team Member Defined.
- Removed Email Address: The mention appears in grey, with tooltips displaying: Invalid Email.
Note: You can mention multiple Users in a single Comment, including the same user more than once. However, each User will receive only one notification, regardless of how many times they are mentioned.
When a user is mentioned using @ notation, the system triggers a Work Item Mention Notification, which includes relevant details about the mention.
Benefit: This feature helps teams collaborate more efficiently by ensuring the right users are promptly notified when action is needed.
For further details refer to Work Item Mention Notification.
Description: The total number of Comments, Links and Attachments related to a Work Item are now readily visible:
- When modifying a Work Item through the Work Item Manager (Entries> Work Item Manager) and Project Work Items pages (Projects List > Project Edit > Work Items)

- When viewing the Work item drawer through the Work Item Manager (Entries> Work Item Manager) and Project Work Items pages (Projects List > Project Edit > Work Items)

Benefit: This improvement makes it easier for you to see updates at a glance by showing the total number of Comments, Links and Attachments for each Work Item. It saves time by removing the need to verify each item individually.
For further details refer to:
Description: In previous releases, data for a field added as a column was displayed in the Work Item Manager (Entries > Work Item Manager) or the Project Work Items (Project List > Project Edit > Work Items), only if the field existed on the Work Item Workflow's Layout. While this approach made sense for custom User Defined Fields, which are often specific to certain workflows, it was unnecessarily restrictive for Base Fields such as Assigned To, Updated On, Created On, Created By, State, Description, Priority, Originator, Title, Deadline, Days Open, Severity, and Probability which contain valuable, universally relevant information.
In this release, improvements have been made to ensure that existing data for these base fields is displayed in the Work Item Manager, even if the fields are not included in the Layout of the corresponding Work Item Workflow.
Benefit: This improvement enhances visibility and accessibility of key information in the Work Item Manager and Project Work Items pages, allowing you to view existing data for essential Base Fields without requiring them to be included in the Workflow Layout. This change streamlines data management, reduces unnecessary configuration dependencies, and ensures consistent access to important details, improving efficiency and decision-making.
For further details refer to:
Work Item Manager

Description: In past releases, an On-Page Filter applied to a Read-only Work Item Manager Public View was inadvertently available to all users of the system who had access to the View.
As of this release, modifications have been implemented to ensure that On-Page Filters are now exclusively available to the User creating them and applied upon subsequent visits by the same User across all browsers.
Caution: Upon upgrading, any existing On-Page Filter for a Read-only Public View will be applied to the View definition itself.
Benefit: By making filters user-specific, the system fosters a more intuitive and personalized experience, aligning with your individual preferences and needs. You can now rely on consistent filter settings across browsers, reducing the need for repeated configurations and saving valuable time.
For further details refer to
Deprecated/Unsupported Functionality
To ensure modern, efficient, and secure integrations, we are deprecating the SOAP API in favor of the REST API. All functionality provided by the SOAP API are available through the REST API, which offers:
- Improved Performance: Faster response times and streamlined processing.
- Enhanced Security: Built-in support for modern authentication methods.
- Broader Compatibility: Easier integration with a variety of tools and platforms.
Please be advised that early adoption of the REST API is highly encouraged to avoid any disruption to your workflows.
Review Your Integrations: Identify any systems or processes currently using the SOAP API.
Transition to REST API: Update your integrations to use the REST API endpoints.
- Access detailed documentation on REST API setup.
- Utilize the REST API's advanced features to optimize your workflows.
Test Thoroughly: Validate that your updated integrations function as expected before the deprecation date.
Documentation: Documentation: Comprehensive REST API documentation and sample code snippets are available in the API Documentation Portal. To access your Rest API documentation, refer to Access the REST API Online Help article.
Migration Planning and Support: For further details or personalized assistance, contact PSA Support. Our team is here to help you assess your requirements, develop a comprehensive migration strategy, and execute the transition smoothly and efficiently. You can also visit the PSA Community Center for additional resources.

Description: In previous releases, Query Actions could be audited and recorded in the Audit Trail, which often resulted in unnecessary records that did not provide meaningful insights. This also had an impact on system performance, as the system had to process, store, and retrieve these additional records. Their presence made it harder for administrators to locate and focus on more critical Audit data.
As of this release, the auditing of Query Action is deprecated. Going forward, Query Action events will no longer be recorded in the Audit Trail.
However, historical records can still be accessed. The Query Action option will continue to be available through the Advanced Filter functionality of the Audit Trail page. You can use this Filter to locate and review past Query Action records as needed.
Furthermore, the Query option has been removed from the Audit Setup page (Setup > Organization > System > Security > Audit Setup).
Benefit: This deprecation allows administrators to focus on essential Audit data by discontinuing the auditing of Query Actions, ensuring that the Audit Trail remains relevant and actionable.
In this release, there have been changes with static hourly Forecast Cost/Billing rates located in the following four areas of the application:
- Project List (
 Project List)
 - Project Status Report (Project List > Project Edit)
- Program List (
 Program List)
 - Role edit page (
 Setup > Organization > Roles)
We have introduced the:
- Dynamic Forecast Rate for Projects in both the Project List and Project Status Report. This rate will reflect the sum of hours allocated to the project multiplied by the corresponding rate, providing a more precise financial forecast.
- The static hourly Forecasted Cost/Billing columns are no longer available from the Program List page

- The static hourly Forecasted Cost/Billing columns are no longer available from Projects tab when editing a Program.

- The Forecasting Rates section including the Hourly Cost Rate and Hourly Billing Rate is removed from the Role edit page.
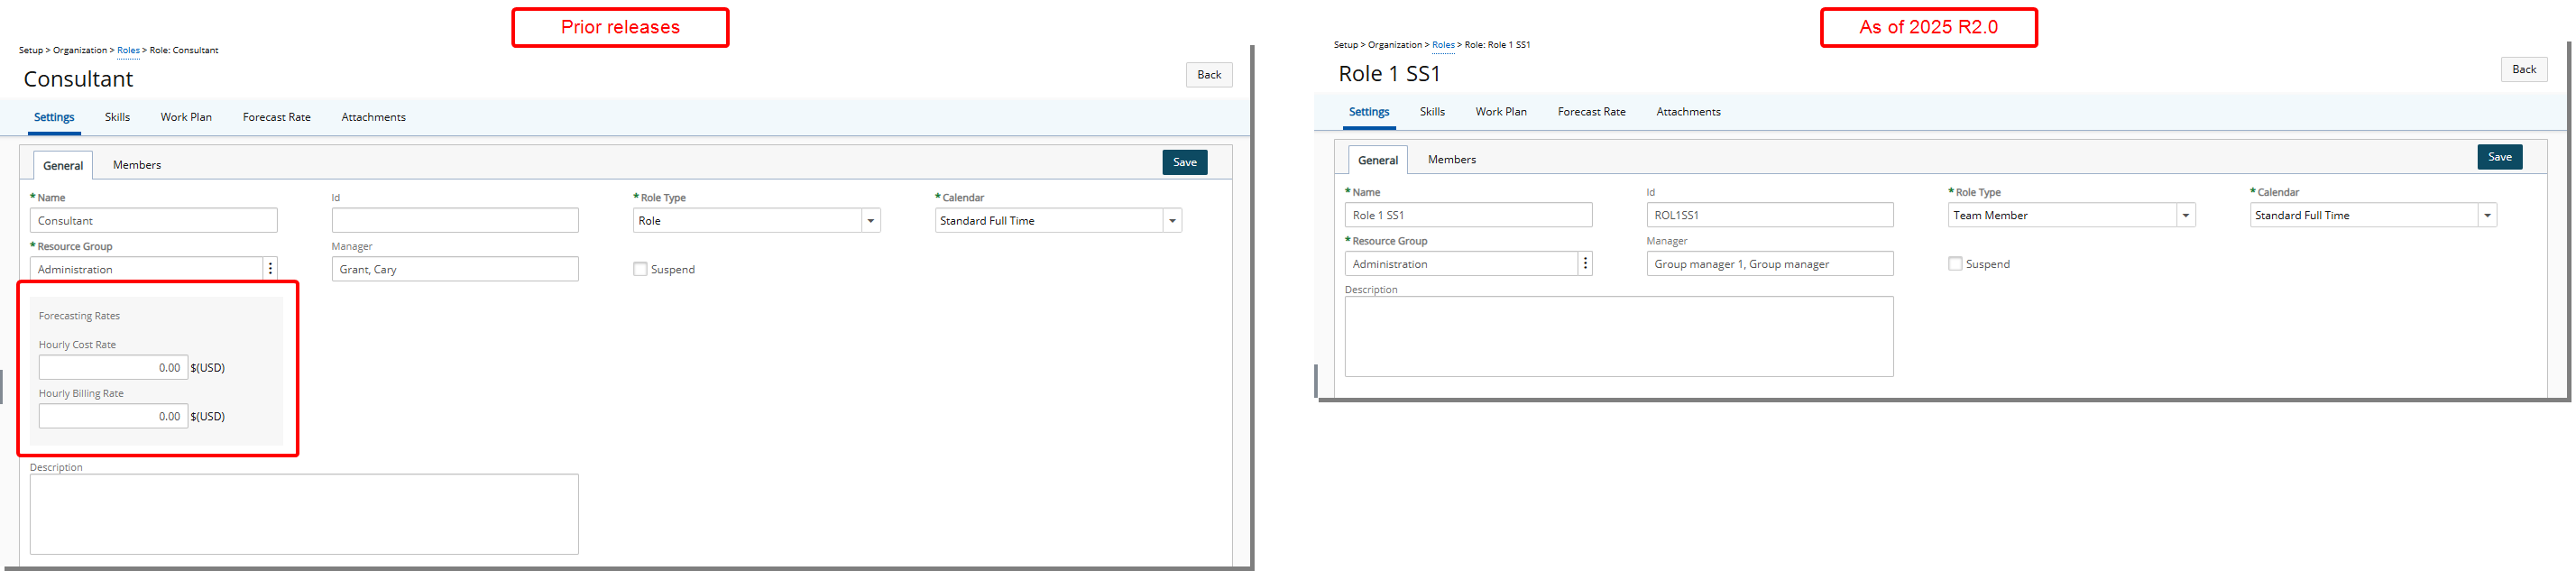
Description: In this release, the Product Central (Entries > Products > Product Central) has been deprecated and no longer available.
The decision to remove Product Central aims to eliminate unused features, enhancing the overall user experience and ensuring that the system remains focused on the tools and capabilities that are actively being used.
As a result of this deprecation, the Product Entry Setup button, which was previously located on the Products list page (Setup > Work > Products), is no longer available.
You can continue to use the My Entries (Entries > Products > My Entries) and the Approval (Entries > Products > Approval) pages to create and manage Product Entries.

Description: In this release, the information button ![]() that was positioned within the Search bar has been removed.
that was positioned within the Search bar has been removed.
Further details regarding the search capability refer to Searching for an item.
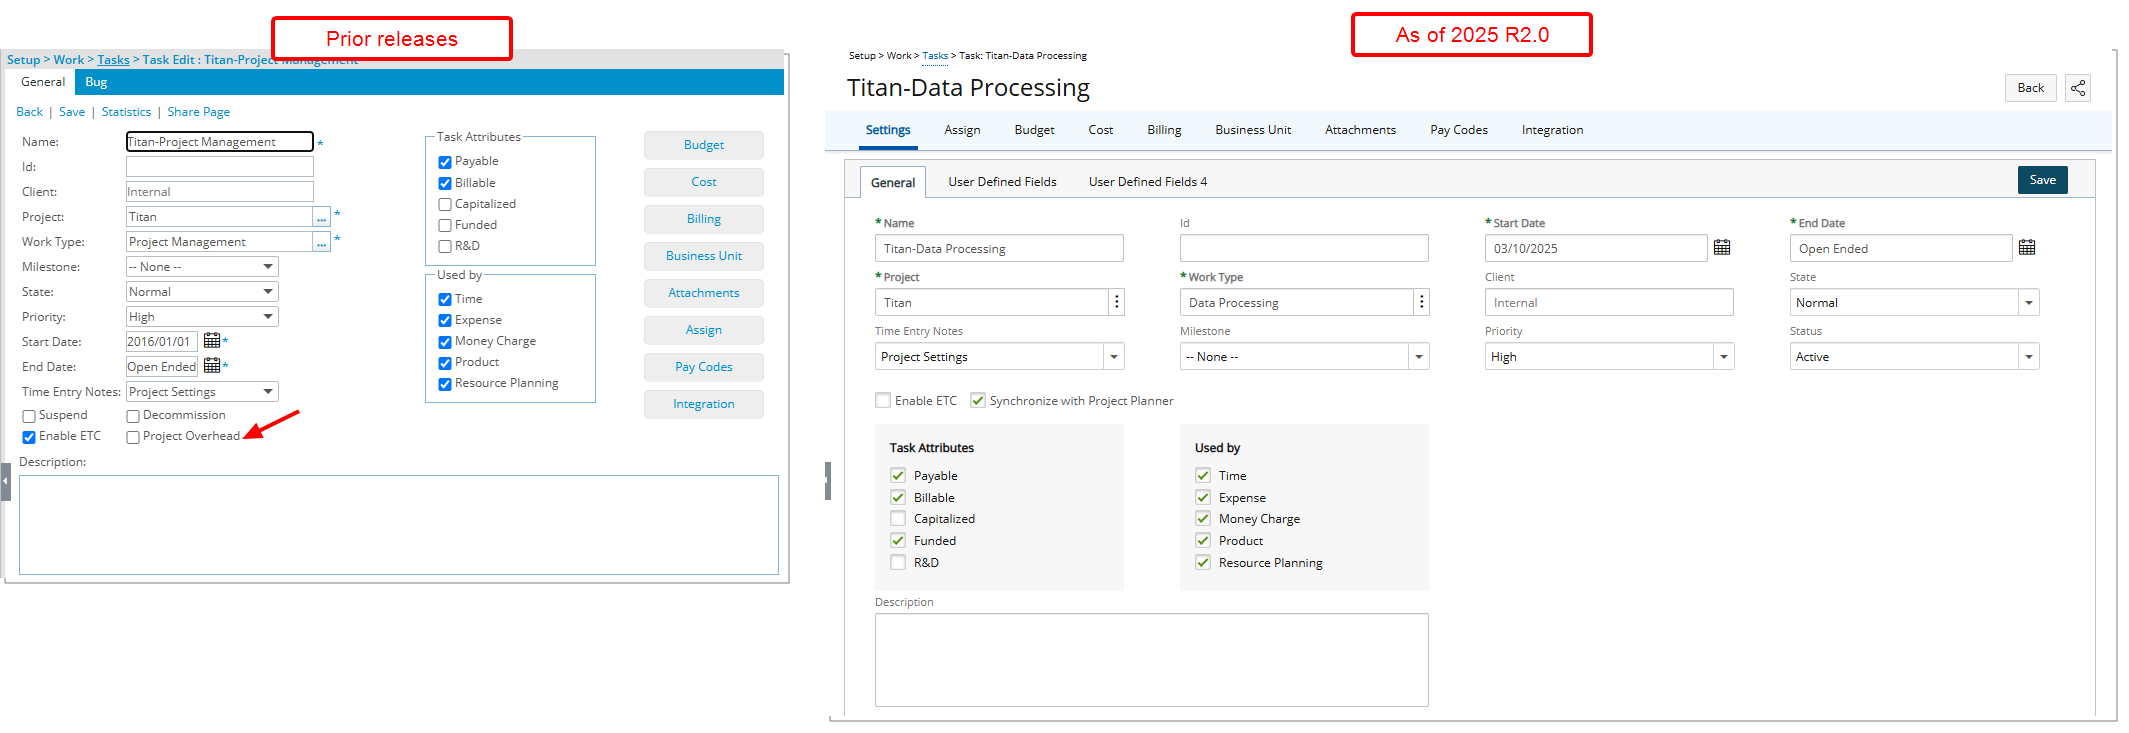
Description: As part of the Task Edit page redesign, the Project Overhead option has been removed. This option was no longer in use and its removal helps streamline the interface and eliminates an unnecessary field that no longer served a functional purpose.